Beko RCNE720E4VZXPN User manual

RCNE720E4VZXPN
EN/DE
58 5493 0000/AD -EN-DE
Refrigerator
User Manual
Gefrierschrank
Bedienungsanleitung

Please read this manual before using the product!
Dear Valued Customer,
We wish you to get the best results from your product that has been manufactured meticulously at modern plants
and tested with detailed quality control checks.
For this reason, we recommend that you read this user manual thoroughly before starting the product. If you hand
over the product to someone else, please remember to give the user manual as well.
This manual will help you use your appliance in a fast and safe way.
Please read this user manual carefully before installing and using the product.
Always follow the applicable safety instructions.
Keep the user manual in an easily accessible place for further use.
Please read all the other documents provided with the product.
Please keep in mind that this manual may apply to several product models. This manual expressly indicates the
differences between various models.
CImportant information and
useful hints.
ARisk of injury and property
damage.
BRisk of electric shock.
Packaging materials of
this product has been
manufactured from recyclable
materials in accordance with
the National Environment
Regulations.
A
A
A
C
SUPPLIER’S NAME MODEL IDENTIFIER (*)
INFORMATION
C
.The model information as stored in the product data base
can be reached by entering following website and searching
for your model identifier (*) found on energy label.
https://eprel.ec.europa.eu/

2 /25EN Refrigerator / User Manual
1. Safety instructions 3
2 Your Refrigerator 7
3 Installation 8
3.1. Appropriate location for installation . . . . . . . . . . . 8
3.2. Installing the plastic wedges . . . . . . . . . . . . . . . . 8
3.3. Adjusting the feet . . . . . . . . . . . . . . . . . . . . . . . . 9
3.4. Electrical connection. . . . . . . . . . . . . . . . . . . . . . 9
4 Preparation 10
4.1. Things to be done for energy saving . . . . . . . . . 10
4.2. Initial use . . . . . . . . . . . . . . . . . . . . . . . . . . . . . 10
5 Operating the product 11
5.1. Indicator panel . . . . . . . . . . . . . . . . . . . . . . . . . 11
5.2. Indicator panel . . . . . . . . . . . . . . . . . . . . . . . . . 12
5.3. Blue light/HarvestFresh. . . . . . . . . . . . . . . . . . . 14
5.4. Ice machine . . . . . . . . . . . . . . . . . . . . . . . . . . . 15
5.5. Icematic. . . . . . . . . . . . . . . . . . . . . . . . . . . . . . 15
5.6. Ice tray . . . . . . . . . . . . . . . . . . . . . . . . . . . . . . 15
5.7. Deodoriser Module . . . . . . . . . . . . . . . . . . . . . . 16
(FreshGuard) . . . . . . . . . . . . . . . . . . . . . . . . . . . . . . 16
5.8. Chiller compartment. . . . . . . . . . . . . . . . . . . . . 17
5.9. Crisper. . . . . . . . . . . . . . . . . . . . . . . . . . . . . . . 17
5.10.Using the water dispenser . . . . . . . . . . . . . . . . 18
5.11.Filling the water dispenser's tank . . . . . . . . . . . 18
5.12.Cleaning the water tank . . . . . . . . . . . . . . . . . . 18
5.13.Drip tray. . . . . . . . . . . . . . . . . . . . . . . . . . . . . . 19
5.14.Humidity-controlled crisper (Ever Fresh). . . . . . . 20
5.15.Freezing fresh food. . . . . . . . . . . . . . . . . . . . . . 20
5.16.Recommendations for preserving the frozen food21
5.17.Deep-freeze information . . . . . . . . . . . . . . . . . . 21
5.18.Placing the food . . . . . . . . . . . . . . . . . . . . . . . . 21
5.19.Door open warning. . . . . . . . . . . . . . . . . . . . . . 21
5.20.Illumination lamp . . . . . . . . . . . . . . . . . . . . . . . 21
6 Care and Cleaning 22
6.1. Avoiding Bad Odours . . . . . . . . . . . . . . . . . . . . 22
6.2. Protection of plastic surfaces . . . . . . . . . . . . . . 22
6.3. Cleaning the Inner Surface . . . . . . . . . . . . . . . . 22
6.4. Stainless Steel Outer Surfaces . . . . . . . . . . . . . 22
6.5. Cleaning Products with Glass Doors . . . . . . . . . 23
7 Troubleshooting 24

3 /25 EN
Refrigerator / User Manual
This section contains safety instructions that will
help get protected against risks of personal injury or
property damage.
Our company shall not be responsible for damages
that may arise when these instructions are not
followed.
A Installation and repair procedures must always be
performed by the manufacturer, authorised service agent
or a qualified person specified by the importer.
A Only use original parts and accessories.
A Do not repair or replace any part of the product
unless specified expressly in the user manual.
A Do not make any technical modifications to the
product.
A 1.1 Intended Use
This product is not suitable for commercial use and
it must not be used out of its intended use.
This product is designed to be used in houses and
indoor places.
For example:
- Personnel kitchens in stores, offices and other
working environments,
- Farm houses,
- Areas used by customers at hotels, motels and
other types of accommodation,
- Bed&breakfast type hotels, boardinghouses,
- Catering and similar non-retail applications.
This product should not be used outdoors with or without
a tent above it such as boats, balconies or terraces. Do
not expose the product to rain, snow, sun or wind.
There is the risk of fire!
A1.2 - Safety for children, vul-
nerable persons and pets
This product can be used by children at and above 8
years old and by persons with limited physical, sen-
sory or mental capabilities or who lack experience
and knowledge provided that they are supervised or
trained on the safe use of the product and the risks
it brings out.
Children aged from 3 to 8 years are allowed to load
and unload refrigerating products.
Electrical products are dangerous for children and
pets. Children and pets must not play with, climb or
enter the product.
Cleaning and user maintenance should not be per-
formed by children unless they are supervised by
someone.
Keep packaging materials away from children. There
is the risk of injury and suffocation!
Before disposing of the old or obsolete product:
1.
Unplug the product by gripping from the plug.
2.
Cut the power cable and remove it from the appliance
together with its plug
3.
Do not remove the shelves or drawers so that it is harder
for children to enter the product.
4.
Remove the doors.
5.
Keep the product in a way that it will not tip over.
6.
Do not allow children play with the old product.
Never throw the product into fire for disposal. There
is the risk of explosion!
If there is a lock on the door of the product, the key
should be kept out of the reach of children.
A1.3 - Electrical safety
The product must be unplugged during installation,
maintenance, cleaning, repairing and moving pro-
cedures.
If the power cable is damaged, it must be replaced
by a qualified person specified by the manufacturer,
authorised service agent or importer in order to avo-
id potential dangers.
Do not squeeze the power cable under or behind the
product. Do not place heavy objects on the power
cable. Power cable must not be bent excessively,
pinched or get in contact with any heat source.
Do not use extension cords, multi-sockets or adap-
ters to operate the product.
Portable multi-sockets or portable power sources
can overheat and cause fire. Therefore, do not keep
any multi-sockets behind or near the product.
Plug must be easily accessible. If this is not possib-
le, the electrical installation to which the product is
connected must contain a device (such as a fuse,
switch, circuit breaker, etc.) which conforms to the
electrical regulations and disconnects all poles from
the grid.
Do not touch the power plug with wet hands.
Remove the plug from the socket by gripping the
plug and not the cable.
A1.4 - Transportation safety
Product is heavy; do not move it alone.
Do not hold its door when moving the product.
Pay attention not to damage the cooling system
or the piping during transportation. If the piping is
damaged, do not operate the product and call the
authorised service agent.
1. Safety instructions

Instructions for safety and environment
4 / 25 EN Refrigerator / User Manual
A1.5 - Installation safety
Call the authorised service agent for installation of
the product. To make the product ready for use,
check the information in the user manual to make
sure that the electricity and water installations are
suitable. If they are not, call a qualified electrician
and plumber to have the necessary arrangements
made. Otherwise, there is the risk of electric shock,
fire, problems with the product, or injury!
Prior to installation, check if the product has any
defects on it. If the product is damaged, do not
have it installed.
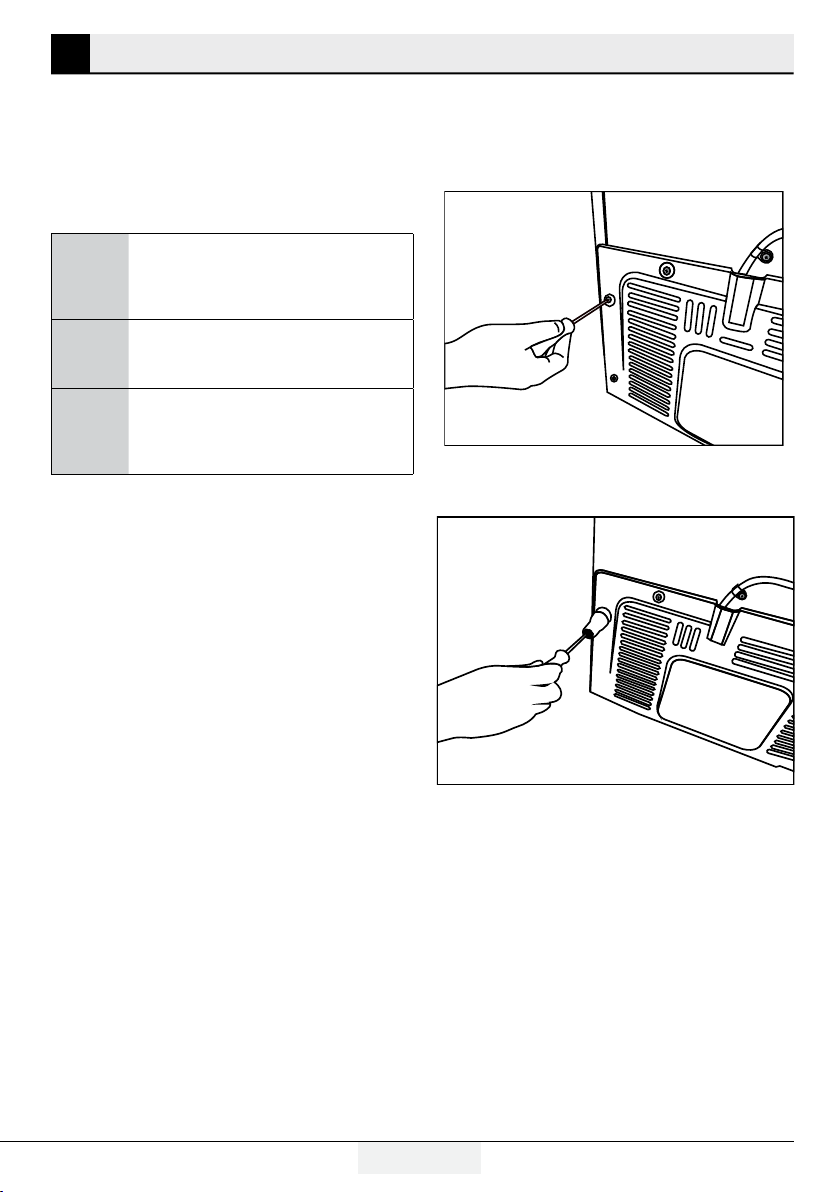
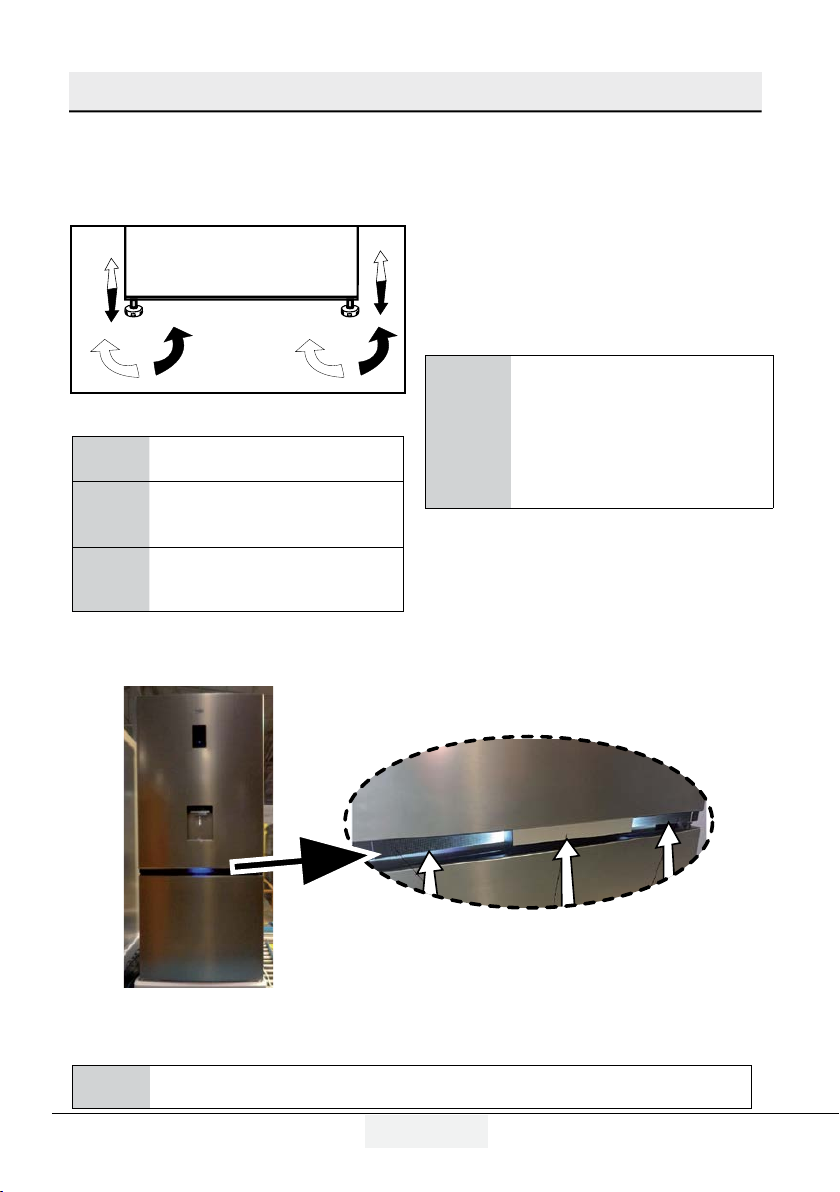
Place the product on a clean, flat and solid surface
and balance it with adjustable feet. Otherwise, the
product may tip over and cause injuries.
The installation location must be dry and well ven-
tilated. Do not place carpets, rugs or similar covers
under the product. Insufficient ventilation causes
the risk of fire!
Do not cover or block the ventilation openings.
Otherwise, power consumption increases and your
product may get damaged.
Product must not be connected to supply systems
such as solar power supplies. Otherwise, your
product may get damaged due to sudden voltage
changes!
The more refrigerant a refrigerator contains, the
larger the installation location must be. If the ins-
tallation location is too small, flammable refrigerant
and air mixture will accumulate in cases of refrige-
rant leakage in cooling system. The required space
for each 8 gr of refrigerant is 1 m³minimum. The
amount of refrigerant in your product is indicated
on the Type Label.
Product must not be installed in places exposed to
direct sunlight and it must be kept away from heat
sources such as hobs, radiators, etc.
If it is inevitable to install the product close to a heat
source, a suitable insulation plate must be used in
between and the following minimum distances must be
kept to the heat source:
- Minimum 30 cm away from heat sources such as
hobs, ovens, heater units or stoves,
- Minimum 5 cm away from electric ovens.
Protection class of your product is Type I. Plug the
product in a grounded socket that conforms the
voltage, current and frequency values stated on
the type label of the product. The socket must be
equipped with a 10 A – 16 A circuit breaker. Our
company shall not be liable for any damages that
will arise when the product is used without gro-
unding and electrical connection in accordance
with the local and national regulations.
Product must not be plugged in during installati-
on. Otherwise, there is the risk of electric shock
and injury!
Do not plug the product in sockets that are loo-
se, dislocated, broken, dirty, greasy or bear the
risk of getting in contact with water.
Route the power cable and hoses (if any) of the
product in a way that they do not cause risk of
tripping over.
Exposing the live parts or power cable to humi-
dity may cause short circuit. Therefore, do not
install the product in places such as garages or
laundry rooms where humidity is high or water
may splash. If the refrigerator gets wet with
water, unplug it and call the authorised service
agent.
Never connect your refrigerator to energy sa-
ving devices. Such systems are harmful to your
product.
A1.6- Operational safety
Never use chemical solvents on the product.
There is the risk of explosion!
If the product malfunctions, unplug it and do not
operate until it is repaired by the authorised ser-
vice agent. There is the risk of electric shock!
Do not place flame sources (lit candles, cigaret-
tes, etc.) on or close to the product.
Do not climb on the product. There is the risk of
falling and getting injured!
Do not damage the pipes of the cooling system
with sharp or penetrating objects. The refrigerant
that might come out when the refrigerant pipes,
pipe extensions or surface coatings are punctu-
red causes skin irritations and eye injuries.
Unless recommended by the manufacturer, do
not place or use electrical devices inside the
refrigerator/deep freezer.
Be careful not to trap your hands or any other
part of your body in the moving parts inside the
refrigerator. Pay attention not to squeeze your
fingers between the door and the refrigerator.

Instructions for safety and environment
5 /25EN
Refrigerator / User Manual
Be careful when opening and closing the door
particularly if there are children around.
Never eat ice cream, ice cubes or frozen food
right after removing them from the refrigerator.
There is the risk of frostbite!
When your hands are wet, do not touch the
inner walls or metal parts of the freezer or the
food stored therein. There is the risk of frostbite!
Do not place tins or bottles that contain carbo-
nated drinks or freezable liquids in the freezer
compartment. Tins and bottles may burst. There
is the risk of injury and material damage!
Do not place or use flammable sprays, flam-
mable materials, dry ice, chemical substances
or similar heat-sensitive materials near the refri-
gerator. There is the risk of fire and explosion!
Do not store explosive materials that contain
flammable materials, such as aerosol cans, in
your product.
Do not place containers filled with liquid onto the
product. Splashing water on an electrical part
may cause electric shock or the risk of fire.
This product is not intended for storing medi-
cines, blood plasma, laboratory preparations or
similar medical substances and products subject
to Medical Products Directive.
Using the product against its intended purpose
may cause the products stored inside it to dete-
riorate or spoil.
If your refrigerator is equipped with blue light,
do not look at this light with optical tools. Do not
stare at UV LED lamp directly for a long time.
Ultraviolet light may cause eye strain.
Do not overload the product. Objects in the refri-
gerator may fall down when the door is opened,
causing injury or damage. Similar problems may
arise if any object is placed onto the product.
To avoid injuries, make sure that you have clea-
ned all the ice and water that may have fallen or
splashed on the floor.
Change the position of the shelves/bottle hol-
ders on the door of your refrigerator only when
they are empty. There is the risk of injury!
Do not place objects that can fall down/tip over
onto the product. Such objects may fall down
when the door is opened and cause injuries
and/or material damage.
Do not hit or exert excessive force on glass sur-
faces. Broken glass may cause injuries and/or
material damage.
Cooling system of your product contains R600a
refrigerant: Type of the refrigerant used in the
product is indicated on the type label. This ref-
rigerant is flammable. Therefore, pay attention
not to damage the cooling system or the piping
while the product is in use. If the piping is da-
maged:
- Do not touch the product or the power cable,
- Keep away potential sources of fire that may
cause the product to catch fire.
- Ventilate the area where the product is loca-
ted. Do not use fans.
- Call the authorised service agent.
If the product is damaged and you see refrige-
rant leak, please stay away from the refrigerant.
Refrigerant may cause frostbite in case of skin
contact.
For products with a Water Dispenser/Ice
Machine
Use only potable water. Do not fill the water
tank with any liquids -such as fruit juice,
milk, carbonated beverages or alcoholic
drinks- that are not suitable for use in the
water dispenser.
There is the risk for health and safety!
Do not allow children play with the water
dispenser or ice machine (Icematic) in order
to prevent accidents or injuries.
Do not insert your fingers or other objects
into the water dispenser hole, water channel
or ice machine container. There is the risk of
injury or material damage!

Instructions for safety and environment
6 / 25 EN Refrigerator / User Manual
A1.7- Maintenance and
cleaning safety
Do not pull from the door handle if you need to
move the product for cleaning purposes. Handle
may break and cause injuries if you exert exces-
sive force on it.
Do not spray or pour water on or inside the pro-
duct for cleaning purposes. There is the risk of
fire and electric shock!
Do not use sharp or abrasive tools when clea-
ning the product. Do not use household cleaning
products, detergent, gas, gasoline, thinner, alco-
hol, varnish etc.
Only use cleaning and maintenance products
inside the product that are not harmful for food.
Never use steam or steam assisted cleaners to
clean or defrost the product. Steam gets into
contact with the live parts in your refrigerator,
causing short circuit or electric shock!
Make sure that no water enters the electronic
circuits or lighting elements of the product.
Use a clean and dry cloth to wipe the foreign
materials or dust on the pins of the plug. Do not
use a wet or damp cloth to clean the plug. There
is the risk of fire and electric shock!
A1.8- HomeWhiz
When you operate your product through
HomeWhiz application, you must observe the
safety warnings even when you are away from
the product. You must also follow the warnings
in the application.
A1.9- Lighting
Call the authorised service when it is required to
replace the LED/bulb used for lighting.

7 /25 EN
Refrigerator / User Manual
1. Door shelves of fridge compartment
2. Freezer compartment drawers
3. Icematic
4. Water tank
5. Crisper
6. Crisper cover
7. Chiller compartment
8. Glass shelves of fridge compartment
9. Odour filter (violed)
10. Inside display
11. Glass shelves of fridge compartment
12. Freezer compartment
*Optional
2Your Refrigerator
C*Optional: Figures in this user manual are given as an example and may not match the product
exactly. If the relevant parts are not available in the product you purchased, the figure applies to other
models.
*1
*3
*4
6
*5
7
*8
11
12
*2
*1
*2
*3
*5
7
*8
9
10
11
6
12
It may not apply to all models

8 /25EN Refrigerator / User Manual
3Installation
3.1. Appropriate location for installation
Contact an Authorized Service for the installation of the
product. In order to prepare the product for use, refer the
information in the user manual and ensure that electrical
installation and water installation are appropriate. If not,
call a qualified electrician and technician to have any
necessary arrangements carried out.
B
WARNING: Manufacturer shall not
be held liable for damages that may
arise from procedures carried out by
unauthorized persons.
B WARNING: Product must not be plugged
in during installation. Otherwise, there is
the risk of death or serious injury!
A
WARNING: : If the door clearance of the
room where the product will be placed is
so tight to prevent passing of the product,
contact the authorised service provider.
jolts.
there must be a clearance of at least 2 cm between
the side walls and the cabin/furniture.
sources such as hobs, heater cores and stoves and at
least 5 cm away from electrical ovens.
kept in humid places.
function efficiently. If the product will be placed in an
alcove, remember to leave at least 5 cm clearance
between the product and the ceiling, rear wall and the
side walls.
to leave at least 5 cm clearance between the product
and the ceiling, rear wall and the side walls. Check
if the rear wall clearance protection component is
present at its location (if provided with the product). If
the component is not available, or if it is lost or fallen,
position the product so that at least 5 cm clearance
shall be left between the rear surface of the product
and the wall of the room. The clearance at the rear is
important for efficient operation of the product.
In environments where the room temperature drops
below 10°C, the refrigerator will continue to run to
preserve the food in the freezer. However, fresh food
in the fridge compartment might freeze due to the
cold environment.
3.2. Installing the plastic wedges
Plastic wedges supplied with the product are used to
create the distance for the air circulation between the
product and the rear wall.
1. To install the wedges, remove the screws on the
product and use the screws supplied together with
the wedges.
2. Insert the 2 plastic wedges onto the rear ventilation
cover as illustrated in the figure.

Installation
9 /25EN
Refrigerator / User Manual
3.3. Adjusting the feet
If the product stands unbalanced after installation,
adjust the feet on the front by rotating them to the
right or left.
3.4. Electrical connection
AWARNING: Do not make connections
via extension cables or multi-plugs.
BWARNING: Damaged power cable
must be replaced by the Authorized
Service Agent.
CIf two coolers are to be installed side
by side, there should be at least 4 cm
distance between them.
Our company shall not be liable for any
damages that will arise when the product
is used without grounding and electrical
connection in accordance with the national
regulations.
Power cable plug must be within easy reach
after installation.
Do not extension cords or cordless multiple
outlets between your product and the wall
outlet.
C
Hot surface warning!
Your product is equipped with coolant
pipes to improve the cooling system for
the side walls. The hot fluid might flow
through these surfaces, causing heat on
the side walls. This is normal and does
not require service maintenance. Be
careful when touching these areas.
A WARNING: “The protective films on the vertical handle” will be removed.

10 /25EN Refrigerator / User Manual
4.1. Things to be done for energy saving
mehmet
AConnecting the product to electric energy
saving systems is risky as it may cause
damage on the product.
for a freestanding appliance; ‘this refrigerating
appliance is not intended to be used as a built-in
appliance’ ;
Do not leave the doors of your refrigerator open for
a long time.
Do not put hot food or drinks in your refrigerator.
Do not overload the refrigerator, cooling capacity will
fall when the air circulation inside is hindered.
Since hot and humid air will not directly penetrate
into your product when the doors are not opened,
your product will optimize itself in conditions
sufficient to protect your food. Functions and
components such as compressor, fan, heater,
defrost, lighting, display and so on will operate
according to the needs to consume minimum
energy under these circumstances.
To be able store maximum food in the freezer
compartment of your refrigerator, the upper flap
and drawer must be removed and placed on top of
glass shelves. Power consumption stated for your
refrigerator has been determined after removing the
icebox, ice tray and flap and the middle drawer as
to allow maximum loading. Using the upper flap and
lower drawer while loading is highly recommended.
Depending on the features of your product, thawing
frozen food in fridge compartment will both provide
energy saving and preserve the food quality.
Airflow should not be blocked by placing foods in
front of the freezer compartment fan. Foods should
be loaded by leaving minimum 5 cm space in front
of the protective fan grid.
Since hot and humid air will not directly penetrate
into your product when the doors are not opened,
your product will optimize itself in conditions
sufficient to protect your food. In this energy
saving function, functions and components such
as compressor, fan, heater, defrost, lighting,
display and so on will operate according to
the needs to consume minimum energy while
maintaining the freshness of your foodstuff.
4Preparation
The temperature sensor in the freezer compartment
must not directly contact food packages. In case of
contact with the sensor, the power consumption of
the product may increase.
CInside of your product must be cleaned.
CIf two coolers are to be installed side
by side, there should be at least 4 cm
distance between them.
4.2. Initial use
Before starting to use your refrigerator, ensure that
all preparations are made in accordance with the
instructions in sections "Instructions for safety and
environment" and "Installation".
Run the product without putting any food for 6 hours
and do not open its door unless certainly required.
CYou will hear a noise when the compressor
starts up. The liquids and gases sealed
within the refrigeration system may also
give rise to noise, even if the compressor is
not running. This is normal.
CIt is normal that the front edges of
the refrigerator are hot. These areas
are designed to be warm to avoid
condensation.

11 /25 EN
Refrigerator / User Manual
5Operating the product
5.1. Indicator panel
Indicator panels may vary according to the product model.
Audio – visual functions on the indicator panel helps you in using your product.
C*Optional: Figures in this user manual are given as an example and may not match the product
exactly. If the relevant parts are not available in the product you purchased, the figure applies to other
models.
1. Temperature Adjustment / Temperature Increase
2. Temperature Adjustment- Slider / Temperature
value indicator
3. Temperature Unit Selection (°C) Celsius indicator
4. Temperature Unit Selection (°F) Fahrenheit
indicator
5. Temperature Adjustment / Temperature Decrease
6. Quick Fridge function indicator / button
7. * Wireless
8. Eco Mode indicator/button
9. *Joker Freezer indicator/button
10. *Auto Door
11. High Temperature Warning/Error
12. *Bottle Cooler
13. *Filter Replacement Warning/Button
14. Menu Button
15. Product On/Off indicator/button
16. *Icematic indicator/button
17. *Sabbath Mode
18. Vacation Mode indicator/button
19. Key Lock indicator
20. Quick Freeze function indicator/button
21. Cabin Selection
22. Fridge compartment indicator
23. Freezer compartment indicator
It may not apply to all models
1
2
3
4
*16
*17
18
20
21
22
23
19
5
6
8
*7
*10
*12
*13
14
15
11
*9a
*9b
Dear customer, if you purchased this product directly from exhibition, please consider the appliance
might be in Demo condition. However, your dealer can help you to fix this issue accordingly.

Operating the product
12 / 25EN Refrigerator / User Manual
1. Temperature Adjustment / Temperature
Increase
When pressed, increases the temperature of the
selected compartment.
2. Temperature Adjustment- Slider/
Temperature value indicator
Shows the temperature value of the selected
compartment. Plus, you can slide your finger up or
down to increase or decrease the temperature.
3. Temperature Unit Selection (°C)
Celsius indicator
When the button is pressed, the temperature unit is
selected as Celsius.
It is the Celsius indicator. When the Celsius
indication is activated, temperature set values are
shown in Celsius and the relevant icon turns on by
100%.
Fahrenheit icon turns on by 50%.
4. Temperature Unit Selection (°F)
Fahrenheit indicator
When the button is pressed, the temperature unit is
selected as Celsius.
It is the Fahrenheit indicator. When the Fahrenheit
indication is activated, temperature set values are
shown in Fahrenheit and the relevant icon turns on
completely.
Celsius icon turns on by 50%.
5. Temperature Adjustment / Temperature
Decrease
When pressed, decreases the temperature of the
selected compartment.
5.2. Indicator panel
Indicator panels may vary according to the product model.
Audio – visual functions on the indicator panel helps you in using your product.
C*Optional: Figures in this user manual are given as an example and may not match the product
exactly. If the relevant parts are not available in the product you purchased, the figure applies to other
models.
It may not apply to all models
Select !
15 21 22 23 521*13 *7
*11 *10 *17 *12 *16 *9b *9a
818
6
20
4
3
6. Quick fridge function indicator
When the quick fridge function is activated, the
indicator turns on by 100%. When the function
is cancelled, the product returns to its normal
settings and the indicator turns on by 50%.
Quick fridge function button
It is used to activate or deactivate the quick fridge
function.
CUse quick fridge function when you
want to quickly cool the food placed
in the fridge compartment. If you want
to cool large amounts of fresh food,
activate this function before putting the
food into the product.
CIf you do not cancel it, quick fridge
will cancel itself automatically after 8
hours at the most or when the fridge
compartment reaches to the required
temperature.
CIf you press the quick fridge button
repeatedly with short intervals, the
electronic circuit protection will be
activated and the compressor will not
start up immediately.
CThis function is not recalled when
power restores after a power failure.
7. *Wireless
When the button is pressed, the product is
introduced to the home network. When the function

Operating the product
13 /25EN
Refrigerator / User Manual
is activated, the indicator turns on by 100%, when it
is cancelled, the indicator turns on by 50%.
8. Eco mode indicator/button
Press this button to activate and deactivate the Eco
mode.
When the Eco mode is activated, the indicator turns
on by 100%. When the function is active, the freezer
will start to run in the eco mode at least 6 hours
later. When the function is cancelled, the indicator
will turn on by 50%.
9a. *Joker freezer indicator/button
When the button is pressed, the joker
compartment runs as a freezer and the indicator
turns on by 100%. Joker fridge compartment
turns on by 50%.
9b. *Joker fridge indicator/button
When the button is pressed, the joker
compartment runs as a fridge and the indicator
turns on by 100%. Joker freezer compartment
turns on by 50%.
10.* Auto Door
Press this button to activate or deactivate the Auto
Door mode. When the function is activated, the
indicator turns on by 100%. When the function is
cancelled, the indicator will turn on by 50%.
When the function is active, touch the relevant
section on the door handle to make the door open
automatically.
11. High Temperature Warning/Error
This indicator illuminates during power failure, high
temperature failures and error warnings. During
long-term power failures, the highest temperature
value that the freezer compartment reaches will
blink on the digital display. After checking the food
located in the freezer compartment, press the high
temperature button to clear the warning.
12. *Bottle Cooler
Press this button to activate or deactivate the bottle
cooler mode.
When the function is activated, the indicator turns
on by 100%. When the function is cancelled, the
indicator turns on by 50%.
13. *Filter Replacement Warning/Button
This icon turns on when the filter needs to be reset.
When the button is pressed, the filter will be reset
and the reset icon will go off.
14. Menu Button
It is used the activate or deactivate the sleep mode
for the display. If you do not press any button or
open the door in 30 seconds, it switches to sleep
mode automatically.
15. Product On/Off indicator/button
Press and hold the On/Off button for 3 seconds to
switch on or off the product.
When the product is turned off, the product on/off
indicator turns on by 100%, and all the other indi-
cators go off. To turn on the product, press and hold
the button for 3 seconds again. The refrigerator will
turn on and the on/off indicator will turn on by 50%.
16. *Icematic indicator/button
Press this button to activate or deactivate the
Icematic. If the indicator is on by 100%, this means
that the icematic is running. If the indicator is on by
50%, this means that the icematic is off.
CWater flow from water tank will stop
when this function is not selected.
However, ice made previously can be
taken from the icematic.
17. *Sabbath Mode
Press this button to activate or deactivate the
Sabbath mode. When the function is activated, the
indicator turns on by 100%. When the function is
cancelled, the indicator will turn on by 50%.
18. Vacation Mode indicator/button
Press this button to activate the vacation mode The
vacation mode indicator will turn on by 100%. When
the vacation mode is active, “- -” will be shown
on the Temperature Value Indicator and no active
cooling is performed in the fridge compartment.
It is not suitable to keep the food in the fridge
compartment when this function is activated. Other
compartments will continue to be cooled according
to their set temperatures.
To cancel this function press Vacation function
button again. When the function is cancelled, the
indicator will turn on by 50%.
19. Key Lock indicator
Press and hold the quick fridge and vacation
buttons simultaneously for 3 seconds. When
pressing the button, a countdown will start in the
temperature value indicator. When the key lock
is activated, the key lock indicator will turn on by
100% and the key lock mode will be enabled.

Operating the product
14 / 25EN Refrigerator / User Manual
Buttons will not function when the key lock mode is
active. Press and hold the quick fridge and vacation
buttons again simultaneously for 3 seconds. When
pressing the button, a countdown will start in the
temperature value indicator. When the key lock is
cancelled, the key lock indicator will turn on by 50%
and the key lock mode will be disabled.
Activate this function if you want to prevent
changing of the temperature setting of the
refrigerator.
20.Quick freeze function indicator
When the quick freeze function is activated,
the indicator will turn on by 100%. When the
function is cancelled, the product will return to its
normal settings and the indicator will turn on by
50%.
Quick freeze function button
It is used to activate or deactivate the quick freeze
function.
Press this button to activate or deactivate the quick
freeze function. When you activate the function, the
freezer compartment will be cooled to a temperature
lower than the set value.
CUse the quick freeze function when you
want to quickly freeze the food placed
in freezer compartment. If you want
to freeze large amounts of fresh food,
activate this function before putting the
food into the product.
CIf you do not cancel it, Quick Freeze
will cancel itself automatically after 4
hours at the most or when the fridge
compartment reaches to the required
temperature.
C
This function is not recalled when
power restores after a power failure.
21. Cabin Selection
Press the cabin selection button to see and change
the temperature value of the fridge or freezer on the
Temperature Value indicator.
22. Fridge compartment indicator
When this indicator is active, the temperate of the
fridge compartment is displayed on the temperature
value indicator.
23 Freezer compartment indicator
When this indicator is active, the temperate of the
freeze compartment is displayed on the temperature
value indicator.
5.3. Blue light/HarvestFresh
*May not be available in all models
For the blue light,
Fruits and vegetables stored in the crispers that are
illuminated with a blue light continue their photosyn-
thesis by means of the wavelength effect of blue light
and thus preserve their vitamin content.
ForHarvestFresh,
Fruits and vegetables stored in crispers illuminated
with the HarvestFresh technology preserve their vita-
mins for a longer time thanks to the blue, green, red
lights and dark cycles, which simulate a day cycle.
If you open the door of the refrigerator during the
dark period of the HarvestFresh technology, the
refrigerator will automatically detect this and enable
the blue-green or red light to illuminate the crisper
for your convenience. After you have closed the door
of the refrigerator, the dark period will continue,
representing the night time in a day cycle.

Operating the product
15 /25EN
Refrigerator / User Manual
5.4. Ice machine
(This feature is optional)
Ice machine allows you to obtain ice from the
product easily.
Using the ice machine
1. Remove the water tank from the fridge
compartment.
2. Fill the water tank with water.
3. Replace the water tank. First ice cubes will be
ready in approximately four hours in the ice machine
drawer located in the freezer compartment.
CWhile the water tank is completely
filled, you will be able to obtain
approximately 60-70 ice cubes.
CThe water within the tank should be
renewed in every 2-3 weeks.
5.5. Icematic
(This feature is optional)
Icematic allows you to obtain ice from the product
easily.
Using the icematic
1. Take out the icematic pulling it out carefully.
2. Fill the Icematic with water.
3. Place Icematic in place. About two hours later, the
ice is ready.
4. To obtain ice, turn the knobs on the ice reservoirs
clockwise by 90˚ degrees. Ice cubes in the reservoirs
will fall down into the ice storage container below.
5. You may take out the ice storage container and
serve the ice cubes.
CDo not remove the Icematic from its
seating to obtain ice.
CIf you wish, you may keep the ice
cubes in the ice storage container.
The ice storage container is just for
accumulating ice cubes. Do not put
water in it. Otherwise, it will break.
5.6. Ice tray
(This feature is optional)
Ice tray allows you to obtain ice from the product
easily.
Using the ice tray
1. Remove the ice tray from the freezer
compartment.
2. Fill the ice tray with water.
3. Place the ice tray in the freezer compartment.
About two hours later, the ice is ready.
4. Remove the ice tray from the freezer
compartment and bend it over the service plate. Ice
cubes will easily fall down to the service plate.

Operating the product
16 / 25EN Refrigerator / User Manual
5.7. Deodoriser Module
(FreshGuard)
(This feature is optional)
The deodoriser module quickly eliminates the bad
smells in your refrigerator before they permeate the
surfaces. Thanks to this module, which is placed
on the ceiling of the fresh food compartment, the
bad odours dissolve while the air is actively being
passed on the odour filter, then the air that has
been cleaned by the filter is re-emitted to the fresh
food compartment. This way, the unwanted odours
that may emerge during the storage of foods in the
refrigerator are eliminated before they permeate the
surfaces.
This is achieved thanks to the fan, LED and
the odour filter integrated into the module. The
deodoriser module will get activated automatically
on a periodical basis. The sound you will hear
during periodical activation of the module is normal;
it is emitted by the integrated fan. If you open
the door of the fresh food compartment while the
module is active, the fan will pause temporarily and
resume where it has left off when the door is closed
again. In case of a power failure, the deodoriser
module will get activated when the power is back.
Info: It is recommended to store aromatic foods
(such as cheese, olives and delicatessen foods) in
their packaging and sealed to avoid bad odours that
may result when smells of various foods get mixed.
Besides, it is recommended to take spoiled foods
out of the refrigerator quickly to prevent the other
foods from getting spoiled and avoid bad odours.

Operating the product
17 /25EN
Refrigerator / User Manual
5.8. Chiller compartment
(This feature is optional)
Use this compartment to store delicatessen that shall
be stored in a lower temperature or meat products
that you will consume in a short time. Do not store
your vegetables or fruits in this compartment.
You can increase the inner volume of your product by
removing any of the chiller compartments:
To remove, just pull forwards until it stops and then lift
it and pull towards yourself.
5.9. Crisper
Crisper of the refrigerator is designed specially
to keep the vegetables fresh without loosing their
humidity. For this purpose, cool air circulation is
intensified around the crisper in general. Store your
fruits and vegetables in this compartment. Do not
place leafy greens next to fruits to prolong their life.

Operating the product
18 / 25EN Refrigerator / User Manual
5.10. Using the water dispenser
(This feature is optional)
CIt is normal for the first few glasses
of water taken from the dispenser to
be warm.
CIf the water dispenser is not used for
a long period of time, dispose of first
few glasses of water to obtain fresh
water.
1. Push in the lever of the water dispenser with your
glass. If you are using a soft plastic cup, pushing
the lever with your hand will be easier.
2. After filling the cup up to the level you want,
release the lever.
CPlease note, how much water flows
from the dispenser depends on how far
you depress the lever. As the level of
water in your cup / glass rises, gently
reduce the amount of pressure on the
lever to avoid overflow. If you slightly
press the arm, the water will drip; this
is quite normal and not a failure.
5.11. Filling the water dispenser's tank
Water tank filling reservoir is located inside the door
rack.
1. Open the cover of the tank.
2. Fill the tank with fresh drinking water.
3. Close the cover.
CDo not fill the water tank with
any other liquid except for water
such as fruit juices, carbonated
beverages or alcoholic drinks which
are not suitable to use in the water
dispenser. Water dispenser will be
irreparably damaged if these kinds of
liquids are used. Warranty does not
cover such usages. Some chemical
substances and additives contained
in these kinds of drinks/liquids may
damage the water tank.
CUse clean drinking water only.
CCapacity of the water tank is 3 liters;
do not overfill.
5.12. Cleaning the water tank
1. Remove the water filling reservoir inside the door
rack.

Operating the product
19 /25EN
Refrigerator / User Manual
2. Remove the door rack by holding from both sides.
3. Grab the water tank from both sides and remove it
with an angle of 45°C.
4. Remove the cover of the water tank and clean the
tank.
CComponents of the water tank and
water dispenser should not be washed
in dishwasher.
5.13. Drip tray
Water that dripped while using the water dispenser
accumulates in the spillage tray.
Remove the plastic filter as shown in the figure.
With a clean and dry cloth, remove the water that
has accumulated.
Table of contents
Languages:
Other Beko Refrigerator manuals

Beko
Beko DSA25000 User manual

Beko
Beko GN163220S User manual

Beko
Beko DN167123 User manual

Beko
Beko GN1416233DZJGB User manual

Beko
Beko RDP 6500 User manual

Beko
Beko GN1416240ZXN User manual

Beko
Beko RCNA295K20W User manual

Beko
Beko GN1603140XBN User manual

Beko
Beko RDNT360150VZP User manual

Beko
Beko BCND4VE73 User manual

Beko
Beko RDSA240K30XPN Instruction Manual

Beko
Beko BCFD4V50 User manual

Beko
Beko RCSA330K30XPN Instruction Manual

Beko
Beko RFNE312E33X User manual

Beko
Beko RCSA340K30WN Instruction Manual

Beko
Beko RCNE720E3VZW User manual

Beko
Beko DN 150120 D User manual

Beko
Beko RDNE18C2E21W User manual

Beko
Beko RSNE445 E 22 User manual

Beko
Beko RCSA300K30XP User manual