3 / EN
Washng Machne / User’s Manual
1 General safety instructions 5
1.1 Life and property safety ------------------------------------------------------------------------------------ 5
1.2 Children's safety -------------------------------------------------------------------------------------------- 6
1.3 Electrical safety --------------------------------------------------------------------------------------------- 7
1.4 Hot surface safety------------------------------------------------------------------------------------------ 7
2 Important instructions for environment 8
2.1 Compliance with WEEE Directive--------------------------------------------------------------------------- 8
2.2 Package information --------------------------------------------------------------------------------------- 8
3 Intended use 8
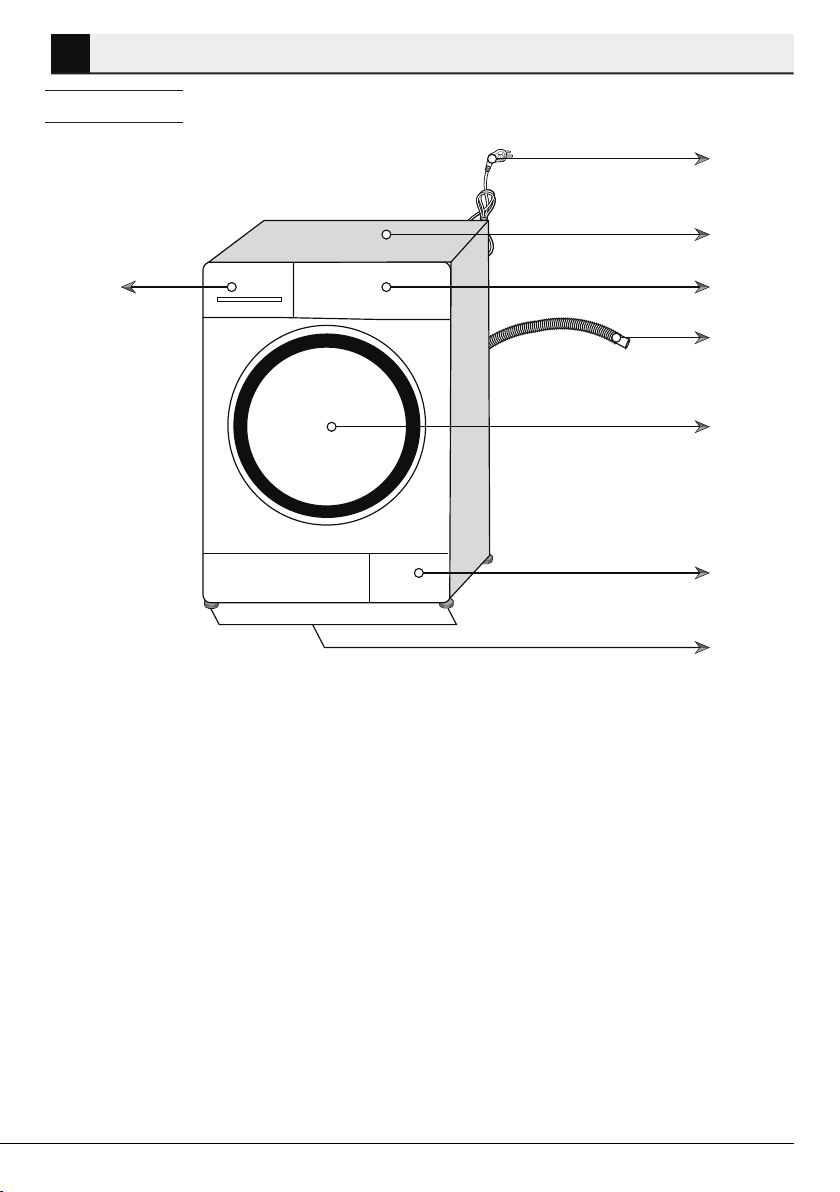
4 Your product 9
4.1 Overview ---------------------------------------------------------------------------------------------------- 9
4.2 Package Contents ------------------------------------------------------------------------------------------ 10
4.3 Technical specifications------------------------------------------------------------------------------------ 11
4.4 Installation ------------------------------------------------------------------------------------------------- 12
4.4.1 Approprate nstallaton locaton ----------------------------------------------------------------------------------- 12
4.4.2 Removng packagng renforcement ------------------------------------------------------------------------------- 12
4.4.3 Removng the transportaton locks -------------------------------------------------------------------------------- 13
4.4.4 Connectng water supply ------------------------------------------------------------------------------------------- 13
4.4.5 Connectng the dran hose to the dran ---------------------------------------------------------------------------- 14
4.4.6 Adjustng the feet--------------------------------------------------------------------------------------------------- 15
4.4.7 Electrcal connecton------------------------------------------------------------------------------------------------ 15
4.4.8 Intal use ------------------------------------------------------------------------------------------------------------ 17
4.5 Preparation------------------------------------------------------------------------------------------------- 18
4.5.1 Sortng the laundry-------------------------------------------------------------------------------------------------- 18
4.5.2 Preparng laundry for washng ------------------------------------------------------------------------------------- 19
4.5.3 Thngs to be done for energy savng------------------------------------------------------------------------------- 19
4.5.4 Loadng the laundry------------------------------------------------------------------------------------------------- 19
4.5.5 Correct load capacty------------------------------------------------------------------------------------------------ 20
4.5.6 Usng detergent and softener-------------------------------------------------------------------------------------- 20
4.5.7 Tps for effcent washng ------------------------------------------------------------------------------------------ 22
4.6 Operating the product ------------------------------------------------------------------------------------- 23
4.6.1 Control panel -------------------------------------------------------------------------------------------------------- 23
4.6.2 Dsplay symbols ----------------------------------------------------------------------------------------------------- 23
4.6.3 Preparng the machne---------------------------------------------------------------------------------------------- 24
4.6.4 Programme selecton ----------------------------------------------------------------------------------------------- 24
4.6.5 Programmes -------------------------------------------------------------------------------------------------------- 24
4.6.6 Temperature selecton --------------------------------------------------------------------------------------------- 26
4.6.7 Economy symbol ---------------------------------------------------------------------------------------------------- 26
4.6.8 Spn speed selecton------------------------------------------------------------------------------------------------ 27
4.6.9 Programme and consumpton table ------------------------------------------------------------------------------- 28
4.6.10 Auxlary functon selecton --------------------------------------------------------------------------------------- 30
4.6.11 Tme dsplay -------------------------------------------------------------------------------------------------------- 31
4.6.12 Delayed start------------------------------------------------------------------------------------------------------- 31
4.6.13 Startng the programme------------------------------------------------------------------------------------------- 32
4.6.14 Progress of programme ------------------------------------------------------------------------------------------- 32
TABLE OF CONTENTS