BEL Engineering i-Thermo M5 Series User manual

Filename:QUICK_GUIDE_BILANCE_M5_EN+IT+POR_rev11;April16
1
Declaration of Conformity
EC-Konformitätserklärung
EC-Déclaration de conformité
EC-Dichiarazione di conformità
EC-Declarção de conformidad
EC-Declaration of conformity
EC-Declaración de conformidad
BEL Engineering s.r.l., Via Carlo Carrà 5 Monza 20900 (MB) ITALY
GB
Declaration of conformity
We hereby declare that the product to which this declaration refers
complies with the following standards.
D
Konformitätserklärung
Wir erklären hiermit, dass das Produkt, auf das sich diese Erklärung
bezieht, mit den nachstehenden Normen übereinstimmt.
F
Déclaration de conformité
Nous déclarons avec cela responsabilité que le produit, auquel se
rapporte la présente déclaration, est conforme aux normes citées ci-après.
I
Dichiarazione di conformità
Di
chiariamo con ciò che il prodotto al quale la presente dichiarazione si
riferisce è conforme alle norme di seguito citate.
E
Declarção de conformidade
Manifestamos en la presente que el product al que se refiere esta
declaración està de acuerdo con las normas siguientes..
P
Declaración de
conformidad
Declaramos por meio da presente que o produto no qual se refere esta
declaração, corresponde às normas seguintes
Electronic Balance: Series i-Thermo M5
Euro
pean Directive
Harmonized Standard
2014/30/EU (EMC) EN 61326-1:2013
2014/35/EU (LVD) EN 61010-1:2010
EN 61010-2-010:2014
2011/65/EU (RoHS) EN 50581:2012

ENGLISH
QUICK GUIDE
ELECTRONIC PRECISION MOISTURE BALANCES
Series: i-Thermo M5
ATTENTION:
This is a guide to start quickly working and do NOT substitute the complete user manual; we
please you to read completely the user manual for a correct installation and a right use of your
new electronic balance.
Usage of the instrument different from the one reported in the user manual does not ensure
anymore the safety of the product.
1. INSTALLATION INSTRUCTIONS
•Remove the balance, the calibration weight (if included) and the accessories from the
package and check if any visible damage of the instrument
•Do not install the balance in places with air flows, heavy thermal changes and vibrations.
Place the support pan and weighing pan on the balance
•Level the balances using the levelling feet and looking at
the level bubble
•
Wait for 30 minutes from switch on and the calibrate the balance (using the appropriate
mass if included) following the instructions of the paragraph “calibration”

Filename:QUICK_GUIDE_BILANCE_M5_EN+IT+POR_rev11;April16
3
ENGLISH
WARNING
:
Please follow carefully these steps for installing and use the new balance before
starting your work routine. A way of use of the instrument different from this user
manual will not guarantee the instrument’s safety anymore. Keep this manual in a safe
place.
Please follow these indications to avoid problems and to grant a safe use of
moisture analyzer:
Use the moisture analyzer exclusively for the moisture determination of samples.
Every incorrect use of this instrument may create danger for safety of persons and
may cause damages at the instrument or at other objects.
Do not use the instrument in areas where there is danger of explosions; also make
the instrument work only respecting the enviroment conditions as reported in this
manual.
If this material is used in plants or in enviroment conditions that require strict safety
conditions, please respect the instructions of the directives regarding the installation
of this material currently existing in your country.
This instrument must be used only by qualified personell, who knows the features
and characheristics of the sample under test.
Before starting to work with the instrument for the first time, please check that
voltage is the same of your electric mains.
To get the instrument free from tension, remove the power supply cable.
Place straight the power supply cable so that to avoid contact with the very hot
surfaces of the instrument.
Use only extension cables that are conform to normatives and that are equipped of
a protection conductor.
Attention, protection against heat
Respect the distance and the free space around the instrument to avoid an
accumulation of heat in the instrument and and the over heating of the instrument
ifself:
- 20 cm around the instrument
- 1 m upon the instrument
Do not place flammable materials upon, below or near the instrument since the
heater warms the surroinding area.
Remove the samples carefully, the heater and the dishes for samples may be still
very hot.
Danger for persons or objects when working with particular samples: Fire
Explosion
Flammable or explosive substances
Substances that contain solvents
Substances that during drying emit gas or flammable explosive vapors

ENGLISH
Package content
1 Device for humidity determination.
2 VDE power cable
3 15 pin M/F cable for connecting the
balance/heater
4 Tablemat
5 Sample-holder plate pan
6 Pan with antiventilation cylinder
7 #10 sample-holder plates
8 CD with instruction manual
1 2
3
4
5
6
7
Filename:QUICK_GUIDE_BILANCE_M5_EN+IT+POR_rev11;April16
5
ENGLISH
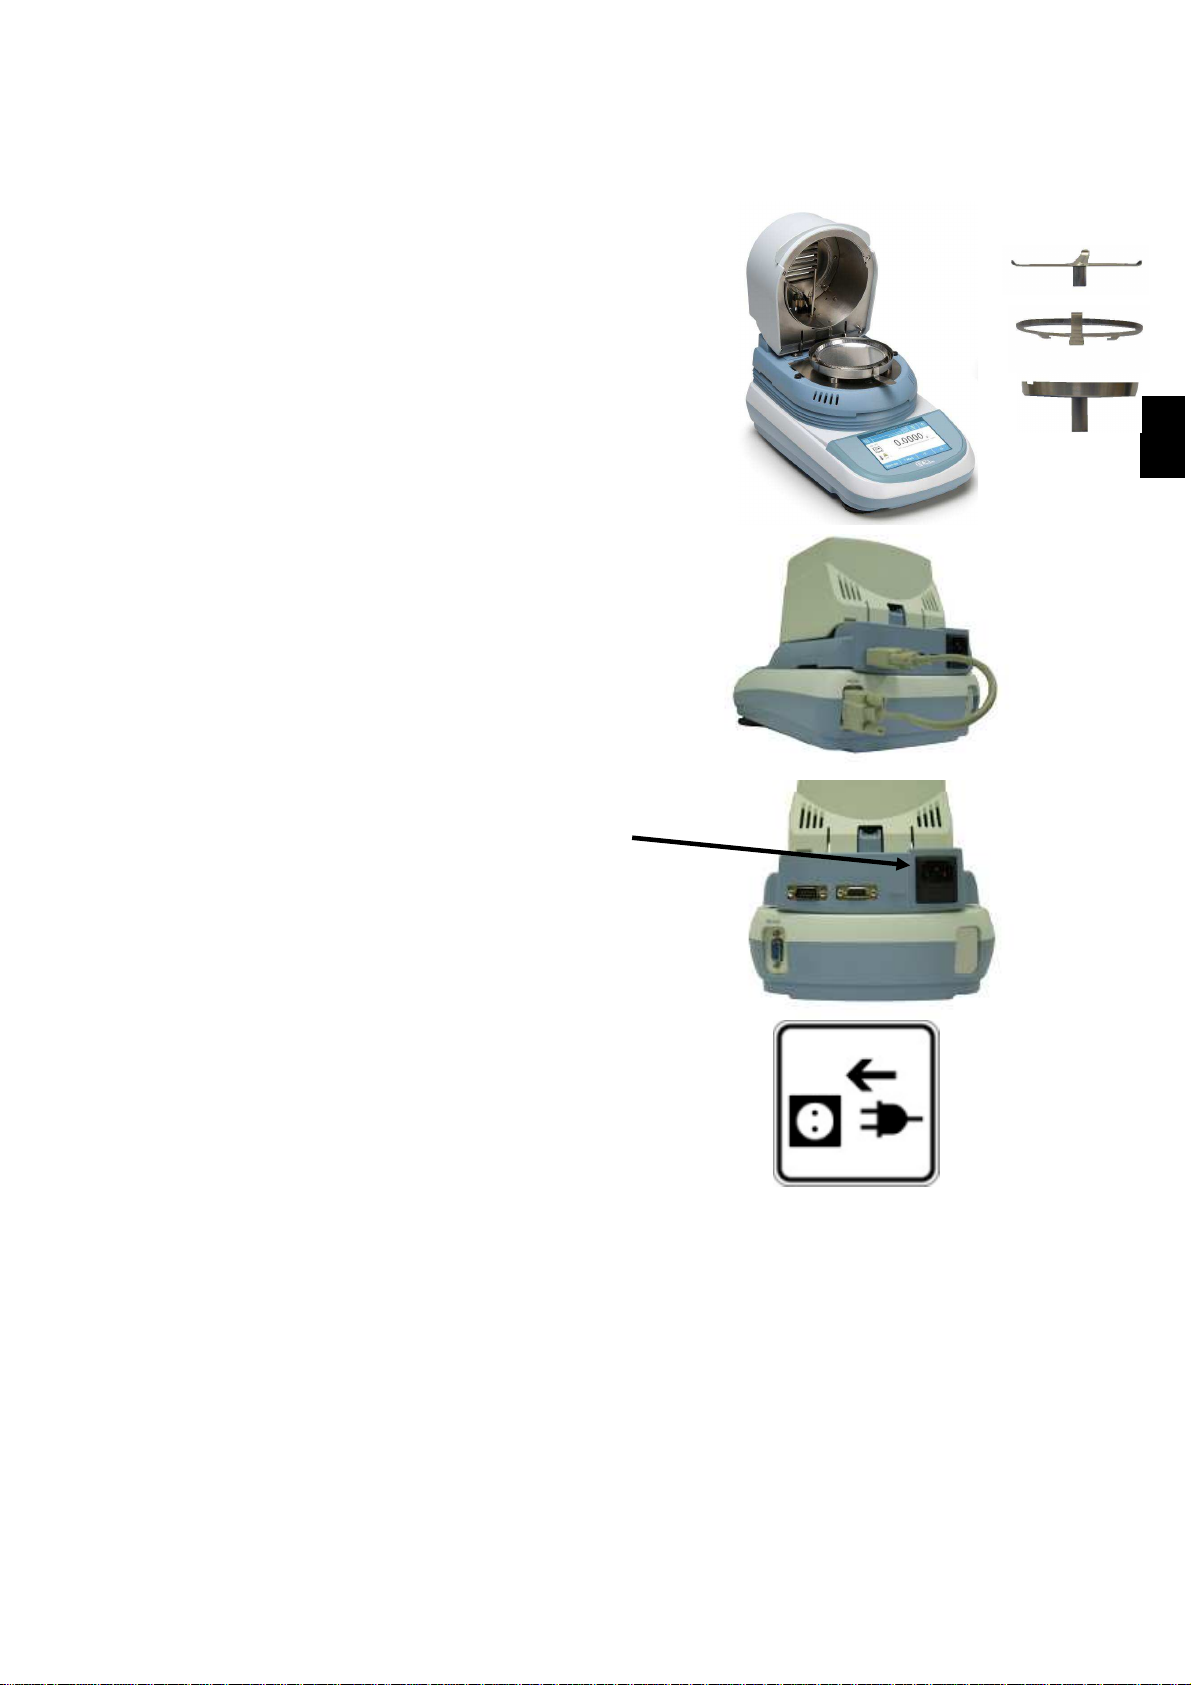
Start-up
The following describes all the steps required to prepare the device for the first start-up.
Open the oven lid and place:
1. Pan with the antiventilation cylinder
2. Place the sample-holder plate
extractor
3. Place the star on the weighing cone.
The balance is connected to the heater via
a 15-pin M/F cable.
Plug the cable into the two connectors on
the rear of the device as shown in the
figure.
Plug the VDE cable supplied into the
supply connector on the rear of the device.
N.B. Verify that the power supply indicated
on the device nameplate matches the one
in use in the country where you are
installing the unit.
So connect the VDE cable to the outlet in
the vicinity of the device. Do not use
cables/extensions non-compliant with
current regulations.
Wait 30 minutes after the start-up and calibrate the device prior its leveling. For the calibration
procedure, refer to Chapter 7.6. Perform calibration of the device each time it is moved to
another place.
It is recommended not to drop overweight items on the balance weighing pan to avoid
damaging it.
The service must be performed by trained personnel and spare parts used must be original.
To do that, please contact the retailer from whom the device was purchased.
1
2
3

ENGLISH
Display area functions
The thermobalance is equipped with a color display with tap screen functionality that allows
tapping on the screen in the active areas to quickly perform the access to the various menus
and functionality of the device.
1
Area showing the weighing values or data related to humidity during and at the end of
the drying cycle
g Display of the measurement unit; tapping the symbol, you can access the
menu of the measurement units and select the ones desired.
Stability value display.
T = Tare value display.
0%-100% Analog bar showing the magnitude being measured.
2
Area showing the heating operation status
60 °C Value display of the heater temperature.
Stb: 60°C Value display of the standby temperature of the heater.
High temperature danger display.
2
4
3
1

Filename:QUICK_GUIDE_BILANCE_M5_EN+IT+POR_rev11;April16
ENGLISH
3
Bar to display the time and date, to set the weighing parameters, to select the user, to
access to drying functions and to switch off the device.
By tapping this area, you access the menu of the drying mode functions
By tapping this area, you access the weighting menu settings, the viewing
preferences, the devices and user customization setup
By tapping this area, you access the switching off menu or enable the
standby status of the device
By tapping this area, you access the user menu to make your selection
quickly than desired
4
Bar to display the function keys.
By tapping the keys displayed in this area, the relative function will be executed. The
following are all available keys that may vary depending on the selected applications

ENGLISH
Standby, logout, switching off functions
After inserting the power cord into the wall outlet, the device will automatically switch on
taking in the basic weighing screen.
By tapping the area with the symbol
You access the switching off menu.
There are 3 switching off modes:
Display off.
Logout.
Switching off.
Display off
Selecting the display off mode, the
device will go in the standby state; the
display is turned off, so that only the
bottom right command to turn on the
system will be enabled.
Tapping the symbol, you will return to the
basic weighing screen.
Logout
Selecting the logout mode, you will
disable the current user
Tapping “Start”, it will activate the user
and in the case of password protected user
it will be asked you to enter it.
Tapping , you can select another
user by which you want to switch on the
device.
Switching off
Selecting the switching off command, the
device will be turned off. To turn it on, you
shall press the key on the left of the device
or remove the power plug and insert it
again.

Filename:QUICK_GUIDE_BILANCE_M5_EN+IT+POR_rev11;April16
ENGLISH
Determination of the humidity content with "Quick" method
This section describes how to perform the analysis of the humidity content using the "Simple"
method that allows you to perform a quick test by defining only the temperature and the
method of drying end.
To access the function, tap the "Simple" icon in the menu "Functions".
The display screen allows you to start a
drying cycle by tapping the "Start" button
with the temperature parameters and
modalities of the drying end displayed to
the right of the function.
Temperature.
Enter the desired temperature and tap the
“OK" key.
The temperature values that can be set
range from a minimum of 35°C to a
maximum of 160°C) with step of 1°C.
Drying end.
The end drying parameter is the setting
that defines the method by which you want
to determine the end of the humidity
measuring cycle contained in the
substance to be analyzed.

ENGLISH
Time: setting this method of the end
drying, the cycle will end when the time set
will be elapsed. Also you can end the cycle
manually at any time by tapping the "Stop"
key.
Enter the value of time and press the "OK"
button to confirm
Autostop %: setting this method of the
end drying, the cycle will end when the
variation of humidity loss will be less than
0.1% for a time interval of 30 seconds.
Also you can end the cycle manually at any
time by tapping the "Stop" key.
Start: tapping “Start”, you will enable the
procedure for the humidity content
analysis.
Load the test pan on the weighing plate
and close the oven. You will automatically
tare the test plate.
Load the substance to analyze and close
the oven.
N.B. The minimum amount of substance
required for the drying cycle based on
the balance resolution:
0.01g Min 500mg
0.001g Min 500mg
0.0001g Min 50mg

Filename:QUICK_GUIDE_BILANCE_M5_EN+IT+POR_rev11;April16
ENGLISH
After closing the heater cover, the cycle will
automatically start and the analysis screen
will appear.
During drying, they are displayed all the
parameters related to the test and through
a real-time graph you can see the trend of
drying.
For all the details related to the phase of
drying and the final result management,
refer to Chapter 11.

ITALIANO
GUIDA VELOCE
TERMOBILANCE
Serie: i-Thermo M5
ATTENZIONE:
Questa è una guida rapida per iniziare subito a lavorare e non sostituisce il manuale
completo; vi preghiamo quindi di leggere attentamente il manuale completo d’istruzioni
per una completa installazione e un corretto utilizzo della vostra nuova bilancia. Un
utilizzo dello strumento differente da quello riportato nel manuale non garantisce più la
sicurezza del prodotto
ISTRUZIONI PER L’INSTALLAZIONE
•Togliere la bilancia ed il relativo peso di calibrazione (ove previsto) dall’imballo e verificare
eventuali danni visibili dello strumento.
•Non installare la bilancia in ambienti in cui vi siano correnti d’aria, forti sbalzi termici e
vibrazioni. Porre sulla bilancia il sottopiatto ed il piatto
•Mettere in bolla la bilancia regolando gli appositi piedini
della bilancia.
•
Attendere 30 minuti dall’accensione e calibrare la bilancia (usando l’apposito peso se in
dotazione) seguendo le istruzioni al paragrafo “calibrazione”

Filename:QUICK_GUIDE_BILANCE_M5_EN+IT+POR_rev11;April16
ITALIANO
ATTENZIONE
:
Vi preghiamo di leggere attentamente le presenti istruzioni per l’installazione e l’uso
prima di iniziare il Vostro lavoro con la nuova bilancia. Un utilizzo dello strumento
differente da quello riportato in questo manuale non garantisce più la sicurezza del
prodotto. Conservare accuratamente il manuale d’istruzioni.
Osservare le seguenti indicazioni per un funzionamento dell’analizzatore
di umidità sicuro e senza problemi:
Utilizzare l’analizzatore di umidità esclusivamente per la determinazione di umidità
di campioni. Ogni utilizzo non idoneo dell’apparecchio può mettere in pericolo la
sicurezza delle persone e causare danni allo strumento o ad altri oggetti.
Non impiegare l’apparecchio in aree a pericolo d’esplosione; inoltre far funzionare
lo strumento solo nel rispetto delle condizioni ambientali riportate in questo manuale
d’istruzioni.
Se si utilizza il materiale elettrico in impianti e in condizioni ambientali che
richiedono maggiori misure di sicurezza, rispettare le disposizioni previste nelle
direttive per l’installazione di tale materiale in vigore nel proprio Paese.
L’apparecchio deve essere utilizzato solo da personale qualificato che conosca le
proprietà/caratteristiche del campione utilizzato.
Prima di mettere in funzione per la prima volta l’apparecchio controllare se il
voltaggio di alimentazione corrisponde alla tensione di rete.
Per disconnettere l’apparecchio dalla tensione di rete staccare il cavo di
alimentazione.
Stendere il cavo di alimentazione in modo tale da evitare il contatto con superfici
molto calde dell’apparecchio.
Utilizzare solo cavi di prolunga conformi alle normative e dotati di un conduttore di
protezione.
Avvertenza protezione contro il calore
Rispettare la seguente distanza e lo spazio libero attorno all’apparecchio per evitare
un accumulo di calore nell’apparecchio e un surriscaldamento dell’apparecchio
stesso:
- 20 cm attorno all’apparecchio
- 1 m sopra l’apparecchio
Non collocare materiali infiammabili sopra, sotto o vicino all’apparecchio in quanto
l’elemento di riscaldamento surriscalda l’area circostante.
Togliere i campioni con cautela, l’elemento di riscaldamento e i piattelli porta
campione potrebbero essere ancora molto caldi.
Pericolo per persone o cose lavorando con campioni particolari: Incendio
Esplosione
Sostanze infiammabili o esplosive
Sostanze che contengono solventi
Sostanze che durante l’essiccazione emettono gas o vapori infiammabili o esplosivi
Togliere la bilancia ed il relativo peso di calibrazione dall’imballo e verificare
eventuali danni visibili dello strumento.

ITALIANO
Contenuto della confezione
1 Strumento per la determinazione dell’umidità.
2 Cavo alimentazione VDE
3 Cavo 15 poli M/F per collegamento bilancia/riscaldatore
4 Sottopiatto
5 Estrattore piattello porta campione
6 Vaschetta con cilindro anti ventilazione
7 N°10 Piattelli porta campione
8 CD con manuale d’istruzioni
1 2
3
4
5
6
7

Filename:QUICK_GUIDE_BILANCE_M5_EN+IT+POR_rev11;April16
ITALIANO
Messa in funzione
Di seguito sono descritte tutte le operazioni da eseguire per preparare lo strumento alla prima
accensione.
Aprire il coperchio fornetto e posizionare:
1. Vaschetta con cilindro anti
ventilazione
2. Posizionare l’estrattore piatto porta
campione
3. Posizionare la stella sul cono di
pesata.
La bilancia è connessa al riscaldatore
tramite un cavo a15 poli M/F.
Inserire il cavo nei due connettori posti sul
retro dello strumento come indicato in
figura.
Inserire il cavo VDE in dotazione nel
connettore di alimentazione posto sul retro
dello strumento.
N.B. Verificare che l’alimentazione
indicata sull’etichetta di targa dello
strumento corrisponda a quella in uso
nel paese in cui si sta effettuando
l’installazione.
Collegare quindi il cavo VDE alla presa di
corrente posta nelle vicinanze dello
strumento. Non utilizzare cavi/prolunghe
non conformi alle normative vigenti.
Attendere 30 minuti dall’accensione e calibrare lo strumento previa messa in bolla dello
stesso. Per le procedure di calibrazione far riferimento al capitolo 7.6. Eseguire la
calibrazione dello strumento ogni qualvolta viene spostata in un altro luogo.
Si raccomanda di non far cadere oggetti di peso eccessivo sul piatto di pesata della bilancia
per evitare il danneggiamento della stessa.
Il servizio di assistenza deve essere eseguito da personale specializzato e i ricambi
utilizzati devono essere originali. A tale scopo occorre rivolgersi al rivenditore presso il quale
lo strumento è stato acquistato.
1
2
3

ITALIANO
Funzionalità area display
La termobilancia è dotata di un display a colori con funzionalità touch screen che
permette toccando sullo schermo nelle aree attive di eseguire in maniera rapida
l’accesso ai vari menù e funzionalità dello strumento.
1
Area d’indicazione valori di pesata o dati relativi all’umidità durante e a fine ciclo
d’essicazione
g Indicazione unità di misura, toccando il simbolo sarà possibile accedere al
menu delle unità di misura e selezionare quella desiderata.
Indicatore di stabilità.
T = Indicatore valore di tara.
0%-100% Barra indicatrice analogica della grandezza sotto misura.
2
Area d’indicazione stato funzionamento riscaldatore
60 °C Indicatore valore temperatura del riscaldatore.
Stb: 60°C Indicatore del valore della temperatura di standby del riscaldatore.
2
4
3
1

Filename:QUICK_GUIDE_BILANCE_M5_EN+IT+POR_rev11;April16
ITALIANO
Indicatore pericolo alta temperatura.
3
Barra visualizzazione data ora, impostazione parametri di pesatura, selezione utente,
accesso alle funzioni di essicazione, e spegnimento strumento.
Toccando quest’area si accede al menù delle funzioni della modalità di
essicazione
Toccando quest’area si accede al menù delle impostazioni di pesata,
preferenze di visualizzazione, setup periferiche e personalizzazione utenti.
Toccando quest’area si accede al menù di spegnimento o attivazione
stato di standby dello strumento,
Toccando quest’area si accede al menu degli utenti per effettuare la
selezione in modo rapido di quello desiderato.
4
Barra visualizzazione tasti funzione.
Toccando i tasti visualizzati in quest’area verrà eseguita la relativa funzione. Di seguito
vengono illustrati tutti i tasti disponibili che possono variare in base alle applicazioni
selezionate

ITALIANO
Funzione di standby, logout, spegnimento
Dopo aver inserito il cavo di alimentazione nella presa di rete, lo strumento si accenderà
automaticamente portandosi nella schermata base di pesatura.
Toccando l’area con il simbolo
si accede al menù di spegnimento.
Vi sono 3 modalità di spegnimento:
Display off.
Logout.
Spegnimento.
Display off
Selezionando la modalità display off, lo
strumento entrerà nello stato di standby,
verrà spento il display e rimarrà solo in
basso a destra attivo il comando per
riaccendere il sistema.
Toccando il simbolo si tornerà nella
schermata base di pesatura.
Logout
Selezionando la modalità logout, verrà
disattivato l’utente in uso.
Toccando il tasto “Start” verrà riattivato
l’utente e nel caso di utente protetto da
password ne verrà richiesta
l’inserimento.
Toccando il tasto si potrà
selezionare un’altro utente con il quale
riavviare lo strumento.
Spegnimento
Selezionando il comando di
spegnimento lo strumento sarà spento.
Per riavviare sarà necessario premere il
tasto posto sulla sinistra dello strumento.
Oppure rimuovere la presa di
alimentazione e reinserirla
.

Filename:QUICK_GUIDE_BILANCE_M5_EN+IT+POR_rev11;April16
ITALIANO
Determinazione dell’umidità con metodo “Rapido”.
In questa sezione è descritto come eseguire l’analisi del contenuto di umidità utilizzando
il metodo “Semplice” che consente di eseguire una prova rapida definendo solo la
temperatura e il metodo di fine essicazione.
Per accedere alla funzione dal menù delle “Funzioni” toccare l’icona “Semplice”.
La schermata visualizzata consente di
avviare un ciclo d’essicazione toccando
il tasto “Avvia” con i parametri di
temperatura e modalità di fine
essicazione visualizzati alla destra della
funzione.
Temperatura.
Inserire il valore di temperatura
desiderato e toccare il tasto “OK”
I valori di temperatura impostabili
vanno da un minimo di 35°C a un
massimo di 160°C) con step di 1°C.
Fine essicazione.
Il parametro di fine essicazione è
l’impostazione che definisce il metodo
con il quale si vuole determinare la fine
del ciclo di misura dell’umidità contenuta
nella sostanza da analizzare

ITALIANO
Tempo: impostando questo metodo di
fine essicazione il ciclo terminerà
quando sarà trascorso il periodo di
tempo impostato. Inoltre possibile è
possibile far terminare il ciclo
manualmente in qualunque momento
toccando il tasto “Stop”
Inserire il valore del tempo e premere il
tasto “OK” per confermare
Autostop %: impostando questo
metodo di fine essicazione il ciclo
terminerà quando la variazione di perdita
di umidità sarà inferiore al 0,1% per un
intervallo di tempo di 30secondi.
Sarà inoltre possibile far terminare il ciclo
manualmente in qualunque momento
toccando il tasto “Stop
Avvia: toccando il comando “Avvia”,
sarà attivata la procedura per l’analisi del
contenuto di umidità.
Caricare il piattello prova sulla stella di
pesata e chiudere il fornetto. Verrà
eseguita automaticamente la tara del
piattello prova.
Caricare la sostanza da analizzare e
chiudere il fornetto.
N.B. La quantità minima di sostanza
necessaria per il ciclo di essicazione
varia in funzione della risoluzione
della bilancia:
0,01g Min 500mg
0,001g Min 500mg
0,0001g Min 50mg
Table of contents
Languages:
Other BEL Engineering Scale manuals


Popular Scale manuals by other brands


Scarlett
Scarlett SC-BS33E052 instruction manual

Linea 2000
Linea 2000 Domo DO9150W Instruction booklet

Scarlett
Scarlett SC-BS33ED11 instruction manual

Weight Watchers
Weight Watchers PointsPlus Value Database user manual

TEC
TEC TEC EO1-31001 owner's manual

Taylor
Taylor The Biggest Loser 3865BL instruction manual