NCS NCS3K User manual

COUNTING SCALE
ZÄHLWAAGE
BALANCE DE COMPTAGE
BILANCIA CONTAPEZZI
NCS
USER MANUAL
BENUTZERHANDBUCH
MANUEL D’UTILISATION
MANUALE OPERATIVO

2
SPRACHEN
LANGUAGES
LANGUES
LINGUE
DEUTSCH ................................................................................................................ 3
ENGLISH ............................................................................................................... 12
FRANÇAIS ............................................................................................................. 21
ITALIANO ............................................................................................................... 30

3
DEUTSCH
INHALTSVERZEICHNIS
1 EINLEITUNG ........................................................................................................................................................................
2 TECHNISCHE HAUPTEIGENSCHAFTEN ..........................................................................................................................
3. INSTALLATION .................................................................................................................................................................. 5
3.1 STROMVERSORGUNG UND INBETRIEBNAHME ................................................................................................... 5
3.2 BATTERIEBETRIEB................................................................................................................................................... 5
. TASTEN UND ANZEIGEN AUF DEM FRONTPANEL ........................................................................................................ 6
4.1 FUNKTION DER TASTEN ......................................................................................................................................... 6
4.2 FUNKTION DER KONTROLLLEUCHTEN ................................................................................................................. 7
5. FUNKTIONEN ..................................................................................................................................................................... 7
5.1 AUTOMATISCHE NULLEINSTELLUNG BEIM EINSCHALTEN ................................................................................. 7
5.2 NULLSTELLUNG DER WAAGE ................................................................................................................................ 7
5.3 TARAFUNKTIONEN................................................................................................................................................... 7
5.3.1 HALBAUTOMATISCHE TARAEINGABE .......................................................................................................... 7
5.3.2 EINGABE HANDTARA ..................................................................................................................................... 7
5.4 ÜBERLAST WARNUNG............................................................................................................................................. 8
5.5 STÜCK ÄHLUNG ...................................................................................................................................................... 8
5.5.1 ABLAUF ÄHLUNG ......................................................................................................................................... 8
5.5.2 EINGABE EINES BEKANNTEN MITTLEREN STÜCKGEWICHTES ............................................................... 8
5.5.3 MELDUNGEN .................................................................................................................................................. 8
5.6 GESAMTWERT DER TEILE ...................................................................................................................................... 8
6. SETUP ................................................................................................................................................................................ 9
6.1 AN AHL DER IFFERNSCHRITTE UND NULL NACHFÜHRUNG ............................................................................. 9
6.2 KALIBRIERUNG OHNE NULLABGLEICH UND OHNE AUSWAHL DES WÄGEBEREICHS ...................................... 9
6.3 KALIBRIERUNG MIT NULLABGLEICH UND AUSWAHL DES WÄGEBEREICHS ...................................................... 9
6.4 GRAVITATIONALWERT DER KALIBRIERUNG UND DES AUSSTELLUNGSORTES ................................................ 9
6.5 GEWICHTSFILTER ................................................................................................................................................... 10
6.6 HINTERLEUCHTUNG ............................................................................................................................................... 10
7. FEHLERMELDUNGEN ..................................................................................................................................................... 10
ANWEISUNGEN ZUM RECYCLING .................................................................................................................................... 10
KONFORMITÄTSERKLÄRUNG ........................................................................................................................................... 11
GARANTIE ............................................................................................................................................................................ 11

4
1. EINLEITUNG
Diese Beschreibung erklärt Ihnen den Einsatz und die Funktionen der NCS Waage.
HINWEISE
Die Waage soll an einem Ort eingesetzt werden welcher die Genauigkeit nicht beeinträchtigt.
Extreme Temperaturen vermeiden. Nicht in direktem Sonnenlicht oder bei Ventilatoren betreiben.
Achten Sie auf stabile Auflage. Tisch oder Boden muss eben und frei von Vibrationen sein. Nicht in der Nähe von
vibrierenden Maschinen betreiben.
Achten Sie auf ein sauberes Netz. Nicht an der gleichen Steckdose mit großen Geräten oder Motoren anschließen.
Nicht in hoher Luftfeuchtigkeit betreiben. Direkten Kontakt mit Wasser vermeiden. Nicht in Wasser eintauchen oder
ansprühen.
Vermeiden Sie ugluft von offenen Fenstern oder Ventilatoren. nicht in der Nähe von Türen platzieren.
Halten Sie die Waage sauber.
Stapeln Sie keine Waren auf die unbenutzte Waage.
2. TECHNISCHE HAUPTEIGENSCHAFTEN
Version
Schale
(Abmessungen mm)
Wägebereich
kg
Ziffernschri
tt [g]
Auflösung g
CE
-
M
Ziffernschritt g
NCS3K
218x267
3
0,1
0,01
1
NCS6K
218x267
6
0,2
0,02
2
NCS15K
218x267
15
0,5
0,05
5
NCS30K
218x267
30
1,0
0,10
10
Betriebstemperatur
:
0°C
-
40°C / 32°F
-
104°F.
Relative Luftfeuchtigkeit:
≤ 85 % RH
Stromversorgung:
AC 240V (±10%) / 50 Hz, 110V/60H ,
DC 4V / 4Ah mit Eingebauter Akku.
Null
-
Bereich
:
Möglich bis +/
-
2% des max. Wägebereichs
.
Automatische Nullmessung
:
Möglich bis +/
-
10% des max. Wägebereichs
.

5
3. INSTALLATION
a) Die Verpackung öffnen.
b) Nivellieren Sie die Waage mittels der Stellfüße bis die Libelle im entrum ist. Ein stabiler Standort der Waage ist sehr
wichtig.
ALLE ECKEN MÜSSEN GLEICHMÄSSIG STEHEN. Überprüfen Sie gründlich, dass alle Füße auf dem Boden feststehen,
und dass die Waage bei Ecklast nicht instabil ist (Die Waage darf nicht „kippeln“).
3.1 STROMVERSORGUNG UND INBETRIEBNAHME
Die Waage kann mit dem Netzteil oder der internen Batterie betrieben werden.
ANMERKUNG: Bei Batteriebetrieb wird empfohlen, bei der Geräteinstallation die Batterie voll aufzuladen (12
Stunden).
ZUR VERSORGUNG des Gerätes mit Netzspannung, muss der kleine Stecker des serienmäßigen AC/DC-Netzteils in die
dafür vorgesehene Buchse unter der Waage, gesteckt werden.
ZUM EINSCHALTEN/ ABSCHALTEN des Gerätes, die Taste C-On/Off bis zum Einschalten gedrückt halten.
Das Display zeigt nacheinander:
UL569
XXX gibt den Modelnamen an: "NCS"
02.YY gibt die installierte Softwareversion an.
Die Anzeige hat eine “automatische Nullstellungsfunktion” während des Starts: sollte dabei ein Gewicht von +/- 10% der
Kapazität ermittelt werden, erfolgt automatische Nullstellung; wenn das Gewicht nicht innerhalb dieses Bereiches liegt, wird
bei einem nicht geeichten Instrument am Display das gegenwärtige Gewicht nach wenigen Augenblicken angezeigt.
Während bei einem geeichten Instrument “ ero” fortlaufend auf dem Display gezeigt wird, solange wie das Gewicht nicht in
den Toleranzbereich zurückgeführt wird.
Danach wird “hi rES” (falls NICHT geeicht) oder “LEGAL” (falls geeicht) angezeigt.
3.2 BATTERIEBETRIEB
Die Waage kann, wenn gewünscht, auch batteriebetrieben genutzt werden.
Muss die Batterie geladen werden, so erscheint das “- LO -” im Display. Die Batterie sollte geladen werden, wenn das
Symbol aufleuchtet. Die Waage arbeitet noch ca. 10 Minuten, bis sie sich automatisch ausschaltet, um die Batterie zu
schützen.
Um die Batterie zu laden, stecken Sie einfach das Netzteil ein. Die Waage braucht nicht eingeschaltet zu sein.
Um die volle Kapazität der Batterie zu erreichen, sollte der Ladevorgang mindestens 12 Stunden andauern.
Auf der linken Seite des Displays befindet sich die “- - AC - - ” Mitteilung, die den ustand des Akkus anzeigt. Wird die
Waage mit dem Steckernetzteil betrieben, wird der interne Akku geladen.
Die Kapazität des Akkus kann mit der eit abnehmen. Wenn die Betriebsdauer sehr stakt abgenommen hat, setzten Sie
sich bitte mit Ihrem Händler in Verbindung.

6
. TASTEN UND ANZEIGEN AUF DEM FRONTPANEL
.1 TASTENFUNKTIONEN
ZERO-B.L.
- Löschen des Brutto-Gewichts, bis +/-10% des max. Wägebereichs.
- Bei kurzem drücken, erlaubt es das Einstellen des Hinterleuchtungsmodus (Siehe
Abschnitt 5.10).
TARE
- Abzug der Tarawerte und Änderung von Brutto- auf Netto-Modus.
- Bei längerem drü
cken, erlaubt es Ihnen hier den Gravitationalwert zu verändern
(siehe Kap. 6.5).
- Als zweite Funktion können Sie Werte auswählen beim Setzen der Parameter oder
anderen Funktionen.
C-On/Off
- Im Wägezustand drücken Sie diese Taste, um das Gewicht pro Einheit zu
entfernen.
- Schaltet die Waage an/aus bei längerem Drücken.
- Als zweite Funktion löscht es Ihre Eingabe beim Setzen der Parameter oder
anderen Funktionen.
PCS
- Kurz gedrückt zum Ausführen einer “Refferenz Operation” (siehe Kap. 5.5.1).
- Beim drücken nach dem Einschalten während des Selbstchecks und in Verbindung
mit 5, erhalten Sie ugang zu den Einstellungen des FILTERS (siehe Kap. 6.5).
- Drüchen Sie die Taste in der Wägephase zusammen mit 7, erhalten Sie ugang in
die Einstellungen der iffernschritte und Nullnachführung (siehe Kap. 6.1).
- Drüchen Sie die Taste in der Wägephase zusammen mit 8, erhalten Sie ugang zur
Kalibrierung mit Nullabgleich und Auswahl des Wägebereichs (siehe Kap. 6.3).
M+
- Kurz gedrückt zum aufaddieren des Wertes zum Speicherwert, falls Speicher
vorhanden und diese Funktion nicht automatisiert ist (siehe Kap 5.6).
- Als zweite Funktion bestätigen Sie die Eingabe beim Setzen der Parameter oder
anderen Funktionen.
MC
- Es löscht die angefallenen gespeicherten Daten.
- Langes Drücken zum Kalibrierung ohne Nullabgleich und Ohne Auswahl des
Wägebereichs (siehe Kap. 6.2).
0 … 9
- um eingeben eines Handtara (siehe Kap. 5.3.2) oder der Eingabe des mittleren
Stückgewichtes (Average Piece Weight APW) (siehe Kap. 5.5.2).
- Als zweite Funktion können Sie numerische Werte eingeben beim Setzen der
Parameter oder anderen Funktionen..

7
.2 SYMBOL-FUNKTION
SYMBOL
FUNKTION
0
eigt an, dass das Brutto
-
Gewicht angezeigt wird
.
M+
eigt an, dass tota
lisiert wurde
.
NET
eigt an, dass das Netto
-
Gewicht angezeigt wird
.
LOW
-
PCS
eigt an, dass das Referenzgewicht zu gering ist. Erneuten Vorgang starten.
LOW
-
APW
eigt an, dass das Stückgewicht < 80% einer Teilung ist. Die Stückzählung ist möglich
aber ungenau.
5. FUNKTIONEN
5.1 AUTOMATISCHE NULLSTELLUNG BEIM EINSCHALTEN
Wird die Waage eingeschaltet wenn ein Gewicht auf der Platte liegt, dann wird die Waage nullgestellt wenn das
aufgelegte Gewicht innerhalb +/- 10% in Bezug auf den Wägebereich ist. Ist das Gewicht außerhalb dieses Wertes
erscheint “Err 2”. Bei ungeeichten Waagen wird die Waage nach kurzer eit nullgestellt jedoch erscheint periodisch
“ ERO”.
5.2 NULLSTELLUNG DER WAAGE
Wenn kein Gegenstand auf der Waage liegt, aber nicht Null angezeigt wird, drücken Sie die Taste ZERO um das
Anzeigegerät auf Null zu stellen.
Wenn der Wert größer als +/- 2% in Bezug auf den Wägebereich ist, wird die Taste keine Wirkung zeigen.
5.3 TARA FUNKTIONEN
5.3.1 HALBAUTOMATISCHE TARAEINGABE
NULLEN Sie die Waage durch drücken der ERO Taste, falls nötig. Das “0” Symbol wird erscheinen.
Legen Sie einen Behälter auf die Waage und dessen Gewicht wird angezeigt.
Drücken Sie die TARE Taste zum Tarieren, wenn das Gewicht stabil ist. Das angezeigte Gewicht wird als Tarawert
gespeichert und vom Anzeigewert angezogen; somit steht das Display auf NULL. Die “NET” Anzeige leuchtet. Wird
nun ein Produkt aufgelegt, so wird nur dieses Gewicht angezeigt. Die Waage kann erneut tariert werden, sollte noch
ein weiteres Produkt aufgelegt werden.
Wird nun der Behälter von der Waage genommen erscheint ein negativer Wert.
Um die Tara zu löschen, tarieren Sie die leere Waage.
5.3.2 EINGABE EINES HANDTARA
Dieser Vorgang kann ausgeführt werden, bei entladener Plattform und ohne aktives Tara.
Wenn ein Tara aktiv ist, müssen Sie die Waage entladen und TARE drücken um es zu entfernen.
Geben Sie die Dezimalstellen ein, indem Sie C-ON/OFF drücken. Um den Wert zu löschen, drücken Sie einige male
die Taste 0 und um eine Decimalstelle auszuwähle: 0.0000, 0.000, 0.00.
Zur Eingabe eines Tarawertes, tippen Sie den Wert mit der Tastatur ein; um den eingegebenen Wertz u ändern,
müssen Sie C-ON/OFF drücken. Danach können Sie einen neuen Wert eingeben. Wenn Sie innerhalb von 3
Sekunden keinen Wert eingegeben haben, können Sie einen neuen Wert eingeben ohne C-ON/OFF zu drücken.
Drücken Sie TARE um den eingegebenen Wertz u bestätigen.
Das Anzeigegerät subtrahiert automatisch den eingegebenen Wert vom angezeigenten Gewicht (das NET Symbol
erscheint) so lange der Wert nicht größer ist, als die max. Kapazität der Waage.
Um das Tara zu entfernen, entladen Sie die Waage und drücken Sie nochmals TARE.

8
5. ÜBERLAST WARNUNG
Bitte legen Sie keine Gegenstände auf die Waage, welche die maximale Kapazität übersteigen.
Wenn “- - - - -“ angezeigt wird und ein piepen ertönt, nehmen Sie den Gegenstand von der Schale um eine
Beschädigung der Wägezelle zu vermeiden.
5.5 STÜCKZÄHLUNG
Bei der Stückzählung können Sie entweder Teile in einen Behälter einzählen oder Teile aus einem Behälter
herauszählen. Um eine größere Menge von Teilen zählen zu können, muss mit einer kleinen Menge
(Referenzstückzahl) das durchschnittliche Gewicht pro Teil ermittelt werden. Je größer die Referenzstückzahl, desto
höher ist die ählgenauigkeit. Die Referenz muss bei kleinen oder stark unterschiedlichen Teilen besonders hoch
gewählt werden.
5.5.1 ABLAUF ZÄHLUNG
Die auszuführenden Arbeitsschritte sind folgende:
1) Legen Sie einen Behälter auf die Waage und tarieren Sie die Waage.
2) Überprüfen Sie, dass die Anzeige NULL ist.
3) Geben Sie nun eine bestimmte Stückzahl als Referenz mit der Tastatur ein; wenn Sie die Menge der Muster
ändern müssen, drücken Sie zuerst die Taste C-ON/OFF, dann geben Sie die neue Anzahl ein. Wenn Sie die
Anzahl innerhalb von 3 Sekunden eingeben, brauchen Sie nicht zuerst die Taste C-ON/OFF zu drücken.
) geben Sie nun die bestimmte Stückzahl auf die Waage und drücken Sie PCS wenn das Gewicht stabil ist, der
Indikator berechnet das “Mittlere Stückgewicht” [Average Piece Weight (APW)]. Nach einigen Augenblicken wird
die Stückzahl der auf der Waage befindlichen Teilen im Display angezeigt und das “Average Piece Weight”
erscheint
5) Fügen Sie nun die zu zählenden Teile in den Behälter hinzu, die Stückzahl wird angezeigt.
6) Leeren Sie die Waage und der APW-Wert bleibt gespeichert für die nächste ählung der gleichen Teile. Somit
müssen Sie nicht wieder den Referenzwert ermitteln.
7) Zum Abbrechen oder zur Ermittlung eines neuen Referenzwertes wiederholen Sie die Prozedur.
5.5.2 EINGABE DES BEKANNTEN MITTLEREN STÜCKGEWICHTES
Geben Sie das mittlere Stückgewicht ein, indem Sie C-ON/OFF drücken, um den Wert zu löschen, drücken Sie einige
male die Taste 0 und um eine Decimalstelle auszuwählen: 0.0000, 0.000, 0.00.
Zur Eingabe des bekannten mittleren Stückgewichtes (APW) geben Sie den Wert über die Tastatur ein; wenn Sie den
eingegebenen Wert ändern müssen, drücken Sie zuerst die Taste C-ON/OFF, dann geben Sie die neue Anzahl ein.
Wenn Sie die Anzahl innerhalb von 3 Sekunden eingeben, brauchen Sie nicht zuerst die Taste C-ON/OFF zu drücken.
Das “Average Piece Weight” Display ziegt nun den eingegebenen Wert an und das “COUNT” Display zeigt die
einzelnen Stücke auf der Waage.
Mit vier Dezimalstellen kann kein Average Piece Weight über oder gleich 2kg eingegeben werden.
Der Vorgang kann geladenen oder leerer Plattform vollzogen werden.
Im Falle einer neuen Eingabe eines mittleren Stückgewichtes, wird die alte Eingabe gelöscht.
5.5.3 MELDUNGEN:
a. Das LOW-APW” symbol besagt, dass das Stückgewicht < 80% einer Teilung ist. Die Stückzählung ist möglich
aber ungenau.
b. Das Die LOW-PCS” symbol besagt, dass das Referenzgewicht zu gering ist. Erneuten Vorgang starten.
5.6 GESAMTWERT DER TEILE
Die Waage kann durch drücken der Taste M+ manuell Geweichte summieren.
Das Angezeigte Gewicht wird im Speicher abgelegt, wenn die M+ Taste gedrückt wird und die Waage “stable” ist.
Im Display wird "Add" angezeigt und anschließend der Gesamtwert im Speicher. Nach der ersten Berechnung
erscheint das Symbol “M+”.
Leeren Sie die Waage bevor Sie ein zweites Gewicht auflegen und das Display in den Normalmodus wechselt;
wiederholen Sie diesen Vorgang bis alle Gewichte summiert sind.

9
Um sich den im Speicher abgelegten Gesamtwert anzeigen zu lassen, drücken Sie die M+ Taste, wenn die Waage
NULL ist ( ero Anzeige leuchtet). um beenden eine beliebige Taste drücken.
Um den summierten Wert zu löschen, drücken Sie während dieser angezeigt wird oder der Normalansicht die MC
Taste.
ANM.:
- In der geeichten Version, funktioniert das Totalisieren erst ab einem Minimalgewicht von 20d.
- Die maximale Anzahl der Wägungen, die angezeigt werden sollen beträgt 99999.
Erreicht man diese Grenzen, so muss der Speicher durch drücken der M+ Taste gelöscht werden. Die Anzeige
“- OF -” erscheint im Display.
- Die maximale Anzahl der Wägungen, die summiert werden sollen, 99999 beträgt.
Erreicht man diese Grenzen, so muss der Speicher durch drücken der M+ Taste gelöscht werden. Die Anzeige
“- OF -” erscheint im Display.
- Der Gesamtwert geht verloren, wenn das Gerät ausgeschaltet wird.
6. SET-UP
6.1 AUSWAHL DER GENAUIGKEIT UND NULLNACHFÜHRUNG
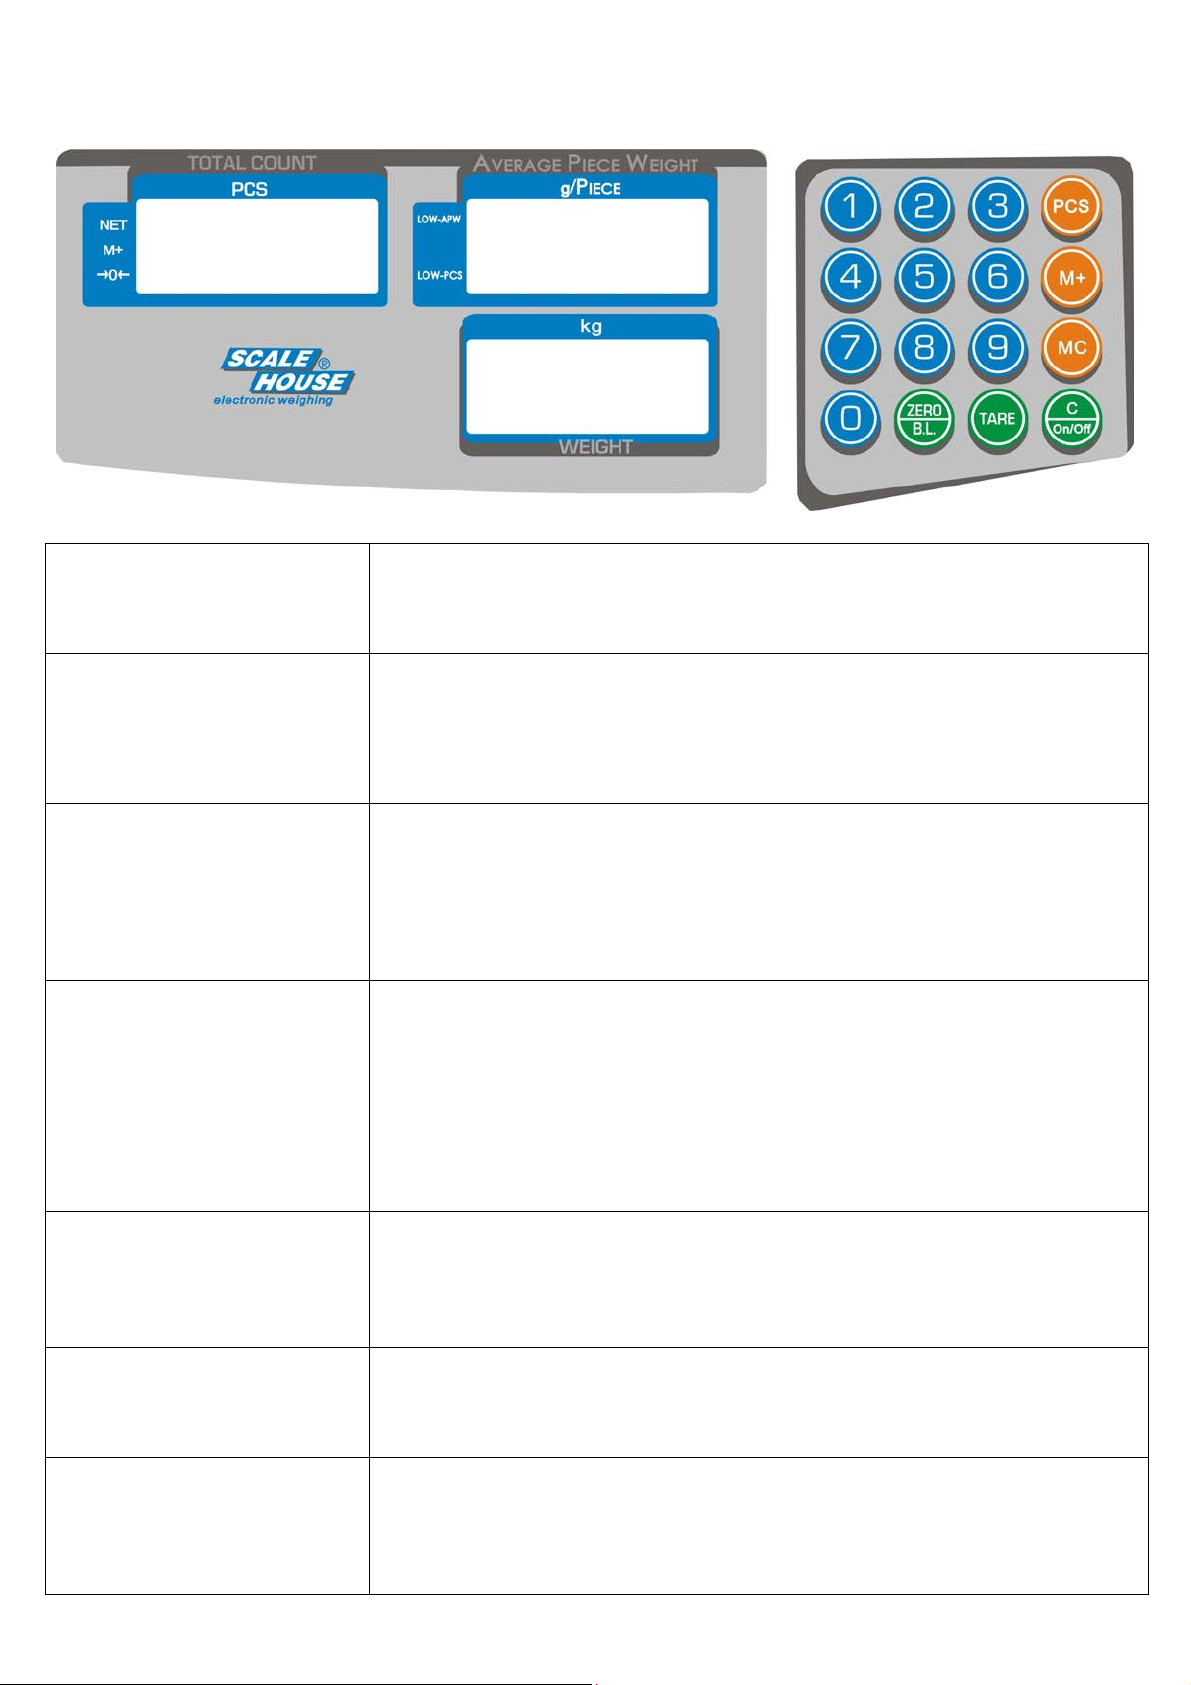
Drücken Sie wärend des Einschaltens PCS und 7 während des hochfahrens und des Selbstchecks:
-Im Display erscheint die eingestellte Genauigkeit “d XXXX”: Mit drücken der TARE Taste können Sie die
Verfügbaren Auswahlmöglichkeiten auswählen: 3000, 6000 oder 7500, 15000, 30000.
-Mit drücken der M+ Taste zeigt das Display den eingestellten Nullwert “ZEr X.X”, erbei handelt es sich um einen
Parameter, mit dem die Wärmedrift der Waage ausgeglichen wird. Der eingestellte Wert entspricht der ahl der
stabilen Teilungen pro 1 Sekunde, die kompensiert werden soll
-Die TARE taste drücken zum auswählen 0.0 (deaktiviert), 0.5, 1.0, 1.5, 2.5 or 3.5.
-Bestätigen Sie mit M+.
6.2 KALIBRIERUNG OHNE NULLABGLEICH UND OHNE AUSWAHL DES WÄGEBEREICHS
Drücken Sie die Taste MC bis das Gewichtsdisplay “-CAL.-” anzeigt, das Display “Average Piece Weightt” und das
ahlendisplay zeigen Null oder eine kleinere ahl.
1. F.S. (Bereichs-) Kalibrierung: Legen Sie ausreichend Gewicht auf die Plattform. Drücken Sie M+, sobald die Anzeige
stabil ist. Die Kalibrierung ist beendet.
2. Kalibrierung mit gewähltem Gewicht: Drücken Sie TARE, das Gewichtsdisplay zeigt nun “-----“. Das Display „Average
Piece Weight” und das ahlendisplay ändern sich nicht. Geben Sie das Gewicht über die Tastatur ein, und legen
dann das entsprechende Gewicht auf die Plattform. Drücken Sie M+, sobald das Display stabil ist. Die Kalibrierung
ist beendet.
Setzen Sie den Gravitationalwert der Kalibrierung und der Benutzung (siehe Schritt 6.5).
6.3 KALIBRIERUNG MIT NULLABGLEICH UND AUSWAHL DES WÄGEBEREICHS
1) Waage Aus-/Einschalten.
2) Drücken Sie wärend des Einschaltens PCS und 8.
3) Mit drücken der TARE Taste können Sie den möglichen Wägebereich auswählen: 1.5, 3, 6, 15, 30, 60. Mit M+
bestätigen.
4) Entladen Sie die Waage und Drücken Sie M+.
5) Beladen Sie die Waagen mit dem halben Wägebereich und drücken Sie M+.
6) Beladen Sie die Waage mit dem vollen Wägebereich und drücken Sie M+.
Setzen Sie den Gravitationalwert der Kalibrierung und der Benutzung (siehe Schritt 6.5).
6. Gravitationalwert der Kalibrierung und der Benutzung
a) Die Taste TARE für ca. 4 Sek. gedrückt halten: Das Display „Average Piece Weight“ zeigt „CAL_G“ und das
Gewichtsdisplay zeigt den g-Faktor der Kalibrierungszone.
b) Um die Werte zu ändern benutzen Sie den iffernblock und bestätigen mit M+.
c) Das „Unit Weight“ Display zeigt nun „USE_G“ an und das Gewichtsdisplay zeigt den g-Faktor in der
Gebrauchszone.
d) Um die Werte zu ändern benutzen Sie den iffernblock und bestätigen mit M+.
e) Sind die Werte eingegeben und bestätigt, kehrt die Waage in den Wägemodus zurück.

10
6.5 GEWICHTSFILTER
1. Drücken Sie PCS und 5 während des Anschaltens im Selbstcheck.
2. Mit TARE können Sie die möglichen Filter auswählen: SPd 0, SPd 1, SPd 2. Je höher der Filterwert, desto höher ist
die Reaktion.
3. M+ drücken zum bestätigen.
6.6 HINTERLEUCHTUNG
Durch lange drücken der ZERO-B.L Taste Scrollen Sie durch die folgenden Funktionsmodi der
Hintergrundbeleuchtung; lassen Sie die Taste los, wenn die gewünschte Funktion im Display erscheint:
oFF Beleuchtung dauerhaft aus
on Beleuchtung dauerhaft ein
AUTO Beleuchtung nur ein, wenn das aufleigende Gweicht größer als 0 ist oder eine Taste gedrückt wird. Die
Beleuchtung bleibt für 5 Sekunden aktiv.
7. MESSAGES
MELDUNGEN
BESCHREIBUNG
LÖSUNG
-
-
OF
-
-
Überlast
Entfernen Sie das Gewicht von der Waage
Err 2 / ERO
Nullfindungsfehler
Beim hochfahren oder wenn
ZERO
ge
drückt wird, überschreitet das
Gewicht +/- 10% des Wägebereiches. Entfernen Sie das Übergewicht
und wiederholen Sie den Vorgang
UNSTA
Nullfindungsfehler
Beim hochfahren, ist das Gewicht nicht stabil genug um zu nullen
.
Die
Waage steht nicht ruhig oder der Untergrund ist unruhig. Sorgen Sie
für eine stabile Platzierung der Waage.
-
-
ADC
-
-
A/D außerhalb
Bereich
Die Werte aus dem A / D
-
Wandler sind außerhalb des normalen
Bereichs.
Entfernen Sie Last, falls überlastet; Stellen Sie sicher, dass die
Wägezelle angeschlossen ist.
eigt an, dass die Wägezelle oder die Elektronik fehlerhaft ist.
Wenn das Problem weiterhin besteht, wenden Sie sich an Ihren
Händler.
-
SYS
-
Kalibrierungs
fehler
Die Waage muss neu kalibriert oder zur Reparatur geschickt werden.
-
LO
-
Akku fast leer
Sie können die Waage kurzzeitig benutzen, sollten Sie aber so schnell
wie möglich an das Ladegerät anschließen
-
-
AC
-
-
Akku geladen
ANWEISUNGEN ZUM RECYCLING
Die durchgestrichene Mülltonne auf dem Produkt bedeutet, dass Altgeräte separat entsorgt werden müssen
oder bei Kauf eines Neugerätes dem Händler zurückgegeben werden können. Die entsprechende
uführung zum Recyclingprozess hilft negative Folgen für die Umwelt und Gesundheit zu vermeiden und
unterstützt die Wiederverwertung der Materialien aus denen das Gerät besteht. Das widerrechtliche
Entsorgen des Produkts durch den Benutzer wird durch entsprechende gesetzliche Regulierungen
geahndet.

11
KONFORMITÄTSERKLÄRUNG
Dieses Gerät entspricht den erforderlichen Standards und Normen bezüglich der
anzuwendenden Europäischen Vorschriften. Die Konformitätserklärung ist auf der
Webseite www.scalehouse.it einsehbar.
GARANTIE
Die WEIJÄHRIGE Garantiezeit beginnt mit dem Tag der Lieferung des Gerätes. Sie
beinhaltet kostenlose Ersatzteile und Arbeitszeiten für Reparaturen, wenn das GERÄT
FREI HAUS AN DEN SIT DES VERKÄUFERS URÜCKGESENDET WIRD. Die
Garantie deckt alle Defekte ab, die NICHT auf den Kunden zurückgeführt werden
können (z.B. unsachgemäße Handhabung) und NICHT auf dem Transport verursacht
wurden.
Falls aus irgendeinem Grund Vor-Ort-Service angefordert wird (oder notwendig ist),
übernimmt der Kunde alle Kosten für die Servicetechniker: Reisezeit und Reisekosten
plus Unterbringung und Verpflegung (wenn notwendig).
Der Kunde übernimmt die Transportkosten (Hin und urück), wenn das Gerät zur
Reparatur an den HÄNDLER oder HERSTELLER gesendet wird.
Die GARANTIE ist NICHTIG, wenn es sich um einen Defekt handelt, der dadurch
verursacht wurde, dass unautorisiertes Personal Arbeiten am Gerät durchgeführt hat,
dass Geräte angeschlossen wurden, die durch andere installiert wurden oder dass
Anschlüsse an die Stromversorgung nicht korrekt waren.
Diese Garantie KOMMT NICHT für Entschädigungen für direkte oder indirekte Verluste
oder Schäden auf, die dem Kunden durch den vollständigen oder teilweisen Ausfall von
verkauften Geräten oder Systemen entstehen, auch nicht während der Garantiezeit.
STEMPEL DER KUNDENDIENSTSTELLE

12
ENGLISH
INDEX
1. INTRODUCTION ................................................................................................................................................................ 13
2. MAIN TECHNICAL SPECIFICATIONS .............................................................................................................................. 13
3. INSTALLATION ................................................................................................................................................................. 1
3.1 POWER SUPPLY AND START-UP ........................................................................................................................... 14
3.2 BATTERY POWERED .............................................................................................................................................. 14
. FRONT PANEL KEYS AND INDICATORS ....................................................................................................................... 15
4.1 FUNCTION OF THE KEYS ....................................................................................................................................... 15
4.2 FUNCTION OF THE INDICATORS ........................................................................................................................... 16
5. OPERATION ...................................................................................................................................................................... 16
5.1 AUTOMATIC ERO UPON START-UP ..................................................................................................................... 16
5.2 SCALE ERO FUNCTION ........................................................................................................................................ 16
5.3 TARE FUNCTION ..................................................................................................................................................... 16
5.3.1 ENTRY OF SEMIAUTOMATIC TARE ............................................................................................................ 16
5.3.2 ENTRY OF PREDETERMINED MANUAL TARE ........................................................................................... 16
5.4 OVERLOAD MESSAGE............................................................................................................................................ 16
5.5 COUNTING PIECES ................................................................................................................................................. 17
5.5.1 COUNTING PROCEDURE ............................................................................................................................ 17
5.5.2 ENTRY OF THE KNOWN AVERAGE PIECE WEIGHT ................................................................................. 17
5.5.3 NOTES .......................................................................................................................................................... 17
5.6 TOTALISATION OF THE PIECES ............................................................................................................................. 17
6. SET-UP .............................................................................................................................................................................. 18
6.1 NUMBER OF DIVISIONS AND ERO TRACKING ..................................................................................................... 18
6.2 CALIBRATION WITH NO ERO ACQUISITION AND NO CAPACITY SELECTION .................................................. 18
6.3 CALIBRATION WITH ERO ACQUISITION AND CAPACITY SELECTION ............................................................... 18
6.4 GRAVITY OF CALIBRATION AND USE ONES ........................................................................................................ 18
6.5 WEIGHING FILTER .................................................................................................................................................... 18
6.6 DISPLAY BACKLIGHT ................................................................................................................................................ 19
7. MESSAGES ....................................................................................................................................................................... 19
RECYCLING INSTRUCTION ................................................................................................................................................. 20
DECLARATION OF CONFORMITY ...................................................................................................................................... 20
WARRANTY .......................................................................................................................................................................... 20

13
1. INTRODUCTION
This manual was created to help you install and learn all about the functional possibilities of the NCS scale.
WARNINGS
The scales should be sited in a location that will not degrade the accuracy.
Avoid extremes of temperature. Do not place in direct sunlight or near air conditioning vents.
Avoid unsuitable tables. The tables or floor must be rigid and not vibrate. Do not place near vibrating machinery.
Avoid unstable power sources. Do not use near large users of electricity such as welding equipment or large motors.
Avoid high humidity that might cause condensation. Avoid direct contact with water. Do not spray or immerse the scales in
water.
Avoid air movement such as from fans or opening doors. Do not place near open windows.
Keep the scales clean.
Do not stack material on the scales when they are not in use.
2. MAIN TECHNICAL SPECIFICATIONS
Model
Plate
(dimensions in mm)
Capacity kg
Division g
Resolution g
CE
-
M Division g
NCS3K
218x267
3
0,1
0,01
1
NCS6K
218x267
6
0,2
0,02
2
NCS15K
218x267
15
0,5
0,05
5
NCS30K
218x267
30
1,0
0,10
10
Operative Temperature:
0°C
-
40°C / 32°F
-
104°F.
Relative humidity:
≤ 85 % RH
Power supply:
AC 2
4
0V (±10%) / 50 Hz, 110V/60H
DC 4V / 4Ah with rechargeable accumulator inside.
ero range:
+/
-
2% of max load capacity.
Auto zero at start
-
up:
+/
-
1
0%
of max load capacity.

14
3. INSTALLATION
a) Unpack then product.
b) Level the platform by adjusting the adjustable feet until the bubble is in the centre of the level. The stability of the
platform is very important.
ALL THE CORNERS MUST REST IN A UNIFORM WAY. Carefully check that all feet fully rest on the ground and that the
platform, loaded on the corner, is not unstable (if a corner is not resting on the ground its relative foot is easier to turn).
3.1 POWER SUPPLY AND START-UP
The indicator can be powered with a fitted external power adapter or just with the fitted battery.
NOTE: it is advisable to completely recharge the battery (12 hours) with the first installation of the instrument.
TO POWER the instrument through the 240 Vac mains put the AC/DC power plug in the appropriate socket under the scale
and the power adapter in the 240 Vac mains socket.
TO TURN ON/TURN OFF the instrument, press the C-On/Off key at length.
The display shows:
UL569
XX_X is the name of the model: "NCS"
02.YY is the installed software version.
The indicator has an “auto zero at start-up” function: in other words it means that if at start-up a weight within +/- 10% of the
capacity is detected, it will be zeroed; if the weight is not within this tolerance, with a non approved instrument the display
shows the present weight after a few instants, while with an approved instrument “ erO” is shown continuously on the
display, until the weight does not re-enter within this tolerance.
After this, it shows “hi rES” (in case of NOT approved instrument) or “LEGAL” (in case of approved instrument).
3.2 BATTERY POWERED
The weighing indicator can be operated from the battery if desired.
When the battery needs charging the “- LO -” message on the display appears. The battery should be charged when the
message appears. The scale will still operate for some minutes after which it will automatically switch off to protect the
battery.
To charge the battery simply plug into the mains power. The scale does not need to be turned on.
The battery should be charged for 12 hours for full capacity.
One can find the “- - AC - -” message on the PCS display to indicate the status of battery charging. When the scale is
plugged into the mains power the internal battery will be charged.
As the battery is used it may fail to hold a full charge. If the battery life becomes unacceptable then contact your distributor

15
. FRONT PANEL KEYS AND INDICATORS
.1 FUNCTION OF THE KEYS
ZERO-B.L. - It clears the displayed gross weight if it’s within +/- 2% of the total capacity.
- If pressed at length it allows the backlight set (see section 5.10).
TARE - It executes the semiautomatic tare.
- If pressed at length it allows the modification of the gravity of calibration and use zones (see
section 6.2).
- A secondary function of selecting the value when setting a parameter or other functions.
C-On/Off - Under weighing condition, it clears the Average Piece Weight (APW).
- If pressed at length it turns on/off the scale.
- A secondary function of clearing the value when setting a parameter or other functions.
PCS - It executes the Average Piece Weight (APW) calculation (see section 5.5.1).
- Pressed in weighing phase together with the 5 key it access to the setting of the FILTER
(see section 6.5).
- Pressed at start-up, during self-checking, together with the 7 key, it access to the setting of
the number of divisions and zero tracking (see section 6.1).
- Pressed at start-up, during self-checking, together with the 8 key, it access to the calibration
with zero acquisition and capacity selection (see section 6.3).
M+ - It executes the accumulation (see section 5.6).
- A secondary function of confirming the value when setting parameters or other functions.
MC - It clears the memorized accumulating data.
- If pressed at length it access to the calibration with no zero acquisition and no capacity
selection (see section 6.2).
0 … 9 - They allow the manual entry of the predetermined tare (see section 5.3.2) or the manual
entry of the Average Piece Weight (APW) calculation (see section 5.5.2).
- Secondary function of numeric value insertion when setting a parameter or other functions.

16
.2 FUNCTION OF THE INDICATORS
INDICATOR
FUNCTION
0
Indicates that the weigh
t detected on the weighing system is near zero
.
M+
Indicates that total value is greater than 0.
NET
Indicates that the displayed weight is a net weight.
LOW
-
PCS
Indicates that an insufficient number of samples
was used
in order to determine an accurat
e
count (see section 5.5.3).
LOW
-
APW
Indicates that the
A
verage
P
iece
W
eight (
APW
) is insufficient in order to determine an
accurate count (see section 5.5.3).
5. OPERATION
5.1 AUTOMATIC ZERO UPON START-UP
The indicator has an “auto zero at start-up” function: in other words it means that if at start-up a weight within +/- 10%
of the capacity is detected, it will be zeroed; if the weight is not within this tolerance, the display shows “Err 2” and with
a non approved instrument the present weight after a few instants, while with an approved instrument “ ERO” is shown
continuously.
5.2 SCALE ZERO FUNCTION
When there is no item on the scale but reading is not zero, press the ZERO key to turn on 0 indicator. If the
weight is greater than +/- 2% in respect to the capacity, the zeroing will have no effect.
5.3 TARE FUNCTION
5.3.1 ENTRY OF SEMIAUTOMATIC TARE
ero the scale by pressing the ZERO key if necessary (see section 5.2). The “0” symbol will be on.
Place a container on the platform, a value for its weight will be displayed.
Press the TARE key to tare the scale once the weight reading is stable. The weight that was displayed is stored as the
tare value and that value is subtracted from the display, leaving zero on the display. The "NET" indicator will be on. As
product is added only the weight of the product will be shown. The scale could be tared a second time if another type
of product was to be added to the first one. Again only the weight that is added after taring will be displayed.
When the container is removed a negative value will be shown.
To remove the tare, unload the scale and press again TARE.
5.3.2 ENTRY OF PREDETERMINED MANUAL TARE
The operation can be made with unloaded platform and with no active Tare.
If a tare is active, it is first required to unload the scale and press TARE to remove it.
Set the decimals’ number of the weight to introduce by pressing C-ON/OFF key to clear the value on the APW display
and by pressing 0 key several time to select the available decimals’ number: 0.0000, 0.000, 0.00.
To enter the tare value, type the value with the keyboard; to change the entered value, one should first press the key
C-ON/OFF key, then input the new number. If one has not input the number for 3 seconds, one can input the new
number directly without pressing the key C-ON/OFF key.
Press the TARE key to confirm the entered tare value.
The indicator automatically subtracts the entered value from the displayed weight (the NET symbol turns on) as long
as the value is not greater than the maximum capacity of the instrument.
To remove the tare, unload the scale and press again TARE.
5. OVERLOAD MESSAGE
Please do not add item that is over the maximum capacity. When reading “- - - - -” and hear beeping sound, remove
the item on the platter to avoid damage to the load cell.

17
5.5 COUNTING PIECES
Through the reference function it’s possible to use the scale as a piece counter.
5.5.1 COUNTING PROCEDURE
The operations to be carried out are the following:
1) Place the empty container on the scale and press TARE to tare it.
2) Check that the zero is on the display
3) Type the quantity of pieces chosen for the SAMPLE with the keyboard; to change the entered value, one should
first press the key C-ON/OFF key, then input the new number. If one has not input the number for 3 seconds, one
can input the new number directly without pressing the key C-ON/OFF key.
) Put the weight on the scale and press PCS when the weight is stable, the indicator will calculate the Average
Piece Weight (APW). After a few instants the display will indicate the quantity selected put on the platform and the
“Average Piece Weight” display indicates the calculated value.
5) Add the rest of the items to count in the container and whose value will appear on the display.
6) Unload the scale; the APW will remain stored in memory for the next counting of similar pieces, without having to
repeat the REFERENCE operation.
7) To cancel or to carry out a new reference operation, repeat the operations as describe in point 1).
5.5.2 ENTRY OF THE KNOWN AVERAGE PIECE WEIGHT
Set the decimals’ number of the Average Piece Weight (APW) by pressing C-ON/OFF key to clear the value on the
display and by pressing 0 key several time to select the available decimals’ number: 0.0000, 0.000, 0.00.
To enter the known Average Piece Weight (APW), type the value with the keyboard; to change the entered value, one
should first press the key C-ON/OFF key, then input the new number. If one has not input the number for 3 seconds,
one can input the new number directly without pressing the key C-ON/OFF key.
The “Average Piece Weight” display indicates the entered value and the “COUNT” display will already show the
number of pieces on the scale.
With four decimals number, the Average Piece Weight value can not be entered over or equal 2 kg.
The operation can be made with a loaded or unloaded platform.
In any case, the entry of a new average piece weight cancels and substitutes the previous one.
5.5.3 NOTES
a. When the “LOW-APW” symbol is on, it means the Average Piece Weight is less than 80% of division. You still can
count but the counting may be inaccurate.
b. When the “LOW-PCS” symbol is on, it means the weight of sample is not enough at all. Please re-sample.
5.6 TOTALISATION OF THE PIECES
The scale can accumulate manually the number of pieces on the scale by pressing the M+ key.
The displayed values will be stored in memory when the M+ key is pressed and the weight is stable.
When an accumulation is made, the “WEIGHT” display will show "- Add -", the “Average Piece Weight” display will
show the number of accumulations and the “TOTAL COUNT” display will show the accumulated total number of
pieces. After the first accumulation the “M+” symbol turns on.
Remove the weight, allowing the scale to return to zero and to the normal viewing; put a second weight on and
continue until all pieces have been added.
To view the total number of pieces in memory press M+ key when current scale in zero status ( ero indicator on).
Press any key to exit.
To clear the accumulated total weight, press the MC key when show total values or in normal weighing phase, “M+”
symbol turns off.

18
NOTE:
- With approved instrument the accumulation functions with a minimum weight of 20d.
- The maximum total value which may be viewed is 99999. Once reached these limits the message “- OF -” will
appear on the display.
- The maximum total value which may be accumulated is 99999.
Once reached these limits, one should clear the total; by pressing M+ the message “- OF -” will appear on the
display.
- The total values will be cleared when it’s turned off.
6. SET-UP
6.1 NUMBER OF DIVISIONS AND ZERO TRACKING
Press together PCS and 7 keys at start-up, during self-checking:
-The display shows the set number of divisions “d XXXX”: press TARE to select 3000, 6000 or 7500, 15000, 30000
maximum divisions.
-By pressing the M+ key the display shows the set zero tracking value “ZEr X.X”, in other words, scale’s thermal
drift compensation parameter; the set value corresponds to the number of divisions which is cleared. Press TARE
to select 0.0 (disabled), 0.5, 1.0, 1.5, 2.5 or 3.5.
-Press M+ to confirm.
6.2 CALIBRATION WITH NO ZERO ACQUISITION AND NO CAPACITY SELECTION
Press MC key till the weight window display “-CAL.-”, the unit weight window and the number window display 0 or
smaller number.
1. F.S. calibration: Put enough weight on the platform. press M+ when display is stable. The calibration finish.
2. Calibrate by any weight: Press TARE, then weight window displays “-----“. Average Piece Weight window and
number window doesn’t change. Input the weight by keyboard, then put the corresponding weight on the platform.
Press M+ when display is stable. The calibration finishes.
Set the gravity of calibration and use zones (see section 6.4).
6.3 CALIBRATION WITH ZERO ACQUISITION AND CAPACITY SELECTION
1. Turn off/on the scale.
2. Press both the PCS and 8 keys during the turning on.
3. By pressing the TARE key one selects the available scale capacity: 1.5, 3, 6, 15, 30, 60 kg. Confirm with M+.
4. Unload the scale and press M+.
5. Load a weight equal to the half capacity and press M+.
6. Load a weight equal to the capacity and press M+.
7. Set the gravity of calibration and use zones (see section 6.4).
6. GRAVITY OF CALIBRATION AND USE ZONES
a) Keep pressed the TARE key for about 4 seconds: the "Average Piece Weight" display will show "CAL_G", and the
"weight" display will show the gravity value of the calibration zone
b) Modify the value trough the numeric keyboard and confirm by pressing M+.
c) The "unit weight" display will show "USE_G", and the "weight" display will show the gravity value of the use zone
d) Modify the value trough the numeric keyboard and confirm by pressing M+.
e) Once the value is confirmed the scale return in weighing mode.
6.5 WEIGHING FILTER
4. Press both the PCS and 5 keys during normal weighing.
5. By pressing the TARE key one selects the available filter: SPd 0, SPd 1, SPd 2, SPd 3, SPd 4. The higher the
filter value, and greater is its intervention.
6. Confirm with M+.

19
6.6 DISPLAY BACKLIGHT
By keeping pressed the ZERO-B.L. key, the display will scroll the possible activation modes; release the key when the
desired functioning is displayed:
OFF backlighting always off
ON backlighting always on.
AUTO backlighting on when the weight is unstable or when a key is pressed. The backlighting remains active for 5
seconds.
7. MESSAGES
MESSAGES
DESCRIPTION
RESOLUTION
-
-
OF
-
-
Over range
Remove weight from the scale.
Err 2
/ ERO
ero Error
Upon start
-
up or when the
ZERO
key is pressed, the weight on the
scale exceeds the +/- 10% of the max. capacity.
Remove the excess weight and retry.
UNSTA
Auto ero Error
Upon start
-
up, the weight on the scale
is not stable
to be zeroed
. It
maybe because of the platform’s intensity is too low or the platform is
shaken strongly.
You may strengthen the platform or avoid the shake.
-
-
ADC
-
-
Input signal
overflow error
Indicates that the A/D converter value is
overflows
:
- Remove the weight from the scale if it’s exceeding.
- The load cell or the electronics could be damaged.
-
SYS
-
Calibration error
Please re
-
calibrate
the scale with the procedure with zero acquisition
(see section 6.3). If the problem persists contact the dealer.
-
LO
-
Accumulator
voltage low
One can use the scale in a short time, but you should plug in th
e AC
plug as soon as possible to recharge the accumulator.
-
-
AC
-
-
Accumulator
recharge.

20
RECYCLING INSTRUCTION
The crossed-out wheeled bin on the product means that at the product end of life, it
must be taken to separate collection or to the reseller when a new equivalent type of
equipment is purchased. The adequate differentiated refuse collection in having the
product recycled, helps to avoid possible negative effects on the environment and
health and supports the recycling of the materials of which the equipment is made.
The unlawful disposal of the product by the user will entail fines foreseen by the
current regulations.
DECLARATION OF CONFORMITY
This device conforms to the essential standards and norms relative to the applicable
European regulations. The Declaration of Conformity is available in the web site
www.diniargeo.com
WARRANTY
The TWO-YEAR warranty period begins on the day the instrument is delivered. It
includes spare parts and labour for repairs at no charge if the INSTRUMENTS ARE
RETURNED prepaid to the DEALER’S PLACE OF BUSINESS. Warranty covers all
defects NOT attributable to the Customer (such as improper use) and NOT caused
during transport.
If on site service is requested (or necessary), for any reason, where the instrument is
used, the Customer will pay for all of the service technician’s costs: travel time and
expenses plus room and board (if any).
The customer pays for shipping costs (both ways), if the instrument is shipped to the
DEALER or manufacturer for repair.
The WARRANTY is VOIDED if faults occur due to work done by unauthorised
personnel or due to connections to equipment installed by others or incorrect
connection to the power supply.
This warranty DOES NOT provide for any compensation for losses or damages,
direct or indirect, incurred by the Customer due to complete or partial failure of
instruments or systems sold, even during the warranty period.
AUTHORISED SERVICE CENTRE STAMP
This manual suits for next models
3
Table of contents
Languages: