Belair BCIF680B User manual

1
○
1
Dear customer:
Thank you for purchasing this Induction cooktop. Please read this instruction manual carefully before
use and installation. Keep it somewhere safe for future reference.
Product Introduction
The BCIF680B Induction cooktop with it’s advanced induction heating system, micro-computerized
control, low energy usage and multi-functions, is the optimum solution for a modern kitchen.
The Induction hob has been designed with the focus on the user. Manufactured from high quality
materials, the unit is safe and reliable, ergonomic and will enhance your cooking experience.
Working Principle
The two main components of the Induction cooktop are the induction heating coils, and the control
system. The electronic control system energizes the coils, causing them to generate powerful magnetic
fields in the areas immediately above the coils. These fields travel through the vitro ceramic plate on
which the pans are placed and eddy currents are formed in the ferromagnetic materials in the pans. The
tremendous energy generated by the eddy currents heat the food directly by conducting the heat through
the base of the pans and into the food. Good quality pans suited to the particular cooking processes
being carried out are essential for obtaining good cooking results
○
2 Safety
This hob is designed for domestic use only.
With a view to constantly improving our products, we reserve the right to make any changes to their
technical, programming or aesthetic features connected with their technical evolution.
Over- Temperature Protection
Temperature sensors are fitted and can monitor the temperatures inside the hob.
When an excessive temperature is monitored, the induction hob will stop operation automatically.
Detection of Small Articles
If a pot of less than 80 mm in diameter, small articles (knife, fork, scissors, keys , etc.) or non-magnetic
pots (such as aluminum ) are sensed, the buzzers give out an alarm lasting about 30 seconds. If a
suitable pan is not placed on the hob the cooker will switch off.
Heat Indication
When the hob is used for a long time, residual heat remains in the heating zone for a few minutes. The
code “H” appears, warning the user to avoid touching the heating zone.
Auto shutdown protection
Auto shut down is a safety protection function for your induction cooker. It will shut down automatically if
you forget to turn off your cooking.
When a pot is removed, the induction hotplate will stop heating that zone immediately and shut it down
after the buzzer sounds for 1 minute.
Reminder: People with a heart pacemaker should only use this product under the guidance of a licensed
medical practitioner.
○
3 Installation
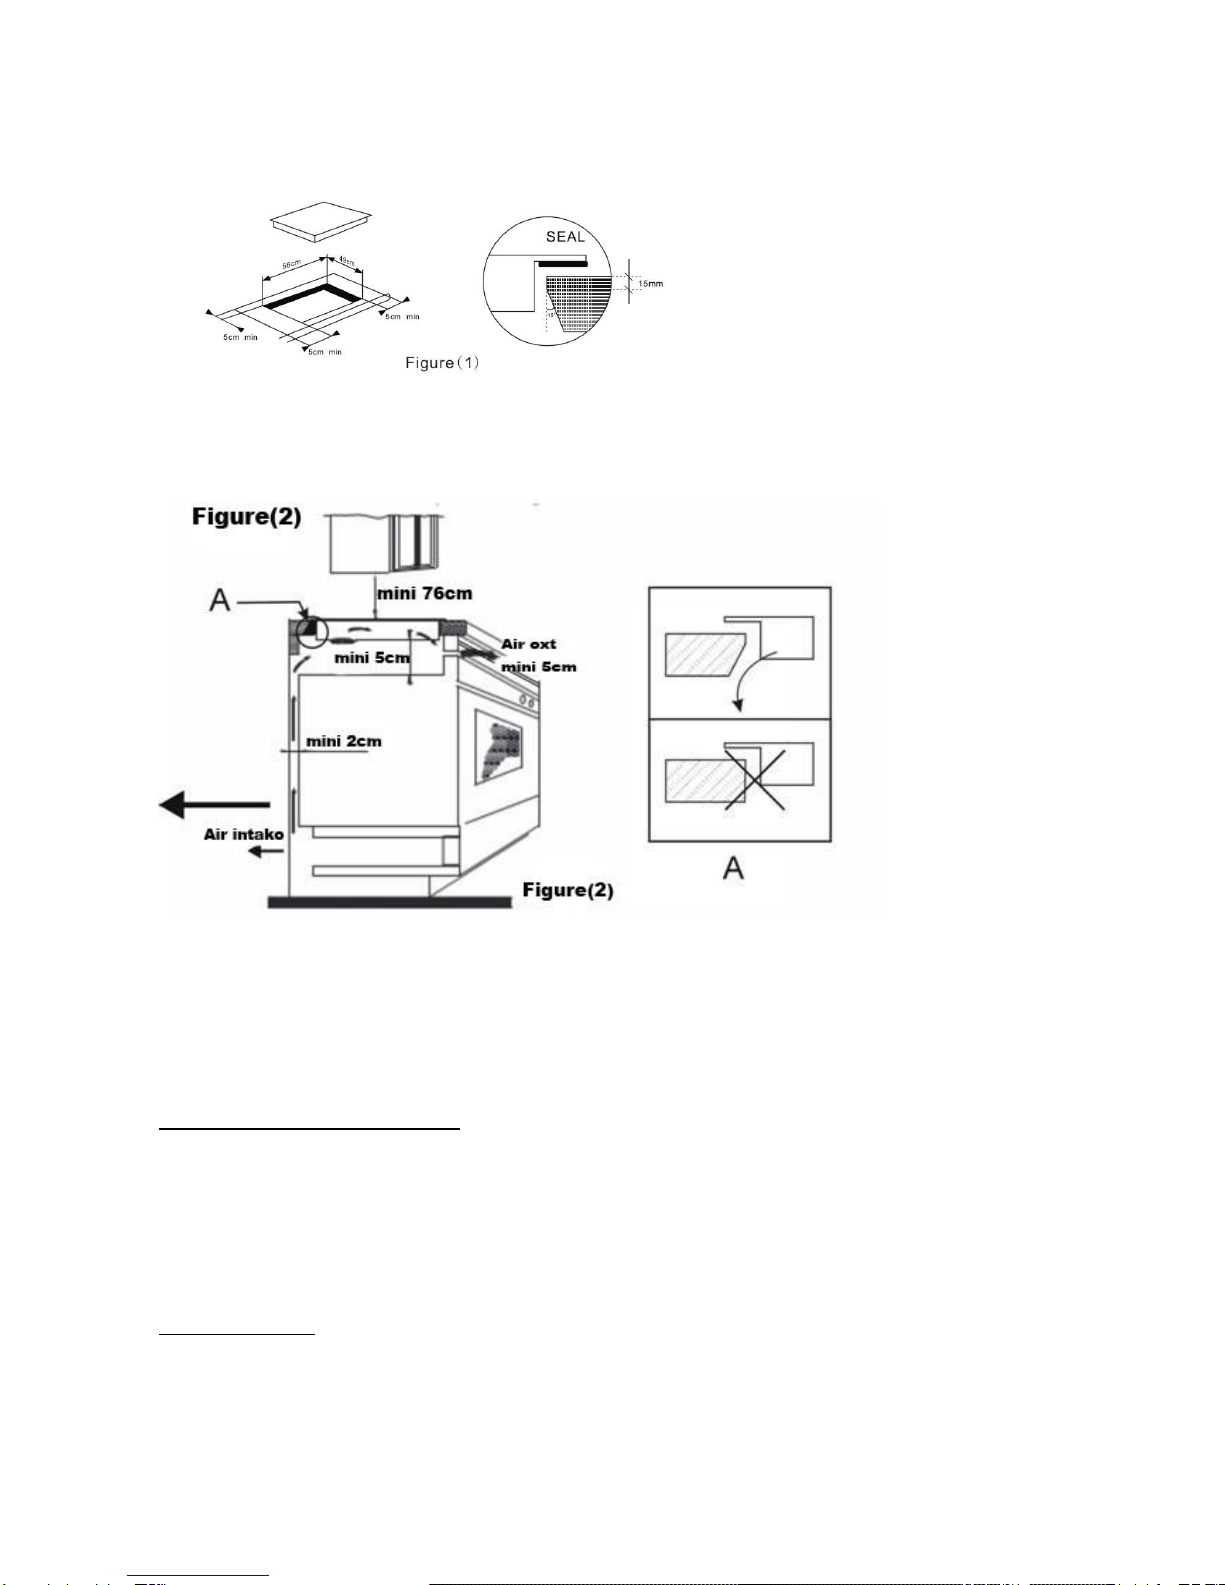
Cut an aperture in the table surface in accordance with the sizes shown in the drawing. For the purpose
of installation, and use, a minimum of 50 mm space shall be preserved around the hole. Be sure the
thickness of the table surface is at least 30mm. Please select heat-resistant table material to avoid
deformation caused by the heat radiation from the hotplate. As an alternative to the method below, the
2
hob can be flush mounted provided the adjacent surface is stainless steel or some other suitable heat
proof material. See Figure (1)
Ensure that the induction hob is well ventilated and the air inlet and outlet is not blocked. Good
ventilation is vital for a long service life of the induction cooker. As shown in Fig 2 Ensure the
induction hob is in good working order.
Note: The safety distance between the hotplate and any cupboard above the hotplate should be at least
760mm.
Apply suitable sealant to secure the hob to the worktop and to prevent ingress of water.
Caution
The induction hotplate must be installed by a qualified electrician.
Do not install the cooktop yourself.
The induction hob should not be mounted to cooling equipment, dishwashers and rotary dryers or any
other electrical appliance
The induction hob must be well ventilated to ensure efficient cooling prolonging its’life and
ensuring reliability.
Adjacent walls, the worktop and any surfaces above the hob must be made of heat resistant materials.
To avoid any damage, the sandwich layer and adhesive must be resistant to heat.
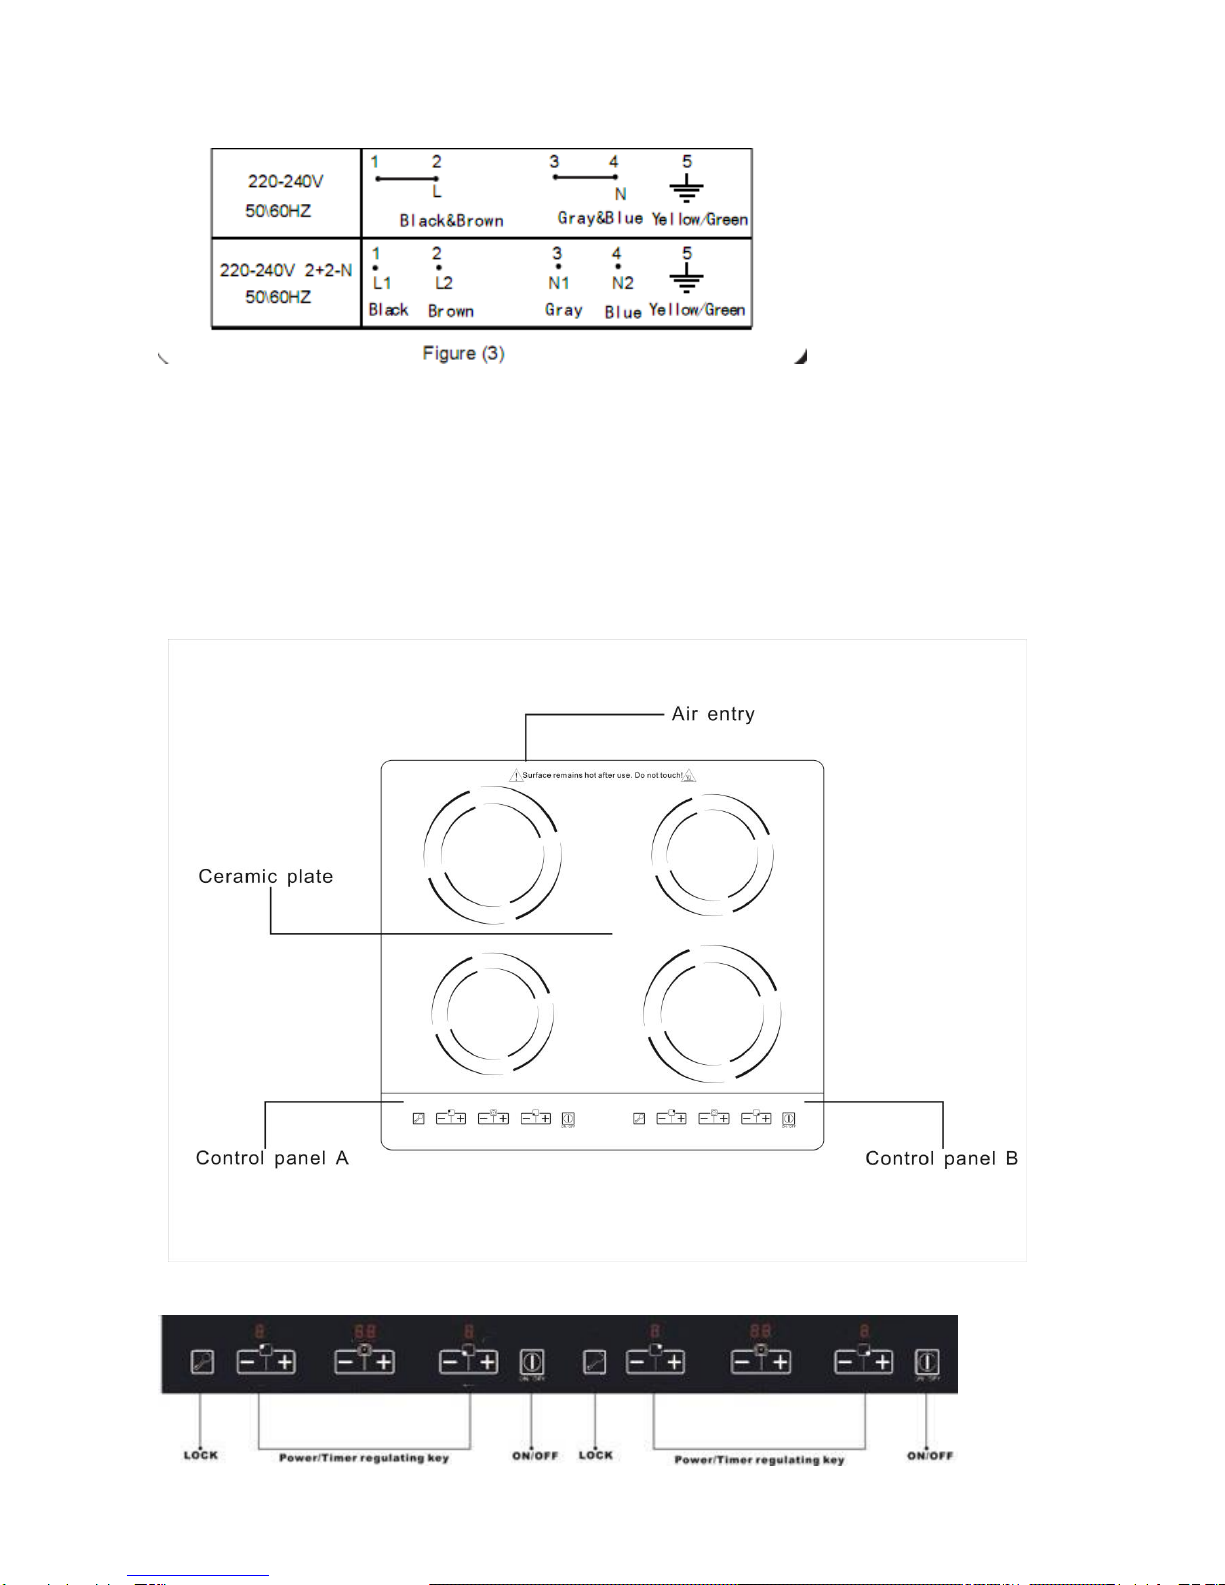
PowerConnection
The socket shall be connected according to the relevant national standard or connected to a single-pole
cut-out. The method of connection is shown in Figure (3):
3
○
4
If the cable is damaged or needs to be replaced, the operation must be carried out the by a fully qualified
electrician.
If the appliance is being connected directly to the mains an omni polar circuit-breaker must be installed
with a minimum opening of 3mm between contacts. The installer must ensure that the correct electrical
connection has been made and that it is compliant with safety regulations. The cable must not be bent or
compressed. The cable must be checked regularly and replaced by authorized technicians only.
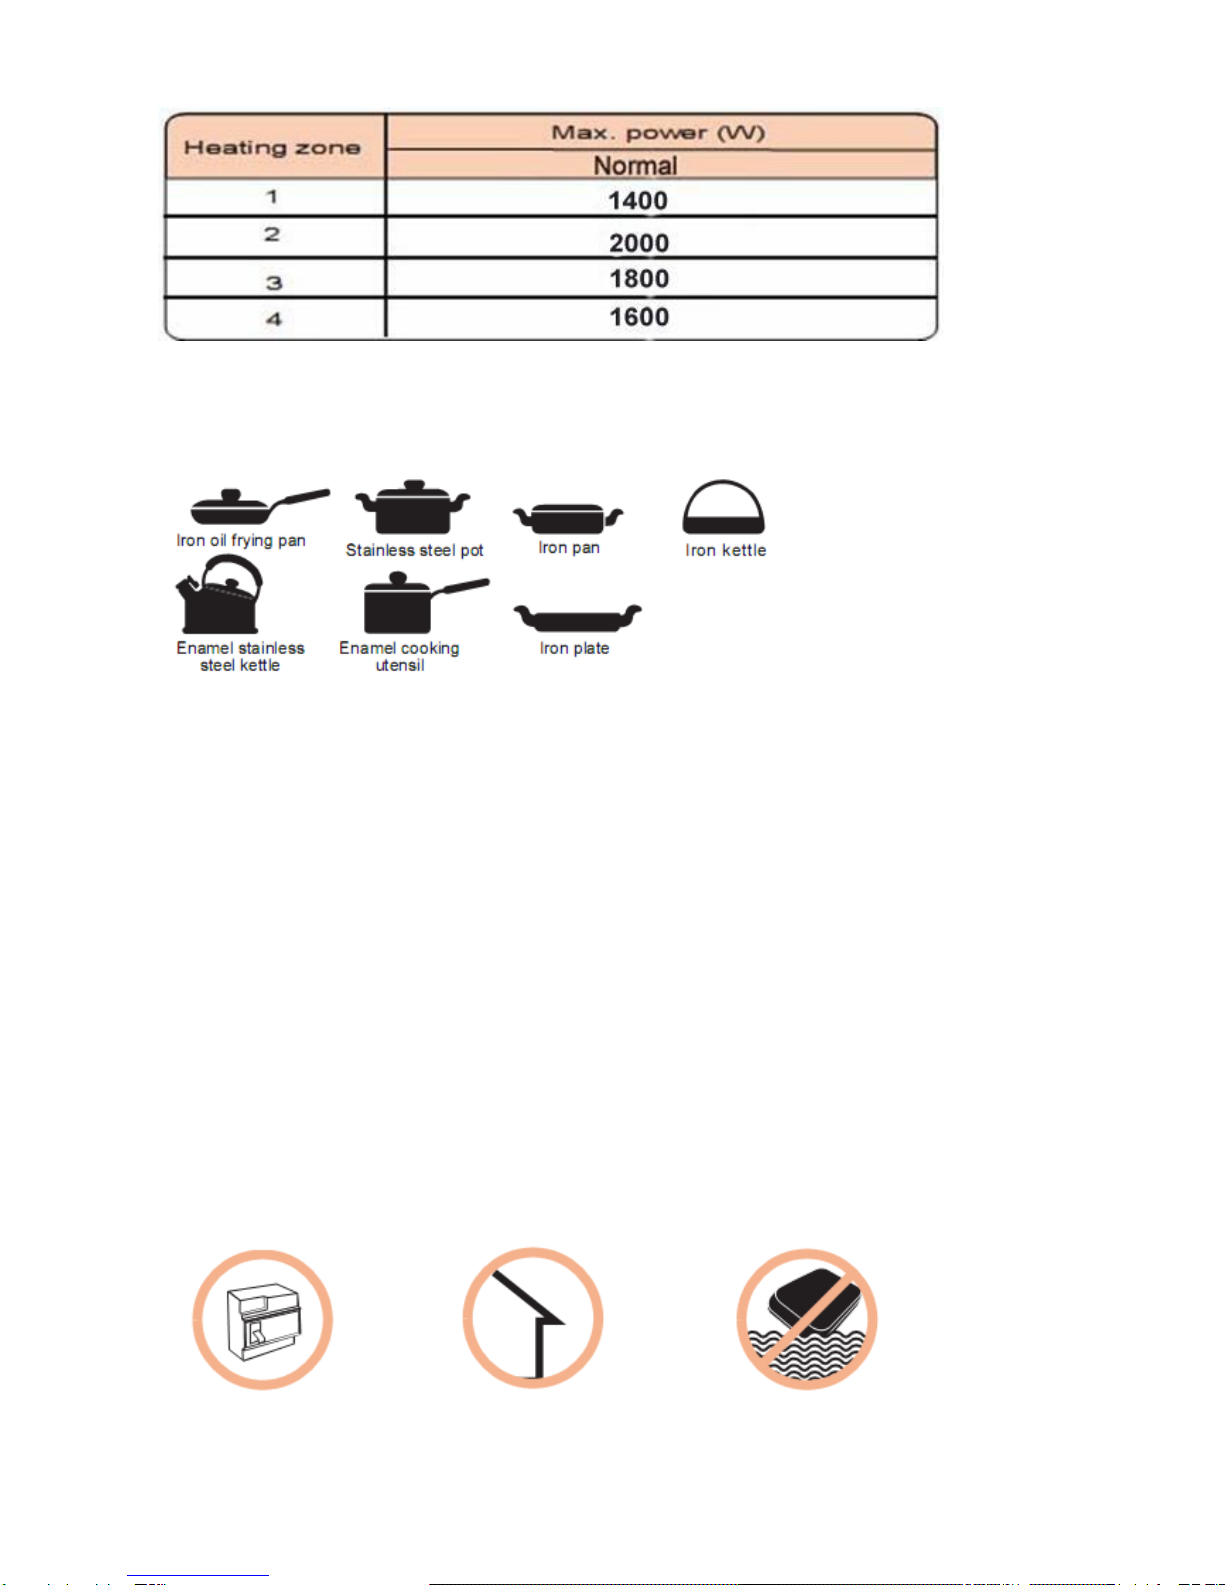
Induction hotplate appearance
Schematic diagram of the control panel

4
○
5
Instructions for Use
Preparation before using:
After power on, the buzzer will beep once, all the indicators light up for 1 second then go out, indicating
the induction hotplate is in standby mode.
Put the pot in the center of the heating zone.
Operation Instructions
Heating function
1. Pressing ,the light will shine to_ _ indicate that the induction cooker is heating up
2. Pressing“+”, the light will shine, the cooker will heat at 8-level. Set the cooker at desired power by
directly pressing by “-”or “+” to adjust the power from 8 to 1 level,
3. Pressing “-”the light will shine, the cooker will heat at 1-level. Set the cooker at desired power by
directly pressing y “+”or “-” to adjust the power from 1 to 8 levels
4. Adjust the time from 0 minute to 99 minutes by pressing the knob at the state of Time.
Note:
1) If no pan is found in the heating zone, the buzzer gives out an alarm in the heating mode. In case of
the user attempting to use an unsuitable pan, the heating zone will enter the standby state automatically
within 30 seconds.
2) Hotplate "1, 2" are Team A control zone, "3, 4" are Team B control zone. Team A and Team B operate
independently.
Timing function
1. Press function adjust key to select timing, the indicators flashes.
2. Press heating zone “’key to set heating time.
3. Original heating power set or temperature setting recognized.
4. Cancel the timer:
a) The timer indicator returns to “0”;
b) Restart after switching off
Locking
To ensure normal operation, and to avoid inadvertent change of mode, press “LOCK”key, the hob enters
the locked state, the locking indicator flashes and other keys are disabled.
Unlocking: To unlock the induction hob, hold the “LOCK”key for three seconds.
5
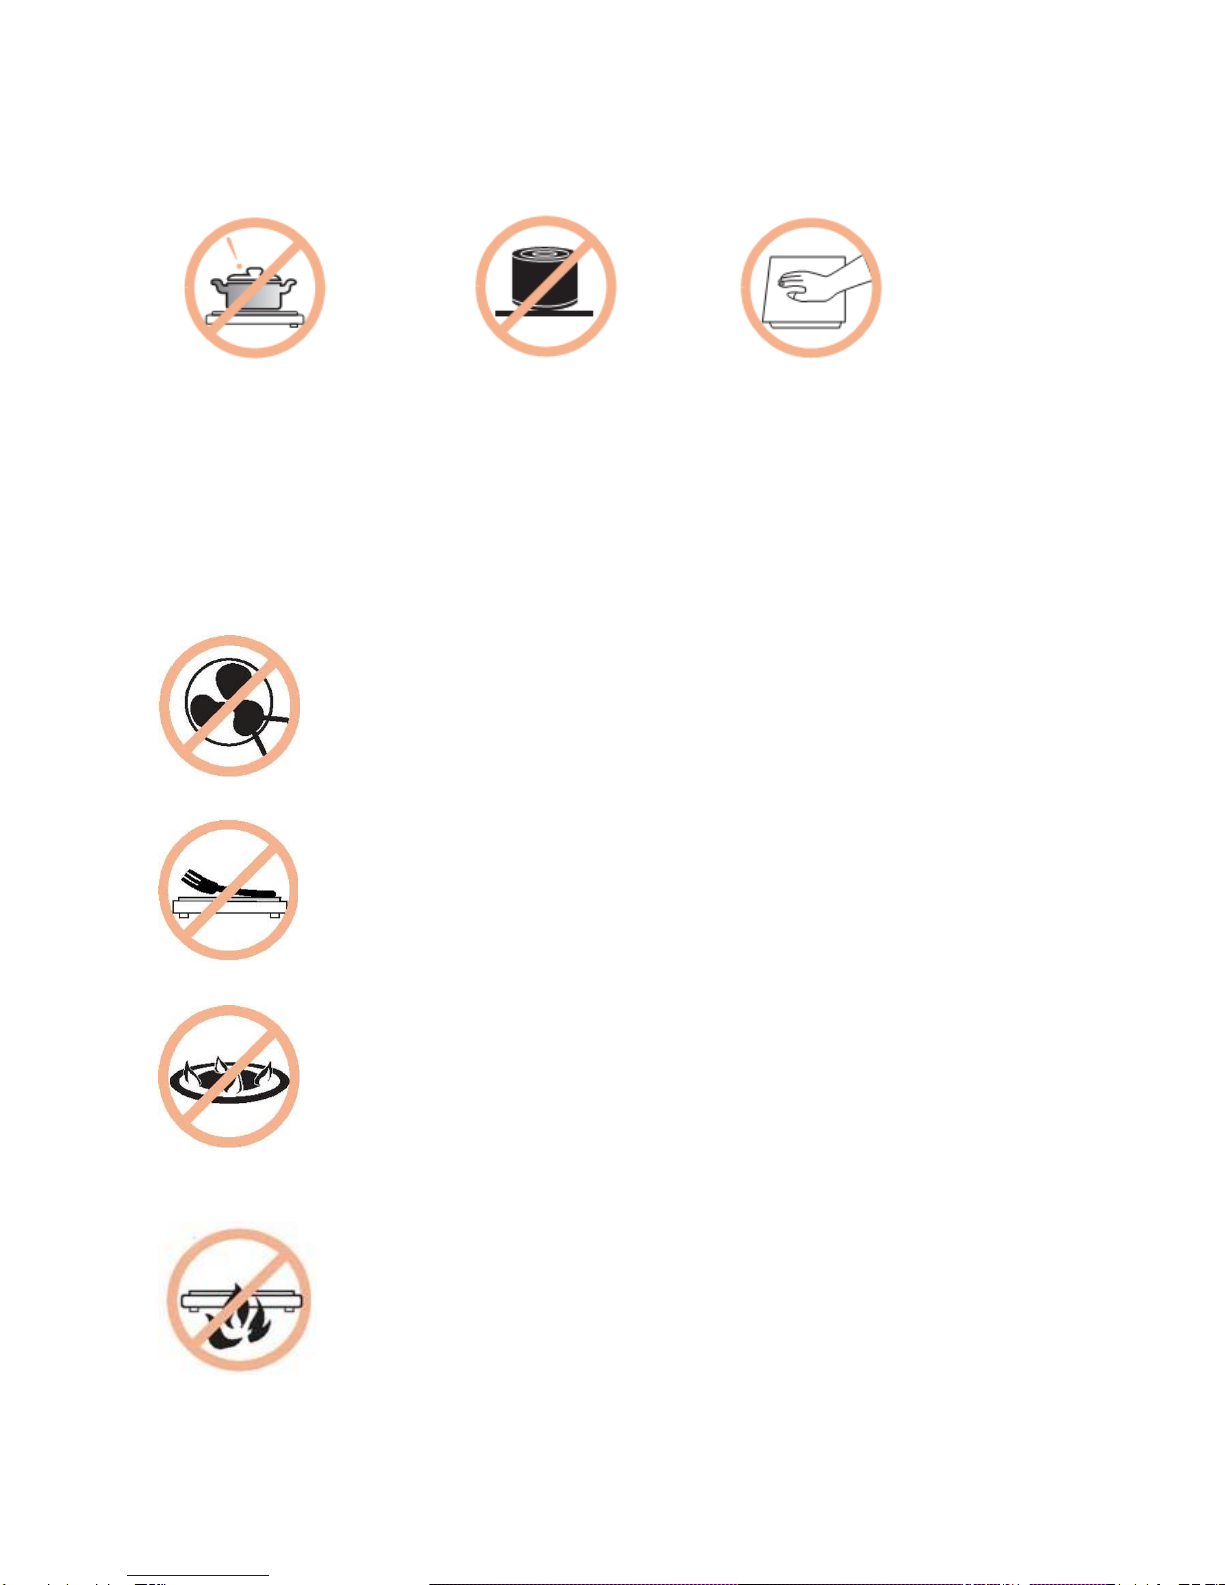
The above power may vary according to the material and the size of pan.
Selection of suitable cookware for Induction cooking
This induction hob is able to identify multiple heating appliances, and you can test them by the following
methods: Place the appliance in the heating zone. If the corresponding heating zone displays a power
level, it shows the suitability of the pan; if “U” flashes, the pan is not suitable for induction cooking.
Generally, if the base of the pan is magnetic it should be suitable for induction cooking.
If the buzzer gives out an alarm, this indicates that the pan is not suitable for the induction hotplate; the
hotplate will turn off after 1 minute.
Notes:
1. Snapping sound: Snapping sounds could be produced if a pan with a composite base is used.
Because the pans are made of different materials, the movement of different materials in the heating
zone can produce noise. Selection of proper pan can reduce or eliminate the noise.
2. Squeaking sound: If pans made of different materials are used in the neighboring zones of Team A
control zone or Team B control zone, which produced different frequencies squeaking noises can occur .
Selection of pans made from similar materials can reduce or eliminate the noise.
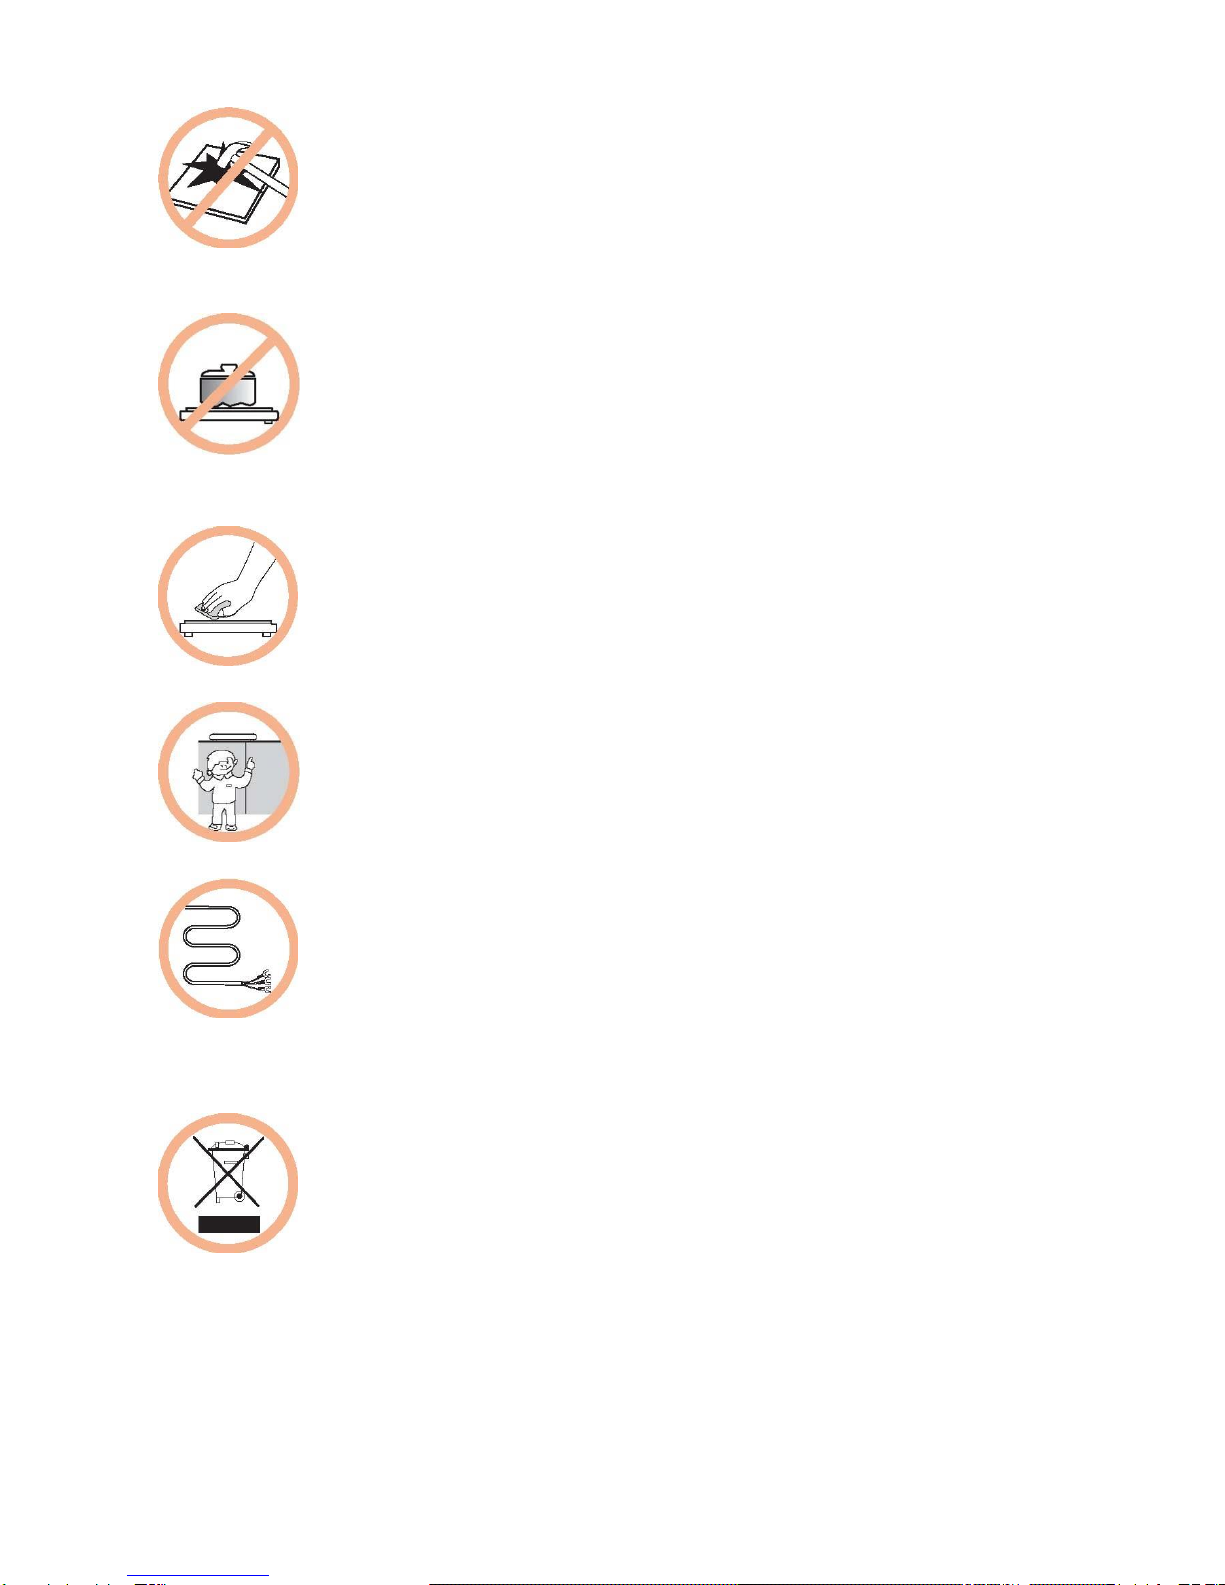
Please use a dedicated Indoor use only Never directly wash the
power switch induction hob in water
6
To avoid danger.
Never use
the induction hob For sealed food such as After being used for a long
with empty pans as there canned goods, please do not time, the corresponding
is risk of overheating and heat them before opening them heating zone of the hob
damage and the operation to avoid any risk of explosion. will remain hot. Never touch
of the hob may affected. the ceramic surface to avoid burning.
We suggest that you should periodically check that there are no objects (glass, paper,
etc) that could obstruct the inlet under your induction cooker.
Metallic objects such as knives, forks, spoons and lids should not be placed on the
hotplate as they may get very hot.
Never use the induction hotplate in high temperature environments such as near a gas
stove or kerosene stove.
Do not put any detergents or flammable materials in the equipment installed under the
induction hotplate.
7
If the surface is cracked, switch off the appliance to avoid the possibility of electric
shock.
Do not use damaged pans, or those with rough or distorted bases, they may damage
the ceramic surface and also affect the performance of the induction hob.
Clean the induction hob on a regular basis to prevent foreign matters from entering the
fan thus effecting the normal operation. Refer to “Cleaning and Maintenance” for cleaning methods.
Keep electrical appliances out of the reach of children. Do not let them use the
appliances without supervision.
If the supply cord is damaged, it must be replaced by the manufacturer, its service
agent or similarly qualified persons.
DISPOSAL: Do not dispose of this product as unsorted municipal waste. Collection of
such waste separately for special treatment is necessary。

8
Cleaning and Maintenance
You can easily clean the surface of the induction hotplate by following the methods given in the table
below.
Type of contamination
Method of cleaning
Articles used for cleaning
Light
Wet with hot water then
wipe dry
Cleaning sponge
Accumulation of dirt
Wet with hot water then
wipe it dry with coarse
sponge
Special cleaning sponge for
ceramic glass
Rings and lime crumbles
Apply white vinegar to the
soiled zone, then wipe dry
with soft cloth
Special descaler for ceramic
glass
Burnt on food ,melted
aluminum or plastics
Use a scraper suitable for
ceramic glass (to protect
glass, a silicon product is
preferred) to remove
residue
Special cleaner for ceramic
glass
Always disconnect power before cleaning.
Failure Display and Inspection
If an abnormality occurs, the induction hob will enter the protective state automatically and display
corresponding protective codes:
Problem
Possible reasons
Solutions
E1
Fan failure
Bad hob ventilation
Abnormal temperature
Please restart after the
hotplate cools down.
Please inspect the pan.
Please contact the
supplier.
E2
Temperature sensor
failure
Please contact the
supplier.
E3
Abnormal supply
voltage
Please inspect whether
power supply is normal.
Power on after the power
supply is normal.
Verify if the power supply
interface is secure. After

9
confirming it is normal,
switch on the induction
hotplate again. If the code
appears constantly,
please contact supplier.
The above are the common failures. Please do not disassemble the unit by yourself to avoid danger
and damage to the induction hob.
Customer Care Service
Before calling the Customer Care Service area, we suggest you check the following:
a) verify if the plug is correctly inserted in the socket
b) read the Failure and Display table above
In case it is not possible to establish the reason for the malfunctioning of the appliance, switch it off and
call the Customer Care Service area.
Special Declaration
a) All the contents in this material have been subjected to careful check.
b) For any mistake and omission in printing or misunderstanding of the contents, the company
maintains the right of interpretation.
c) Any technical or cosmetic improvement may be placed in the revised/future manuals without
notice.
d) Whilst all efforts are made to ensure information at time of purchasing this item is correct, the
manufacturer/supplier bears no responsibility for changes to features, dimensions or cosmetics
of the product listed at the time of purchase.
Other Belair Cooktop manuals

Popular Cooktop manuals by other brands


Goldline
Goldline SAB Series user manual

Alico
Alico PROXY70 74GFTIST Instructions for installation, operation and maintenance

Magic Chef
Magic Chef 8341VB owner's guide

Smeg
Smeg Dolce Stil Novo PV664LCNXAU manual

ILVE
ILVE ILCC30 Instruction manual / installation manual

Opera
Opera NIVEL DNI93 Series user manual


