belavi 23701-23 User manual

User Manual
________________
Manual
del usuario
RATTAN BAR CART
English.... Page 3
Español.... Página 16
CARRITO DE SERVICIO DE RATÁN
For Reference Only

Contents •Índice
Getting Started ................................... 3
Pack Contents/Parts ........................... 4
Parts List ............................................. 5
Hardware List...................................... 6
Assembly Instructions ........................ 7
Warranty.............................................. 13
Para comenzar .................................... 16
Contenido del paquete/piezas........... 17
Lista de piezas .................................... 18
Lista de herrajes ................................. 19
Instrucciones de ensamblaje.............. 20
Garantía............................................... 26
For Reference Only

3
Getting Started
Ensure all parts packaged in carton match the parts list.
Remove all protective materials and place parts on a
non-abrasive surface to avoid scratching. If any parts are
missing or damaged, DO NOT attempt to assemble. Please
contact our customer service center (Monday-Friday
9:00am – 5:00pm EST) at 1-800-599-8898.
Caution
Read all the instructions before assembly. Failure to
comply with instructions may result in faulty assembly and
potential injury! Assemble product on a soft, non-abrasive
surface such as a grass lawn or cardboard to avoid surface
scratches or damage to parts. Seek assistance to assemble
bulky or heavy items. After final alignment, make sure all
bolts are securely tightened.
For Reference Only

4
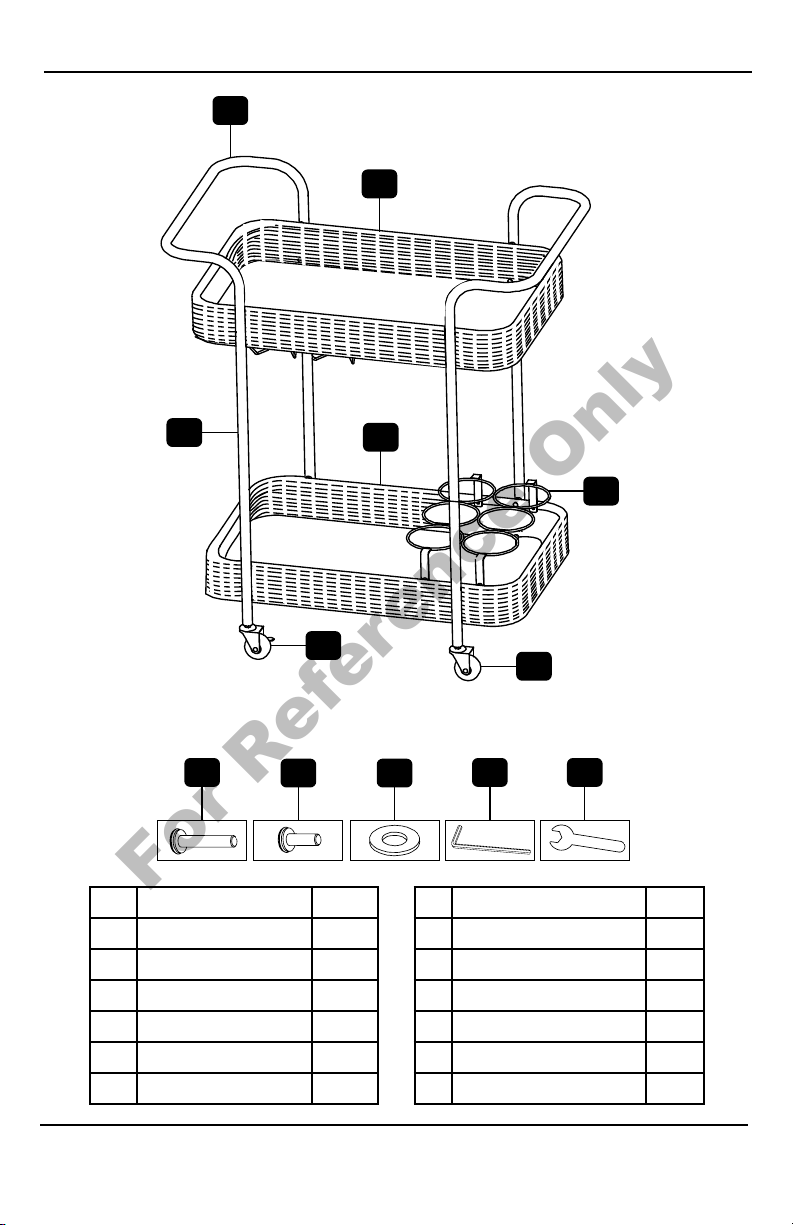
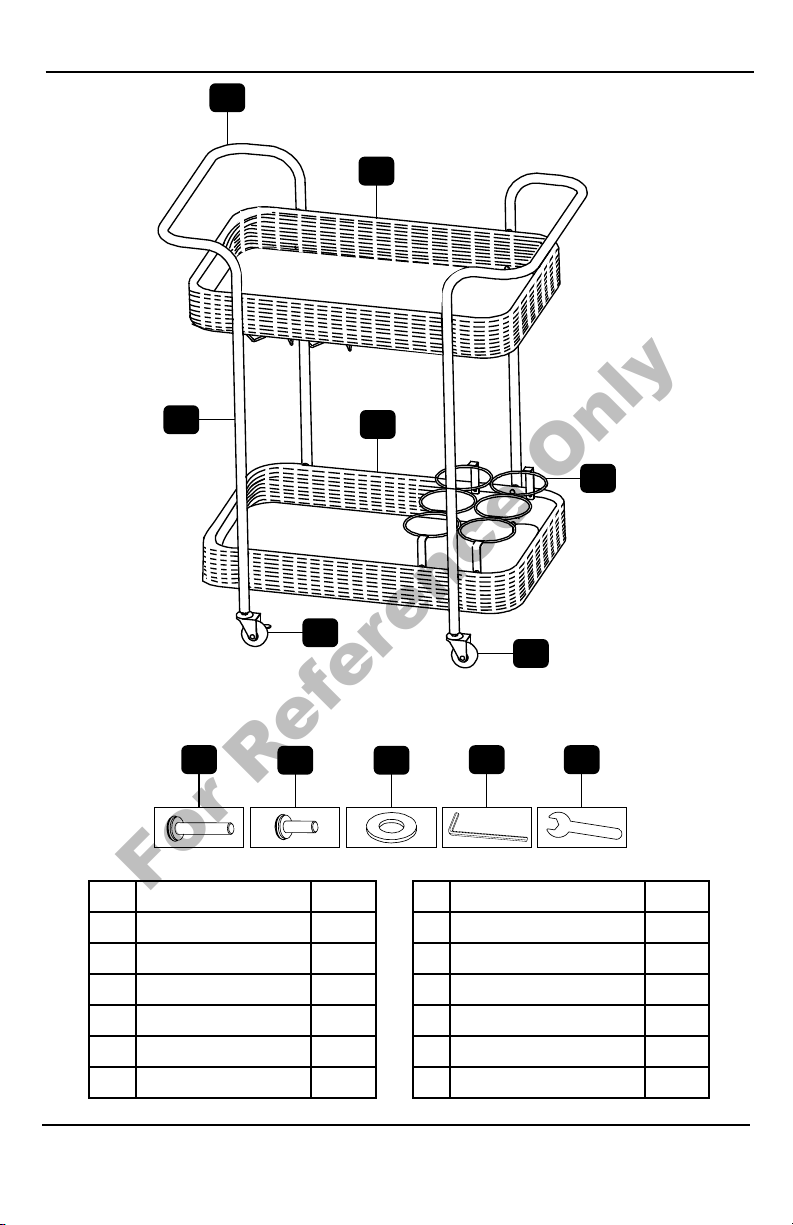
Pack Contents / Parts
Contents
AHandle
BPole
CUpper Tray
DLower Tray
EBottle Holder
FWheel
GWheel with Brake
HM6 x 30 Bolt
IM6 x 15 Bolt
JWasher
KHex Key
LWrench
For Reference Only
5
Parts List
Descripon Qty Descripon Qty
AHandle 2 G Wheel with Brake 2
B Pole 4 H M6 x 30 Bolt 16
CUpper Tray 1 I M6 x 15 Bolt 4
DLower Tray 1 J Washer 20
EBole Holder 1 K Hex Key 1
FWheel 2 L Wrench 1
A
C
D
E
F
G
B
HI J K L
For Reference Only

6
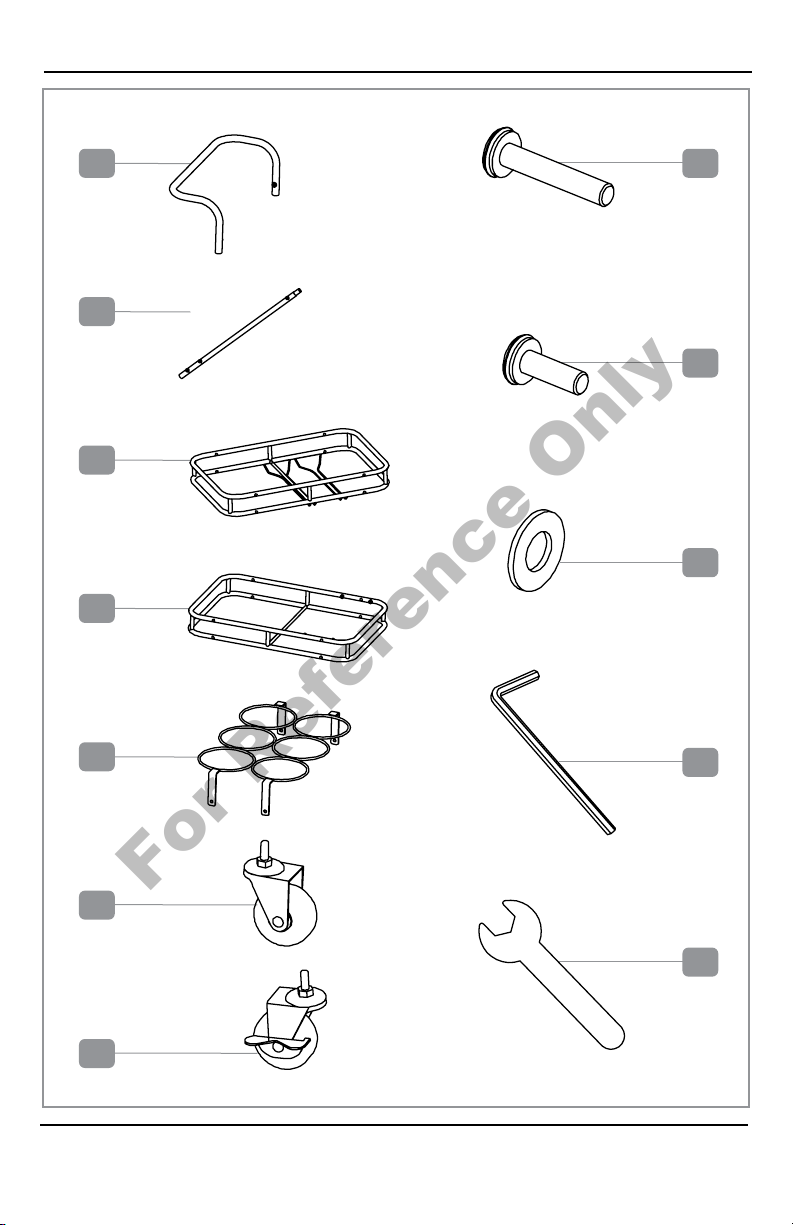
Hardware List
F
E
C
A
D
B
H
G
I
J
K
L
For Reference Only
7
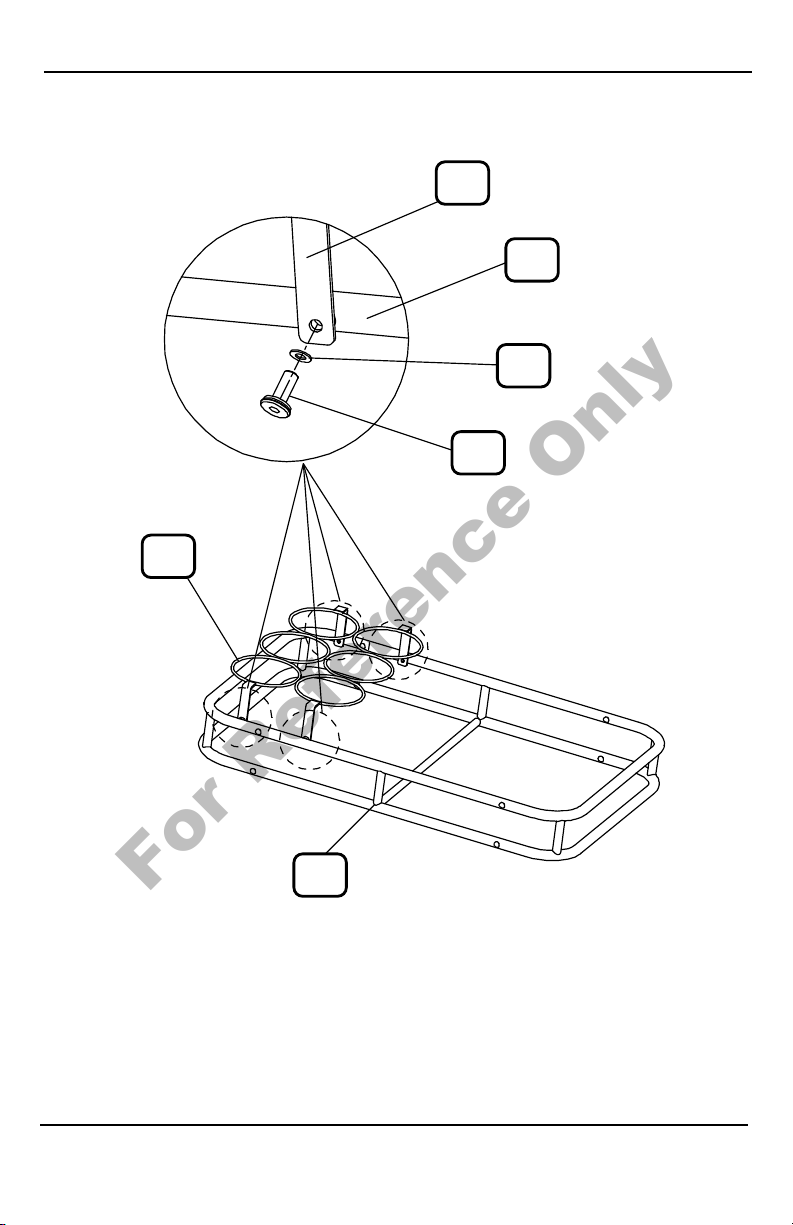
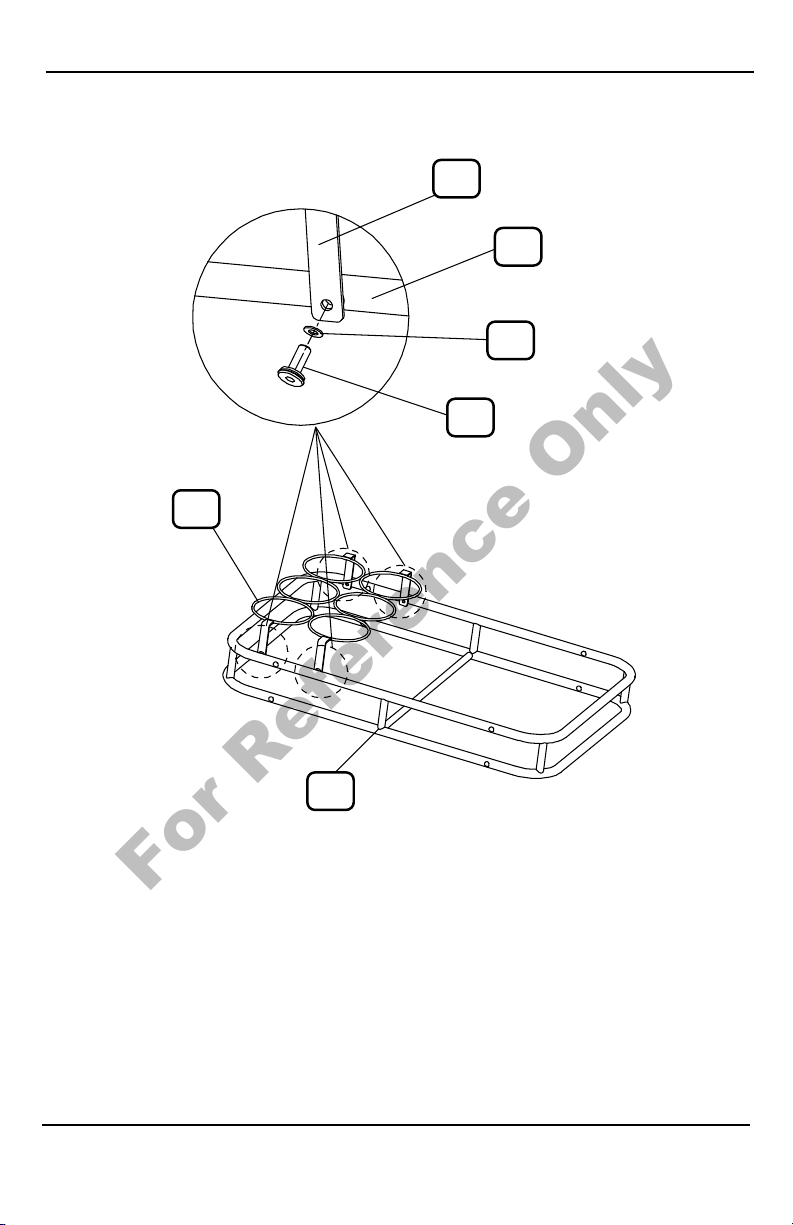
Assembly Instructions
STEP 1:
Place the Bottle Holder (E) upright, in between the walls of the Lower
Tray (D) as illustrated here.
Insert one M6x15 Bolt (I) with Washer (J) through eyelet of brace on
part E, and into the bolt-threading on the inner wall of Lower Tray (D).
Follow this step to connect remaining braces on part E to part D.
E
D
J
I
E
D
*Do not tighten bolts down completely during this portion of assembly.
For Reference Only

8
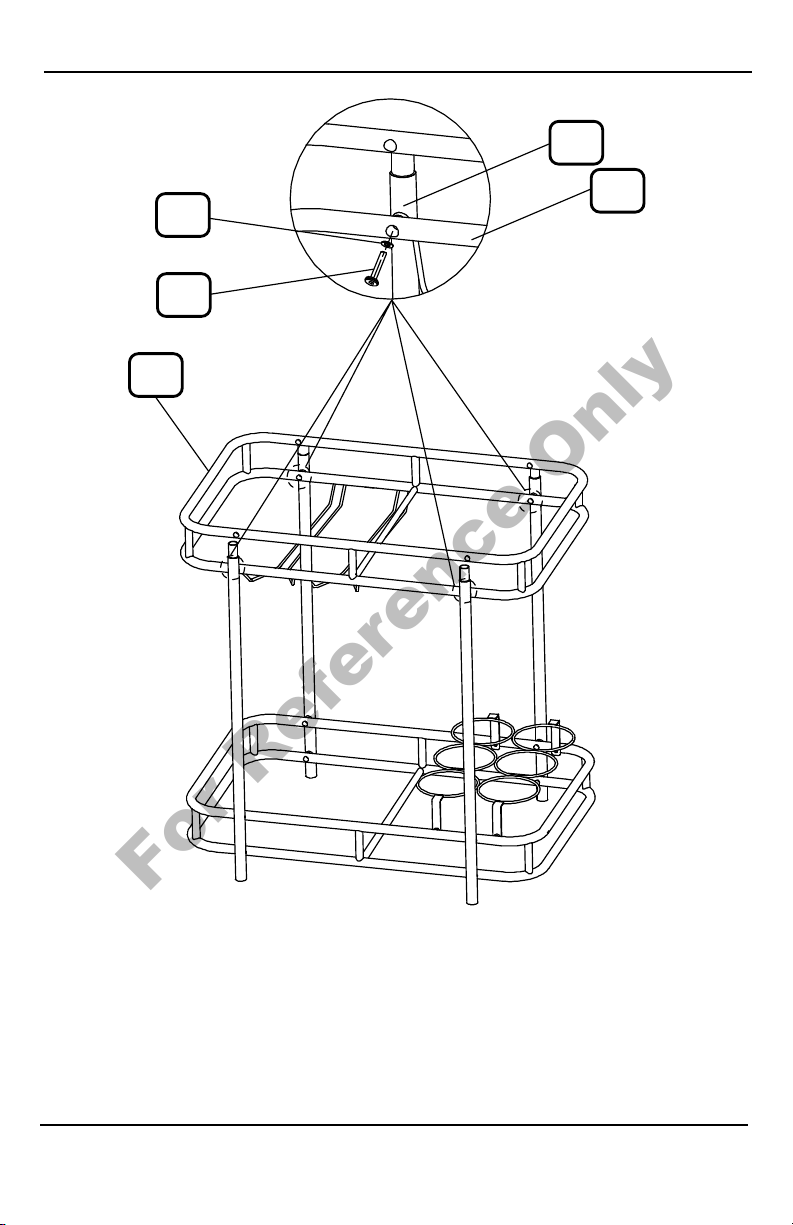
Assembly Instructions
STEP 2:
Insert one M6x30 Bolt (H) with Washer (J) through eyelet on inner wall
of Lower Tray (D), and into upper bolt-threading found near the bottom
end of Pole (B). Insert one M6x30 Bolt (H) with Washer (J) through
eyelet of inner wall, underneath Lower Tray (D), and into lower bolt-
threading found near the bottom end of Pole (B). Follow these steps to
connect remaining part B’s near the corners of part D.
*Do not tighten bolts down completely during this portion of assembly.
D
B
J
B
B
H
For Reference Only
9
Assembly Instructions
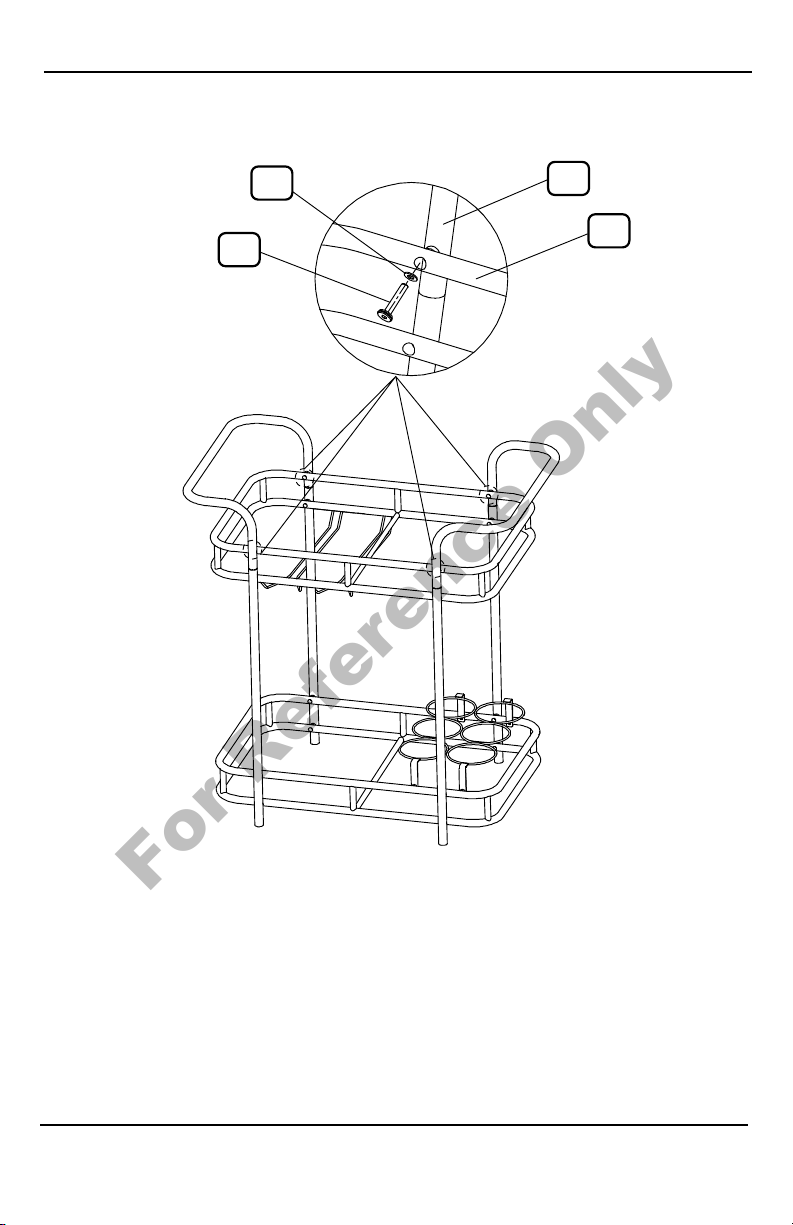
STEP 3:
Insert one M6x30 Bolt (H) with Washer (J) through eyelet of inner wall,
underneath Upper Tray (C), and into the bolt-threading at the top of
Pole (B). Follow this step to connect remaining part B’s to part C.
B
C
C
J
H
For Reference Only

10
STEP 4:
Insert openings on the ends of Handle (A) to the tops of Poles (B). Apply
weight on the handles so they are securely in place and there are no
gaps where these two parts connect.
Assembly Instructions
A
A
For Reference Only
11
Assembly Instructions
STEP 5:
Insert one M6x30 Bolt (H) with Washer (J) through top eyelet of inner
wall of Upper Tray (C), and into bolt-threading near the end of Handle
(A). Follow this step to connect the other end of part A to the opposite
side of part C. Follow these steps to connect the second part A to the
opposite end of part C. Tighten all bolts left loose throughout assembly
process.
*Do not tighten bolts down completely during this portion of assembly.
J
H
A
C
For Reference Only

12
STEP 6:
Screw in one Wheel (F) into the bottoms of the two Poles (B) at the end of
Lower Tray (D) where Bottle Holder (E) is placed. Use Wrench (L) to tighten
the nut at the top of Wheel (F) to secure these parts together.
Screw in one Wheel with Brake (G) into the bottoms of the two Poles (B)
at the opposite end of Lower Tray (D). Use Wrench (L) to tighten the nut at
the top of Wheel with Brake (G) to secure these parts together.
Assembly Instructions
B
G
B
F
For Reference Only

708817
1800 599 8898
E-Mail:
Address:
Name:
Your details:
Descripon of problem:
SERVICE CENTER
PRODUCT CODE
AFTER SALES SUPPORT
WARRANTY CARD
US
RATTAN
BAR CART
23701-23
MODEL NUMBER
TDC USA, Inc.
5 Industrial Road, STE 1
Fairfield, NJ 07004-3017
United States of America
Phone lines available Monday to Friday
9am - 5pm EST.
Please contact our AFTER SALES SUPPORT by phone or e-mail when
needing assistance with your purchase.
Please retain your sales receipt which validates the 1-year Limited Warranty.
Only submit the Warranty Card when needing assistance with a faulty part.
For Reference Only

ALDI INC. FULL WARRANTY CONDITIONS
Dear Customer:
The ALDI warranty is a full warranty oering you the following benets:
Warranty period: 1 year* from date of purchase.
Costs: Free repair, exchange, or refund.
No transport costs.
ADVICE Please contact our service hotline by phone, email, or fax
when needing assistance with assembly or with faulty
parts. This allows us to provide support in the event of
possible operator errors.
In order to make a claim under the warranty, please send us:
A copy of your sales receipt, your completed warranty card with
contact informaon provided, and an explanaon as to how we can
help and what concerns you have with any parts.
The warranty does not cover damage caused by:
• Accident or unancipated events to frame [metal parts] (e.g. wind,
snow, lighng, re).
• Deterioraon, fading, sagging, or unancipated events to canopy
(e.g. wind, sun, rain, pets/animals).
• Improper use or transport.
• Failure to follow safety and maintenance instrucons.
• Other improper treatment or modicaon.
Aer the expiraon of the warranty period, you may have your product
repaired at your own expense. You will be noed of the repair costs in
advance.
This warranty gives you specic legal rights, which may vary from state to state,
that are not intended to exceed statutory minimum requirements beyond what
is included above.
This warranty does not limit the statutory obligaon of the seller arising
from any implied warranes. The period of warranty can only be extended in
accordance with applicable law.
For Reference Only

..
For Reference Only

16
Para comenzar
Compare todas las piezas incluidas en la caja con la lista de
piezas. Quite todos los materiales de protección y ponga
las piezas sobre una supercie no abrasiva para evitar que
se rayen. Si falta alguna pieza, NO intente ensamblar la
unidad. Llame a nuestro centro de atención al cliente (de
lunes a viernes de 9:00 a.m. a 5:00 p.m. EST) al
1-800-599-8898.
Precauciones
Lea todas las instrucciones antes de ensamblar la unidad.
¡No hacerlo puede resultar en un ensamblaje incorrecto, lo
que puede ocasionar lesiones! Ensamble la unidad sobre
una supercie suave y no abrasiva, tal como una alfombra
o cartón, para evitar dañarla. Pida ayuda para ensamblar
las partes pesadas y voluminosas. Tras la alineación
nal, asegúrese de que todos los pernos y tuercas estén
rmemente apretados.
Para comenzar
For Reference Only

17
Contenido del paquete/Lista de piezas
Contenido de la caja/Piezas
AAsa
BPoste
CBandeja superior
DBandeja inferior
ESoporte para botellas
FRueda
GRueda con freno
HPerno M6 x 30
IPerno M6 x 15
JArandela
KLlave hexagonal
LLlave
For Reference Only
18
Lista de piezas
Descripción Cant. Descripción Cant.
A Asa 2 G Rueda con freno 2
BPoste 4 H Perno M6 x 30 16
CBandeja superior 1 I Perno M6 x 15 4
DBandeja inferior 1 J Arandela 20
ESoporte para botellas 1 K Llave hexagonal 1
FRueda 2 L Llave 1
A
C
D
E
F
G
B
HI J K L
For Reference Only
19
Lista de herrajes
F
E
C
A
D
B
H
G
I
J
K
L
For Reference Only
20
Instrucciones de ensamblaje
*No apriete completamente los pernos durante esta parte del
ensamblaje.
PASO 1:
Coloque el soporte para botellas (E) en posición vertical, entre las
paredes de la bandeja inferior (D) tal como se muestra en la ilustración
de arriba.
Pase un perno M6 x 15 (I) con una arandela (J) a través del ojal del
soporte de la pieza E e insértelo en el orificio para perno de la pared
interior de la bandeja inferior (D). Siga este mismo paso para conectar
los demás soportes de la pieza E a la pieza D.
E
D
J
I
E
D
For Reference Only
Table of contents
Languages:
Popular Outdoor Cart manuals by other brands


Carts Vermont
Carts Vermont 20 manual

Westward
Westward 2CZY4 Operating instructions and parts manual

Numatic
Numatic EcoMatic EM-5 Assembly

Bosch
Bosch XL-Cart Operating/safety instructions

Tennsco
Tennsco Modular Cart Top Component Assembly Assembly Instructions/Parts Manual

Clam
Clam POLAR TRAILER HD MAX manual


