BelFone BF-TD520 User manual

-TD520
Commercial Portable Radio
www.belfone.com


Acknowledgement!
Notice to the user
Thank you for choosing BelFone series professional radio communication
products!
Since 1989, BelFone has been dedicated to research and exploration in the
field of radio communication technology throughout the decades, and has
developed leading smart technology in the industry. Underpinned by research,
development and design geared towards modern complicated and changeable
communication environment, it is capable of tailoring specific communication
solutions to your needs based on features of your industry. Superior products
with outstanding performance may help you control the overall situation, while
providing you with the best choice for smart scheduling and instructions
communicating.
This operation manual is applicable to
BF-TD520 series
Government law prohibits the operation of unlicensed radio transmitters
within the territories under government control.
Illegal operation is punishable by fine or imprisonment or both.
Warning!
◆In explosive atmospheres(inflammable gas, dust particles,
powder-covered area, etc.),Please turn the power off.

Following the safety precautions below may prevent damage to this product
and personal injuries. To avoid potential risks, please read these instructions
carefully before using the product, and operate the product as instructed.
◆The recommended usage rate is 1 minute for TX and 4 minutes for RX,
Continuously TX will let the radio rear surface will be in a high
temperature state, When placing the radio, do not make the rear part
touch the surface of objects with low melting point and low ignition
point (such as plastic, etc.);
◆The radio shall be protected from long-time direct exposure to the
sun, kept in a place away from high temperature, high humidity, high
dustiness or water splashes, and put on a stable surface;
◆Where use of the radio is prohibited or use of intercommunication
may cause interference or danger, the radio shall have its power turned
off as required by relevant regulations;
◆Please avoid to use the radio while driving, which may be against the
Traffic Rules;
◆If you find any fault of the product, please turn off the power
immediately, and then contact the local distributor of BelFone; unless
otherwise specified in this Manual, maintenance shall not be performed
by any person other than a maintenance worker authorized by BelFone
Company;
◆ If this product is needed for further development, please contact
BelFone Company or BelFone's distributor;
◆Do maintain the product surface clean and dry; for cleaning, use a
piece of soft cloth dipped with mild detergent or clear water (without
water dripping) to wipe the product surface.
Instructions before Use

Content
Unpacking and Device Inspection········································ · · · 01
Installation of Accessories··············································· · · · 02
Get Familiar with the Device············································· · · · 06
Basic Operation························································· · · · 07
Functions and Operations··············································· · · · 10
Scan····································································· · 10
Auto Scan······························································ · · · 10
Monitor and Permanent Monitor········································· · · · 10
Message································································· · 10
One Touch Call························································· · · · 10
Talk Around···························································· · · · 11
TX Power······························································ · · · 11
Bandwidth······························································ · · · 11
Squelch Level·························································· · · · 11
Emergency····························································· · · · 12

Content
Alone Worker·························································· · · · 12
Time Out Timer (TOT)·················································· · · · 12
Voice Encryption························································ · · · 12
VOX··································································· · · · 13
Tone Alerts····························································· · · · 13
Reject Stranger Call····················································· · · · 14
TX Permission·························································· · · · 14
Battery Saver·························································· · · · 14
Lower Battery Alert······················································ · · · 15
CTCSS/CDCSS························································ · · · 15
CTCSS Standard Frequency Table······································ · · · 16
CDCSS Standard Code Table··········································· · · · 17
Specifications·························································· · · · 18
Statement································································ · 20

Unpacking and Device Inspection
Note: The following instructions regarding unpacking are only for BelFone’s
distributors, and service agencies or factories authorized by BelFone.
Be careful when taking the device out of the packing box. You’d better count
the accessories against the following list before discarding the packaging. If
you find any item is missing or damaged, please contact the local distributor
of BelFone or directly contact BelFone Communication immediately.
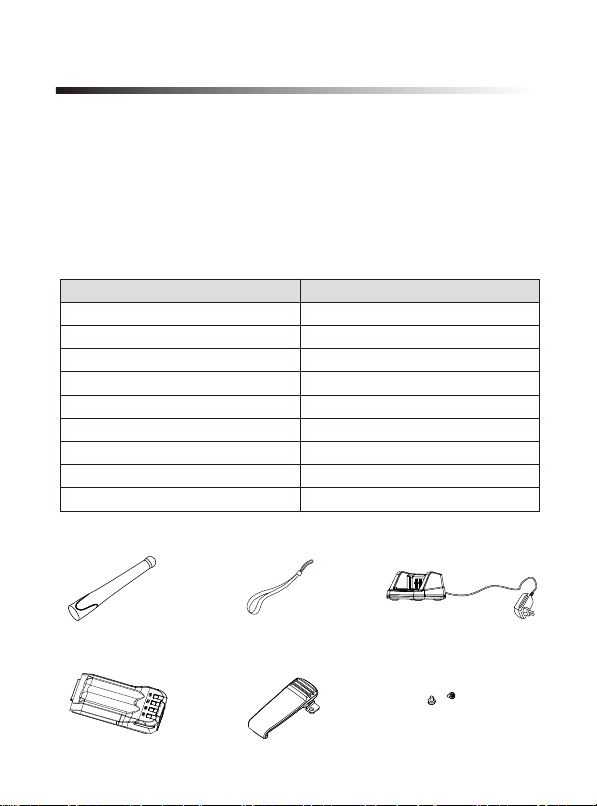
Accessories supplied along the device
Quantity
1
1
1
1
1
1
1
1
1
Items
Antenna
Strap
Belt Clip
Charger
Li-ion Battery
Screws
User Manual
Warranty Card
Certificate
StrapAntenna
Belt Clip ScrewsLi-ion Battery
Charger
01

02
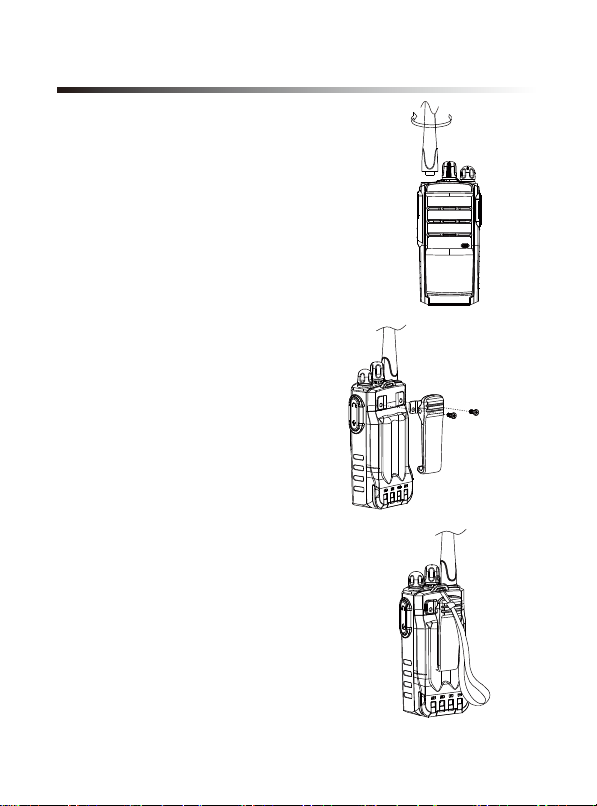
Hold the antenna base, screw it into
the connector at the top of the radio until
fasten.
Turn the antenna anti-clockwise to
remove it.
Installation/ removing
the belt clip
Installation/ removing the
antenna
Attach the belt clip using the two
supplied3*7mm binding screws.
Attaching/ removing the strap
Thread the hand strap to the loop back
of your two-way radio.
Installation of Accessories

03
Warning!
1. Don’t short-circuit the battery, which may cause damaged or catch fire;
2. Never to remove the case of the battery, prevent battery short circuit;
3. Battery is flammable and explosive, don’t throw it into fire or don’t use it in
dangerous area,such as gas stations
Attaching/Removing the Battery
Following the guide, insert the contact
side of the battery first, gently pushes the
battery into place until hear “click” and
slide battery latch into lock position.
To remove the battery, please turn the
power off, release latch to unlock the
battery, and pull it away from the radio.
Note: Do not insert or remove the battery
if the radio is on.
Battery Information
New battery shipped from the factory is not fully charged, so please charge it for 5
hours before initial use. After three full charge and discharge cycles, battery
capacity and performance can reach the best condition. Please recharge/charge
the battery in low power level.

To reduce the risk of injury, please only use the battery and charger specified by
Belfone, other batteries may burst, causing bodily injury and property damage.
Applicable Battery
1.Batteries charge best at room temperature within 5℃—40℃, or it’ll lead to
battery leakage and damage.
2.Prior to charging a battery with the radio, it is recommended to turn the radio off.
3.Avoid cut off the power supply or remove the battery during charging.
4.Please ensure that the battery is charged in a dry state before charging.
5.Please change the battery when working time is shorten than normal
performance even if the battery is fully charged.
Battery Tips
Extend Battery Life
1.The battery performance will be decreased under 0℃. Please prepare a spare
battery in cold weather. A battery not work properly in a cold environment does
not mean that it is damaged. Please keep the battery and reconfirm at room
temperature.
2.The dust on the battery contact point may cause battery faulty, please cleaning
it by a dry cloth before using.
Battery Storage
1.Fully charge the battery before long-term storage, to avoid battery damage due
to over-discharge.
2.Recharge a battery after several months’ storage, to avoid battery capacity
reduction due to over-discharge.(NI-MH batteries:3 months, Li-Ion& Li-polymer
batteries: 6 months)
3.Store your battery in a cool, dry place under room temperature, to reduce
self-discharge.
04

Use only the charger specified by the manufacturer, the charge indicator indicates
the charging progress.
1.Plug the AC connector of the charger into the AC outlet socket, the charger
indicator glows green;
2.Plug the battery or the radio with battery into the charger;
3.Making sure the battery plugs the charger, the charging process initiates
when the charger indicator glows red;
4.The charger indicator glows green when the battery is fully charged, please
remove the battery.
Note: While charging the temperature out of the limit, or battery has
damaged, or battery is not connected, the LED indicator of charger will
flash red and green.
Charging the battery
Charging Procedure:
Attaching the Speaker/
Microphone
Open the accessory port cover, then align
the plug with the accessory port.
05
Charger Status
Standby(No-load)
Battery is charging
Battery is fully charged
Charger Indicator
Green
Red
Green

Get Familiar with the Device
06
①
②
③
④
⑤
Channel Selector Knob
Power &Volume Knob
LED Indicator
Orange Button
Speaker
⑥
⑦
⑧
⑨
⑩
Microphone(MIC)
PTT key
Button 1
Button 2
MIC-SP Jack
3
4
6
5
10
7
1 2
9
8

Power on /off
Rotate the power &volume knob clockwise to turn the power on.
Rotate the power &volume knob anti-clockwise to turn the power off.
Adjusting the volume
After the radio is powered on, you can rotate the power &volume knob to adjust
the volume level, rotate the knob clockwise to increase the volume, or rotate the
knob anti-clockwise to decrease the volume.
Selecting a Channel
Turn the channel selector knob to select channel 1 to 16, rotate the knob
clockwise to increase the channel number, or rotate the knob anti-clockwise to
decrease the channel number, while enable all tone alert, switch channel will play
the current channel number voice.
Switch a Zone
The radio can support up to 16 zones, and each zone include a maximum of 16
channels, that means the radio support up to 256 channels. You may select a
desire zone by pressing [Zone] function button (if defined in the programming
software) to switch the zone. While enable all tone alert, select zone will play the
current zone number voice.
Dual Modes Switching
If current channel mode is D/A compatible, press preprogrammed [AD Switch] key
to switch the channel mode. The current channel mode is digital compatible
analog , press preprogrammed [AD Switch] key to switch to analog compatible
digital mode; the current channel mode is analog compatible digital, press
preprogrammed [AD Switch] key to switch to digital compatible analog mode.
Note: If a channel is not programmed, LED indicator flash red and a prompt
tone “no channel “sounds.
Basic Operation
07

Note: Analog/Digital Switch function only switching the channel mode
temporarily, while you restart the radio or changing channel by the knob, the
current channel will resume to default mode.
Receiving
While a call is received on current channel, LED indicator glows green. While a
group or private call is received, you may press the PTT key within the preset time
period to call back. On compatible channel, while receiving, the radio detect digital
and analog signal (is must attach to CTCSS/CDCSS) simultaneously, if detected
matching signal, within the preset time period to call back.
Call
Each digital channel you may initiate a private call, a group call or an all call; On
analog compatible digital channel press PTT key, if is not within hang time to
transmit analog call, within the hang time to call back; On digital compatible analog
channel press PTT key, if is not within hang time to initiate a digital call, within hang
time to call back. To transmit press and hold down the PTT key, LED indication
glows red, speak into the microphone, hold the palm microphone approximately 3
to 4 centimeters away from your mouth.
1.)Group Call
To initiate a group call, the radio will add the group contact via the programming
software. If you preset a group call contact for current digital channel, press PTT
key to initiate a group call. Also allow set the one touch call key as group call
feature, then to initiate a group call. Release PTT key to exit transmitting.
2.)Private Call
To initiate a private call, the radio will add the private contact via the programmable
software. If you preset a private call contact for current digital channel, press PTT
key to initiate a private call. Also allow set the one touch call key as private call
feature, then to initiate a private call. Release PTT key to exit transmitting. If the
feature “private call ACK” is enabled, to transmit a private call need to confirm
whether target device is power on or activate on the current channel.
3.)All Call
If you preset an all call contact for current digital channel, press PTT key to initiate
an all call, release PTT key to exit transmitting.
08

Call and receiving on analog Channel
On analog channel press and hold down the PTT key to transmit, LED indication
glows red, speak into the microphone, and hold the palm microphone
approximately 3 to 4 centimeters away from your mouth.
Button Configuration
Use the customer programming software to configure orange button, button1,
button2 to pressing and holding-down operation.
Programmable buttons are including functions listed below:
09
1
3
4
5
6
7
8
10
11
12
13
14
Unassigned
Emergency on/off
Monitor
Scan on/off
All alert tone on/off
Battery Indication
Zone Toggle:
Power Switch
Repeater/talk around
Vox on/off:
Nuisance Delete
Permanent Monitor
The key is not assigned with any function
Allow user to make an emergency call
Enable monitor function.
To enable or disable the scan function.
To enable or disable all alert tones
Quick to view battery capacity
Quick access to [Zone Toggle]
To switch High/Middle/Low Power quickly
To enable or disable talk around quickly
To enable or disable VOX quickly
To temporarily ignore unwanted channel activity
To enable or disable permanent monitor function
2
9
One Touch Call 1~6
AD Switch
To quick access a service as: group call,
private call, private message, group message,
and call alert.
To temporarily switch channel mode to AD or DA
on digital analog compatible channel.

Scan
Scan is useful for monitoring signals on the radio channels which is configured the
scan list. While scanning, the radio checks for a signal on each channel and only
stops on a channel if a signal is present. Press programmed [Scan on/off] key to
begin scanning, while scanning on, a “scan on” sounds, LED indicator flash red.
While scanning off, a “scan off” sounds
Auto Scan
If Auto Scan feature is enabled for a channel, the radio will automatically enter
scan mode when it is switched to this channel. To stop scanning, press
programmed [Scan On/Off] key or switch to other channels. If return to the channel
will enter scan mode directly.
Monitor and Permanent Monitor
Monitor: On analog or digital channel, enable the Monitor feature to monitor
current channel activities and receive weak signals. Press the programmed
[Monitor] key to activate the monitor function, if a signal is detected, until the signal
is no longer present the radio will exit monitor mode.
Permanent Monitor: Permanent monitor feature is the same as monitor, but long
press the [Permanent Monitor] key to enter monitor mode, the radio will remain on
monitor mode until long press it again to exit.
Message
On digital channel and digital mode compatible channel, you can send preset
messages by programmed [one touch call] key.
One Touch Call
On digital channel and digital mode compatible channel, one touch call feature
contains: to send messages or transmit to a group call contact, to send messages
or send call alert and transmit to a private call contact.
10
Functions and Operations

11
Talk Around
When your repeater malfunctions, or when radio is out of repeater’s range, you can
continue to communicate in talk around mode. While enable talk around feature,
by this time TX frequency is the same as to RX frequency. Press the programmed
Repeater/Talk Around key to switch between repeater modes and talk around
mode. Switch to talk around, a “talk around” sound; switch to repeater mode, a
“repeater” sounds.
Note:To enable this function, TX frequency should be different from RX
frequency, and the channel will set as allow talk around on the
programmable software.
TX Power
You can switch power levels to Low, Middle or High. If you communicate with radio
located at a distant place please select High power; if you communicate with radio
located at a close place please select Low power to save battery. Press the
programmed [Power Switch] key to switch between high power, middle power and
low power. Switch to high power, a “high power” sounds; switch to middle power,
a “middle power” sounds; switch to low power, a “low power” sounds.
Press programmed [Power Switch] key to switch power level or select power level
via programmable software
Bandwidth
On analog mode, there are two types of bandwidth available, you can choose
bandwidth as wide (25 KHz) or narrow (12.5 kHz) via programmable software.
Squelch Level
On analog mode and digital mode compatible channel, this feature allows you to
adjust the squelch threshold for the radio to receive audio. You can set squelch
level as 0~9. High level requires stronger signal for the radio to un-mute.

Emergency
The digital channel and digital analog compatible channel support the emergency
alarm function. In case of an emergency you can enter emergency mode to ask for
help. While current channel add emergency system, you may enable the feature.
The emergency modes and emergency types are configured via the programming
software. You can short press orange key to send emergency information or long
press to exit the emergency mode.
Alone Worker
This function is useful for persons who work lonely and encounter an incident; you
cannot press any keys or transmit audio within the preset period time. The radio will
alarm automatically to ask help. Via the programmable software to enable the
feature, and setting work alone response time, work alone warn time, work alone
response operation.
Time Out Timer (TOT)
The purpose of TOT is to prevent any user occupy a channel for an extended
period. If a channel is busy, the time will be shorter. If the preset time (default as
300s) expires, the radio will generate beep and terminate transmission
automatically.
Voice Encryption
The voice encryption can encrypt your audio signals to guarantee the privacy of
your communication, via the programmable software user can select encryption
type as static or dynamic. If the encrypt feature is enabled, the transmitter and
receiver will be set as the same encryption type and same voice encryption key,
otherwise the receiver is mute.
Note: This feature is effective on digital channel, if enable voice encryption
feature, the voice encryption key must be 10 characters, there are including
letters and numbers.
12

VOX
If enable VOX feature you can enjoy hands-free communication, the radio will
automatically begin transmitting when you speaking, and terminate transmitting
when you stop talking with no need of PTT press. You may set VOX level as1~8 or
disable (Off). When the environment too much noise, VOX level will be higher,
when the environment is quiet, VOX level will be lower. If the VOX level is set as off
via the programmable software, press programmed [VOX on/off] key can’t enable
VOX feature, if the VOX level is set as 1 to 8, press programmed VOX on/off key
can enable or disable VOX feature.
Tone Alerts
Voice Indication
If enable voice indication feature, the radio will give tone indication for channel
change, zone change, power level switch, scan feature enable or disable, VOX on
or off, low battery alert, repeater mode or talk around mode switch and etc.
Channel Free Indication
On digital mode, if enable Channel Free Indication feature, the receiver gives a
high-pitched tone indication while the transmitter release PTT key to stop
transmitting.
Talk Permit Indication
There are four options are available for Talk Permit Indication feature: None (the
radio does not give any tone indication for transmission on analog and digital
channel), Analog (the radio gives tone indication for transmission on analog
channel), Analog & Digital (the radio gives tone indication for transmission on
analog and digital channel), Digital (the radio gives tone indication for transmission
on digital channel).
13

Reject Stranger Call
On digital mode, if enable reject strange call feature, while the call ID not exist in
the contacts list, it’s unable to transmit or receive. When received group call or all
call, the device ID of transmitter and group call ID or all call ID should preset on
address list.
Battery Saver
This feature allows an idler radio to automatically enter battery saver mode, the
mode will extend battery service life, but response time may be delayed. You can
set battery saver time ratio as: 1:1, 1:2, 1:3, 1:4, the time rate is smaller, the power
saving more evidently.
TX Permission
Digital Channel
This feature can restrict the channel if it is already in use you will be unable to
transmit. There are three options available: always, color code free, channel free,
if choose always, whenever press PTT key to transmit directly; If choose color
code free, you will be unable to transmit on the channel if the color code is already
in use; If choose channel free, you will be unable to transmit on the channel if it is
already in use. If the channel is busy, press PTT key a low-pitched tone will sound.
Analog Channel
This feature can restrict the channel if it is already in use you will be unable to
transmit. There are three options available: Off, Carrier, CTCSS/CDCSS, if
choose off, whenever press PTT key to transmit directly; If choose carrier, you will
be unable to transmit on the channel if the channel is being used by others; If
choose CTCSS/CDCSS, you will be unable to transmit on the channel if it is
already in use and the CTCSS/CDCSS code in use. If the channel is busy, press
PTT key a low-pitched tone will sound.
14
Table of contents
Other BelFone Radio manuals