Belgravium Boston 8550 User manual

_______________________________________________________
________
Boston 8550i User Guide – © 2012 Belgravium Technologies Plc (v.1.0) 1
Boston 8550
Mobile omputer
USER GUIDE

Boston 8550i User Guide – © 2012 Belgravium Technologies Plc (v.1.0) 2
INTRODUCTION ................................................................................................................ 4
T
HE
R
EADER
......................................................................................................................... 4
R
ELATED
P
UBLI ATIONS
.......................................................................................................... 4
ACKNOWLEDGEMENTS .................................................................................................... 4
FIRST OPERATION ............................................................................................................ 5
I
NSERTING
T
HE
B
ATTERY
P
A K
................................................................................................. 5
S
WIT HING
O
N
..................................................................................................................... 5
USING THE KEYBOARD ..................................................................................................... 6
USING THE SOFT INPUT PANEL ......................................................................................... 7
USING THE BARCODE SCANNER ....................................................................................... 8
ONFIGURING
T
HE
S
ANNER
.................................................................................................... 8
CALIBRATING THE TOUCH SCREEN ................................................................................... 9
S
ETTING THE
D
ATE
/T
IME
....................................................................................................... 10
D
ISPLAY
S
ETTINGS
................................................................................................................ 10
POWER MANAGEMENT ................................................................................................. 11
HARGING THE BATTERY
........................................................................................................ 11
L
I
-I
ON
B
A KUP
B
ATTERY
....................................................................................................... 11
B
ATTERY
S
AFETY
.................................................................................................................. 11
R
EMOVING THE
B
ATTERY
P
A K
............................................................................................... 11
I
NSERTING
T
HE
B
ATTERY
P
A K
............................................................................................... 12
RESETTING THE BOSTON ................................................................................................ 1
W
ARM
B
OOTING THE
B
OSTON
............................................................................................... 13
OLD
B
OOTING THE
B
OSTON
................................................................................................. 13
POWER STATUS ............................................................................................................. 14
B
OSTON
Q
UI K
D
O K
HARGER
.............................................................................................. 14
BOSTON 6-GANG BATTERY CHARGER ............................................................................ 15
PC COMMUNICATIONS .................................................................................................. 16

Boston 8550i User Guide – © 2012 Belgravium Technologies Plc (v.1.0) 3
S
ETTING
U
P
M
I ROSOFT
A
TIVE
S
YN
(WMD
IF
V
ISTA
/W
INDOWS
7)
O
N
T
HE
H
OST
P ................ 16
OMMUNI ATING
V
IA
T
HE
USB
P
ORT
..................................................................................... 16
P
ERMANENT
S
ETTINGS
S
AVE
.................................................................................................. 17
WIFI ............................................................................................................................... 18
U
SING THE
S
UMMIT
LIENT
U
TILITY
–
S U .............................................................................. 18
T
O INITIALIZE
S U: .............................................................................................................. 18
S
TATUS
W
INDOW
................................................................................................................ 21
D
IAGS
W
INDOW
.................................................................................................................. 21
G
LOBAL
W
INDOW
............................................................................................................... 22
EMU APPLICATION ......................................................................................................... 2
ONFIGURATION
.................................................................................................................. 23
CARE AND CLEANING OF THE BOSTON ........................................................................... 24
GPRS EDGE (OPTION) ..................................................................................................... 25
S
ETTING UP A
ONNE TION
................................................................................................... 25
CAMERA......................................................................................................................... 26
SD CARD SLOT ................................................................................................................ 26
TECHNICAL SPECIFICATION ............................................................................................ 27

Boston 8550i User Guide – © 2012 Belgravium Technologies Plc (v.1.0) 4
Introduction
The Belgravium Boston is a rugged, compact and lightweight hand held mobile computer powered
by the Marvell PXA270 processor and Microsoft Windows E operating system. The Boston offers
multiple connectivity options through local, wide area wireless technologies and integral barcode
scanner.
The Boston provides a familiar Windows environment for development and use, and is well suited
for warehouse management, asset tracking and many other data collection applications.
The Reader
This user guide is intended for all operators of the Boston 8500 Series Mobile omputer, and
assumes no previous knowledge of the product. The user should be aware however, that the exact
hardware configuration of your Boston may be different from the information presented in this user
guide. For example, your Boston may or may not be configured with a handle, scanner, camera or
wireless options.
Related Publications
This guide describes the operation of the Boston’s factory default software only. The user should
refer to supplementary documentation associated with any additional software application that is
programmed into the Boston.
Acknowledgements
Any third party products mentioned in this guide are included for identification purposes only and
may be trademarks of their respective companies. Belgravium reserve the right to change the
product described in this document without prior notice. The document and the information
contained herein are copyright and may not be reproduced by any method without prior consent
from Belgravium.
Issue Date Part Number Document Number
Rev 1.0 May2012 12D005i
omments are welcome and should be sent to:
The Marketing Department Telephone: +44 (0) 1274 741860
Belgravium, ampus Road Fax: +44 (0) 1274 741862
BD7 1HR, ENGLAND Internet: www.belgravium.com
Boston 8550i User Guide – © 2012 Belgravium Technologies Plc (v.1.0) 5
First Operation
Inserting The Battery Pack
Insert the end of the battery without the locking tab into the top of the battery opening and snap
the battery into place with a hinging motion. Press the battery firmly into the well until the clip is
engaged.
The Boston will initialise and, after a few seconds, will show the Boston start-up screen.
WARNING: If a battery pack is allowed to discharge completely by ignoring all the battery warnings,
then the battery pack will disconnect itself internally to prevent damage. In this event, the battery
can no longer be recharged in the Boston, but must be charged in the six gang charger. Attempting
to charge a completely flat battery in the terminal may result in the Boston not turning on and the
battery not being charged.
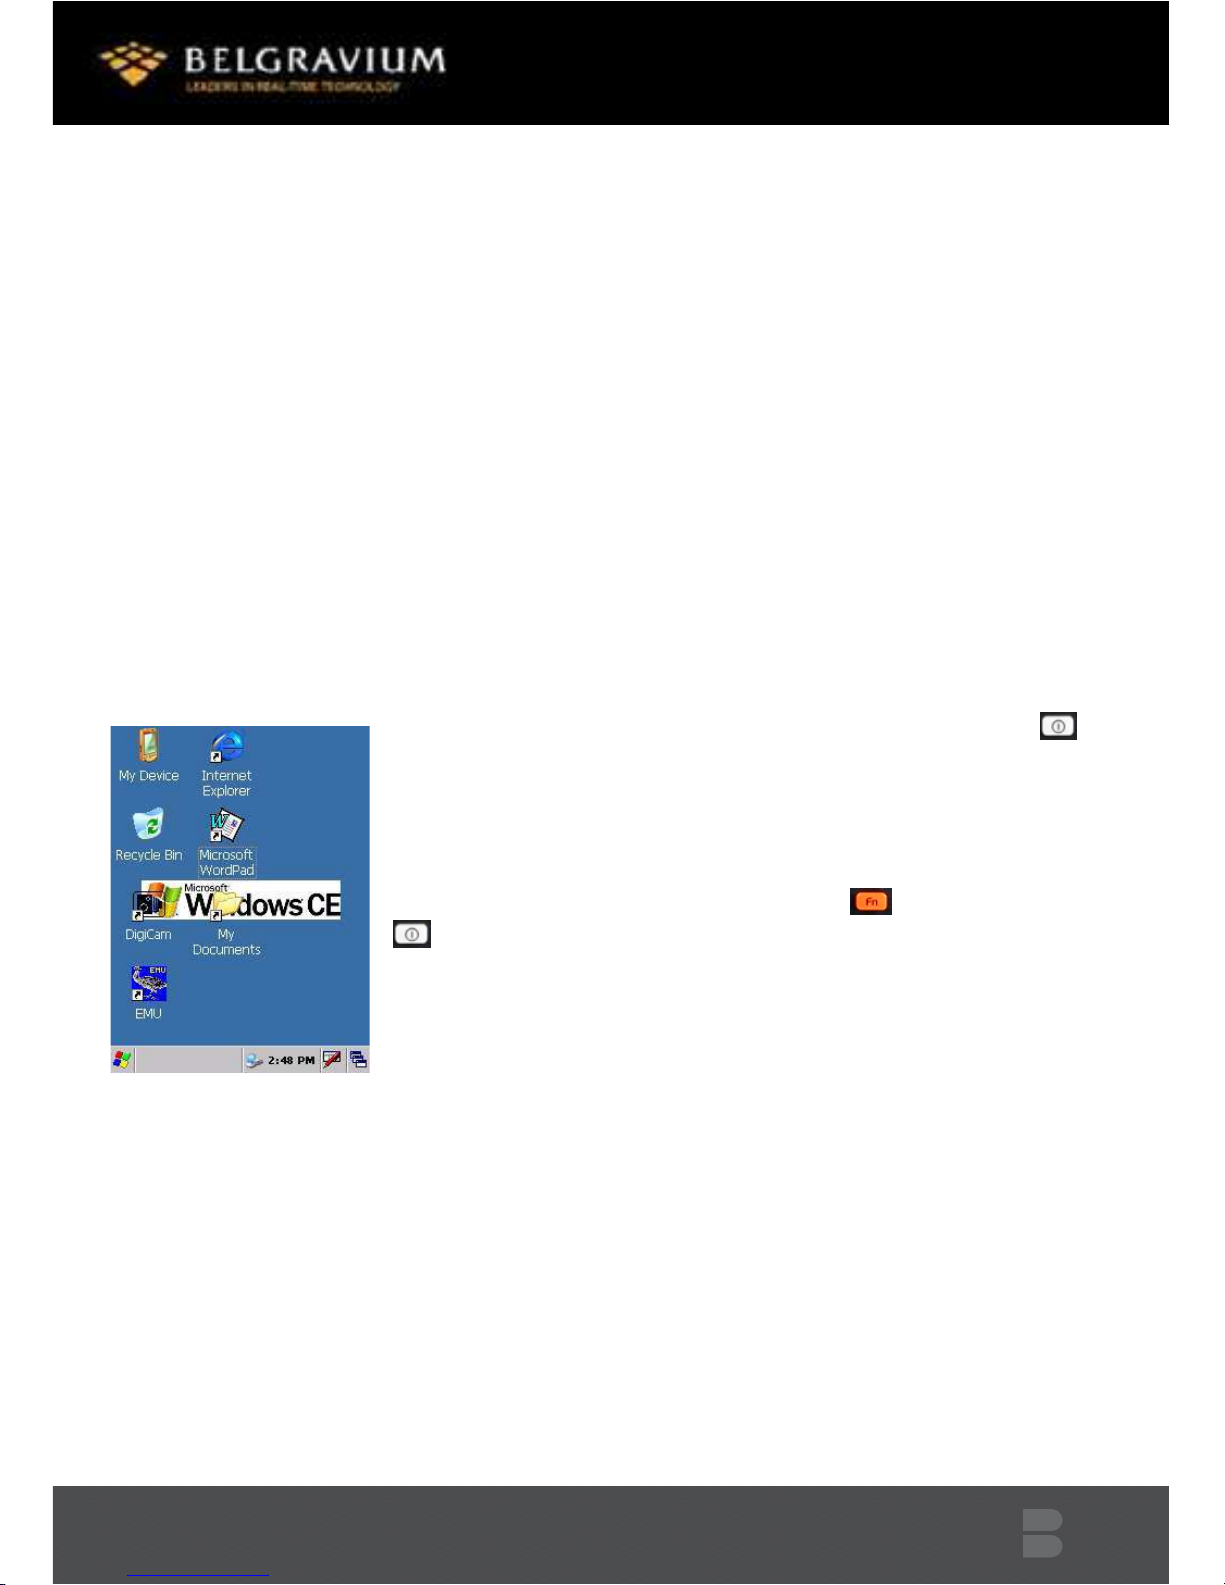
Switching On
Ensure that a battery pack is loaded into the Boston and press the
key for two seconds. The Boston will initialise, and after a few seconds
will display a start-up screen similar to the one shown left:-
Suspend Operation -The Boston is never actually turned off, but
conserves battery life by suspending all operations. The Boston can be
placed in suspend mode either by pressing the key and then the
000 key, or by selecting SUSPEND from the Start menu. The Boston will
automatically suspend operation when it has been inactive for a
programmed period of time. This period is configurable by the user via
the “Power Properties” settings in the ontrol Panel. When the Boston
is in suspend mode, the screen will appear blank. Press any key to wake
the Boston from suspend mode, and you can start working where you
left off.
The Boston will immediately suspend all operations if the main battery pack is removed. To resume
operations, install a charged battery and press the any key.
WARNING: Any changes made to the setting of the terminal will not be permanently saved unless
the registry settings are saved (see Page 17).

Boston 8550i User Guide – © 2012 Belgravium Technologies Plc (v.1.0) 6
Using the Keyboard
The Boston keyboard consists of 29 multifunction tactile keys.
Each key on the Boston’s keyboard can perform two/three functions depending
on the following modes of operation
- Normal Mode
- Function Key Mode (Blue/Orange Key)
Numeric Keys
an be accessed directly by pressing the required number
Function Keys
Fn to access the characters in blue/orange text on each key, press the
rele relevant blue/orange “Fn” key and then the required character/symbol.
Ctrl Key
This key can be used to generate AS II ontrol haracter for an application running on the
terminal that responds to them e.g. to pop up the Find Text in Document ( trl+F) dialogue
box in wordpad. To access press and then
Alt Key
This key can be used when the application running on the terminal responds to the ALT
function e.g. to gain access to the menu bar in WordPad.
Windows Logo Key
This key can be used to pop up the Windows Start menu at any time if the
taskbar is enabled.
Function of the ‘F’ Key
an be used when the application running on the terminal requests the user to press Function
Keys (F1-F18). F1-F6 directly, F7-F12 by pressing the key and the required “F” key,
F12-F18 by pressing the and the required “F” key.
On/Off Key
To switch the terminal off press and the key. To resume, press any key.
Boston 8550i User Guide – © 2012 Belgravium Technologies Plc (v.1.0) 7
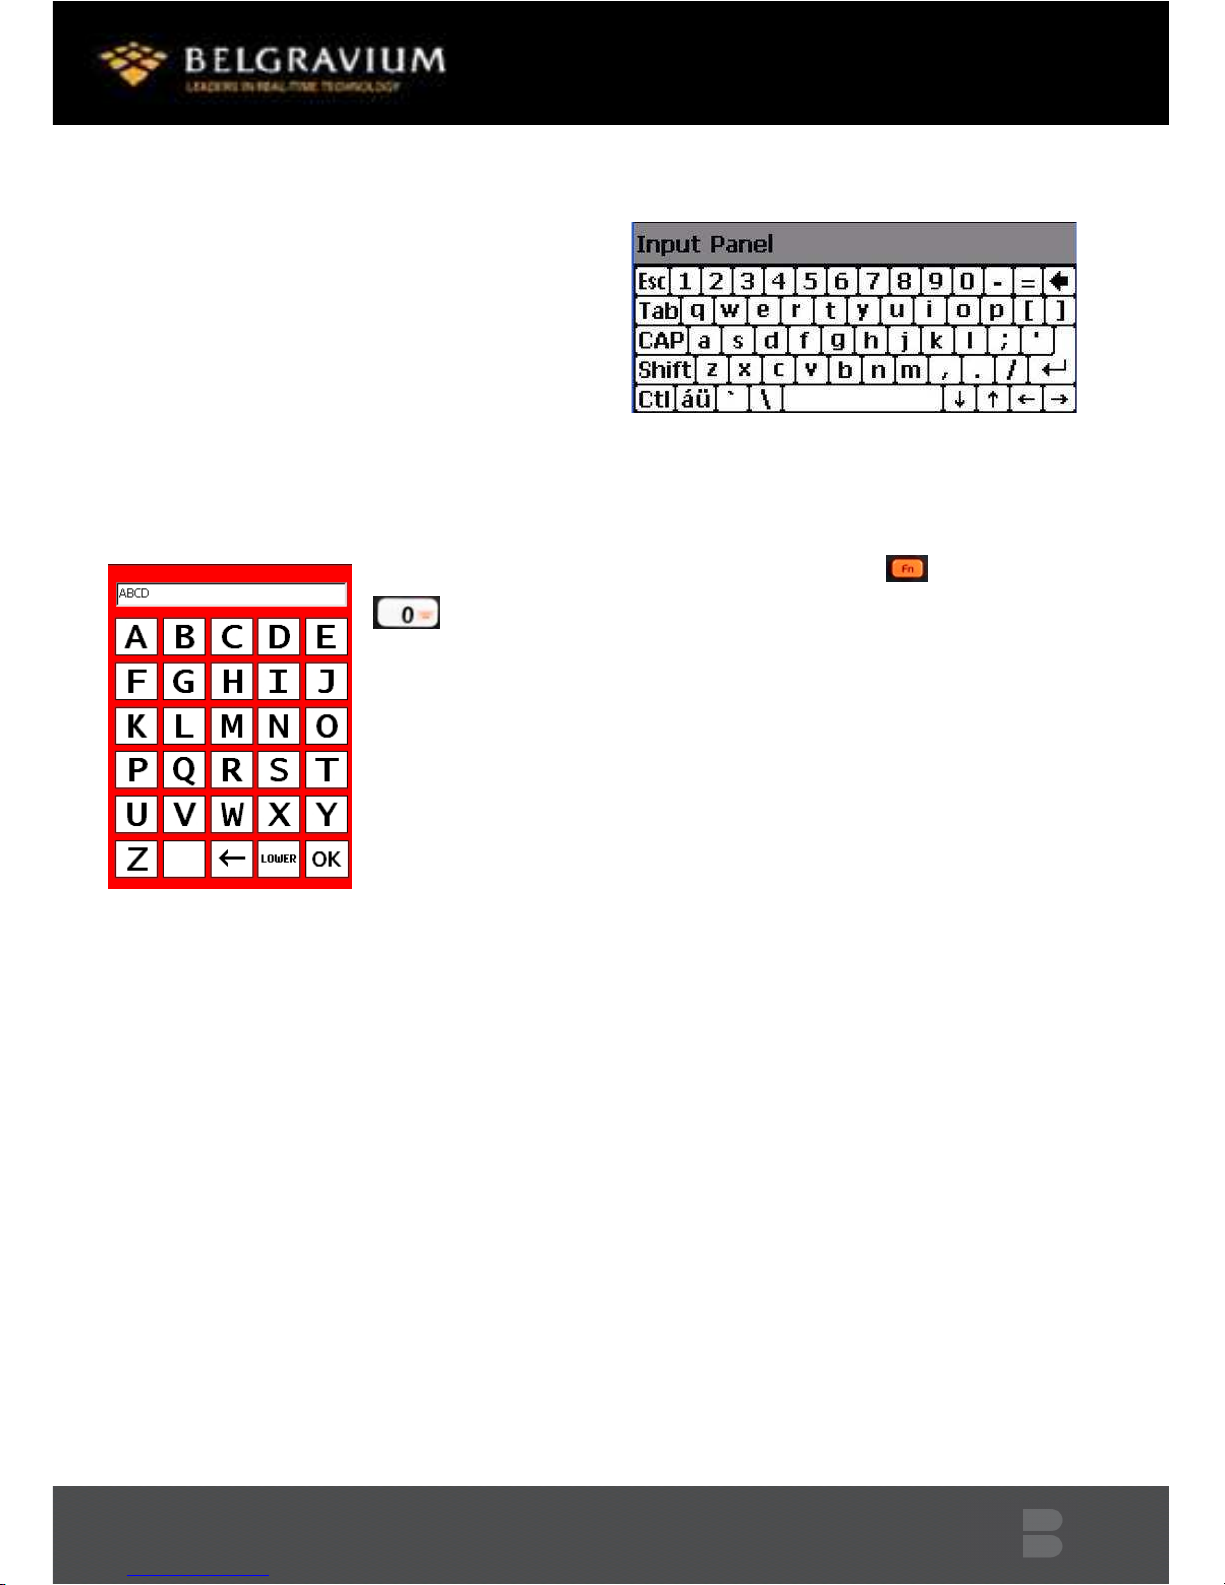
Using The Soft Input Panel
If it is necessary to enter extended alphabetic
characters into the Boston, the soft input
panel (pop-up keyboard) can be used. Double tap
the keyboard icon on the taskbar to
display the pop-up keyboard.
The pop-up keyboard will now be displayed and data can be entered by tapping on the keys. Double
tap on the keyboard icon to hide the pop-up keyboard. The pop-up keyboard can be moved around
the screen by dragging the input bar to the desired position with the stylus.
To access the on-screen Alpha keyboard (left), press and then

Boston 8550i User Guide – © 2012 Belgravium Technologies Plc (v.1.0) 8
Using The Barcode Scanner
The integral barcode scanner can be
activated by pressing the scan trigger shown
and scan button (above):
All popular 1D and 2D barcode symbologies
are supported. The Boston’s scanner can be
configured to decode the users preferred
barcode symbologies using the “Reader”
settings properties within the ontrol Panel.
Configuring The Scanner
The Boston
comes with the
following default barcode symbologies enabled:- 1D Laser & D
Scanners - ode 39, ode 128, EAN 8, EAN 13, EAN 128, UP A, UP E
and Interleave 2 of 5
2D Imager - 1D symbologies: EAN/UP , GS1 Databar, ode 39, ode
128, GS1 128, ISBN, ISBT, Interleaved, Matrix, Industrial and Standard 2
of 5, odabar, ode 93/93i, ode 11, MSI, Plessey, Telepen. 2D
symbologies: Data Matrix, PDF417, Micro PDF 417, Maxicode, QR,
Aztec, GS1 composite, postal codes
The default barcode decode settings can be modified by selecting the
“Reader” section of the ontrol Panel. Here the required barcode decode types can be enabled and
disabled. Select the required barcode types and tap the apply button to configure the scanner.
The scanner decode preferences can be tested by using the “Read” tab and tapping the “Scan”
button to scan a barcode.
NOTE: For Faster Scanning only select the codes required The default settings may be restored by
tapping the “Defaults” button.
Scan
Triggers

Boston 8550i User Guide – © 2012 Belgravium Technologies Plc (v.1.0) 9
Calibrating the Touch Screen
alibration can be performed by opening the "Stylus" folder in the
ontrol Panel directory and choosing the " alibration" tab. While
following the directions for calibration of the screen, keep the
following points in mind:-
•On tapping the “Recalibrate” button, you will be prompted
to calibrate the screen. The Boston will display a cross-hair
target and a message to "Press and hold stylus on centre of
target".
•alibration should always be performed with a stylus
designed for touch screen applications (Part No. PP1001).
•The stylus should be oriented at a 90 degree angle to the
screen surface. Press the stylus firmly into the centre of the
cross-hair target, briefly hold, and release. Do not
"doubletap" the target. You will be prompted to repeat this
process for a total of five targets. Press the ENTER key
when complete in order to save the new calibration
settings, or the Esc key to cancel.
•It may also be necessary to calibrate the screen for the
user’s prefON/erence of "double-tap" speed. If the Boston does
not respond properly to a "double-tap" on the screen, open the
"Stylus" folder in the ontrol Panel directory and choose the
"Double-Tap" tab. Double-tap the chequered square using your
normal double- tap speed then verify by double-tapping the
verification icon. This setting is also reset to factory default each time the Boston is cold
booted and must be recalibrated by the user.
WARNING: If the main battery becomes fully discharged or is removed. The data held in RAM will be
preserved for a maximum of 60 minutes. If the main battery is not replaced with a charged battery,
the Boston will be restored to its original factory default settings and any data stored in the RAM
filing system will be lost. However, applications and data in the persistent storage folder \Flash
Storage will be preserved (Intel Persistent Storage Manager). (See Page 17)

Boston 8550i User Guide – © 2012 Belgravium Technologies Plc (v.1.0) 10
Setting the Date/Ti e
Use the ontrol Panel “Date/Time” function to set the date and time
for your Boston. It is suggested that the time zone is the first setting
to be selected.
Display Settings
The display settings can be adjusted by using the “Display” function in
the ontrol Panel. Here the display appearance, brightness and
backlight settings can be adjusted.

Boston 8550i User Guide – © 2012 Belgravium Technologies Plc (v.1.0) 11
Power Management
Charging the battery
WARNING: Boston 8550i battery charging process should not be performed within restricted areas.
If the battery becomes discharged and there is no longer enough power to continue full
operations, the battery can be charged through the QuickDock (see page 14) if the charge option is
fitted to the QuickDock. Alternatively the battery should be placed in the Six Gang harger.
For maximum performance, charge the batteries between 10° and 35° (50°F and
95°F).
The battery is designed to operate in a temperature range of –5° to 50° (23°F to
122°F).
Li-Ion Backup Battery
The backup battery retains data in RAM if you need to remove and replace the main battery. The
backup battery is automatically recharged by the Boston and takes approximately 14 hrs to fully
recharge if left to go flat. This provides a RAM hold-up period of 4 days (if the internal battery is fully
charged) in the absence of the main battery.
Battery Safety
If exposed to abuse conditions, lithium ion cells and battery packs may get hot, explode or ignite and
cause serious injury. Be sure to follow the safety warnings listed below:-
•Do not place the battery in fire or heat the battery.
•Do not connect the battery terminals together with any metal object
•Do not pierce the battery, strike the battery or otherwise subject it to strong impacts or
shocks.
•Do not immerse the battery in water.
•Do not disassemble or modify the battery. The battery contains safety and protection
devices, which, if damaged, may cause the battery to generate heat, explode or ignite.
Re oving the Battery Pack
1. Preferably ensure that the Boston is suspended, either press the key, or select “Suspend”
from the Start Menu.
2. Hold the Boston with the front panel (keyboard) facing down.
3. Push the locking tab on the battery pack up and remove the battery from the Boston with a
hinging motion.

Boston 8550i User Guide – © 2012 Belgravium Technologies Plc (v.1.0) 12
Inserting The Battery Pack
WARNING: Boston 8550i battery insertion and replacement process should not be performed within
restricted areas.
1. Insert the end of the battery without the locking
tab into the top of the battery opening and snap the
battery into place with a hinging motion.
2. Press the battery firmly into the well until the clip is
engaged. When the terminal is new, more force than
usual may be required to engage the clip.
3. Using an appropriate tool, slide the locking tabs into
place so that the green tabs indicate that battery is
securely locked in place and suitable for use within an
ATEX environment.
The Boston will initialise and after a few seconds will
show the Boston start-up screen.

Boston 8550i User Guide – © 2012 Belgravium Technologies Plc (v.1.0) 13
Resetting the Boston
There are two methods of resetting the Boston; warm boot and cold boot.
War Booting the Boston
There are times when you may need to warm boot the Boston. These may include:-
•After installing new software
1. To warm boot the Boston simply turn the Boston off ( and ) and then again.
Note: No data will be lost but drivers and hardware cards will be restarted.
Cold Booting the Boston
Under certain conditions, you may need to reset the Boston with a cold boot. These may
include:-
•Resetting the operating system.
•Resetting the Boston back to factory defaults.
•Resetting the Boston after a boot loader and kernel upgrade.
1. To cold boot the Boston press and hold the key and hold for 10 seconds, the screen will then
reload back to the desktop.
NOTE: A cold boot (hardware reset) terminates all applications, clears the RAM filing system and the
RAM copy of the system registry. All data and programs held in the RAM filing system will be lost.
However, applications and data in the persistent storage folder/Flash Storage will be preserved
(Intel Persistent Storage Manager).

Boston 8550i User Guide – © 2012 Belgravium Technologies Plc (v.1.0) 14
Power Status
A taskbar power icon denotes the Boston's current power status. Under normal operating
conditions, the Boston with a fully charged battery will not show any power status on the taskbar.
However, when the battery is running low, a series of pop-up warnings will be displayed prompting
the user to recharge the battery, and the taskbar will show the battery low warning icon.
When the Boston is in the QuickDock, the battery will begin to
charge and the charging icon will appear on the taskbar.
When the battery is fully charged, the icon will change to the
plug icon.
Double tap the power icon in control panel to display power
properties. On this screen the status of the main and backup
battery is shown, and the power saving features can be
adjusted.
The Boston battery incorporates smart circuitry to enable an
accurate measurement of charge/discharge level and battery
condition. The Boston’s battery pack should be charged using
the Boston QuickDock harger, or alternatively to charge up
to six battery packs simultaneously use
the Boston 6-Port battery charger.
Boston QuickDock Charger
WARNING: Boston 8550i quick dock battery charging process
should not be performed within restricted areas.
1. Place the Boston in the QuickDock to charge the battery pack.
When placed in the cradle, the Boston’s taskbar power icon will
appear showing the charging status of the battery in the
Boston. There is one LED status indicator on the QuickDock cradle.
The LED glows green to show power is connected.
Boston 8550i User Guide – © 2012 Belgravium Technologies Plc (v.1.0) 15
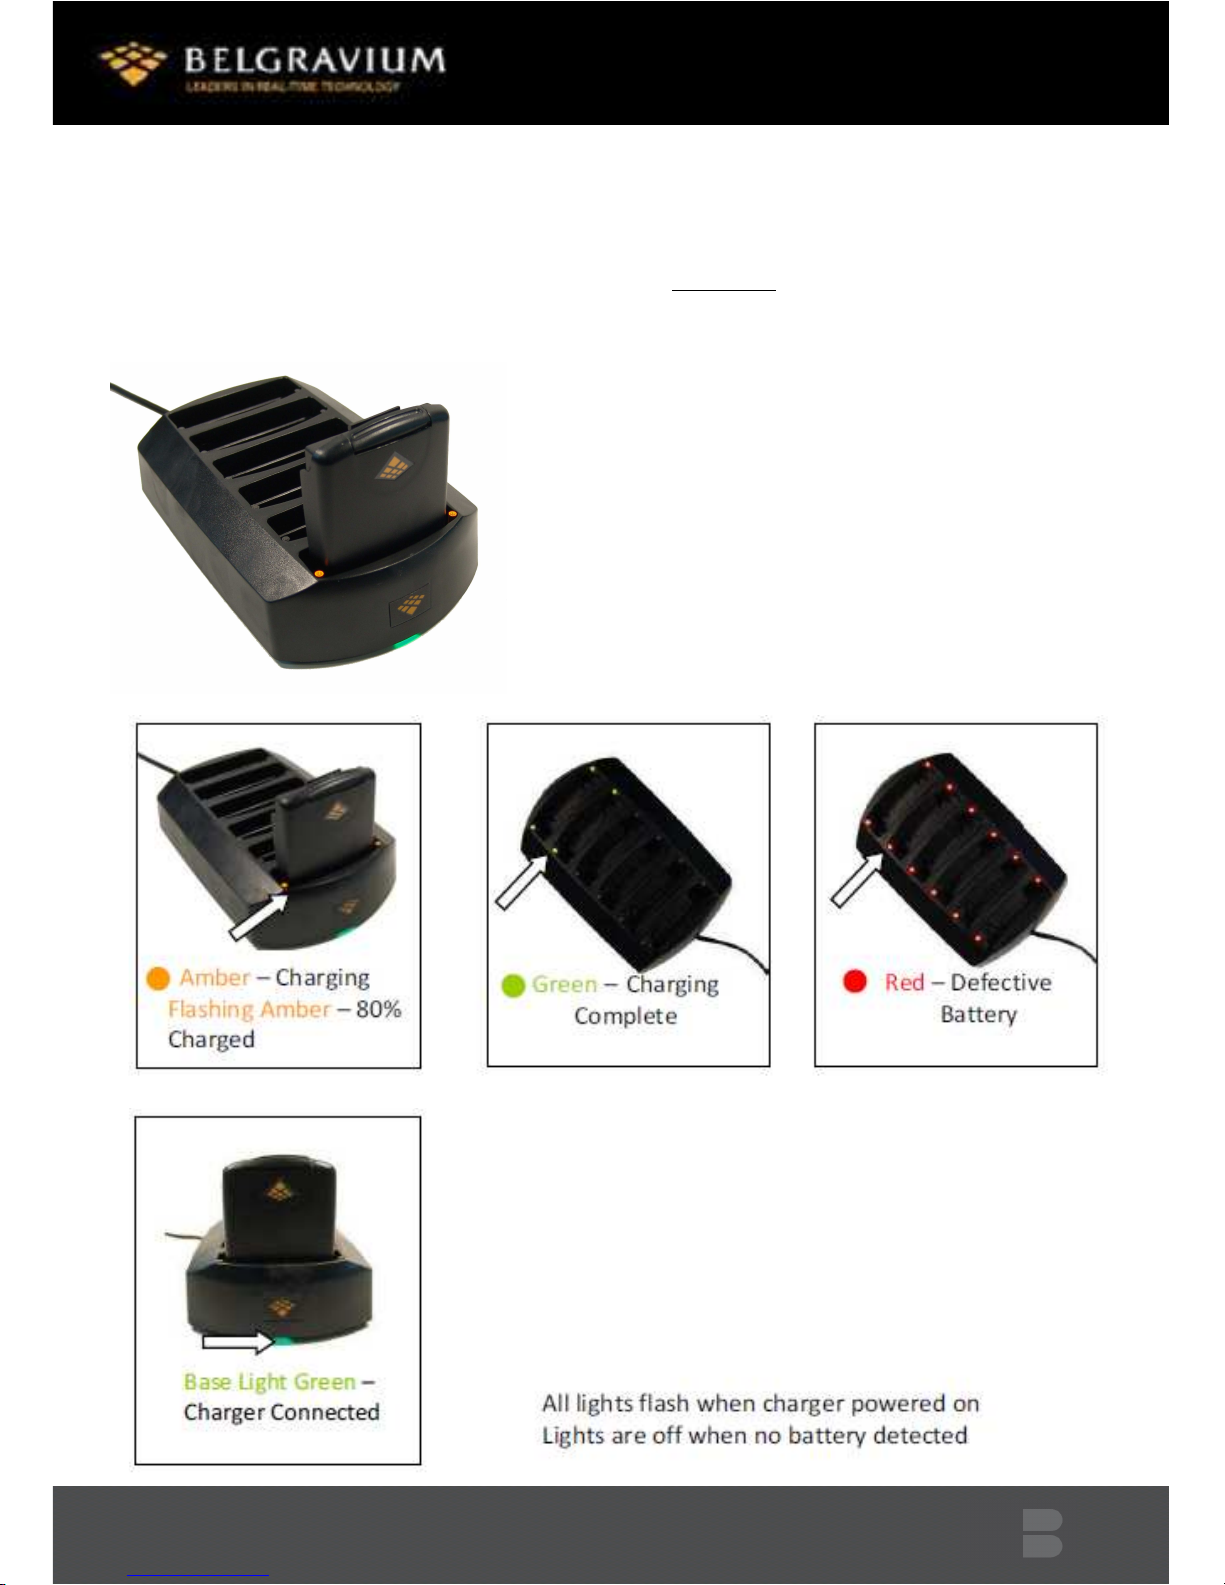
Boston 6-Gang Battery Charger
WARNING: Boston 8550i 6 gang battery charging process should not be performed within restricted
areas
The Boston 6-gang battery charger is an intelligent
charger used to charge, discharge and condition up to six
individual batteries.
Battery harging - To charge a battery, place it into a free
slot, the battery will then be tested and charged. Fully
charging a flat battery can take up to four hours.
Interrupting the charge cycle will not harm the battery,
however it will not be fully charged. Batteries can be
safely left in the slots when charge is completed. There
are two status LED’s per slot indicating the status of the
battery in that slot as follows:-

Boston 8550i User Guide – © 2012 Belgravium Technologies Plc (v.1.0) 16
PC Communications
The Boston can communicate with a host P running Microsoft ActiveSync (WMD if
Vista/Windows7), using infrared or USB (via the QuickDock) to transfer applications and data.
Setting Up Microsoft ActiveSync (WMDC if Vista/Windows7) On The Host PC
In order for P to Boston communications to take place Microsoft ActiveSync 3.7 or greater must
be installed on the host P . Microsoft ActiveSync can be downloaded from
www.microsoft.com/mobile/ and is installed by simply double-clicking the downloaded file and
following the on-screen instructions.
1. Start ActiveSync and select File- onnection settings.
2. Ensure ‘Allow serial cable or Infrared onnection to the OM port’ is checked.
3. Ensure ‘Allow USB connection with this computer’ is checked.
4. Ensure ‘Allow network (Ethernet)’ is unchecked.
5. Ensure ‘Show status icon in taskbar’ is checked.
6. There should be a grey ActiveSync icon in the taskbar.
Co unicating Via The USB Port
Enabling The USB onnection on the Boston
From the Start menu select: Settings → ontrol Panel →P
onnection
1. Tap on the ‘ hange onnection’ button.
2. Select ‘USB radle’.
3. Tap OK.
Co unicating
1. onnect the Boston QuickDock with USB to the Host P
2. Ensure Microsoft ActiveSync is running on the host P .
3. Insert the Boston in to the QuickDock
The grey ActiveSync icon in the host P taskbar will turn green. ActiveSync will ask if you want to set
up a partnership. Select no, connect as Guest only. The Boston will be seen in Windows Explorer on
the host P as ‘mobile device’, or through ActiveSync. The communications icon will appear on the
Boston’s taskbar indicating that a connection has been established.

Boston 8550i User Guide – © 2012 Belgravium Technologies Plc (v.1.0) 17
Installing User Applications
User applications can be developed for the Boston using Microsoft embedded Visual Tools and the
Boston SDK, or Microsoft Visual Studio and ompact Framework. Once developed, applications can
be installed on the Boston via ActiveSync. It is recommended that all user applications are either
installed or copied into the Flash Storage folder (Intel Persistent Storage Manager). After a cold
boot, the Boston is restored to its original factory default settings and any data stored in the RAM
filing system or memory will be lost. However, applications and data stored in the persistent storage
filing system folder \Flash Storage will be preserved.
Per anent Settings Save
Saving Desktop and Progra Menu Settings
Any program shortcuts placed on the desktop or in the program menu can also be saved to the Flash
Storage folder by running the ‘SaveDesk’ utility after installation. This will ensure the user’s desktop
and program menu settings are restored automatically after a cold boot. The desktop and program
menu setting can be manually restored at any time using the ‘LoadDesk’ utility.
Saving Registry Settings
The Windows E registry on the Boston stores data about applications, drivers, user preferences,
and other configuration settings in RAM. After a cold boot, the Boston is restored to its original
factory default registry settings and any user data stored in the RAM registry will be lost. The Boston
provides the ‘SaveReg’ utility which can be used at anytime to save the contents of the RAM based
registry to persistent storage. This allows registry settings to be preserved and automatically
restored after a cold boot.

Boston 8550i User Guide – © 2012 Belgravium Technologies Plc (v.1.0) 18
WiFi
Using the Su it Client Utility – SCU
S U is an application designed for end users and administrators of mobile devices that use a Summit
radio module. Using S U, an end user can:
•Disable the radio (turn it off) and enable the radio (turn it on)
•View the contents of configuration profiles
•Select the profile to be used to connect to a WLAN
•View global settings
•View status information on the radio, the access point (AP) or WLAN router to which it is
connected, and the
•RF connection or link between the two
•View in-depth diagnostic information and perform troubleshooting and diagnostic tests
After completing an administrator login to the utility, a user can perform these additional tasks:
•reate, rename, edit, and delete profiles
•Edit global settings
S U provides a graphical user interface for access to all of its functions. Access to these functions is
also available through an SDK that an application programmer can use to enable another utility to
manage the radio.
To initialize SCU:
Select the “Summit” icon from the control panel.
1. To run S U, lick the S U icon.
S U includes the following five windows: Main, Profile, Status, Diags (or Troubleshooting), and
Global.

Boston 8550i User Guide – © 2012 Belgravium Technologies Plc (v.1.0) 19
Main Window
· Admin Login/Logout – The default password is SUMMIT (case
sensitive). The password can be
changed through the Admin Password function on the Global
window.
· Enable/Disable Radio
· Active Profile – You can view the name of the
active profile and using the selection list, select a
different profile. If you select Third Party onfig then,
after the device goes through a power cycle, WZ is
used for configuration of the radio.
· Status – Radio status.
· Radio Type – B (802.11b) and G(802.11g).
· Reg. Domain – Indicates the regulatory domain for which the
radio is configured.
The domain cannot be configured by an administrator or user.
· Auto Profile – Enables the user to activate or deactivate an automatic profile
selection facility.
· Driver – Indicates the version of the device driver that is running on the device.
· SCU – Indicates the version of S U that is running on the device.
· About SCU: When tapped, supplies information on S U that on a Windows
application normally would appear under Help > About.
Profile Window
Profile settings are radio and security settings that are
stored in the registry as part of a configuration profile.
When a profile is selected as the active profile on the
Main window, the settings for that profile become active.
An administrator can define up to 20 profiles, edit them
and delete them on the Profile window in S U.
NOTE: Profile changes made on the window are saved to the profile only when you click commit.

Boston 8550i User Guide – © 2012 Belgravium Technologies Plc (v.1.0) 20
Unless it is modified, the Default profile does not specify an SSID, EAP type, or method of
encryption. If the Default profile is the active profile, then the radio will associate only to an access
point that broadcasts its SSID and requires no EAP type and no encryption.
· Edit Profile - This is used to select the profile to be viewed or, if you are an
administrator, edited.
· New – Tap to create a new profile (Admin only).
· Rename – Tap to give the profile a new unique name (Admin only).
· Delete – Tap to delete a non-active profile (Admin only).
· Scan – Tap to view access points that are broadcasting SSID’s.
S U allows an administrator to create a profile from a listed SSID.
· Radio – When an attribute is selected, the current setting or an appropriate selection box with the
current setting highlighted appears on the right.
· Security –EAP type and encryption type display with the current values highlighted.
Administrators can define EAP type credentials as well as WEP keys or PSK’s.
· Commit – Tap ommit to confirm changes made to the profile settings.
To cause a Summit radio to connect to a typical business WLAN, you must select a
profile that specifies the SSID, EAP type, and encryption type supported by the WLAN:
· SSID – Name or identification of the WLAN.
· EAP type – Protocol used to authenticate the device and its user if the WLAN uses the Enterprise
version of Wi-Fi Protected Access (WPA) and WPA2.
· Encryption – Type of key used to encrypt and decrypt transmitted data and how that key is
specified or derived. Encryption options include:
- WPA2 or WPA with dynamic keys
- WPA2 or WPA with pre-shared keys
- Static WEP keys
Table of contents


