Belkin F1PG111EN User manual

Make sure you have
the following:
Belkin Message
Manager
Belkin Easy
Install Wizard
Software CD
Auto Setup
Users of
Windows® 98SE
Windows Me
Windows 2000
Windows XP
can use Easy Install Wizard
IMPORTANT: Run the Easy Install
Wizard from the computer that is
directly connected to the cable or
DSL modem. DO NOT CONNECT
the Belkin Message Manager at
this time.
Make sure you have the following 1 Connect 4Install 3Connect 5
Ethernet
Cable
1. Install
Install the Easy Install Wizard Software
Power
Supply
Manual Setup
Advanced Users Go to
the “Alternate Setup
Method” section of
your User Manual.
Install 2
1.1 Shut down any programs that are running on your computer at
this time.
1.2 Turn off any firewall or Internet connection sharing software on
your computer.
1.3 Insert the Easy Install Wizard software CD into your CD-ROM
Drive. The Easy Installation Wizard screen will automatically
appear on your screen within 15 seconds. If it does not, select
your CD-ROM drive from “My Computer” and double-click on
the file named “Setup” on the CD-ROM.
1.4 You will see the Wizard’s
welcome screen.
1.5 Easy Install will show you a
progress screen each time a
step in the setup has been
completed. Each time you
see the progress screen, click
“Next” when you are ready to
move to the next step.
1.6 The Wizard will now examine
your computer’s network
settings and gather information
needed to complete the Belkin
Message Manager’s connection
to the Internet. When the
Wizard is finished examining
your computer, click “Next”
to continue.
The Wizard will walk you through connecting your Message Manager to
your computer and modem. Follow the steps on the screen using the
pictures as a guide.
2. Connect
Connect the Message Manager to your Modem
and Computer
Connect 6
Next
(click)
Telephone
Cord
User
Manual
Features
Guide
Next
(click)
Next
(click)
2.1 Locate the cable connected
between your modem and
the networking port on your
computer. Unplug this cable
from the computer and plug
it into the WAN port on the
Belkin Message Manager.
Next
(click)
STOP! IMPORTANT!
• If you are currently sharing your cable or DSL broadband access using a
router/gateway you can plug the Belkin Message Manager into one of the
available networking ports on your router/gateway. Refer to the section
of your manual titled “Connecting your Message Manager to a Router/
Gateway”. If you are going to connect the Belkin Message Manager directly
to a router/gateway you DO NOT need to run this Installation Wizard.
• If you currently have broadband and do not have a router/gateway, then you
may continue with Easy Install.
2.2 Locate the Ethernet cable that
is included with your Message
Manager. Plug one end of this
cable into the LAN port on
your Message Manager. Plug
the other end of the cable
into the networking port on
your computer.
2.3 Connect your analog phone to
Phone Port of your Message
Manager. Plug the Phone line
from your wall outlet to the
Phone Line Port on the Belkin
Message Manager.
Next
(click)
Next
(click)
2.4 This step instructs you to
locate the power supply that
is included with your Message
Manager. Plug the power
supply’s small connector
into the power jack on the
Message Manager. Plug the
power supply into an empty
power outlet.
2.5 Look at the lights on the
front of your Belkin Message
Manager. Make sure the
appropriate lights are ON.
Refer to the Easy Install
software on your computer’s
screen for more details.
Next
(click)
Next
(click)
NOTE for Windows Users:
If the Easy Install Wiizard does not start up
automatically, select your CD-ROM drive from “My
Computer” and double-click on the “Setup” on the
CD-ROM.

F1PG111EN
Belkin, Ltd.
7 Bowen Crescent • West Gosford
NSW 2250 • Australia
Tel: +61 (0) 2 4372 8600
Fax: +61 (0) 2 4372 8603
Belkin, B.V.
Starparc Building • Boeing Avenue 333
1119 PH Schiphol-Rijk • The Netherlands
Tel: +31 (0) 20 654 7300
Fax: +31 (0) 20 654 7349
Belkin Tech Support
US: 888-542-2207
Belkin Corporation
501 West Walnut Street
Compton • CA • 90220 • USA
Tel: 310.898.1100
Fax: 310.898.1111
Belkin, Ltd.
Express Business Park • Shipton Way
Rushden • NN10 6GL • United Kingdom
Tel: +44 (0) 1933 35 2000
Fax: +44 (0) 1933 31 2000
© 2004 Belkin Corporation. All rights reserved. All trade names are registered trademarks of
respective manufacturers listed.
P74264
Quick Installation
Guide
Check 7Check 8
Start Here
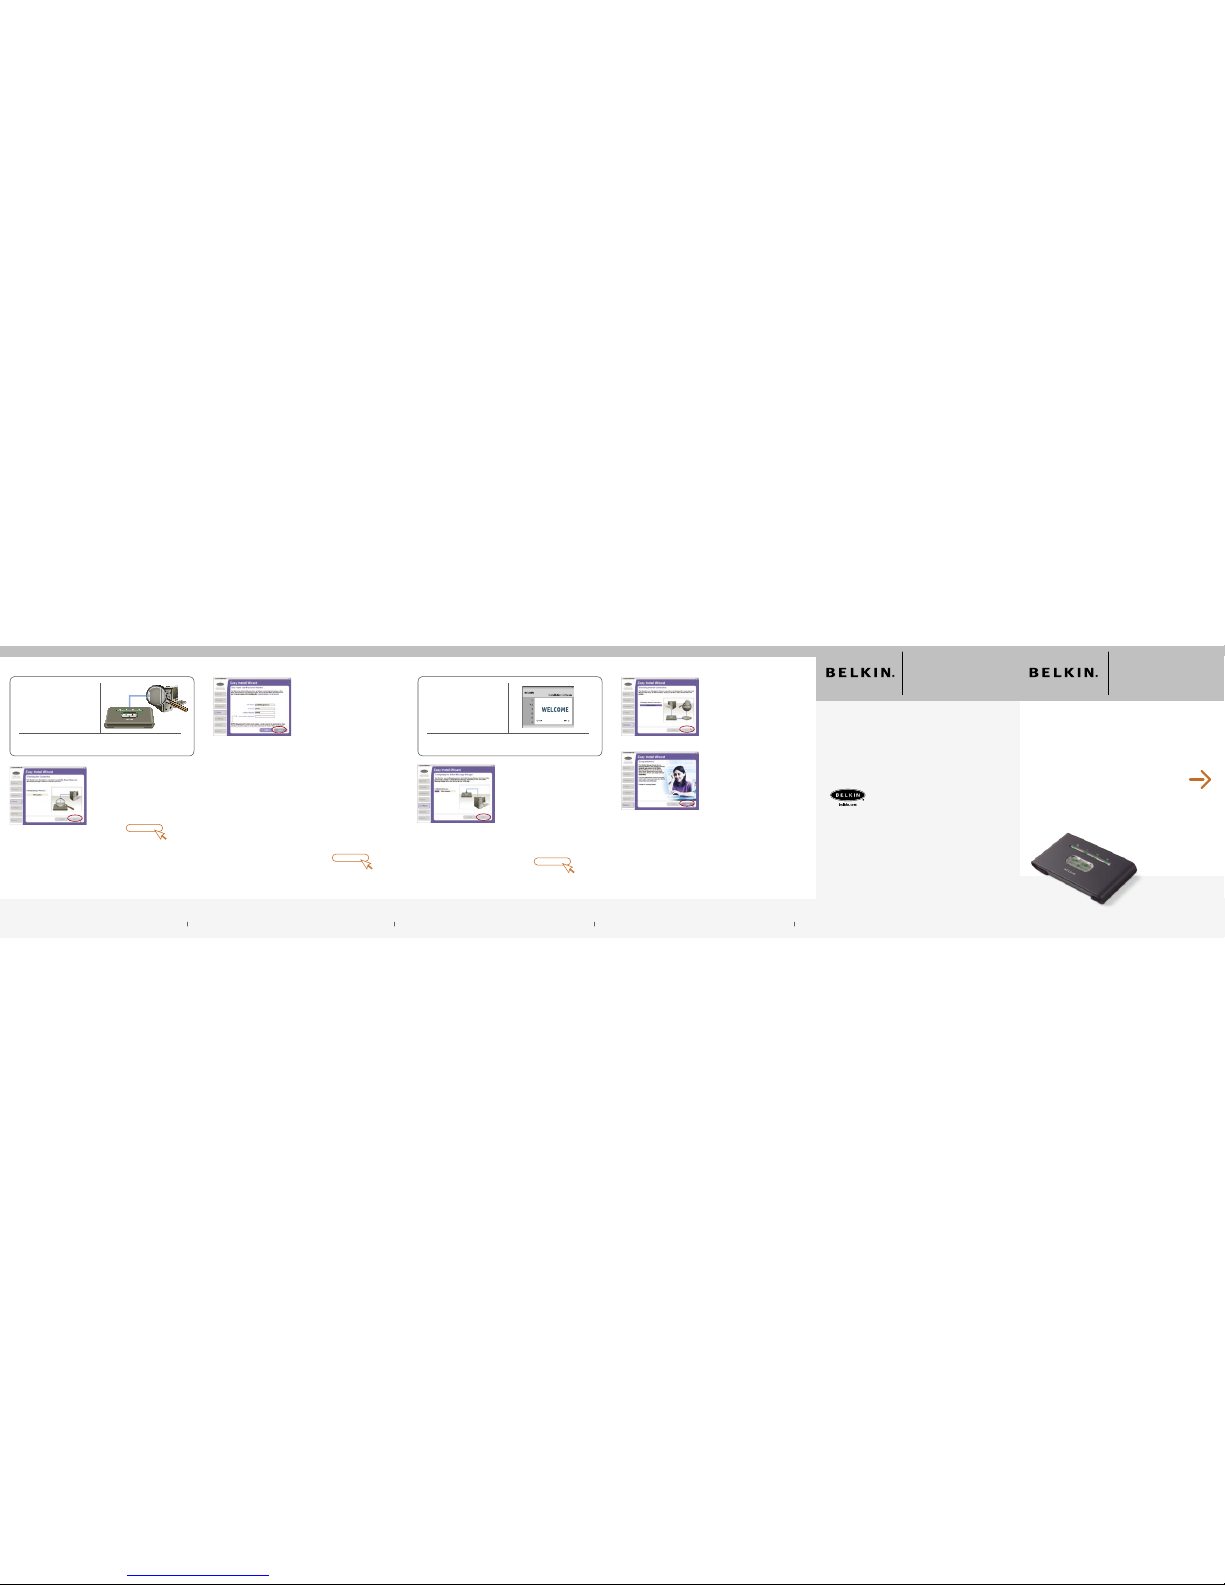
3.1 Once you have completed
connecting the Message
Manager, the Wizard will
check the connection to the
Message Manager then go
on to determine what type of
Internet connection you have.
3. Check
Check the Message Manager connection
Congure 9Congure 10
4.1 The Wizard will now transfer all
of the configuration information
to the Message Manager.
This will take approximately
one minute. During this time,
do not turn off the Message
Manager or Computer. The
Message Manager will restart
itself at the end of this step.
Please allow one minute after
restarting before continuing to
the next step to assure enough
time for boot up.
4. Congure
Conguring the Message Manager
4.2 The Wizard will now check for
an Internet connection. This
can take a few minutes. The
“Connected” light on the front
panel of the Message Manager
will flash during this time. Please
be patient through this process.
4.3 When the Internet connection
is complete; the Wizard will
tell you that you are finished.
The “WAN” LED on the front
of the Message Manager will
be GREEN, indicating that
the Message Manager is now
connected to the Internet.
Wait up to 5 minutes while the
Message Manager automatically
registers to the Belkin callEverywhere™ center. Once a connection to our
callEverywhere center is established the phone connected to the Message
Manager will ring confirming a connection was established. Answer the
call and follow the on-phone instructions. You will be directed to go to the
following website to sign up for your service. www.everywhere.net
Congratulations! You have finished installing your new Message Manager.
Need Help? For further information regarding the installation of this
product, please visit www.everywhere.net, check your manual or call our
toll free 24/7 technical support number 888-542-2207.
Next
(click)
Next
(click) Next
(click)
3.2 If you have a connection type
that requires a user name
and a password, the Wizard
will ask you to type in your
user name and password. If
your connection type does
not require a user name and
password, you will not see
this screen.
Your user name and password
is provided to you by your
Internet Service Provider. If
you have to type in a user
name and password to
connect to the Internet, then
type that same user name and
password in here. Your user
name looks something like
“[email protected]” or simply
“jsmith”. The service name
is optional and is very rarely
required by your ISP. If you
don’t know your service name,
leave this blank. When you
have entered your information,
click “Next” to move on.
Message ManagerMessage Manager
Other manuals for F1PG111EN
2
This manual suits for next models
1
Popular Answering Machine manuals by other brands

Panasonic
Panasonic KX-TM150ALB operating instructions

Panasonic
Panasonic KX-TG2224W - 2.4 GHz Digital Cordless Phone Description

HumanTechnik
HumanTechnik freeTEL II/S Operation instructions

Panasonic
Panasonic KX-TG2584 operating instructions

Panasonic
Panasonic X-TG9385BX operating instructions

BT
BT RESPONSE 85 user guide