Bell and Howell 606 User manual

Panchromatic Bell & Howell 606 Gaumont (H) User Manual
1
The Place to find Antique, Vintage, Retro or just plain used, 8 mm Super 8 mm 9.5 mm,
16 mm Film Projectors, Slide Transparency Projectors, Cameras and Darkroom
Equipment.
G.B. Bell & Howell
Model 606 / 606H
User Manual
Service@Panchromatic.co.uk

Panchromatic Bell & Howell 606 Gaumont (H) User Manual
2
BELL & HOWELL
MODEL 606
BELL & HOWELL
MODEL 606 H
Instructions for Operation

Panchromatic Bell & Howell 606 Gaumont (H) User Manual
3
CONTENTS Page
Setting Up for Use - - - - - - 6
Electrical Connections- - - - - 6
Inserting the lamp - - - - - 8
Focusing the Projector- - - - - 8
Threading the Film - - - - - 9
Projected Picture Sizes with Various Projection Lenses 12
Operation - - - - - - 13
Projection - - - - - - - 13
Adjustment - - - - - - - 13
Rewinding - - - - - - - 13
Pilot Light - - - - - - 14
Still Picture Device - - - - - 14
Care and Maintenance - - - - 15
Projection Lamp Replacement - - - 15
Projector Lubrication - - - - 15
Cleaning Optical Parts - - - 15
Cleaning Film Handling Parts - - - - 16
Specification - - - - - - 17
IMPORTANT
Be sure to fill in and mail the accompanying registration card. This will ;
1. Enable you to obtain the full benefits of our Guarantee.
2. Let us help you find your equipment in case of loss or theft.
3. Enable our Service Department to co-operate with you intelligently.
The Serial Number of your Model will be found on the front plate to the left of the hand
setting knob, beneath the shield.
Serial No: 160802

Panchromatic Bell & Howell 606 Gaumont (H) User Manual
4
Fig 1
1
Motor & Lamp Switches
7
Feed Spool Spindle
2
Lamp Locking Screw
8
Film Gate Lever
3
Reflector
9
Projector Lens
4
Condenser Lens
10
Sprocket Guards
5
Sprockets
11
Take-up Spool Spindle
6
Run / Rewind Lever
12
Lens Locking Screw

Panchromatic Bell & Howell 606 Gaumont (H) User Manual
5
Fig 2
13
Motor & Lamp Switches
17
Feed Spool Spindle
14
Lamp Locking Screw
18
Film Gate Lever
15
Reflector
19
Projector Lens
16
Condenser Lens
20
Sprocket Guards

Panchromatic Bell & Howell 606 Gaumont (H) User Manual
6
Setting Up
Electrical Connections
Important Before attempting to connect your projector to the
mains please check the following.
1. Find out the voltage of your electricity supply, and
whether it is A.C. or D.C. Your Electricity Authority or local
dealer will supply this information.
(240V A.C. in the UK)
2. Make sure that your projector corresponds to this voltage.
The voltage range of the projector is clearly shown on the
switch panel.
3. Check the lamp supplied with the projector is of the same
voltage as the supply. This information is printed on the
lamp.

Panchromatic Bell & Howell 606 Gaumont (H) User Manual
7
4. The adjusting switch for AD/DC. Is situated at the front of
the bakelite housing above the tilt knob (Fig 1 19)
Uppermost letters indicate type of current to which the
projector is set –rotate clockwise to obtain alternative
setting if required.
5. Connection to Mains. The free end of the mains lead
should be connected to a suitable 3 pin mains plug.
Connect the Blue / Black Cable to the Neutral
connection, the Brown / Red Cable to the Live (fused)
connection and the Green / Green & Yellow Cable to the
earth connection. (The mains socket for the machine will
only fit the projector if it is the correct way up).

Panchromatic Bell & Howell 606 Gaumont (H) User Manual
8
Inserting the Lamp
Turn the tilt knob (Fig 2 13) clockwise until the projector is
tilted fully forward. Unscrew the bakelite cap below the lamp
housing (Fig 1 2) and insert the projector lamp with the vertical
tongue at its base towards the front of the projector. Rotate
slightly so the tongue passes through the pre-alignment slot in
the lamp house, when the lamp can be pushed home out of
sight. Now the lamp is in position, replace the lamp house cap.
Focusing the Projector
First ensure that both the motor and lamp switches (Fig 1 1)
are in the OFF position then, insert the rubber covered mains
plug into the socket (Fig 1 20). This plug will only fit in the
correct position as the locating pin is offset. Now plug into the
electrical supply. Switch on the motor and lamp and then move
the clutch Fig 1 18) to the RUN position. The motor will operate
and a beam of light be projected.
Move the projector on its stand or table to a position where the
light falls squarely onto the screen, using the tilt control (Fig 1
13) to either raise or lower the picture area. To adjust the size
of the picture area move the projector nearer to or further
away from the screen as required.

Panchromatic Bell & Howell 606 Gaumont (H) User Manual
9
If there is a noticeable flicker of the light on the screen, turn
the speed control Fig 1 14) in an anti-clockwise direction until
the light is steady. Sharp definition of the edge of the light area
on the screen indicates approximate focus of the lens.
To focus the lens, loosen the lens locking screw (Fig 1 12),
slide the lens backwards or forwards for rough focus and to
make fine adjustments rotate the lens by its knurled front
edge. Lock the lens in position. Return the clutch to the STOP
position and switch off the lamp and motor.
Threading
1. Place the empty take up spool on the spindle of the lower
arm (Fig 1 11) with the spool centre hole slits towards the
take up arm. The spool must click firmly over the spring of
the spool spindle. Place the full spool on the upper feed
arm spindle (Fig 1 7) in the same way.
2. Unwind about 18” of film from the top spool. The film
should feed from the lower front of the spool with the dull
side out and the sprocket holes nearest you as you thread
the projector.
3. Open the sprocket Guards Fig (1 10) by pressing towards
the lens mount, and open the film gate by raising the gate
operating lever (Fig 1 8)
4. Pass the film under the top sprocket and ensure the
perforations fit over the sprocket teeth. Close the sprocket
guard. Next form the upper loop as shown in Fig 3
5. Lead the film through the channel behind the lens, making
sure it is fully located in the channel. Close the film gate
by lowering the lever (Fig 1 8). The gate will only close
properly when the rewind lever (Fig 1 6) is in the RUN
position
6. Form the second loop before passing the film over the
lower socket and close the sprocket guard
Panchromatic Bell & Howell 606 Gaumont (H) User Manual
10
7. Feed the end of the film into the slot on the take-up spool
and rotate the spool in a clockwise direction to take up
slack
Panchromatic Bell & Howell 606 Gaumont (H) User Manual
11
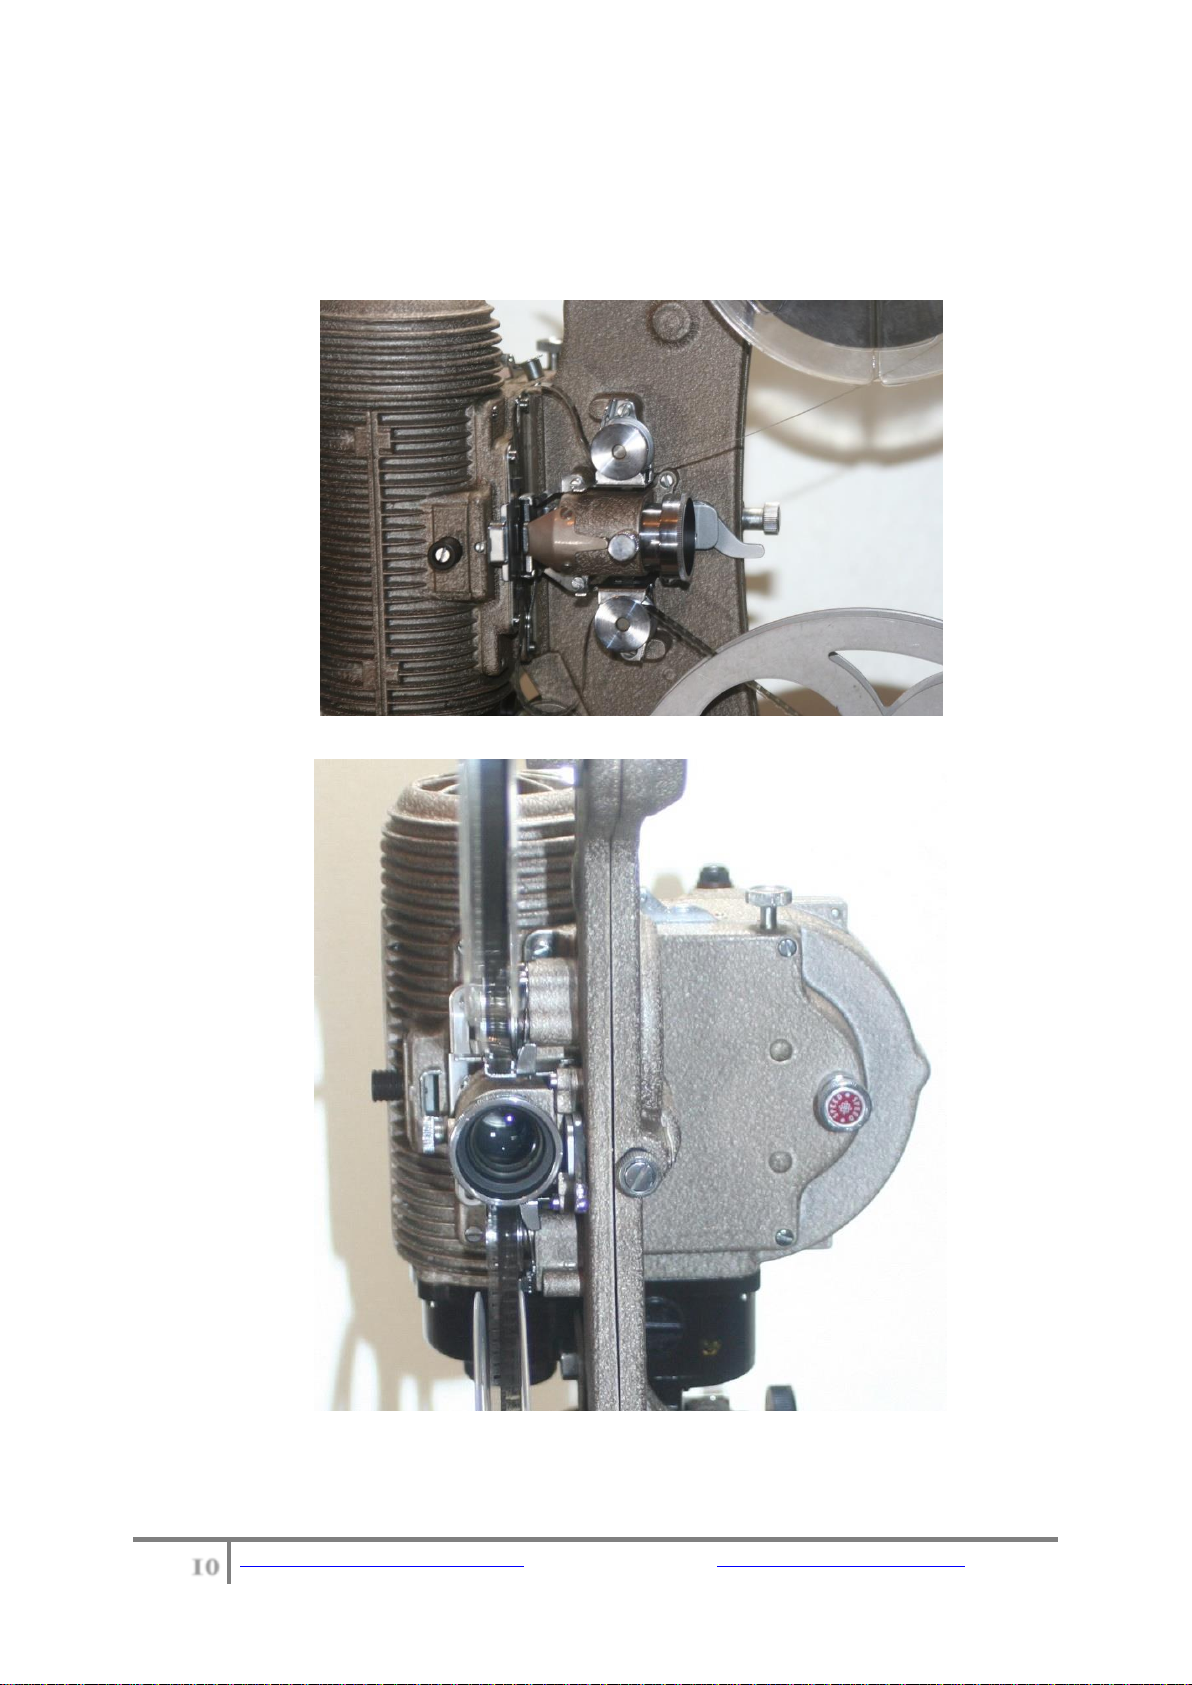
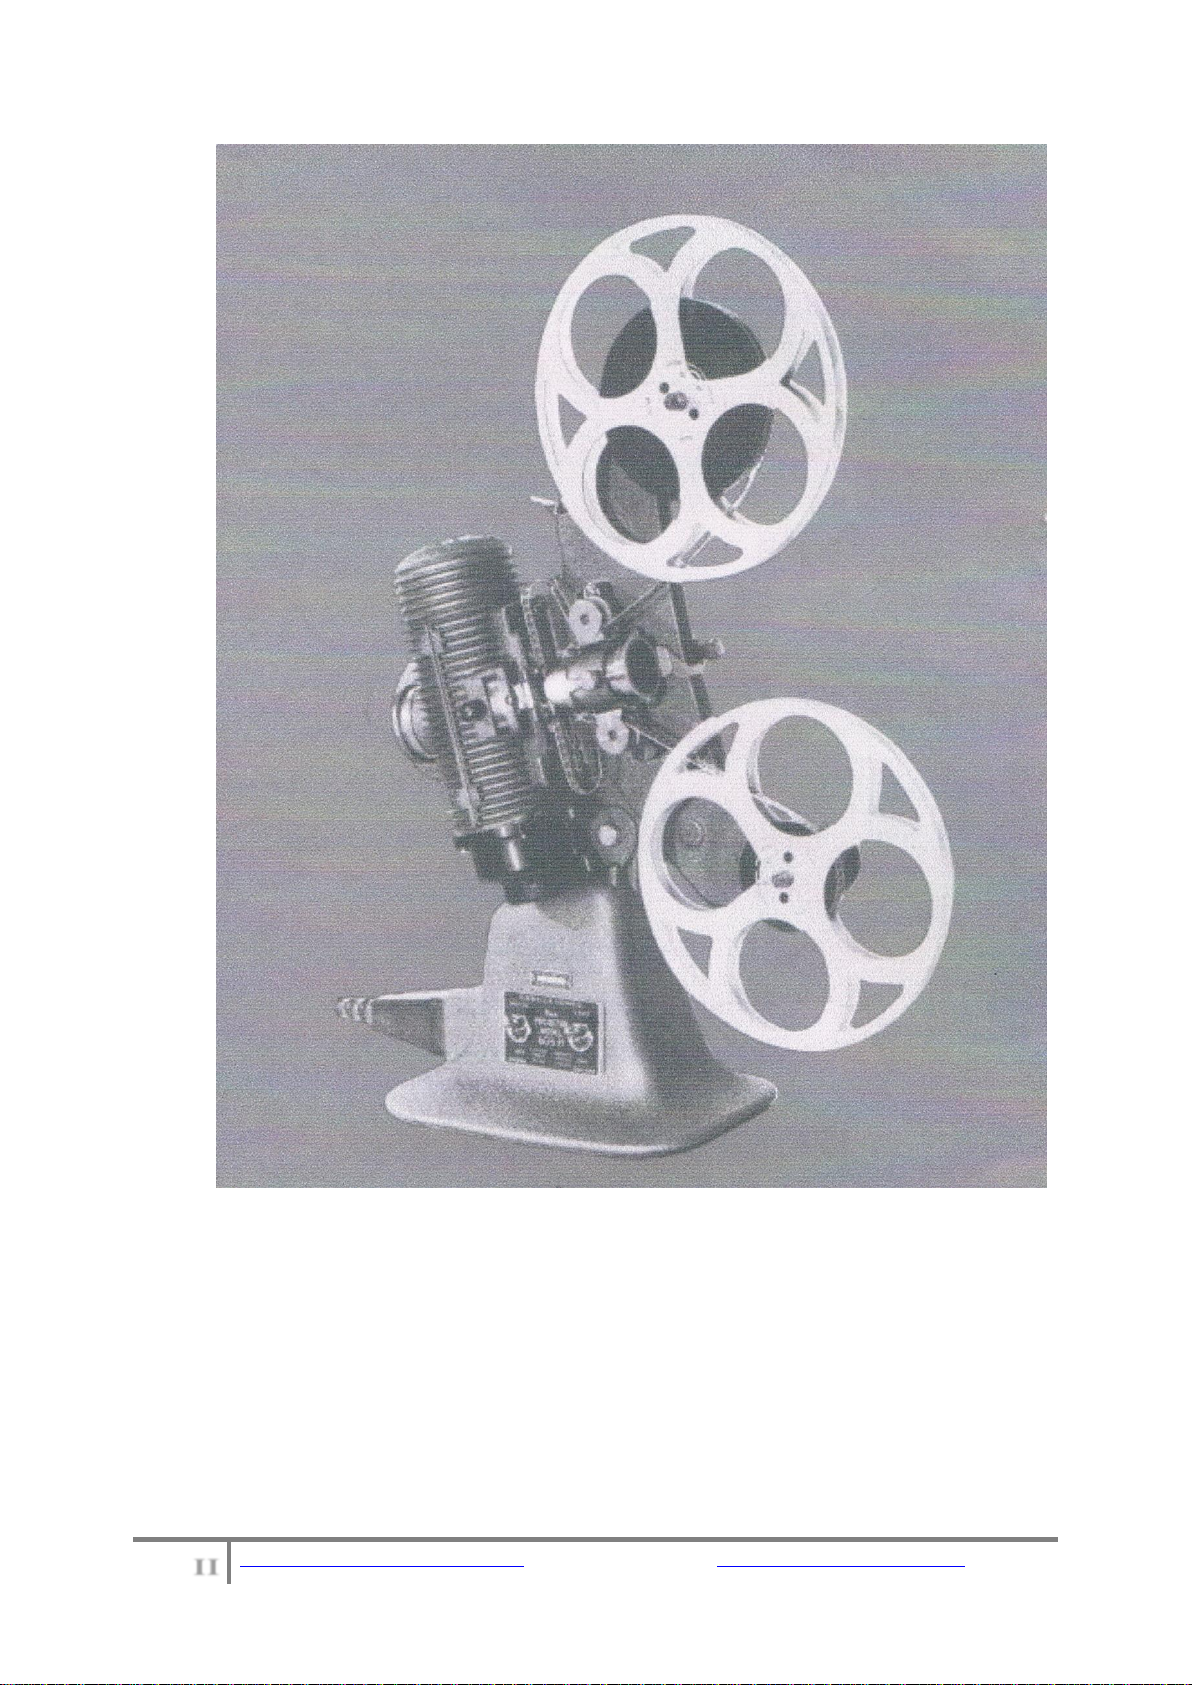
The threading completed your machine should appear as in the
illustration above. To test the threading is correct, push in and
turn the hand setting knob (Fig 2 15) in clockwise direction
carefully watching the movement of the film over the sprockets
and through the gate
Panchromatic Bell & Howell 606 Gaumont (H) User Manual
12
.
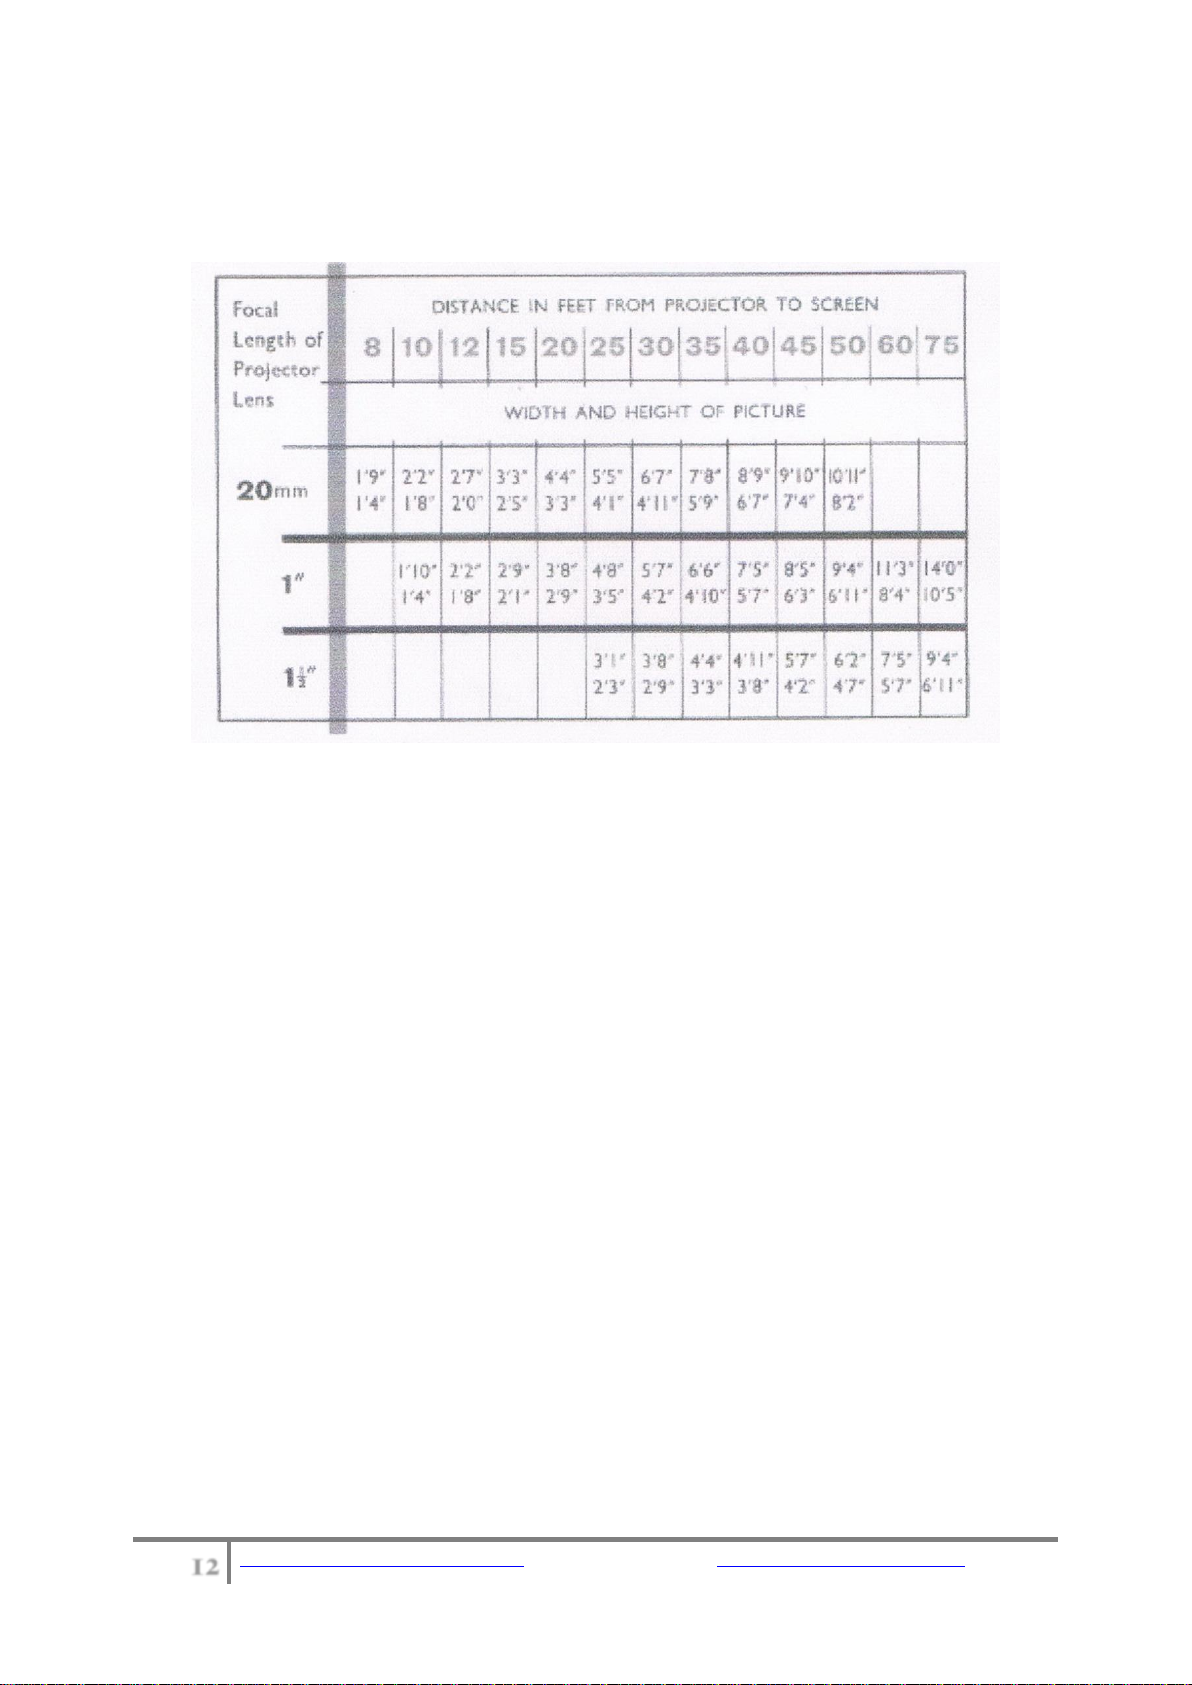
Projected Picture Size
Upper Dimension is width of Picture
Lower Dimension is height of Picture

Panchromatic Bell & Howell 606 Gaumont (H) User Manual
13
Operation
Projection
1. Turn off the room lights
2. Switch on the MOTOR switch
3. Switch on the LAMP switch
4. Move the clutch to the RUN position (Fig 2 18)
Adjustment
1. Fine Focus –Loosen the lens locking screw (Fig 1 12) and
obtain fine focus by rotating the lens (Fig 1 9). When the
picture is sharp clear tighten the locking screw.
2. Framing –If the picture is cut off on top or bottom, rotate
the framing knob (Fig 2 16) in either direction until the full
picture comes into view.
3. Speed –In order to increase, decrease or reset the film
speed turn the speed control knob (Fig 2 14).
Rewinding
1. Push up the film gate lever (Fig 1 8) and move the lever
(Fig 1 6) to the REWIND position.
2. Thread the film from the take-up spool (Fig 1 11) up and
over the front of now empty feed spool (Fig 1 7).
3. Insert the film into the slot on the reel and turn anti-
clockwise to secure the film.
4. Switch on the MOTOR only, move the clutch to RUN (Fig 2
18) and the film will rewind.
5. Immediately the film has run off the take-up spool return
the clutch to STOP (Fig 2 18) and switch off the MOTOR.
6. Important. To reset the projector for the next show return
the rewind lever (Fig 1 6) to the RUN position. Ensure this
lever is fully home.
Panchromatic Bell & Howell 606 Gaumont (H) User Manual
14
Pilot Light
When threading in a darkened room, the condenser (Fig 1 4)
can be partially withdrawn as indicated below so the light from
the projector lamp falls onto the lens and the sprocket
assembly.
The clutch (Fig 2 18) must first be placed in the STOP position
before turning on the motor and lamp.
After threading the projector push the condenser fully home
and return the clutch (Fig 2 18) to RUN.
Still Picture Device
If you wish to view a still picture, place the clutch (Fig 2 18) in
the STOP position. This may be done at any time while the film
is running. (If the picture does not fully appear, press and turn
the hand setting knob, (Fig 2 15), to obtain a full picture)
It will be necessary to adjust focus of the lens for the still
picture. Re-focus the lens when clutch is returned to RUN
position.

Panchromatic Bell & Howell 606 Gaumont (H) User Manual
15
Care & Maintenance
Built for a lifetime of dependable service your 606 needs little
maintenance, but to obtain a consistently brilliant performance
the lens system must be kept clean and the projector
mechanism lubricated.
It will also occasionally be necessary to renew the lamp.
Lamp Replacement
1. Disconnect from the electrical supply.
2. Remove the take-up spool and tilt the projector forward.
3. Unscrew the lamp housing cap (Fig 1 2) and allow the
lamp to drop out.
4. Hold the lamp only by the alignment ring.
5. Insert the new lamp as per page 8.
Note
Never attempt to change a lamp while the current is on. Never
turn the machine upside down or lay it on its side while the
lamp is burning.
Lubrication
If the projector is used infrequently the oil hole (Fig 2 17)
should receive one drop of projector oil before every show.
Alternatively one drop should be applied for every 5 hours
operation.
Cleaning Optical Parts
Before every show the projection lens (Fig 1 9) and condenser
lens (Fig 1 4) should be removed and cleaned.
Panchromatic Bell & Howell 606 Gaumont (H) User Manual
16
Remove the projection lens by loosening the locking screw
(Fig 1 12) and pulling the lens forward.
The condenser lens is removed by pulling on the handle.
All glass surfaces must be cleaned with a soft camel hair
brush or alternatively with lens cleaning tissue.
Care must be taken to avoid scratching.
The reflector (Fig 1 3) which is retained in place by a
Powerful internal spring clip should be pulled out and
cleaned in the same manner.
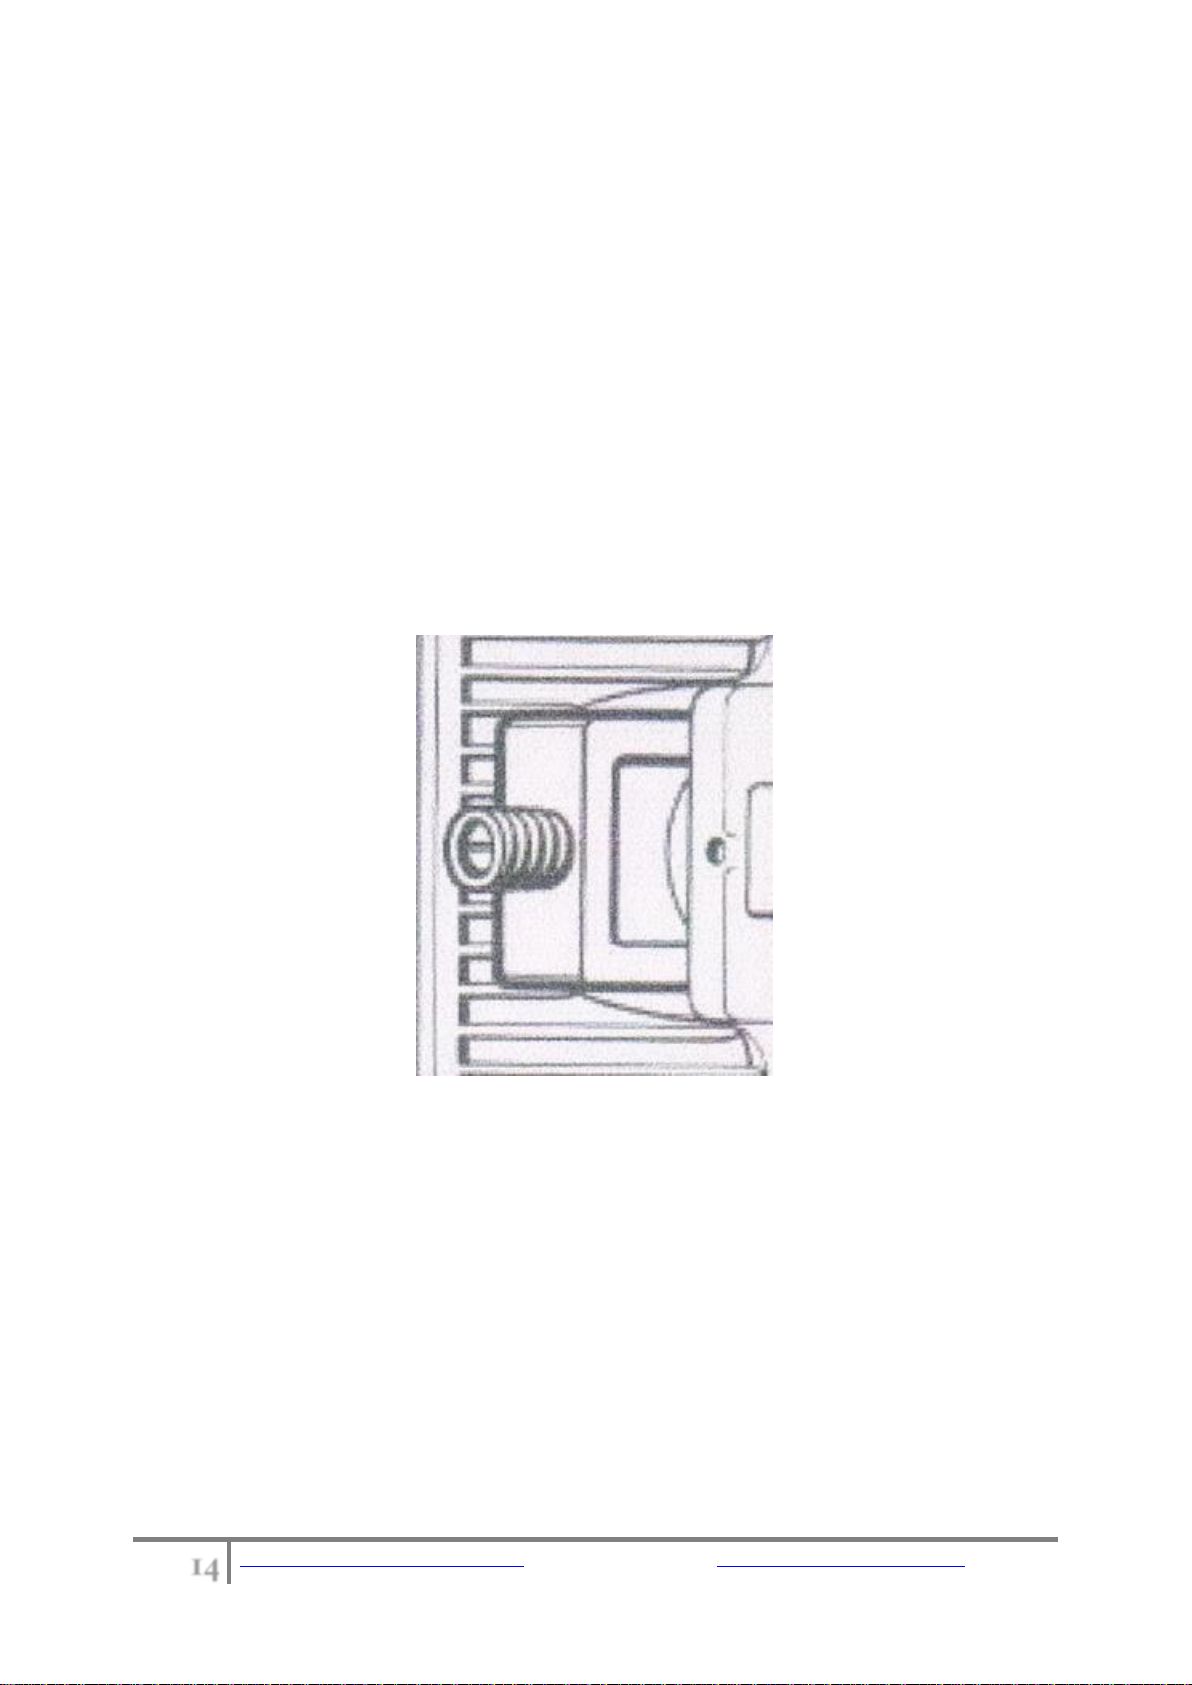
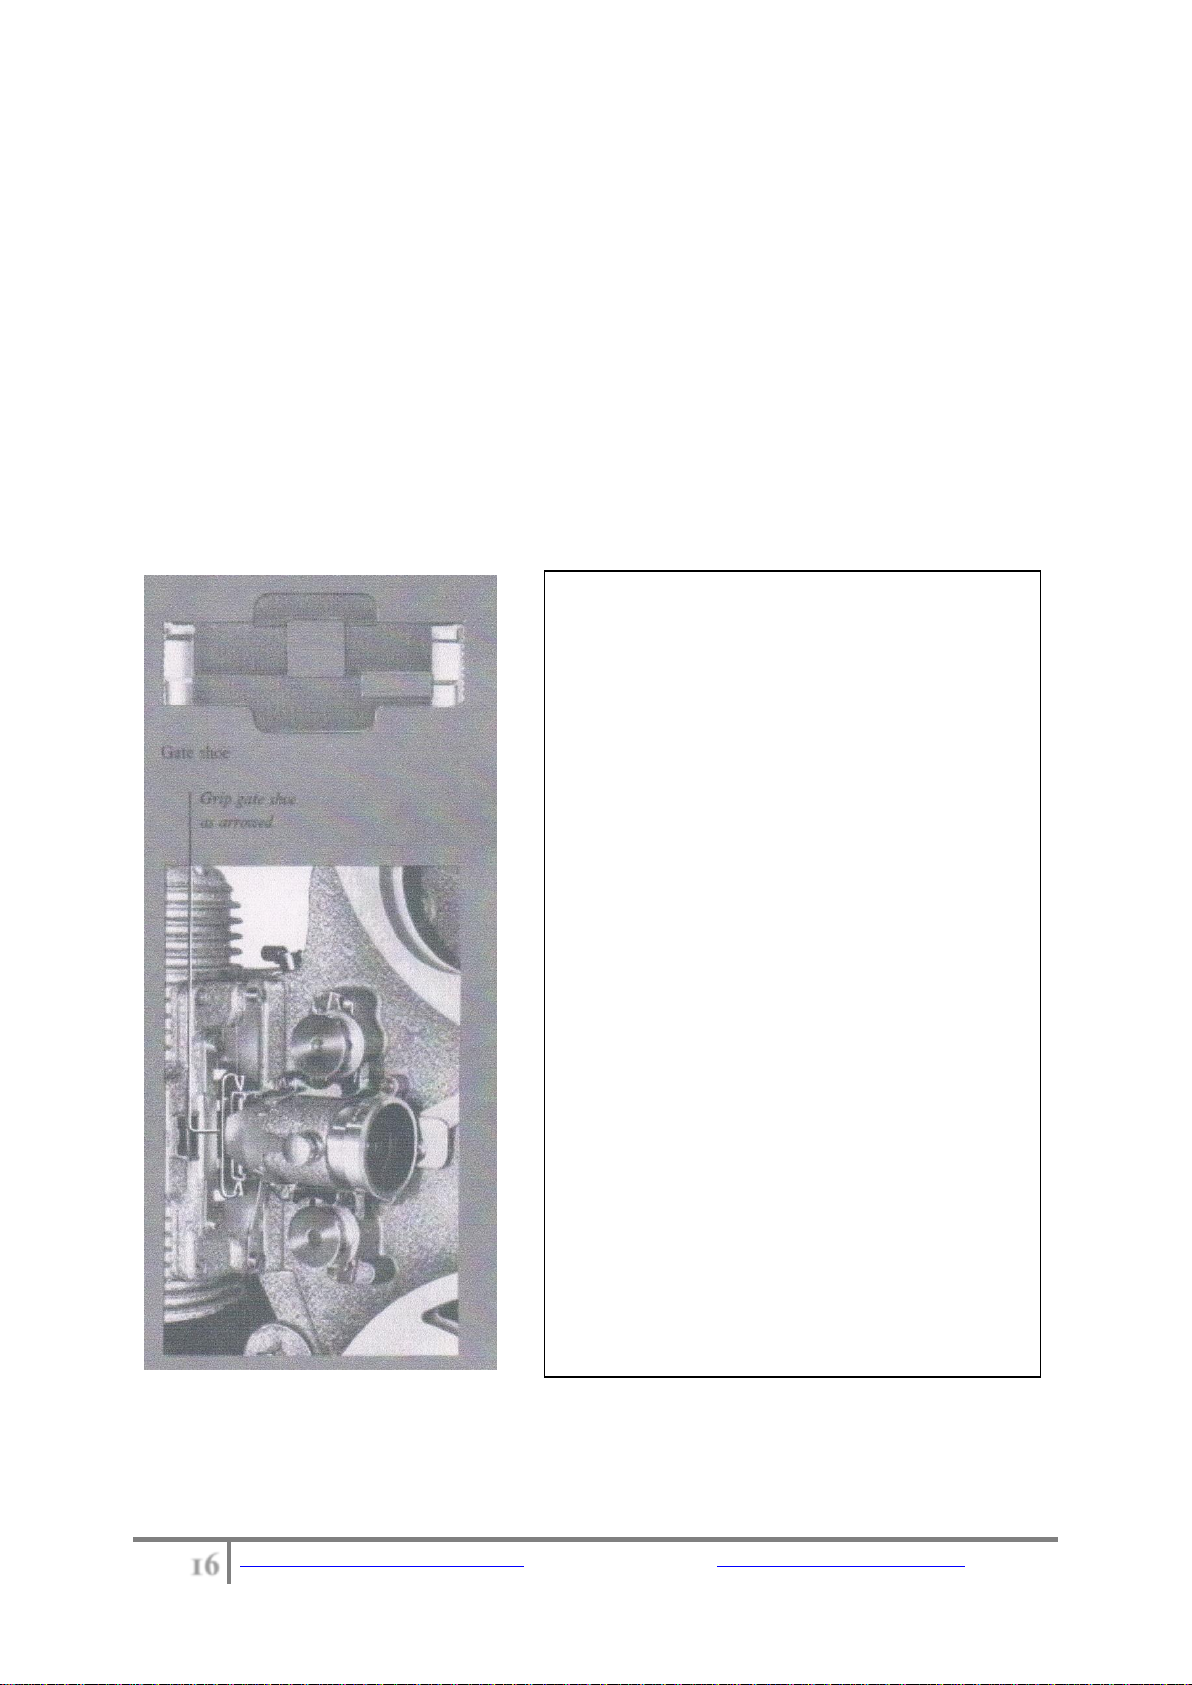
Cleaning The Film Path Mechanism
With the lens removed and the
film gate lever raised, withdraw
the gate by grasping the metal
frame at the top and bottom as
the arrows show as illustrated
on the left.
Clean the gate shoe with a soft
cloth, moistening it if necessary,
to remove obstinate dirt.
Never use sharp tools on the
projection mechanism.
Clean the film channel by
inserting the cleaning brush
vertically and sliding it up and
down with a rotary movement.
The brush may be used to clean
carefully other exposed parts of
the film Mechanism.
Replace the gate shoe in its
guides, taking care the long
slotted hole is at the lower end
and the shoe is fully home.

Panchromatic Bell & Howell 606 Gaumont (H) User Manual
17
Specifications
• Bell & Howell 606H standard 8mm projector
• Mechanically driven film transport - no belts to be replaced
• 500W 240V lamp type A1/47
• Bell & Howell Filmovara 15-20mm 1/1.5 zoom lens
• Auto light out when motor stopped
• Individual switch for motor and lamp
• Powered rewind (very fast)
• Framing and speed controls
• Motor brushes accessible for replacement
• Adjustable projection angle
• Serial No: 160802
Service@Panchromatic.co.uk
This manual suits for next models
1
Table of contents
Other Bell and Howell Projector manuals

Bell and Howell
Bell and Howell Autoload 456 Operating instructions

Bell and Howell
Bell and Howell TQIII User manual

Bell and Howell
Bell and Howell 2585 User manual

Bell and Howell
Bell and Howell Commercial User manual

Bell and Howell
Bell and Howell 365 AUTOLOAD SUPER 8 Operating instructions

Bell and Howell
Bell and Howell RC55 User manual


