Bella PRO series User manual

6 Burger Grill
Instruction Manual

ThankYou for your purchase
Register & sign up for special
announcements and trendy recipes!
Tell us what you think!
Rate, review or ask us a question.
@bellahousewares.com
#getinspired
BellaLife BellaLifestyle

Important Safeguards ..................................................................................................... 4-5
Additional Important Safeguards...................................................................................6-7
Notes on the Plug ................................................................................................................6
Notes on the Cord................................................................................................................7
Plasticizer Warning ..............................................................................................................7
Electric Power.......................................................................................................................7
Getting to Know Your 6 Burger Grill .................................................................................8
Before Using for the First Time .........................................................................................8
Operating Instructions ........................................................................................................9
6 Burger Grill (Closed Position) ......................................................................................10
Grilling hints for best results ........................................................................................... 11
General cooking chart....................................................................................................... 11
Panini Press (Closed Position).......................................................................................... 12
Panini Press: Hints for Best Results ................................................................................ 13
USDA Cooking Guidelines................................................................................................14
User Maintenance Instructions........................................................................................14
Care & Cleaning Instructions ........................................................................................... 14
Recipes...........................................................................................................................17-21
Warranty ........................................................................................................................22-23
TABLE OF CONTENTS

4
IMPORTANT SAFEGUARDS
When using electrical appliances, basic safety precautions should always
be followed, including the following:
1. READ ALL INSTRUCTIONS.
2. The cord to this appliance should be plugged into a 120V AC electrical
outlet only. CAUTION: NEVER plug unit in without both upper and
lower GRILL PLATES properly installed.
3. To protect against risk of electric shock, do not immerse the cord, plug
or cooking body in water or any other liquid.
4. Do not touch hot surfaces. Use handles.
5. This appliance is not intended for use by persons (including children)
with reduced physical, sensory or mental capabilities, or lack of
experience and knowledge, unless they have been given supervision
or instruction concerning use of the appliances by a person
responsible for their safety.
6. Children should be supervised to ensure that they do not play with
the appliance.
7. Unplug from outlet when not in use and before cleaning. Allow to
cool before cleaning or storing this appliance.
8. Never yank the cord to disconnect the cooking unit from the outlet.
Instead, grasp the plug and pull to disconnect.
9. Do not operate any appliance if the cord is damaged. Do not use
this appliance if the unit malfunctions, if it is dropped or has been
damaged in any manner. In order to avoid the risk of an electric
shock, never try to repair the 6 Burger Grill yourself. Bring it to a
qualied technician for examination, repair or electrical or mechanical

5
adjustment. An incorrect reassembly could present a risk of electric
shock when the 6 Burger Grill is used.
10. The use of accessories or attachments not recommended by the
manufacturer may cause re, electrical shock or injury.
11. Do not use outdoors or for commercial purposes.
12. Do not let the electrical cord hang over the edge of the table or
counter top, or touch hot surfaces.
13. Do not place on or near a hot gas or electric burner or heated oven.
14. Use on a heat-resistant, at level surface only.
15. Use extreme caution when moving any appliance containing hot food,
water, oil or other liquids.
16. To disconnect, remove plug from outlet.
1 7. WARNING! ALWAYS UNPLUG UNIT WHEN COOKING IS FINISHED.
Otherwise, the 6 Burger Grill will continue to heat until unit is
unplugged.
18. CAUTION HOT SURFACES:This appliance generates heat during use.
Proper precautions must be taken to prevent the risk of burns, re or
other damage to persons or property.
19. When using this appliance, provide adequate ventilation above and
on all sides for air circulation. Do not allow this appliance to touch
curtains, wall coverings, clothing, dish towels or other ammable
materials during use.
20. Use with wall receptacle only.
21. Do not use for other than intended use. WARNING: TO AVOID
POSSIBLE FIRE HAZARD AND DAMAGE TO THE UNIT, THE 6 BURGER
GRILL MUST BE STORED AND USED WITH BOTH UPPER/LOWER
GRILL PLATES INSTALLED

6
SAVE THESE INSTRUCTIONS
FOR HOUSEHOLD USE ONLY
ADDITIONAL IMPORTANT
SAFEGUARDS
CAUTION HOT SURFACES: This appliance generates heat and escaping
steam during use. Proper precautions must be taken to prevent the risk
of burns, res or other damage to persons or property.
CAUTION: This appliance is hot during operation and retains heat for
some time after unplugging. Always use oven mitts when handling hot
materials and allow metal parts to cool before cleaning. Do not place
anything on top of the appliance while it is operating or while it is hot.
1. All users of this appliance must read and understand this instruction
manual before operating or cleaning this appliance.
2. If this appliance begins to malfunction during use, immediately
unplug the cord. Do not use or attempt to repair the malfunctioning
appliance.
3. Do not leave this appliance unattended during use.
NOTES ON THE PLUG
This appliance has a polarized plug (one blade is wider than the other).
To reduce the risk of electric shock, this plug will t in a polarized outlet
only one way. If the plug does not t fully into the outlet, reverse the plug.
If it still does not t, contact a qualied electrician. Do not modify the plug
in any way.

7
NOTES ON THE CORD
A. A short power-supply cord (or detachable power-supply cord) is to
be provided to reduce the risk resulting from becoming entangled in or
tripping over a longer cord.
B. Longer detachable power-supply cords or extension cords are
available and may be used if care is exercised in their use.
C. If a long detachable power-supply cord or extension cord is used :
1. The marked electrical rating of the cord or extension cord should be
at least as great as the electrical rating of the appliance;
2. If the appliance is of the grounded type, the extension cord should
be a grounding-type3-wire cord;
3. The longer cord should be arranged so that it does not drape
over the countertop or table top where it can be pulled on by children
or tripped over unintentionally.
PLASTICIZER WARNING
CAUTION: To prevent Plasticizers from migrating to the nish of the
counter top or table top or other furniture, place NON-PLASTIC coasters
or place mats between the appliance and the nish of the counter top
or table top. Failure to do so may cause the nish to darken; permanent
blemishes may occur or stains can appear.
ELECTRIC POWER
If the electrical circuit is overloaded with other appliances, your appliance
may not operate properly. It should be operated on a separate electrical
circuit from other appliances.

8
GETTING TO KNOW YOUR 6 BURGER GRILL
Product may vary slightly from illustrations
BEFORE USING FOR THE FIRST TIME
1. Carefully unpack the 6 Burger Grill and remove all packaging and materials.
2. Set the unit on a dry, clean and at surface. Your Grill comes assembled with both grill
plates locked in place.
3. Keep the 6 Burger Grill closed until use.
4. Use the handle to expose both the upper and lower grill plates.
5. Wipe the non-stick grill plates with a damp cloth to remove all dust. Wipe the 6 Burger Grill
body with a slightly damp, soft cloth or sponge. Dry all parts before use.
CAUTION: Take care to prevent water from running into the appliance. NEVER IMMERSE
BURGER GRILL IN WATER OR ANY OTHER LIQUIDS!
6. Plug the unit into a 120V AC electrical outlet.The red POWER light will illuminate.
7. Operate the unit in the closed position for 2 to 4 minutes without food. This will burn off
residue on the plates.
Figure 1
Upper Side Plate
Lock Clips
Lid Handle
Upper Removable
Non-Stick Grill Plate
Lower Removable Non-
Stick Grill Plate
Lower Side Plate
Lock Clips
Removable Drip Tray
Polarized Plug (not shown)

9
NOTE: When the grill plates are heated for the rst time, they may emit slight smoke or
odor. This is normal and should disappear in a few minutes. This will not affect the safety of
the appliance.
8. Condition grill plates. Use a brush or paper towel to lightly coat the grill surfaces with solid
vegetable shortening or vegetable oil. Wipe dry and keep closed until ready to use.
OPERATING INSTRUCTIONS
1. WARNING: TO AVOID POSSIBLE FIRE HAZARD AND DAMAGE TO THE UNIT, THE 6 BURGER
GRILL MUST BE USED WITH BOTH UPPER/LOWER GRILL PLATES INSTALLED AT ALL TIMES.
CAUTION: To avoid personal injury or damage to property, make sure the removable drip
tray is fully inserted into the front of the unit.
1. Preheat the 6 Burger Grill. Use the handle to close the Burger Grill. Plug the unit into a
120VAC electrical outlet.The red POWER light will illuminate and remain lighted during use.
2. After approximately 5 to 7 minutes, the green READY light will illuminate, indicating the
preheat temperature unit has been reached and the 6 Burger Grill is ready for use.
3. Oil grill plates before use…or not! Wearing a protective oven mitt, use a heat-proof brush
or paper towel dipped in vegetable oil to lightly coat the upper and lower grill plates to
encourage even browning. For health-conscious cooks, the non-stick coating of the grill
plates assures crisp and delicious toasting without the use of oil or butter.
IMPORTANT: Do not use non-stick sprays as they can cause build-up on the grill plates.
Use vegetable or olive oil instead.
4. Center food on the lower grill plate; then lower the lid. The green READY light will cycle on
and off as the temperature is maintained.
5. Cook foods according to recipe instructions or consult the General Cooking Chart for
reference. Recipes will vary in cook time and brownness. Note the perfect grill/cooking times
for each food for future reference. WARNING! ALWAYS UNPLUG UNIT WHEN COOKING IS
FINISHED. Otherwise, the 6 Burger Grill will continue to heat until unit is unplugged.
10
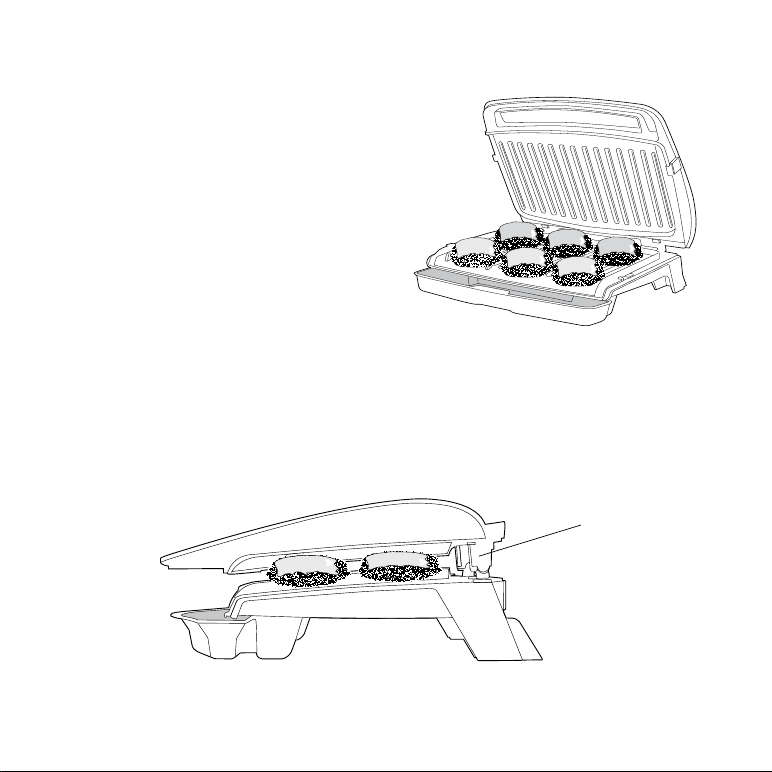
6 BURGER GRILL
(CLOSED POSITION)
1. Use cuts of meat, vegetables, sh, poultry
of equal thickness; all food should be thick
enough to touch the upper and lower grill
plates when the 6 Burger Grill is closed.
2. Floating Hinge Set-Up: Open the lid to
90º. Center food on the lower plate. Grasp
the handle to lift the upper grill plate and
extend the hinge (See Figure 3). Lower the
upper grill plate so that it lies evenly on the
top of the food.
3. Press the handle down gently over the food
to prevent juices from releasing.
IMPORTANT! Foods cooked in the
BurgerGrill will take roughly half the
cooking time as an open grill, since they
are being cooked top and bottom i
n a conned cooking area.
Figure 2
Figure 3
Floating Hinge
Other manuals for PRO series
22
This manual suits for next models
1
Table of contents
Other Bella Grill manuals


Popular Grill manuals by other brands


Kenmore
Kenmore 415.16123800 Use and care guide

Tucker Barbecues
Tucker Barbecues GTR Series Assembly, installation and operating instructions

Monogram
Monogram ZGG540NCP1SS owner's manual

Equipex
Equipex Sodir Savoy Operation manual

Gaggenau
Gaggenau VR 414 610 use and care manual

Miele
Miele KM 408-1 operating instructions


