Bellini BTGW930 User manual

EnerGI Nutrient Blender
BTGW930

2
Important Safeguards
When using electrical appliances,
in order to reduce the risk of electric
shock and/or injury to persons, basic
safety precautions should always be
followed, including:
For Your Safety
Read all instructions carefully, even if you are
familiar with the appliance.
• To protect against the risk of electric shock,
DONOTIMMERSEtheappliance,powercord
setorpluginwateroranyotherliquid.
• This appliance is not intended for use by
persons (including children) with reduced
physical, sensory and mental capabilities, or
lack of experience and knowledge, unless
theyhavebeengivensupervisionorinstruction
concerninguseoftheappliancebyaperson
responsiblefortheirsafety.
• Children should be supervised to ensure that
theydonotplaywiththeappliance.
• Switch off the power outlet and remove the
plugbeforecleaningorwhentheapplianceis
notinuse.
• Do not operate any appliance with a
damagedpowercordorplug;iftheappliance
malfunctions;orifitisdroppedordamagedin
anymanner.
• Donotallowthepowercordtohangoverthe
edge of a table or counter, or to touch hot
surfaces.
• Do not operate or place any part of this
appliance on or near a hot gas or electric
burner,orinaheatedoven.
• The use of attachments or accessories not
recommended or sold by the manufacturer
cancauseelectricshockorinjury.
• Operate on a dry level surface; sinks,
drainboards or uneven surfaces must be
avoided.
• Donotuseanyapplianceforanythingother
thanitsintendeduse.Thisproductisintended
forhouseholduseonly.
• Thisapplianceisintendedtobepluggedina
standarddomesticpoweroutletonly.
• Donotuseoutdoors.
• Neverlettheblenderoperateunattended.
• Make sure the blade is securely fastened to
the accessories before you assemble them
ontothemotorunit.
• Make sure all parts are correctly mounted
beforeyouswitchontheappliance.
• Do not remove accessories from the motor
basewhentheblenderisworking.
• Donotexceedthequantitiesandprocessing
timesindicatedintheinstructionmanual.
• Unplugtheblenderimmediatelyafteruse.
• Do not misuse the power cord. Never carry
theappliancebythepowercordorpullitto
disconnect from the power outlet. Instead,
grasptheplugandpulltodisconnect.
• Do not carry the appliance by the power
cord.
• Do not attempt to repair or disassemble the
appliance. There are no user-serviceable
parts.
• Extreme caution is necessary when moving
anyappliancecontaininghotliquids.
• Waituntiltheappliancehasbeenswitchedoff
beforemovingtheEnerGINutrient
Blender.
• Nevermicrowavewiththebladestillattached.
Remove the blade and twist on a shaker /
steamtop.
• When microwaving, beware of steam and
useanovenmitttoremovehotcupsfromthe
microwave.
• Donotusepartymugsinthemicrowave.
• Neverkeep the motorrunning for morethan
30seconds.
• Thisapplianceisnotintendedtobeoperated
by means of an external timer or separate
remote-controlsystem.
• Becarefulifhotliquidispouredintotheblender
asitcanbeejectedoutoftheappliancedue
toasuddensteaming.
• Switch off the appliance and disconnect
from supply before changing accessories or
approachingpartsthatmoveinuse.

3
FAILURE TO OBSERVE THESE CAUTIONS MAY RESULT
IN DAMAGE TO THE APPLIANCE.
Warning
Ifthesupplypowercordisdamaged,thepower
cord must be replaced by the manufacturer, its
serviceagentorsimilarlyqualiedpersonsinorder
toavoidahazard.
Thisproducthasnotbeendesignedforanyuses
otherthanthosespeciedinthisbooklet.
Caution - BLADES ARE SHARP, HANDLE
CAREFULLY. Avoid contacting moving parts.
Keep hands, spatulas and other utensils,
away from blades during operation to
reduce risk of injury to persons, and/or
damage to blender.
Warning - Injury Hazard:
Unplug the blender and ensure the blade is
stopped completely before moving the cup
or touching the blades. Failure to do so can
result in broken bones, cuts or bruises.
SaveTheseInstructions

4
FeaturesofBelliniEnerGINutrientBlender
SippingRings
350mlShortCups
Keep-Fresh
StorageLids
MillingBlade
Subassembly(this
subassemblycan
onlybeusedwith
the350mlShort
cups)
600mlTallCup
Pulverizing blade
subassembly( Can
beusedwithboth
the 600ml Tall cup
and the 350ml
shortcup)
MotorBase
PowerIndicator
Switch

5
Getting to Know Your
BelliniNutrientBlender
Congratulations on the purchase of your new
BelliniNutrientBlender.
The Nutrient Blender is the ideal Multi Purpose
Blender for chopping, grating,whipping and
grinding. The unit is so versatile for its size; it can
stayonthebenchtopallyearround.
BeforeFirstUse
Before using your Nutrient Blender for the rst
time it is important that you read and follow
the instructions in this use and care booklet,
evenifyoufeelyouarefamiliarwiththistypeof
appliance.
Yourattentionisdrawninparticulartothesection
dealingwithIMPORTANTSAFEGUARDS.Findasafe
andconvenientplacetokeepthisbooklethandy
for future reference. This appliance has been
designed to operate from a standard domestic
power outlet. It is not intended for industrial or
commercial use. Carefully unpack the Nutrient
Blender. Remove all packaging materials and
eitherdiscardorretainforfutureuse.
Ensurethatthevoltageofyourelectricitysupply
isthesameasthatindicatedontheratinglabel
ontheappliance(220-240V).Removetheplastic
accessoriesandwashin warmsoapywater.Dry
thoroughlyandreplace.Wipeovertheexteriorof
theMotorBasewithadampspongeorcloth.Do
notuseabrasivecleaners.
How to Use Your Bellini
NutrientBlender
Choosing the Right Blade
Care is needed when handling cutting blades,
especially when removing the blade from the
cup,emptyingthecupandduringcleaning.
TheNutrientBlendercomeswithtwoblades:
PulverizingbladeandMillingblade.
Pulverizing Blade Subassembly
Chopping-Foodslikeonions,garlicandcarrots,
Andformakingdipssuchassalsaorbeandip.
Blending – Pulverizes ice for smoothies, frozen
cocktailsandmilkshakes.
Mixing - Pancake batters, mufns and quick
breadsaremixedinseconds.
Grating–Hardand soft cheeses and chocolate
aregratedinseconds.
Pureeing – Dishes such as hummus, all-natural
soups, and baby food are creamy smooth in
seconds.
Shaving Ice and Frozen Fruits – For tasty treats
suchassnowconesorfruitsorbets.
Grinding Meats – Delicious chicken and ham
salads or pates are ground in seconds (Do not
exceed100gwhengrinding).
6
Milling Blade Subassembly
Grinding and chopping, harder, single ingredient
items such as:
Coffeebeans
Nuts
Cinnamonsticks
Driedfruit
NOTICE:
• Do not use the MAX. level marking on
the small cup for dry grinding / milling
option as volume contained will not
give the desired result
• For dry grinding / milling function only
ll small cup to 1/3 of the max. level
marking.
Operation
NOTICE:
• Never overll the cups above the MAX
level indication.
• Do not mash or grind heavy foods
(e.g., potatoes) or stir thick mixtures
(e.g., dough) in this product.
• Do not operate the product empty.
• Never use the blender for more than 30
seconds without interruption.
NOTE: The blender has a built-in safety
lock feature, this ensures that you can
only switch on the appliance while the
cup and the blade subassembly are
assembled on the motor base securely.
If the appliance is correctly assembled,
the built-in safety lock will be unlocked.
Using the Pulverizing Blade Subassembly:
1. Place the Motor Base on a at, level, stable
surface.Ensurethepowercordisunplugged.
2. Cleanandcutallsolidingredientsintopieces
small enough to t and place into a Tall or
ShortCup,thenpourinanyliquidingredients.
3. Ensure the Gasket is seated properly in the
Pulverizing Blade subassembly, then tighten
the Pulverizing Blade subassembly clockwise
ontothetopoftheCup.
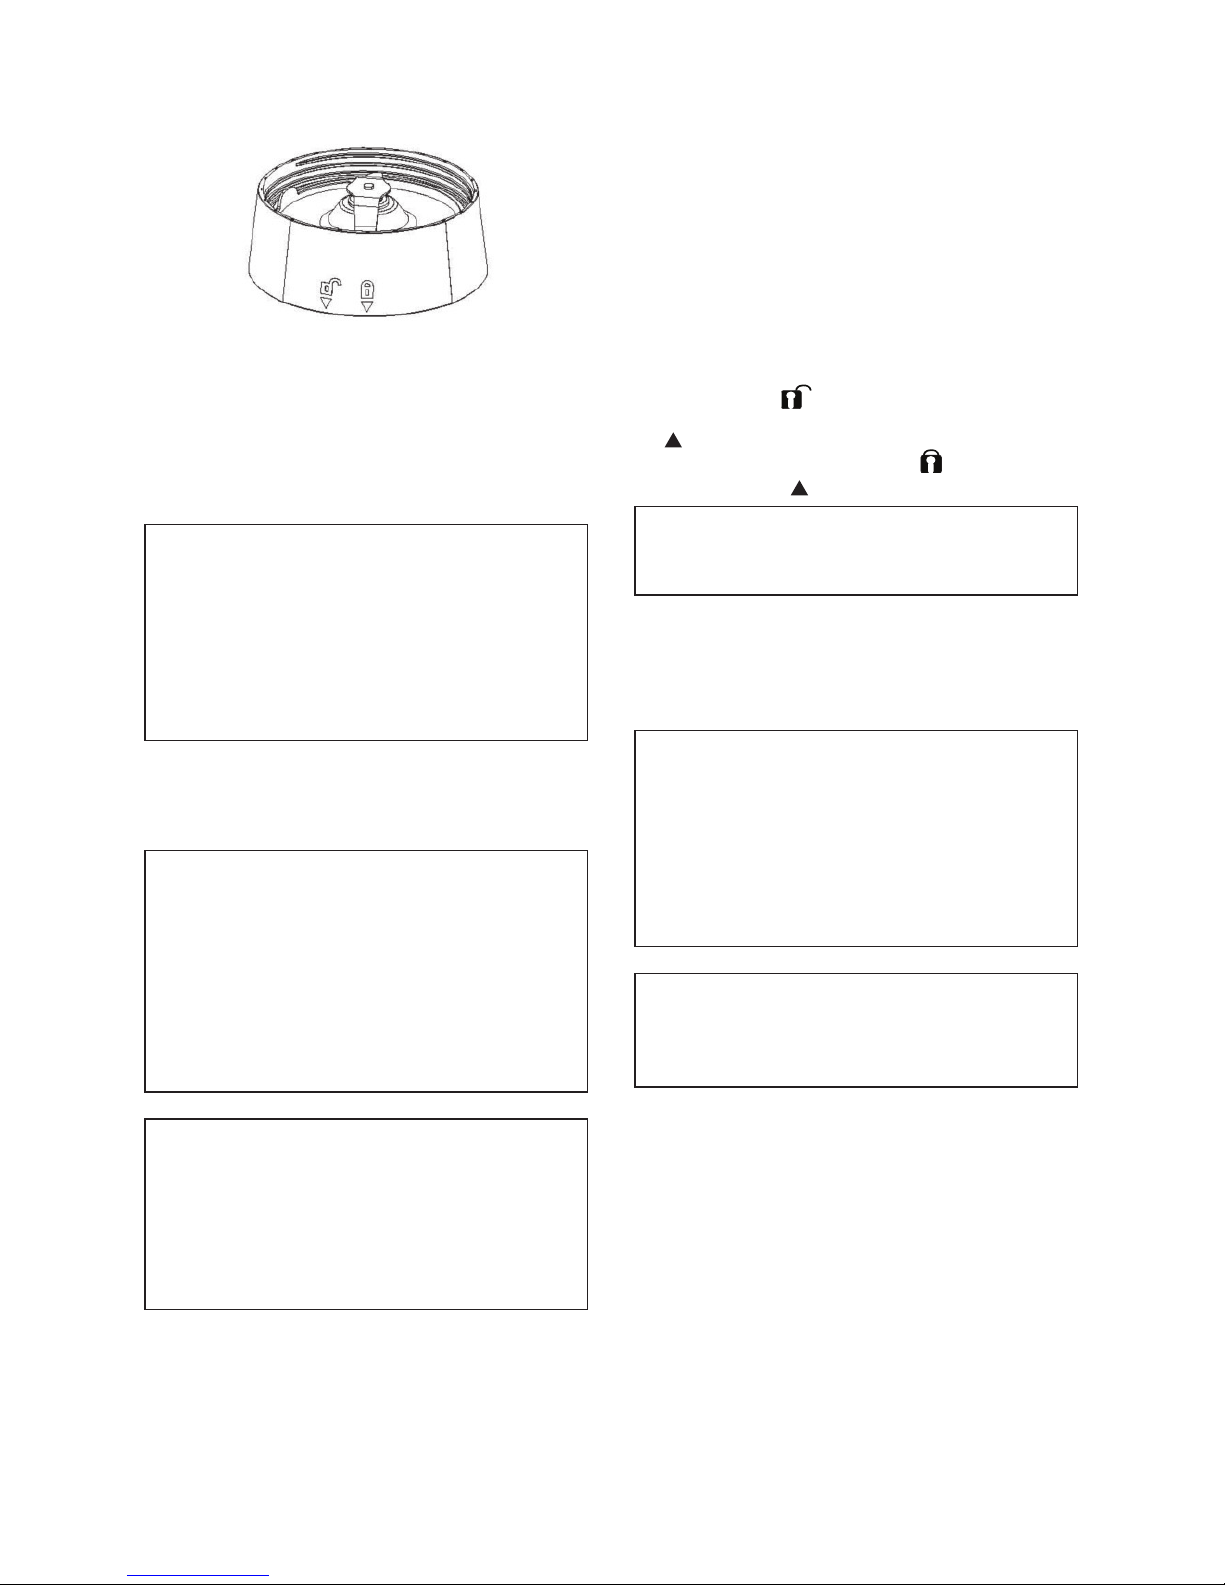
4. Turn the assembled cup upside down, place
and lock it onto the Motor Base. You need
to align the symbol on the bottom edge
ofthePulverizingBladesubassemblywiththe
markontheMotorBaseandturnclockwise
untilitisrmlyinplace.The symbolshould
alignwiththe mark.
NOTE: Product will not operate unless
BOTH the Cup and Blade subassembly
are attached properly to the Motor Base.
5. Plug the power cord into 220-240V AC
electricaloutlet.
6. PresstheSwitchtoactivate.
NOTICE: Never run the appliance for
more than thirty seconds at a time. Allow
the motor to cool for one minute after
each thirty seconds of operation. As it
can cause permanent damage to the
motor. If the motor stops working, unplug
the Motor Base and let it cool for a few
hours before attempting to use it again.
NOTICE: If the Blade is not running
smoothly, stop the product and add some
liquid, or reduce the solid ingredients in
the Cup.
7. Shut the motor off by pressing the Switch
again. Unplug the power cord from the
electricaloutletimmediatelyafteruse.
8. Whenthebladeisstoppedcompletely,unlock
andremovetheassembledPulverizingblade
subassemblyandcupfromtheMotorBase.
9. UnscrewtheBladesubassemblyfromtheCup.
Todisassemblethecup,followtheinstructions
aboveinreverseorderanddirection.Pourthe
contents into a separate container or screw
a Sipping Ring onto the Cup to consume
contents directly. For later consumption,
screwaStorageLidontotheCupandplace
theCupinyourrefrigerator.
7
CareandCleaning
CAUTION: Always ensure the product is
unplugged from the electrical outlet before
relocating,assembling,disassembling,orcleaning
it and wait until it has cooled down sufciently
before cleaning.This product contains no user
serviceable parts. Refer service to qualied
servicepersonnel.
NOTE:
• Unplug the blender before you
started cleaning it.
• Wait until the blender has cooled
down sufciently before cleaning it.
• All detachable accessories can be
cleaned in dishwasher.
• Clean the motor base with a slightly
damped cloth.
• Do not use scouring pads, abrasive
cleaning agents or aggressive liquids
such as petrol, alcohol or acetone ot
clean the appliance.
1. Alwayswashimmediatelyafteruseforeasier
cleaning.Don’tletfooddryonthecupasthis
willmakecleaningdifcult.
2. After you unplug the blender, detach the
usedaccessoriesandparts,andcleanthemin
warm, soapy water.Rinse all accessories and
partsunderatapanddrythoroughly.
3. Wipe the motor base clean with a slightly
damped cloth to remove any residue, and
dry thoroughly. Never submerge the motor
base in water or other liquid, or place in a
dishwasher.Donotimmersethemotorbasein
wateroranyliquidforcleaning.
Tips:
• Use a small brush (not included) to remove
particles of food lodged underneath the
blades.
• If some leftover particles dry onto the inside
of the cup, ll the cup about 2/3 full with
warm soapy water and attach the Milling
Blade Subassembly. Place the cup and
BladeSubassemblyontotheMotorBaseand
press the Motor Button. Run the appliance
for about 20-30 seconds to help loosen the
stuckingredients.Repeattheabovestepbut
useclean tap water.Empty blender anddry
thoroughly.
Using the Milling Blade Subassembly:
1. Place the Power Base on a at, level, stable
surface.Ensurethepowercordisunplugged.
2. FillaShortCupwiththefoodthatyouwishto
grind/chop.Cutlargeingredientsintopieces
approximately2cmbeforeprocessing.
3. ScrewtheMillingBladeSubassemblyontothe
Cupuntilsecure.
NOTE: Ensure that the Gasket, located
on the inside bottom edge of the Milling
Blade Subassembly, is in place.
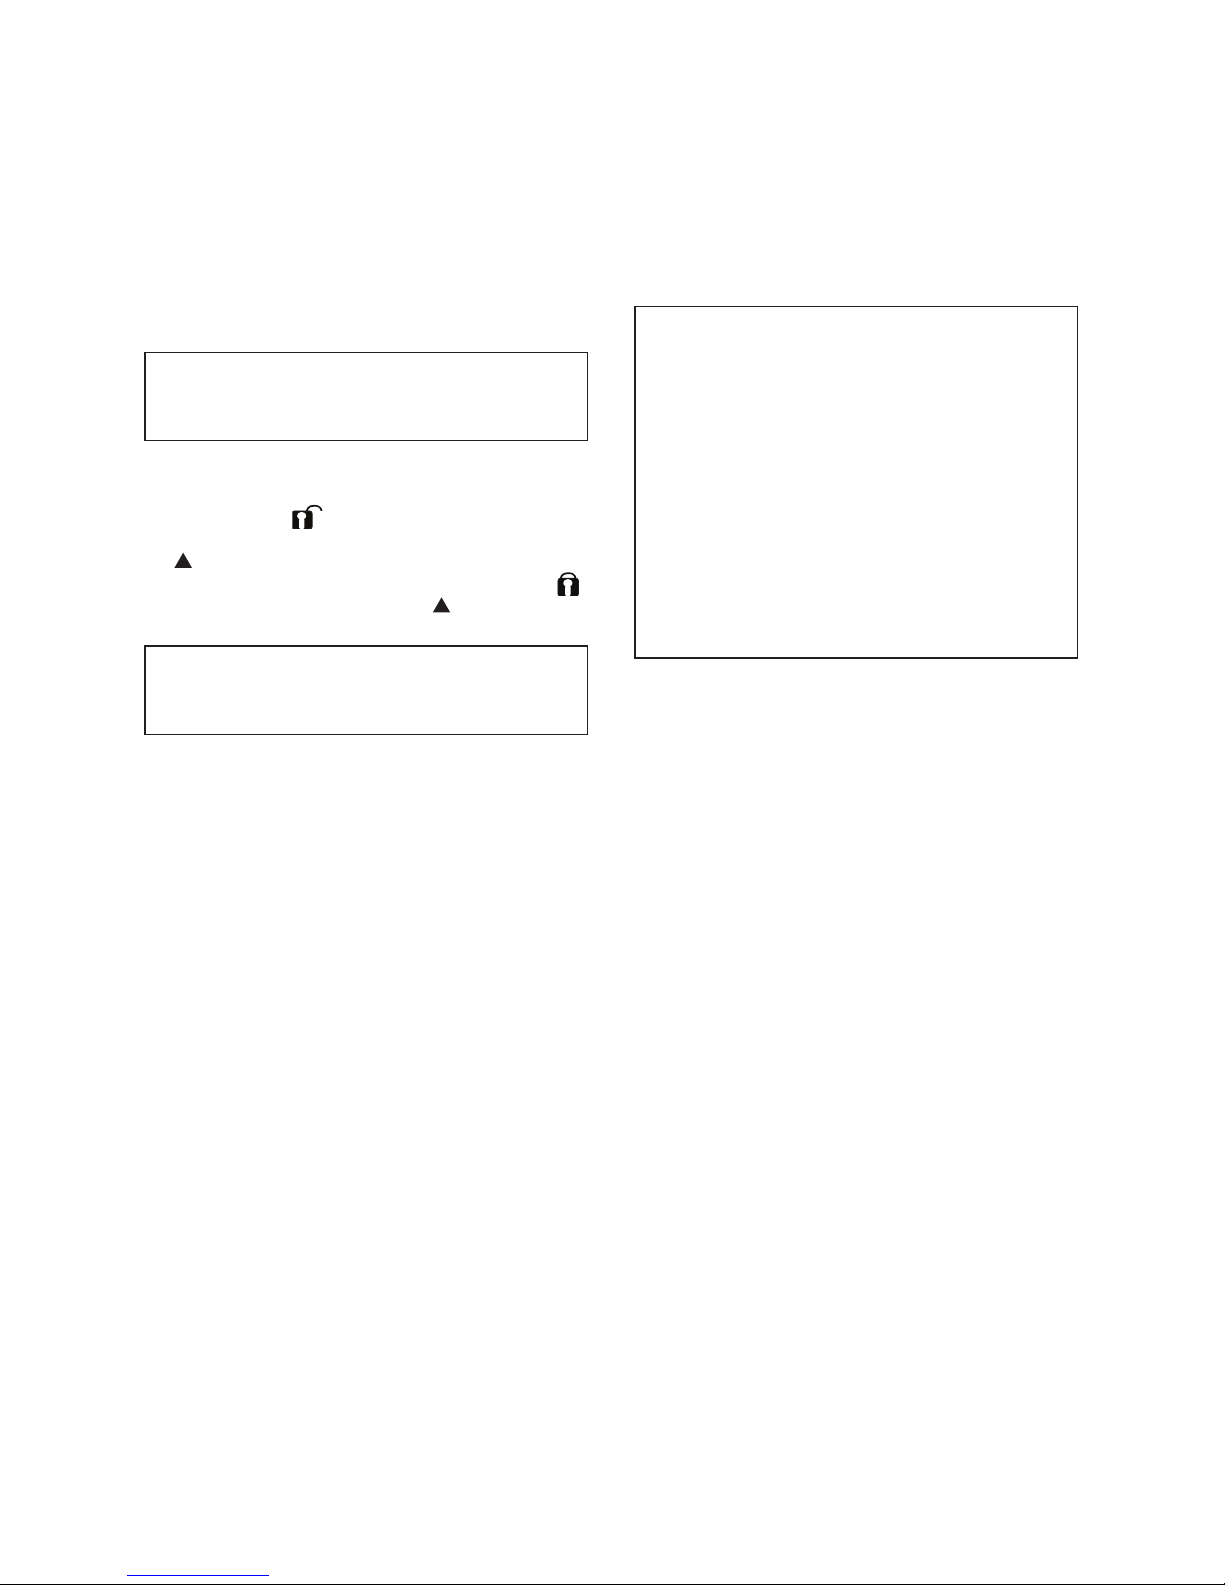
4. Turn the assembled cup upside down, place
and lock it onto the Motor Base. You need
toalignthe symbolonthebottomedge
of the Milling Blade Subassembly with the
mark on the Motor Base and turn Cup
clockwise until it is rmly in place. The
symbolshouldalignwiththe mark.
NOTE: Product will not operate unless
BOTH the Cup and Blade subassembly
are attached properly to the Motor Base.
5. Plugthepowercordinto220-240VAC
electricaloutlet.
6. Press the Switch to begin grinding/chopping
thecontents.Topreventproductoverheating,
dryingredientsmustnotbeprocessedformore
than30secondsatatime.Switchtheproduct
offandletitcooldowntoroomtemperature
beforeyoucontinueprocessing.
7. To stop grinding/chopping, press the Switch
again.Whenthebladeisstoppedcompletely,
unlock and remove the assembled Milling
blade subassembly and cup from the Motor
Base. Unscrew the blade subassembly from
thecup.
8. If using the Short Cup for storing, screw a
StorageLidontoittokeepcontentsfresh.
9. Unplug the power cord from the electrical
outletwhentheproductisnotinuseorisleft
unattended(notlookedafterorwatched).

8
• Storetheproductinacool,dryplace.
Caution:TheNutrientBlenderattachments(Short
Cup,TallCup,LidandRing)areabletobeplaced
in upper rack of the dishwasher or alternatively
they can be hand washed with warm soapy
waterandthenrinsed.
Caution: Always make sure the gaskets are
still inside after cleaning. The heat from some
dishwashers can cause them to become loose
andpopout.
CAUTION: Handle the blade carefully.
1. Do not immerse the motor base in liquid
to prevent the risk of electric shock.
2. Do not use harsh or abrasive cleansers
on any part of the appliance.
3. Do not use scouring pads, abrasive
cleaning agents or aggressive liquids
such as petrol, alcohol or acetone to
clean the appliance.
4. Do not touch the sharp blades, they are
extremely SHARP and may cause injury.
Do not attempt to remove blades from
the Blade subassembly for cleaning.
Specications
PowerSupply220-240V~50Hz
PowerConsumption600W
Note: Asaresultofcontinualimprovements,
the design and specications of the
product within may differ slightly to the
unit illustrated from the packaging.

9
Recipes
Body Balance Blaster
•2handfulsspinach
•1/2cuprasperries
•1banana
•6almonds
•3tbsrawcacao
FilltotheMAXindicationwithspringwater.
Juiceaway!
The Relaxer
• 1/2rawbeet
• 8redseedlessgrapes
• 3smallbroccoliorets
• 8blueberries
• 1tbspgojiberries
• 1/2inchofgingerroot
• dashofcoconutmilk
Fillto theMAX indicationwith springor coconut
water.
Juiceaway!
Young at Heart
• 1handfulkale
• 1/2avocado(pittedandpeeled)
• 2mediumapricot
• 1cupblueberries
• 8walnuthalves
•1kiwifruit(peeled)
Fill to the MAX indication with spring water or
almondmilk.
JuiceAway!
Sleepy Hollow
• 1handfulspinach
• 1banana
• 1/2cupraspberry
• 1/2cupblackberry
• 1tbspumpkinseeds
• 1tbssunowerseeds
•1tbsChiaseeds
FilltotheMAXindicationwithspringwater.
JuiceAway!
Glowing Beauty
• 1handfulswisschard
• 1/2cuppineapple
• 1/2cupstrawberries
• 1tbsgojiberries
• 8cashews
Fill to the MAX indication with spring water or
almondmilk.
Juiceaway!
Strikingly Skinny
• 3to4spinachleaves
• 1banana
• 1/8cuppumpkinseeds
• 1orange(peeled)
• 1stickofcelery
FilltotheMAXindicationwithspringwater
JuiceAway!

10
NOTES

11
NOTES

12
Cat.No.BTGW930
October2014
GSM International Ltd has a policy of continual improvement throughout the product range.
As such the unit contained within may differ slightly from the unit illustrated on the pack.
MADE IN CHINA for GSM International Ltd.
GSM International Ltd.
Gerard Sourcing & Manufacturing
Consumer Service Centre : 1300 373 199
Table of contents
Other Bellini Blender manuals


