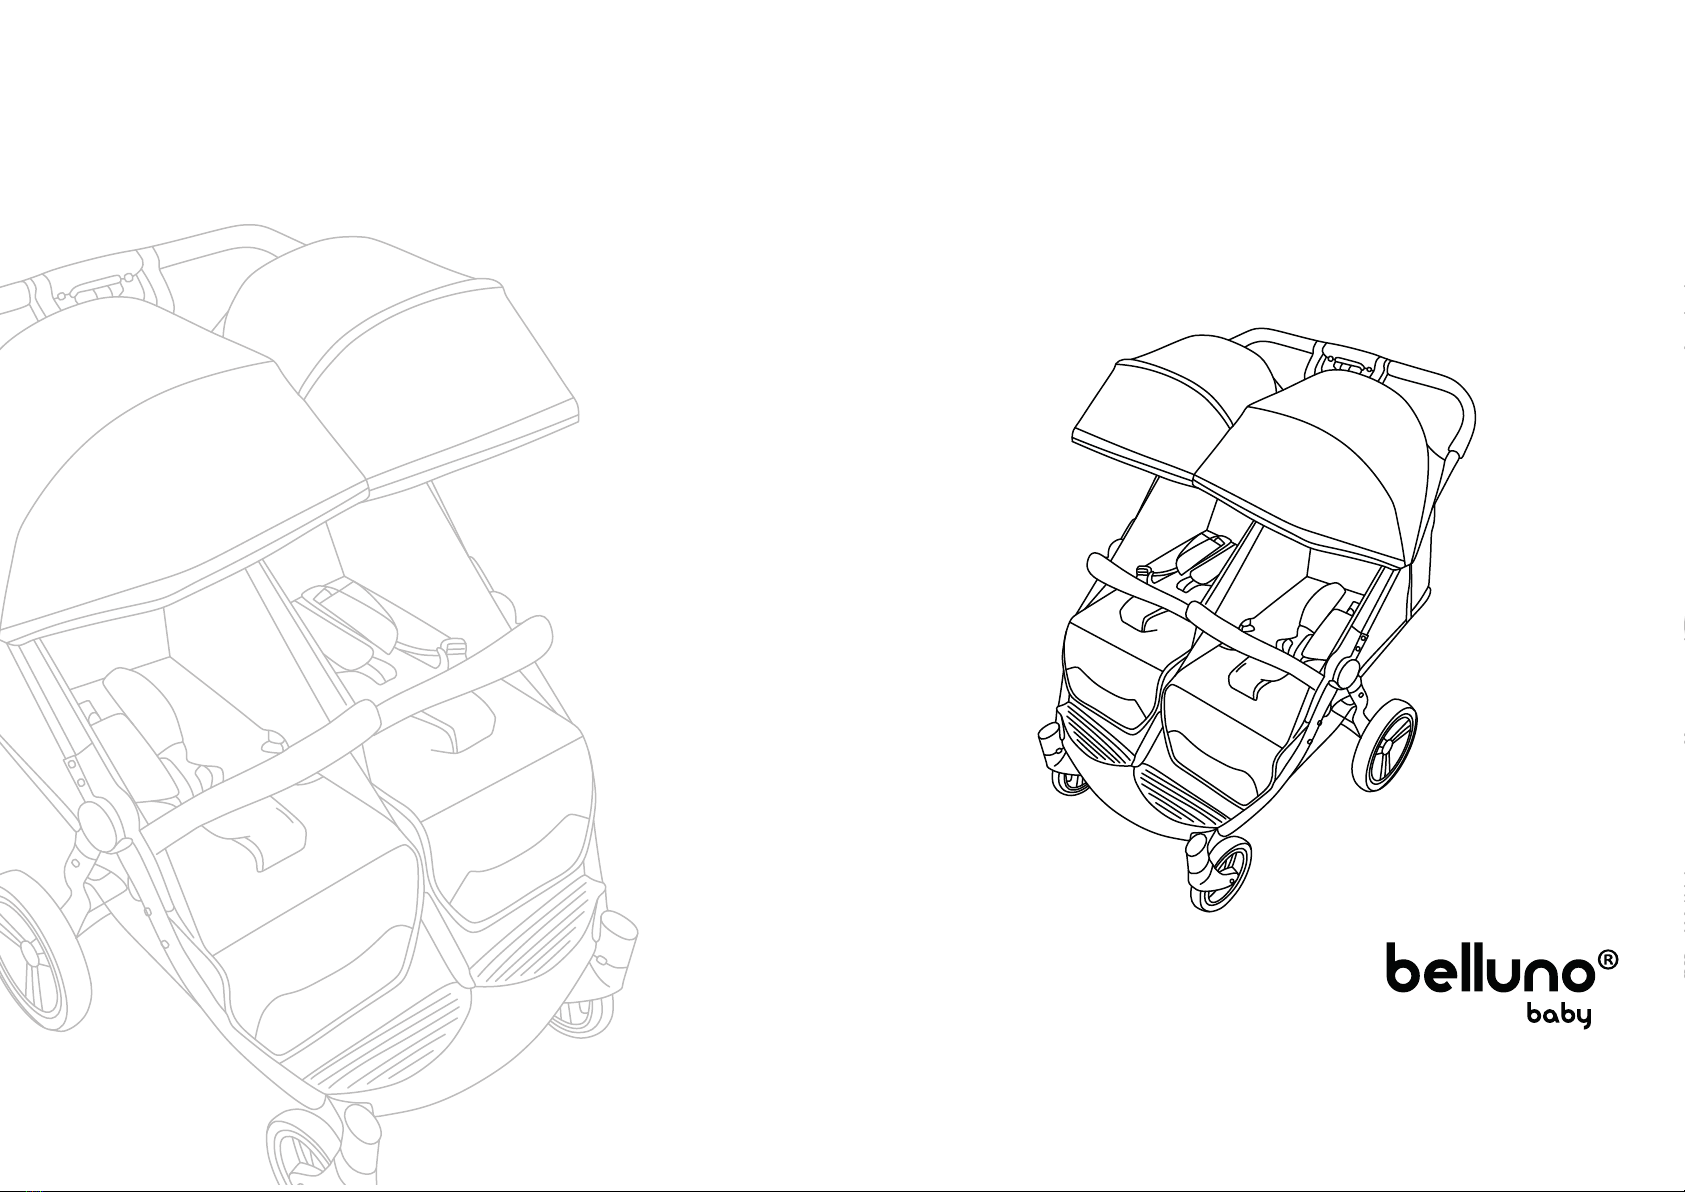
Belluno Baby MOMO TWIN User manual
Si el contenido de este manual no se ajusta al producto, prevalecerá el producto actual. La empresa se reserva los derechos de cambio de diseño.
If the content of this manual does not conform to the actual product, the actual product will prevail. The company reserves design change rights.
For your child’s safety, please read this manual carefully and save it for future reference.
Por la seguridad de su hijo, por favor lea estas instrucciones y guárdelas para futura referencia.
M O M O T W I N
RJ-609
INSTRUCTION MANUAL FOR ASSEMBLY AND USE
MANUAL DE INSTRUCCIONES PARA ARMADO Y USO

Si el contenido de este manual no se ajusta al producto, prevalecerá el producto actual. La empresa se reserva los derechos de cambio de diseño.
ENGLISH
INDEX
Componentes
Instrucciones de armado
Apertura del cochecito
Instalación de ruedas delanteras
Instalación de ruedas traseras
Alineación de ruedas delanteras
Barral de seguridad
Apoyapies
Ajuste del respaldo
Capota
Estilo de capota
Uso freno ruedas traseras
Arnés de seguridad
Plegado del cochecito
Advertencia
Mantenimiento
Importante
Components
Assembly instructions
Unfold the baby stroller
Front wheels installation
Rear wheels installation
Front wheels alignment
Front bar
Footrest
Backrest adjustment
Canopy
Canopy style
Rear wheels brake
Safety harness
Fold the baby stroller
Warning
Maintenance
Important
02
03
03
03
04
04
05
05
05
06
06
07
07
08
09
09
10
11
12
12
12
13
13
14
14
14
15
15
16
16
17
18
18
19
ESPAÑOL
ÍNDICE
INSTALACIÓN DE RUEDAS DELANTERAS
02
• Inserte cada una de las ruedas
dentro del eje delantero hasta escu-
char un “click”. Ese sonido indicará
que se encuentran correctamente
colocadas.
• Para quitarlas, presione con una
mano, el botón de desmonte de acero
ubicado en la parte inferior del eje;
con la otra, saque la rueda (Fig. 3).
Manillar
Capota extensible
Respaldo multiposición
Arnés de 5 puntos
Funda acolchonada
Freno trasero centralizado
Barral de seguridad
desmontable
Apoyapies regulable
Canasto portaobjetos
Rueda delantera giratoria
con traba
2 3
Belluno Baby Momo Twin ™
Manual de instrucciones de uso y armado del cochecito.
Antes de usar el cochecito, lea el manual cuidadosamente y por completo.
Mantenga el manual a mano por cualquier referencia a futuro.
ES
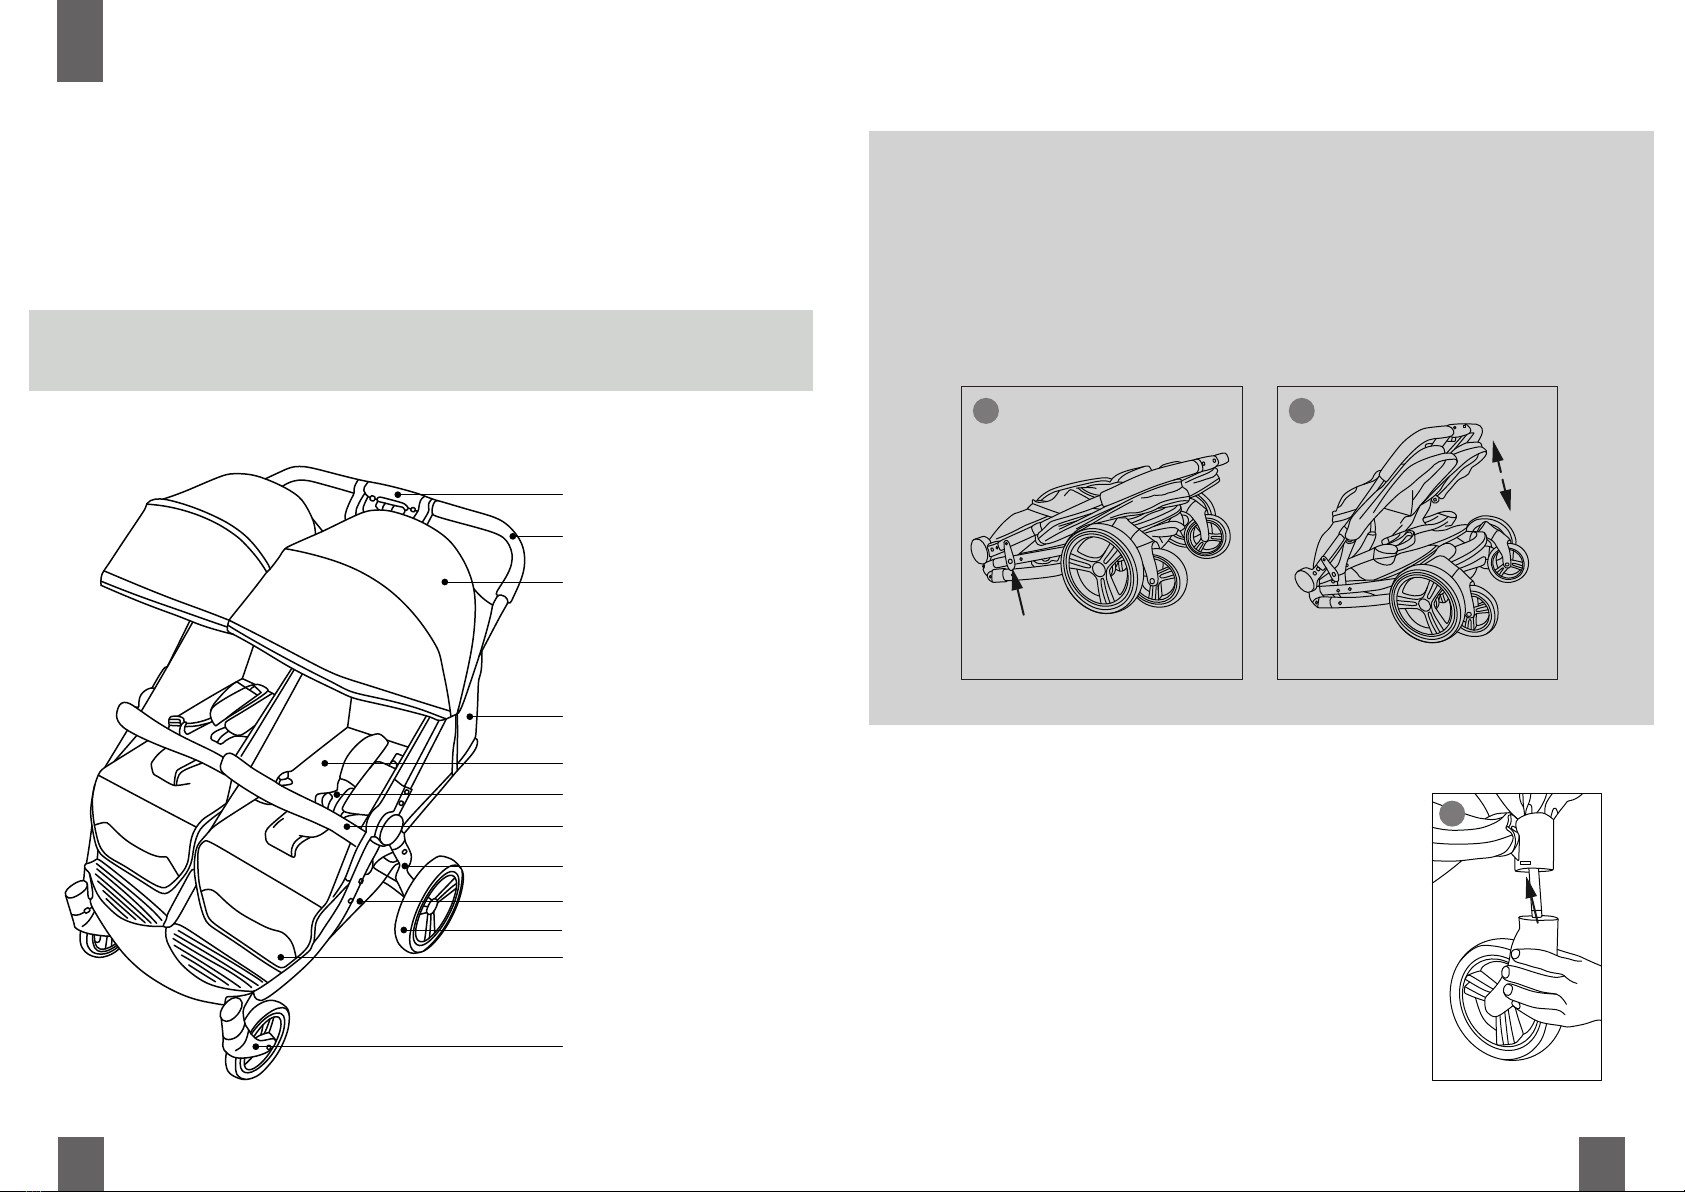
COMPONENTES
INSTRUCCIONES DE ARMADO
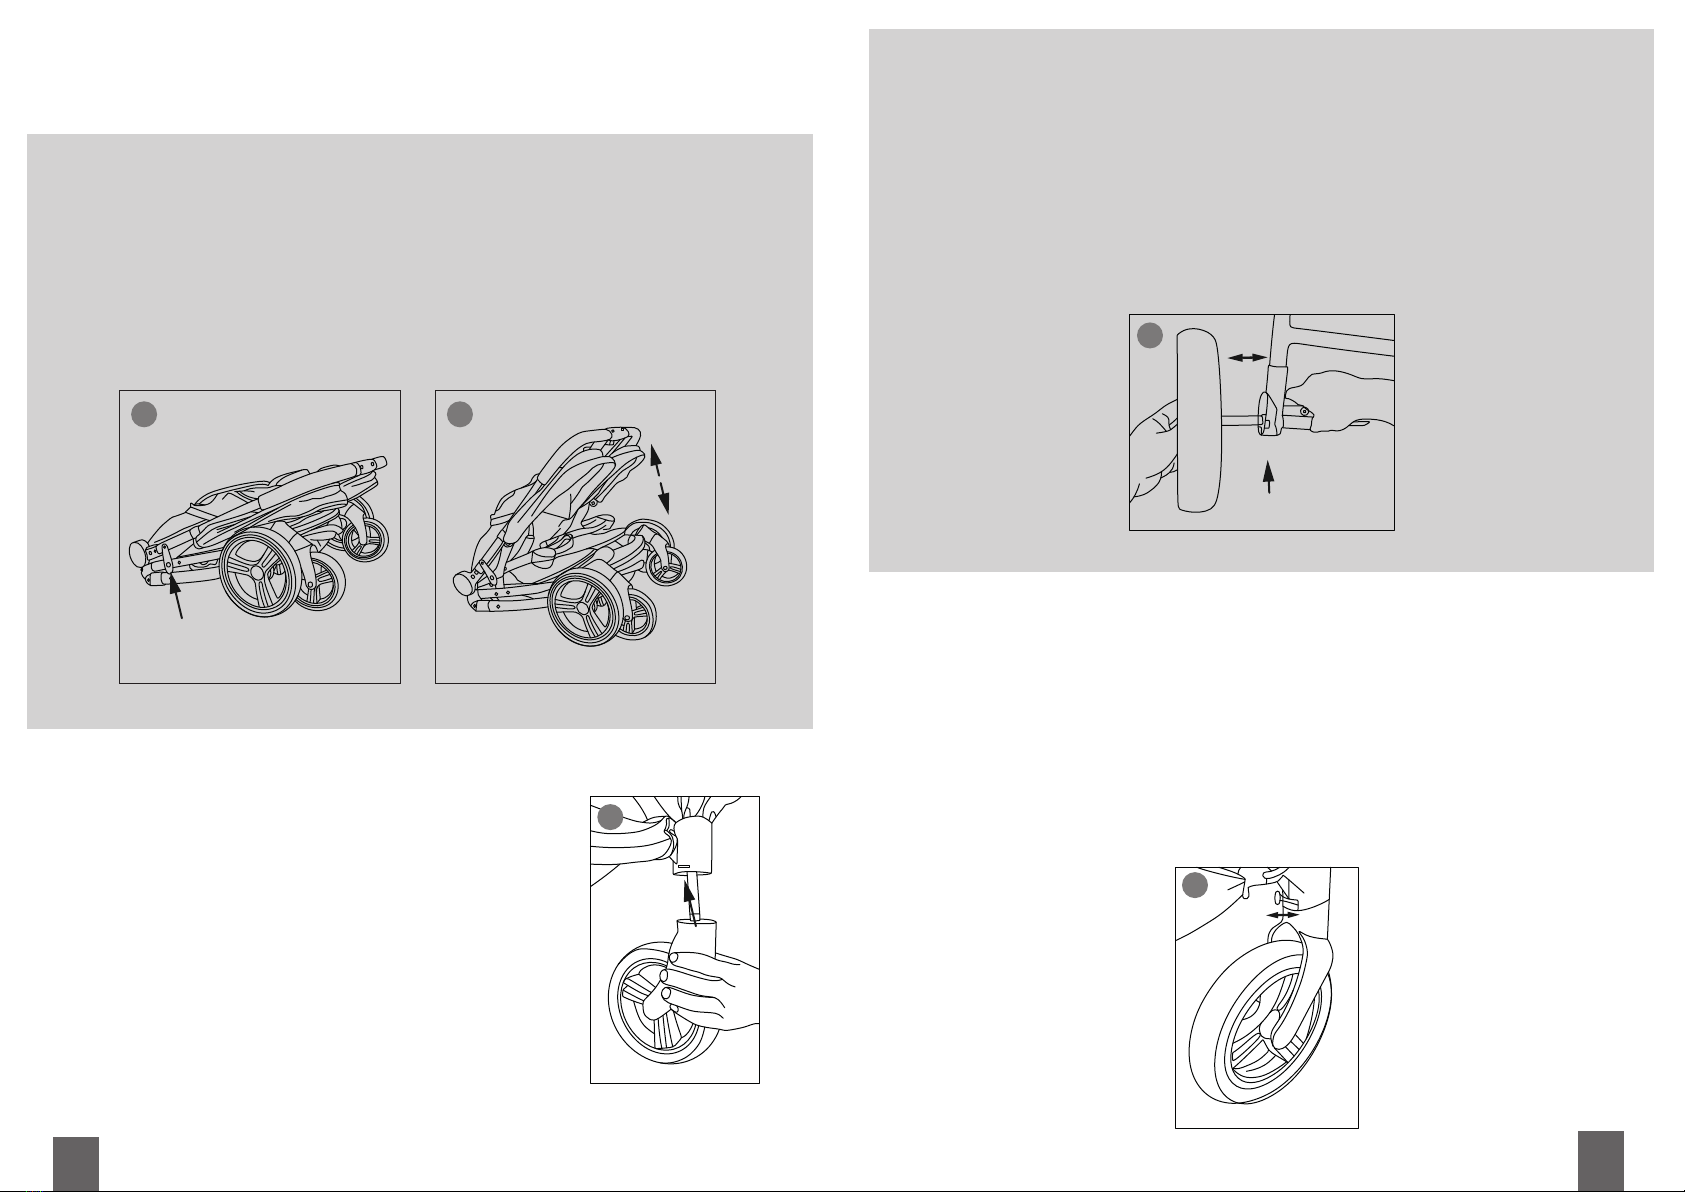
01
• Quite la traba de seguridad (Fig. 1).
• Tome el coche desde el manillar y tire hacia arriba para armar la estruc-
tura (Fig. 2).
• Corrobore que la misma se sienta firme.
APERTURA DEL COCHECITO
Cierre One Hand Fold
1 2
Rueda trasera
3

07
AJUSTE DEL RESPALDO
• Mueva la pieza de fijación hacia la derecha y hacia la izquierda para
bloquear y desbloquear las ruedas delanteras (Fig. 5).
• Si las trabas ubicadas en la parte posterior de las ruedas se encuentran
direccionadas hacia afuera, entonces las ruedas delanteras se manten-
drán en una posición fija.
• De modo contrario, si las mismas se encuentran hacia adentro, las
ruedas girarán sobre su propio eje, hacia un lado y otro, en forma aleato-
ria.
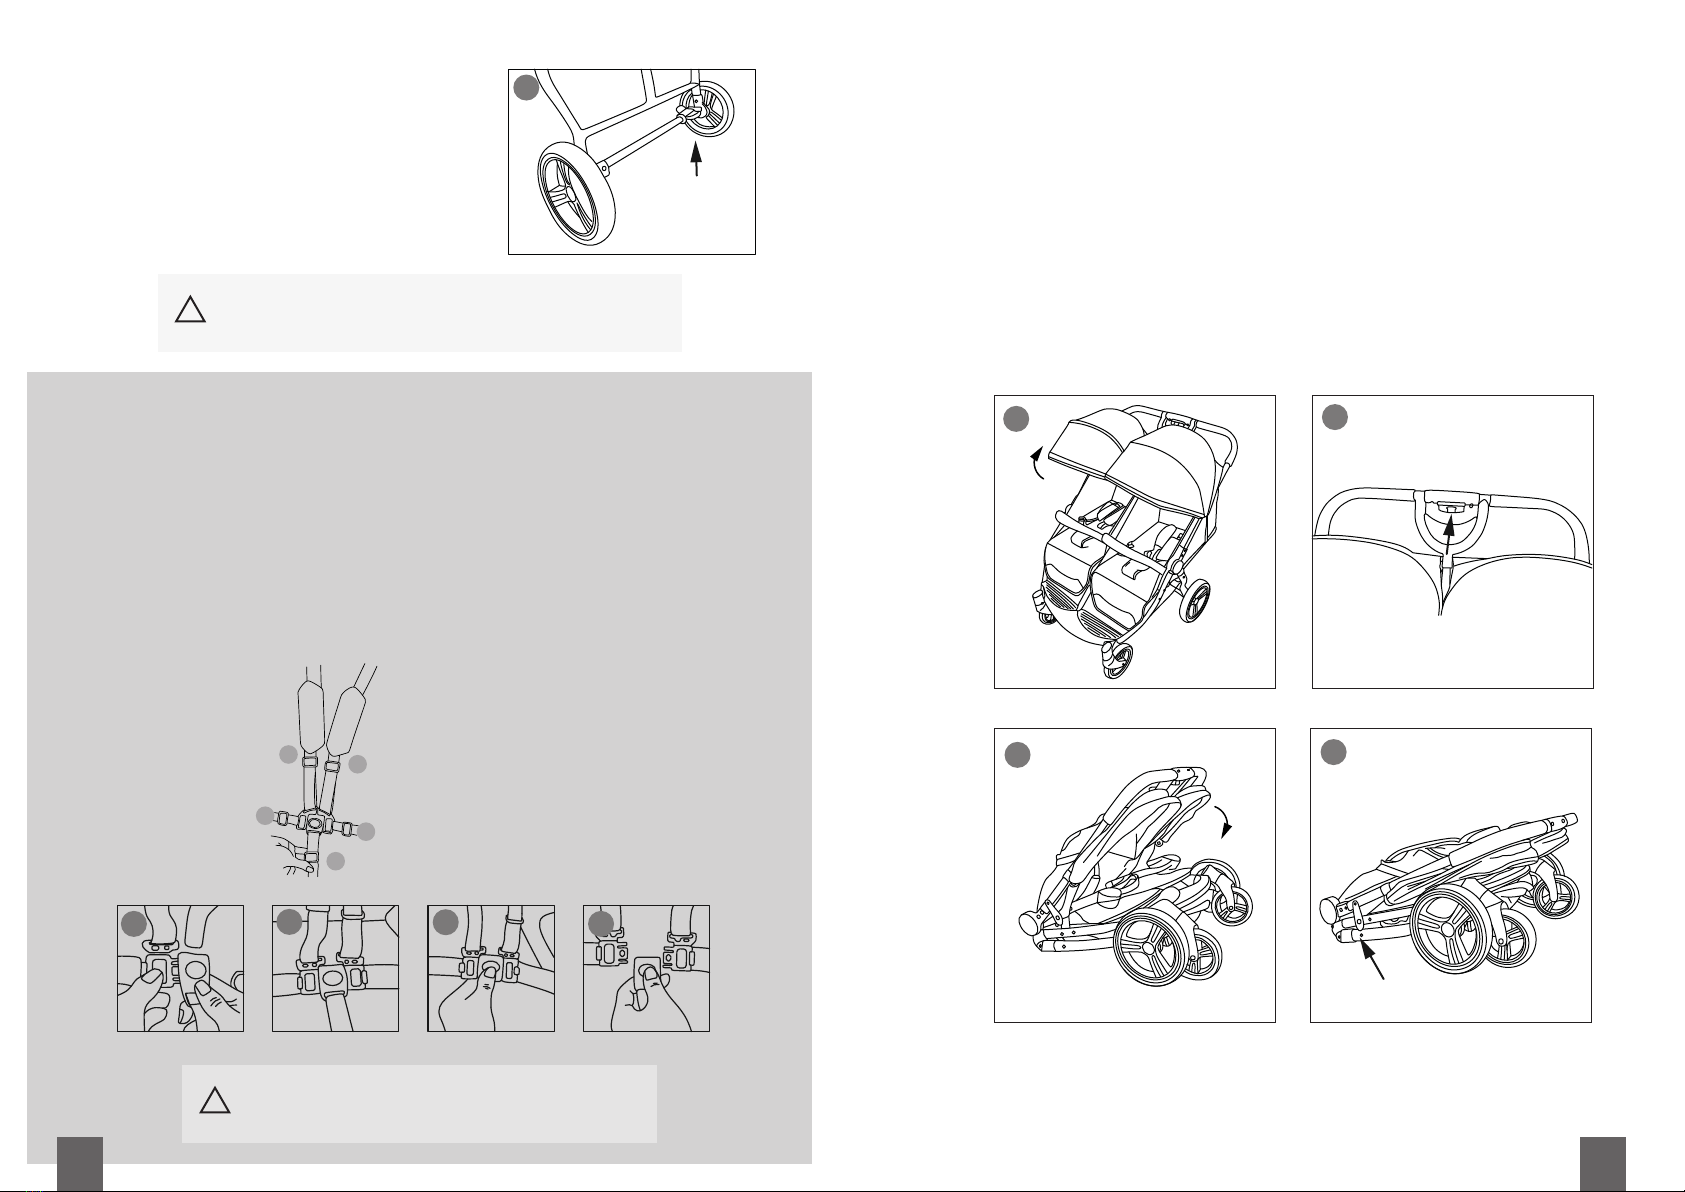
ALINEACIÓN DE RUEDAS DELANTERAS
04
• Regulable en dos posiciones.
• Presione en simultáneo los dos boto-
nes ubicados a ambos lados del
apoyapiés para colocarlo en la
posición deseada (Fig. 7).
4 5
5
7
05
03
• Como se muestra en la Fig. 4, inserte cada una de las ruedas dentro del
eje trasero hasta escuchar un “click”.
• Asegúrese de que las mismas estén bloqueadas y no puedan ser saca-
das.
• Para desmontar las ruedas traseras, presione el botón de liberación
rápida de acero que se encuentra en la parte posterior del eje. Encontra-
rá uno para cada rueda. Ayúdese con la otra mano para quitar cada una
de ellas desde el lateral.
INSTALACIÓN DE RUEDAS TRASERAS
• Inserte cada uno de los extremos
del barral en los dos encastres de la
estructura del coche.
• Escuchará un “click” que indicará su
correcta colocación.
• Presione los botones a ambos lados
del barral para extraerlo (Fig. 6).
• De este modo, el apoyabrazos
podrá ser retirado sin inconvenien-
tes.
BARRAL DE SEGURIDAD
APOYAPIES
06
4
6
• El respaldo es multiposición.
• Regulable entre los 108° y 178°.
• Con una mano, sujete las tiras; con la
otra mano, presione el broche de
ajuste (Fig. 8).
• Deslícelo hacia arriba o hacia abajo,
según el ángulo de reclinación deseado
para el respaldo.
• Ajústelo cuidadosamente en caso de
que el bebé se encuentre en el interior
del cochecito.
!Tire fuertemente del barral de seguridad para corroborar que se
encuentre firmemente encastrado.
PRECAUCIÓN:
8
11
09
• Capota XL.
• Confeccionada con materiales resistentes a los rayos UV.
• Posee cierre extensible, lo cual proporciona mayor amplitud de cober-
tura al bebé.
• Puede ser plegada o desplegada empujando o tirando de su borde
delantero hacia atrás o adelante (Fig. 9).
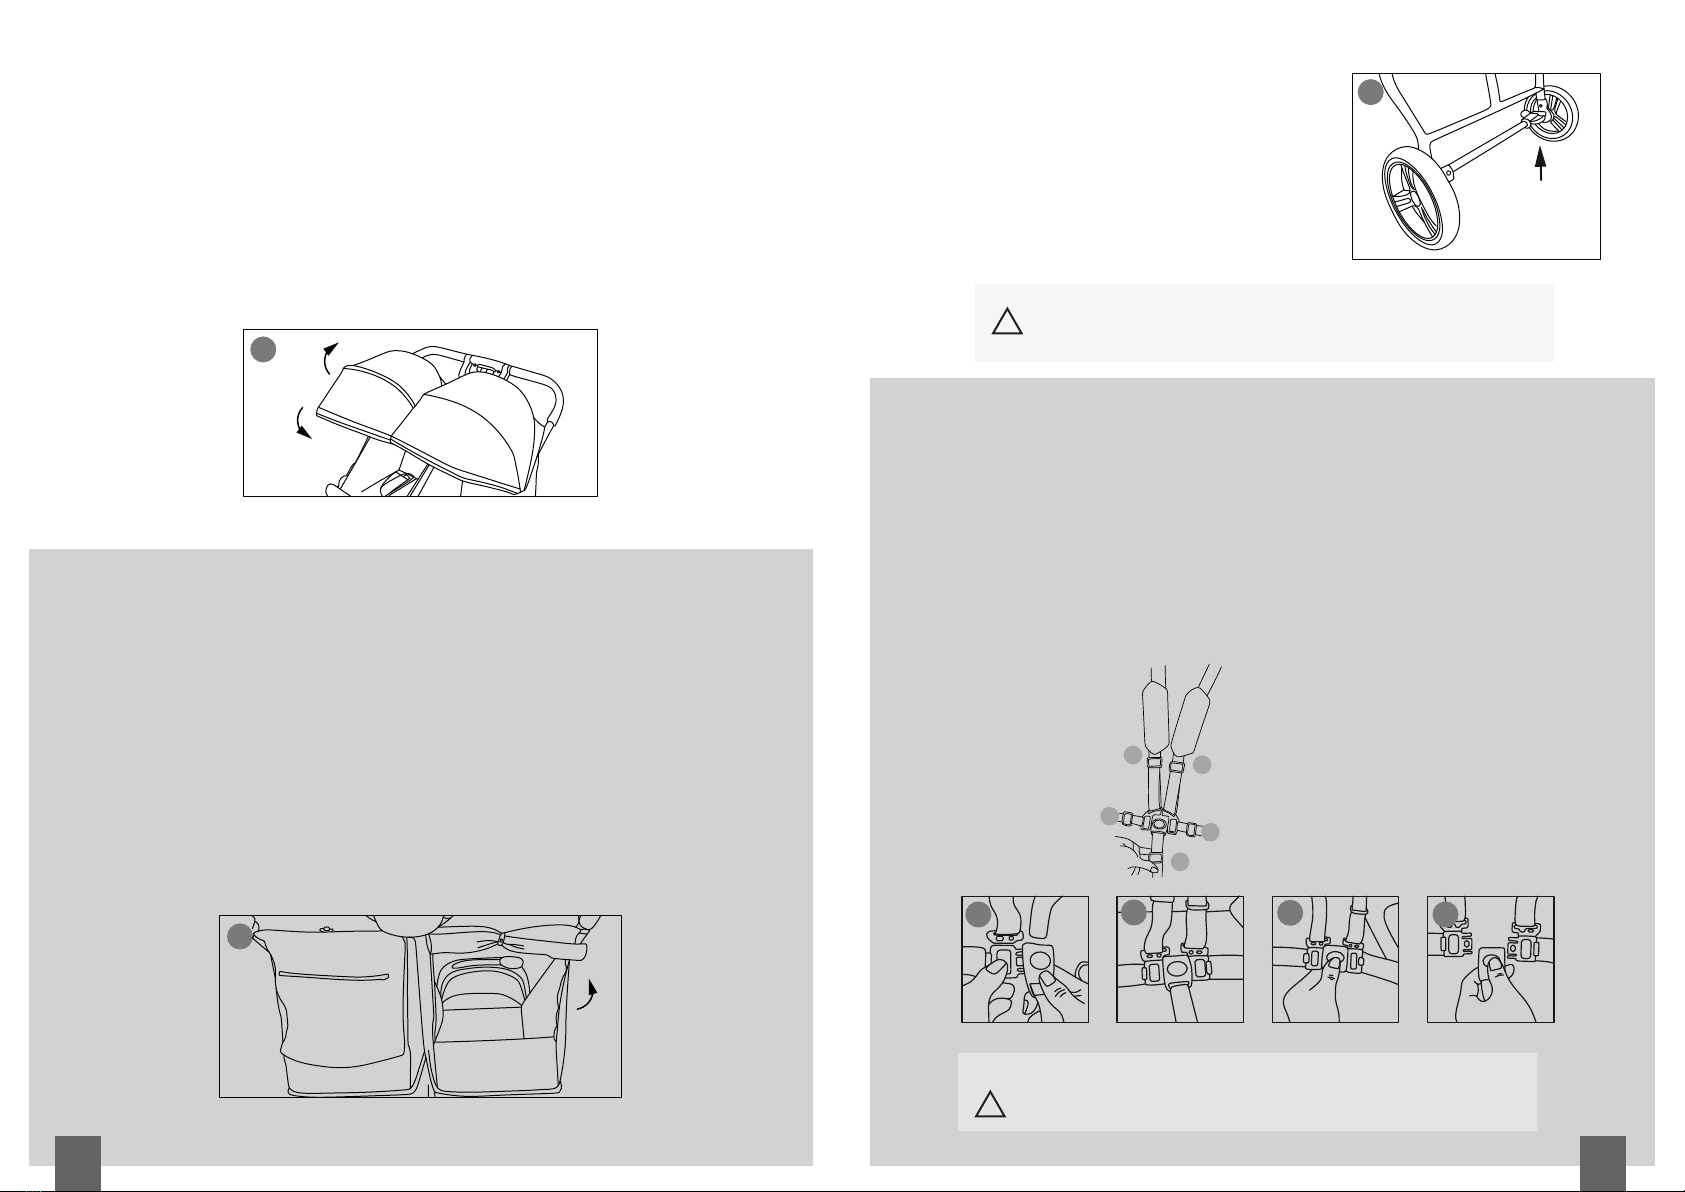
CAPOTA
08
• Dos modalidades de uso (Fig. 10).
• Como puede apreciarse en la parte posterior del asiento izquierdo, la
parte baja de la capota funciona como protección para el bebé y bloquea
el paso del sol y del viento.
• En caso de querer levantarla, para permitir mayor ingreso de aire,
sujete la tela con el agarre plástico, tal como se ve en el asiento de la
derecha.
• Recuerde que, al ser asientos individuales, no necesariamente debe
utilizar la misma modalidad en ambos.
ESTILO DE CAPOTA
• Pise sobre la parte inferior del
seguro ubicado en el eje trasero y
así se aplicará el freno (Fig. 11).
• Presione en su parte superior para
liberarlo.
USO FRENO RUEDAS TRASERAS
10
• El arnés de seguridad es de 5 puntos y su utilización es obligatoria.
• Simplemente, encastre las correas laterales en la parte hembra de la
correa de la entrepierna (Fig. 12).
• Inserte las piezas macho de las correas verticales en el hombro (Fig. 13).
• Presione ligeramente para bloquear (Fig. 14).
• Para destrabar el arnés, presione el botón central de la hebilla y luego
separe las partes (Fig. 15).
ARNÉS DE SEGURIDAD
6 7
10
11
Apertura del botón con una mano.
1 y 2: Hebilla de ajuste del hombro.
3 y 4: Hebilla de ajuste de la cintura.
5: Hebilla de ajuste de la ingle.
12
3
4
5
9
!Presione la palanca del freno al detenerse para evitar que el cochecito se mueva.
Empújelo para comprobar que las trabas estén en la posición correcta de bloqueo.
PRECAUCIÓN:
!El arnés de 5 puntos debe ser obligatoriamente utilizado por motivos de seguridad
del bebé. Utilice todas sus partes y chequee que estén correctamente encastradas.
ADVERTENCIA:
12 13 14 15
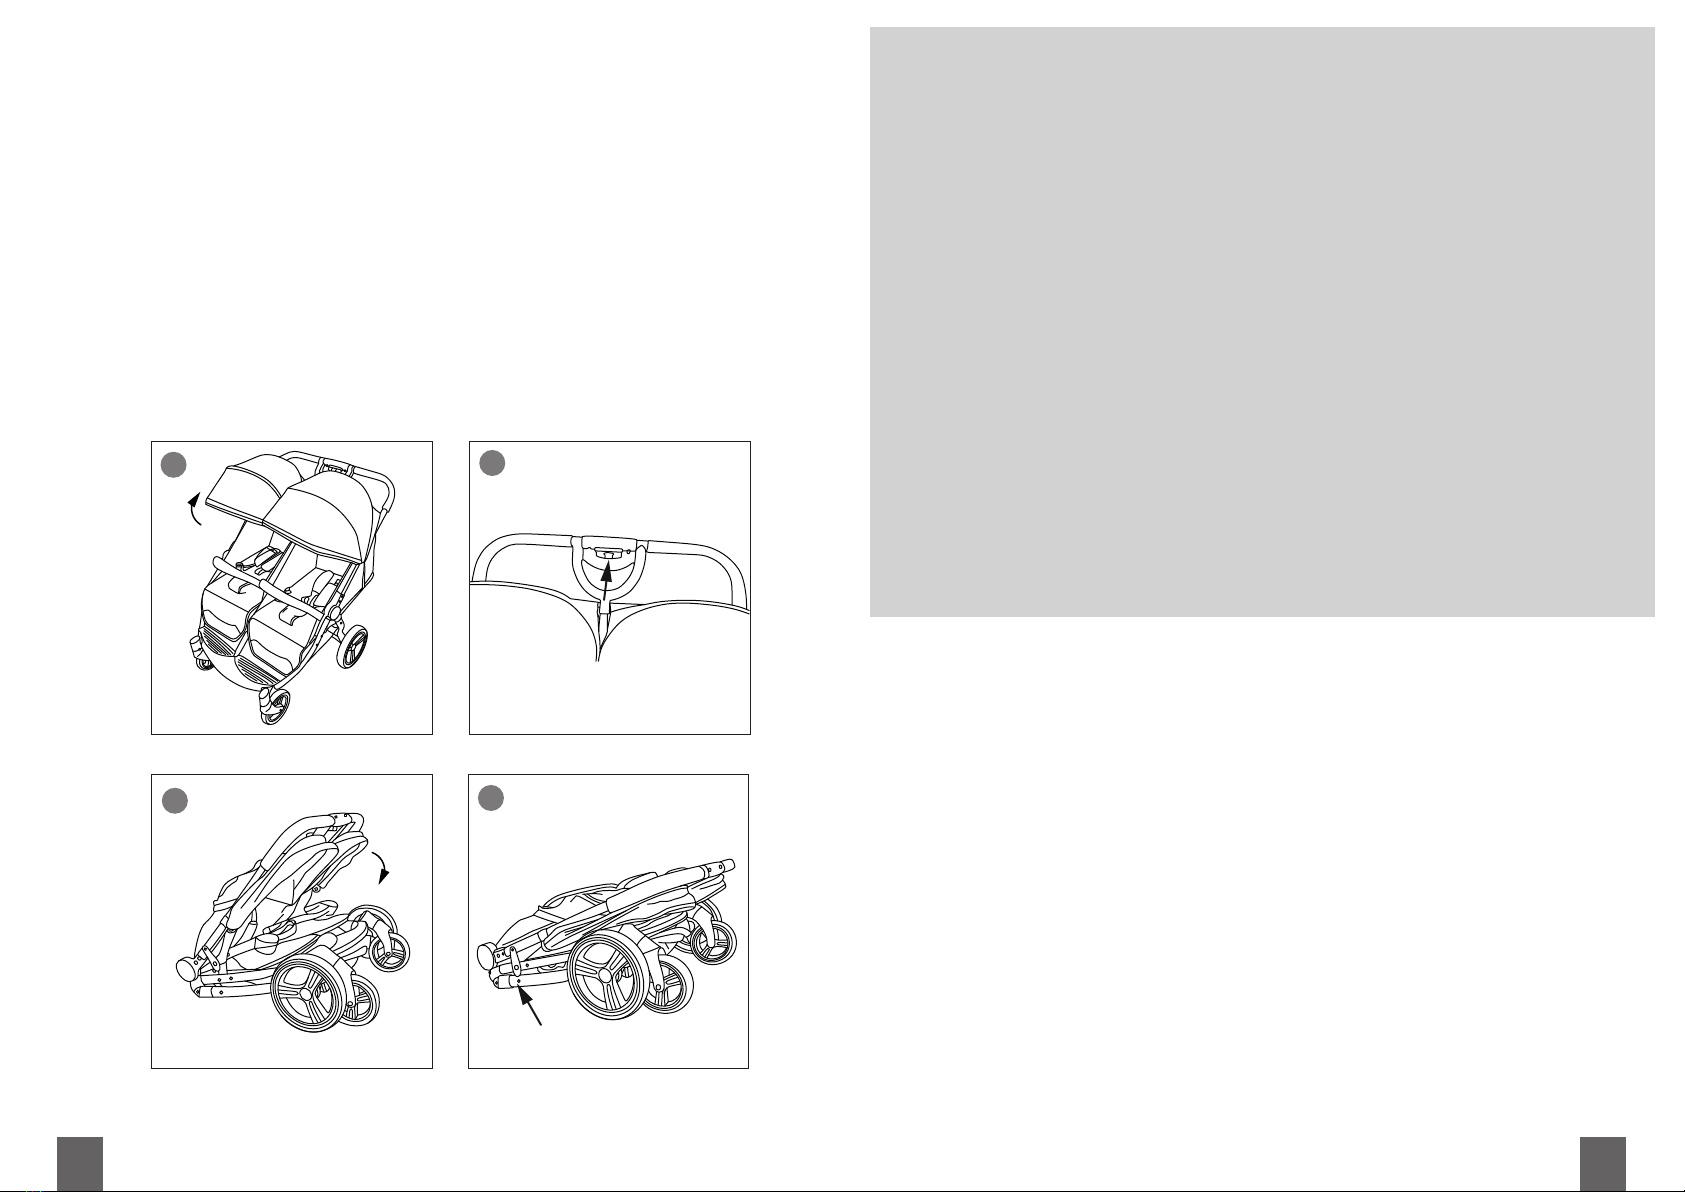
• Lleve la capota hacia atrás (Fig. 16).
• Es importante tener en cuenta que el respaldo no debe estar reclinado,
sino en posición de asiento.
• En primer lugar, presione el botón central de bloqueo (Fig. 17). Una vez
hecho esto, mantenga presionado el botón completo de plegado, para
liberar el cierre del cochecito.
• En simultáneo, lleve hacia el adelante y luego hacia abajo el manillar, tal
como se aprecia en la Fig. 18. No suelte el botón de plegado.
• Coloque la traba de seguridad para mantenerlo cerrado (Fig. 19).
• El cochecito se encuentra correctamente plegado y listo para ser trans-
portado.
PLEGADO DEL COCHECITO
12 ADVERTENCIA
1. Revise el cochecito cuidadosamente siempre antes de colocar a su bebé.
2. Nunca deje a su niño desatendido en el cochecito.
3. No coloque peso extra en el manillar para así poder mantenerlo balanceado.
4. Antes de usarlo, asegúrese de que los dispositivos de bloqueo estén colocados.
5. El coche es recomendado para bebés entre 0 y 36 meses con una capacidad
máxima de carga de 18 kilos por asiento.
6. El canasto portaobjetos puede cargar hasta 3 kilos.
7. El cochecito no es adecuado para correr o patinar.
8. Siempre aplique el freno cuando el coche está parado.
9. Mantenga el producto alejado del fuego.
10. Use el coche preferentemente sobre superficies lisas o uniformes.
11. Siempre preste atención a la condición del pavimento o veredas cuando está
en movimiento, para evitar caídas.
12. Nunca estacione el coche en pendientes empinadas.
13. No lleve más de un niño por asiento.
14. No ajuste o mueva partes del coche cuando el niño se encuentre a bordo.
15. No use el coche cuando alguna de sus partes está dañada.
16. No permita a los niños trepar o jugar con el cochecito.
17. Mantenga todas las piezas pequeñas fuera del alcance de los niños.
MANTENIMIENTO
• Cualquiera sea el componente que quiera lavar, quítelo de la estructura del
coche.
• Limpie la tela rápidamente con jabón en pan blanco y agua fría. Deje secar.
• No blanquear, prensar o limpiar en seco la tela del coche.
• Limpie las partes metálicas y plásticas del cochecito con un paño húmedo. No
utilice ningún tipo de producto químico en su limpieza.
• Manténgase atento a tornillos sueltos, partes dañadas o descosidas.
• No utilice accesorios o componentes que no sean repuestos originales del fabri-
cante ya que pueden no ser seguros.
• Tanto para armar como para desarmar el coche, siga las instrucciones de este
manual.
• Ante cualquier duda, contacte primero al servicio técnico de la marca.
8 9
16 17
18 19

P
No planchar.
No utilizar cloro.
No secar en secadora.
Lavar en seco, no utilizar productos que contengan
tricloroetileno.
Lavado a mano a una
temperatura menor a 30°.
IMPORTANTE Belluno Baby Momo Twin ™
Stroller assembly and use instructions manual
Before using the stroller, read the manual carefully and completely.
Keep the manual for future reference.
EN
COMPONENTS
10 11
Handle
Extendable canopy
Multiposition backrest
5 point safety harness
Padded cover
Centralized rear brake
Removable front bar
Adjustable footrest
Storage basket
Swivel front wheel with
lock
One Hand Fold
Rear wheel
12 13
ASSEMBLY INSTRUCTIONS
FRONT WHEELS INSTALLATION
02
• Insert each of the wheels into the
front axle until you hear a “click”. This
sound will indicate that they are
correctly positioned.
• To remove them, press with one
hand, the steel dismounting button
located at the bottom of the axle; with
the other hand, remove the wheel
(Fig. 3).
01
• Remove the security lock (Fig. 1).
• Take the stroller from the handlebar and pull up to assemble the frame
(Fig. 2).
• Check that it is firmly armed.
UNFOLD THE BABY STROLLER
1 2
3
• Move the fixing piece to the right and left to lock and unlock the front
wheels (Fig. 5).
• If the locks at the rear of the wheels are pointed outward, then the front
wheels will be held in a fixed position.
• Otherwise, if they are inwards, the wheels will rotate on their axis, back
and forth, randomly.
FRONT WHEELS ALIGNMENT
04
5
03
• As shown in Fig. 4, insert each of the wheels into the rear axle until you
hear a “click”.
• Make sure they are locked and cannot be removed.
• To remove the rear wheels, press the steel tab on the rear of the axle.
You will find one for each wheel. Help yourself with the other hand to
remove the wheel from the side.
REAR WHEELS INSTALLATION
4

09
• XL canopy.
• Made with UV-resistant materials.
• It has an extendable closure, which provides greater coverage to the
baby.
• It can be folded or unfolded by pushing or pulling its front edge
backward or forward (Fig. 9).
CANOPY
08
• Two modes of use (Fig. 10).
• As can be seen in the rear of the left seat, the lower part of the hood
works as a protection for the baby and blocks the passage of sun and
wind.
• If you want to lift it, to allow more air to enter, hold the fabric with the
plastic grip, as seen on the seat on the right.
• Remember that, as they are individual seats, you should not necessarily
use the same modality in both.
CANOPY STYLE
10
9
07
BACKREST ADJUSTMENT
• Adjustable in two positions.
• Simultaneously press the two
buttons located on both sides
of the footrest to place it in the
desired position (Fig. 7).
7
05
• Insert each end of the front bar into
the two sockets on the stroller
frame.
• You will hear a “click” that will
indicate its correct placement.
• Press the buttons on both sides of
the front bar to remove it (Fig. 6).
• In this way, the front bar can be
easily removed.
FRONT BAR
FOOTREST
06
6
• The backrest is multi-position.
• Adjustable between 108 ° and 178 °.
• With one hand, hold the strips; With
the other hand, press the adjustment
clip (Fig. 8).
• Slide it up or down depending on the
desired recline angle for the backrest.
• Adjust carefully in case the baby is
inside the stroller.
!Pull hard on the safety bar to verify that it is firmly seated.
CAUTION:
8
14 15
11
• Step on the bottom of the lock
located on the rear axle and the
brake will apply (Fig. 11).
• Press on its upper part to release
it.
REAR WHEELS BRAKE
10
• The safety harness is 5 points, and its use is obligatory.
• Simply snap the side straps onto the female part of the crotch strap (Fig.
12).
• Insert the male pieces of the vertical straps into the shoulder (Fig. 13).
• Press lightly to lock (Fig. 14).
• To unlock the harness, press the center button on the belt and then
separate the parts (Fig. 15).
SAFETY HARNESS
11
One-handed button opening.
1 y 2: Shoulder adjustment buckle.
3 y 4: Waist adjustment buckle.
5: Groin adjustment buckle.
12
3
4
5
!Press the brake lever when stopping to prevent the stroller from moving.
Push it in to check that the locks are in the correct locked position.
CAUTION:
!The 5-point harness must be used for safety reasons for the baby.
Use all its parts and check they are correctly fitted.
WARNING:
12 13 14 15
16 17
• Move the hood backward (Fig. 16).
• It is important to note that the backrest should not be reclined but in a
sitting position.
• First, press the central locking button (Fig. 17). Once done, press and
hold the full fold button to release the stroller lock.
• Simultaneously push the handlebar forward and then down, as shown
in Fig. 18. Do not release the fold button.
• Place the safety lock to keep it closed (Fig. 19).
• The stroller is correctly folded and ready to be transported.
FOLD THE BABY STROLLER
12
16 17
18 19
18 19
WARNING
1. Always check the stroller carefully before placing your baby.
2. Never leave your child unattended in the stroller.
3. Do not put extra weight on the handlebars to keep the product balanced.
4. Before use, make sure the locking devices are secure.
5. The stroller is recommended for babies between 0 and 36 months, with a maxi-
mum load capacity of 18 kilos per seat.
6. The storage basket can carry up to 3 kilos of weight.
7. The stroller is not suitable for running or skating.
8. Always set the brake when the stroller is stationary.
9. Keep the product away from fire.
10. Use the stroller preferentially on smooth or even surfaces.
11. Always pay attention to the condition of the pavement or sidewalks when in
motion to avoid falls.
12. Never park the stroller on steep slopes.
13. Do not carry more than one child per seat inside.
14. Do not adjust or move parts of the stroller when the child is on board.
15. Do not use the stroller when any of its parts are damaged.
16. Do not allow children to climb or play with the stroller.
17. Keep all small parts out of the reach of children.
MAINTENANCE
• Whatever component you want to wash, remove it from the frame of the stroller.
• Clean the fabric quickly with white bread soap and cold water. Let it dry.
• Do not bleach, press, or dry clean the stroller fabric.
• Clean the metal and plastic parts of the stroller with a damp cloth. Do not use
any type of chemical product for cleaning.
• Be on the lookout for loose screws, damaged or loose parts.
• Do not use accessories or components other than original manufacturer spare
parts as they may not be safe.
• Both to assemble and disassemble the car follow the instructions in this manual.
• Any doubt, consult the brand's technical service first.
P
Do not iron.
Do not use chlorine.
Do not tumble dry.
Dry clean, do not use products containing trichlorethylene.
Hand wash under 30 degrees
Celsius.
IMPORTANT
This manual suits for next models
1
Table of contents
Languages:
Other Belluno Baby Stroller manuals


