Belvedere Siesta SR24 Assembly instructions
Siesta Chairs
SIESTA
Perfect design. Personal service.
User Instructions and Assembly
R
UP
UP
DOWN
DOWN
R
UP
UP
DOWN
DOWN
R
4000978
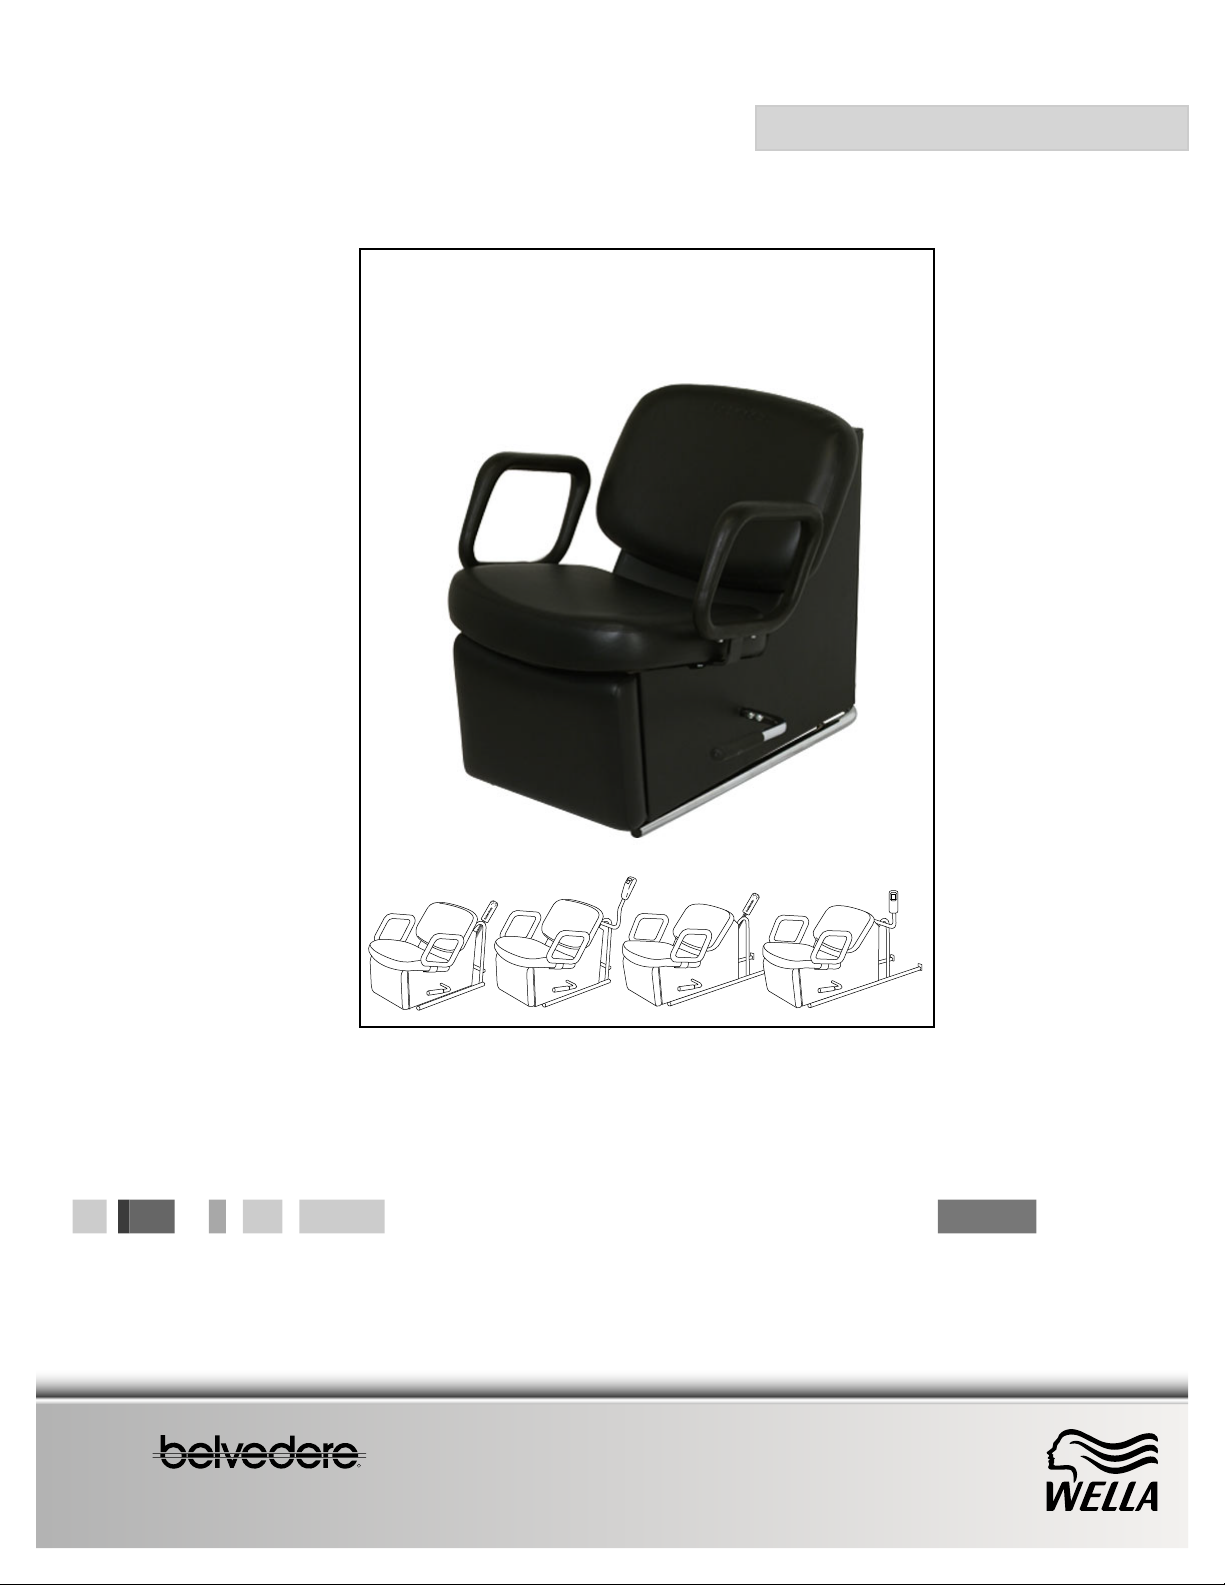
Congratulations. You have purchased the most
advanced and comfortable shampoo seating system
available. The Siesta is ergonomically designed.
The seat adjusts at an angle to maintain proper
alignment between the bowl and the client.
This provides a consistent level of comfort
throughout the adjustment range.
The fixed seat cushion-to-backrest angle provides
a feeling of security as well.
The Siesta chair adjusts to accommodate more than
90% of all salon clients without cumbersome pumps.
Siesta's constant back angle positions the client
properly, regardless of the seat height.
Your Siesta chair requires minimal maintenance. Clean
the vinyl fabric with soap and water. Avoid harsh
cleaners or solvents.
Do not attempt to service or disassemble the gas-
spring lift mechanism. Call your service technician.
Pull up on the release trigger
and allow the chair to rise to
the highest position before
seating the client.
Note: The chair rises ONLY
when unoccupied. With the
chair all the way up, seat the client.
You or the client
may raise
the legrest. Grasp the
handle and pull back.
Caution: The legrest
is spring-loaded.
Note: Clients
wearing dresses
may want a towel
or cape over their legs.
Now pull the
height-control
release trigger
gently until
the client is properly
positioned. The chair
will go down only with a
person in it. If you go
too far, have the
client stand up.
Then raise the
chair as above
and start over.
USING SIESTA (PNEUMATIC LIFT)WHY SIESTA?
Siesta Backwash and Conventional
CONSTANT
BACK ANGLE
ANGLED
ADJUSTMENT
CARE AND CLEANING
Produced by: J. Baer Date: 06/06 Amended: 02/07 Version: 1 Shampoo Seating System Siesta
2
RELEASE
TRIGGER
IMPORTANT! (SIESTA PNEUMATIC ONLY)
The chair should be moved to the LOWEST position
to allow the client to exit when the shampoo service
is completed.
If the chair is not lowered after each service, it
could suffer excessive stress and wear resulting in
damage not covered by the published warranty.
When the shampoo
service is completed, LOWER the chair to allow the
client to exit the chair easily. Heavier clients will lower
the chair slightly faster than petite clients. Push the
lever handle forward to lower the legrest to exit.
4000978

The SR24 electric Siesta comes with a ten-foot power cord. The unit must be plugged into a GFCI (Ground Fault
Circuit Interrupter) circuit or outlet. The GFCI should be installed by a qualified electrician. The outlet may be
located on the wall or in the floor according to local electrical codes. Electrical requirements: 115V, 100 watts.
The electric Siesta uses an
electric actuator system to
move the chair up and down.
It is operated by a two-button
corded remote control.
Push the up or down
button on the
handset to position
the client.
USING ELECTRIC SIESTA
The hook molded on the back
of the electric Siesta remote
control fits into a plastic loop
on the back of the Belvedere
S54 backwash station. If the
Siesta is used with other
shampoo systems, the remote
can be hooked onto any other
convenient location.
UP
UP
DOWN
DOWN
R
REMOTE
CONTROL
UP
UP
DOWN
DOWN
R
3
When the shampoo is complete, push the down
button on the remote to move the
chair to the lowest position.
Push the lever handle
forward to lower the
legrest to exit.
Seat the client in the chair. Then push the up button
on the remote control until the client is properly
positioned. The stylist or client may pull the lever
handle back to raise the legrest.
Note:
Clients wearing dresses may
want a towel
or cape over
their legs.
HOOK
LOWER CHAIR
TO EXIT
PULL LEVER TO RAISE LEGREST
Before seating the client, push the down button on the
remote to move the chair to the LOWEST position.
IMPORTANT! (ELECTRIC SIESTA ONLY)
The chair should be in the LOWEST position:
when the shampoo service begins, and…
when the shampoo service is completed.
If the chair is not lowered after each service, it
could suffer excessive stress and wear resulting in
damage not covered by the published warranty.
Produced by: J. Baer Date: 06/06 Amended: 02/07 Version: 1 Shampoo Seating System Siesta
4000978

Lead anchor or other anchor suitable for wall
construction (no bulkhead cabinet used
SR14, SR34 only) obtain locally.
1 / 4 - 20 Flat Phillips-head screw
J-Hook (2)
Hanger Loop
#8 x 1-1/4” Pan head Phillips screw (2)
Wood screw or other fastener suitable for wall or
bulkhead construction (SR14, SR34 only)
obtain locally.
4
2
1
Tools & hardware
4
5
6
7#2 Phillips screwdriver
3
Produced by: J. Baer Date: 06/06 Amended: 02/07 Version: 1 Shampoo Seating System Siesta
4000978
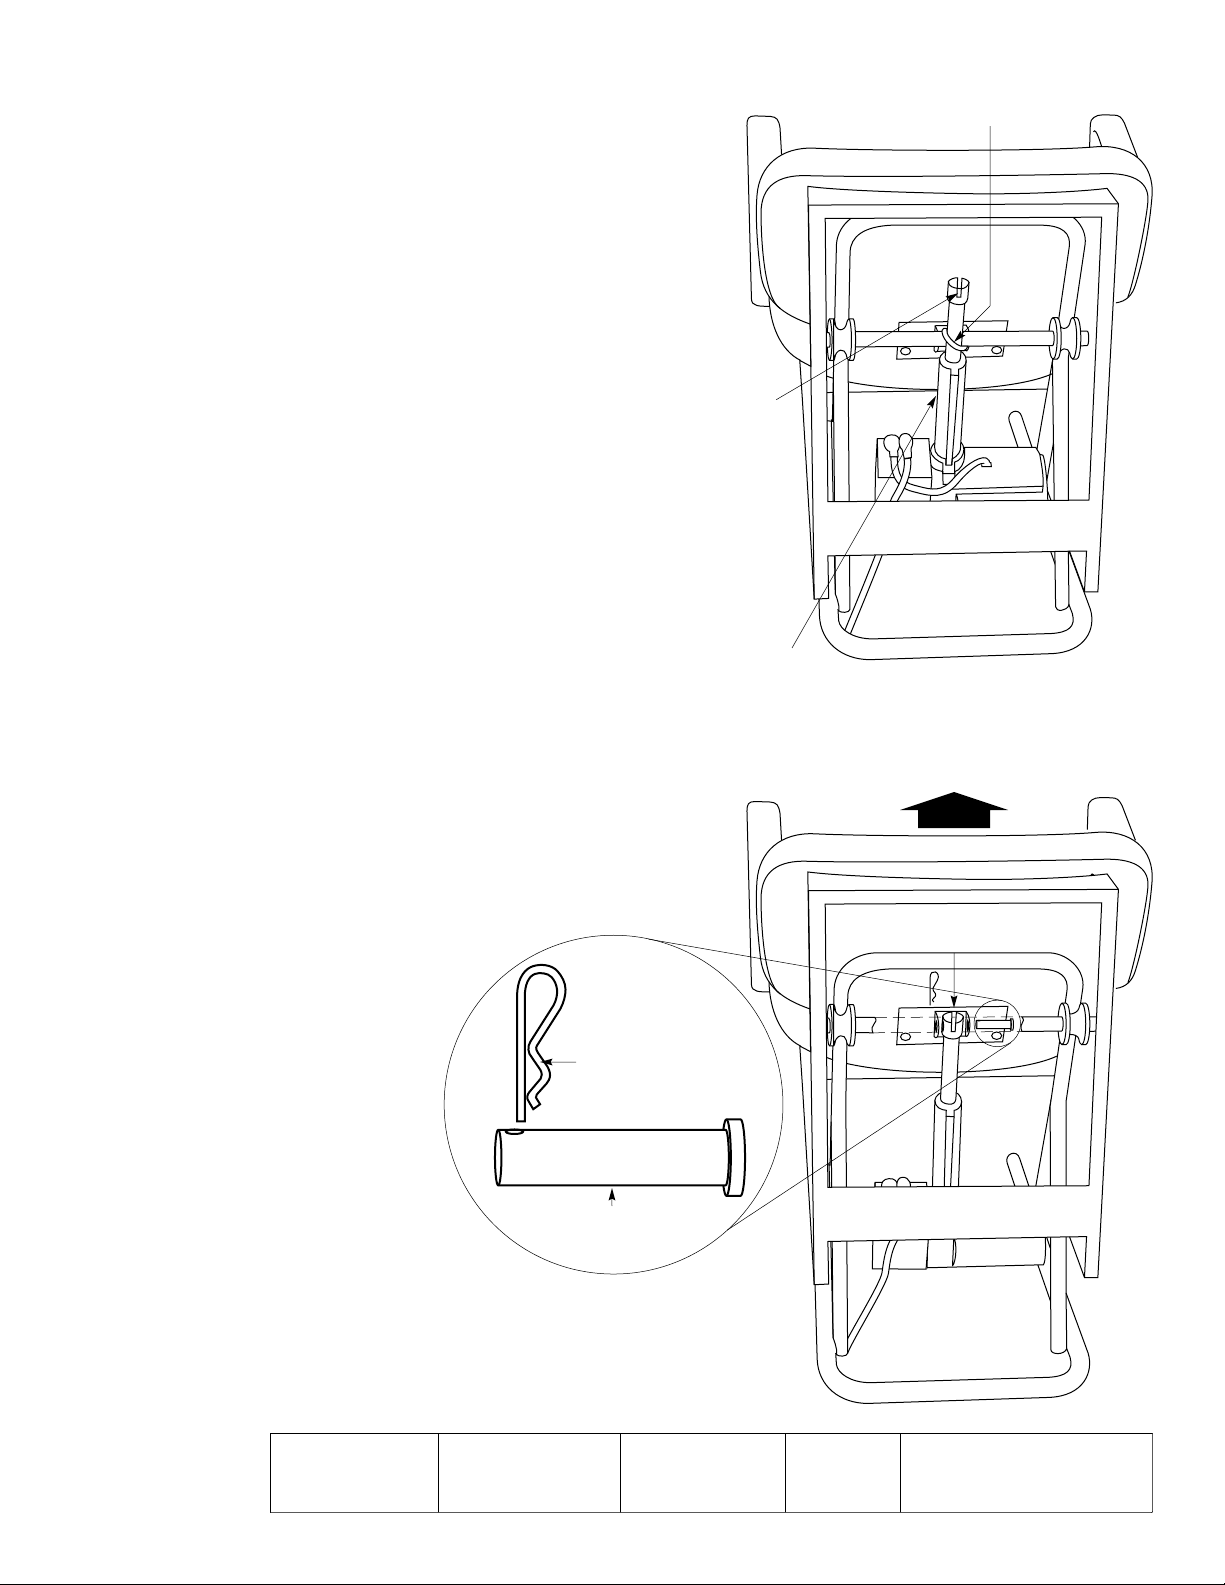
IMPORTANT NOTE:
Your Siesta chair is shipped with the lift mechanism
disconnected from the chair to avoid possible damage
caused by mishandling in shipping. Follow the
directions below to connect the lift mechanism
to the chair.
1. Remove the Siesta chair from the carton.
CAUTION! To avoid damage to the upholstery,
do not use a knife to open the carton.
2. Carefully remove the protective packing materials.
3. Remove the back panel from the chair by
unscrewing four (4) Phillips screws holding the
back panel in place.
4. Use a wire cutter or side cutter to cut and remove
the plastic “zip-tie” holding the top of the lift
mechanism to the chair frame.
5. Pull the retaining clip out of the pin and remove
the pin from the bracket on the chair.
6. To connect the lift mechanism to the chair:
a. Have a helper pull the chair up on the frame
until the bracket is even with the black plastic
fitting on the top of the lift mechanism.
b. Align the black plastic fitting with the
bracket.
c. Insert the pin through the bracket and the
fitting.
d. Push the retaining clip through
the hole in the end of the pin
to keep it from sliding out
of the bracket.
7. Replace the back panel.
SIESTA CHAIR ASSEMBLY
5
BRACKET
RETAINING
CLIP
LIFT
MECHANISM
Produced by: J. Baer Date: 06/06 Amended: 02/07 Version: 1 Shampoo Seating System Siesta
PIN
”ZIP-TIE”
CUT AND REMOVE
BLACK
PLASTIC
FITTING
RAISE
CHAIR
4000978
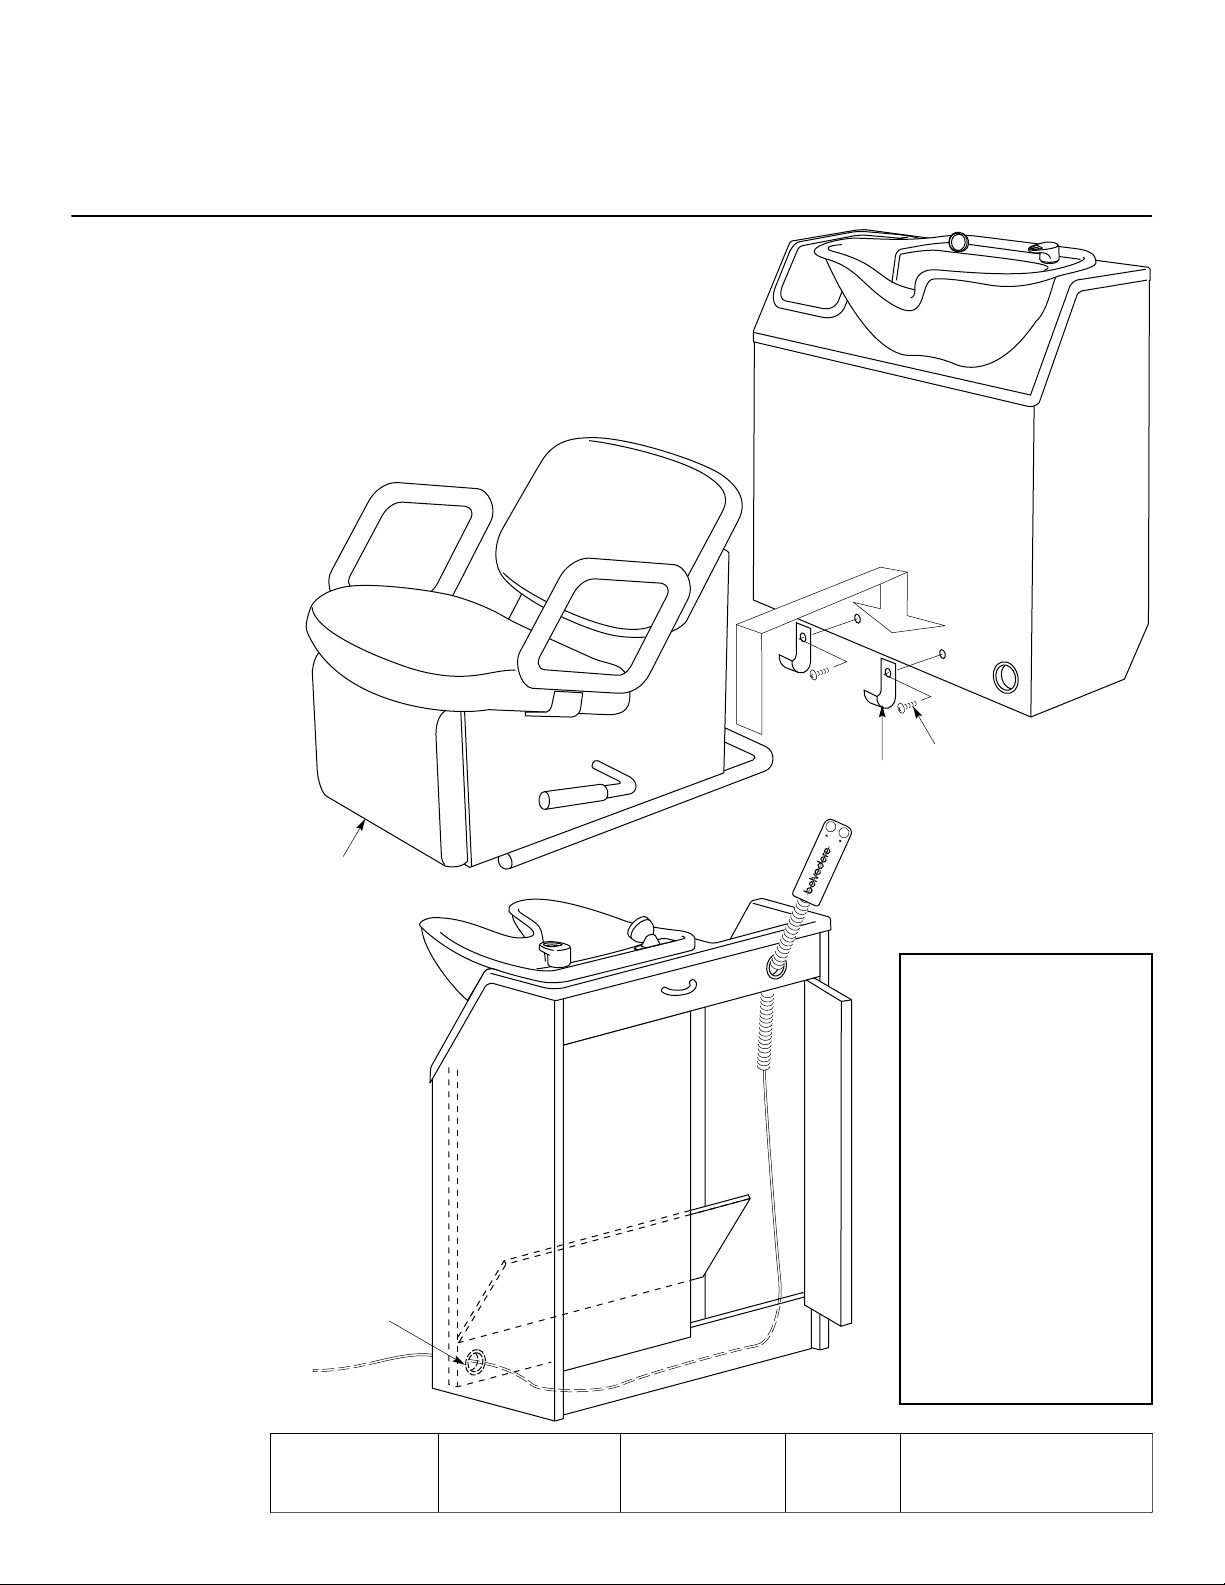
1. Remove the Siesta chair from the carton. CAUTION! To avoid damage to the upholstery, do not use a
knife to open the carton.
2. Carefully remove the protective packing from the control.
S54 Backwash Units:
3. Fasten two J-hooks to the front of the S54 backwash
cabinet with two machine screws provided.
NOTE: The pre-drilled holes in the front of the cabinet
are equipped with T-nuts.
4. Place the back tube of the Siesta chair frame
into the J- hooks.
SIESTA CHAIR INSTALLATION
6
The SR24 and SR34
electric Siestas come
with a 10-foot power
cord. The unit must be
plugged into a GFCI
(Ground Fault Circuit
Interrupter) circuit or
outlet. The GFCI
should be installed by
a qualified electrician.
The outlet may be
located on the wall or
in the floor according
to local electrical codes.
Electrical requirements:
115 volts, 100 watts.
UP
UP
DOWN
DOWN
R
ROUTE REMOTE
CORD THROUGH
GROMMETS
SCREW (2)
J-HOOK (2)
S54
CABINET
5. Route the remote
control through
the grommets
in the front and back
of the S54 cabinet.
The remote may be
hung on the plastic
loop on the back
of the S54.
SR24 SIESTA
CHAIR SHOWN
Produced by: J. Baer Date: 06/06 Amended: 02/07 Version: 1 Shampoo Seating System Siesta
4000978

1. Remove the Siesta chair from the carton. CAUTION! To avoid damage to the upholstery, do not use a
knife to open the carton.
2. Carefully remove the protective packing from the control.
NL54 Nile Backwash Units:
6. Fasten two J-hooks to the front of the NL54 backwash cabinet with two 3/4” long wood screws provided.
7. Place the back tube of the Siesta chair
frame into the J- hooks on the front
of the Nile backwash cabinet.
8. The hanger-loop for the remote
control may be fastened to the
cabinet. Drill two holes, 3/16”
diameter, 1-9/16” apart at a
convenient location.
Fasten the hanger loop
with two screws provided.
SIESTA CHAIR INSTALLATION
7
The SR24 and SR34
electric Siestas come
with a 10-foot power
cord. The unit must be
plugged into a GFCI
(Ground Fault Circuit
Interrupter) circuit or
outlet. The GFCI
should be installed by
a qualified electrician.
The outlet may be
located on the wall or
in the floor according
to local electrical codes.
Electrical requirements:
115 volts, 100 watts.
SCREW (2)
J-HOOK (2)
NILE
BACKWASH
CABINET
1-9/16”
3/16” DIA. 2 PLACES
DRILL PATTERN FOR
HANGER LOOP
SUGGESTED
LOOP HANGER
LOCATION (IF
NO PLUMBING
CABINET USED)
SR24 SIESTA
CHAIR SHOWN
Produced by: J. Baer Date: 06/06 Amended: 02/07 Version: 1 Shampoo Seating System Siesta
4000978
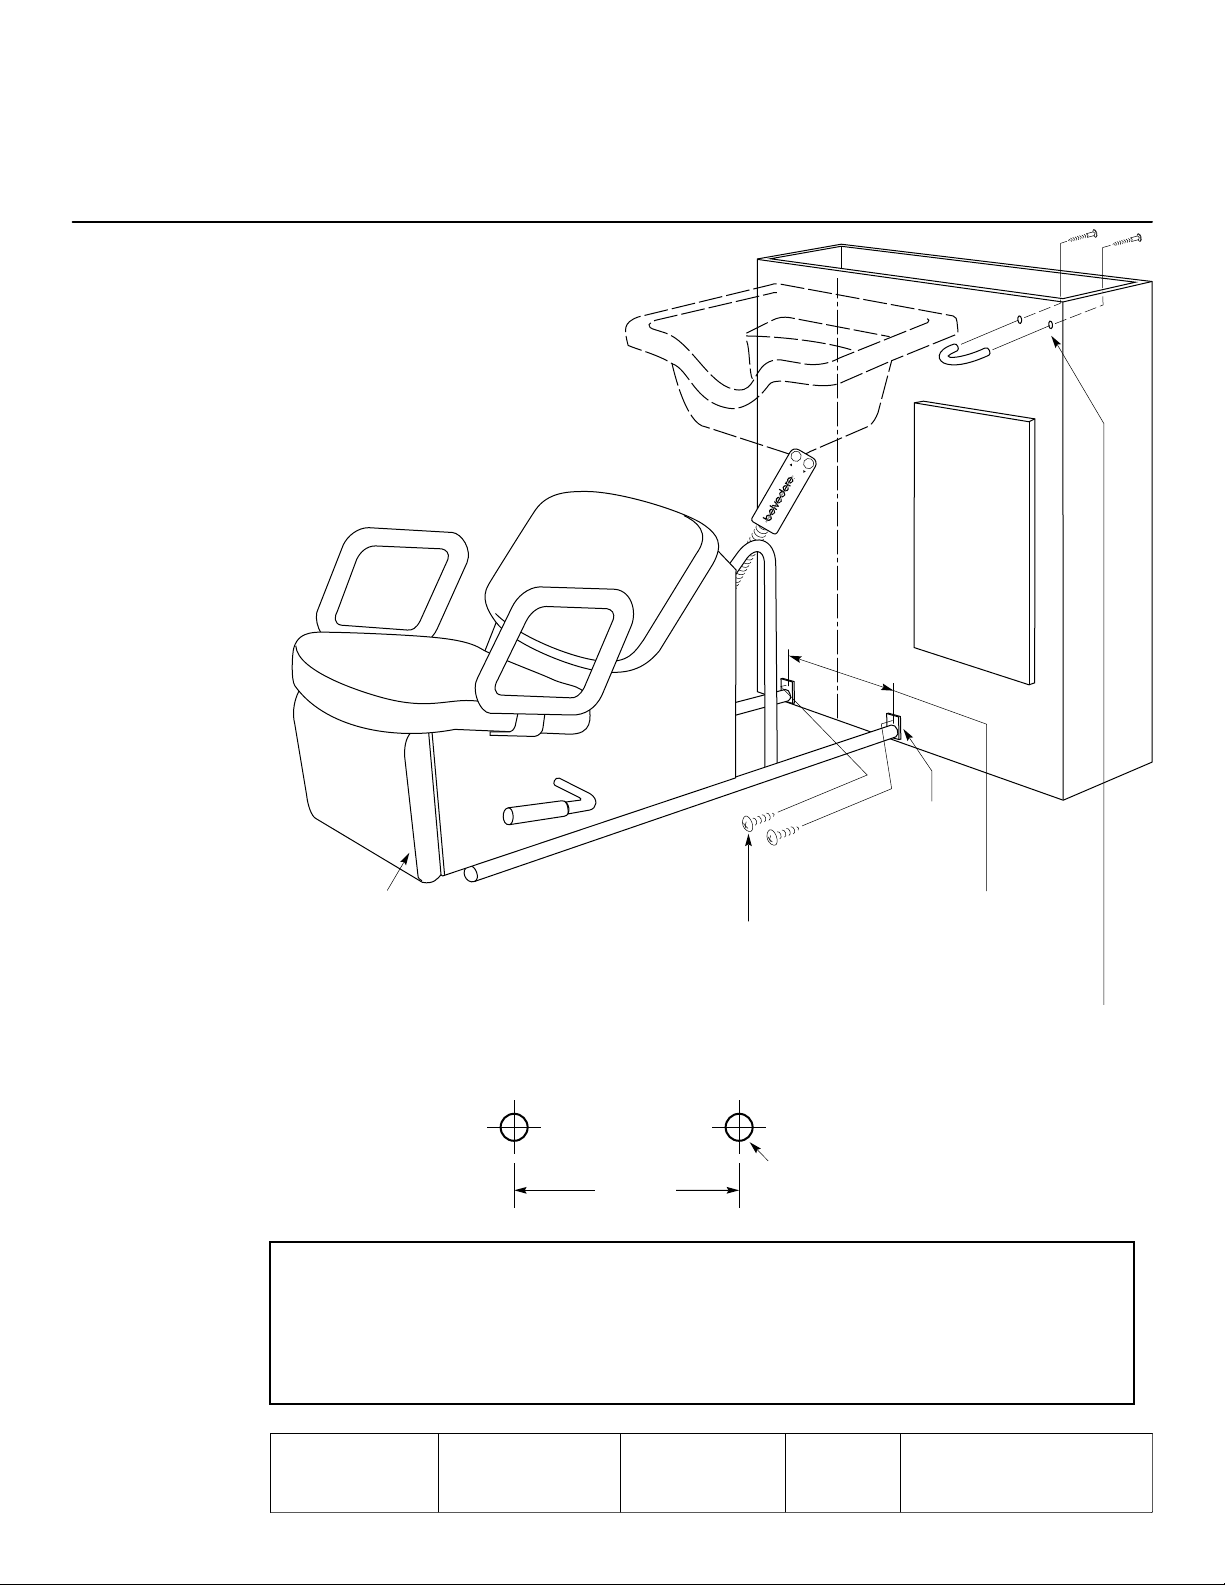
SIESTA CHAIR INSTALLATION
Conventional (Side wash) Units:
NOTE: If installing he Siesta in front of a wall (no bulkhead or shampoo bowl mounting cabinet is used) you must
secure the chair to the wall with fasteners appropriate for your wall construction. Obtain these fasteners locally.
9. Place the Siesta chair in front of the bulkhead or wall.
The mounting plates at the back of the Siesta frame
should be against the shampoo bulkhead or wall.
Be sure the Siesta chair is centered under the bowl.
Mark the locations of the mounting plate screw
holes on the bulkhead or wall.
10. Move the chair aside and drill holes for the fasteners:
a. Bulkhead or shampoo cabinet:
pilot holes
(1/16” dia. x
1/4” deep).
b. Wall: size
appropriate
for your
fasteners.
11. Drive wood
screws
provided
(or your
fasteners)
through the
holes in the
mounting
plates and
into the bulk-
head or wall.
8
UP
UP
DOWN
DOWN
R
BE SURE
CHAIR FRAME
IS CENTERED
UNDER BOWL.
SCREWS (2)
MOUNTING
PLATES (2)
The SR24 and SR34 electric Siestas come with a 10-foot power cord. The unit must be
plugged into a GFCI (Ground Fault Circuit Interrupter) circuit or outlet. The GFCI
should be installed by a qualified electrician. The outlet may be located on the wall or
in the floor according to local electrical codes. Electrical requirements:
115 volts, 100 watts.
12. The hanger-loop for the remote
control may be fastened to the
cabinet. Drill two holes, 3/16”
diameter, 1-9/16” apart at a
convenient location.
Fasten the hanger loop
with two screws provided. 1-9/16”
3/16” DIA. 2 PLACES
DRILL PATTERN FOR
HANGER LOOP
SUGGESTED
LOOP HANGER
LOCATION (IF
NO PLUMBING
CABINET USED)
SR34 SIESTA
CHAIR SHOWN
Produced by: J. Baer Date: 06/06 Amended: 02/07 Version: 1 Shampoo Seating System Siesta
4000978
This manual suits for next models
1
Table of contents
Popular Indoor Furnishing manuals by other brands


Kaboodle
Kaboodle W-51613 Accessories assembly instructions

modway
modway EEI-2538 Assembly instructions

Furniture of America
Furniture of America CM3882PC - 2PK Assembly instructions

Riverside Furniture
Riverside Furniture Stone Forge 31041 Assembly instructions

VISIONARY DESIGNS
VISIONARY DESIGNS VK-1334 Setup instructions

Winners Only
Winners Only DS54072 Assembly instructions