Belwith FIRST WATCH 1381 User manual

©Belwith Products
3100 Broadway, SW • Grandville, MI 49418
Made to Belwith Products’ specications in China
INSTRUCTIONS
Cabinet and
Drawer Lock
1381
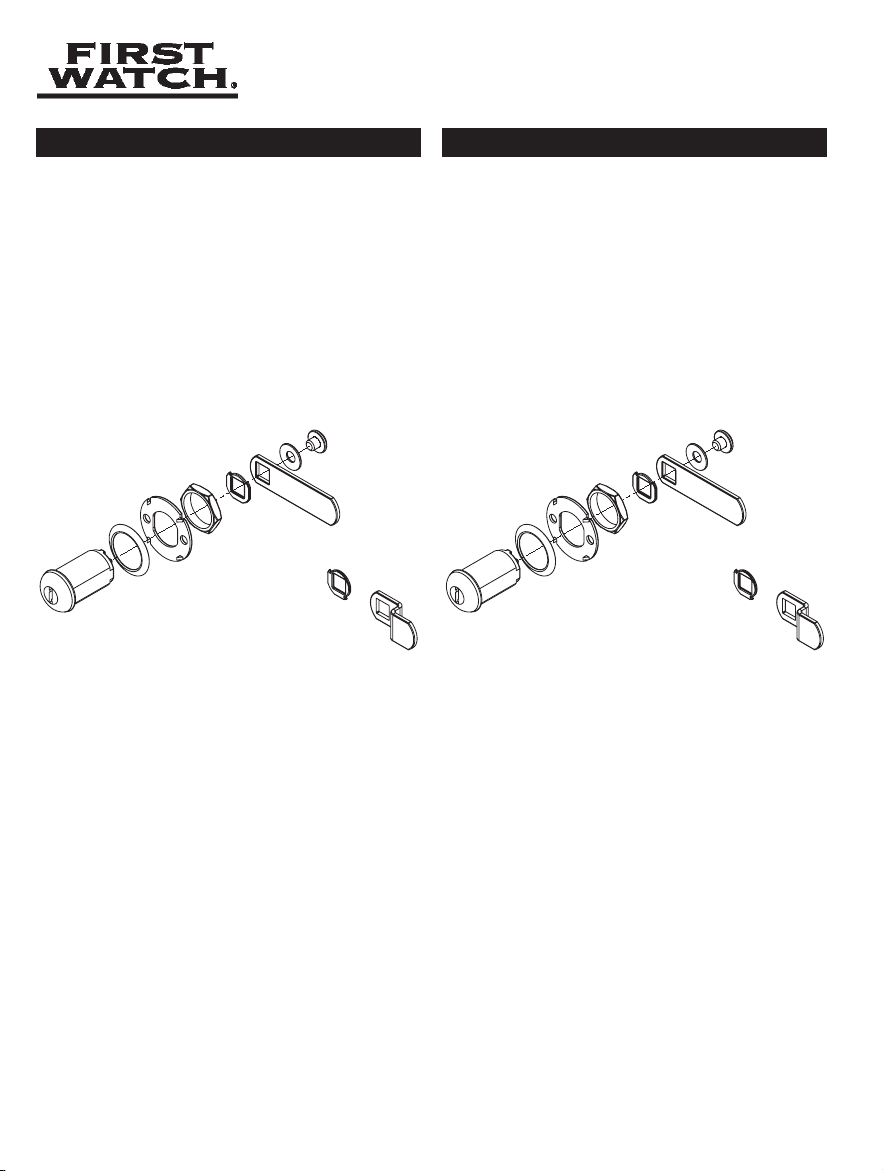
1. Mount template to door or drawer.
2. Remove cam from lock. Drill 3/4" diameter hole.
3. Place collar onto lock and insert lock into hole.
4. Place spur washer (for wood only) to lock.
5. Place 3/4" nut tightly.
6. Place 90 or 180 rotation washer, whichever is preferred.
7. Place cam (either straight or bent, whichever suits conditions
better). You can adjust cam by bending it slightly.
8. Fasten lock with lock washer and screw.
SATISFACTION GUARANTEED
(See website for details http://www.Hickoryhardware.com/warranty)
SATISFACCIÓN GARANTIZADA
(Visite el sitio web para obtener más información
http://www.Hickoryhardware.com/warranty)
SATISFACTION GARANTIE
(Veuillez consulter le site web pour obtenir les détails
http://www.Hickoryhardware.com/warranty).
©Belwith Products
3100 Broadway, SW • Grandville, MI 49418
Fabriqué en Chine aux spécications de Belwith Products
©Belwith Products
3100 Broadway, SW • Grandville, MI 49418
INSTRUCTIONS INSTRUCCIONES
Serrure pour
placard et tiroir
Cerradura para
gabinetes y
gavetas
1381 1381
1. Montez le gabarit à la porte ou au tiroir.
2. Enlevez la came de la serrure. Percez un trou de 1,9 cm de
diamètre.
3. Placez la collerette sur la serrure et insérez la serrure dans le
trou.
4. Placez la rondelle en griffe (pour bois seulement) pour barrer.
5. Bien serrez l’écrou de 1,9 cm.
6. Placez une rondelle pivotante de 90 ou 180 degrés selon votre
gré.
7. Placez la came (droite ou croche, selon les conditions). Ajustez
la came en la pliant légèrement.
8. Attachez la serrure avec une rondelle de blocage et visez.
1. Monte la plantilla en la puerta o en la gaveta.
2. Extraiga la leva de la cerradura. Realice un agujero de 1,9 cm
de diámetro.
3. Coloque el collar en la cerradura e insértela en el agujero.
4. Coloque la arandela dentada (para madera solamente) en la
cerradura.
5. Coloque una tuerca de 1,9 cm y ajústela bien.
6. Coloque la arandela de 90º o de 180º de rotación, según su
preferencia.
7. Coloque la leva (derecha o curva, según sea conveniente).
Puede doblar suavemente la leva y ajustarla.
8. Ajuste la cerradura con la arandela y el tornillo.
Fabricado según las especicaciones de los herrajes Belwith Products en China
Popular Lock manuals by other brands


Sargent and Greenleaf
Sargent and Greenleaf 8550 Installation and Combinatiion Changing Instructions

Assa Abloy
Assa Abloy Bolt ASSA 560/13 Fitting instructions

Hewi
Hewi 850.300 installation instructions

Windsor
Windsor 1390 Fitting instructions

XLOCK
XLOCK 145B installation guide

Kaba Mauer
Kaba Mauer 82021 Code-Combi K operating instructions


