BENCHFOODS TP-20 User manual

TEMPERATURE
PROBE
TP-20 USER MANUAL
CAUTIONS:
• Always wear a heat resistant glove to touch the stainless-steel probe or heat resistant wire during, or just after
cooking.
• Hand wash the stainless-steel probe thoroughly between uses (probe is not dishwasher safe).
• Keep the stainless-steel probe and heat resistant wire away from children.
• If the meat temperature does not appear on the screen after the probe has been inserted into the meat, check
to make sure the plug from the probe is securely inserted into the side of the transmitter.
• DO NOT place the monitor in direct sunlight, or let it come in direct contact with moisture or hot surfaces.
• DO NOT USE THE PRE-PROGRAMMED THERMOMETER IN A MICROWAVE OVEN.
• This probe is for measuring the temperature of meat and poultry, not for oven temperatures.
• DO NOT submerse the probes in water. Moisture inside the probe’s plug or the thermometer might cause an
incorrect temperature reading. Always wipe the probe’s plug before plugging into the transmitter.
• DO NOT expose the probes or probe wires to open ames. Doing so can deteriorate the probes.
1

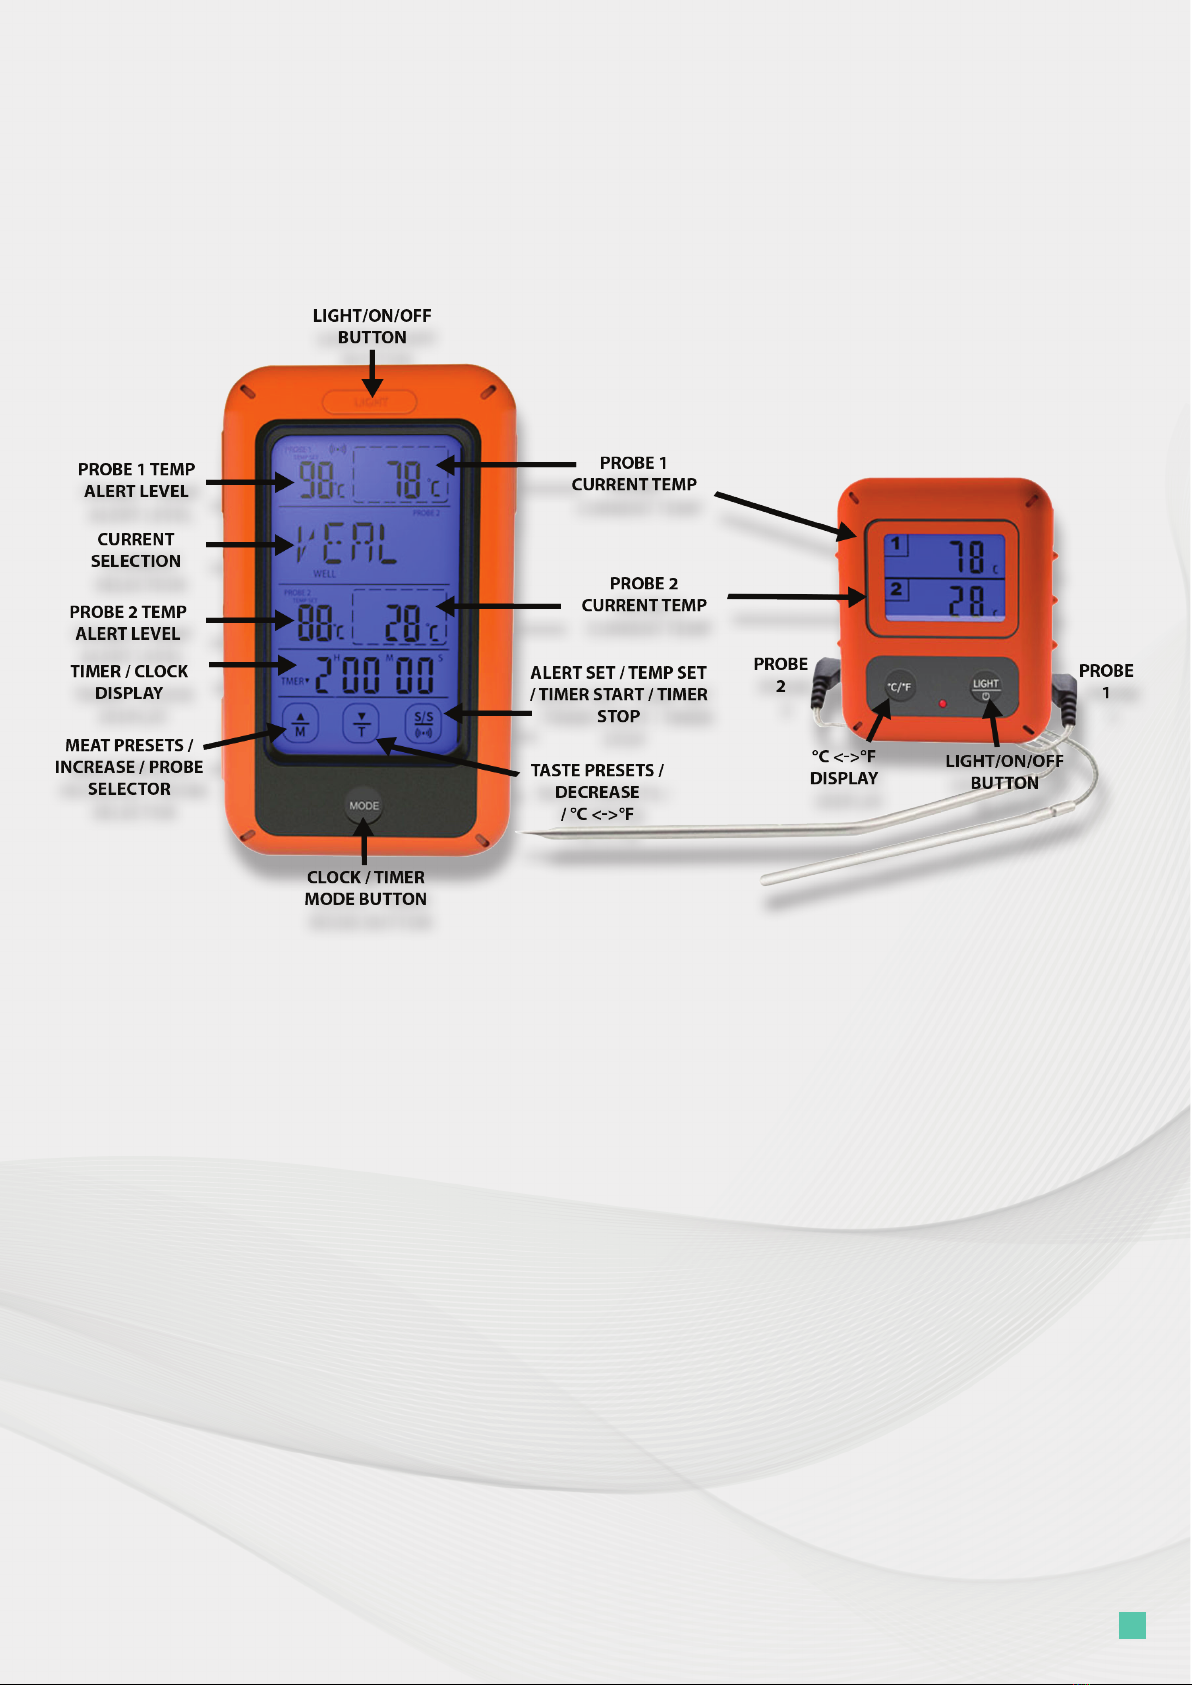
TEMPERATURE PROBE FEATURES
2
WELL MED WELL MEDIUM MED RARE RARE
°C °F °C °F °C °F °C °F °C °F
1 BEEF 77 170 74 165 71 160 63 145 60 140
2 LAMB 77 170 74 165 71 160 63 145
3 VEAL 77 170 71 160 63 145 60 140
4 HAMBURG 71 160
5 PORK 77 170 74 165 71 160
6 TURKEY 79 175
7 CHICKEN 79 175
8 FISH 58 137
9 PROGM 71 160
• Pre-programmed default cooking temperatures
available for different meats and tastes.
• Monitor has 5 function keys: “LIGHT” and touch
buttons: “▲/M”, “▼/T”, “S/S/ ” and “MODE”.
The sensor has 2 touch buttons: “°C /°F” and
“LIGHT/”.
• Alarms, with orange ashing light when target
temperature is reached.
• Dual stainless-steel probe with 1m heat resistant
wire
• °C or °F functionality
• Blue backlight; press any key to turn ON the blue
backlight for 10 seconds.
• 9:59:59 (h:min:sec) count down timer
• Wireless transmission up to 25-30 meters in open space
• Temperature range: 32°F to 482°F (0°C to 250°C). Temperatures lower than this range will cause the unit
to display ‘LLL’. Temperatures exceeding this range will cause the unit to display ‘HHH’.
• Dual probes to test 2 kinds of meats at the same time
• Time display
• Magnetic backing or in-built stands for convenient positioning.
• The thermometer has been pre-programmed with ideal temperature for the taste levels for most types of
meat. Default temperatures are as follows:

GETTING STARTED
INSTALLING THE BATTERIES IN THE MONITOR & TRANSMITTER
3
1. Remove the clip from the back of the monitor
by sliding it to the left.
2. Open the battery compartment cover on the
back of the monitor.
3. Insert 2 AAA batteries as indicated and replace
the battery cover and the hanger.
4. Repeat Steps 2-3 for the Transmitter
DEFAULT SETTINGS
- Meat Setting: BEEF
- Taste Setting: WELL
- Temperature Scale: °Celcius
POWER ON/OFF
1. To power on your monitor, hold the orange ‘LIGHT’ button for 3 seconds. This is located at the top of your
device’s screen.
2. To power on your transmitter, hold the grey ‘LIGHT/’ for 3 seconds
3. Repeat steps 1-2 to turn off your devices.
SETTING UP YOUR CLOCK
1. Ensure the bottom display is set to ‘TIME’. If this display shows ‘TIMER’, press the ‘MODE’ button once, to
change this over.
2. Hold down the ‘MODE’ button until the ‘TIME’ display starts ashing.
3. Use the “▲/M” & “▼/T” buttons to choose between 12HR & 24HR time format.
4. To conrm your selection, press the ‘MODE’ button once
5. Use the “▲/M” & “▼/T” buttons to adjust the time to your current time (HH:MM) Pressing the ‘MODE’
button to conrm each segment.
ADJUSTING THE TEMPERATURE SCALES
Transmitter Device
1. To switch between °C & °F on your transmitter device, press the “°C /°F”
Monitor
1. To switch between °C & °F on your monitor device, hold the “▼/T” button for 3 seconds.

PROBES
SETTING UP YOUR PROBES
1. Insert your 2 probes into the sides of your transmitter device and remove the black safety cap from
your sharp probe.
2. The device inserted into the left is ‘PROBE 1’.The device inserted into the right is ‘PROBE 2’.
ADJUSTING THE TEMPERATURES PER PROBE
1. Select the probe that you would like to adjust by holding the “▲/M” button for 3 seconds. The
middle display screen shows which probe is currently active for adjustment.
2. Ensure the TIME/TIMER is in ‘TIME’ mode. If this display currently says ‘TIMER’ then use the ‘MODE’
button to switch this.
Preset Meats & Tastes
3. To select the type of meat you want to cook, press the ▲/M button. The monitor displays the type
of meat the thermometer is ready to measure. Each press will change the display in the following
sequence:
4. To select the taste level of the meat you want to cook, press the ▼/T button. The different taste
options are: WELL / MED WELL / MEDIUM / MED RARE / RARE
5. The corresponding preset temperature will show on the monitor as “TEMP SET”.
6. If this is the correct temperature that you wish to have displayed then proceed to step 10.
Customized Temperature
To adjust the temperature for your meat selection or to set a customized temperature:
7. Hold the “S/S/ ” button for 3 seconds, or until the temperature display starts ashing.
8. Use the “▲/M” & “▼/T” buttons to adjust the display to your desired temperature.
4
9. Press the “S/S/ ” button
to conrm.
10. Repeat this process
for the other probe by
holding the “▲/M”
button for 3 seconds or
until the active screen
switches probes.

5
TEMPERATURE ALARMS
To setup an alert for when your probe(s) reach your desired temperature:
1. Ensure your monitor is in “TIME” mode rather than “TIMER” mode. If not, change this over by
clicking the “MODE” button.
2. Click the “S/S/ ” button as follows:
• 1 press – Alert set for Probe 1 ONLY
• 2 presses – Alert set for Probe 2 ONLY
• 3 presses – Alert set for BOTH probe 1 and probe 2
• 4 presses – All alerts OFF.
When the alert function is ON and the alert temperature is exceeded, an alarm will sound and the screen
will ash orange.
• For probe 1; the alert is 1 beep/second.
• For probe 2; the alert is 2 beeps/second.
• For both probes; the alert is 3 beeps/second.
Press any key to stop the alert.The alert will restart again in 5 minutes if the temperature is still above
the alert level.
PROBE PLACEMENT
Insert the tip of the probe into the thickest part of the meat. The probe should be placed
on the side of the mean. This allows for the meat to be turned during cooking.
Avoid touching the bone, fat or gristle. Place the long stainless-steel probe into the meat
and feed the heat resistance wire away from the meat.
Never place the transmitter in an oven or barbeque.

6
TIMER FUNCTION
The timer function is available to either count up or count down to a desired time. This functionality works
independently of the temperature sensors.
To use the timer function ensure the TIME/TIMER display is on the ‘TIMER’ setting. If not, press the ‘MODE’ button to
switch to this setting. By default the timer is set to 0H:00M:00S, with the ▲symbol, indicating the timer will count
up.
To reset the timer back to 0:00:00 at any point. Hold the “▲/M” & “▼/T” buttons down for 3 seconds.
TO START THE TIMER COUNTING UP
1. Press the “S/S/ ” button.This has no alarm attached and will continue counting (unless stopped)
until it reaches the maximum time of 9:59:59.
2. To stop the timer, press the “S/S/ ” button again.
3. The count-up timer is available when the timer is set to 0:00:00 and the ▲symbol is displayed.
TO START THE TIMER COUNTING DOWN
1. Hold the “MODE” button until the Timer starts ashing
2. Select a time to count down from by using the “▲/M” & “▼/T” buttons to increase/decrease the time
(Press for a single increment, hold for multiple increments).
3. Press the “MODE” button to conrm each segment, until the time is set.
4. Press the “S/S/ ” button to start the countdown
5. Press the “S/S/ ” button again at any point to PAUSE the countdown.
6. Once the countdown has reached 0:00:00, an alarm will sound and the screen will ash orange to alert
you that the end time has been reached. This will be 4 beeps/per second for 30 seconds. You can switch
the alarm off at any point by pressing any button. After 30 seconds the alarm will stop sounding.
SAVE THESE INSTRUCTIONS!
Refer to them often and use them to instruct others.

3 YEAR
COMMERCIAL WARRANTY
1. WHAT DOES THIS WARRANTY COVER?
This Commercial Warranty covers any defects in material or workmanship under normal commercial use
during the Warranty Period. During the Warranty Period, BenchFoods or your Authorized Retailer will
repair, at no charge, products or parts of a product/s that prove defecve under normal commercial use.
2. WHAT WILL WE DO TO CORRECT PROBLEMS?
BenchFoods or your Authorized Retailer will acon 1 of 3 scenarios based on the defect and the product
purchased;
1. Send a brand-new replacement of the defecve product. *Does not apply for custom industrial orders
2. If the defecve part of the product can be idened, we will ship the replacement part and have a
service technician come on-site to replace and install it once it has arrived.
3. Send out a service technician to invesgate the defect. Once the issue has been idened, the
technician will either x the defect immediately or nofy BenchFoods of replacement parts needed. If
the laer, BenchFoods will ship the required replacement parts to the service address. The technician
will then return on-site to service and x the product.
3. HOW LONG DOES THE COVERAGE LAST?
The Warranty Period for BenchFoods products, as well as their accessories, is 3 years from the original
date of purchase. Individual Parts purchased are not covered by warranty unless they are received through
a warranty claim on a previously purchased product. In this case, a replacement product or part/s assumes
the remaining warranty of the original Physical Goods or 180 days from the date of replacement or repair,
whichever is longer.
4. WHAT DOES THIS WARRANTY NOT COVER?
This Commercial Warranty does not cover defects or malfuncon caused by misuse, abuse or improper
maintenance, failure to follow operang instrucons, or use with equipment with which it is not intended
to be used. It doesn’t cover cosmec or incidental damages. Also, the warranty will not apply to damage
caused by unauthorized alteraon, modicaon or repair of the product.
5. WHAT DO YOU HAVE TO DO?
To obtain warranty service, rstly contact us to determine the problem and the most appropriate soluon
for you. In most cases, technical problems can be corrected over the phone. Tech support can be reached
via telephone or email.
This Commercial Warranty applies to all physical goods (product/s) purchased from
the company BenchFoods.
Tel: US: (972) 737-1282 CA: (604) 800-7466 UK: 0203 879 4355
AU: (07) 3184-4335 NZ: (09) 870-3320
Email:inf[email protected]o

UNITED STATES:
(972) 737-1282 | 4514 MAXEY RD, SUITE A - D, ALVARADO, TX, 76009
CANADA:
(604) 800-7466 | SUITE 900/2025 WILLINGDON AVE,
BURNABY, BC V5C 0J3
UNITED KINGDOM:
0203 879 4355 | 27 OLD GLOUCESTER STREET, LONDON WC1N 3AX
AUSTRALIA:
(07) 5526 2335 | 8/17 INDY COURT, CARRARA, QLD, 4210
NEW ZEALAND:
(09) 870-3320 | SUITE 13044, 17B FARNHAM STREET, PARNELL,
AUCKLAND, 1052
INFO@ BENCHFOODS.CO
BENCHFOODS.CO
Table of contents
Popular Measuring Instrument manuals by other brands


Extech Instruments
Extech Instruments SDL400 user guide

AEMC
AEMC 501N user manual

ENDEVCO
ENDEVCO 7255A instruction manual

Wildlife Acoustics
Wildlife Acoustics Song Meter Mini Bat 2 user guide

Endress+Hauser
Endress+Hauser Levelflex M FMP45 operating instructions

Siemens
Siemens 7ME4613 Installatio and user's operating instructions


