Benchmark USA 21011 User manual

OWNERS MANUAL
MODEL:
H
HH
H
H
HH
Ho
oo
o
o
oo
ot
tt
t
t
tt
t
B
BB
B
B
BB
Be
ee
e
e
ee
ev
vv
v
v
vv
ve
ee
e
e
ee
er
rr
r
r
rr
ra
aa
a
a
aa
ag
gg
g
g
gg
ge
ee
e
e
ee
e
/
//
/
/
//
/
T
TT
T
T
TT
To
oo
o
o
oo
op
pp
p
p
pp
pp
pp
p
p
pp
pi
ii
i
i
ii
in
nn
n
n
nn
ng
gg
g
g
gg
g
D
DD
D
D
DD
Di
ii
i
i
ii
is
ss
s
s
ss
sp
pp
p
p
pp
pe
ee
e
e
ee
en
nn
n
n
nn
ns
ss
s
s
ss
se
ee
e
e
ee
er
rr
r
r
rr
r
Multipurpose Heated Dispenser
PART NUMBER:
2
22
2
2
22
21
11
1
1
11
10
00
0
0
00
01
11
1
1
11
11
11
1
1
11
1
115 volts, 60 hz
WARNING: Handling the cord on this product may expose you to lead, a chemical known to the State Of California to
cause cancer and birth defects or other reproductive harm. WASH HANDS AFTER HANDLING.
Electrical ground is required on this appliance.
1. Do not modify the power supply cord plug. If it does not fit the outlet, have a proper outlet installed by a
qualified electrician.
2. Do not use an extension cord with this appliance.
3. Check with a qualified electrician if you are in doubt as to whether the appliance is properly grounded.
SAFETY INSTRUCTIONS
1. Plug electrical cord into a certified electrical outlet with a corresponding voltage rating as listed on the
machine model labels.
2. Always unplug the electric cord when appliance is not in use and before cleaning, adjusting or maintaining
this machine. Do not operate with a damaged cord or plug or after the machine malfunctions, has been
dropped or damaged. Use authorized service for examination, electrical or mechanical adjustment or repair.
3 This equipment will be HOT during use and for a short time after it is turned off, BE CAREFUL. To avoid
burns, do not let bare skin touch hot surfaces. If provided, use handles when moving this appliance. Keep
combustible materials away from appliance.
4. Extreme caution is necessary when any appliance is used by or near children and whenever the appliance is
left operating and unattended.
5. This appliance is not intended for use in wet locations. Never locate appliance where it may fall into a water
container.
6. Do not insert or allow foreign objects to enter any ventilation or exhaust opening as this may cause an
electrical shock, fire or damage to the appliance.
B
Be
en
nc
ch
hm
ma
ar
rk
k
U
US
SA
A
I
In
nc
c.
.
●
●
2
25
5-
-J
J
B
Br
ro
oo
ok
kf
fi
ie
el
ld
d
O
Oa
ak
ks
s
D
Dr
r.
.
●
●
G
Gr
re
ee
en
nv
vi
il
ll
le
e,
,
S
SC
C
2
29
96
60
07
7
●
●
T
T:
:
8
86
64
4-
-3
31
12
2-
-5
55
50
00
0
●
●
F
F:
:
8
86
64
4-
-3
31
12
2-
-5
55
50
05
5
WARNING ELECTRICAL SHOCK HAZARD.
FAILURE TO FOLLOW THESE INSTRUCTIONS COULD RESULT IN SERIOUS INJURY OR DEATH.

Operating Instructions
1. Clean and sanitize the dispenser before initial use.
2. Fill the bowl with the desired product. Prepare product as suggested by the
manufacturer of that product.
3. Place cover securely on the bowl before switching on dispenser and be sure the
faucet is closed.
4. Turn machine on and mixer will begin to operate. Thermostat under the machine
should be set to highest temperature and can be lowered to regulate max temp.
5. Adjust thermostat to desired temperature and LED light will remain on until the
heating element reaches that temperature.
6. When product is warm, place serving dish or cup under the faucet and pull
handle forward to dispense.
7. When serving is complete bowl can be removed and refrigerated for future use.
Cleaning
1. Unplug the machine from power source before breaking down parts.
2. Remove the lid and mixer and empty the bowl.
3. Dismantle the faucet by removing the pin, then handle and finally the piston.
4. Remove the drip tray and empty waste.
5. The bowl, lid, faucet, mixer and drip tray can be hand washed or washed in a
dishwasher. The body of the machine can be wiped clean with wet cloth and
should never be submerged in water.
6. When all items are clean and dry, reassemble machine for next use.
Wiring Diagram
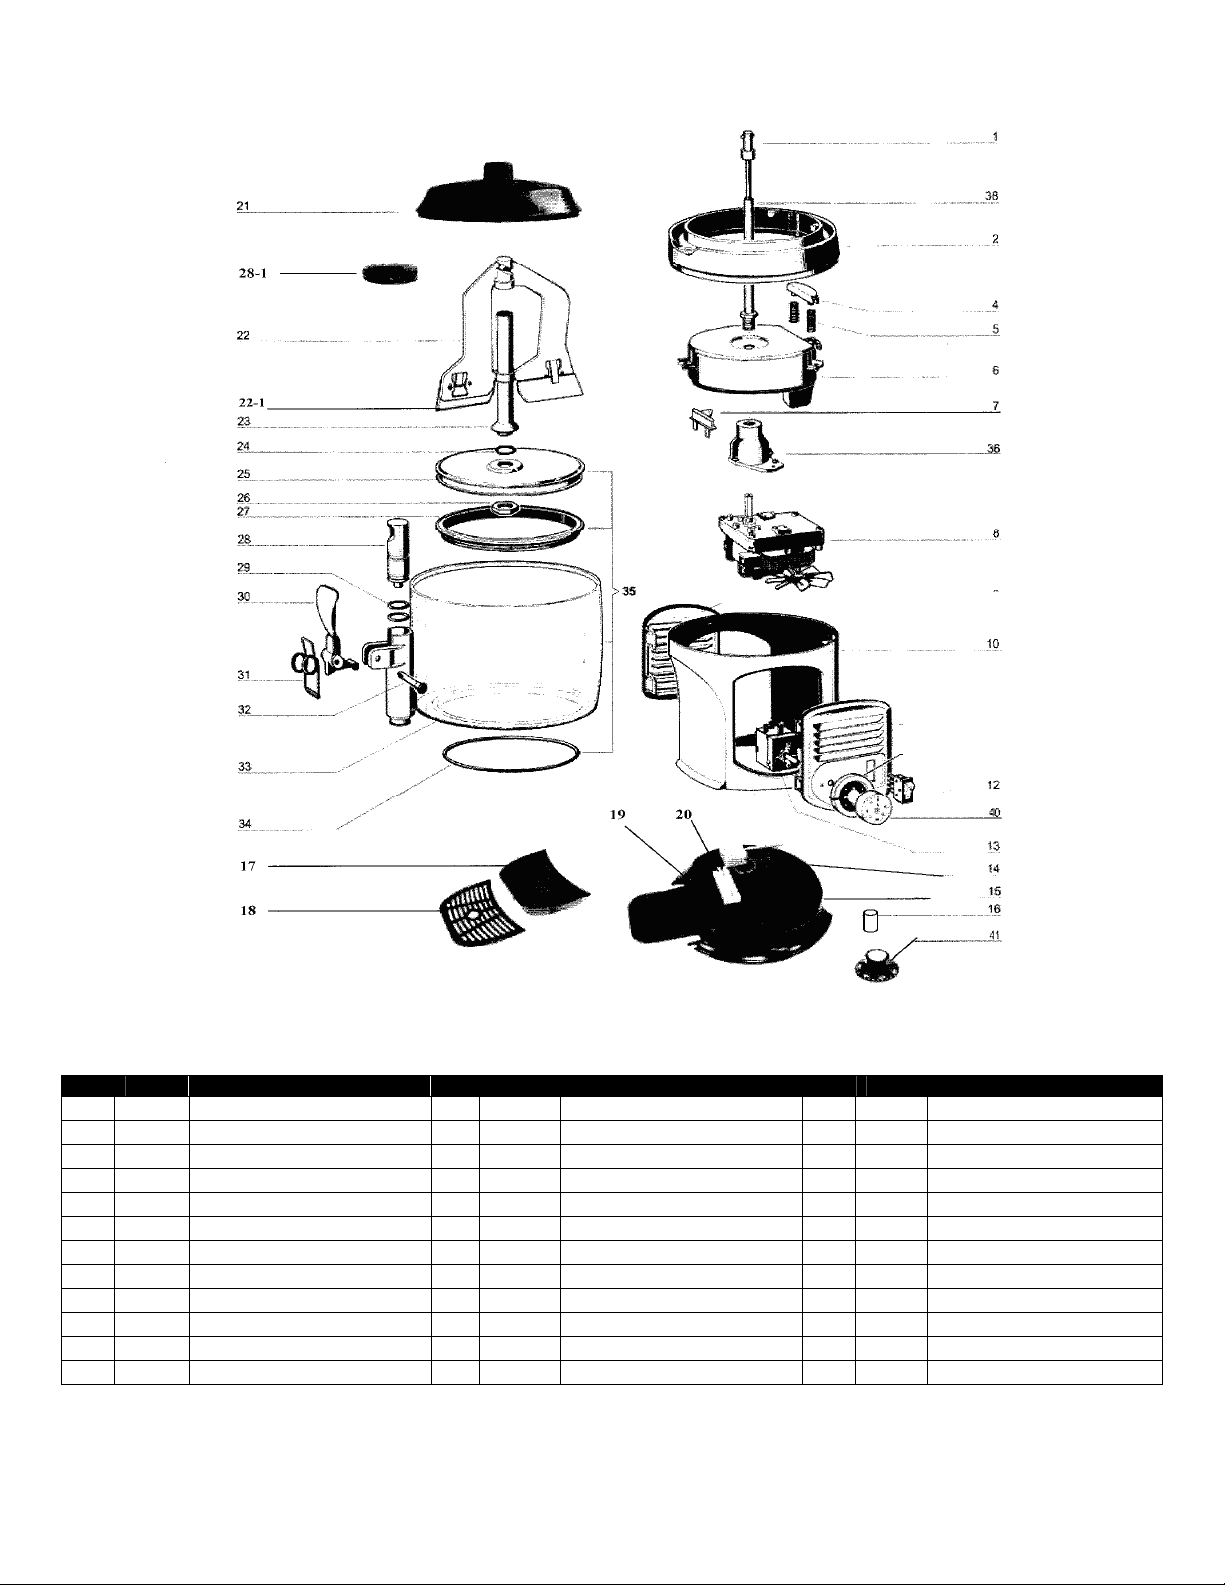
Assembly Instructions and Parts
Parts List
Fig. Part# Part Description Fig Part# Part Description Fig. Part# Part Description
1
21001
Drive shaft 16
21016
Rubber Foot 28
21028
Faucet Piston and Cap
2
21002
Heat plate holder 17
21017
Drip Tray 29
21029
Faucet Piston O-ring
4
21004
Thermostat bulb holder 18
21018
Drip Tray Cover 30
21030
Faucet Handle
5
21005
Bulb holder spring 19
21019
Strain Relief 31
21031
Faucet Spring
6
21006 120V 60Hz Heating plate
20
21020
Terminal Block 32
21032
Faucet Handle Pin
7
21007
Limit Switch 21
21021
Bowl Lid 33
21033
Bowl
8
21008
120V 60Hz gear motor 22
21022
Mixer and Base 34
21034
Bowl O-ring
10
21010
Cabinet 23
21023
Bowl shaft 35
21035
Bowl Assembly
12
21012
Switch 24
21024
Bowl shaft O-ring 36
21036
Gear Motor Flange
13
21013
0-90*C Thermostat 25
21025
Bowl bottom plate 38
21038
Central Shaft
14
21014
0-120*C Thermostat 26
21026
Central Shaft Nut 40
21040 0-90*C Thermostat Knob
15
21015
Base 27
21027
Bowl Gasket 41
21041 0-120
*
C
Thermostat Knob
T
To
o
O
Or
rd
de
er
r
P
Pa
ar
rt
ts
s
C
Co
on
nt
ta
ac
ct
t:
:
B
Be
en
nc
ch
hm
ma
ar
rk
k
U
US
SA
A
I
In
nc
c.
.
●
●
2
25
5-
-J
J
B
Br
ro
oo
ok
kf
fi
ie
el
ld
d
O
Oa
ak
ks
s
D
Dr
r.
.
●
●
G
Gr
re
ee
en
nv
vi
il
ll
le
e,
,
S
SC
C
2
29
96
60
07
7
T
T:
:
8
86
64
4-
-3
31
12
2-
-5
55
50
00
0
●
●
F
F:
:
8
86
64
4-
-3
31
12
2-
-5
55
50
05
5
E
Em
ma
ai
il
l:
:
p
pa
ar
rt
ts
s@
@b
be
en
nc
ch
hm
ma
ar
rk
ku
us
sa
ai
in
nc
c.
.c
co
om
m

T
Th
hr
re
ee
e
Y
Ye
ea
ar
r
W
Wa
ar
rr
ra
an
nt
ty
y
THE WARRANTY:
Benchmark USA warrants the original purchaser of new food equipment manufactured by
Benchmark USA to be free from defects in material or workmanship from the date of the
original purchase for a period of three years.
WHO IS COVERED BY THIS WARRANTY:
The original purchaser who has provided proper proof of the original retail purchase and all
other requested information.
WHAT IS WARRANTIED:
The obligation of Benchmark USA under this warranty is limited to the replacement of any
parts or components that in the opinion of Benchmark USA are defective, F.O.B. the factory, or
at any other location that Benchmark USA may designate.
WHAT VOIDS THE WARRANTY:
1. Any piece of equipment that has been installed, operated or maintained inconsistently
with Benchmark USA operating instructions.
2. Any part or component that has been modified, changed or altered from its original
configuration.
3. Any electrical component that has been damaged due to submergence in any
liquid.
4. Any part or component that has been subject to abuse, misuse, neglect or
accidents.
EXTENT OF WARRANTY:
Any defective component, part or assembly returned to Benchmark USA will be replaced by
Benchmark USA. Benchmark USA will not be responsible for any expenses incurred by the
customer under the terms of this warranty, nor shall it be responsible for any damages either
consequential, special, contingent, or otherwise; or expenses or injury arising directly or
indirectly from the use of a Benchmark USA product. Any component, part or assembly
returned to Benchmark USA must be returned at the customers expense along with proof of
purchase. Benchmark USA reserves the right to determine whether the terms of this warranty
have been properly complied with. In the event that the terms are not complied with,
Benchmark USA shall be under no obligation to honor this warranty.
B
Be
en
nc
ch
hm
ma
ar
rk
k
U
US
SA
A
I
In
nc
c.
.
●
●
2
25
5-
-J
J
B
Br
ro
oo
ok
kf
fi
ie
el
ld
d
O
Oa
ak
ks
s
D
Dr
r.
.
●
●
G
Gr
re
ee
en
nv
vi
il
ll
le
e,
,
S
SC
C
2
29
96
60
07
7
●
●
T
T:
:
8
86
64
4-
-3
31
12
2-
-5
55
50
00
0
●
●
F
F:
:
8
86
64
4-
-3
31
12
2-
-5
55
50
05
5
This manual suits for next models
3
Popular Beverage Dispenser manuals by other brands


Curtis
Curtis Chill-X CFBX2 user guide

lancer
lancer Flavor Select 30 Installation and service manual

Kenmore
Kenmore 183.91579 Use and care guide

Prince Castle
Prince Castle Ketchup Dispenser 404-SL Specifications

Marvel
Marvel ML24BS Installation, operation and maintenance instructions

Cornelius
Cornelius Jet Spray EJ1 parts list