Benchmark 1282-111 User manual


Oxygen
nydrogen
Combustible
explosive
CAUTION!AlwaysensurethatthetoolhasstoppedbeforedisconnectingtheairsupplyDonotwearwatches,rings,bracelets,orlooseclothingwhenusinganyair-poweredtool
Donotoverloadthetool.Allowthetooltooperateatitsoptimumspeedformaximumefficiency.
Donotuseatoolthatisleakingair,thathasmissingordamagedparts,orthatrequiresrepairs.VerifythatallscrewsaresecurelytightenedForoptimalsafetyandtoolperformance,inspectthetoolbeforeeveryusage,inordertoensurefreemovementofthetrigger,safetymechanisms,andsprings.Alwayskeepyourairtoolcleanandlubricated.Dailylubricationisessentialtoavoidinternalcorrosionandpossiblefailures.Ensurethefloorisnotslipperyandwearnon-slipshoes.Floorsshouldbekeptcleanandclear.Alwaysfollowallworkshopsafetyrules,regulations,andconditionswhenusingthetoolandkeeptheworkareaclean.Carrythetoolbythehandleonly,keepingfingersawayfromthetrigger.Donotcarrythetoolbythehose,magazine,oranyotherparts.Donotusethetoolnearorbelowfreezingpoint,asdoingsomaycausetoolfailure.Donotstorethetoolinafreezingenvironmenttopreventiceformationonthetoolsoperatingvalves,asdoingsomaycausetoolfailure.Handlingandstorageofoil:Usewithadequateventilation.Avoidcontactofoilwitheyes,skin,andclothing.Avoidbreathingsprayormist.Storeinatightlyclosedcontainerinacool,dry,well-ventilatedareafreefromIncompatiblesubstances.Trippinghazard.Theairhosemaybecomeatrippinghazardwhenitisplacedintheworkarea.Usecarewhenwalkingintheworkarea.
Recycle unwanted materials rather than disposing of them as waste. Sort the tools,
hoses, and packaging in specific categories and take to the local recycling center or
dispose of in an environmentally safe way.
SYMBOLS
Read operator s manual:To reduce the risk of injury,
user must read and understand operator s manual
before using this product.
Risk to hearing
using this tool.
In hearing loss.
Always wear ear protection when
Failure to do so m a y r e s u l t
Eye protection: Always wear safety goggles, safety
glasses with side shields, or a full- f a c e shield
when operating this product.

Use compressed air at regulated pressure: Always use clean, dry, and
compressed
air at the regulated pressure.
Do not exceed the maximum operating pressure of 50 PSI.
Failure to comply
could lead to serious injury or loss of life.
Do not use this tool in the presence of flammable liquids or gases: Sparks that are
created during use may ignite gases. Please use the tool in a well-ventilated area only
and avoid any ignition sources
Use components recommended by manufacturers: Never modify the tool for other
applications.
Use only parts, nozzles, and accessories with specifications as mentioned in this
manual (see section technical specifications). Inspect the tool components and
attachments before operation and
ensure that they are assembled properly and are
not damaged.
Failure to comply could lead to serious injury or loss of life.
Disconnect the spray gun from the air supply hose and turn of the compressor before
performing any maintenance when the tool is not in use, when it is being handed to
another person, and when it is left unattended. It is recommended to use a ball valve
in the gun to air supply for emergency stoppage and to prevent unintended operation
Use safety respirator: Toxic vapors produced by spraying certain materials can cause
serious damage to health.
Always wear safety gloves and a respirator to prevent hazards caused by inhaling
toxic vapor or contact of solvent and paint with eyes or skin. Failure to comply may
result in moderate injury.
Do not use Latex paint for air powered suction spray gun. It is recommended to
use non-latex water-based paint. Latex is water-based paint bit with a large
granule that is easy to jam the nozzle. This type of sprayer is normally used for
painting metal surfaces, not drywall.
Do not use paint stripper because it will damage the aluminum housing.
Never allow the sprayer gun to lean a side when spraying.
The kind of paint depends on the viscosity. Pour the paint into the Ford 4 viscosity cup, flow
empty within 24s, it is appropriate.
Attached a viscosity cup for reference.

7
5
6
4
1
2
3
8
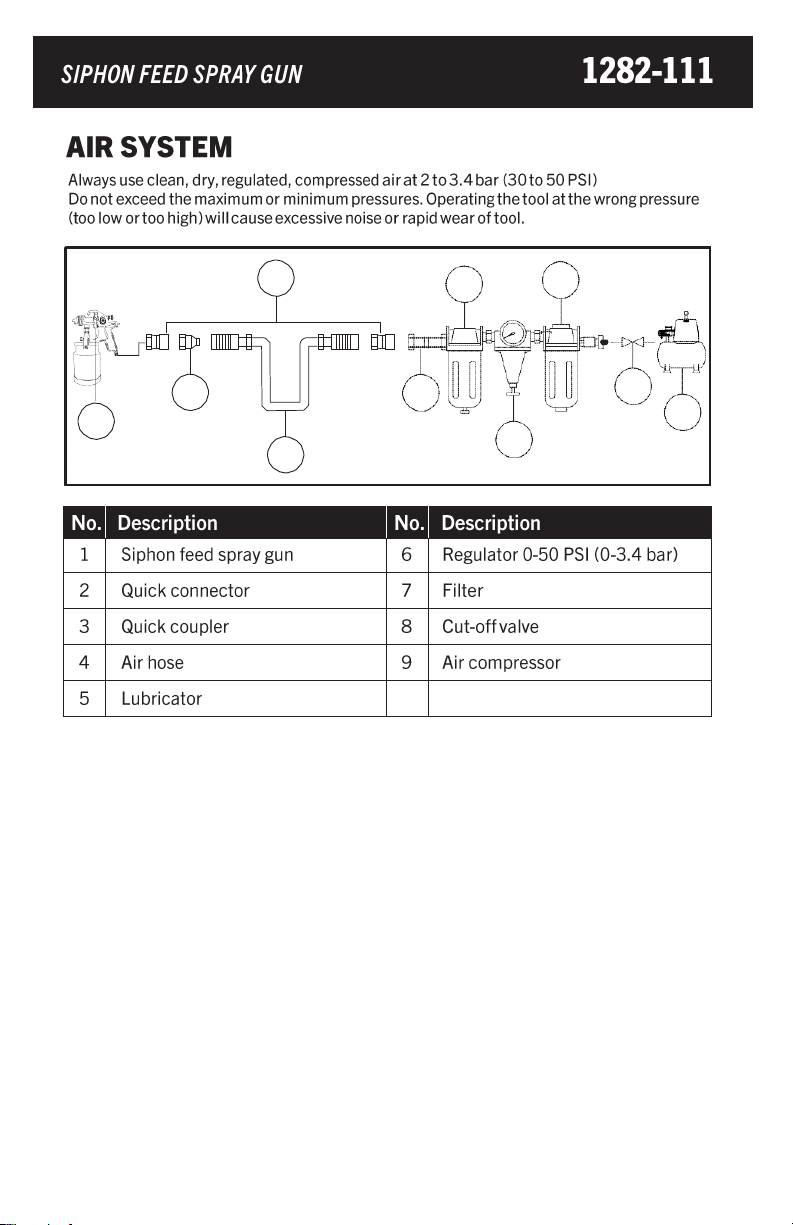
Air adjusting knob
8

This spray gun has all-metal components and reinforced base for long lasting durability.
Features include an adjustable pattern and material control for total control and an even coat.
10
2 5 7
3 3 8
1 9
6
4

Keep hands and other parts of the body away from the work areas when connecting the tool
to the air supply. Failure to comply could lead to serious injury or loss of life.
It is recommended that a filter-regulator-lubricator be used and be located as close to the tool
as possible.
If a filter-regulator-lubricator is not installed, place up to 6 drops of pneumatic tool oil into the
air inlet plug before each use.
If a filter-regulator-lubricator is installed, keep the air filter clean. A dirty filter will reduce the
air pressure to the tool, which will cause a reduction in power, efficiency, and general
performance.
For optimal performance, install a quick connector to the tool and a quick coupler on the
hose, if applicable.
Verify that all connections in the air supply system are sealed in order to
prevent air from leaking. Failure to comply may result in moderate injury or
damage to equipment.
Read all safety guidelines (see section "Safety guidelines”) at the beginning of this manual.
Always inspect the air tool prior to each use to
-
ensure proper use of power source.
-
determine whether the tool is in proper working order.
Clean the air inlet filter weekly.
Line pressure should be increased to compensate for unusually long air hoses. The hose
diameter should be 3/8".
Do not use the tool if it is not in proper working order.
Do not use oxygen or any other combustible or bottled gas to power this tool.
Do not use this tool in the presence of any flammable liquids or gases.
Keep hose away from heat, oil, and sharp edges. Check hose for wear and
tear, ensure that all connections are secure. Failure to comply could lead to
serious injury or loss of life.
AirtoolsReadthisInstructionManualcarefullybeforeusingthetool

1 . Pour paint through a strainer
,
cheese
cloth or a paint strainer to remove any
foreign substance from the paint.
2 . Fill canister ( 1 ) three quarters full with
paint (2) .
3 . Close the canister ( 1 ) by turning the lid
(2) clockwise. Tum the lid tightly until
“arms” on the top of the lid click into
the pins on either side of the canister.
Secure into place by turning the
locking lever on the lid clockwise.
4
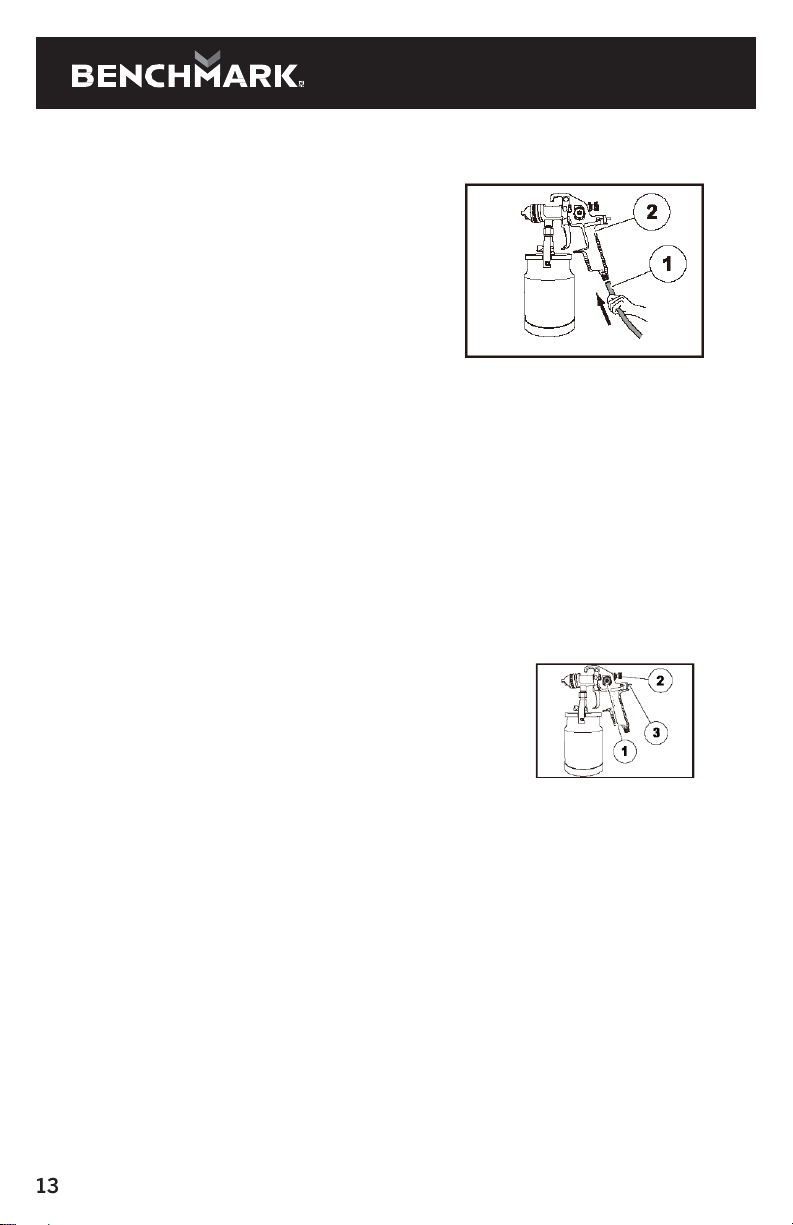
. Attach the gun ( 1 ) to the canister ( 2 )
filled with paint , by firmly holding
the canister.
5 . Tighten the nut ( 1 ) connecting the gun
and canister , by rotating it clockwise
using the wrench provided.
Fillingthepaintcanister
6. Plug in the compressor, turn on and
set the pressure regulator to 40PSI.
Attach one end of the air hose to the
compressor and the other end of
the air hose (1) to the tool (2).
7. Mixing and thinning of the paint
should be performed in accordance
with the paint manufacturer’s
instructions.
8.Most materials readily spray if
thinning is performed properly.
Test the consistency of the paint by making a
few strokes on a cardboard target. If the stroke appears
to be very thick, add a small amount of thinner.
⚠CAUTION! Do not exceed the thinning limits recommended
by the paint manufacturer. Failure to comply may result in moderate injury or
damage to the equipment.
ADJUSTMENTS
The siphon-feed spray gun has a pattern adjusting
knob (1), a paint adjusting knob (2) and an air
adjusting knob (3)
these are used to obtain the desired pattern, to control the output volume of
paint, and to obtain fine atomization, respectively
PATTERN ADJUSTMENT
Rotate the pattern adjustment knob in a clockwise direction to form a circular spray
pattern and rotate the knob in a counter-clockwise direction to form an elliptical
spray pattern.
PAINT ADJUSTMENT
Rotate the paint adjusting knob clockwise to reduce the output volume of paint and
rotate the knob in a counterclockwise direction to increase the output volume of
paint.
AIR VOLUME ADJUSTMENT
Rotate the air adjusting knob clockwise to reduce the output volume of air and rotate
the knob in a counterclockwise direction to increase the output volume of air.
14
Operation
1. Plug in the compressor, turn it on, set the pressure regulator
to 40 PSI, attach one end of the air hose to the compressor
and the other end of the air hose to the air tool.
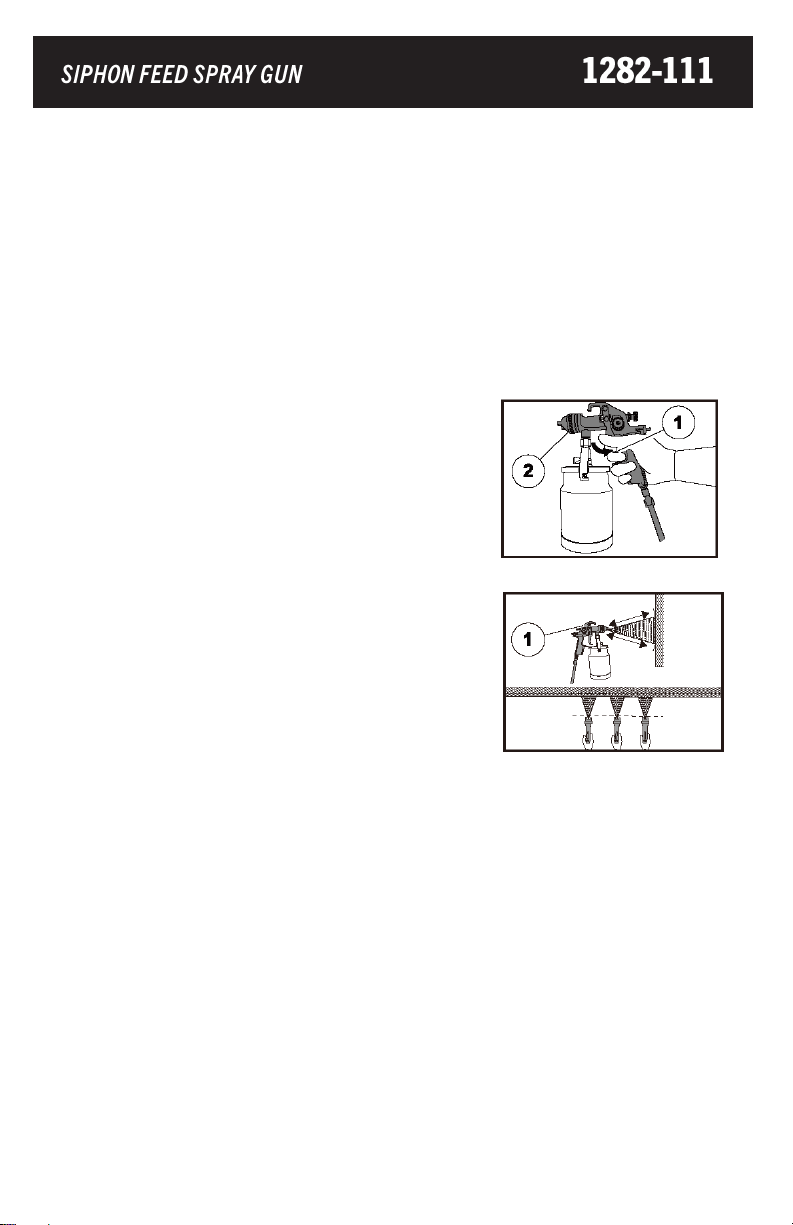
2. Hold the gun (1) in such a way
that the nozzle is approximately
6-12” away from the work
surface, perpendicular to
spraying area.
3. Squeeze the trigger (1) of the spray gun (2).
Start moving the gun before pressing the trigger
and release the trigger before stopping the gun
movement at the end of each stroke.
This procedure will blend each stroke with
the next without any overlap or unevenness
4. Move the gun (1) at a constant pace in a
parallel direction for spraying,
maintaining uniform distance from the
surface to be painted.
5.
Repeat the strokes until a uniform
coating is formed.
Note:
Use a piece of cardboard as a shield to capture the loss of spray paint at the ends of the workpiece to protect
the other surfaces from being painted.
The speed of stroke, the distance from the work surface, and the adjustment of the paint adjusting knob will vary the
amount of paint being applied
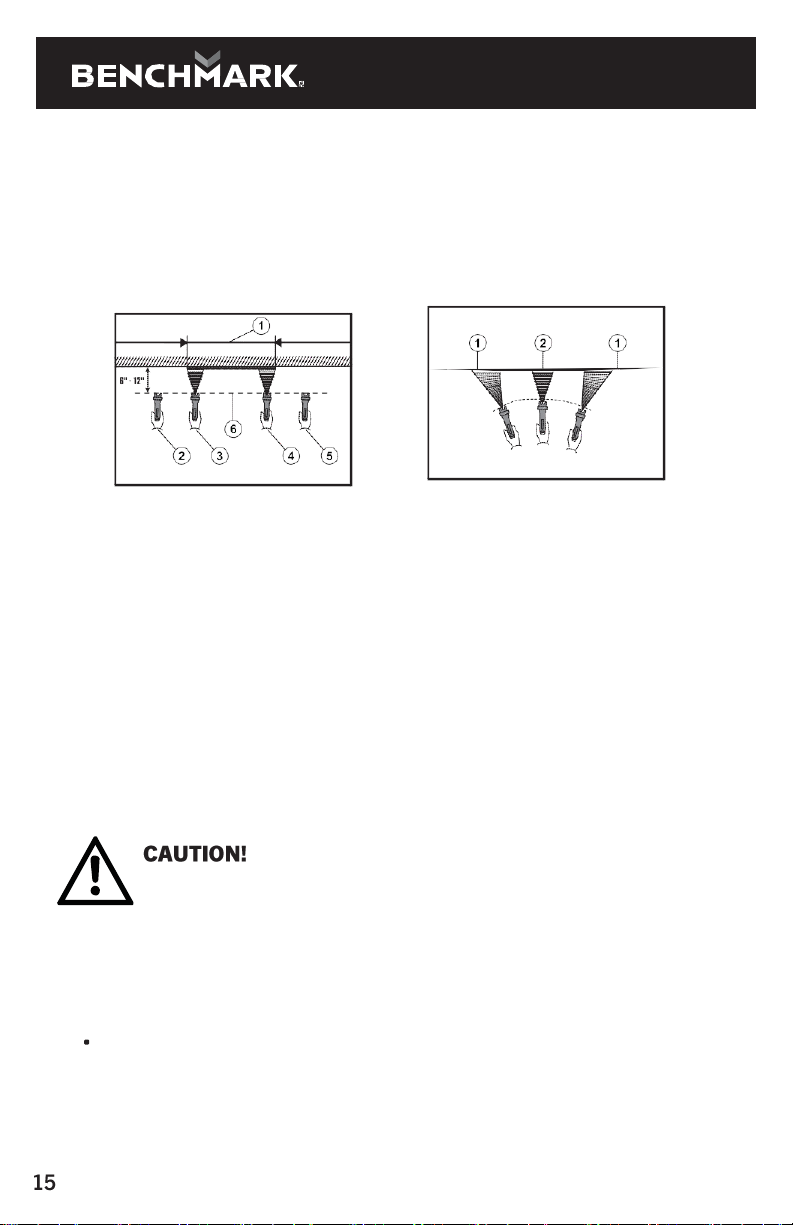
Do’s
Always move the gun in parallel direction
.
1 . Uniform coating region
2 . Stroke starting position
3 . Trigger pressing position
4 . Trigger releasing position
5 . Stroke stopping position
6 . Gun movement path
DONT’S
Do not press the trigger with the gun at an
inclined or angled position.
1 . Improper / thin coating region
2 . Uniform / thick coating region
Do not stop the sprayer movement in between, which will cause a build-up of
paint and result in runs.
Do not fan the gun while painting. This will cause a build-up of paint in the
center of the stroke and an insufficient coating at the ends. Failure to comply
may result in moderate injury or damage to equipment.
Storage
Rotate the paint adjusting knob in a counterclockwise direction and open the knob
when the gun is not in use. This will reduce spring tension on the needle fluid tip.
Clean the Spray Gun thoroughly and slightly lubricate it,
before and after storage.
Note:
Two thin coats of paint, rather than one thick layer, will yield better results and have lesser
chance of runs.
16
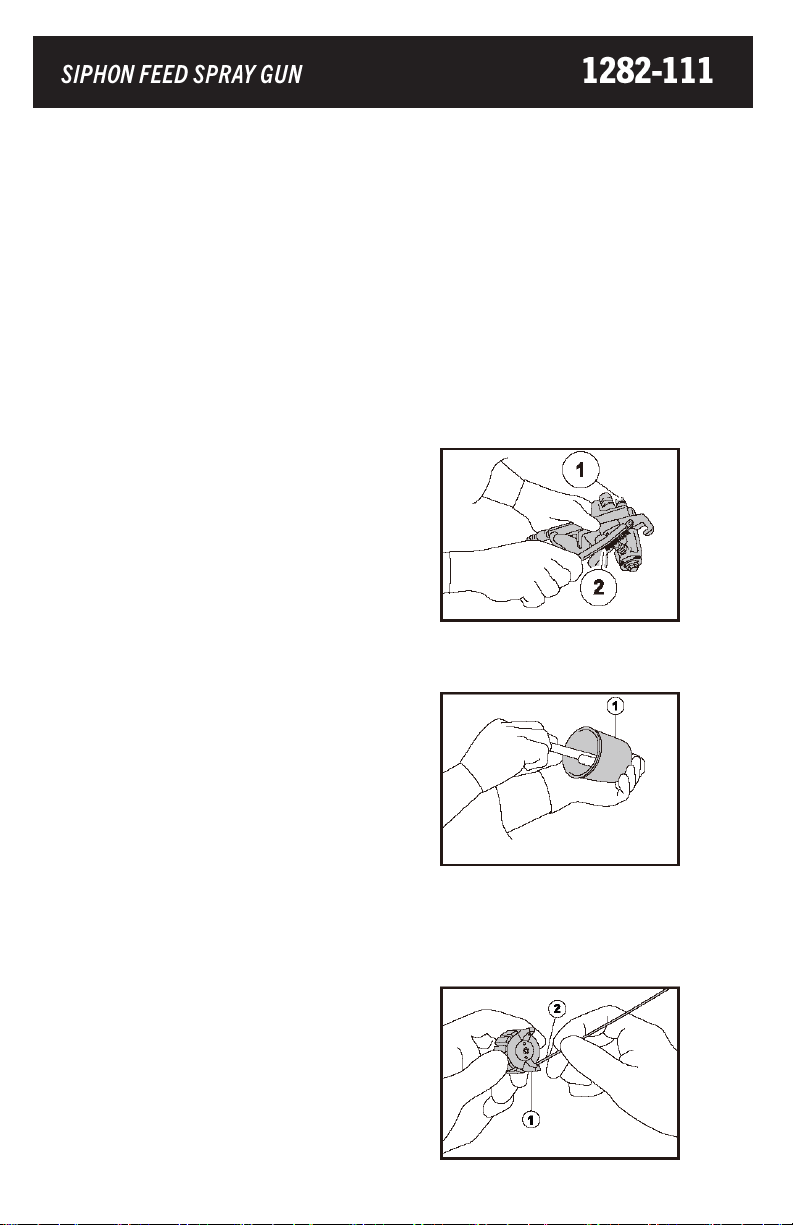
CARING FOR YOUR SPRAY GUN
The spray gun should be cleaned after
every use. Any paint remaining inside the
gun will thicken and may damage the inner
components and the mechanism of the gun.
.
Washing Procedure
1. Cover the air cap with a cloth and pull the
trigger. The air that is blown out of the paint
nozzle tip enters the paint passage and
cleans the inside of the gun.
2.Discard the paint remaining in the canister
and add some thinner to help in washing it
out of the sprayer.
3.Clean the inside and outside of the spray
gun
(1) with a brush (2).
4. Clean the inside of the paint canister
(1).
5.Remove and clean the inside and
outside of the air cap with a brush soaked
in cleaning solvent
.
Note: Wash the air cap (1) carefully without causing
any damage to the air hole as this would
affect the spraying pattern. Never use a
steel wire or wire brush for cleaning.
If the air hole is clogged, clean it using a
wooden Toothpick (2).
DANGER
Disconnect the tool from the air compressor before maintenance,
adjusting, cleaning, filling and when it is not in use. Ensure the needle is removed
before disassembling the nozzle, to avoid damage to the nozzle closure housing.
Repairs must be performed by a qualified service technician only. Failure to comply
will lead to serious injury or loss of life.
Lubrication: If the tool and the
compressor are not equipped with an in-
line lubrication system, place 2 to3 drops
of pneumatic tool oil into the air inlet
before each use or after every
two hours
of continuous use, depending
on the
characteristics of the workpiece
Maintenance
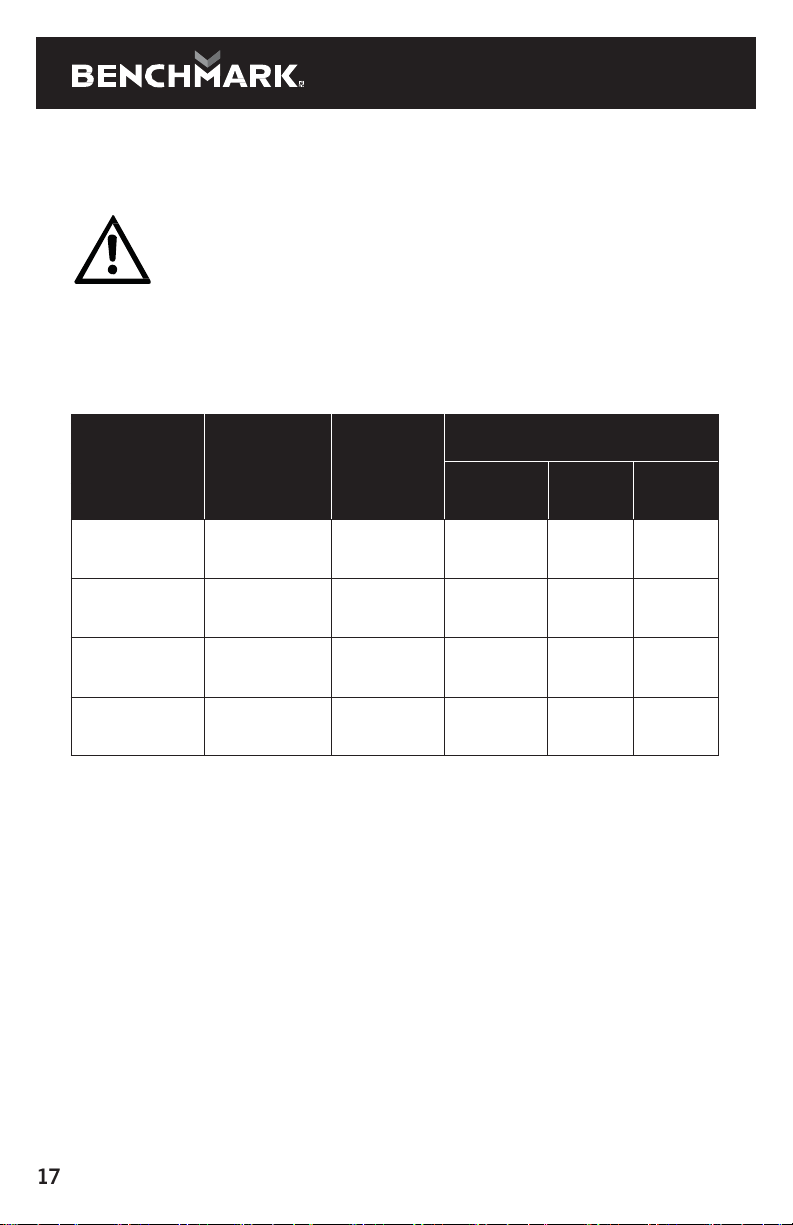
NOTE:Donotstorethetoolanywheretemperatureswillfallbelowfreezing.MAINTENANCEREQUIREDDESCRIPTIONTOOLSORMATERIALSREQUIREDMAXIMUMSERVICEINTERVALEachuseorevery2hrs.MonthlyAsneeded
Generalinspection-freemovementTrigger,spring,NoneXIn-depthinspectionWornorbrokenpartsXXReplacewornorbrokenpartsXLubricationSeebelow
Pneumatic
tooloilX
If any of the following symptoms appear while the tool is in use, turn it off
and disconnect it from the air supply immediately. Failure to comply will
lead to serious injury or loss of life.
Disconnect the tool from the air supply
before making any adjustments.
Repairs must be performed by a qualified service technician only.
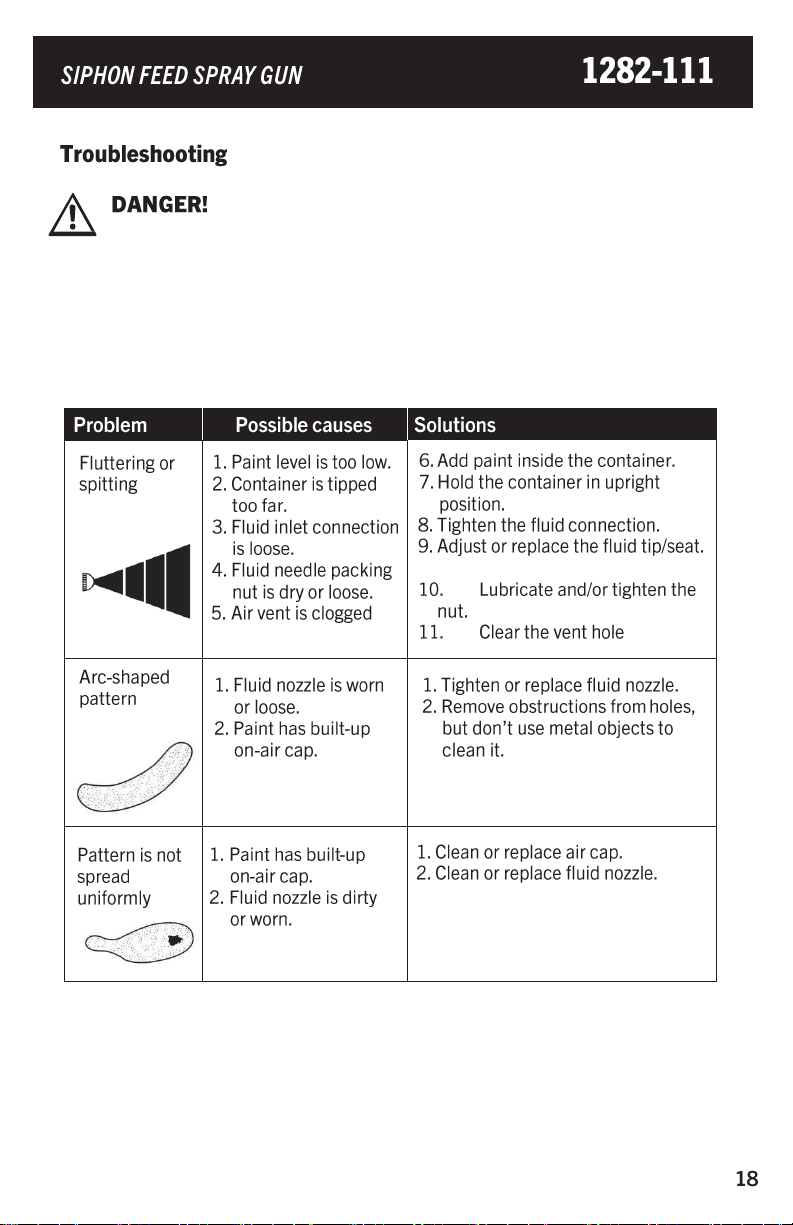
The following chart lists common issues and solutions. Please read it carefully and
follow all instructions carefully.

Table of contents
Other Benchmark Paint Sprayer manuals


Popular Paint Sprayer manuals by other brands

Jacto
Jacto PJB-16U Operator's manual

3M
3M Scotchkote HSS-450 User instructions

Carlisle
Carlisle Binks AA1600M Service manual

Air Gunsa
Air Gunsa AZ3 HTE2 instruction manual

Graymills
Graymills Tempest T-10 Operation and maintenance instructions

Graco
Graco SaniSpray HP ProPack 25T781 Operation - repair - parts

Surtek
Surtek 108006 User manual and warranty

BUFFALO TURBINE
BUFFALO TURBINE BT-CS4 Original instructions and parts manual

Fast Mover
Fast Mover FMT9800 instruction manual

Guarany
Guarany Knapsack SP Operator's manual

Graco
Graco MAGNUM 232751 Operation

Clarke
Clarke CHHSB1 Operating & maintenance instructions


