Hardi New NAVIGATOR 1100 User manual

New NAVIGATOR
67020803 (10/04)
Operator’s Manual


New NAVIGATOR
Operator’s Manual
HARDI
HARDI
HARDI® reserves the right to make changes in design,
material, or specification without notice thereof.
HARDI®and other product names are registered trademarks
of HARDI®Inc. in the U.S. and in other countries.
67020803 (10/04)

2 HARDI®New NAVIGATOR OPERATOR’S MANUAL
Table of Contents
Introduction................................................................. 4
Description.................................................................. 5
Frame..................................................................... 5
Adjustable wheel spacing.......................................5
Suspension (optional) ............................................ 5
Tank ....................................................................... 5
Pump...................................................................... 5
HARDI®SMART VALVE MANIFOLD system......... 5
ECP operating unit................................................. 5
ECPC operating unit .............................................. 5
Filters (standard and optional) ............................... 5
Booms.................................................................... 5
Safety Instructions ..................................................... 6
Operating the sprayer safely .................................. 6
Handling chemical products safely......................... 7
Local poison information center .............................7
Connection.................................................................. 8
Support jack ........................................................... 8
Bottom step (optional)............................................ 8
P.T.O. Shaft .................................................................. 9
P.T.O. shaft operator safety ....................................9
Installation of P.T.O. shaft ....................................... 9
Wheel Spacing Adjustment
(Suspended and Non-suspended axle) .................. 10
Axle Clearance Adjustment
(Suspended and Non-suspended axle) .................. 10
Tires ........................................................................... 11
Hydraulic System ..................................................... 11
Connection requirements..................................... 11
Hydraulics - standard joystick handle................... 12
Direct Acting Hydraulic system (D.H.) .................. 12
Connecting electric controls................................. 13
Disconnecting sprayer.......................................... 13
Before operating sprayer...................................... 13
Transport ................................................................... 13
Roadworthiness ................................................... 13
Rear lights............................................................ 13
Transport bracket settings .................................... 14
Adjusting boom transport position........................ 14
ECP Plumbing Diagram ........................................... 15
ECPC Plumbing Diagram......................................... 16
Operation................................................................... 17
Operation of spraying functions ........................... 17
Filling tanks with water......................................... 17
Tank capacities .................................................... 17
Filling through tank lids ........................................ 17
Quick Fill (optional).................................................. 18
General Quick Filling guidelines........................... 18
ECP & ECPC Operating Unit.................................... 19
Controls adjustment ............................................. 19
Adjustment of constant pressure .........................19
Operating the control unit while spraying ............. 19
Emergency operation........................................... 20
Remote 4” pressure gauge (optional) .................. 20
Filters ................................................................... 20
Self cleaning filter (ECP only) .............................. 20
Adding Chemicals .................................................... 21
Filling through the tank lid .................................... 21
Filling with the HARDI®chemical filler (optional) .21
Operating with Liquid-based chemicals ............... 21
Operating with Powder-based chemicals............. 22
Use of flush tank and rinse nozzles (optional) ...... 23
Technical residue ................................................. 23
Draining tanks ...................................................... 23
Nozzle Selection ....................................................... 24
Calibration................................................................. 26
Maintenance - rules of thumb.................................. 27
Cleaning the sprayer ............................................ 27
Guidelines ............................................................ 27
Cleaning the tank ................................................. 28
Cleaning and maintenance of filters..................... 28
Lubrication ................................................................ 29
About lubricants ................................................... 29
Recommended lubricants .................................... 29
Lubrication schedule ............................................ 30
Service and Maintenance Intervals......................... 33
10 hours service................................................... 33
50 hours service................................................... 34
250 hours service................................................. 34
1000 hours service............................................... 35
Occasional maintenance...................................... 35
Pump valves and diaphragms replacement
(363/463 pumps) .............................................. 35
Pump valves and diaphragms replacement
(1302 pumps) ................................................... 36
Cone check/replacement ECP/ECPC
operating unit ................................................... 37
Cone check/replacement ECP/ECPC
distribution valve............................................... 37
Wear bushing replacement, boom lift............... 37
Shock absorbers .............................................. 37
Level indicator adjustment................................ 38
Cord replacement, level indicator..................... 38
Nozzle tubes and fittings .................................. 38
Off-Season Storage .................................................. 39
Preparation after off season storage.................... 39
Equipment and Accessories ................................... 40
Troubleshooting........................................................ 43
Emergency Operation of the Sprayer ..................... 48
Technical Specifications.......................................... 49
Overall measurements ......................................... 49
Weight .................................................................. 49
Filters and nozzles ............................................... 50
Temperature and pressure ranges ....................... 50
Electrical connections - Rear lights......................50
Electrical connections for ECP/ECPC
operating unit ....................................................... 50
EAGLE™ boom hydraulics SPB-HZ and SPC-HZ
.51
EAGLE™ boom hydraulics SPB-HY and SPC-HY
.51
DH Hydraulics ...................................................... 52
Warranty Policy and Conditions ............................. 53
Notes.......................................................................... 55

Dear Owner,
Thank you for purchasing a HARDI®product and welcome to the ever- increasing family of
HARDI®sprayer owners.
Our sprayers and accessories are rapidly becoming a familiar sight on North American farms.
We believe that this results from growers becoming increasingly conscious of crop protection
input costs and the vital need for cost effective spray application equipment.
Please take the time to thoroughly read the Operator’s Manual before using your equipment.
You will find many helpful hints as well as important safety and operation information.
Some of the features on your HARDI®New NAVIGATOR sprayer were suggested by growers.
There is no substitute for “on farm” experience and we invite your comments and suggestions.
If any portion of this instruction book remains unclear after reading it, contact your HARDI®
dealer or service personnel for further explanation before using the equipment.
For Product, Service or Warranty Information:
- Please contact your local HARDI®dealer.
To contact HARDI®directly:
- Please use the HARDI®Customer Service number: 1-866-770-7063
HARDI®INC. Visit us online at: www.hardi-us.com
HARDI®MIDWEST
1500 West 76th St.
Davenport, Iowa 52806
Phone: (563) 386-1730
Fax: (563) 386-1710
HARDI®WEST COAST
8550 W. Roosevelt Avenue
Visalia, California 93291
Phone: (559) 651-4016
Fax: (559) 651-4160
HARDI®GREAT LAKES
290 Sovereign Rd.
London, Ontario N6M 1B3
Phone: (519) 659-2771
Fax: (519) 659-2821
Sincerely,
Tom L. Kinzenbaw
President

4 HARDI®New NAVIGATOR OPERATOR’S MANUAL
We congratulate you for choosing a HARDI®plant protection product. The reliability and efficiency of this product
depends upon your care. The first step is to carefully read and pay attention to this instruction book. It contains
essential information for the efficient use and long life of this quality product.
The New Navigator 1100 trailer sprayer consists of a powder coated frame with a tank, diaphragm or centrifugal
pump, ECP control (Electric Control Plus) for diaphragm pump system or ECPC control (Electric Control Plus
Centrifugal) for centrifugal pump system, HARDI®Smart Valve Manifold system, Self-Cleaning Filter (diaphragm
only), Paralift™ Boom Lift System, and a 45’, 50’, 60’, or 66’ EAGLE™ SPB series spray boom. The 1100 trailer
sprayers also offer an 80’, 88’, 90’, or 100’ EAGLE™ SPC series spray boom.
Introduction
New NAVIGATOR 1100 gallon with 100’ Eagle™ SPC (HZ) boom

5HARDI®New NAVIGATOR OPERATOR’S MANUAL
Description
Description
Frame
The frame is all steel construction. It has a strong
chemical and weather resistant powder coat. Screws,
nuts, etc. have been electrochemically treated to be
resistant to corrosion.
Adjustable wheel spacing
Allows infinite wheel spacing adjustment of 60” to 120”.
WARNING! Use extreme caution with narrower
wheel spacing (close to 60”). Always slow
down before entering a curve, especially when
turning on uneven ground or on a hillside.
Note: The wider the wheel spacing, the better the
stability of the sprayer and boom.
Suspension (optional)
Suspended axle systems are available featuring swing
arms, dual coil springs and gas shock absorbers.
Tank
The tanks, made of impact proof and chemical
resistant polyethylene, have a purposeful design with
rounded contours which allows for efficient cleaning
and draining. The tanks are designed with a large
deep sump, so that they can be completely emptied
even when the sprayer is used on slopes up to 15%
inclination. A remote operated drain valve is fitted for
efficient draining. Available tank size - 1100 gallon.
Pump
The HARDI®diaphragm pumps have low maintenance
requirements and guaranteed pump life. The bearings
and crankshaft are grease lubricated and are therefore
protected from spray solution if any diaphragm fails in
service. A drain hole is in the base of the crank case
to facilitate the draining of any foreign matter. The
diaphragm pumps are self priming and can be run
dry without damage. Centrifugal pumps and plumbing
systems are also available.
HARDI®SMART VALVE MANIFOLD system
All functions of the spray circuit are selected via
the centrally located simple, logical and functional
MANIFOLD valves, featuring color coding and clear
symbols for easy operation.
ECP operating unit
The ECP operating unit consists of: control box,
adjustable pressure agitation, pressure filter,
HARDIMATIC mechanical rate controller (within same
gear), 2-1/2” pressure gauge and individual boom feed
valve featuring constant pressure device for unchanged
application rate even if one or more boom sections are
shut off. The master on/off switch on the control box
operates by shutting off all boom sections regardless of
whether individual boom switches are on or off.
ECPC operating unit
The ECPC operating unit consists of: control box,
adjustable pressure agitation, 2-1/2” pressure gauge
and individual boom feed valves featuring constant
pressure device for unchanged application rate even
if one or more boom sections are shut off. The master
on/off switch on the control box operates by shutting
off all boom sections regardless of whether individual
boom switches are on or off.
Filters (standard and optional)
With the self-cleaning filter (ECP only), the impurities
that exist in the spray liquid will pass the filter and be
re-circulated back to the tank via the return flow. When
the tank is emptied, the impurities are then flushed out
through the drain. In-line filters and nozzle filters are
standard to ensure the sprayer will have minimal nozzle
blockages. Suction filter and filling filter are optional.
Booms
The HARDI®New NAVIGATOR boom options are as
follows:
New NAVIGATOR 1100
• 45’, 50’, 60’, 66’ Eagle™ SPB booms
• 80’, 88’, 90’, 100’ Eagle™ SPC booms
All of the booms are suspended in a strong, stable
parallelogram boom lift - Paralift™.
Booms feature trapeze/pendulum suspension and
an integrated spring suspension system with shock
absorber dampening.
Please refer to the
EAGLE™ BOOM
Operator’s Manual
for more information.

6 HARDI®New NAVIGATOR OPERATOR’S MANUAL
Safety Instructions
SAFETY INFORMATION
WARNING
ALWAYS READ OPERATOR’S MANUAL BEFORE
USING EQUIPMENT
DO NOT REMOVE ANY SAFETY DEVICES OR
SHIELDS. NEVER SERVICE, CLEAN OR REPAIR A
MACHINE WHILE IT IS OPERATING
WARNING
ALWAYS WATCH FOR THIS SYMBOL TO POINT OUT
IMPORTANT SAFETY PRECAUTIONS
IT MEANS ATTENTION! BECOME ALERT!
YOUR SAFETY IS INVOLVED!
RECOGNIZE SAFETY INFORMATION
This is the Safety-alert symbol.
When you see this symbol on your
machine or in this manual, be alert
to the potential for personal injury.
Follow recommended precautions
and safe operating practices.
Follow safety instructions
• Carefully read all the safety messages in this man-
ual and the safety labels fitted to the machine. Keep
safety labels in good condition. Replace missing
or damaged safety labels. Be sure that new equip-
ment components include any current safety labels.
Replacement safety labels are available from your
authorized HARDI®dealer.
• Learn how to operate the sprayer and how to use
the controls properly. Do not let anyone operate the
machine without proper instructions.
• Keep your sprayer in proper working condition. Unau-
thorized modifications or use may impair the function
and/or safety and affect the machine’s life.
• If you do not understand any part of this manual and
need assistance, please contact your authorized
HARDI®dealer.
Operating the sprayer safely
1. Read the complete manual carefully and become
familiar with the operation of the equipment before
initial operation in each spraying season. Failure to
do so may result in possible over or under appli-
cation of spray solution which may drastically affect
crop production and lead to personal injury.
2. Before starting the engine on the tractor unit, be
sure all operating controls are in the off or neutral
position, including (but not limited to) the P.T.O.
shaft and/or spray controls. Be sure the tractor
power train is disengaged.
3. Operate spray and boom functions only when
seated in the operator’s seat.
4. One of the most frequent causes of personal injury
or death results from persons falling off or being
run over. Do not permit others to ride on or in. Only
one person should be working the machine when in
operation.
5. Before leaving the tractor seat, stop the engine,
put all controls in neutral, and put the transmission
control lever in the park position or neutral with the
brakes locked. Read the tractor operation manual
for added safety precautions.
6. P.T.O. driven equipment can cause serious injury.
Before working on or near the P.T.O. shaft, servicing
or cleaning the equipment, put P.T.O. lever in the
DISENGAGE position and stop the engine.
7. Do not fold or unfold boom near overhead wires.
Serious injury or death could result if contact is
made with electric wires.
8. Keep hands, feet & clothing away from moving
parts.
9. Wear relatively tight and belted clothing to prevent
from being caught on some part of the machine.
10. Slow down when turning, especially with boom
unfolded.
11. Always keep children away from your sprayer and/
or tractor unit.

7HARDI®New NAVIGATOR OPERATOR’S MANUAL
Safety Instructions
12. Before transporting the sprayer, ensure that the
boom is fully folded and fully locked into transport
position. Ensure all locking devices are fully en-
gaged, whether hydraulic or mechanical.
13. Slow moving tractors and spray equipment can cre-
ate a hazard when on public roads. Avoid personal
injury or death resulting from any accidents by
using flashing lights. Local regulations may require
installation of flashing warning lights.
14. Avoid injuries from high pressure fluids penetrating
the skin by relieving system pressure before discon-
necting hydraulics or other lines. Ensure all fittings
are tight before applying pressure to the system.
15. Understand service procedures before undertaking
any maintenance. Never lubricate, service, or adjust
the machine while it’s moving. Securely support any
components before working on them.
16. Keep all parts in good condition and properly
installed. Fix damaged parts immediately. Replace
worn or broken parts. Remove excessive buildup of
grease, oil or debris.
Handling chemical products safely
1. Direct exposure to hazardous chemicals can cause
serious injury. These chemicals can include lubri-
cants, coolants, paints, adhesives and agricultural
chemicals. Material Safety Data Sheets (M.S.D.S.)
are available for all hazardous chemicals which
inform the user of specific details including: physical
and health hazards, safety procedures, and emer-
gency response techniques.
2. Protective clothing such as rubber gloves, goggles,
coveralls and respirator must be worn while han-
dling chemicals. All protective clothing should be
kept in excellent condition and cleaned regularly or
discarded.
3. If chemicals come in contact with any exposed
skin areas, wash immediately with clean water and
detergent. Never place nozzle tips or any other
components that have been exposed to chemicals
to lips to blow out obstructions. Use a soft brush to
clean spray nozzles.
4. Dedicate an area to fill, flush, calibrate and decon-
taminate sprayer where chemicals will not drift or
run off to contaminate people, animals, vegetation,
water supply, etc. Locate this area where there is
no chance of children coming in contact with this
residue.
5. Decontaminate equipment used in mixing, trans-
ferring and applying chemicals after use. Follow
the instructions on the chemical label for the cor-
rect procedure required. Wash spray residue from
outside of the sprayer to prevent corrosion.
6. Extreme care should be taken in measuring spray
products. Powders should be used in suitable sized
packages or weighed accurately. Liquids should be
poured into a suitable graduated container. Keep
chemical containers low when pouring. Wear a
filtered respirator and let the wind blow away from
you to avoid dust and/or splashes contacting the
skin or hair.
7. Store chemicals in a separate, plainly marked
locked building. Keep the chemical in its original
container with the label intact.
8. Dispose all empty containers after rinsing in ac-
cordance with local regulations & by-laws. Dispose
of all unused chemicals and left over fertilizer in an
approved manner.
9. Keep a first aid kit and fire extinguisher available at
all times when handling chemicals.
Local poison information center
If you live anywhere in the United States, the following
toll free number will connect you to your Local Poison
Information Center.
PHONE NO. 1 - 8 0 0 - 2 2 2 - 1 2 2 2
If you live outside the United States, find the number for
the poison control center in your phone book and write
it in the space below:
PHONE NO. _______-_______-__________
Keep a list, in the space provided below, of all the
chemicals that you have in use.
1._________________________________________
2._________________________________________
3._________________________________________
4._________________________________________
5._________________________________________
6._________________________________________
7._________________________________________
8._________________________________________
9._________________________________________
10._________________________________________

8 HARDI®New NAVIGATOR OPERATOR’S MANUAL
Sprayer Setup
Connection
Connect the sprayer to the tractor, adjusting the hitch
mounting height (A
Fig. 1
) on the drawbar so that the
sprayer is level.
WARNING! The drawbar bolts must be re-tight-
ened to the specified torque every 8 hours of
work until the torque is stabilized, and then at
intervals stated in the service scheme (p. 34).
WARNING! Ensure the drawbar is secured to
the tractor and cannot be accidentally discon-
nected. Safety chains are recommended when
towing the sprayer.
WARNING! Your tractor will have decreased
braking efficiency with the sprayer connected,
particularly when the tank is full.
Support jack
To remove support jack (B
Fig. 1
): lift leg, remove
securing pin and pull out support jack. When sprayer
is attached to the tractor, support jack is stored in a
bracket on the left side of the frame (
Fig. 2
).
WARNING! The support jack is not designed
for lifting a full sprayer or supporting the trailer
for extended periods if the sprayer is full of
water.
Bottom step (optional)
To access the front platform, pull the step lock pin out
and lower the step (
Fig. 3
). Always lift up and push the
step in to the locked position before driving. The step
will lock automatically when it is lifted up.
WARNING! Ensure the molded steps on the
Flush Tank are kept clear of mud and debris to
optimize their slip-resistant properties.
WARNING! Always ensure the Flush Tank tie-
down strap is secured before moving sprayer or
climbing onto steps (
Fig. 4
).
Tie-down strap in secured position.
Fig. 2
Fig. 4
Fig. 3
LOCK PIN
LOCK PIN
Fig. 1
B
A

9HARDI®New NAVIGATOR OPERATOR’S MANUAL
P.T.O. shaft operator safety
WARNING:
ALWAYS STOP ENGINE BEFORE
ATTACHING THE TRANSMISSION SHAFT
TO TRACTOR P.T.O. MOST TRACTOR P.T.O.
SHAFTS CAN BE ROTATED BY HAND TO FACILI
TATE
SPLINE ALIGNMENT WHEN ENGINE IS STOPPED.
When attaching the shaft, make sure that the snap lock
is FULLY ENGAGED - push and pull shaft until it locks.
WARNING:
ROTATING TRANSMISSION
SHAFTS WITHOUT PROTECTION GUARDS
ARE FATAL.
Always keep protection guards and chains intact and
make sure that the guards cover all rotating parts,
including CV-joints at each end of the shaft.
Do not use without protection guard.
Do not touch or stand on the transmission shaft when it
is rotating - safety distance: min 5’ (1.5 meters).
Prevent protection guards from rotating by attaching the
chains, allowing sufficient slack for turns.
Make sure that protection guards around the tractor
P.T.O. and implement shaft are intact. Always STOP
ENGINE and remove the ignition key before carrying
out maintenance or repairs to the transmission shaft or
implement.
Installation of P.T.O. shaft
WARNING:
THE P.T.O. SHAFT ANGLE WILL
CHANGE WHEN RAISING AND LOWERING
THE CLEVIS. TO PREVENT EXCESSIVE
LOADING AND BINDING ON THE P.T.O. SHAFT, IT
MAY BE ADVISABLE TO LEAVE THE P.T.O. SHAFT
DISCONNECTED UNTIL THE CLEVIS ADJUSTMENT
IS COMPLETED. THEN THE P.T.O. SHAFT ADJUST-
MENTS CAN BE MADE.
Initial installation of the shaft is done as follows:
1. Attach sprayer to tractor and set sprayer in the posi-
tion with shortest distance between the tractor and
sprayer pump P.T.O. shafts.
2. Stop engine and remove ignition key.
3. If P.T.O. shaft must be shortened, the shaft is pulled
apart. Fit the two shaft parts at tractor and sprayer
pump and measure how much it is necessary to
shorten the shaft. Mark the protection guards.
Sprayer setup
Note: The minimum allowable overlap for the shaft
depends on the pump model.
Pump with 6 splines (540 r.p.m.)
The shaft must always have a minimum overlap of 1/3
the length.
Pump with 21 splines (1000 r.p.m.)
The shaft must always have a minimum overlap of 2/3
the length.
4. The two parts are shortened equally. Use a saw, and
file the profiles afterwards to remove burrs.
5. Grease the profiles, and assemble male and female
parts again.
6. Fit the shaft to tractor and sprayer pump.
Note: Female part towards tractor. Fit chains to prevent
the protection guards from rotating with the shaft.
7. To ensure long life of the P.T.O. shaft, try to avoid
working angles greater than 15°.
Min 13/16" (20mm)
Min. 13/16” (20mm)
Min. 1/3 of Length
Length
Length
Min. 2/3 of Length
10 HARDI®New NAVIGATOR OPERATOR’S MANUAL
Sprayer Setup
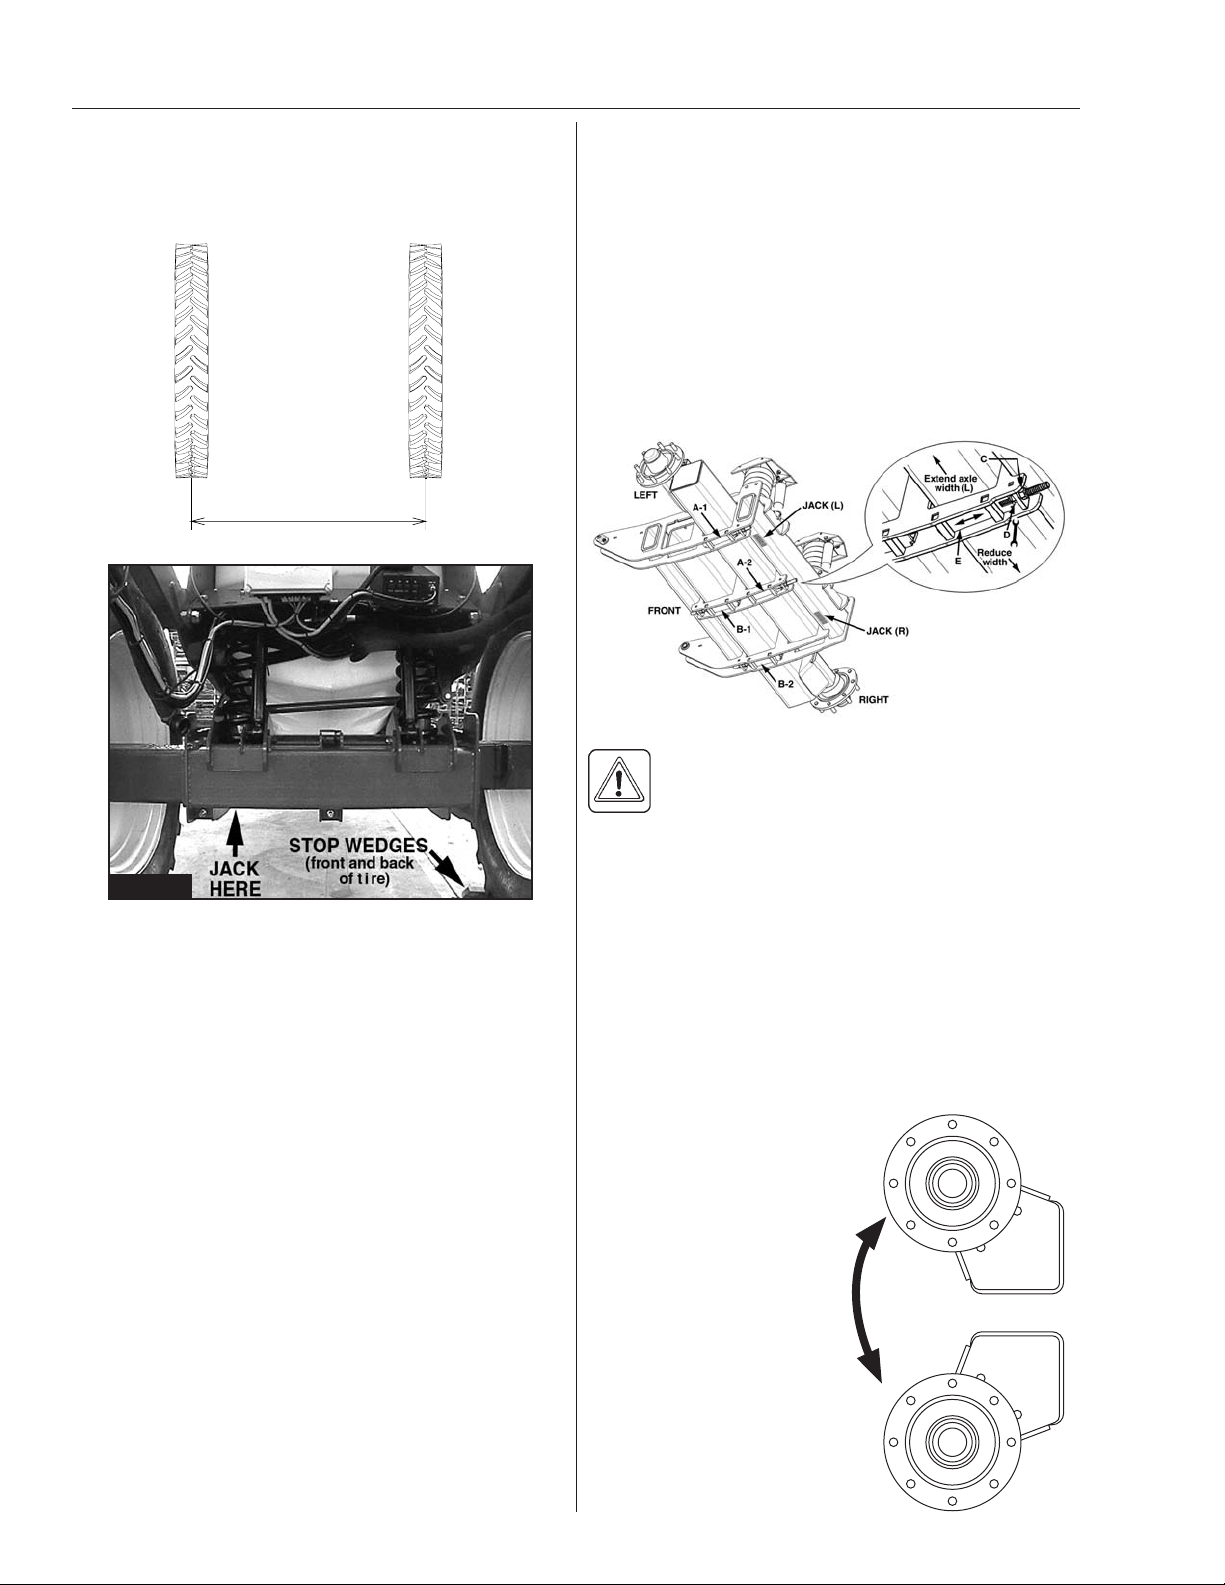
Wheel Spacing Adjustment
(Suspended and Non-suspended Axle)
Wheel spacing can be infinitely adjusted from 60” to
120” with suspended or non-suspended axle systems.
1Measure the correct wheel spacing (Center of right
hand tire to center of left hand tire). Each side must
be extended or retracted half the desired alteration.
2Attach sprayer to the tractor and engage tractor
parking brake.
3Place stop wedges in front of and behind the right
hand wheel (
Fig 5
). Using suitable heavy duty
equipment, jack up the left hand wheel. Ensure
secure support for the sprayer body.
4To release axle wedge for the left hand wheel axle
and extend or retract the axle:
Turn Nut (C
Fig 6
) counterclockwise to allow
approx. 1” clearance. With an open-ended wrench,
turn Nut (D
Fig 6
) against anchor plate until hold on
axle is released. Shift axle to measured position.
5To tighten axle wedge and secure axle at required
width:
Turn Nut (D
Fig 6
) counterclockwise to allow
movement of stop wedge. Turn Nut (C
Fig 6
)
clockwise against anchor plate to draw stop wedge
up against the axle and hold it in position. Tighten
to torque of 100 Ft/lb (135 Nm), then lock by re-
tightening Nut (D
Fig 6
).
6 If the wheels were reversed and exchanged,
remember to tighten the wheel nuts to the specified
torque - rim plate to hub 120 Ft./lb (180 Nm).
7Repeat the procedure on the right hand wheel.
8Check the distance from the center of the tire to
the center of the tank, to make sure the distance is
equal from left to right.
9Re-tighten the clamp bolts and wheel nuts to the
specified torque after 8 hours of work.
IMPORTANT! Always place a jack under axle and
lift the wheel to remove the load from the clamps
before tightening the clamp bolts.
WARNING! Use extreme caution with narrower
wheel spacing (close to 60”). Always slow
down before entering a curve, especially when
turning on uneven ground or on a hillside.
Note: The wider the wheel spacing, the better the
stability of the sprayer and boom.
Axle Clearance Adjustment
(Suspended and Non-suspended Axle)
The two axle inserts are equipped with offset spindles
allowing for a "low" or "high" clearance setting. To
change axle clearance:
1Follow steps 1-4 in "Wheel spacing adjustment"
section to release left
axle insert.
2Slide axle insert
completely out and
rotate 90°.
60” to 120”
Fig. 6
Fig. 5

11HARDI®New NAVIGATOR OPERATOR’S MANUAL
Note: Make sure the left axle offset faces the front of
the sprayer and the right axle offset faces the
rear of the sprayer so the axles are aligned.
3Re-insert axle insert and follow steps 5-9 in "Wheel
spacing adjustment" section to tighten.
4Repeat procedure for right axle insert.
Tires
Equal pressure in both tires is essential. Pressure
should be kept as low as practical. For recommended
pressures see
Tire pressures
(p. 34).
WARNING! Never inflate tires above the
specified pressures. Over-inflated tires can
explode and cause severe personal injuries.
Note: Sprayers fitted with rate controllers/monitors
must always maintain the same tire pressure as
when calibrated.
Sprayer Setup
Hydraulic System
Connection requirements
Connection requirements for
EAGLE™ booms
are:
• One single acting outlet for the lift function of the
spray boom.
• One double acting outlet for the folding and/or tilt
function of the spray boom.
Note: The hydraulic system requires an oil capacity
of approximately 0.8 GPM (3 liters) and a minimum
pressure of 1,950 PSI (130 bar).
BE SURE TO HOOK UP HYDRAULIC LINES
PROPERLY !
ENSURE HYDRAULIC LINES HAVE NOT BEEN
DAMAGED DURING SHIPPING.
ESCAPING HYDRAULIC FLUID UNDER PRESSURE
CAN PENETRATE THE SKIN CAUSING SERIOUS
INJURY. AVOID THIS HAZARD BY RELIEVING
PRESSURE BEFORE DISCONNECTING
HYDRAULIC LINES.
ENSURE ALL CONNECTIONS ARE TIGHT BEFORE
APPLYING PRESSURE, SEARCH FOR LEAKS WITH
A PIECE OF CARDBOARD NOT YOUR HANDS!
IMPROPER HOOK-UP CAN CAUSE DANGEROUS
BOOM MOVEMENTS AND/OR DAMAGE TO THE
SPRAYER HYDRAULICS.
DO NOT ALLOW ANYONE NEAR A HYDRAULIC
BOOM IN OPERATION.
ALWAYS SHUT TRACTOR OFF WHEN
CONNECTING, SERVICING OR ADJUSTING BOOM.
Make sure that the hydraulic couplers are clean before
connecting to the tractor’s remote outlets.
IMPORTANT! Due to the variation in tractor hydraulic
systems and capacities, care should be exercised when
initially operating the sprayer hydraulic cylinders. It is
advisable to adjust the hydraulic flow control down to
the minimum rate before operating the system. Adjust/
increase the flow control after the system is bled of any
air, if necessary.
BOTTOM VIEW

12 HARDI®New NAVIGATOR OPERATOR’S MANUAL
Sprayer Setup
Hydraulics - standard joystick handle
Installation of handle
1. Attach the control handle/joystick (A
Fig 9
) to the
hydraulic lever that operates the double acting outlet
to be used. The universal mounting bracket (B
Fig 9
)
is very flexible and a number of different mounting
positions can be used.
2. Connect the plug (C
Fig 9
) to the tractor’s 12V
power system. Try to hook-up the handle as close
as possible to the battery power supply. HARDI®
recommends using an electric distribution box (ref.
no. 817925) to ensure a good power supply to
various 12V attachments.
Note: Check with your dealer or tractor operator’s
manual for the best location to hook up the 12V system.
Note polarity:
BROWN wire = Positive (+)
BLUE wire = Negative (-)
3. Connect electric plug (D
Fig 9
) from sprayer’s
hydraulics to plug (E
Fig 9
) on handle.
Hydraulic lever
A
B
C
D
E
Fig. 9
Direct Acting Hydraulic system (D.H.)
Installation of control box
1. Connect the plug (A
Fig 10
) to the tractor’s 12V
power system. Try to hook up the handle as close
as possible to the battery power supply. HARDI®
recommends using an electric distribution box (ref.
no. 817925) to ensure a good power supply to
various 12V attachments.
Note: Check with your dealer or tractor operator’s
manual for the best location to hook up the 12V system.
Note polarity: BROWN wire = Positive (+)
BLUE wire = Negative (-)
2. Route the cable, with the 7 pins, from the hydraulic
mount plate to the tractor.
3. Mount the hydraulic control box (B
Fig 10
) in a
suitable location in the tractor cabin.
4. Connect the female 7 pin plug (C
Fig 10
) from the
switch box to the 7 pin male plug (D
Fig 10
) from the
sprayer.
C
D
B
A
Fig. 10

13HARDI®New NAVIGATOR OPERATOR’S MANUAL
Connecting electric controls
The control box for ECP or ECPC controls should be
mounted at a convenient place in the tractor cab. The
control box has 4 screw holes in the back cover which
need to be drilled out for mounting on a flat surface
(using the mount plate, bracket and hardware furnished
with the sprayer).
There should be a minimum of 8 amp fuse protecting
this circuit. Power requirement is 12 volt DC.
Note polarity:
Brown pos. (+)
Blue neg. (-)
The wires must have a cross-sectional area of at least
12wg (4mm2) to ensure sufficient power supply. The
boxes must be fused according to the following table.
Use the optional HARDI®Electric 12 volt outlet box
(#817925 -
Fig 11
) if more than one power outlet is
needed.
Disconnecting sprayer
Always clean the sprayer inside and outside before
disconnecting and parking it. See
Cleaning
(pp. 28-29).
Before disconnecting the sprayer from the tractor, make
sure the support jack is properly fitted.
WARNING! To prevent the sprayer from tipping
over, do not disconnect the sprayer from the
tractor with the boom unfolded, unless the
boom is securely supported.
Place stop wedges in front of and behind wheels.
Remember to disconnect all hoses and cables from the
tractor.
WARNING! If the sprayer is parked unattended,
avoid unauthorized persons, children and
animals having access to the sprayer.
Sprayer Setup
Before operating sprayer
Although the sprayer has had a strong and protective
surface treatment applied to steel parts, bolts, etc. in
the factories, it is recommended to apply a thin layer of
anti-corrosion oil to all metal parts, hoses and tires.
There are many factors that affect the selection of
protective oils, such as temperature and humidity,
and exposure to UV, salt and chemicals. Your local
distributor of oil products will be able to advise on the
best specific formula for you local conditions. If this is
done before the sprayer is put into operation for the first
time, it will always be easy to clean the sprayer, avoid
chemicals discoloring the protective coating, and keep
the coatings shiny for many years.
This treatment should be carried out every time the
protective film is washed off.
Transport
Roadworthiness
Slow moving tractors and spray equipment can create
a hazard when on public roads. Make sure the S.M.V.
sign is in place and clearly visible from the rear of the
sprayer (
Fig 12
).
NOTE! Max. driving speed is 15 mph (25 km/h).
Rear lights
Local regulations may require the use of flashing
warning lights. Connect plug for rear lights to the
tractor’s 7-pin socket, and check function of rear lights,
stop lights and direction indicators on both sides before
driving.
Fig. 11
Fig. 12

14 HARDI®New NAVIGATOR OPERATOR’S MANUAL
Adjusting boom transport position
If the boom wings do not rest accurately in the
transport brackets, the hydraulic fold cylinders can be
adjusted so the wings stop at the right position above
the transport brackets (
Fig 13
).
Fig. 14
The cylinders can be adjusted as described below:
1. Lift the boom all the way to the top.
2. Fold the boom into transport position. With the fold
cylinder pressurized, determine if the boom wings
need to be adjusted inwards or outwards.
3. Relieve the pressure from the fold cylinder by
unfolding the boom a few inches.
If the boom rests too far in on the transport brackets,
loosen the nut (B
Fig 14
) and adjust collar (A
Fig 14
)
in towards the cylinder housing.
If the boom rests too far out on the transport brackets,
the collar (A
Fig 14
) has to go out from the cylinder
housing.
4. Secure jam nut (B
Fig 14
).
5. Pressurize the cylinder to see if the boom is properly
adjusted. If not, repeat the above procedure until it is
correctly adjusted.
Sprayer Setup
Transport bracket settings
The transport brackets on the New Navigator for the
Eagle™ SPB and SPC booms are installed at the fac-
tory and have no adjustment.
The rear transport lock is adjustable, but is set at the
factory according to the boom installed on the sprayer.
This should not need adjustment unless a different
boom is installed on the sprayer.
WARNING! Always measure the actual total
height of your sprayer to be sure that there is
plenty of clearance at all times while trans-
porting the sprayer.
Eagle™ Transport bracket
Fig. 13
15HARDI®New NAVIGATOR OPERATOR’S MANUAL
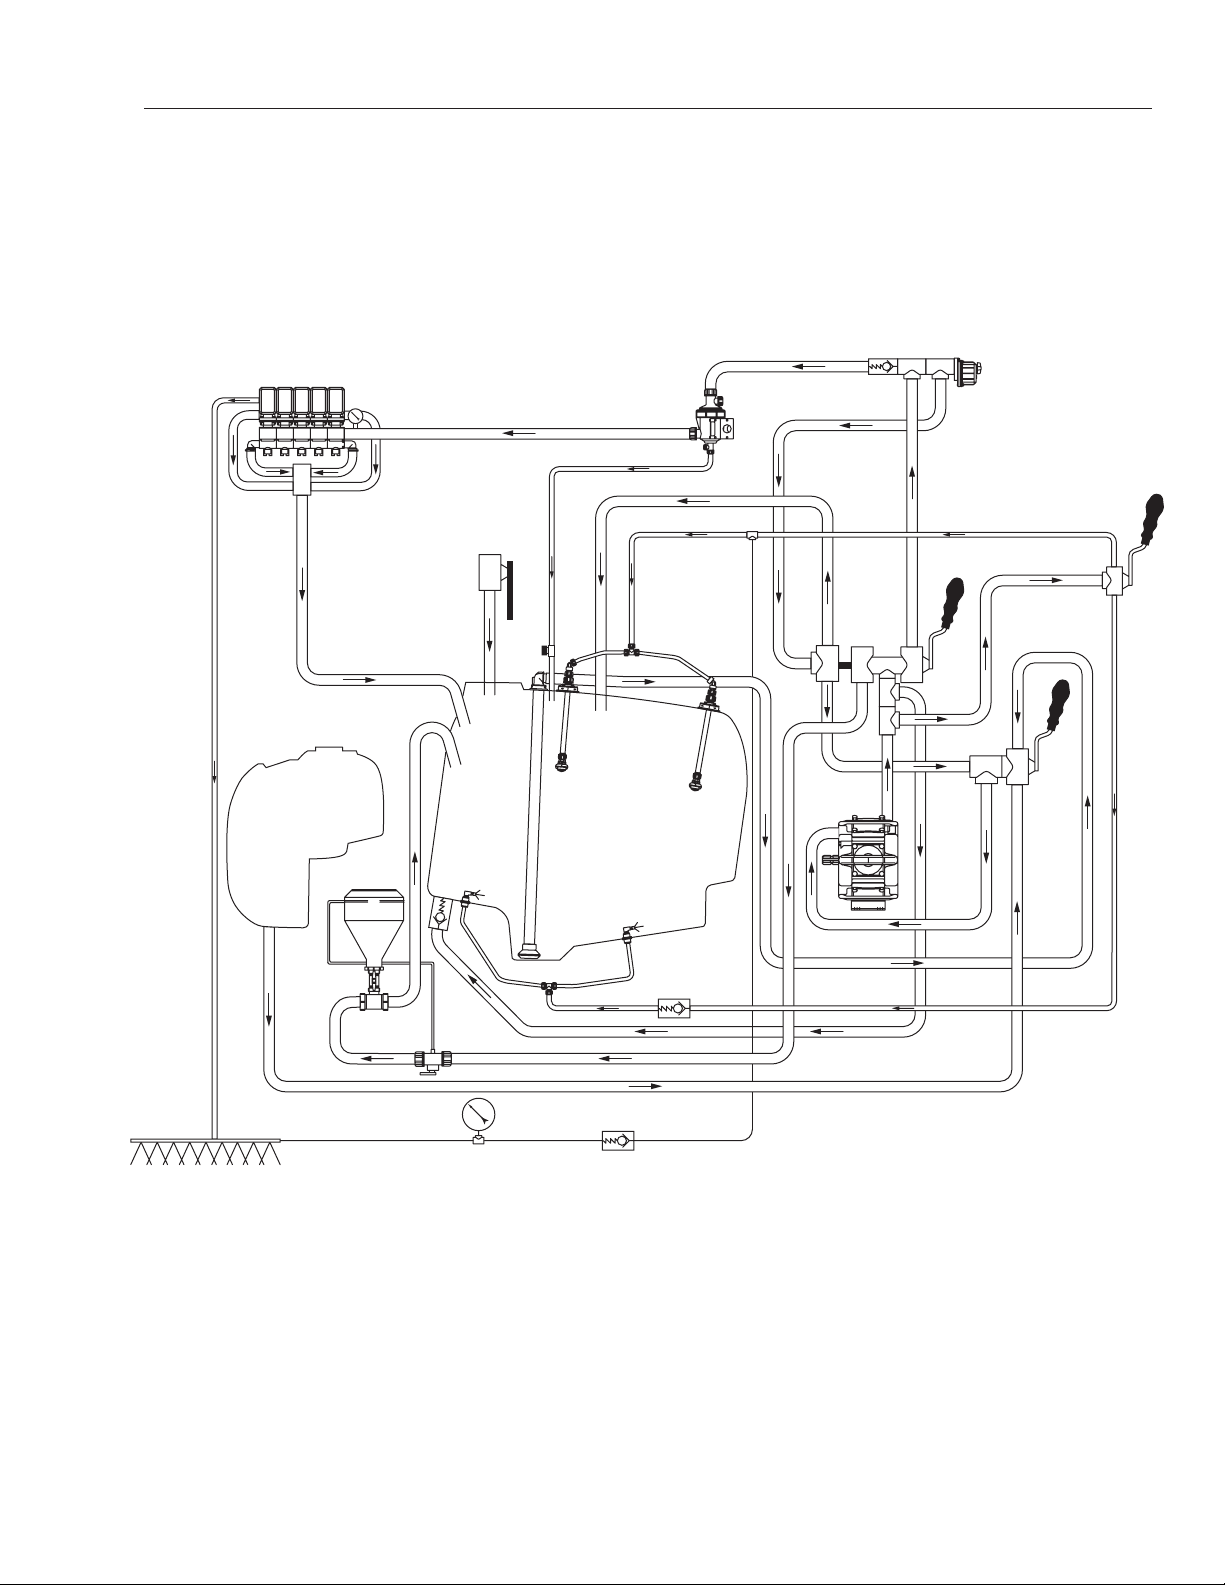
The HARDI®New NAVIGATOR trailer sprayer is available with either diaphragm or centrifugal
plumbing systems. Take time to review and study the plumbing diagram for your sprayer. By
following the flow through the diagram, you will better understand the various functions of your
sprayer system.
1. Suction filter
2. Suction manifold
3. Pump
4. Pressure manifold
5. Agitation
6. Safety valve
7. HARDI-MATIC
8. Return line (Self-cleaning filter)
9. Self-cleaning filter
10. Check valves
11. Boom section valves
Operation
ECP PLUMBING DIAGRAM (for diaphragm pump systems)
12. Pressure equalization return
13. Boom
14. Boom pressure gauge
15. Flush tank
16. Quick fill
17. Variable Agitation manifold
18. HARDI®chemical inductor
19. Tank rinse nozzles
20. Self-cleaning filter shut-off
21. Return by-pass
1
2
3
4
5
5
9
11
12
13 14
15
16
18
19
19
10
10
8
20
10
6
21
17
7
16 HARDI®New NAVIGATOR OPERATOR’S MANUAL
Operation
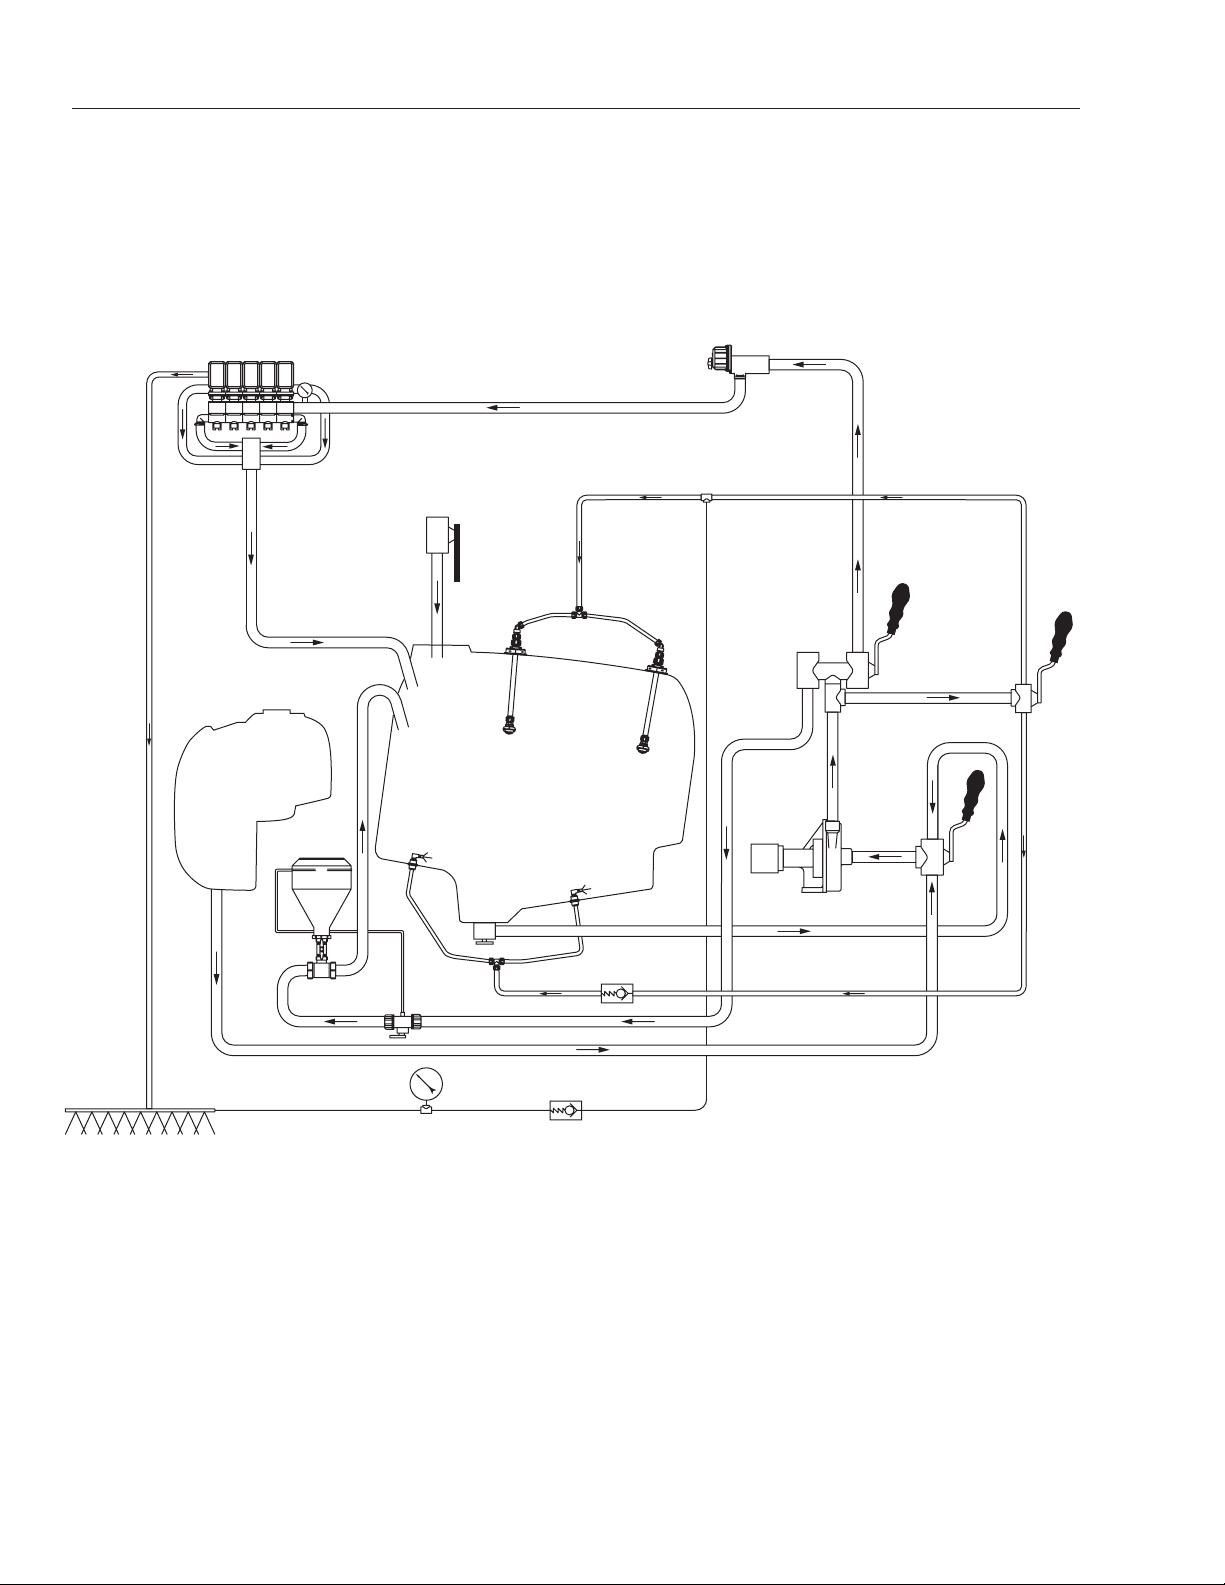
ECPC PLUMBING DIAGRAM (for centrifugal pump systems)
The HARDI®New NAVIGATOR trailer sprayer is available with either diaphragm or centrifugal
plumbing systems. Take time to review and study the plumbing diagram for your sprayer. By
following the flow through the diagram, you will better understand the various functions of your
sprayer system.
1. Bottom Suction Valve
2. Suction manifold
3. Pump
4. Pressure manifold
5. Agitation
6. HARDI-MATIC
7. Boom section valves
8. Boom
9. Boom pressure gauge
10. Flush tank
11. Quick fill
12. Variable Agitation manifold
13. Pressure equalization return
14. HARDI®chemical inductor
15. Tank rinse nozzles
16. Check valves
2
5
5
13
89
10
14
15
15
1
3
6
7
16
16
11
4
12

17HARDI®New NAVIGATOR OPERATOR’S MANUAL
Operation
Operation
The HARDI®SMART VALVE system is located on
the left hand side of the sprayer. This 3-part plumbing
control system permits easy operation of the HARDI®
NAVIGATOR sprayer.
Operation of spraying functions:
• Use the SELECT FUNCTION handle (upper right)
to select the desired function. Note that function
icons shown within the Green outer ring (e.g.
SPRAY MAX AGITATION), indicates the source of
fluid is the Main Tank. Function icons within the Blue
inner ring indicate fluid supplied from the Flush Tank
(optional system).
• Use the SELECT SOURCE handle (lower right)
to select the correct source of the water and/or
chemical solution. Note the color coding: Green for
main tank and Blue for flush tank (optional system).
• Use the Variable Agitation handle (left) to conrol the
amount of flow through the agitation nozzles. It also
operates the Rinse nozzles (optional).
IMPORTANT! Always ensure the indicator arrows
on the handles are carefully aligned with the the
corresponding arrows on the decal. Misalignment
may result in incorrect fluid movement.
NOTE! All fluid system options are shown in this
manual. If your sprayer is not equipped with all
options, some of the selections shown may not be
possible on your sprayer without adding additional
equipment (e.g. HARDI®Chemical filler).
Filling tanks with water
WARNING! Do not overfill any tank as this may
cause chemical spillage out of the tank.
Tank capacities
(U.S. Gallons) (Liters)
Main Tank 1100 4000
Foam Marker Tank 20 or 40 75 or 150
Flush Tank 130 (Nav 1100) 500 (Nav 5000)
Clean Water Tank 4 15
Water can be filled into the tanks in the following ways:
1Filled through tank lids (All tanks).
2Filled by external water supply through the quick fill
system (main tank only).
The main tank should normally be filled with 25% of the
required spraying water before adding the chemicals.
IMPORTANT! Always read the instructions on the
chemical container.
IMPORTANT! The clean water handwash tank is filled
separately to ensure that there is no risk of chemical
solution moving from the valve system into handwash
water.
IMPORTANT! It is recommended to use water as clean
as possible for spraying purposes.
Filling through tank lids
Handwash (clean water) tank
Screw open the clean water tank lid and fill with clean
water only.
IMPORTANT! The water from this tank is only for hand
washing, cleaning blocked nozzles, etc.
WARNING! Although the Handwash tank is
only filled with clean water, the water must
never be used for drinking, due to the small risk
of contamination while filling, etc.
SPRAY
SPRAY
BYPASS
TO
SUCTION
BYPASS
TO TANK,
PRIME,
MAX AGITATION
SELECT FUNCTION
OFF
SELECT SOURCE
MAIN
TANK
97608703
SAFETY
VALV E
PURGE
CHEM
FILL
FLUSH CHEM
FILL
FLUSH
BOOM
OFFOFF
FLUSH
TANK
FLUSH
TANK
FLUSH
TANK

18 HARDI®New NAVIGATOR OPERATOR’S MANUAL
Operation
Flush tank (optional system)
Screw open the flush tank lid and fill with water.
Foam marker tank (optional)
The fill inlet for the foam marker tank is found to the
right of the Hardi®Navigator Smart Valve Control Panel
as shown in (
Fig 15
).
Main tank
Screw open the main tank lid and fill with water through
the strainer to prevent rust or other particles entering
the tank.
An overhead tank will allow high filling capacity.
WARNING!
Do not let the filling hose etc., enter
any tank. Keep it outside the tank, pointing
towards the filling hole. If the end of the hose
is beneath the surface of the tank contents,
and the water pump at the water supply plant
stops, chemicals could be siphoned back and
contaminate water supply lines.
Quick Fill (Optional)
The optional QUICK FILL allows the operator to
connect a hose from a water supply (i.e. overhead fill
tank), and fill the main tank.
WARNING! Do not fill tank so rapidly that air
cannot escape - tank may rupture.
General Quick Filling guidelines
1Remove the camlock plug from the front of the quick
fill valve (
Fig 16
).
2Connect the filling hose from the water supply.
3Open the quick fill valve and fill tank to desired level.
4Close the quick fill valve and remove filling hose.
5Remember to re-fit the camlock plug to the quick fill
coupler when filling is complete.
Fig. 16
Fig. 15
Table of contents
Other Hardi Paint Sprayer manuals

Hardi
Hardi Delta Force Boom User manual

Hardi
Hardi BL Series User manual

Hardi
Hardi Boss Series User manual

Hardi
Hardi ES 50 User manual

Hardi
Hardi Front Tank User manual

Hardi
Hardi NAVIGATOR DELTA User manual

Hardi
Hardi LX-MB Series User manual

Hardi
Hardi EAGLE SPB BOOM User manual

Hardi
Hardi Commander Plus Operating instructions

Hardi
Hardi BPE18 User manual

Hardi
Hardi Eagle Boom User manual

Hardi
Hardi PRESIDIO 2700 User manual

Hardi
Hardi Navigator 3100 User manual

Hardi
Hardi Ranger Series User manual

Hardi
Hardi N Series User manual

Hardi
Hardi MARRO TWIN FORCE 1000 User manual

Hardi
Hardi ES 30 User manual

Hardi
Hardi ZEBRA AXIAL User manual

Hardi
Hardi ATV Series User manual

Hardi
Hardi RANGER PRO User manual


