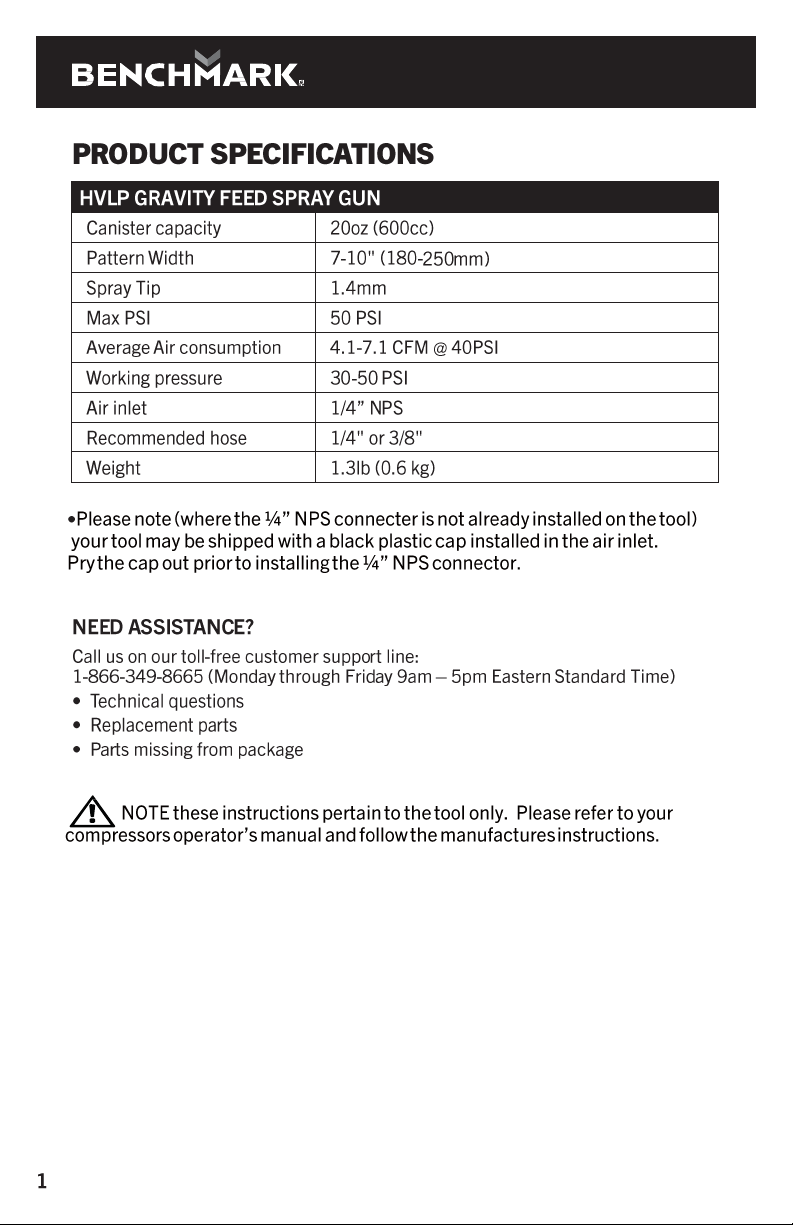
Benchmark 1282-113 User manual


Oxygen
nydrogen
Combustible
explosive
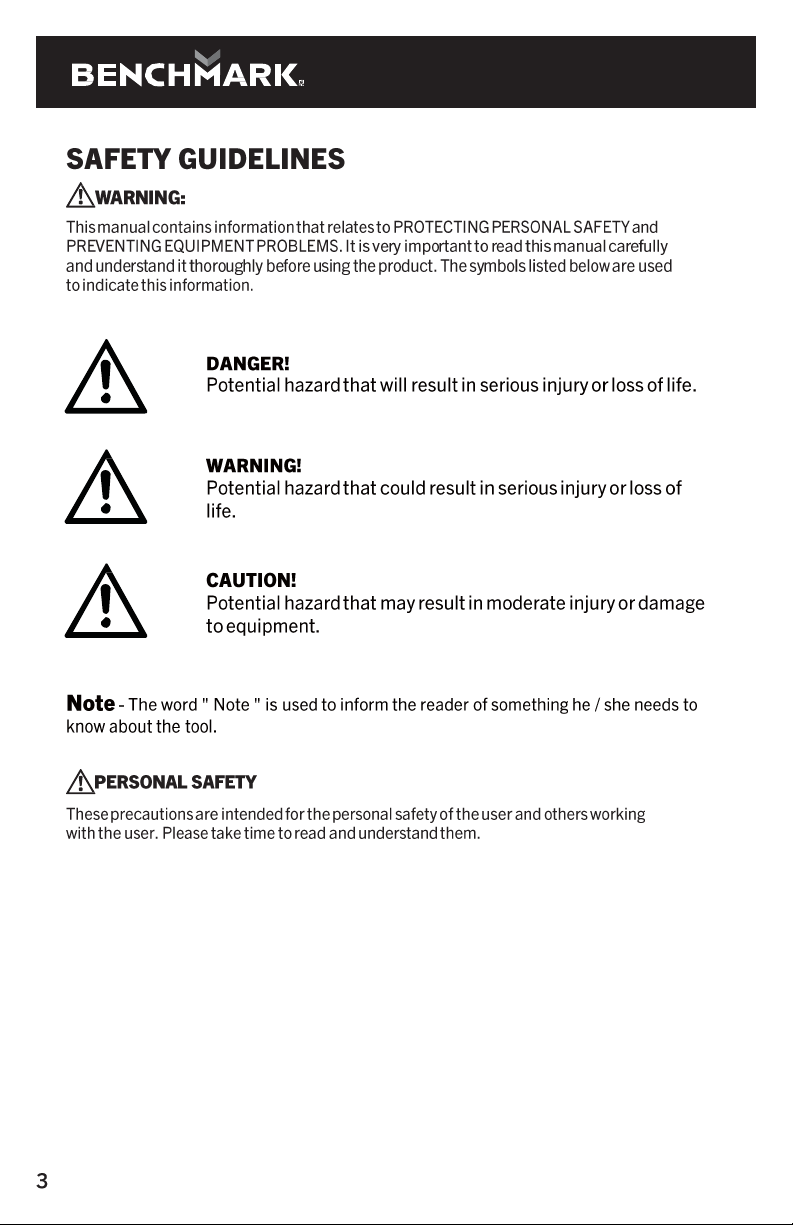
SYMBOL MEANING
6
Recycle unwanted materials rather than disposing of them as waste. Sort the tools,
hoses, and packaging in specific categories and take to the local recycling center or
dispose of in an environmentally safe way.
SYMBOLS
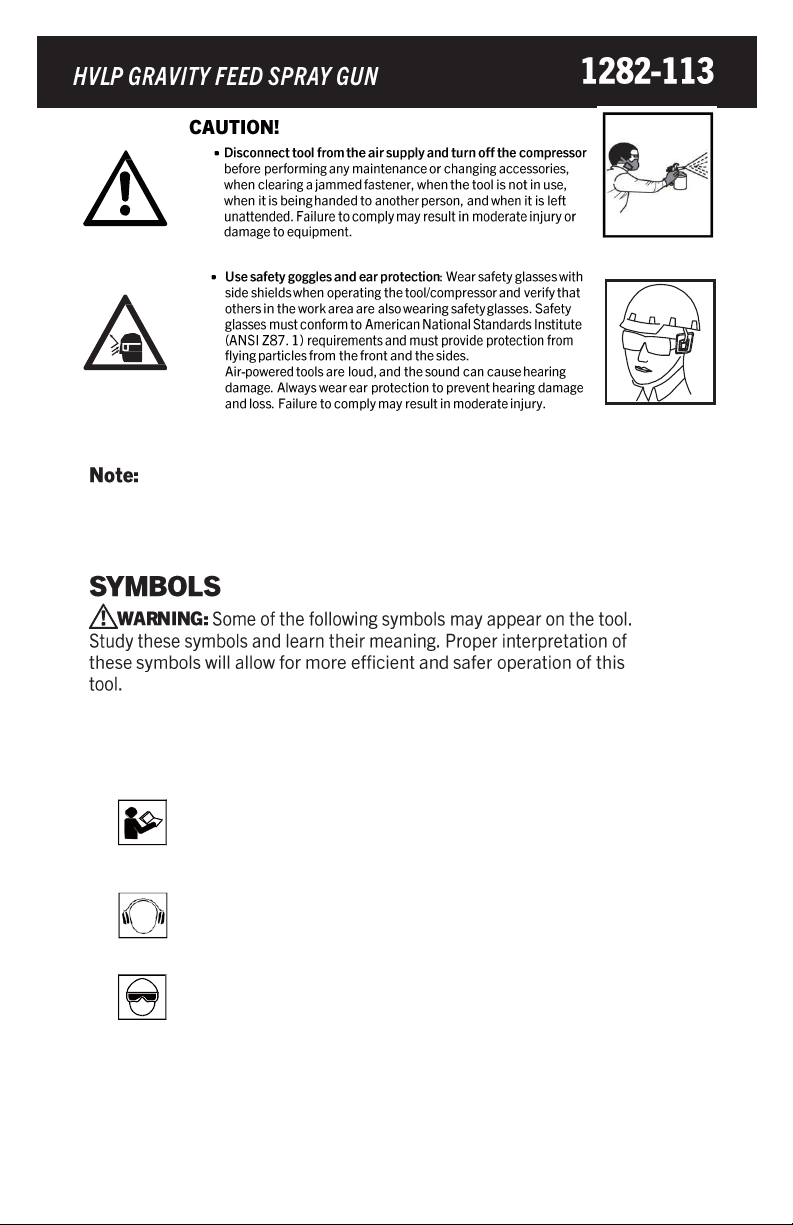
Read operator s manual: To reduce the risk of injury,
user must read and understand operator’s manual
before using this product.
Eye protection: Always wear safety goggles, safety
glasses with side shields, or a full-face shield when
operating this product.
Risk to hearing Always wear ear prptection
when using this tool ,failure to do so may result
in hearing loss.

7
Use safety respirator: Toxic vapors produced by spraying certain
materials can cause serious damage to health.
Always wear safety gloves and a respirator to prevent hazards caused by
inhaling toxic vapor or contact of solvent and paint with eyes or skin.
Failure to comply may result in moderate injury.
Ensure proper tool operation before painting. Before painting, inspect to
ensure free movement of the trigger and nozzle.
Check the tightness of screws before operating the tool. Before operating
the tool, make sure all the screws and caps are securely tightened to
prevent leakage.
Keep the work area clean. A cluttered or dirty workbench may lead to an
accident. Floors should be kept clear.
Handling and storage of paint: Use with adequate ventilation. Avoid
contact of paint with eyes, skin, and clothing. Avoid breathing spray
or mist. Store in a tightly closed container in a cool, dry, well-
ventilated area free from incompatible substances.
Disconnect the spray gun from the air supply hose and turn off the
compressor before performing any maintenance when the tool is not in
use, when it is being handed to another person, and when it is left
unattended. It is recommended to use a ball valve in the gun to air
supply for emergency stoppage and to prevent unintended
operation
8

9

10
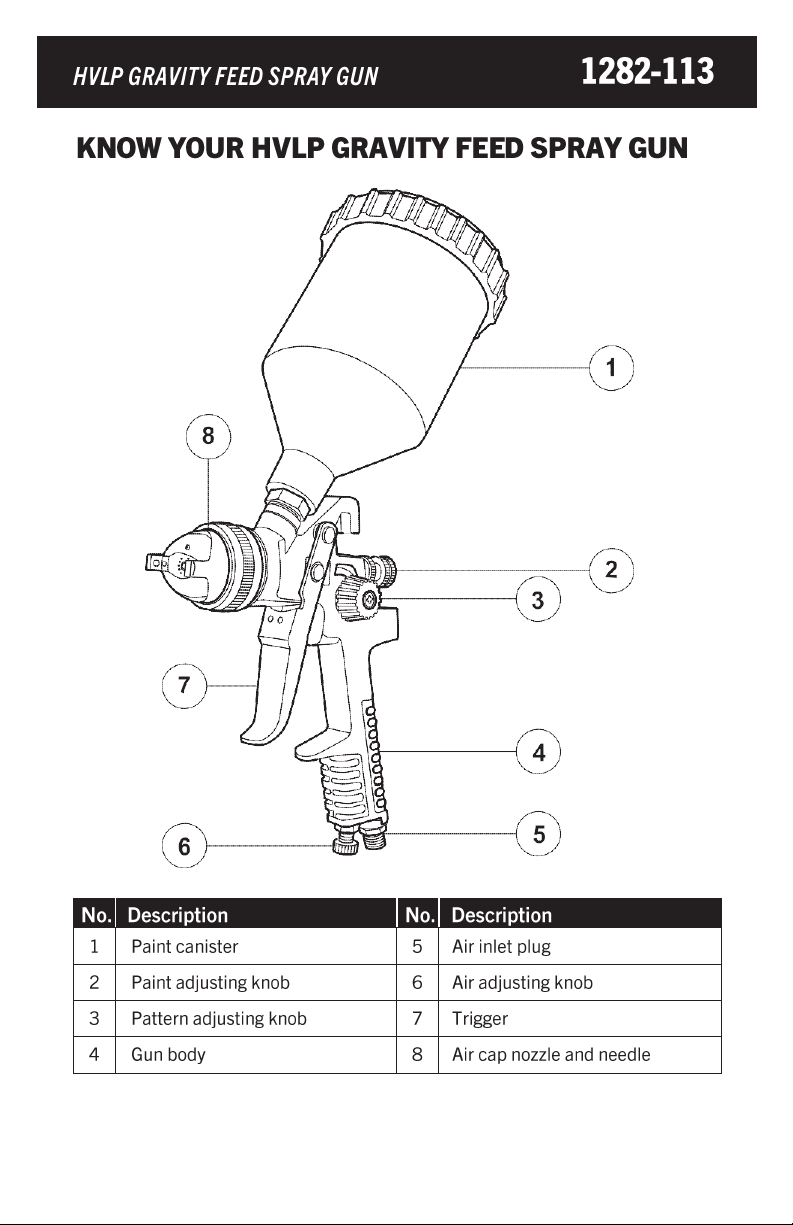
2 5 7
3 3 8
1 9
6
4
Keep hands and other parts of the body away from the work areas when connecting the tool
to the air supply. Failure to comply could lead to serious injury or loss of life.
It is recommended that a filter-regulator-lubricator be used and be located as close to the tool
as possible.
If a filter-regulator-lubricator is not installed, place 2 to 3 drops of oil into the air inlet
plug before each use.
If a filter-regulator-lubricator is installed, keep the air filter clean. A dirty filter will reduce the
air pressure to the tool, which will cause a reduction in power, efficiency, and general
performance.
For optimal performance, install a quick connector to the tool and a quick coupler on the
hose, if applicable.
Verify that all connections in the air supply system are sealed in order to
prevent air from leaking. Failure to comply may result in moderate injury or
damage to equipment.
Read all safety guidelines (see section "Safety guidelines”) at the beginning of this manual.
Always inspect the air tool prior to each use to
-
ensure proper use of power source.
-
determine whether the tool is in proper working order.
Clean the air inlet in the filter weekly.
Line pressure should be increased to compensate for unusually long air hoses. The hose
diameter should be 1/4" or 3/8”.
Do not use the tool if it is not in proper working order.
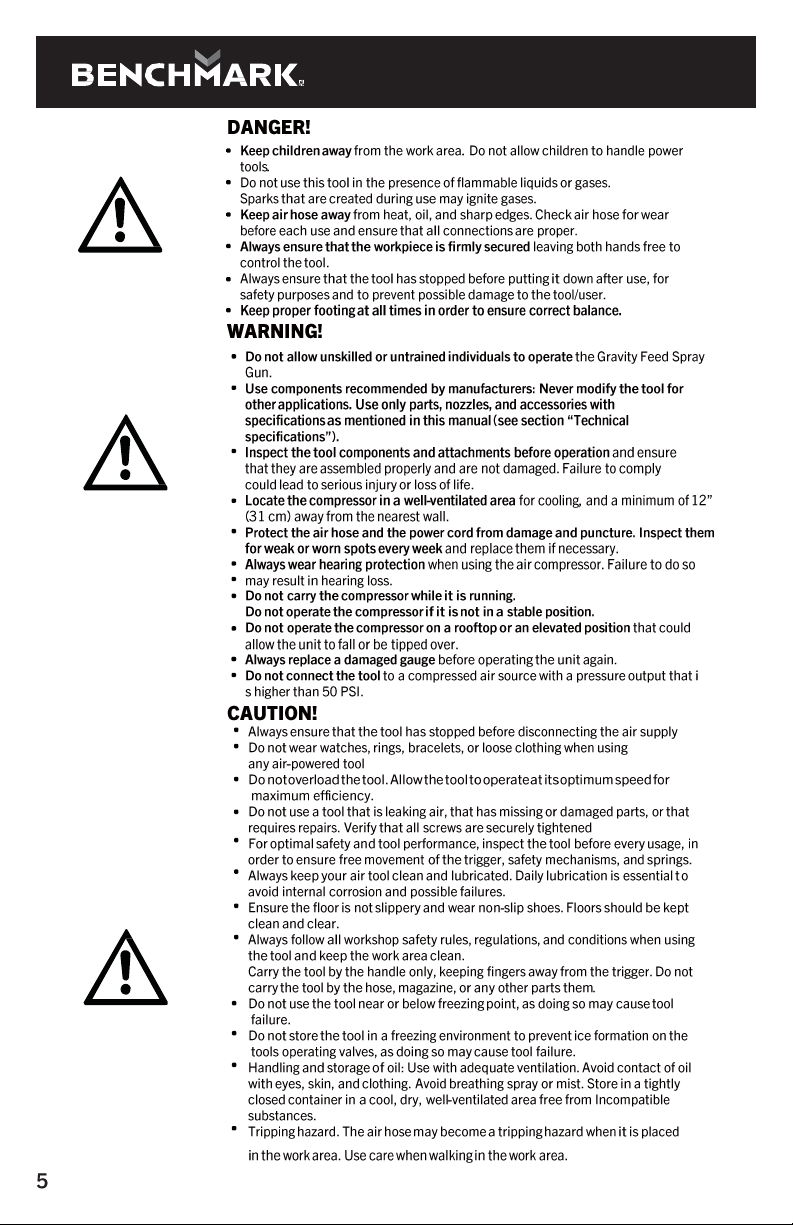
Do not use oxygen or any other combustible or bottled gas to power this tool.
Do not use this tool in the presence of any flammable liquids or gases.
Keep hose away from heat, oil, and sharp edges. Check hose for wear and
tear, ensure that all connections are secure. Failure to comply could lead to
serious injury or loss of life.
Mixing and thinning of paint should be performed in accordance with the paint
manufacturer’s instructions. Most materials readily spray if thinning is properly
performed.
Do not exceed the thinning recommendations of the paint manufacturer.
Failure to comply may result in moderate injury or damage to equipment.

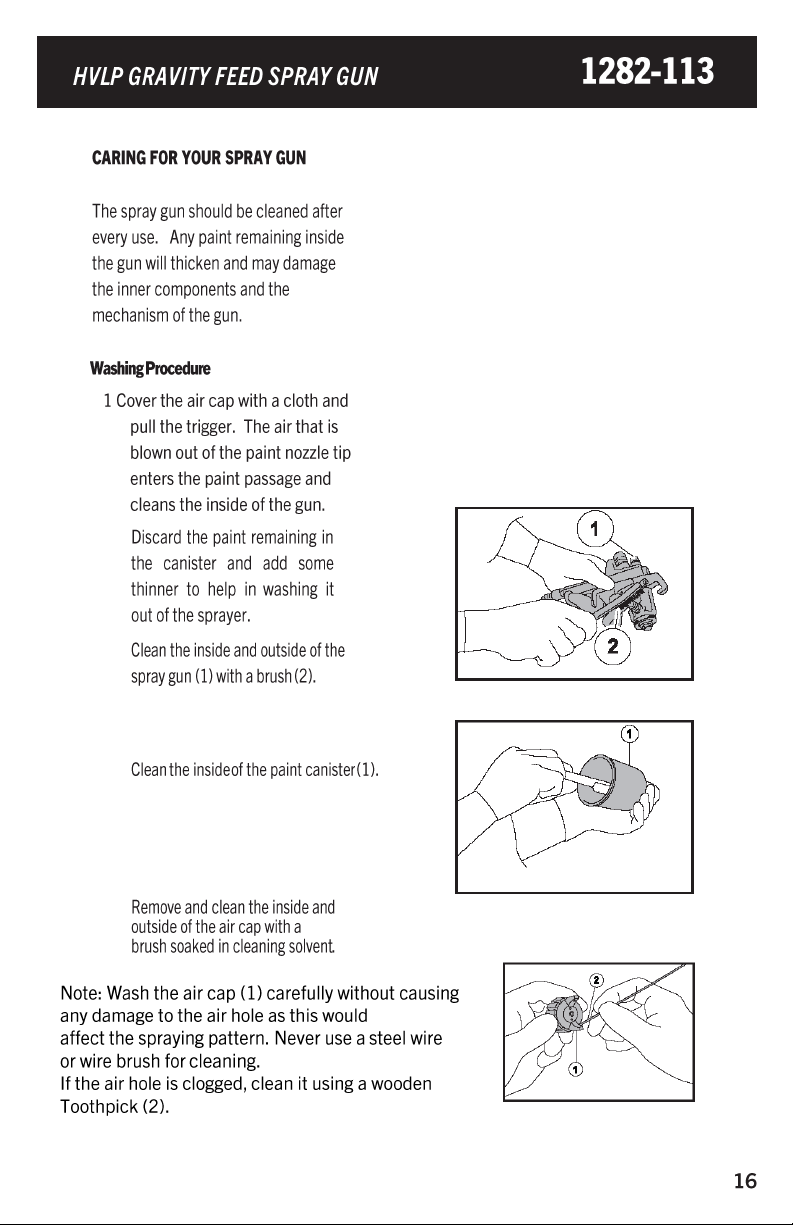
1 . Attach the empty canister ( 1 ) to the
spray gun by lining up the threads then
holding the gun stationary and twisting
the canister clockwise until snug
.
Note : Do not tighten the canister too much by
hand , as doing so may break the plastic
canister.
2 . Use the wrench provided and tighten the
nut ( 1 ) securely to ensure paint does not
leak.
3 . Pour paint through a strainer , cheese
cloth or paint strainer to remove any
foreign substances from the paint.
4
. Fill the canister three quarters full with
paint.
5 . Plug in compressor , turn it on set the
pressure regulator to 40PSI , attach one
end of the air hose to the compressor
and
the other end of the air hose to the
spray
gun . The spray gun is now ready
for use.
6 . After connecting the spray gun to the air
supply , ensure the fluid cap , canister ,
and air hose are tightly connected to the
Air-powered Gravity-feed Spray Gun.

7. Use a piece of cardboard
or other scrap material as a
target for trial spraying and
adjust for desired spray
pattern.
8. Test the consistency of the
paint by making a few strokes
on a cardboard target. If the
stroke appears to be very
thick, add a small amount of
thinner.

1 . Plug in compressor , turn it on , set the
pressure regulator to 40 PSI , attach one
end of the air hose to the compressor
and
the other end of the air hose ( 1 ) to
the air tool
.
2
. Hold the gun ( 1 ) so that the nozzle is
approximately 6 " to 12’’ from the work
surface , perpendicular to the spraying
area.
Note : Do some practice sprays to check and
adjust the spray pattern and gun set up , using
a spare surface ( scrap piece of metal ).
3 . Squeeze the trigger ( 1 ) of the spray gun
( 2 ) . Start moving the gun before pressing
the trigger and release the trigger before
stopping the gun movement at the end
of each stroke . This procedure will blend
each stroke with the next without
overlap or unevenness
.
4 . Move the gun ( 1 ) at a constant pace in a
back and forth parallel direction .
maintaining a uniform distance from
the surface to be painted
.
5 . Repeat the strokes until a uniform
coating is formed.
note: Use a piece of cardboard as a shield to
capture the loss of spray paint at the ends of
the wprkpiece to protect the other surfaces
from being painted.
The speed of stroke,the distance from
work surface, and the adjustment of
paint adjusting knob vary the amount of
paint being applied.

Do’s
DONT’S
Always move the gun in parallel direction
.
1 . Uniform coating region
2 . Stroke starting position
3 . Trigger pressing position
4 . Trigger releasing position
5 . Stroke stopping position
6 . Gun movement path
Do not press the trigger with the gun at an
inclined or angled position.
Do not stop the sprayer movement in between
strokes, as this will cause a build-up of paint
and result in runs.
1 . Improper / thin coating region
2 . Uniform / thick coating region
:
Two thin coats of paint, rather than one thick layer,will yield better results and have lesser
chance of runs.
Do not stop the sprayer movement in between,which will cause a build-up of
paint and result in runs .
Do not fan the gun while painting . This will cause a build-up of paint in the
centre of the stroke and an insufficient coating at the ends . Failure to comply
may result in moderate moderate injury or damage to equipment.
Rotate the paint adjusting knob in a counter-clockwise direction and open the knob
when the gun is not in use. This will reduce spring tension on the needie fluid tip.
Clean the Air-powered Gravity-feed Spray Gun thoroughly and silghtly lubricate it,
after the and before storage.
2.
3.
4.
5.

Lubrication: If the tool and the
compressor are not equipped with an in-
line lubrication system, place fill 2to3
drops of pneumatic tool oil into the air
inlet before each use or after every
two
hours of continuous use, depending on
the characteristics of the workpiec
18
If any of the following symptoms appear while the tool is in use, turn it off
and disconnect it from the air supply immediately. Failure to comply will
lead to serious injury or loss of life.
Disconnect the tool from the air supply before making any adjustments.
Repairs must be performed by a qualified service technician only.
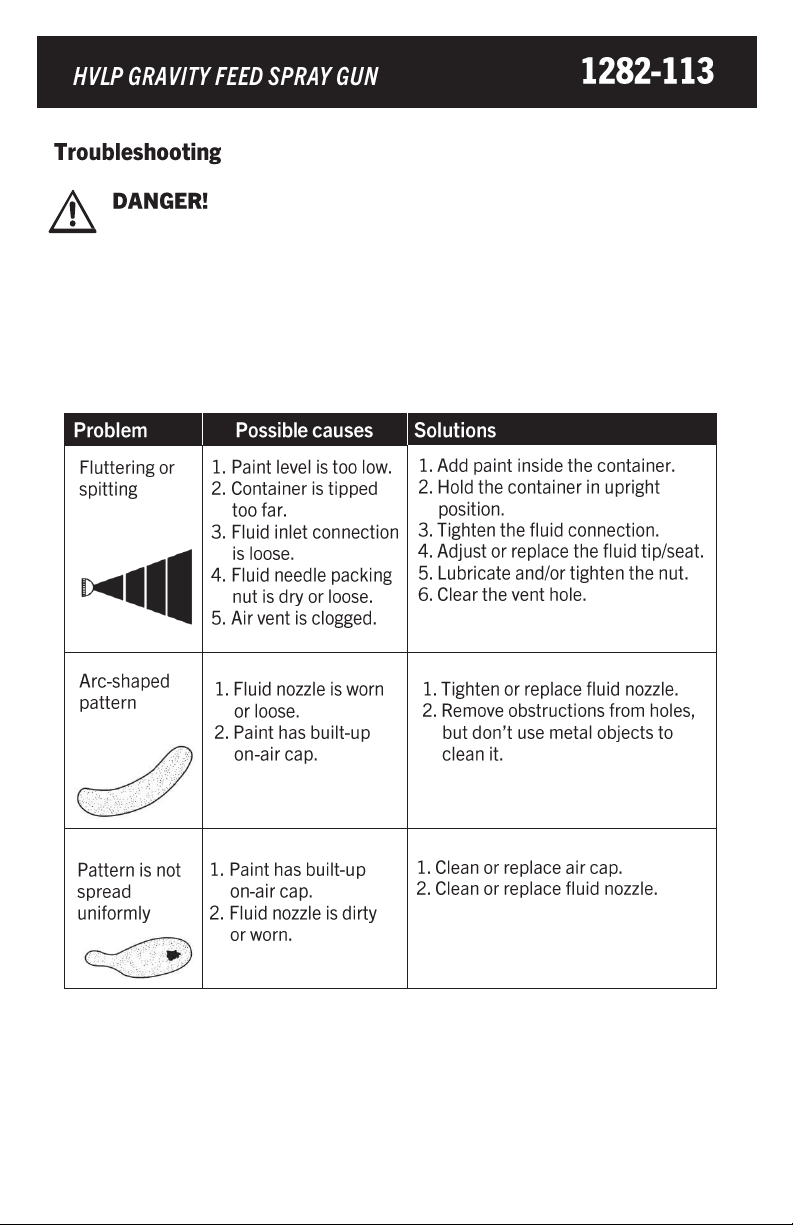
The following chart lists common issues and solutions. Please read it carefully and
follow all instructions carefully.

Other Benchmark Paint Sprayer manuals


Popular Paint Sprayer manuals by other brands

WAGNER
WAGNER WOOD&METAL EXTRA GRAVITY FEED manual

Parkside
Parkside PFS 400 A1 Translation of the original instructions

C.A. Technologies
C.A. Technologies CPR quick guide

MedPro
MedPro assura 007-710 instruction manual

Enduraplas
Enduraplas IceMaster Systems Liquid Master W Series owner's manual

Smithco
Smithco 300G255 Parts & Service


