Billy Goat PW30AOV User manual

PW30AOV Owner’s Manual
Part No 210500 1Form No F021816A
PRESSURE WASHER Owner's Manual
PW30AOV
Beginning Serial #: 021816001
Replacement Parts
This pressure washer is rated in accordance to the Pressure Washer Manufacturers Association (PWMA) standard
PW101-2010 (Testing and Rating Performance of Pressure Washers).
Original Instructions
IMPORTANT- READ CAREFULLY BEFORE USE AND KEEP FOR FUTURE REFERENCE
Hose
Replacement high pressure
hose to connect the pump
to the spray gun.
P/N 80012618
Nozzle Tips
Replacement quick
connect tips for spray
gun.
P/N 210600
Spray Gun
Replacement spray gun.
P/N 80016529
Wand
Replacement wand for
spray gun.
P/N 80013797

PW30AOV Owner’s Manual
Part No 210500 Form No F021816A
2
CONTENTS
SPECIFICATIONS AND INTENDED USE 3
INSTRUCTION LABELS 4
SAFETY INFORMATION AND SAFETY INSTRUCTIONS 4-7
PACKING CHECKLIST & ASSEMBLY 8-10
OPERATION 10-13
MAINTENANCE AND TROUBLE SHOOTING 14-16
WARRANTY INFORMATION 16
ILLUSTRATED PARTS & PARTS LIST 17

PW30AOV Owner’s Manual
Part No 210500 Form No F021816A
3
SPECIFICATIONS
PW30AOV
Engine: cc
205cc
Engine:
VANGUARD
Engine: Fuel Capacity
3.5 qt. (3.3 L)
Engine: Oil Capacity
0.63 qt. (0.6 L)
Total Unit Weight:
88# (40Kg)
Length
40.” (1.3m)
Width
20”( .5m)
Height
23” (.6m)
Max. operating slope
15o
INTENDED USE
EQUIPMENT DESCRIPTION
This pressure washer operates at a maximum of 3,000 PSI (206 BAR) at a flow rate of up to 3.0 gallons (11.3 liters) per minute.
This high quality commercial system features 10 in. (25.4 cm) wheels, Triplex pump with stainless steel pistons, automatic cool
down system, detergent siphoning system, quick connect spray tips, heavy duty 50 ft. (15.2 m) hose, andmore.
Every effort has been made to ensure that information in this manual is accurate and current. However, we reserve the right to
change, alter, or otherwise improve the product and this document at any time withoutprior notice.
The Emission Control System for this pressurewasher is warranted for standards set by the Environmental Protection Agency
and the California Air Resources Board.
DO NOT OPERATE IF EXCESSIVE VIBRATION OCCURS! If excessive vibration occurs, shut engine
off immediately and check for damage or loose engine
HANDLING & TRANSPORTING
Always use two or more people to lift these machines. Lift holding on either side of the machine, using the handles and the
frame. Secure in place during transportation. See specifications for unit weight.
For safety use gloves when lifting.
Never lift any machine while the engine is running.

PW30AOV Owner’s Manual
Part No 210500 Form No F021816A
4
SAFETY SYMBOLS AND SAFETY INSTRUCTIONS
SAFETY SYMBOLS
Operator’s manual Toxic Fumes Electrical shock Slippery Surface Fall Fluid injection Fire
Explosion Kickback Projectile Moving Parts Flying Objects Chemical Burn Hot Surface
SAFETY INSTRUCTIONS
WARNING Chemical Burn Hazard.
Chemicals could cause burns resulting in death or seriousinjury.
•
DO NOT use caustic liquid with pressure washer.
•
Use ONLY pressure washer safe detergents/soaps. Followallmanufacturers’ instructions.
The safety alert symbol indicates a potential personal injury hazard. A signal word (DANGER, WARNING, orCAUTION) is
used with the alert symbol to designate a degree or level of hazardseriousness. A safety symbol may be used to represent the
type of hazard. The signal word NOTE is used to address practices not related to personalinjury.
DANGER indicates a hazard which, if not avoided, will result in death or serious injury.
WARNING indicates a hazard which, if not avoided, could result in death or serious injury.
CAUTION indicates a hazard which, if notavoided, could result in minor or moderate injury.
NOTE address practices not related topersonal injury.
WARNING The engine exhaust from this product contains chemicals known to the Stateof California to cause cancer, birth
defects, or other reproductive harm.
WARNING This product contains lead and lead compounds, known to the State of California to cause birth defects or
other reproductiveharm. Wash your hands after handling thisproduct.
WARNING POISONOUS GAS HAZARD
Engine exhaust contains carbonmonoxide, a poisonous gas that could kill you in minutes. You CANNOT smell it, see it,or
taste it. Even if you do not smell exhaust fumes, you could still be exposed to carbon monoxidegas. Some chemicals or
detergents could be harmfulif inhaled or ingested, resulting in death, serious injury, nausea, fainting orpoisoning.
•
Operate this product ONLY outside far away from windows, doors and vents to reduce the risk of carbon
monoxide gas from accumulating and potentially being drawn towards occupiedspaces.
•
Install battery-operated carbon monoxide alarms or plug-in carbon monoxide alarms with battery back-up
accordingto themanufacturer’s instructions. Smoke alarms cannot detect carbon monoxide gas.
•
DO NOT run this product inside homes, garages, basements, crawlspaces, sheds, or other partially-
enclosed spaces even if using fans or opening doors and windows for ventilation. Carbon monoxide
can quickly build up in these spaces and can linger for hours, even after this product has shut off.
•
ALWAYS place this product downwind and point the engine exhaust away from occupied spaces.
If you start to feel sick, dizzy, or weak while using this product, get to fresh air RIGHT AWAY. See a doctor.
You may have carbon monoxide poisoning.
•
Use a respirator or mask whenever there is a chance that vapors may be inhaled when using chemicals.
Read all instructions with mask so you are certain the mask will provide the necessary protection against
inhalingharmfulvapors whenusingchemicals.
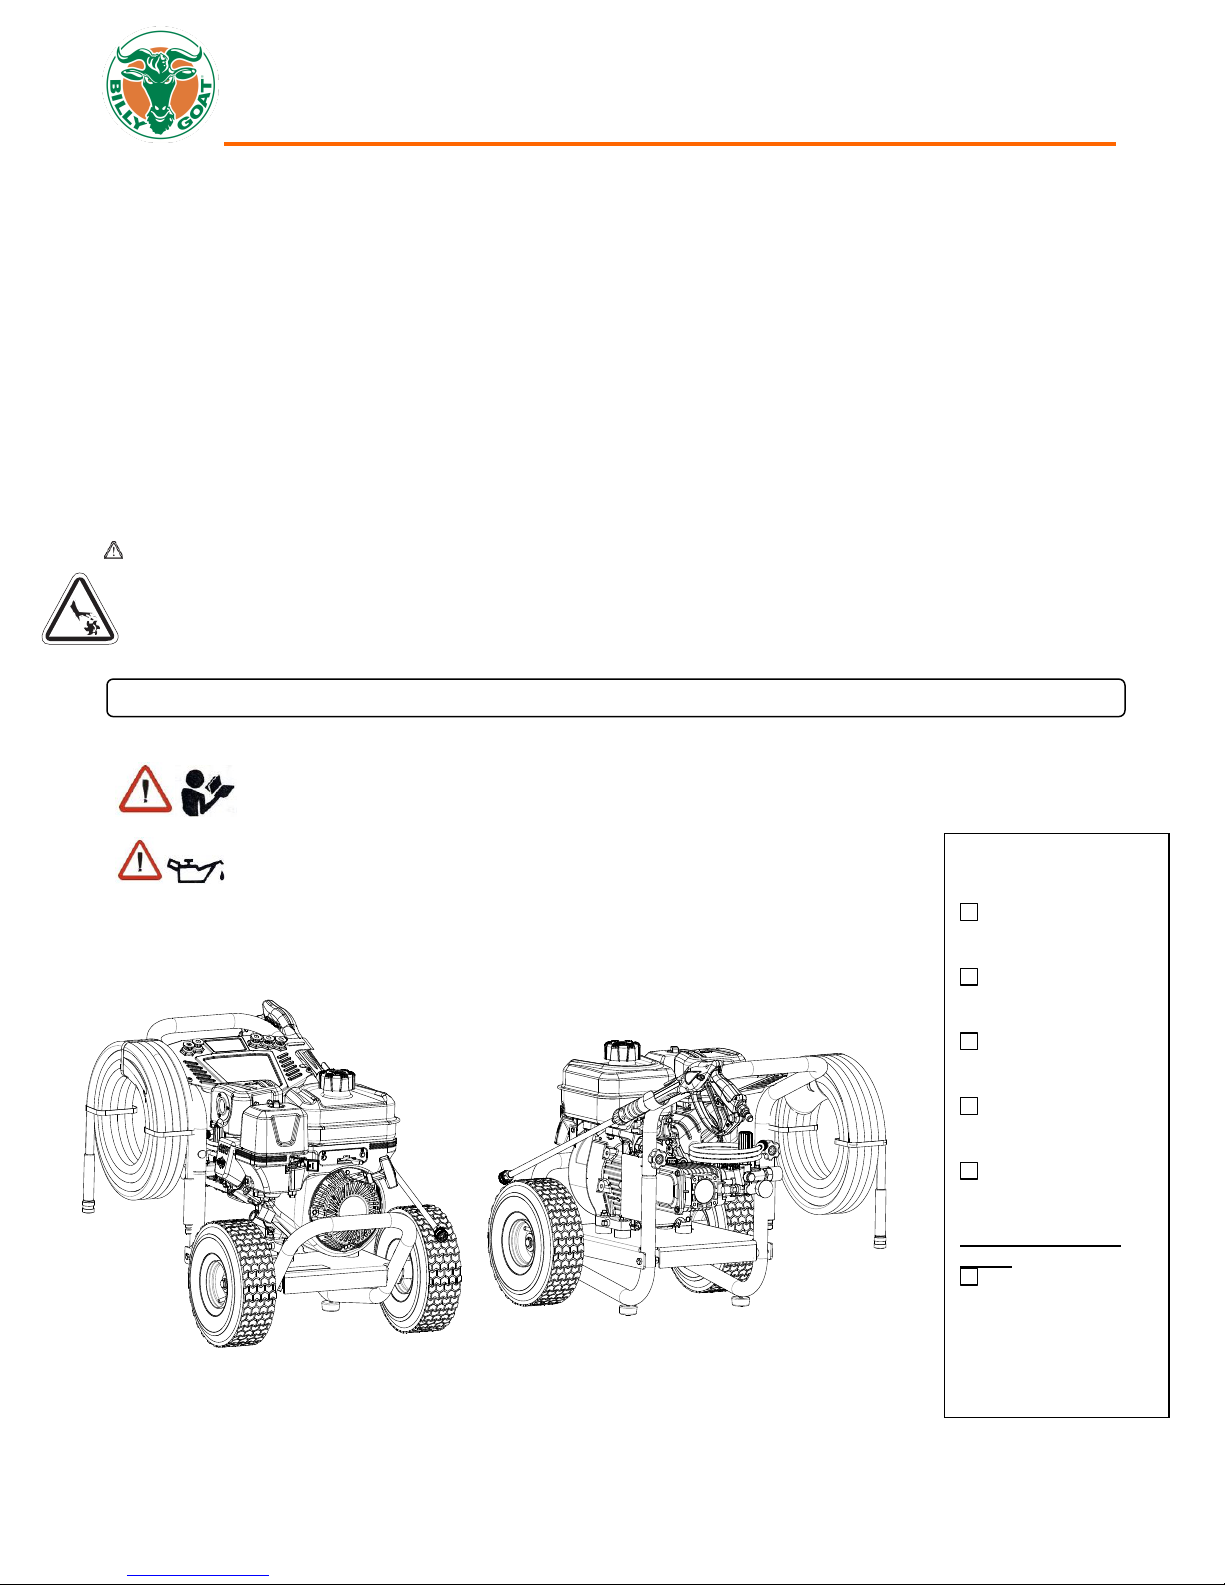
WARNING Starter cord kickback (rapid retraction) will pull hand andarm toward engine faster than you can let go which could
cause broken bones,fractures, bruises, or sprains resulting in serious injury.
•
NEVERpull starter cord without first relieving spray gun pressure.
•
When starting engine, pullcord slowly until resistance is felt and then pull rapidly to avoid kickback.
•
After each starting attempt, where engine fails to run, always point spray gun in safe direction, press red button and squeeze
spray gun trigger to release high pressure.
•
Firmly grasp spray gun with both hands when using high pressure spray to avoid injury when spray gun kicks back.

PW30AOV Owner’s Manual
Part No 210500 Form No F021816A
5
WARNING Exhaust heat / gases could ignite combustibles,structuresordamage fuel tank causing a fire, resulting in deathor
seriousinjury.
Contact with muffler area could causeburns resulting in seriousinjury.
•
DO NOT touch hot parts and AVOID hot exhaust gases.
•
Allow equipment to cool beforetouching.
•
Keep at least 5 ft. (1.5 m) of clearance on all sides of pressure washer includingoverhead.
•
It is a violation of California Public Resource Code, Section 4442, to use or operate the engine on any forest- covered, brush-
covered, or grass-covered land unless the exhaust system is equipped with a spark arrester, as defined in Section 4442,
maintained in effective working order. Other states or federal jurisdictions may have similar laws.
Contact the original equipment manufacturer,retailer, or dealer to obtain a spark arrester designed for the exhaust system
installed on this engine.
•
Replacement parts must be the same and installed in the same position as the originalparts.
WARNING Fuel and its vapors are extremely flammable and explosive which could cause burns, fire or explosion resulting
in death or seriousinjury.
WHEN ADDING OR DRAINING FUEL
•
Turn pressure washer engine OFF and let it cool at least 2 minutes before removing fuel cap. Loosen cap slowlyto relieve
pressurein tank.
•
Fill or drain fuel tank outdoors.
•
DO NOT overfill tank. Allow space for fuel expansion.
•
If fuel spills, wait until itevaporates before starting engine.
•
Keep fuel away from sparks, open flames, pilot lights, heat, and other ignition sources.
•
Check fuel lines, tank, cap andfittings frequently for cracks orleaks. Replace if necessary.
•
DO NOT light a cigarette or smoke.
WHEN STARTING EQUIPMENT
•
Ensuresparkplug,muffler,fuelcap,andaircleanerarein place.
•
DO NOT crank engine with spark plug removed.
WHEN OPERATING EQUIPMENT
•
DO NOT operate this product inside any building, carport, porch,mobile equipment, marine applications, or enclosure.
•
DO NOT tip engine or equipment at angle which causes fuel tospill.
•
DO NOT spray flammable liquids.
WHEN TRANSPORTING, MOVING OR REPAIRING EQUIPMENT
•
Transport/move/repair withfueltank EMPTYor with fuel shutoff valve OFF (0).
•
DO NOT tip engine or equipment at angle which causes fuel tospill.
•
Disconnect spark plugwire.
WHEN STORING FUEL OR EQUIPMENT WITH FUEL IN TANK
•
Store awayfrom furnaces, stoves, waterheaters,clothes dryers, or other appliances that have pilot light or other ignition
source because they could ignite fuel vapors.
WARNING The engine exhaust from this product contains chemicals known to the Stateof California to cause cancer, birth
defects, or other reproductive harm.
WARNING This product contains lead and lead compounds, known to the State of California to cause birth defects or other
reproductiveharm. Wash your hands after handling thisproduct.
SAFETY INSTRUCTIONS CONTINUED
WARNING Use of pressure washer could create puddles and slippery surfaces causing you to fall resulting indeathorserious
injury. Kickback from spray gun could cause you tofall resultingindeathorseriousinjury.
•
Operate pressure washer from a stable surface.
•
The cleaning area should have adequate slopes and drainage to reduce the possibility of a fall due to slippery surfaces.
•
Be extremely careful ifyou must use the pressure washer from a ladder, scaffolding, or any other similar location.
•
Firmly grasp spray gun with both hands when using high pressure spray to avoid injury when spray gun kicks back.

PW30AOV Owner’s Manual
Part No 210500 Form No F021816A
6
SAFETY INSTRUCTIONS CONTINUED
WARNING Risk of electrocution.
Contact with power source could cause electric shockor burn resulting in deathor seriousinjury.
•
NEVERspraynearpowersource.
WARNING Risk of eye or bodilyinjury.
Spray could splash back or propel objects resulting in seriousinjury.
•
Always wear indirect vented (chemical splash) safety goggles marked to comply with ANSI Z87.1 when using or in vicinity of
this equipment.
•
NEVER substitute safetyglasses ordry-condition goggles for indirect vented safety goggles.
•
Always wear protective clothing such as a long-sleeved shirt, long pants and close-toedshoes.
•
NEVER operate pressure washer when barefoot or wearing sandals orshorts.
CAUTION Excessively high operating speeds could result in minorinjury.
Excessively low speeds impose a heavyload.
•
DO NOT tamper with governor spring, links or other parts to increase engine speed. Pressure washer supplies
correct rated pressure and flow when running at governed speed.
•
DO NOT modify pressure washer in any way.
NOTE: High pressure spray could damage fragile items includingglass.
•
DO NOT point spray gun at glass when using red (0°) spray tip.
•
NEVERaim spray gun atplants.
WARNING The high pressure stream ofwater that this equipment produces could cut through skin and its underlying
tissues, resulting in serious injury andpossible amputation.
Spray gun traps high water pressure, even when engine is stopped and water is disconnected,which could result in serious
injury.
•
If cut by fluid, call physician immediately. DO NOT treat as a simplecut.
•
DO NOTallow CHILDREN to operate pressure washer.
•
NEVERrepairhigh pressure hose.Replace it.
•
NEVER repair leaking connections with sealant ofany kind. Replace o-ring or seal.
•
NEVER connect high pressurehose to nozzle extension.
•
Keep high pressure hose connected to pump and spray gun while system is pressurized.
•
ALWAYS point spray gun in safe direction, press red button and squeeze spray gun trigger to release high pressure,
every time you stop engine.
•
NEVERaim spray gun at people, animals, orplants.
•
DO NOT secure spray gun in open position.
•
DO NOT leave spray gun unattended while machine is running.
•
NEVER use a spray gun which does not have a trigger lock ortrigger guard in place and in working order.
•
Always be certainspraygun, nozzles and accessories are correctlyattached.
WARNING Unintentional sparking could cause fire or electric shock resulting in death or seriousinjury.
WHEN ADJUSTING OR MAKING REPAIRS TO YOUR PRESSURE WASHER
•
Disconnect the spark plug wire from thespark plug and place the wire where it cannot contact spark plug.
WHEN TESTING FOR ENGINE SPARK
•
Use approved spark plug tester.
•
DO NOT check for spark with spark plug removed.

PW30AOV Owner’s Manual
Part No 210500 Form No F021816A
7
SAFETY INSTRUCTIONS CONTINUED
PACKING CHECKLIST
Your Billy Goat pressure washer is shipped from the factory in one carton, final assembly will be required before use.
PUT OIL IN ENGINE BEFORE STARTING
Read entire operator’s manual before you attempt to assemble or operate your new pressure washer.
TAKE CAUTION when removing the unit from the box.
Boxing Parts
Checklist
Owner’s Manual
P/N-210500
High Pressure
Hose P/N- 80012618
Spray Gun P/N-
80016529
Wand P/N-
80013797
Oil Pouch P/N-
317999
Engine Manual Per
Model
Vanguard
PARTS BAG & LITERATURE ASSY
Warranty card P/N- 400972, Owner’s Manual P/N-210500, Quick Setup Literature P/N-210501
NOTE: Improper treatment of pressurewasher could damage it and shorten itslife.
If you have questions about intended use, ask dealer or contact qualified service center.
NEVER operate units with broken ormissing parts, or without protective housingorcovers.
DO NOT by-pass any safety device on this machine.
•
DO NOT tamper with governed speed.
•
DO NOT operate pressure washer above rated pressure
•
DO NOT modify pressure washer in any way.
Before starting pressure washer in cold weather, check all parts of the equipment to be sure ice has not formed
there.
NEVER move machine by pulling on hoses. Use handle provided onunit.
•
This equipment is designed to be used with Billy Goat Industries authorized parts ONLY. If equipment is used with parts that
DO NOT comply with minimum specifications, user assumes all risks and liabilities
WARNING Starter and other rotating parts could entangle hands, hair, clothing,or accessories resulting in seriousinjury.
•
NEVERoperate pressurewasherwithoutprotective housing orcovers.
•
DO NOT wear loose clothing, jewelry or anything that could be caught in the starter or other rotating parts.
•
Tie up longhair and remove jewelry.

PW30AOV Owner’s Manual
Part No 210500 Form No F021816A
8
ASSEMBLY
ASSEMBLY CONTINUED
LUBRICATE O-RINGS
LUBRICATING O-RINGS
Lubrication of o-rings is extremely important for installation and operation. The use of a lubricant (petroleum or synthetic grease)
during assembly helps seat o-rings properly and provides an improved seal. It also helps protect the o-ring from damage by
abrasion, pinching or cutting and extends the life of the o-ring.
NOTE: ALWAYS apply a small amount of lubricant on o-rings prior to assembling the garden hose to the pump inlet (A),
high pressure hose to pump outlet (B), high pressure hose (C), spray gun (D), and nozzle extension (E).
Lubricate all connections shown below (Fig. 5), following these instructions:
1. Inspect and clean connecting surfaces priorto lubrication andassembly.
2. Use lubricants sparingly during assembly; a light film is all that isrequired.
3. Use a small brush or cotton swab to applygrease directly to o-rings where they are not accessible (QC fitting, M22 fitting).
1. Verifyoil dipstick(A) hasbeen installedintopump. (See Fig. 1)
2. Place handle (B) onto handle supports (C) connected to main unit. Make
sure holes in handle align with holes on handlesupports. (See Fig. 2)
3. Insert handle carriage bolts (D) through holesfrom inside of unit and attach a
plastic knob (E) from outside of unit. Tighten byhand. (See Fig. 3 next page)
4. Add oil to enginecrankcase.
5. Add fuel to fuel tank.
6. Connect high pressure hose to spray gunand pump (See Lubricating O-
Rings Section).
7. Connect water supply to pump.
8. Attach nozzle extension to spray gun (See Lubricating O-Rings Section).
9. Select/attach quick connect spray tip tonozzle extension.
Fig. 1
Fig. 2
Fig. 3

PW30AOV Owner’s Manual
Part No 210500 Form No F021816A
9
Connect Hose and Water Supply to Pump
NOTE:Using a One Way Valve (vacuum breaker or check valve) at pump inlet could cause pump or inlet connector
damage.
NOTE: DO NOT siphon standing water for thewater supply. Use ONLY cold water (less than 100°F(38°C)).
•
There MUST be at least 10 ft. (3 m) of unrestricted garden hose between the pressure washer inlet and any
device, such as a vacuum breaker or check valve.
•
Damage to equipment resulting from failure to follow this instruction willvoid warranty.
WARNING The high pressure stream of water that this equipment produces could cut through skin and its underlying tissues,
resulting in serious injury and possible amputation.
NEVER connect high pressure hose to nozzle extension.
Keep high pressure hose connected to pump and spray gun while system is pressurized.
Always be certain spray gun, nozzles and accessories are correctly attached
Fig. 5
NOTE: DO NOT run the pump without thewater supply connected and turned on. Damage to
equipment resulting from failure to followthis instructionwill voidwarranty.
1. Uncoil high pressure hose and attach quick connect end of hose to base of spray gun. Pull
down on collar of quick connect, slide onto spray gun and let go of collar. Tug on hose to
be sure of tight connection.
2. Similarly, attach other end of high pressure hose to high pressure outlet (B) on pump (See
Fig. 5). Pull down on collar of quick connect, slide onto pump and let go of collar. Pull on
hose to be sure of tight connection.
3. Before connecting garden hose to water inlet, inspect inlet screen (A) (See Fig. 5). Clean
screen if itcontains debris or have it replaced if damaged. DO NOT run pressure washer if
inlet screen is damaged.
4. Run water through your garden hose for 30 seconds to clean out any debris.
5. Connect the garden hose (not to exceed 50 ft. (15 m) in length) to the water inlet. Tighten
by hand.
6. Turn ON the water, press red button (C) onthe gun and squeeze the trigger to purge the
pump systemofairandimpurities. (See Fig. 7)
Fig. 6
Fig. 7

PW30AOV Owner’s Manual
Part No 210500 Form No F021816A
10
OPERATION
CONTROLS
Automatic Cool Down System (Thermal Relief)
If you run the engine on your pressure washer for 3‑5 minutes without pressing the trigger on the spray gun, circulating water in
the pump can reach temperatures above 125°-155°F (51°-68°C). The system engages to cool the pump by discharging the
warm water onto the ground.
A - Spray Gun —Controls the application of water onto cleaning
surface with trigger device.Includes trigger lock.
B - High Pressure Hose —Connect one end to water pump and
the other end to spraygun.
C - Spray Tips —Detergent, 0°, 15°, 25° and 40°: for various
high pressure cleaningapplications.
D - Warning/Operating Instructions Tag —Identifies hazards
andproperproceduretostart/stoppressure washer.
E - Air Filter —Protects engine by filtering dust and debris out
of intakeair.
F - Choke Lever —Prepares a cold engine for starting.
G - FuelValve—Usedtoturnfuelsupplyon/offtoengine.
H - Throttle Lever —Sets engine in starting mode for recoil
starter and stops a runningengine.
J - Recoil Starter—Usedforstartingtheenginemanually.
K - Oil Fill/Dipstick —Check and add engine oil here.
L - Nozzle Extension with Quick Connect —Allows you to
switch between five different spraytips
M - Automatic Cool Down System —Cycles water through
pump when water reaches 125°-155°F (51°-68°C). Warm
water will discharge frompump onto ground. This system
prevents internal pump damage.
N - Water Inlet —Connection for garden hose.
P - Detergent Siphoning Tube/Filter —Use to siphon
pressurewashersafedetergent intothelow
pressure
stream.
Q - Identification Label —Provides model and serial
number of pressure washer. Please have these readily
available if calling for assistance.
R - High Pressure Outlet —Connection for high pressure
hose.
S - Pump —Develops highpressure.
T - Pressure Control Knob —Varies pressure of high
pressure spray.
U - Fuel Tank —Fill tank with regular unleadedfuel. Always
leave room for fuelexpansion.

PW30AOV Owner’s Manual
Part No 210500 Form No F021816A
11
STARTING ENGINE
See engine manufacturer’s instructions for type and amount of oil and gasoline used.
Engine must be level when checking and filling oil and gasoline.
1. Place pressure washer near an outside water source capable of supplying water
at a flow rate greater than 3.5 gallons (13.25 liters) per minute and no less than
20 PSI (1.4 BAR) at pressure washer end of garden hose. DO NOT siphon
supply water.
2. Check that high pressure hose is tightly connected to spray gun
and pump. SeeAssembly section.
3. Make sure unit is in a level position.
4. Connect garden hose to water inlet onpressure washer pump.
NOTE: DO NOT run the pump without thewater supply connected and turned on.
Damage to equipment resulting from failure to followthis instructionwillvoid
warranty.
5. Turn ON the water, press red button on spray gun and squeeze the trigger to
purge the pump system ofairandimpurities.
Attachnozzleextensiontospraygun. Tightenby hand. (See Fig. 8)
6.
Choose spray tip you want to use, pull back on collar of nozzle extension, insert
spray tip and release collar. Tug on spray tip to make sure it is securely in place.
See How to Use SprayTips. (See Fig. 9)
7.
Move fuel shut-off valve (A) to ON (I)position. (See Fig. 10)
8.
Move throttle control lever (B) to FAST position, shown on engine as a rabbit.
9.
Move choke lever (C) to CHOKE position.
NOTE: For a warm engine, be sure the choke lever is in the RUN position.
NOTE: Before starting the pressure washer, be sure you are wearing safety
goggles as described below.
10.
When starting engine, position yourself as recommended in Fig. 11, grasp
starter grip handle and pull slowly until you feel some resistance. Then pull
rapidly to start engine.
11.
Return starter grip handle slowly. DO NOT let rope “snap back” against starter.
12.
When engine starts, slowly move choke lever to RUN position, as engine
warms. If engine falters, move choke lever to CHOKE position, then to RUN
position.
13.
After each starting attempt, where engine fails to run, always point gun in safe
direction, press red button and squeeze spray gun trigger to release high
pressure. Move choke lever to RUN position, and repeat steps 11 through 13.
14.
If engine fails to start after six pulls, move choke lever to RUN position, and
repeat steps 11 through 13.
NOTE: Always keep the throttle lever in the FAST position when operating the
pressure washer.
If your unit fails to start, check trouble shooting section in operator’s manual and also see engine
manual. NOTE: Honda engines are equipped with a low oil sensor to prevent engine damage. When it senses a low oil
condition (i.e. unit is operating or sitting on a steep slope) the engine shuts down. The low oil condition must be corrected
before the engine can be restarted. See the engine owner’s manual for more information.
Fig. 11
Fig. 10
Fig. 9
Fig. 8

PW30AOV Owner’s Manual
Part No 210500 Form No F021816A
12
HOW TO STOP YOUR PRESSURE WASHER
1. Release spray gun trigger and let engine idle for two minutes.
2. Move throttle control lever on engineto SLOW position, then STOP (0)
position.
3. Move fuel shut-off valve to OFF (0)position.
4. ALWAYS point spray gun in a safe direction, press red button and
squeeze spray gun triggerto release retained high waterpressure.
HOW TO STORE ACCESSORIES
The unit is equipped with multiple places to store your spray gun, nozzle
extension, and high pressure hose and spray tips.
1. Place spray gun into spray gun holder wireform as shown. (See Fig. 12)
2. Place nozzle extension into metal spring clips on side of unit asshown.
3. Coilhighpressurehoseontohookonbackofhandle.
4. Insert multi–colored spray tips in spaces provided on handle.
HOW TO USE SPRAY TIPS (See Fig. 13)
The quick–connect on the nozzle extension allows you to switch between five different quick connect spray tips. Spray tips can
be changed while pressure washer is running once spray gun trigger is locked. The spray tips vary the spray pattern asshown.
Follow these instructions to change spray tips:
1. Pull back collar on quick–connect and pull current spray tip off. Store spray tips in holder provided on the handle.
2.Select desired spray tip:
•For delicate rinse, for gentle cleaning of cars/trucks, boats, RV’s, patio furniture, lawn equipment, etc., select white 40°
or green 25° spray tip.
•For general rinsing, ideal for most all-purpose cleaning such as home siding, brick patios, wood decks, driveways and
sidewalks, garage floors, etc., select yellow 15° spray tip.
•For maximum rinsing, for stubborn or hard to reach surface such as second story surfaces, paint removal, oil stains,
rust removal or other stubborn substances (tar, gum, grease, wax, etc.), select red 0° spray tip.
•To apply detergent, applies project specific cleaners to help break down stubborn dirt and grime on a variety of
surfaces, select pink detergent spray tip.
3.Pull back on collar, insert new spray tip and release collar. Tug on spray tip to make sure it is securely in place.
Usage Tips
For most effective cleaning, keep spray tip from 8 -24 inches (20 - 61 cm) away from cleaning surface.
If you get spray tip too close, especially using a high pressure spray tip, you may damage surface being cleaned.
DO NOT get closer than 6 in. (15 cm) when cleaning tires.
Fig. 13
Fig. 12
Low Pressure
Use to apply
detergent
High
Pressure
Pink
White 400
3400 PSI
2.5 GPM
Green 250
3400 PSI
2.5 GPM
Yellow 150
3400 PSI
2.5 GPM
Red 00
3600 PSI
2.4 GPM

PW30AOV Owner’s Manual
Part No 210500 Form No F021816A
13
CLEANING AND APPLYING DETERGENT
To apply detergent, follow these steps:
1.
Review use of spraytips.
2.
Prepare detergent solution as required byjob.
3.
Place small filter end of detergent siphoningtube into detergent container.
NOTE: Make sure the filter is fully submerged in detergent while applyingdetergent.
NOTE: Contact with the hot muffler could damage detergent siphoning tube.
When inserting the siphon into a detergent solution bottle, route the tube so as to keep it from inadvertently contacting the
hotmuffler.
4. Make sure pink detergent spray tip isinstalled.
NOTE: Detergent cannot be applied with the high pressure spray tips (White, Green, Yellow orRed).
5. Make sure garden hose is connected to water inlet. Check that high pressure hose isconnected to spray gun and pump.
Turn onwater.
NOTE: You must attach all hoses before youstart theengine.
Starting the engine without all the hoses connectedand without the water turned ON could damage the pump.
Damage to equipment resulting from failure to follow this instruction willvoid warranty.
6. Start engine following instructions “How to Start Your PressureWasher”.
7. Apply detergent to a dry surface, starting atlower portion of area to be washed and work upward, using long, even,
overlappingstrokes.
8. Allow detergent to “soak in” for 3-5 minutes before washing and rinsing. Reapply asneeded to prevent surface from
drying. DO NOT allow detergent to dry on (preventsstreaking).
NOTE: You must flush the detergent siphoning system after each use by placing the filter into abucket of clean water, then
run the pressure washer in low pressure for 1-2minutes.
PRESSURE WASHER RINSING
For Rinsing:
1. Remove pink detergent spray tip from nozzle extension.
2. Select and install desired high pressure spray tip following instructions “How to
Use Spray Tips”.
3. Keep spray gun a safe distance from area you plan to spray.
4. Increase (decrease) spray pressure by turning pressure control knob (A) clockwise (counterclockwise). Use lower
pressure to wash items such as a car or boat. Use higher pressure to strip paint and degrease driveways. (See Fig. 14)
5. Apply a high pressure spray to a small area and then check surface for damage. If no damage is found, you can
assume it is okay to continue rinsing.
6. Start at top of area to be rinsed, working down with same overlapping strokes as you used for cleaning.
CLEANING DETERGENT SIPHONING TUBE
If you used the detergent siphoning tube, you must flush it with clean water before stopping theengine.
1. Place detergent siphoning tube/filter in abucket full of cleanwater.
2.
Remove high pressure spray tip fromnozzle extension.
3.
Select and install pink detergent spray tip following instructions “How to Use SprayTips”.
4.
Flush for 1-2minutes.
5.
Shut off engine following instructions “How toStop Pressure Washer”and turn off watersupply.
6.
ALWAYS point spray gun in a safe direction, press red button and squeeze spray gun triggerto release retained high water
pressure.
Fig. 14

PW30AOV Owner’s Manual
Part No 210500 Form No F021816A
14
MAINTENANCE
PERIODIC MAINTENANCE
Periodic maintenance should be performed at the following intervals:
Maintenance Operation
First 5 Hours
Every 10 Hrs
Every 50 Hrs or
Yearly
Change engine oil
Check high pressure hose
Check detergent siphoning/tube filter
Check spray gun and assembly for leaks
Clean debris
Check engine oil level
ENGINE MUST BE LEVEL WHEN CHECKING OR FILLING OIL
GENERAL RECOMMENDATIONS
Regular maintenance will improve the performance and extend the life of the pressure washer. See any qualified dealer for
service.
The pressure washer’s warranty does not cover items that have been subjected to operator abuse or negligence. To receive
full value from the warranty, the operator must maintain the pressure washer as instructed in this manual, including proper
storage as detailed in Winter Storage and Long Term Storage.
CLEAN DEBRIS
Daily or before use, clean accumulated debris from pressure washer. Keep linkage, spring and controls clean. Keep area
around and behind muffler free from any combustible debris. Inspect cooling air slots and openings on the pressure washer.
These openings must be kept clean and unobstructed.
Pressure washer parts should be kept clean to reduce the risk of overheating and ignition of accumulated debris.
Use a damp cloth to wipe exterior surfaces clean.
NOTE: Improper treatment of pressure washer could damage it and shorten its life.
DO NOT insert any objects through colling slots.
Use a soft bristle brush to loosen caked on dirt, oil, etc.
Use a vacuum cleaner to pick up loose dirt and debris.
Check and Clean Inlet Screen
Examine the screen on the pump’s water inlet. Clean it if the screen is clogged or replace it if screen is damaged.
PUMP OIL MAINTENANCE
Changing Pump Oil
NOTE: When changing pump oil, use only high quality SAE 30 weight oil. Use no special additives.
Change pump oil as follows:
1. Clean area around brass oil drain plug at bottom of pump.
2. Remove oil drain plug. Drain oil completely into an approved container.
3. When oil has completely drained, install oil drain plug and tighten firmly.
4. Clean area around pump oil dipstick. Remove dipstick and fill pump with recommended oil (approximately 12 oz. (0.35
liters)) to the point of overflowing.
5. Install pump oil dipstick.
6. Wipe up any spilled oil.

PW30AOV Owner’s Manual
Part No 210500 Form No F021816A
15
WINTER STORAGE
NOTE: You must protect your unit from freezing temperatures.
Failure to do so will permanently damage your pump and render your unit inoperable.
Freeze damage is not covered under warranty.
1.Follow steps 1-5 in the previous section After Each Use.
2.Use pump saver, Model 6039, to treat pump. This minimizes freeze damage and lubricates pistons and seals.
3.If pump saver is not available, connect a 3 ft. (1 m) section of garden hose to water inlet adapter. Pour RV-antifreeze
(antifreeze without alcohol) into hose. Pull recoil handle twice. Disconnect 3 ft. (1 m) hose.
4.Store unit in a clean, dry area.
LONG TERM STORAGE
If you do not plan to use the pressure washer for more than 30 days, you must prepare the engine and pump for long term
storage.
Protect Fuel System
Fuel Additive:
Fuel can become stale when stored over 30 days. Stale fuel causes acid and gum deposits to form in the fuel system or on
essential carburetor parts. To keep fuel fresh, use Briggs & Stratton® Advanced Formula Fuel Treatment & Stabilizer,
available wherever Briggs & Stratton genuine service parts are sold.
There is no need to drain gasoline from the engine if a fuel stabilizer is added according to instructions.
Run the engine for 2 minutes to circulate the stabilizer throughout the fuel system before storage.
If gasoline in the engine has not been treated with a fuel stabilizer, it must be drained into an approved container. Run the
engine until it stops from lack of fuel. The use of a fuel stabilizer in the storage container is recommended to maintain
freshness.
Storing the Engine
See the engine operator’s manual for instructions on how to properly prepare the engine for storage.
Protecting the Pump
To protect the pump from damage caused by mineral deposits or freezing, use PumpSaver, Model 6039, to treat pump. This
prevents freeze damage and lubricates pistons and seals.
NOTE: PumpSaver is available as an optional accessory. It is not included with the pressure washer. Contact the nearest
authorized service center to purchase PumpSaver.
NOTE: You must protect your unit from freezing temperatures.
Failure to do so will permanently damage your pump and render your unit inoperable.
Freeze damage is not covered under warranty.
To use PumpSaver, make sure the pressure washer is turned off and disconnected from supply water. Read and follow all
instructions and warnings given on the PumpSaver container.
Other Storage Tips
1. DO NOT store fuel from one season to another unless it has been treated as described in Protect Fuel System.
2.Replace fuel container if it starts to rust. Rust and/ or dirt in fuel can cause problems if it’s used with this unit.
3.Cover unit with a suitable protective cover that does not retain moisture.
4. Store unit in a clean and dry area.

PW30AOV Owner’s Manual
Part No 210500 Form No F021816A
16
TROUBLESHOOTING
WARRANTY INFORMATION
When servicing engine refer to specific manufacturer’s engine owner's manual. Engine warranty is covered by the specific
engine manufacturer. If your engine requires warranty or other repair work contact your local servicing engine dealer. When
contacting a dealer for service it is a good idea to have your engine model number available for reference (See table page 3). If
you cannot locate a servicing dealer in your area you can contact the manufacturer’s national service organization.
To reach:
Briggs and Stratton: 800-223-3723
WARRANTY CLAIM PROCEDURE
Should a BILLY GOAT ®machine fail due to a defect in material and/or workmanship, the owner should make a warranty claim
as follows:
The machine must be taken to the dealer from whom it was purchased or to an authorized Servicing BILLY GOAT
Dealer.
The owner must present the remaining half of the Warranty Registration Card, or, if this is not available, the invoice or
receipt.
The Warranty Claim will be completed by the authorized BILLY GOAT Dealer and submitted to their respective BILLY
GOAT Distributor for their territory Attention: Service Manager. Any parts replaced under warranty must be tagged and
retained for 90 days. The model number and serial number of the unit must be stated in the Warranty Claim.
The distributor service manager will sign off on the claim and submit it to BILLY GOAT for consideration.
The Technical Service Department at BILLY GOAT will study the claim and may request parts to be returned for
examination. BILLY GOAT will notify their conclusions to the distributor service manager from whom the claim was
received.
The decision by the Technical Service Department at BILLY GOAT to approve or reject a Warranty Claim is final and
binding.
For online product registration go to www.billygoat.com
Problem Possible Cause Solution
Pump has following problems:
failure to produce pressure,
erratic pressure, chattering,
loss of pressure, low water
volume
Low pressure spraytip installed. Water inlet is
blocked. Inadequate water supply. Inlet hose is
kinked or leaking. Clogged inlet hose screen.
Water supplyis over 100°F (38°C). High
pressure hose is blocked or leaks. Spraygun
leaks. Spraytip is obstruc
Replace with high pressure spraytip.
Clear inlet. Provide adequate water flow.
Straighten inlet hose, patch leak. Check
and clean inlet hose screen. Provide
cooler water supply. Clear blocks in outlet
hose. Replace spraygun. Clean spray tip.
Abnormal vibration Loose handle bolts. Loose engine bolts.
Stop work immediately.Tighten all loose
bolts and nuts.
Engine runs good at no-load
but "bogs" when load is added
Engine speed is too slow
Move throttle control to FASTposition. If
engine still "bogs down", contact local
service facility.
Engine will not start; starts and
runs rough, or shuts down
during operation
Low oil level. Dirtyair cleaner. Out of fuel. Stale
fuel. Spark plug wire not connected to spark
plug. Bad spark plug. Water in fuel. Flooded.
Fill crankcase to proper level. Clean or
replace air cleaner. Fill fuel tank. Drain
fuel tank; fill with fresh fuel. Connect wire
to spark plug. Wait 5 minutes and re-
crank engine.
Detergent fails to mixwith
spray
Detergent siphoning tube is not submerged.
Detergent siphoning tube is clogged or
cracked. High pressure spraytip installed.
Detergent siphoning check ball stuck.
Insert detergent siphoning tube into
detergent.Clean or replace detergent
siphoning tube. Replace with low
pressure spray tip. Free detergent
siphoning check ball.
Engine lacks power Dirtyair filter. Replace air filter.
For all other engine related trouble shooting problems contact the engine manufacturer or an authorized service dealer.

PW30AOV Owner’s Manual
Part No 210500 Form No F021816A
17
PW30AOV PARTS DRAWING
26
24
25
1
23
5
4
9
8
11
6
18
7
23
14
16
10
21 19
22
17
15
12 13
20
21
ITEMNO. DESCRIPTION PART NO. QTY
1 ENGINE VANGUARD 6.5 HP 210201 1
2 ALUM FRAME KIT (CONTAINS 3, 7,9,11, 14, 16, 19 20, 21, 22, AND 26) 210001 1
3 WHEEL (CONTAINS 22) 210607 2
4 GUN AL10 3800 80016529 1
5 WAND LOCKING QC STAINLESS 80013797 1
6 HOSE 3/8" X50' 4000 PSI BLACK 80012618 1
7 DASHBOARD BLACK REF 1
8 KIT NOZZLE PW30 210600 1
9 UPPER HANDLE PW30 REF 2
10 MOUNT VIBRATON RUBBER 21217 4
11 GROMMET REF REF
12 LABEL BILLBOARD PRODUCT PW30 210503 1
13 LABEL BILLBOARD LOGO 210502 1
14 KNOB REF 2
15 LABEL SPARK ARRESTOR EN/SP 100256 1
16 BOLT CARRIAGE REF REF
18 HOSE CHEM.350 OD X.250 ID 80006539 1
19 RUBBER BUMPER 210213 2
20 SCREW REF 4
21 NUT REF 8
22 RING RETAINING 5/8" 430226 2
23 PUMP HARDWARE KIT 210608 1
24 PUMP 3100@3.0 ANNOVI REC 3631A 316371 1
25 FILTER CHEMHOSE 80015793 1
26 SCREW REF 2

PW30AOV Owner’s Manual
Part No 210500 Form No F021816A
18
Limpiadora a presión Manual del Operario
PW30AOV
Inicio de serie #: 021816001
Piezas de repuesto
This pressure washer is rated in accordance to the Pressure Washer Manufacturers Association (PWMA) standard
PW101-2010 (Testing and Rating Performance of Pressure Washers).
instrucciones traducidas
IMPORTANTE: LEA CUIDADOSAMENTE ANTES DE USAR Y CONSERVE PARA FUTURAS
REFERENCIAS
Manguera
manguera de alta presión
de reemplazo
P/N 80012618
Punta de la boquilla
reemplazo de puntas de
conexión rápida.
P/N 210600
Pistola rociadora
pistola de pulverización de
reemplazo.
P/N 80016529
Wand
Wand de reemplazo
P/N 80013797

PW30AOV Owner’s Manual
Part No 210500 Form No F021816A
19
CONTENIDOS
ESPECIFICACIONES________________________________________________3
ETIQUETAS DE INSTRUCCIONES_____________________________________4
LISTA DE EMBALAJE Y MONTAJE _________________________________ 8-10
FUNCIONAMIENTO_____________________________________________ 10-13
MANTENIMIENTO ______________________________________________ 14-16
SOLUCIÓN DE PROBLEMAS Y GARANTÍA_____________________________16
LISTADO DE PIEZAS Y PIEZAS ILUSTRADAS __________________________17

PW30AOV Owner’s Manual
Part No 210500 Form No F021816A
20
ESPECIFICACIONES
PW30AOV
Engine: cc
205cc
Motor: cc
VANGUARD
Motor:
3.5 qt. (3.3 L)
Motor: Capacidad de combustible
0.63 qt. (0.6 L)
Motor: Capacidad de aceite
88# (40Kg)
Peso total de la unidad:
40.” (1.3m)
Longitud
20”( .5m)
Ancho
23” (.6m)
Altura
15o
Inclinación máxima de
funcionamiento
USO PREVISTO
Descripción del equipo
limpiadora a presión que funciona a el máximo de 206 BAR (3000 PSI) y un caudal de arriba a 11.3 litros (3.0 GPM) por minuto.
Este sistema residencial de alto poder y de alta calidad, posee una llanta de 25.4 cm (10 pulgadas), bomba triple con pistones
de acero inoxidable, sistema automático de refrigeración, sistema de inyección de detergente, prolongador de boquilla con
conector rápido, distintas puntas de rociado, una manguera de alta resistencia de 15.2 m (50 pies) y muchísimo más.
Se ha hecho cada esfuerzo posible para asegurarse que la información que aparece en este manual es exacta y se encuentra
actualizada. Sin embargo, nosotros se reserva el derecho a cambiar, alterar o de otra manera mejorar, el producto y este
documento en cualquier momento, sin previo aviso.
El Sistema de Control de Emisiones para este generador está garantizado para juegos estándares por la Agencia de Protección
Ambiental y el Consejo de recursos de aire de California.
¡ NO OPERE SI SE PRODUCE UNA VIBRACIÓN EXCESIVA! Si se produce una vibración excesiva,
apague el motor inmediatamente y compruebe que el motor no se haya aflojado.
MANEJO Y TRASLADO
Levante siempre estas máquinas entre dos o mas personas. Levántelas sosteniendo ambos lados de la máquina y, utilizando
las manijas y el armazón. Asegúrela en su lugar durante el traslado. Vea las especificaciones de peso de la unidad.
Por su seguridad, utilice guantes al levantarla.
Nunca levante ninguna máquina mientras el motor esté en funcionamiento.
Other manuals for PW30AOV
1
Table of contents
Languages:
Other Billy Goat Pressure Washer manuals
Popular Pressure Washer manuals by other brands

Kärcher
Kärcher G 2600 FCE Operator's manual

Rockworth
Rockworth AO680/1800 user manual

Briggs & Stratton
Briggs & Stratton 3000 MAX PSI Quick setup guide

Annovi Reverberi
Annovi Reverberi Blue Clean 777 - 787 - 797 owner's manual

Kärcher
Kärcher HD 10/15-4 F manual

Kärcher
Kärcher K 4 Premium operating instructions

IPC
IPC Atomax Series instruction manual

Kärcher
Kärcher K 2.97 M manual

Campbell Hausfeld
Campbell Hausfeld CAMPBELL PW167600AV Operating instructions and parts manual

Husky
Husky HU80215 Assembly guide

Kränzle
Kränzle Quadro 11/140 TST operating manual

Black & Decker
Black & Decker BXPW2100E Original instructions