Benchmark 18 L ASH VACUUM User manual

18 L ASH VACUUM
READ ALL INSTRUCTIONS BEFORE FIRST USE.
KEEP THIS MANUAL FOR FUTURE REFERENCE.
KEEP AWAY FROM CHILDREN.
WEAR CSA APPROVED
EYE PROTECTION
WEAR EAR
PROTECTION
WEAR A
FACE MASK
120V 60Hz 7.5Amp
5 Year Limited Warranty on tool

1
PRODUCT SPECIFICATIONS
18 L ASH VACUUM
Voltage 120V~ 60Hz
Rated Power 7.5A 6HP
Tank Capacity 18 L 4.7 Gallon
Hose Metal wire reinforced hose: 39.37" (1m)
3-1/4 Ft.; Aluminum tube: 9.06" (23cm);
Max Temp of Material Below 40℃(104 oF) If temp of the
vacuuming material exceeds this temp,
there is a risk of fire
Power Cord 10ft. (3m)
Replacement Cartridge Filter 1277-300
Weight 7.3lbs, ( 3.3kg)
NEED ASSISTANCE?
Call us on our toll-free customer support line:
1-866-349-8665 (Monday through Friday 9am – 5pm Eastern Standard Time)
• Technical questions
• Replacement parts
• Parts missing from package

2
18 L ASH VACUUM 1277-020
TABLE OF CONTENTS
Product Specifications .................................................................................. 1
Table of Contents .......................................................................................... 2
General Safety Warnings ............................................................................... 3
Safety Symbols ............................................................................................. 3
Specific Ash Vacuum Safety Instructions .................................................. 3 - 5
Know Your 18 L Ash Vacuum ......................................................................... 6
Assembly ...................................................................................................... 7
Electrical Info & Specifications ...................................................................... 7
Double Insulation .......................................................................................... 7
Extension Cords ............................................................................................ 7
Unpacking Your Vacuum ............................................................................... 8
Installing Hose & Aluminum Nozzle For Vacuuming Mode .............................. 8
Installing Hose & Aluminum Nozzle For Blower Mode ..................................... 8
Operation ...................................................................................................... 9
Maintenance ............................................................................................... 10
Exploded View ............................................................................................ 11
Parts List .................................................................................................... 12
Warranty ..................................................................................................... 13

3
GENERAL SAFETY WARNINGS
IMPORTANT SAFETY INSTRUCTIONS
Read and understand all safety and operational instructions. Failure to follow the
safety rules listed below and other basic safety precautions may result in serious
personal injury. Keep this manual, sales receipts, and applicable warranty forms
for future reference.
SAFETY SYMBOLS
The purpose of safety symbols is to alert you of the potential safety RISKS.
Recognize and understand them. Follow the instructions provided.
SYMBOL MEANING
Failure to obey a DANGER safety alert WILL result in serious personal
injury or death to you or to others. Always obey all messages following
this symbol to reduce the risk of serious personal injury or death.
Failure to obey a WARNING safety alert MAY result in serious personal
injury or death to you or to others. Always obey all messages following
this symbol to reduce the risk of potential serious personal injury or
death.
Failure to obey a CAUTION safety alert MAY result in personal injury
or property damage to you or to others. Always obey all messages
following this symbol to reduce the risk of personal injury or
property damage.
Failure to obey a NOTICE or a CAUTION (without a safety alert)
MAY result in property damage to you or to others. Always obey all
messages following this symbol to reduce the risk of property damage.
SPECIFIC ASH VACUUM SAFETY INSTRUCTIONS
Household Type
READ AND UNDERSTAND ALL INSTRUCTIONS BEFORE USING
THIS VACUUM.
Read and understand this operator’s manual and all labels on the Ash Vacuum
cleaner before operating. Safety is a combination of common sense, staying alert
and knowing how your vacuum works. Use this Ash Vacuum only as described in this
manual. To reduce the risk of personal injury or damage to your Ash Vacuum, use
only manufacturer recommended accessories. For Household Use Only.
WARNING: The temperature of the vacuuming material must be below 40°C
(104°F). If temperature of the vacuuming material exceeds 40°C (104°F), there
is a risk of fire.
CAUTION: Never use this product for vacuuming liquids. Only use this unit to
vacuumdry dust material!

4
SAVE THIS MANUAL
WARNING: For future reference. When using a vacuum, basic precautions
should always be followed including the following:
WARNING: To reduce the risk of fire, electric shock, or injury:
• Do not run vacuum unattended
• Do not use to pick up flammable or combustible liquids, such as gasoline,
or use in areas where they may be present.
• Do not vacuum, or use this Ash vacuum near flammable liquids, gases, or
explosive vapors like gasoline or other fuels, lighter fluids, cleaners, oil-based
paints, natural gas, hydrogen, or explosive dusts like coal dust, magnesium
dust, grain dust, or gun powder. Sparks inside the motor can ignite flammable
vapors or dust.
• To reduce the risk of health hazards from vapors or dusts, do not vacuum
toxic materials.
• Do not use or store near hazardous materials.
• Do not pick up anything that is burning or smoking, such as cigarettes, matches,
or hot ashes. Cold ash only.
• Do not expose to rain. Store indoors
• If vacuum is not working as it should, has been dropped, damaged, left outdoors,
or dropped into water, return it to a service center.
• Do not unplug by pulling on cord. To unplug, grasp the plug, not the cord.
• Do not use with damaged cord or plug.
• Do not pull or carry by cord, use cord as a handle, close a door on cord, or pull
cord around sharp edges or corners.
• Keep cord away from heated surfaces.
• Do not handle plug or vacuum with wet hands
• Do not use without filter in place
• Do not allow to be used as a toy. Close attention is necessary when used by
or near children.
• To reduce the risk of injury from accidental starting, unplug power cord before
changing or cleaning filter.
• Do not leave vacuum when plugged in. Unplug from outlet when not in use and
before servicing.
•
• Unplug before connecting or disconnecting hose, or any other accessories.
• Do not put any object into openings. Do not use with any opening blocked;
keep free of dust, lint, hair, and anything that may reduce air flow.
• Keep hair, loose clothing, fingers, and all parts of body away from openings
and moving parts.
18 L ASH VACUUM 1277-020

5
• Use extra care when cleaning on stairs
• Use only as described in this manual. Use only manufacturer’s
recommended attachments.
• This vacuum is provided with double insulation. Use only identical
replacement parts.
See DOUBLE INSULATION INSTRUCTIONS.
CAUTION: To reduce the risk of injury from moving parts - Unplug
before servicing.
WARNING: To reduce the risk of electric shock - Unplug before cleaning
or servicing.
DOUBLE INSULATION INSTRUCTIONS
This Ash Vacuum is double insulated, eliminating the need for a separate grounding
system. Use only identical replacement parts. Read the instructions for Servicing
Double Insulated Ash Vacuum before servicing. Use this Ash Vacuum as described
in this manual. Observe the following warnings for your Ash Vacuum.
DOUBLE INSULATED - GROUNDING NOT REQUIRED - WHEN SERVICING USE
ONLY IDENTICAL REPLACEMENT PARTS.
WARNING: To reduce the risk of electric shock -do not expose to rain.
Store indoors.
WARNING: For your own safety, read and understand operator’s manual.
Do not run unattended. Do not pick up hot ashes, coals, toxic, flammable or
other hazardous materials. Do not use around explosive liquids or vapors.
WARNING: Servicing of double insulated ash vacuum, two systems of
insulation are provided instead of grounding. No grounding means is provided
on a double insulated appliance, nor should a means for grounding be added.
Servicing a Double insulated ash vacuum requires extreme care and knowledge
of the System, and should be done only by qualified service personnel.
Replacement Parts for a double insulated ash vacuum must be identical to
the parts they Replace.
SAVE THIS USER MANUAL
WARNING: MISUSE or failure to follow the safety rules stated in this instruction
manual may cause serious personal injury.
6
18 L ASH VACUUM 1277-020
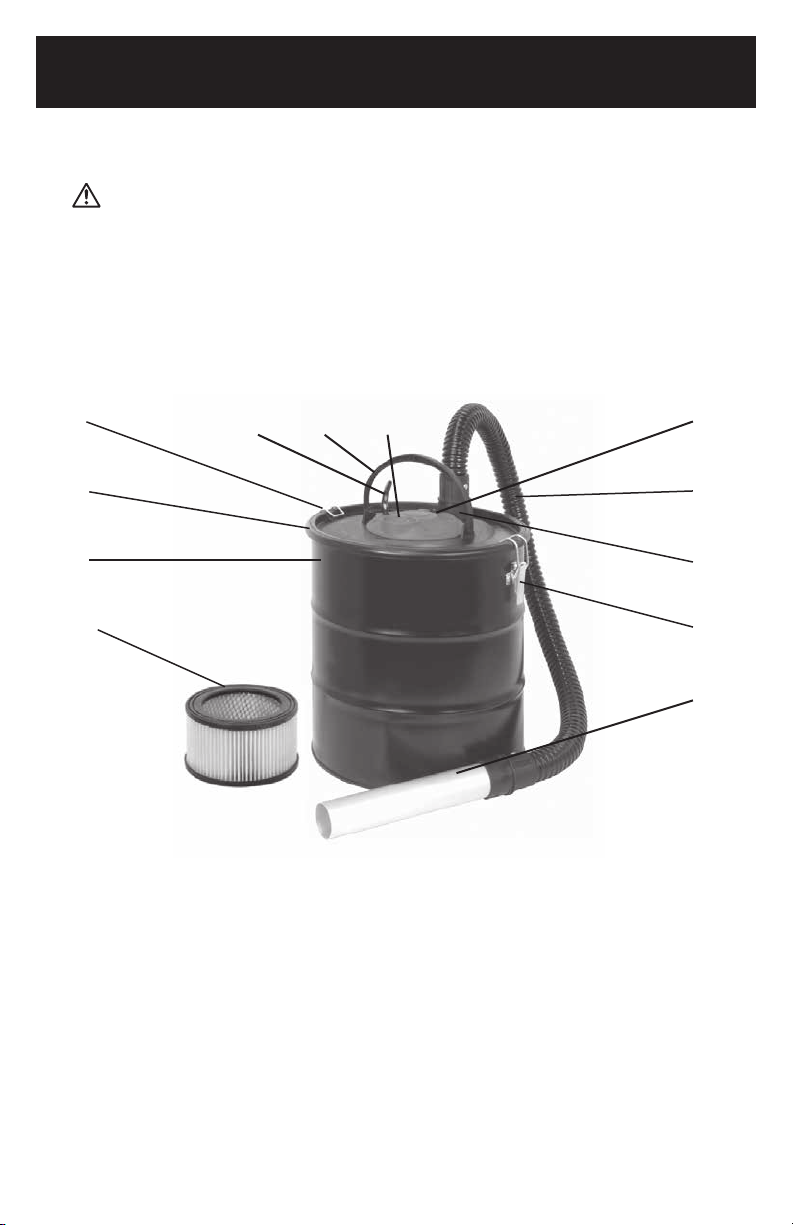
KNOW YOUR 18 L ASH VACUUM
WARNING: Before starting please read, understand, and apply the safety
instructions. Reminder: DO NOT vacuum hazardous substances.
FUNCTIONS
1. Tank 5. Carry Handle 9. Inlet Port
2. Cover/Motor Assembly 6. Blower Port 10. Aluminum nozzle
3. Cover Latch (2) 7. On/Off Switch 11. Cartridge filter
(installed inside tank)
4. Power Cord 8. Hose
7
8
9
3
10
3
2
1
11
4 5 6
7
ASSEMBLY
ATTENTION: Read the entire important safety information section at the
beginning of this manual Including all text under subheadings therein before set
up or use of this product.
ELECTRICAL INFO & SPECIFICATIONS
POWER SUPPLY- WARNING: Your vacuum must be connected to a 120v,
minimum 15-amp. Branch circuit. Failure to connect in this way can result in
injury from shock or fire.
DOUBLE INSULATION
Double insulated tools are equipped with a polarized two-prong plug (one blade
is wider than the other). This plug will fit in a polarized outlet only one way. If the
plug does not fit fully into the outlet, reverse the plug. If it still does not fit, contact
a qualified electrician to install a polarized outlet. Do not alter or change the plug
in any way. Double insulation eliminates the need for three wire grounded power
supply and grounded power cords.
120V OPERATION As received from the factory, your vacuum is ready to run for
120V operation. This vacuum is intended for use on a circuit that has an outlet and
a plug which looks like the one illustrated in Fig.1
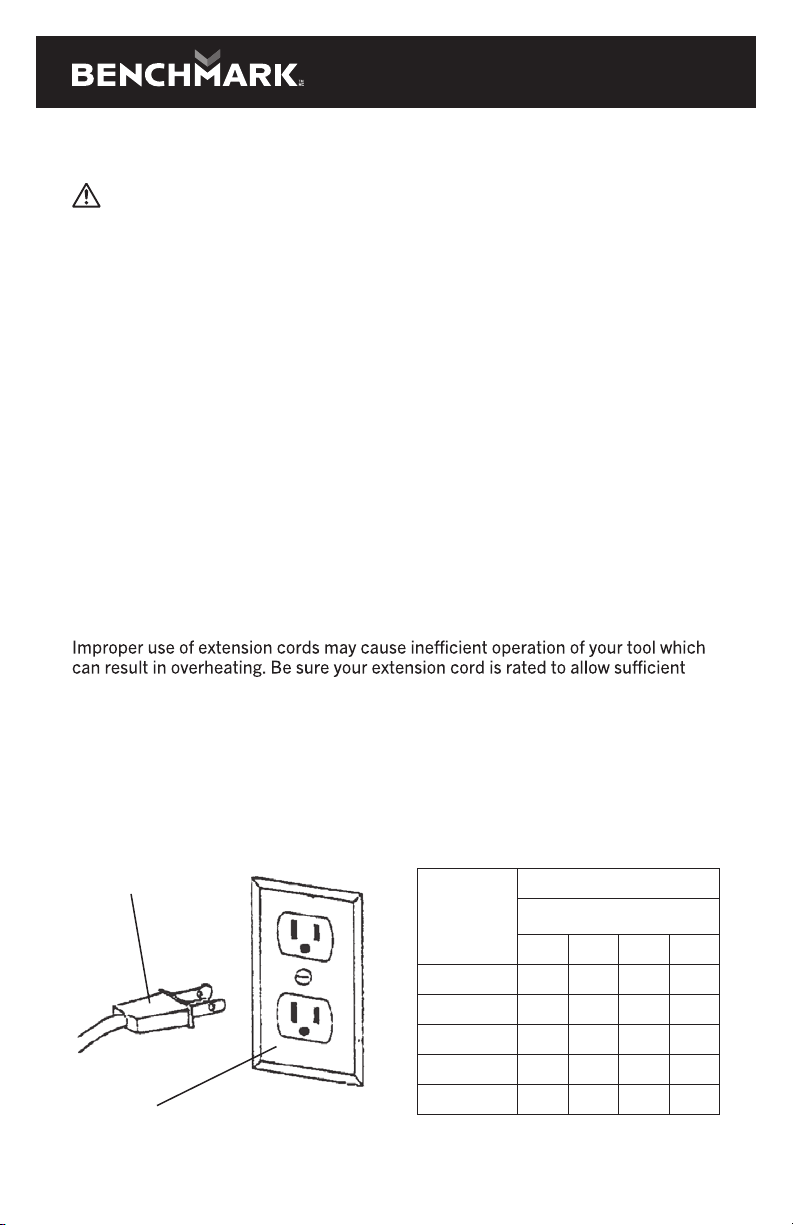
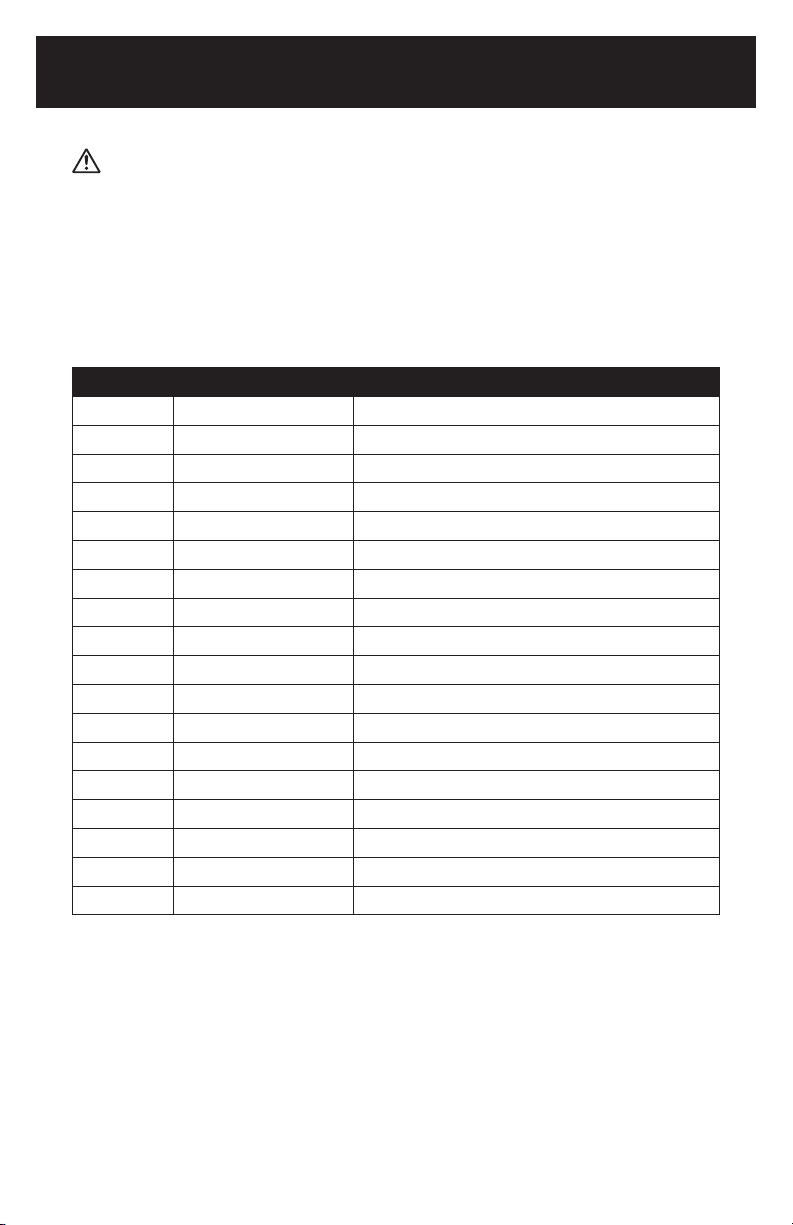
EXTENSION CORDS
current flow to the motor. If you are using the tool outdoors, use an extension cord
rated for outdoor use (signified by “SJW or SJTW” on the jacket). The extension
cord must have a minimum wire size depending on the amperage of the tool and
the length of the extension cord. This size is determined by its AWG (American Wire
Gauge) rating. The smaller the gauge, the greater the cable’s capacity. The amount
of cords used does not matter: Total length determines the minimum AWG rating.
Every cord must meet the AWG rating. Use the chart in Fig.2 to determine what
AWG rating is required for your situation.
Tool’s
Amperage
Rating
Cord Size in A.W.G.
Cord Length in Feet
25 50 100 150
3-6 18 16 16 14
6-8 18 16 14 12
8-10 18 16 14 12
10-12 18 16 14 12
12-16 14 12 - -
POLARIZED
PLUG
POLARIZED
OUTLET
FIG. 1 FIG. 2
8
18 L ASH VACUUM 1277-020
ATTENTION: The vacuum accessories
are packed inside the vacuum tank.
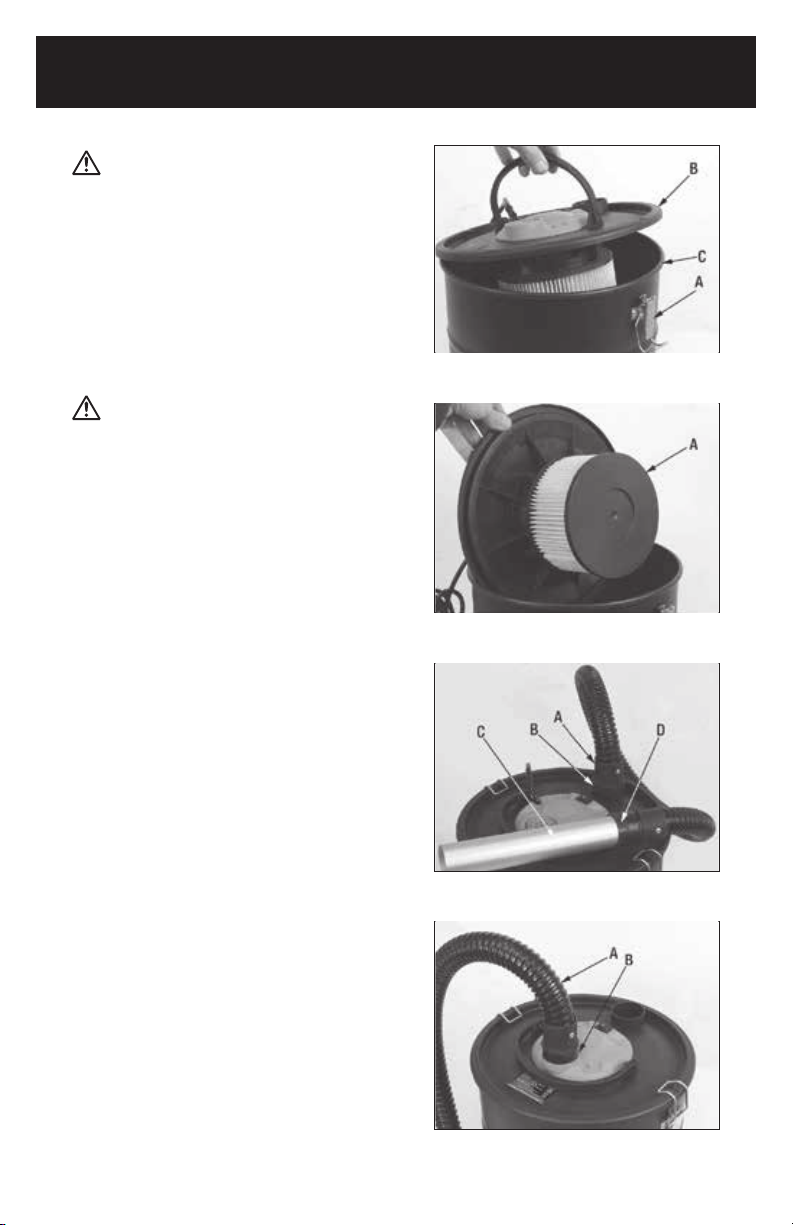
UNPACKING YOUR VACUUM
Remove the entire contents of the carton,
please note that the accessories are packed
inside the vacuum tank. To access these
accessories, undo the latches (A) Fig.3 on
both sides of the tank, remove the tank
cover/motor assembly (B), then remove the
accessories inside the tank (C).
WARNING: Do not connect the
power cord to the power source until the
following assembly and set-up instructions
have been done. Installing filter
Before reinstalling the cover/motor assembly
on, make sure the included cartridge
filter (A) Fig.4 is installed as shown. If the
cartridge filter is not installed, it must be
installed before use, simply press it up over
the motor cage as shown. Reposition and
secure the cover/motor assembly to the tank
with both cover latches.
INSTALLING HOSE & ALUMINUM
NOZZLE FOR VACUUMING MODE
1. Attach one end of the hose (A) Fig.5 to the
vacuum inlet port (B), secure the hose by
inserting and turning it clockwise inside
the inlet port.
2. Attach aluminum nozzle (C) Fig.5 to the
other end of the hose (D).
INSTALLING HOSE & ALUMINUM
NOZZLE FOR BLOWER MODE
1. Attach one end of the hose (A) Fig.6 to the
blower outlet port (B), secure the hose by
turning it clockwise inside the outlet port.
2. If desired, attach aluminum nozzle to
the other end of the hose. Nozzle is not
required for the Blower Mode.
FIG. 3
FIG. 4
FIG. 5
FIG. 6

9
OPERATION
1.Before connecting the power cord to power source, make sure the vacuum is
properly assembled with cartridge filter, hose and aluminum nozzle installed.
CAUTION: NEVER use the Ash Vacuum without the cartridge filter or aluminum
nozzle installed.
3. Place the Ash Vacuum near the fireplace or stove you are cleaning and MAKE
SURE THE ASH INSIDE IS COOL.
4. Connect the power cord plug into power source near your work area and push
the switch to the “I” (ON) position.
5. Using the aluminum nozzle only, begin vacuuming the ash.
6. As you vacuum, constantly check the nozzle, hose, tank, and motor for
the vacuum immediately.
Unplug the vacuum and remove the vacuumed material from the tank and cartridge
filter. ALLOW THE VACUUM AND THE MATERIAL TO BE VACUUMED TO COOL
BEFORE CONTINUING TO VACUUM.
IMPORTANT! Check the tank regularly to see if it is full.
7. Move the vacuum switch to the “O” ( OFF) position, then unplug power cord from
the power source.
8. Allow the vacuum to cool, then remove ash from the tank and clean the cartridge
filter as explained in the “Maintenance” section below before storing the vacuum.

10
MAINTENANCE
WARNING: To reduce the risk of injury and electrical shock, unplug the power
cord from the power source. Airborn dust will be produced when cleaning, wear dust
mask! To maintain peak vacuum performance, the cartridge filter must be cleaned
often.
GENERAL MAINTENANCE AND INSPECTION
The inside of the tank, hose and aluminum nozzle should be cleaned after every
use, this cleaning should only be done outdoors with the power cord disconnected
from the power source. Check the condition of the power cord and make sure it is
not damaged.
Cartridge Filter Maintenance
Inspect the cartridge filter for tears or holes; if any are found, replace the cartridge
filter before reassembly of the Ash Vacuum.
DRY CLEANING METHOD ONLY. DO NOT hand wash with water or mild detergent.
DO NOT machine wash/dry the cartridge filter!
To limit airborn dust, place cartridge filter inside a plastic bag. To clean cartridge
filter tap it gently against a hard surface. Remove cartridge filter from the plastic
bag and inspect it. Dust lodged within the filter pleats may require gentle flexing of
the cartridge filter pleats to get deeply set dust out.
Cleaning the tank
1. Dump the cold ash inside the tank into an appropriate disposable container such
as a plastic or paper trash bag.
2.
towels or cloth rag.
3. Do not wash the tank with water, cleaning agent, or other liquid.
18 L ASH VACUUM 1277-020
11
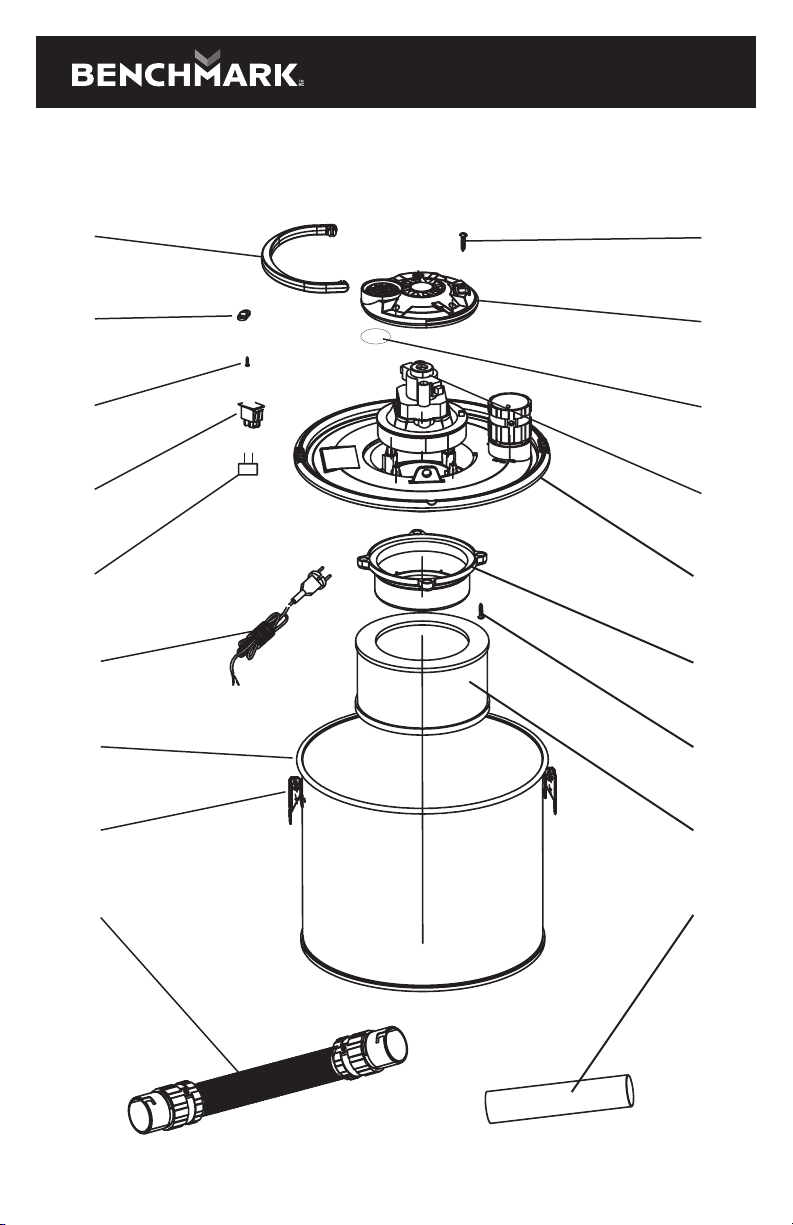
EXPLODED VIEW
1
5
6
7
8
11
12
13
17
2
3
4
9
10
14
15
16
18
12
WARNING: When servicing, use only original equipment replacement parts.
The use of any other parts may create a safety hazard or cause damage to the 18
L ash vacuum Any attempt to repair or replace electrical parts on this 18 L ash
vacuum may create a safety hazard unless repairs are performed by a qualified
technician. For more information, call the Toll-free Helpline, at 1-866-349-8665;
Monday - Friday: 9am to 5pm Eastern Standard Time.
PARTS LIST
Always order by key number.
KEY # PART # PART NAME / QUANTITY
1 1277-020-001 Handle / 1
2 1277-020-002 Top Cover Screws 4*16 / 4
3 1277-020-003 Top Cover / 1
4 1277-020-004 Top Cover Noise Proof Sponge / 1
5 1277-020-005 Press Board / 1
6 1277-020-006 Press Board Screws 4*16 / 2
7 1277-020-007 Switch / 1
8 1277-020-008 Capacitance / 1
9 1277-020-009 Motor / 1
10 1277-020-010 Bottom Cover / 1
11 1277-020-011 Cable / 1
12 1277-020-012 Tank / 1
13 1277-020-013 Clamp Set / 2
14 1277-020-014 Motor Cover / 1
15 1277-020-015 Motor Cover Screw 4*16 / 4
16 1277-020-016 Filter / 1
17 1277-020-017 1m Flex Hose / 1
18 1277-020-018 Alunimun Nozzle / 1
18 L ASH VACUUM 1277-020

13
WARRANTY
VACUUM CLEANER
If this Benchmark tool fails due to a defect in material or workmanship within five
years from the date of purchase, return it to any Home Hardware store with the
original bill of sale for exchange. 3-year warranty for the battery and charger.This
warranty does not include expendable parts including but not limited to blades,
brushes, belts, light bulbs.
This warranty covers defects in material or workmanship only. It does not cover
normal wear and tear, failure due to abuse/misuse, or defects caused by careless
or accidental mishandling. If this Benchmark product is used for commercial or
rental purposes, this warranty does not apply.

14
18 L ASH VACUUM 1277-020

5 Year Limited Warranty on tool
18 L ASH VACUUM
READ ALL INSTRUCTIONS BEFORE FIRST USE.
KEEP THIS MANUAL FOR FUTURE REFERENCE.
KEEP AWAY FROM CHILDREN.
WEAR CSA APPROVED
EYE PROTECTION
WEAR EAR
PROTECTION
WEAR A
FACE MASK
5002219
JN019
Made in China
1277-020
BENCHMARK TOOLS CANADA
ST. JACOBS, ONTARIO N0B 2N0
©2021 Home Hardware Stores Limited
TM
MC
CUSTOMER SERVICE/TECH SUPPORT
1-866-349-8665
* This BenchmarkTM product carries a five (5) year LIMITED warranty against defects
in workmanship and materials. See Owner’s Manual for full details.
Not suitable for ultra-fine collection such as drywall dust.
Such use will void the warranty.
Table of contents
Other Benchmark Vacuum Cleaner manuals


