Benchmark 1277-023 User manual

20 L STAINLESS STEEL
WET/DRY VACUUM
READ ALL INSTRUCTIONS BEFORE FIRST USE.
KEEP THIS MANUAL FOR FUTURE REFERENCE.
KEEP AWAY FROM CHILDREN.
Wet/Dry vacuums used without a filter made of HEPA-rated material
to extract very fine dust, such as drywall dust, will void the warranty.
WEAR CSA APPROVED
EYE PROTECTION
WEAR EAR
PROTECTION
WEAR A
FACE MASK
5002219
JN302
120V 60Hz 8.5Amp
5 Year Limited Warranty on tool
1
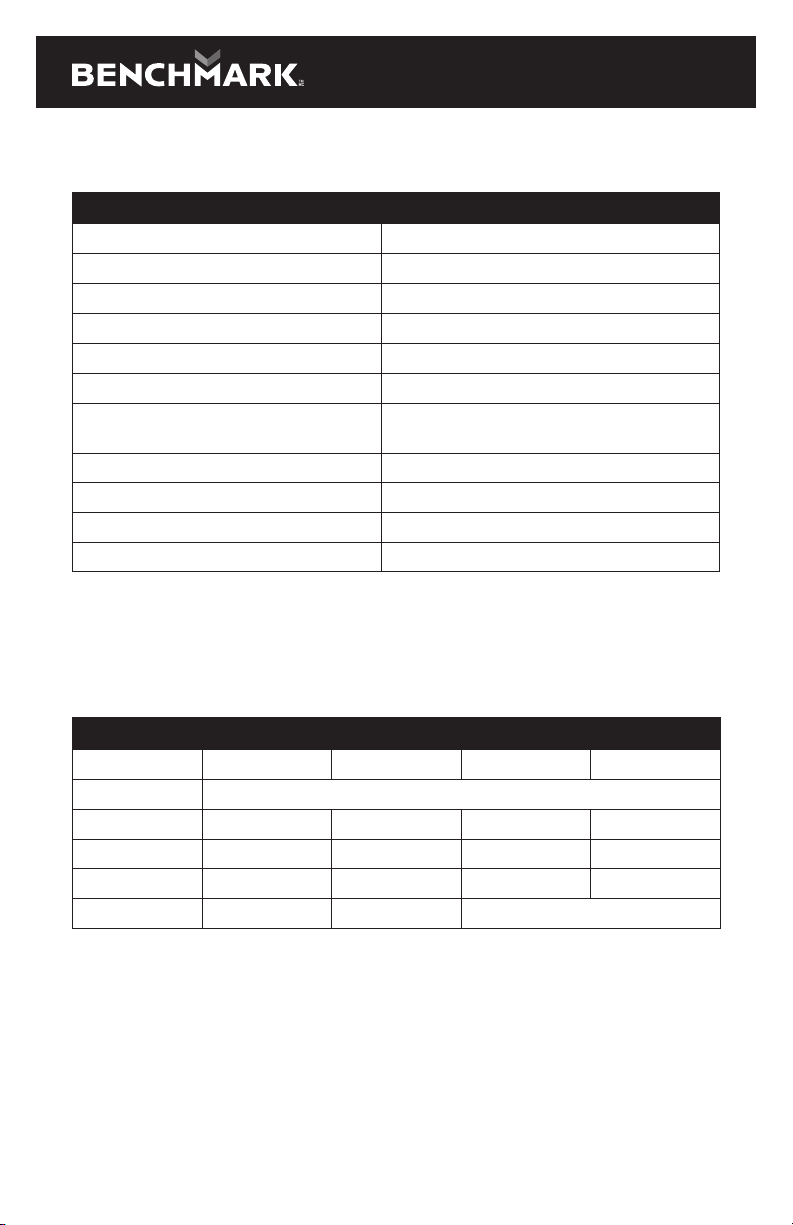
PRODUCT SPECIFICATIONS
20L STAINLESS STEEL WET/DRY VACUUM
Voltage 120V~ 60Hz
Rated Power 8.5A 5.5Peak HP
Tank Capacity 5.25Gal (20L)
Flexi Hose 1 1/4" x 5ft (32mm x 1.5m)
Flow Rate 60CFM
Power Cord 13.13ft. (4m)
Optional Cartridge Filter
(sold separately)
1277-035
Replacement Collection Bag 1277-030
Replacement foam filter sleeve 1277-047
HEPA cartridge filter (sold separately) 1277-037
Weight 12.32LBS (5.6KGS)
When using an extension cord with your Wet/Dry Vac refer to the following table
to determine the required AWG wire size. Before using the cleaner make sure the
power cord and extension cord are in good working conditions. Make repairs or
replacements before using the vacuum cleaner. Only use extension cords that are
rated for outdoor use.
LENGTH OF EXTENSION CORD
110V-120V 25’ (7.5 m) 50’ (15.25 m) 100’ (30.5 m) 150’ (45.7 m)
Amps AWG Wire Size
0-6 18 16 16 14
7-10 18 16 14 12
11-12 16 16 14 12
13-16 14 12 Not recommended
NEED ASSISTANCE?
Call us on our toll-free customer support line:
1-866-349-8665 (Monday through Friday 9am – 5pm Eastern Standard Time)
• Technical questions
• Replacement parts
• Parts missing from package

2
20 L STAINLESS STEEL WET/DRY VACUUM 1277-023
TABLE OF CONTENTS
Product Specifications................................................................................... 1
Table of Contents........................................................................................... 2
General Safety Warnings ................................................................................ 3
Important Safety Instructions......................................................................... 3
Safety Symbols .............................................................................................. 3
Specific Safety Instructions for 20l Stainless Steel Wet/Dry Vacuum .......... 3 - 6
Know Your Wet/Dry Vacuum ........................................................................... 6
Operation ...................................................................................................... 7
Unpacking and Set-Up Summary ................................................................... 7
Dry Pick-Up ................................................................................................... 8
Installing Disposable Filter Bag ...................................................................... 8
Wet Pick-Up .................................................................................................. 9
Emptying the Tank ......................................................................................... 9
Blowing Operation ....................................................................................... 10
Maintenance ............................................................................................... 11
Cleaning ...................................................................................................... 11
Storage ....................................................................................................... 11
Troubleshooting .......................................................................................... 11
Exploded View ............................................................................................. 12
Parts List ..................................................................................................... 13
Warranty ..................................................................................................... 14
3
GENERAL SAFETY WARNINGS
IMPORTANT SAFETY INSTRUCTIONS
Read and understand all safety and operational instructions. Failure to follow the
safety rules listed below and other basic safety precautions may result in serious
personal injury. Keep this manual, sales receipts, and applicable warranty forms
for future reference.
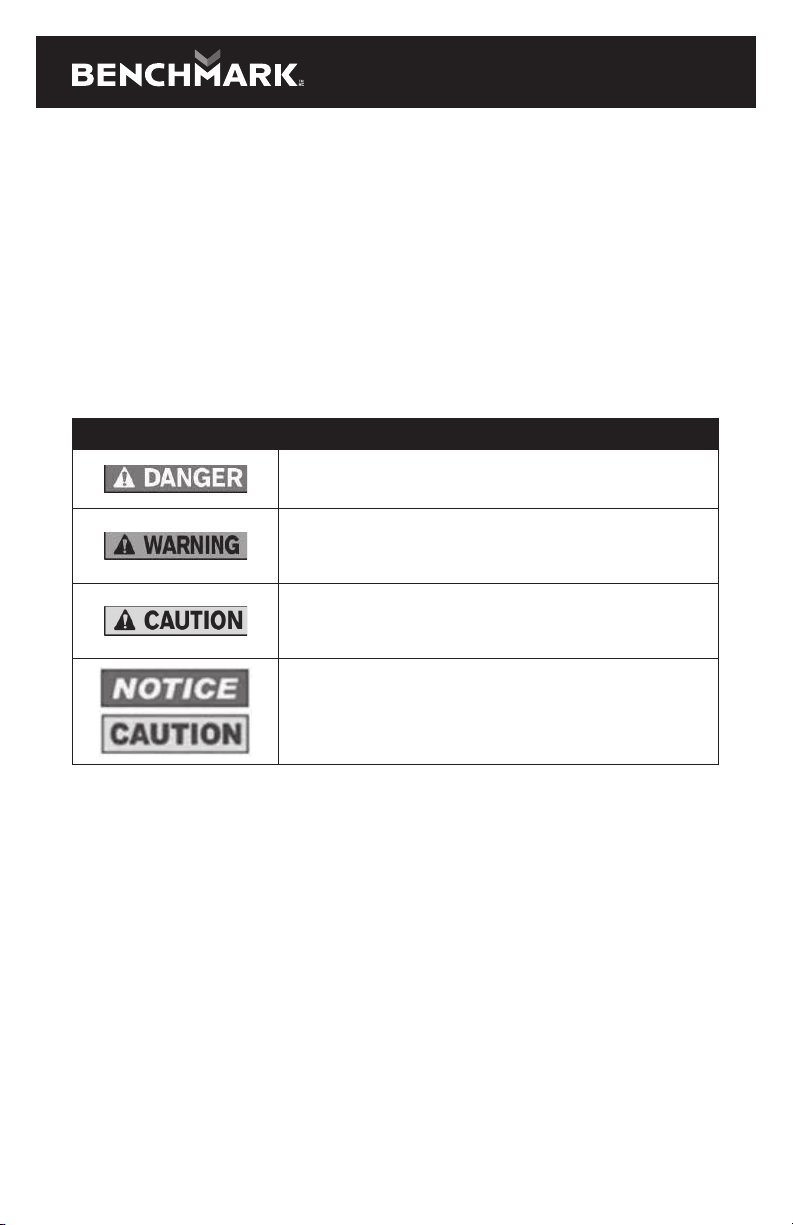
SAFETY SYMBOLS
The purpose of safety symbols is to alert you of the potential safety RISKS.
Recognize and understand them. Follow the instructions provided.
SYMBOL MEANING
Failure to obey a DANGER safety alert WILL result in serious personal
injury or death to you or to others. Always obey all messages following
this symbol to reduce the risk of serious personal injury or death.
Failure to obey a WARNING safety alert MAY result in serious personal
injury or death to you or to others. Always obey all messages following
this symbol to reduce the risk of potential serious personal injury or
death.
Failure to obey a CAUTION safety alert MAY result in personal injury
or property damage to you or to others. Always obey all messages
following this symbol to reduce the risk of personal injury or
property damage.
Failure to obey a NOTICE or a CAUTION (without a safety alert)
MAY result in property damage to you or to others. Always obey all
messages following this symbol to reduce the risk of property damage.
SPECIFIC SAFETY INSTUCTIONS FOR 20L
STAINLESS STEEL WET/DRY VACUUM
SAVE THIS MANUAL FOR FUTURE REFERENCE
• Read all instructions before using this appliance.
• Read and understand this instruction manual and all labels on the Wet/Dry
Vacuum before using.
• Safety is a combination of common sense, staying alert and knowing how this
Wet/Dry Vacuum works. Use this Wet/Dry Vacuum only as described in this
manual. To reduce the risk of personal injury or damage to the Wet/Dry Vacuum,
use only recommended accessories.

4
When using this Wet/Dry Vacuum follow basic safety precautions including
the following:
TO REDUCE THE RISK OF FIRE, ELECTRIC SHOCK OR INJURY:
• Do not run the Wet/Dry Vacuum unattended.
• Do not vacuum, or use this Wet/Dry Vacuum near liquids, gases, or explosive
vapours like gasoline or similar fuels, lighter fluid, cleaners, oil based paints,
natural gas or hydrogen. Do not vacuum or use this Wet/Dry Vacuum near
explosive dusts like coal dust, magnesium dust, grain dust, or gunpowder
as sparks inside the motor can ignite flammable vapours or dust.
• Do not vacuum burning or smoking items such as cigarettes, matches,
or hot ashes.
• Keep the cord away from heated surfaces.
• Do not expose to rain. Store indoors.
• Do not unplug by pulling on cord. To unplug, grasp the plug, not the cord.
• Do not use if the cord, plug or other parts are damaged.
• If the Wet/Dry Vacuum is not working correctly or has missing parts, has
been dropped or damaged, left outdoors or dropped in water, return it to
an independent service centre.
• Do not pull or carry by the cord. Do not use the cord as a handle, close a
door on the cord, or pull the cord around sharp edges or corners.
• Do not run the Wet/Dry Vacuum over the cord.
• Do not handle the plug or the Wet/Dry Vacuum with wet hands.
• To reduce the risk of health hazards from vapours or dusts, do not vacuum
toxic materials.
• Do not use or store near hazardous materials.
• Do not use this Wet/Dry Vacuum with a torn filter or without installing the
filter except when vacuuming liquids as described in the operation section
of this manual.
• Do not use the Wet/Dry Vacuum as a toy. Pay particularly close attention
when it is being used by or near children.
• To reduce the risk of injury from the Wet/Dry Vacuum accidentally starting,
unplug the power cord before changing or cleaning the filter.
• Do not leave the Wet/Dry Vacuum unattended when it is plugged in. Unplug
Wet/Dry Vacuum before unplugging.
• Do not put any objects into the ventilation openings. Do not vacuum with
the ventilation openings blocked.
• Keep free of dust, lint, hair or any other items that may reduce the air flow.
• Keep hair, loose clothing, fingers, and all body parts away from openings
and moving parts.
• To reduce the risk of falling, use extra care when cleaning on stairs.
20 L STAINLESS STEEL WET/DRY VACUUM 1277-023
5
WHEN USING AS BLOWER:
• Direct air discharge only at work area.
• Do not use Wet/Dry Vacuum as a sprayer.
• Do not direct air at bystanders.
• Keep children away when blowing.
• Wear safety goggles.
This Wet/Dry Vacuum is double-insulated, eliminating the need for a separate
grounding system. Use only identical replacements parts. Read the servicing
instructions before servicing the Wet/Dry Vacuum.
Use this Wet/Dry Vacuum only as described in this manual.
Observe the following warnings that appear on the motor housing of this
Wet/Dry Vacuum.
WARNING: SERVICING OF A DOUBLE-INSULATED WET/DRY VACUUM
In a double-insulated Wet/Dry Vacuum, two systems of insulation are provided
instead of grounding. This means that no grounding is provided on a double-
insulated appliance, nor should a means for grounding be added. Servicing a
double-insulated Wet/Dry Vacuum requires extreme care and knowledge of the
system and should be done only by qualified service personnel. Replacement
parts for a double-insulated Wet/Dry Vacuum must be identical to the parts they
replace. The double-insulated Wet/Dry Vacuum is marked with the words
"DOUBLE INSULATED" and the symbol may also be marked on the appliance.
• For household use only.
• To reduce the risk of electric shock, unplug before cleaning or servicing.
• DO NOT use without filters in place.
• To reduce the risk of electric shock, use indoors only.
WARNING: If the supply cord is damaged, it must be replacedby the
manufacturer or its service agent or a similarlyqualified person in order to
avoid a hazard.
WARNING: Remove the plug from the socket before performing maintenance.
Before using the machine make sure that the frequency and voltage shown on the
rating plate correspond with the mains voltage. Specifications and details are
subject to change without prior notice. The accessories shown in the pictures may
vary from model to model.
WARNING: For your own safety, read and understand this instruction manual.
Do not operate unattended. Do not use this Wet/Dry Vacuum to pick up hot ashes,
coals, toxic, flammable or other hazardous materials. Do not use near explosive
liquids or vapours.
WARNING: To reduce the risk of electric shock, do not expose to rain.
Store indoors.
6
CAUTION: Do not vacuum drywall dust or cold fireplace soot or ash with a
standard wet/dry filter. This dust is very fine and hence will not be captured by
the filter and may cause damage. Refer to the operation section for proper
filter selection.
WARNING: SERVICING OFDOUBLE-INSULATED WET/DRY VACUUM.
CAUTION: To reduce the risk of injury from moving parts, unplug before
servicing.
SAVE THIS USER MANUAL
WARNING: MISUSE or failure to follow the safety rules stated in this instruction
manual may cause serious personal injury.
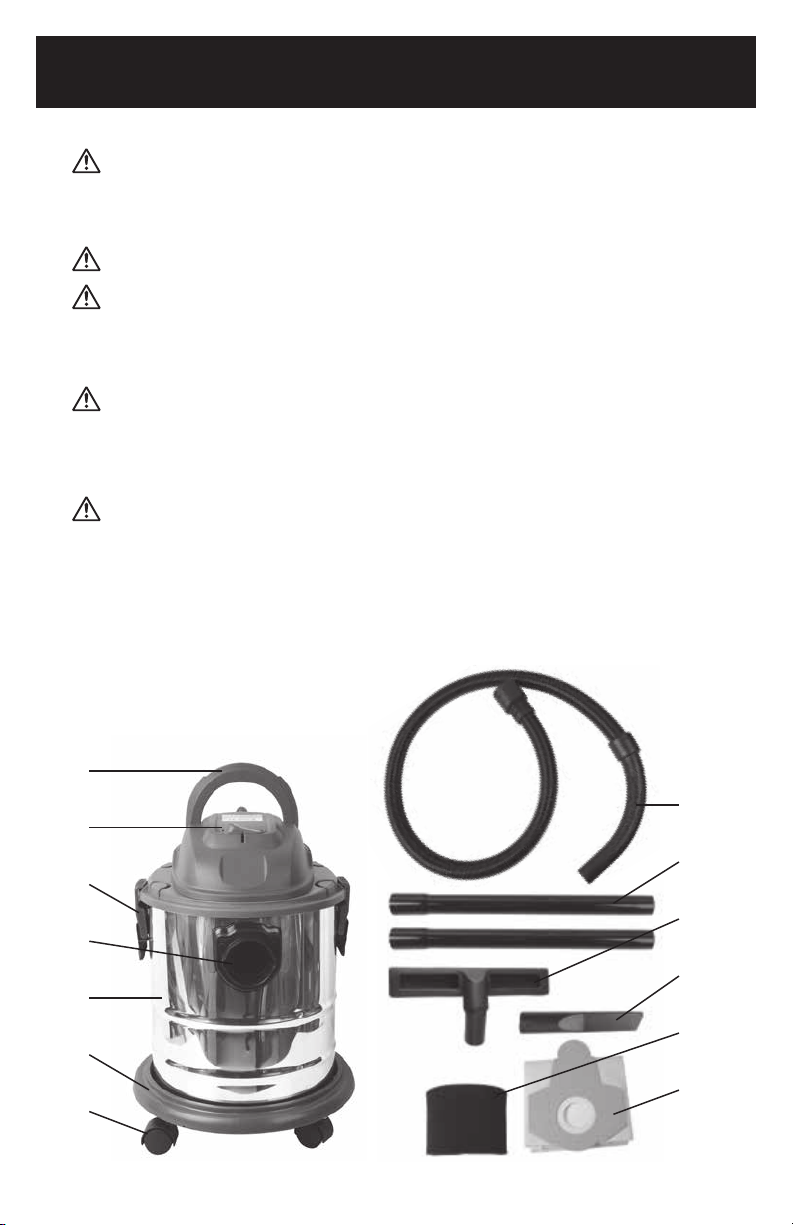
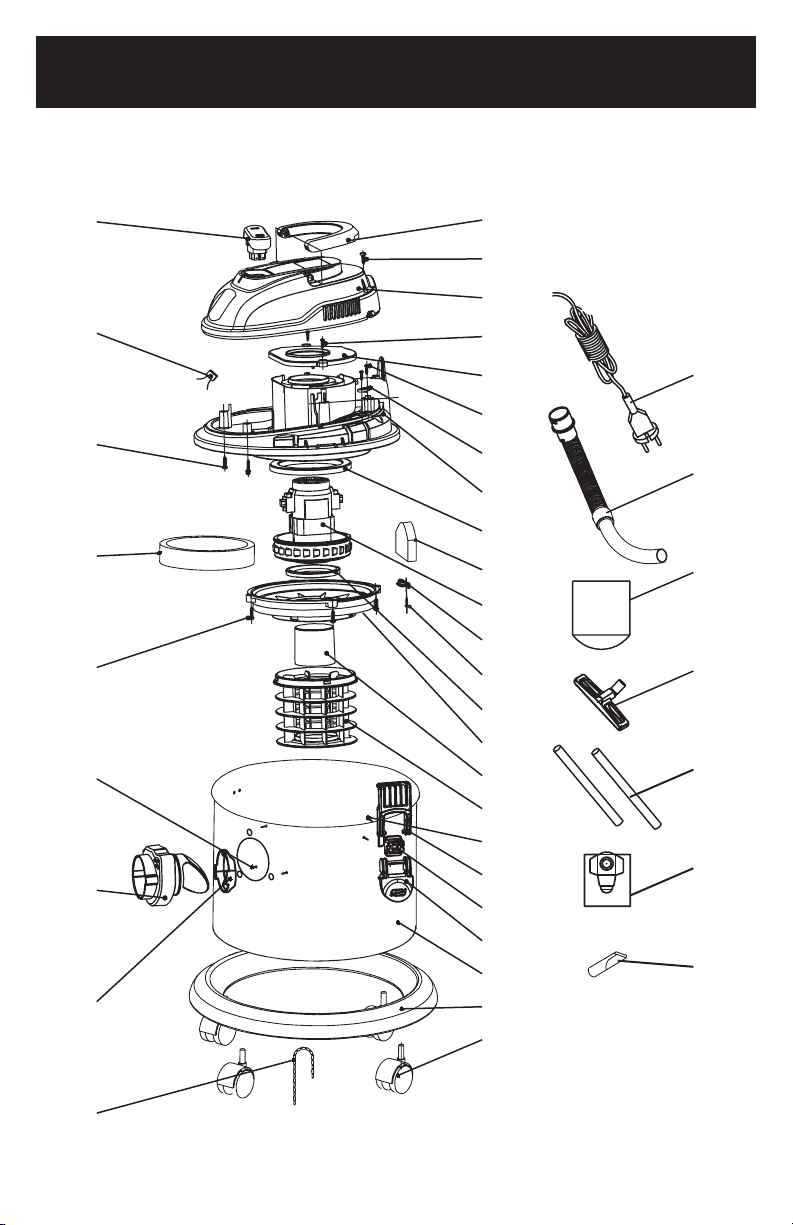
KNOW YOUR WET/DRY VACUUM
ATTENTION: Before starting please read, understand, and apply the safety
instructions. Reminder: DO NOT vacuum hazardous substances.
FUNCTIONS
1. Handle 6. Dolly 11. Crevice Nozzle
2. Power Switch 7. Casters 12. Foam Filter
3. Lid Latches 8. Flexible Hose 13. Disposable Filter Bag
4. Vacuum Port 9. Extension Wand
5. Dust Tank 10. Floor Brush
8
9
10
11
12
13
1
2
3
4
5
6
7
20 L STAINLESS STEEL WET/DRY VACUUM 1277-023

7
OPERATION
ATTENTION: Read the entire important safety information section at the
beginning of this manual Including all text under subheadings therein before set
up or use of this product.
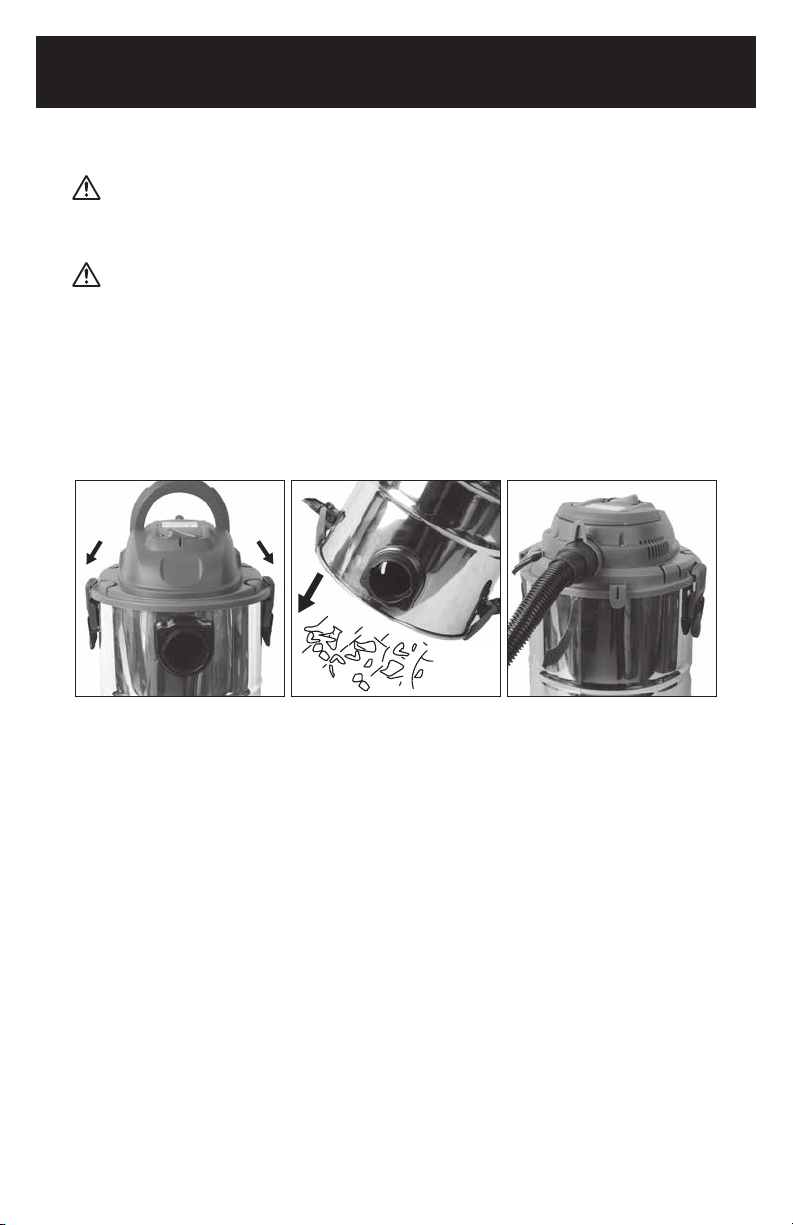
UNPACKING AND SET-UP SUMMARY
1. Pull lid latches in an outward motion, remove power
head and some accessories that may have been
shipped in the tank.
2. Attach caster following the instructions as below:
a. Invert dust tank and align casters as shown in
diagram to the right, then secure casters with
provided screws.
b. Return dust tank to an upright position.
3. Before replacing power head, refer to this manual
to ensure you have the proper filters installed for
the cleaning operation.
4. Replace power head, and apply pressure with thumb
to each latch until it snaps tightly in place. Make sure
all lid latches are clamped securely.
5. Insert the hose end into inlet of tank.
6. Attach the extension wands to the end of the hose.
Apply slight pressure until fitting is tight.
7. Attach one of the cleaning accessories (depending on
the cleaning requirements) on the extension wands.
Twist slightly to tighten the connection.
8. Plug the cord into the wall outlet. The cleaner is
ready for use.
9. Turn the unit “ON” by pushing the switch from
position “O” to position “I”. The “O” is the “OFF”
position and the “I” is the “ON” position.
PUSH DOWN
O = OFF I=ON
WARNING: To reduce the risk of fire or explosion, do not operate this vacuum in
areas with flammable gases, vapors or explosive dust in the air. Flammable gases or
vapors include but are not limited to: lighter fluid, solvent-type cleaners, oil-based
paints, gasoline, alcohol or aerosol sprays. Explosive dusts include but are not
limited to: coal, magnesium, aluminum, and grain or gun powder. Do not vacuum
explosive dust, flammable or combustible liquids or hot ashes. Do not use this
vacuum as a sprayer for any flammable or combustible liquid. To reduce the risk
of health hazards from vapors or dusts, do not vacuum toxic materials.

8
20 L STAINLESS STEEL WET/DRY VACUUM 1277-023
WARNING: The operation of any utility vacuum can result in foreign objects
being blown into the eyes, which can result in severe eye damage. Always wear
safety eyewear complying with ANSI Z87.1 (or in Canada, CSA Z94.3) before
starting operation.
CAUTION: To reduce risk of hearing damage, wear ear protectors when using
the vacuum for extended hours or when using it in a noisy area.
DRY PICK-UP
1. Install a foam filter over the filter basket.
2. When using the vacuum to pick up very fine dust,
such as drywall dust, it will be necessary to
replace cartridge filter with a 1277-037 HEPA
FILTER (sold separately), empty the dust tank
and clean or replace the filter at more frequent
intervals to maintain peak vacuum performance.
Shake excess dust o cartridge filter with a
rapid up and down movement. Wet/Dry vacuums
used without a filter made of HEPA-rated material to extract very fine dust such as
drywall dust, will void the warranty.
NOTICE: A dry filter is necessary to pick up dry material. If you use the vacuum
to clean. If the filter gets wet, replace it before continuing to do dry pickups. Shake
INSTALLING DISPOSABLE FILTER BAG
1. Slide the cardboard collar opening firmly onto the vacuum port deflector until
it stops against the deflector wall.
2. Position the bag so that it is distributed around the inside of the tank.
3. Replace and secure the power head onto the tank.
Disposable
Filter Bag

9
WET PICK-UP
1. Install a foam filter over the filter basket.
NOTE: Wet pick-up accessories should be washed periodically, especially after
picking up wet, sticky kitchen accidents. This can be accomplished with a warm
solution of soap and water.
2. This wet/dry vacuum is equipped with a float mechanism which will rise
because the suction ceases and the motor noise becomes higher in pitch due to
increased motor speed. The liquid capacity may vary with the rate of pickup.
IMPORTANT: To reduce the risk of damage to the vacuum, do not run motor with
float in raised position.
Float in raised
position
NOTICE: If accidentally tipped over, the vacuum could lose its suction
This will allow the float to return to its normal position, and you will be able
to continue operation.
EMPTYING THE TANK
WARNING: To reduce the risk of injury from accidental starting, unplug power
cord before emptying the dust tank.
1. Remove the power head assembly of the wet/dry vacuum by pulling outward on
2. Dump the tank contents into the proper waste disposal container.
10
20 L STAINLESS STEEL WET/DRY VACUUM 1277-023
BLOWING OPERATION
WARNING: Always wear safety eyewear complying with ANSI Z87.1
(or in Canada CSA Z94.3) when using as a blower.
To avoid injury to bystanders, keep them clear of blowing debris.
CAUTION: Wear a dust mask if blowing creates dust which might be inhaled.
To reduce the risk of hearing damage, wear ear protectors when using the vacuum/
blower for extended hours or in confined space.
The vacuum contains a blowing feature. Follow the steps below to use the vacuum
as a blower.
1. Locate blowing port on the vacuum.
2. Insert one end of the 1-1/4" x 4.9' ( 32mm x 1.5m) hose into the blower port.
3. Turn the vacuum “ON”.

11
MAINTENANCE
WARNING: To reduce the risk of injury from accidental starting, unplug power
cord before changing or cleaning the foam filter. The foam filter should be cleaned
often to maintain peak vacuum performance. Do not remove filter cage and float.
The float prevents water from entering the impeller and damaging the motor.
The cage prevents fingers from touching the moving impeller.
NOTICE: To avoid damage to the impeller and motor, always reinstall the
reusable foam filter before using the vacuum for dry pickups and always reinstall
the foam filter before using the vacuum for wet pickups.
After cleaning, check the filter for tears or small holes. Do not use a foam filter with
holes or tears in it. Even a small hole can cause dust to come out of the vacuum.
Replace it immediately. Before installing the foam filter on the vacuum, clean the
area of the lid so that the clamp ring will seal the bag against the lid and stop small
particles from bypassing the filter bag. If the foam filter is clean and not damaged,
replace it on the filter cage. If it cannot be reused, place a new foam filter over
the filter cage.
Clean the filter in an open area.
CLEANING
To keep the wet/dry vacuum looking its best, clean the outside with a cloth
dampened with warm water and mild soap.
To clean the tank:
1. Dump out debris.
2. Wash tank thoroughly with warm water and mild soap.
3. Wipe out with dry cloth.
STORAGE
Before storing the vacuum, the dust tank should be emptied and cleaned. The
cord should be wrapped and hung on the unit and the accessories should be kept
in the accessory holder so they can be readily available. The vacuum should be
stored indoors.
TROUBLESHOOTING
WARNING: Minor problems often can be fixed without calling customer service.
PROBLEM POSSIBLE CAUSE CORRECTIVE ACTION
Vacuum will
not run
No electricity Make sure electrical outlet has voltage (A
qualified electrician may need to be contacted)
Loss of suction,
wet pick-up
1.Full tank
2. Clogged hose
1. Drain and clean tank
2. Remove hose and clean debris
Loss of suction,
dry pick-up
1.Full tank
2. Clogged hose
1. Drain and clean tank
2. Remove hose and clean debris
12
20 L STAINLESS STEEL WET/DRY VACUUM 1277-023
EXPLODED VIEW
1
2
3
(2)
4
5
6
7
8
9
10
11
(5)
12
13
14
15
(2)
16
17
18
19
20
21
27
26
(2)
25
(2)
(2)
24
23
22
28
29
30
31
32
33
34
13
PARTS LIST
Always order by key number.
KEY # PART # PART NAME / QUANTITY KEY # PART # PART NAME / QUANTITY
11277-023-001 Handle / 1 18 1277-023-018 Clamps Handle / 2
21277-023-002 Handle Screws 4*16 / 15 19 1277-023-019 Tank 20L / 1
31277-023-003 Top Cover / 1 20 1277-023-020 Base / 1
41277-023-004 Motor Top Cover / 1 21 1277-023-021 Wheels / 4
51277-023-005 Handle Screws4*12 / 7 22 1277-023-022 Electrostatic Chain / 1
61277-023-006 Power Cord Strain Relief / 1 23 1277-023-023
Air-Inlet Base Sealing Ring / 1
71277-023-007 Bottom Cover / 1 24 1277-023-024 Vacuum Port / 1
81277-023-008 Motor Top Sealing Ring / 1 25 1277-023-025 Motor Filter / 1
91277-023-009 Outlet Hole Filter / 1 26 1277-023-026 Capacitance / 1
10 1277-023-010 Motor / 1 27 1277-023-027 Switch / 1
11 1277-023-011 Motor Bottom Plug / 1 28 1277-023-028 Power Cord 4m / 1
12 1277-023-012
Motor BottomSealing Ring / 1
29 1277-023-029 Ø 32 Hose 1.5m / 1
13 1277-023-013 Bottom Hole Cover / 2 30 1277-023-030 Foam Filter / 1
14 1277-023-014 Safety Valve / 1 31 1277-023-031 Ø 32 Wet&Dry Brush / 1
15 1277-023-015 Bottom Cover Basket / 1 32 1277-023-032 Plastic Tube Extensions / 2
16 1277-023-016 Clamps / 2 33 1277-023-033 Dustbag 20L / 1
17 1277-023-017 Clamps Base / 2 34 1277-023-034
Ø32 Small Crevice Nozzle / 1
WARNING: When servicing, use only original equipment replacement parts.
The use of any other parts may create a safety hazard or cause damage to the
wet/dry vacuum. Any attempt to repair or replace electrical parts on this wet/dry
vacuum may create a safety hazard unless repairs are performed by a qualified
technician. For more information, call the Toll-free Helpline, at 1-866-349-8665;
Monday - Friday: 9am to 5pm Eastern Standard Time.

14
20 L STAINLESS STEEL WET/DRY VACUUM 1277-023
WARRANTY
20L STAINLESS STEEL WET/DRY VACUUM
If this Benchmark tool fails due to a defect in material or workmanship within five
years from the date of purchase, return it to any Home Hardware store with the
original bill of sale for exchange. 3-year warranty for the battery and charger.
This warranty does not include expendable parts including but not limited to blades,
brushes, belts, light bulbs.
This warranty covers defects in material or workmanship only. It does not cover
normal wear and tear, failure due to abuse/misuse, or defects caused by careless
or accidental mishandling. If this Benchmark product is used for commercial or
rental purposes, this warranty does not apply.
*Wet/Dry vacuums used without a filter made of HEPA-rated material to extract very
fine dust, such as drywall dust, will void the warranty.

15

16
20 L STAINLESS STEEL WET/DRY VACUUM 1277-023
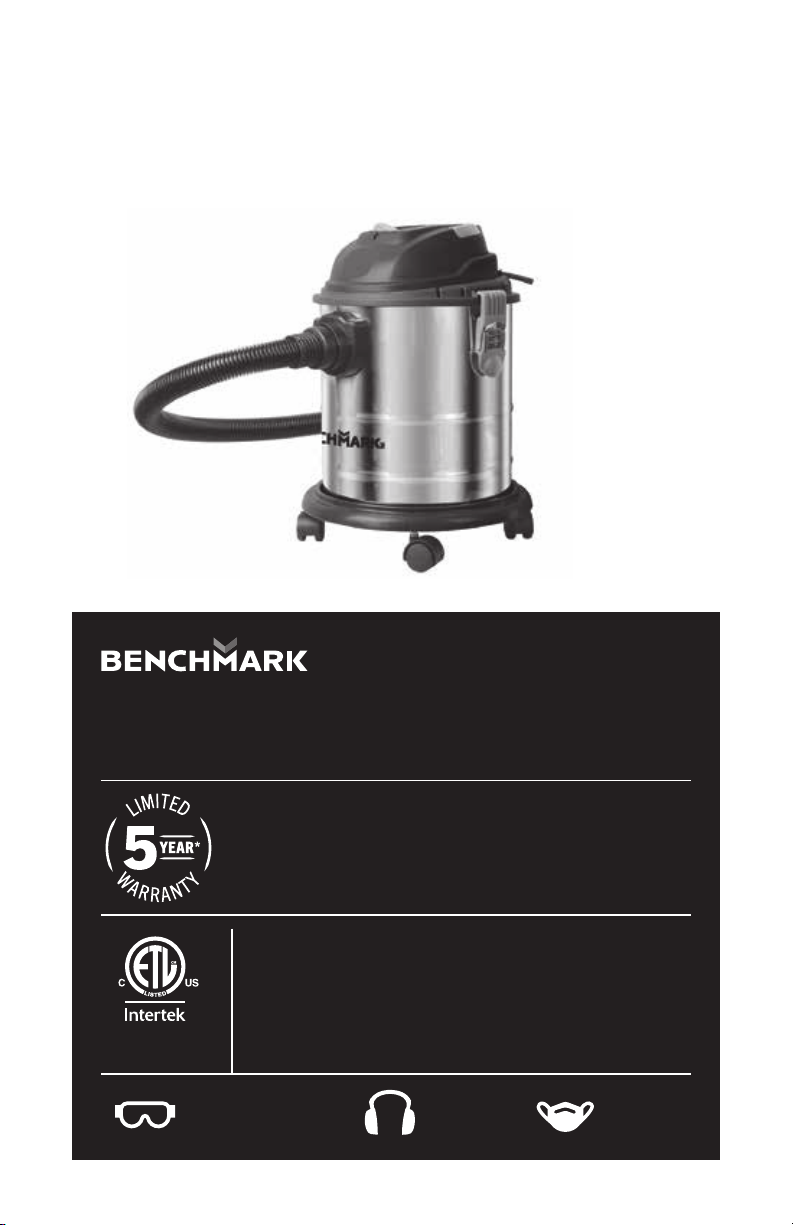
5 Year Limited Warranty on tool
20 L STAINLESS STEEL
WET/DRY VACUUM
WEAR CSA APPROVED
EYE PROTECTION
WEAR EAR
PROTECTION
WEAR A
FACE MASK
5002219
JN302
Made in China
1277-023
BENCHMARK TOOLS CANADA
ST. JACOBS, ONTARIO N0B 2N0
©2023 Home Hardware Stores Limited
TM
MC
CUSTOMER SERVICE/TECH SUPPORT
1-866-349-8665
* This BenchmarkTM product carries a five (5) year LIMITED warranty against defects
in workmanship and materials. See Owner’s Manual for full details.
READ ALL INSTRUCTIONS BEFORE FIRST USE.
KEEP THIS MANUAL FOR FUTURE REFERENCE.
KEEP AWAY FROM CHILDREN.
Wet/Dry vacuums used without a filter made of HEPA-rated material
to extract very fine dust, such as drywall dust, will void the warranty.
Table of contents
Other Benchmark Vacuum Cleaner manuals


