BeneCheck Plus series User manual

TABLE OF CONTENTS
Chapter 1
BeneCheck PLUS Multi-Monitoring System
1.1
Introduction...............................................................................................................1-2
1.2
Contents of the Kit..........................................................................................3-4
1.3
Labelling and Informations..........................................................................5
1.4
System Components
Meter.........................................................................................................................6-7
Test Strips........................................................................................................8-9
Code Strip.............................................................................................................10
Chapter 2
Setting-up the Meter
2.1
Installing/Replacing the Batteries.................................................11-12
2.2 Set the Year/Month/Day/Hour/Minute.................................................12
Set the Year/Month/Day..................................................................13
Set the Hour/Minute.............................................................................14
2.3 Coding the Meter......................................................................................15-17
2.4 Control Test.................................................................................................18-21

Chapter 3
How to Perform a Test
3.1
Before Testing.............................................................................................22-24
3.2
Testing procedures for Blood Glucose...............................................25
3.3
Testing procedures for Blood Uric Acid............................................26
3.4
Testing procedures for Blood Total Cholesterol.................26-27
3.5
Care after the Test..........................................................................................28
Chapter 4
Meter Memory Function................................................................................29-30
Chapter 5
How to Set the Measurement Units......................................................31-32
Chapter 6
Storage and Handling of Meter and Strips..............................................33
Chapter 7
Icon and Alert Tones..............................................................................................34
Chapter 8
Error Message and Trouble Shooting...................................................35-36
Chapter 9
Specications......................................................................................................37-38
Chapter 10
Limitations.............................................................................................................39-46

1
Chapter 1 BeneCheck PLUS Multi-Monitoring System
1.1 Introduction
Thank you for choosing BeneCheck PLUS Multi-Monitoring System. The BeneCheck
PLUS Multi-Monitoring System is designed by General Life Biotechnology Co., Ltd.
and marketed all over the world.
The BeneCheck PLUS Multi-Monitoring System provides you with accurate,
plasma-calibrated results based on electrochemical sensor technology. This
system includes blood glucose, uric acid and total cholesterol level tests, precisely
measured and displayed within 10, 15 and 30-40 seconds respectively.
Intended Use :
The BeneCheck PLUS Multi-Monitoring System is designed to measure the blood
glucose, uric acid or total cholesterol levels in whole blood. The test strips are
for self-testing outside the body (in vitro diagnostic use). It should be used only
for testing glucose, uric acid or total cholesterol with fresh capillary nger blood
samples. The system is suitable for users to monitor their blood glucose, uric
acid or total cholesterol at home by themselves and be used for clinical sites by
healthcare professionals to test the blood glucose, uric acid or total cholesterol
levels of patients.

2
The BeneCheck PLUS Multi-Monitoring System includes glucose, uric acid, and
total cholesterol tests which are all calibrated by J&J DT60 Analyzer (Kodak
EKTACHEM DT60 Analyzer) using venous plasma. The DT60 Analyzer is calibrated
by VITROS DT calibrators which were referenced to the following standard and
method :
Test Standard Method
Glucose NIST SRM 917b AACC/CDC (Hexokinase/G6PDH)
Uric Acid NIST SRM 913a Uricase/UV
Total Cholesterol NIST SRM 911b Abell/Kendall
Please read the entire USER’S MANUAL carefully before using the BeneCheck PLUS
Multi-Monitoring system to test your blood glucose, uric acid or total cholesterol
levels. This USER’S MANUAL guides you through the operation procedures with
illustrated directions and help you nd the required information.
WARNING :
Please carefully read the instructions in this user’s manual and become familiar
with the test procedures before using the system to test blood glucose, uric acid
or total cholesterol levels. Users should consult with a healthcare professional
before going ahead important medical decision.

3
1.2 Contents of the Kit
Please check the whole package for the BeneCheck PLUS Multi-Monitoring System.
The system includes the following items :
Item No. Description Quantity
PD-G001-1 BeneCheck PLUS Meter 1
PD-A041 BeneCheck PLUS Glucose Test Strip x (10pcs/vial) 1
PD-D001 BeneCheck PLUS Uric Acid Test Strip x (10pcs/vial) 1
PD-E001 BeneCheck PLUS Total Cholesterol Test Strip x (5pcs/vial) 1
PD-A020 Code Strip (Glucose x 1, Uric acid x 1, Total Cholesterol x 1) 1
PD-F004 Glucose Control Solution x 1 1
PP-E018 BeneCheck PLUS User’s Manual 1
PP-E019 BeneCheck PLUS Glucose Test Strip Instruction 1
PP-E020 BeneCheck PLUS Uric Acid Test Strip Instruction 1
PP-E021 BeneCheck PLUS Total Cholesterol Test Strip Instruction 1
PP-E023 Glucose Control Solution Instruction 1
PD-A006 Lithium Battery 3V (CR2032) 1
PD-A019 Kit Carrying Bag 1
PD-A015 Lancing Device 1

4
Item No. Description Quantity
PD-A018
Lancets (pack)
(Manufacturers of Lancing Device and Lancet : For detail
information, please refer to inside package. )
1
Optional : ( not included in the standard kit package, please contact your
local distributor for ordering. )
BeneCheck PLUS Glucose Test Strip BKP-G-S001
BeneCheck PLUS Uric Acid Test Strip
BKP-U-S001
BeneCheck PLUS Total Cholesterol Test Strip
BKP-C-S001
5
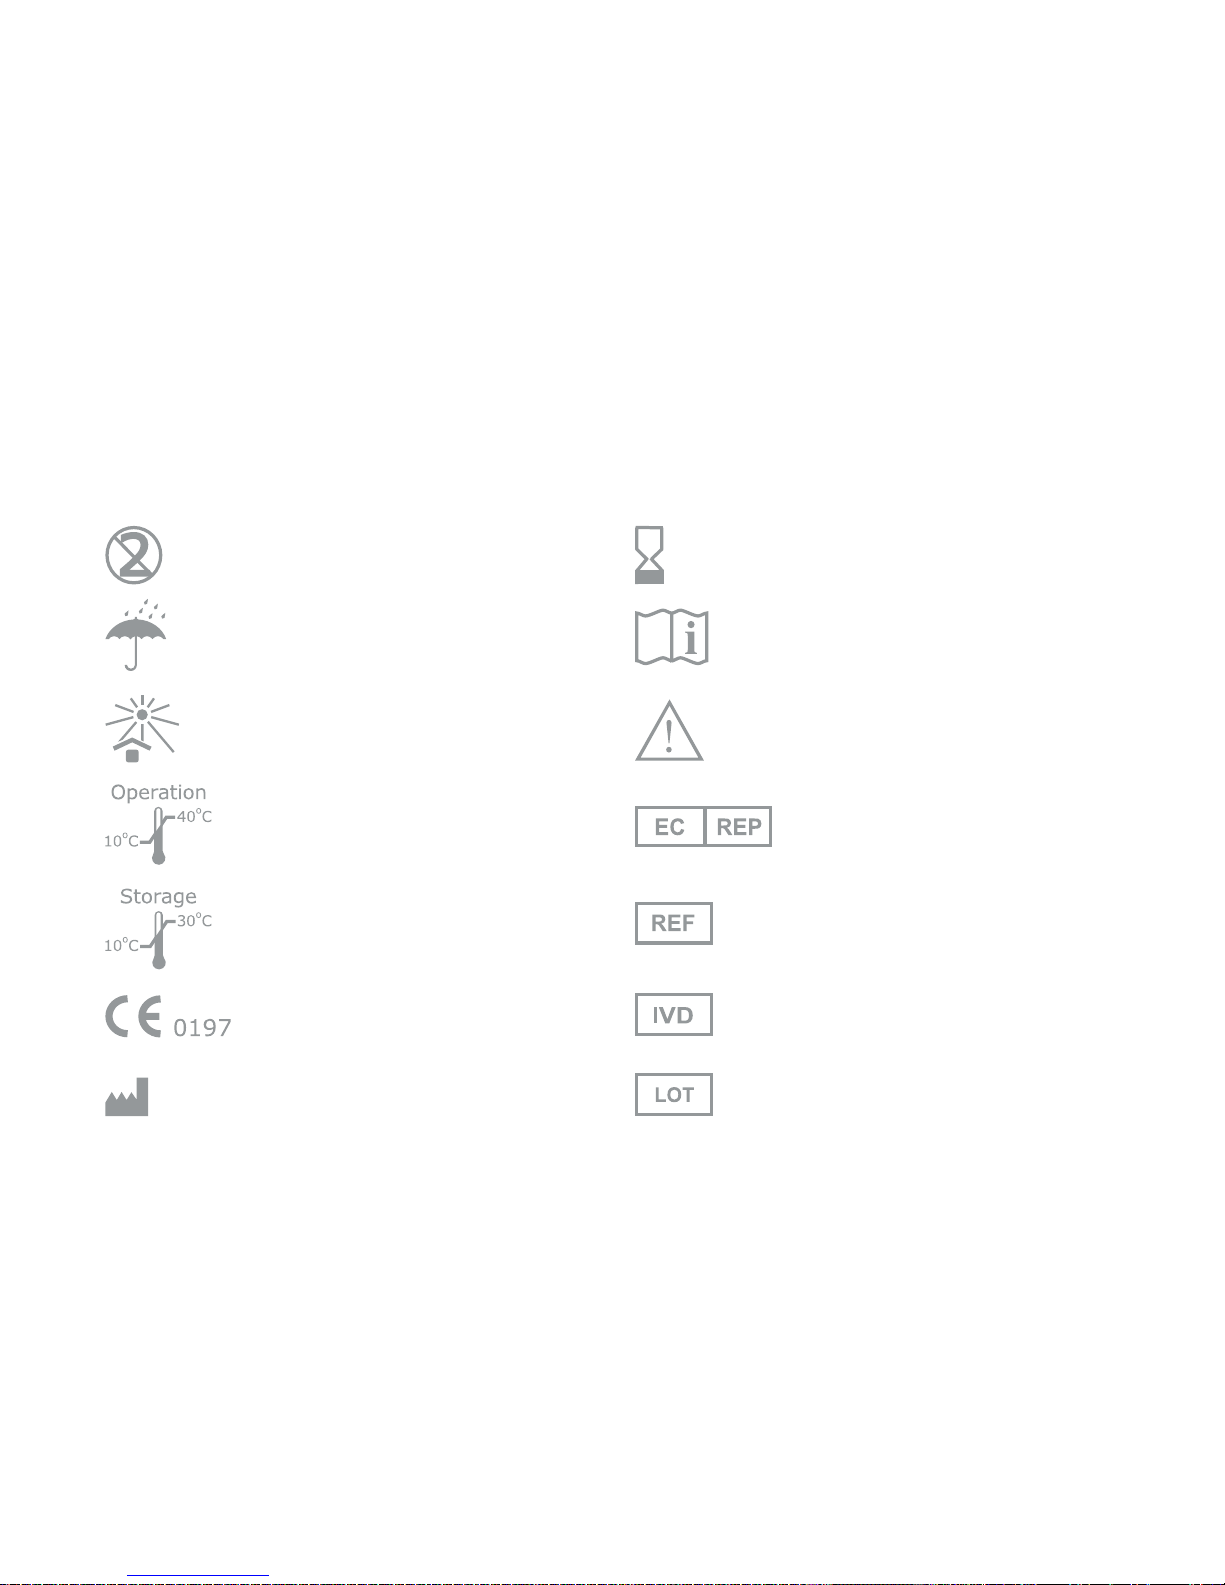
Caution, consult
accompanying documents
1.3 Labelling and Information
Do not re-use
Keep dry
Operation temperature
limitation
In-vitro diagnostic
Lot number
CE certication
Read instructions
Storage temperature
limitation
Use by
EU Representative
Catalogue number
(Product number)
Manufactured by
Keep away from sunlight

6
1.4 System Components
Meter (Front Side)
Right “Set” Button :
For on/off and setup mode
operation.
LCD Screen :
For display of operating
information and test results.
Test Port :
Where you insert the test strip
for testing.
Left “M” Button :
For memory mode operation.
7
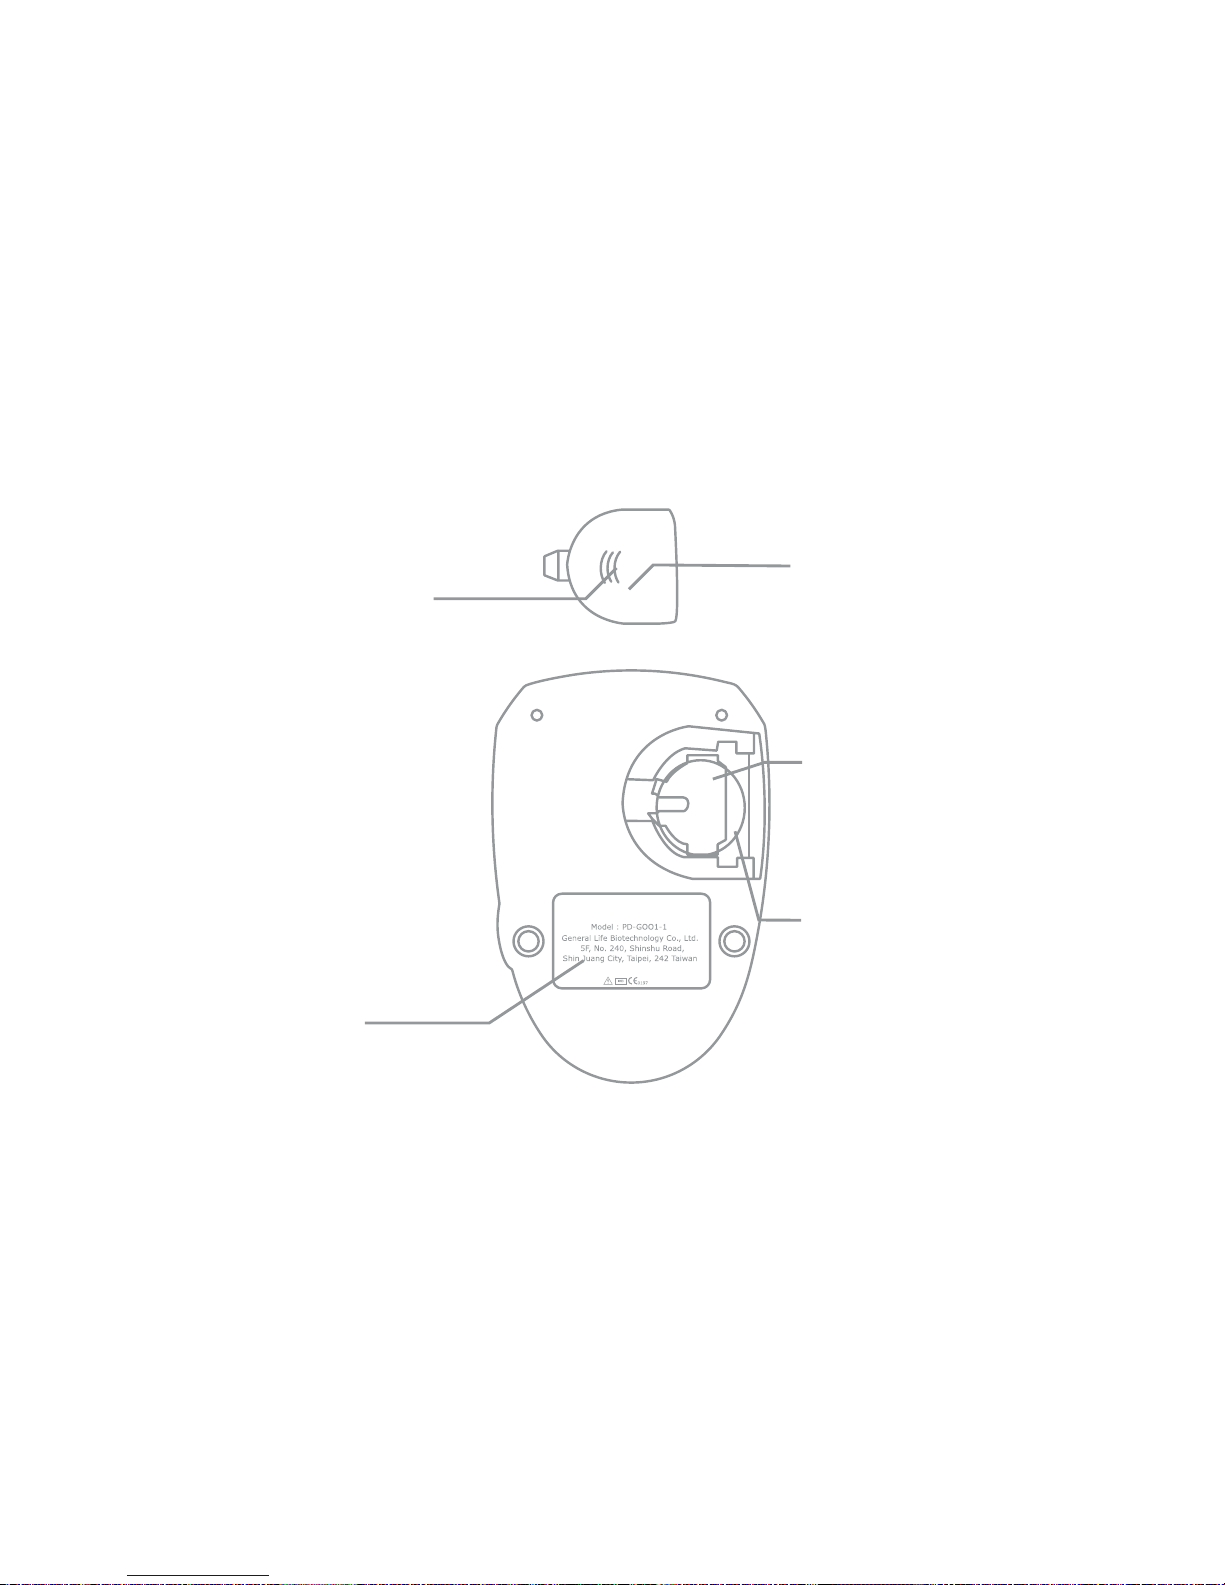
PLUS Multi-Monitoring System
.
Battery : One CR2032
BeneCheck
Battery Cover Lid :
Pull right ward to remove
the cover when replacing
battery
Battery Cover :
For covering the battery.
Battery :
3V lithium battery
(CR2032)
Battery Socket :
For holding a 3V-lithium
battery
Tag :
Display information
about the meter.
Meter (Back Side)

8
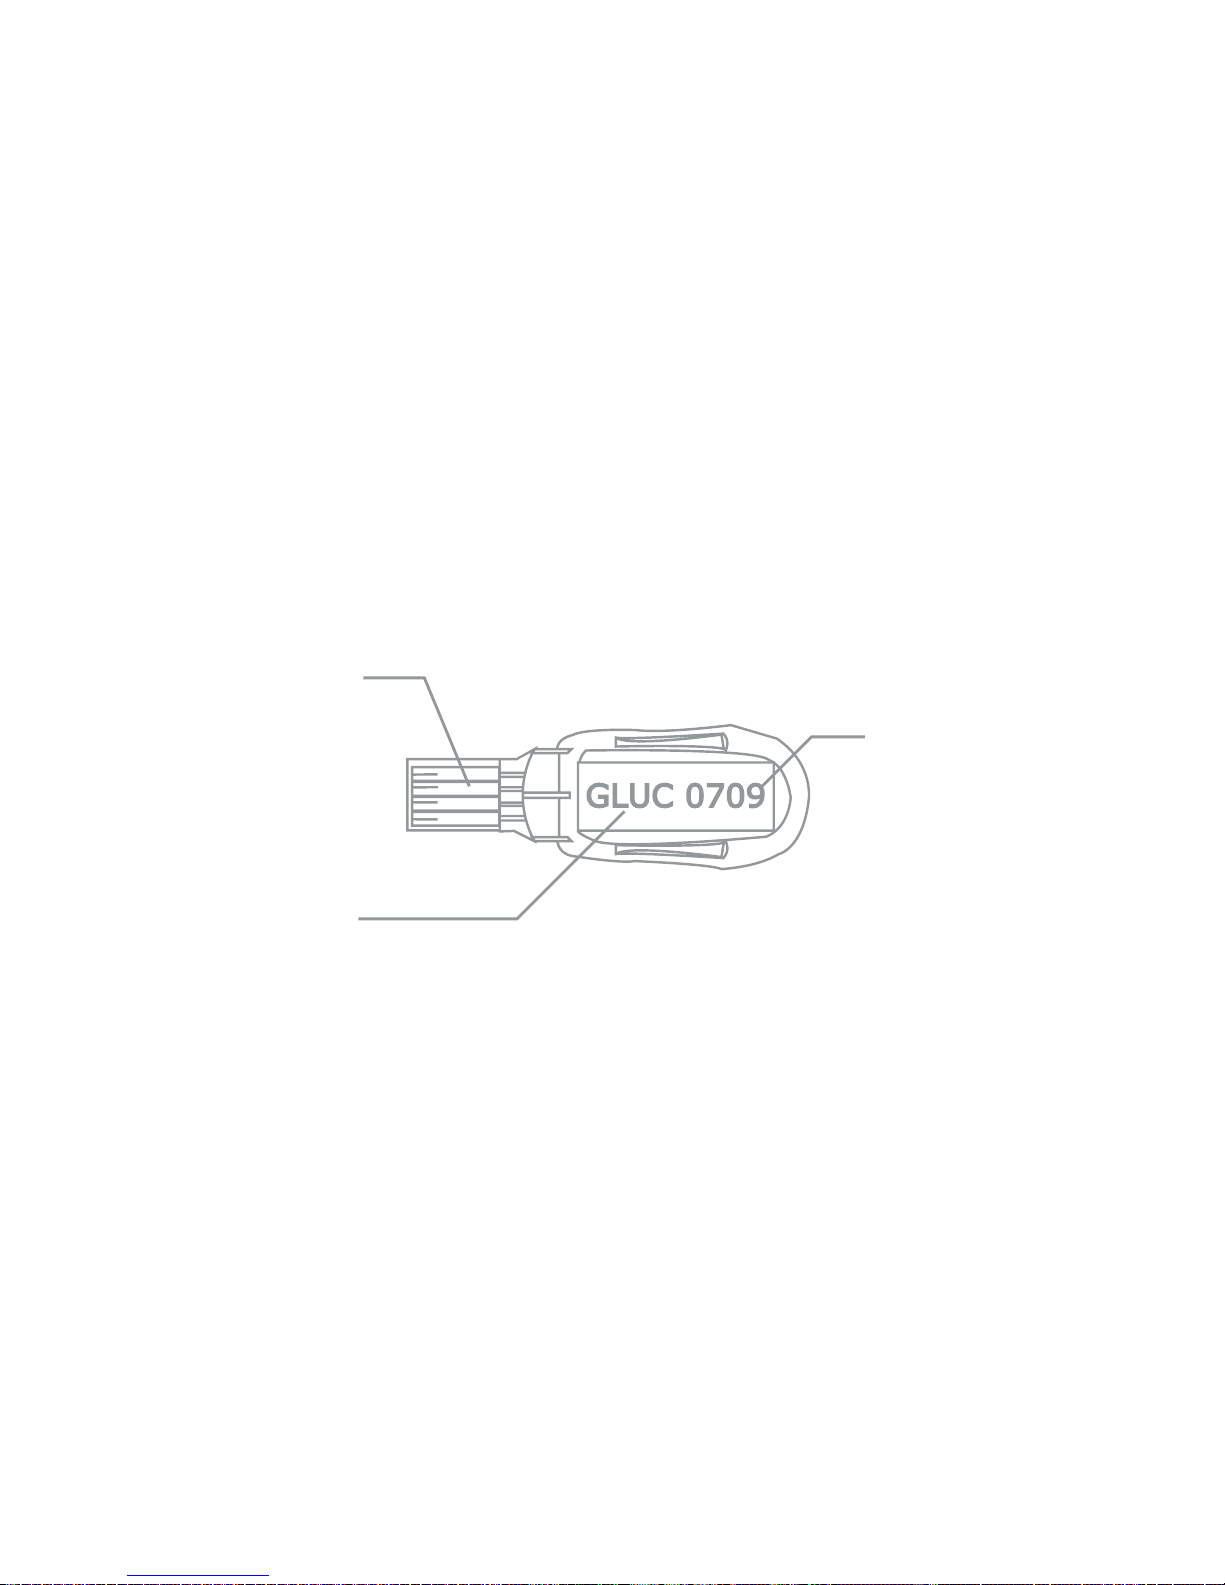
Electronic Contact Bar :
Insert Electronic Contact Bar of the
test strip into the Test Port of the
meter to activate it.
Sample Inlet :
The inlet where the whole blood or control solution is drawn
in. Touching a blood sample or control solution will result in
a capillary action automatically
Test Strip
Glucose & Uric Acid Strip
BeneCheck

9
Total Cholesterol Strip
Electronic Contact Bar :
Insert Electronic Contact Bar of the
test strip into the Test Port of the
meter to activate it.
Sample Inlet :
The inlet where the whole blood or control solution is
drawn in. When a blood sample or control solution touches
this end, the sample will be sucked into the reaction zone
automatically. The reaction zone of total cholesterol strip
full of control solution or a blood sample at least 10 µL is
essential.
Reaction Zone :
Reaction zone of
Total Cholesterol
10
Code Strip ( Front View )
Contact Bar :
Insert this end into
the Test Port of the
meter. Code Number
Test Mode :
GLUC - Glucose
UA - Uric Acid
CHOL - Total Cholesterol
Test Mode

11
Chapter 2 Setting-up the Meter
2.1 Installing/Replacing the Battery
Battery is loaded inside the meter. Use only 3V lithium battery. Do not use or
replace the battery with different types of battery which will damage the
electronics of meter.
Instructions :
1. Hold the meter with one hand, slightly pull right the back
cover to remove the back cover.
2. Insert a new battery to the battery socket with the “+” side
facing up.

12
3. Place back the battery cover onto the meter.
2.2 Set the Year/Month/Day/Hour/Minute
Press and hold the “Set” button for over two seconds, the meter will sound one
beep and enter the setting mode. Please follow the directions below to set the
meter.
Under the setup mode, the LCD screen of the meter shows all setting items start
from a blinking year “200X” and the rest setting items are listed as follows:

13
Set the Year
1. When the meter enter setting mode, the first item on the screen
such as “2008” will blink on screen, which means Year.
2. Click the left “M” button to advance one year until you get a correct
year number.
3. After you set the desired year number, click the “Set” button again
then the meter enters into month setting.
Set the Month
1.
Click the left “M” button until the correct month appears.
2.
Click the right “Set” button, and then day segment starts blinking.
Set the Day
1.
Click left “M” button until the correct day appears.
2.
Click the right “Set” button, and the hour segment will start blinking.

14
Set the Hour
1.
Click left “M” button until the correct hour appears.
2.
Click the right “Set” button, and the minute segment will start
blinking.
Set the Minute
1.
Click left “M” button until the correct minute appears.
2. Click the right “Set” button then measurement unit segment starts
blinking.
After you nish setting the meter, press the right “Set” button, and the the meter
will show “OFF” on the screen and power-off.
Note :
Please refer to Chapter 5 for the measurement units setting procedure.

15
2.3 Coding the Meter
The BeneCheck PLUS meter should be coded before testing with BeneCheck
PLUS test strips for the rst time, or every time a new box of BeneCheck PLUS
test strips are used. There are three kinds of test strips which can be used with
BeneCheck PLUS meter. Each vial of the test strips has assigned a code number
and test mode. The code strip is packaged with the test strip in order to calibrate/
code the meter. Every time a test strip is inserted, please check the code number
and test mode appearing on the Screen is the same as the code number and test
mode marked on the code strip and test strip vial.
Directions :
For Glucose Test Mode
1.
Check the code number and test mode on the code strip is
the same as the code number and test mode on the glucose
test strip vial, and check the test mode of the strip.

16
2. Insert a code strip into the test port of the meter.
Wait for the code number to appear on the screen.
3.
Make sure the code number on the screen is the same as
the code number on the code strip, and the test mode is
also the same as marked on the test vial.
Remove the code strip. “ ” should appear on the screen,
indicating that the meter has been successfully coded to
glucose test mode.
For Uric Acid Test Mode
Follow the same procedures of 1 to 3 described in glucose test mode .
4.
Make sure to check that the code number and test mode on
the code strip are the same as the code number and test
mode on the uric acid test strip vial.
Remove the code strip. “ ” should appear on the screen,
indicating that the meter has been successfully coded to uric
acid test mode.

17
2. Insert a code strip into the test port of the meter.
Wait for the code number to appear on the screen.
3.
Make sure the code number on the screen is the same as
the code number on the code strip, and the test mode is
also the same as marked on the test vial.
Remove the code strip. “ ” should appear on the screen,
indicating that the meter has been successfully coded to
glucose test mode.
For Uric Acid Test Mode
Follow the same procedures of 1 to 3 described in glucose test mode .
4.
Make sure to check that the code number and test mode on
the code strip are the same as the code number and test
mode on the uric acid test strip vial.
Remove the code strip. “ ” should appear on the screen,
indicating that the meter has been successfully coded to uric
acid test mode.
For Total Cholesterol Test Mode
Following the same procedures of 1 to 3 described in glucose test mode .
5.
Make sure to check the code number and test mode on the
code strip is the same as the code number and test mode on
the total cholesterol test strip vial.
Remove the code strip. “ ” should appear on the screen,
indicating that the meter has been successfully coded to
total cholesterol test mode.
Cautions :
If “E-E” appears on the Screen during coding procedure, there may
be a problem with the code strip or a wrong category code strip
may be misused. Perform the coding procedures again, and if “E-E”
continues to appear, please contact the authorized distributor for
service.
Table of contents
Popular Personal Care Product manuals by other brands


Eurofase Lighting
Eurofase Lighting CERISSA 44369 instruction manual

SOLTRON
SOLTRON XL-80 Fresh peppermintDynamic power operating instructions

Conair
Conair NE150SBC Instruction booklet

Orliman
Orliman Thermomed Smart 4102 Use and maintenance instructions

Orliman
Orliman Actius ACP901 Aplication Instructions Use and Care

Braun
Braun Oral-B AQUACARE WATERFLOSSER Usage instructions