Benecykl KOZLIK User manual

OPERATING INSTRUCTIONS FOR A SPECIAL SPORTS STROLLER KOZLÍK
Dear customer,
thank you for your purchase of the special sports stroller Kozlík from the company Benecykl s.r.o. and we
wish you many pleasant moments while cycling.
Our strollers are made with focus on the maximum safety and comfort. You will certainly appreciate the
ease with which you can adjust the stroller accoring to your needs.
In order to serve you well and for a long time, it is important to pay attention to the following
recommendations.
RECOMMENDATION BEFORE THE TRIP:
- Due to the low level of the whole stroller it is recommended to pay attention to highlighting the stoller
with the supplied signal flag.
- The child has to be always firmly secured by the safety belts which are an integral part of the stroller.
- The use of bicycle helmet is recommended.
- When connected behind the bike do always use the protective shield that protects your child from stones
flying off the wheels.
- We also highly recommend using the net „tropico“ which serves as a protection against insects as well as
against little stones flying off the wheels.
- As a protection against rain, snow or mud we recommend to use a raincoat.
- In reduced visibility we strongly recommend you to highlight the stroller with red „twinkling lights“ placed
on the handrail (not included).
- Check the connection between the drag bar and the frame of the wheel by a safety pin as well as with a
snap hook with a black strap.
- Keep the correct angle of the back wheels (see Adjusting the back wheels).
- Keep on checking the inflation pressure of the tires.
- Provide full attention to the balance of the total cargo including the passanger, that should be with a little
overhang in the front part. Just than you will enjoy cycling with a minimum effort and resistence.
- Do not exceed the maximum cargo capacity of the stroller. For your cargo use standardized frontal small
and hinder large backpacks, as well as the little pocket on the handrail.
- As a manufacturer we guarantee the functionality of the front positioning mechanism with locking tow
bar and front wheels only if the cargo in front of the stroller on the axis of the front wheel does not exceed
10 kg.

- In case of unbalanced cargo and overloading of the frontal wheel or rear wheel may cause a damage of
wheel hindge and the manufacturer in any case is not responsible for incured damages.
USING THE SPORTS STROLLER KOZLÍK
STROLLER KOZLÍK is intended for:
- transport of one child and small cargo in a designated area according to the capacity of the stroller,
using seat belts and other safety features (tropiko net, hood and protective shield) and instructions
listed in the "Manual "
- use of the stroller model " sports stroller " for hiking (and alpine hiking ), " jogging " or for " in- line"
skating
- winter "cross country" tourism activities while using the appropriate " ski " or " winter " set
STROLLER KOZLÍK is NOT intended for:
- transport of animals or oversize and excessively heavy loads (by tonnage)
- linking of other brands of other trucks
- ride to and down steep stairs and crossing barriers higher than 10 cm (e.g. stairs, curbs, stones, etc.)
- transport of more people in one stroller than recommended
- higher than the maximum speed 30 km/h, in turns and on flat terrain only up to 20km/h
CAUTION :
Drive speed of the stroller mounted behind the bicycle must be always adjusted to the comfort of your
child, surface and the slope of the road and so that the rider had the stroller always under control. Keep
longer distances of the stroller from side barriers such as safety fence, edge stones, etc. In turnings
aware of the necessity of bigger loops !
Despite the high stability of the stroller KOZLÍK given by the angle of the rear wheels , danger of tipping
over the side of the stroller is still possible especially in the following situations:
-ride in a too steep terrain,
-quick turning with the stroller while speeding,
-quick running against some inequality on the terrain with only one wheel
-driving with an empty stroller
DESCRIPTION OF ACCESSORIES FOR THE STROLLER KOZLÍK FOR SELECTED ACTIVITIES:
The stroller can be due to selection of appropriate accessories easily adapted to a chosen activity such as
riding in a city, off-road riding, cycling, winter exposures, etc.). Individual activities can also be combined
thanks to a simple system of manipulation.
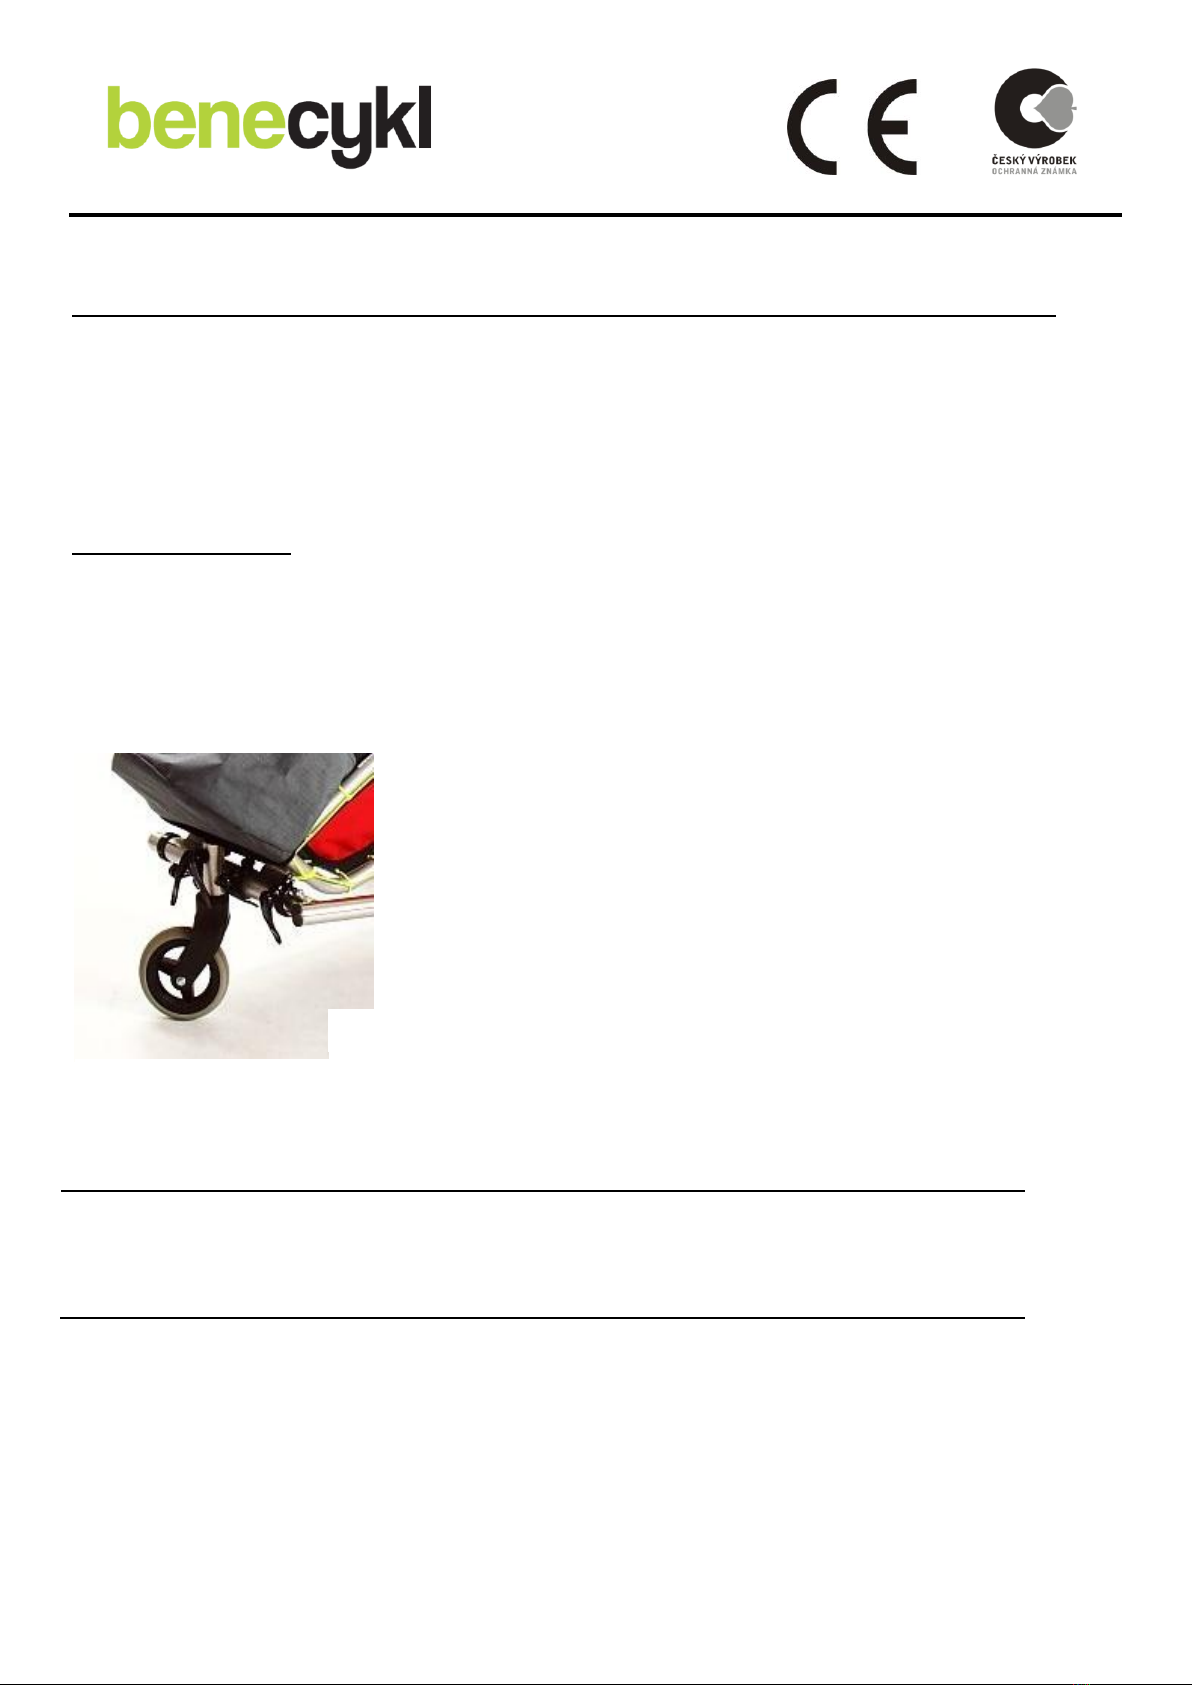
Front swivel wheel
Front swivel wheel (Fig. 1) allows easy manipulation with the stroller and its ability to turn almost on the
spot.
We use it when driving in common city traffic. Adjusting the position of the swivel wheel is possible by a
quick release of the two internal clips that allow movement of the wheel around its axis. Set the front
swivel wheel vertically to the ground to avoid any possible damage of its clamping and fix it by the clips.
CAUTION
Using the swivel wheel is not very suitable for broken terrain. Avoid overloading the front
wheels when the child is standing in the stroller and thus the weight is not optimally distributed.
Front swivel wheel does not require any special maintenance, but keep it clean and if necessary
lubricate the moving parts.
1
1

Large front wheel
Large front wheel is designed for physical activities in broken terrain and sport activities such as "in-line"
skating, hiking or "jogging". Large front wheel is firmly fixed in a given position, the stroller keeps a track
and is not turning. With the help of two inner clamps (Fig. 2) the stroller may be positioned according to
your needs and required sway. The position of the child can be than easily changed from a sitting position
(Fig. 3) to the lying position (Fig. 4). The front wheel sleeve must always be held behind its axis.
Maintenance of the front wheels rests in inflating the tires, up to a maximum given pressure.
Pull system for a wheel with a shield
Pulling system (Fig. 5) is used for cycling. It consists of a drawbar with a protective shield and fixing. The
cycling set is always supplied with 2 pieces of fixing. Instal the pulling system below the axis nut of the rear
wheel or below the locking lever of the quick release hub of the rear wheel (opposite the front derailleur).
While installing grasp the beginning of the drawbar, insert it into the fixing, thread the fuse through both
the drawbar and the fixing and wrap it by the retaining strap ( Figure 6). To connect the tow bar any
specific angle between the wheel and drawbar is not necessary, which allows you to position the stroller
according to your needs.
The shield positioned on the drawbar prevents small stones and other debris flying off the wheel to harm
the child sitting in the stroller. Put the shield into the hole approximately in the middle of the drawbar,
then fasten with clamp. For the right effect of the shield pay attention to keeping the shield in a position
with regard of the rear wheel and the stroller (Fig. 7).
2
2
3
4

Unstretching of the two side clamps on the front axis of the stroller enables rotating of the drawbar round
the axis. Once set into the required position remember fixing the clamps again. In case of longer disuse you
can put the drawbar off and reduce the weight of the stroller.
CAUTION
While fixing the clamps of the drawbar you have to
tighten them strongly. Disused clamps have to fasten
firmly (Fig. 8,9). Just than you avoid possible
spontaneous unscrewing and loss of the components.
5
6
7
8
9
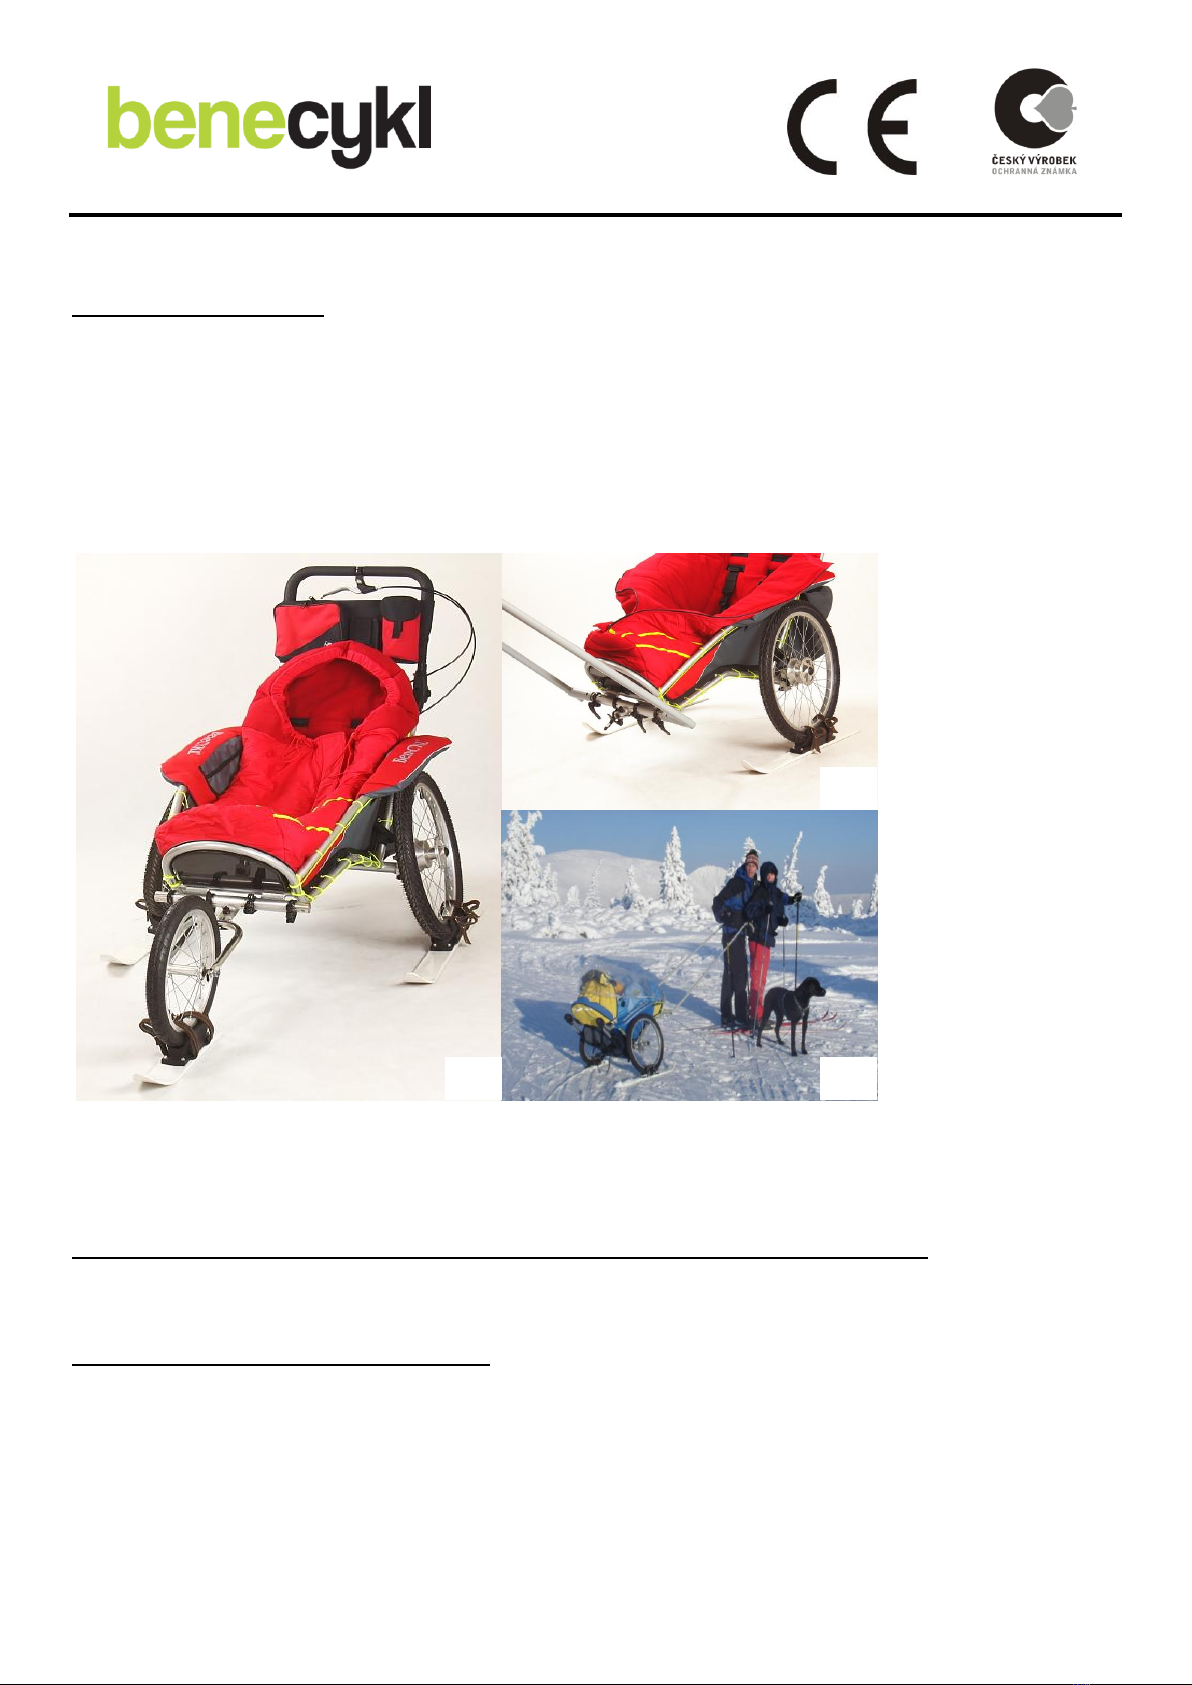
Winter set and ski set
In winter you can easily use the stroller KOZLÍK as a sledge. Click the two bigger skis on the rear wheels and
the smaller ski on the front wheel. Fasten the skis using straps (Fig. 10).
If you want to cross country ski and pull the stroller behind you as a sledge, use the SKI SET. After removing
the front wheel and the drawbar, you just slide the drawbar with a waist belt to the axis of the front pipe
and clip it in firmly.(Fig. 11, 12).
REPLACING OF THE STROLLER EQUIPMENT WHEN CHANGE OF ACTIVITIES
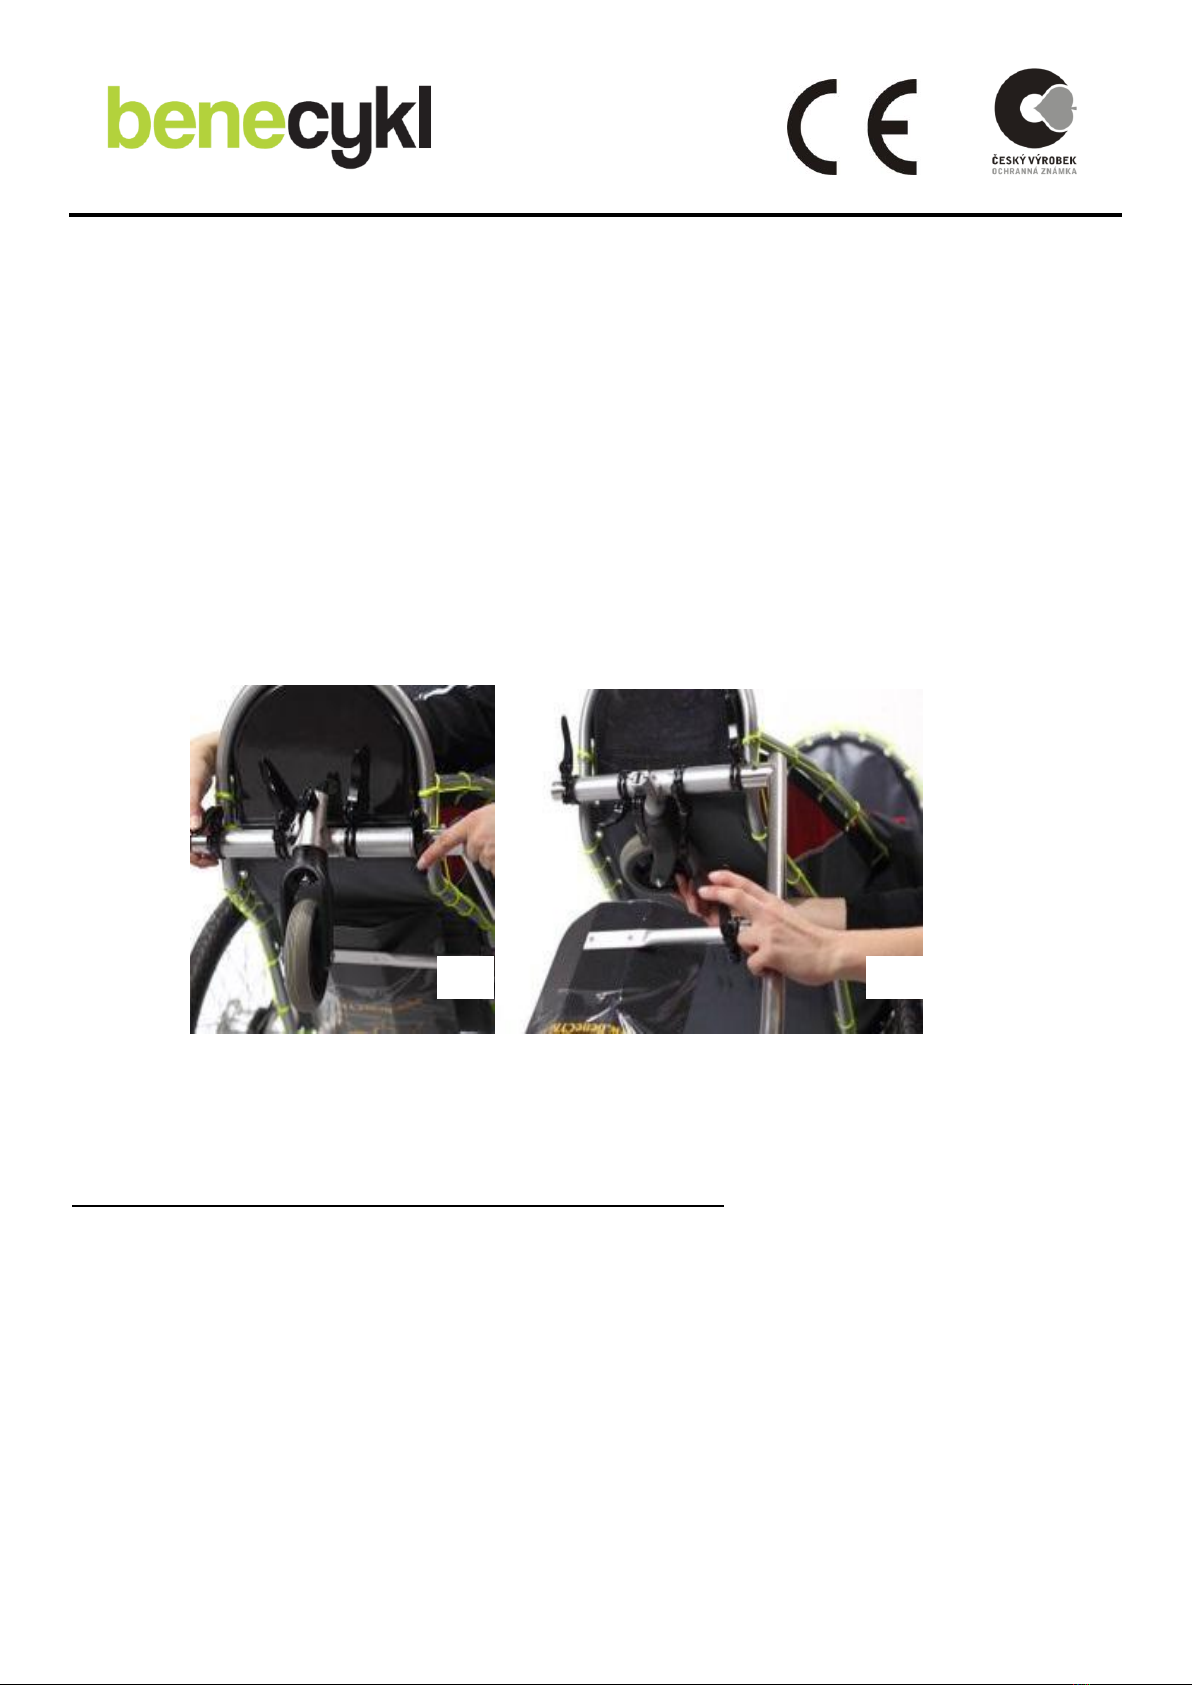
Front swivel wheel - front big wheel
The front wheels can be changed according to the expected terrain in which the stroller will be used
(see above).
1. Release the clamp on the sleeve of the wheel (the closest clamp to the center on the frontal part of
the frame of the stroller –Fig. 13) and fully popp up the replaced component.
1
10
11
12

2. Loosen the two inner clamps around the sleeve (Fig. 14), thereby the frontal axis for positioning is
released (Fig. 15). Insert the wheel so that it is fully inserted into the sleeve. Set the corresponding slope of
the stroller and then firmly tighten all the clamps.
CAUTION
When adjusting the stroller always remember the alighnment
of rear wheels so that the hard aluminum cubes were always
vertically to the ground (Fig. 16) - see the correct wheel
alignment settings.
In case of bad alignment of rear wheels the stroller is
shearing with unnecessary resistence. Which causes
increased vibration as well as enhanced risk of unclaping of
the clamps.
In addition there is an uneven tire wear!!
Exchange of the front wheel
The drawbar is fixed permanently in the position under the stroller. Mutual exchange is achieved through
the following steps :
1. Loosen both inner clamps around the wheel sleeve (Fig. 14). This enables positioning of the front
wheel .
2. Loosen the two outer clamps (Fig. 17). This enables manipulation with the drawbar, placed under
the frame of the stroller. Grip the front wheel folded under the stroller with one hand and use the
other hand to pull the drawbar forward to a suitable position (Fig. 18).
13
14
15
16
3. Fix the drawbar into the desired position by tightening the clamps.
4. Pull the small front wheel under the stroller and fix by clamps.
5. Set the protective shield to the operating position (Fig. 7).
6. Connect the stroller behind the wheel (see the pulling system).
7. Synchronize the geometry of the rear wheels!
When replacing the drawbar by the big front wheel, it is necessary to remove the wheel out first and than
start positioning of the drawbar. Other steps are identical with the exchange of a small front wheel.
Setting the right rear wheel alignment and maintenance
The rear wheels have a size of 20 inches and the slope provides better balance of the stroller and thus
safety for your child.
Maintenance of the rear wheels for optimum performance is to center the wheels, which should be
performed by a professional service, as well as in an appropriate inflation of the coats depending on the
terrain. Higher pressure for driving on even ground, lower pressure for broken terrain. Still, never exceed
the maximum recommended pressure indicated on the wheel cover.
Setting the correct geometry of the rear wheels is achieved by turning the dural blocks (Fig. 19) in the
vertical position to the ground. To move the blocks you must first release the appropriate clamp, than
17
18
remember to tighten the clamps again. Adjusting the angle can be performed at any time after stopping as
needed, and it is not necessary to disconnect the stroller from wheels.
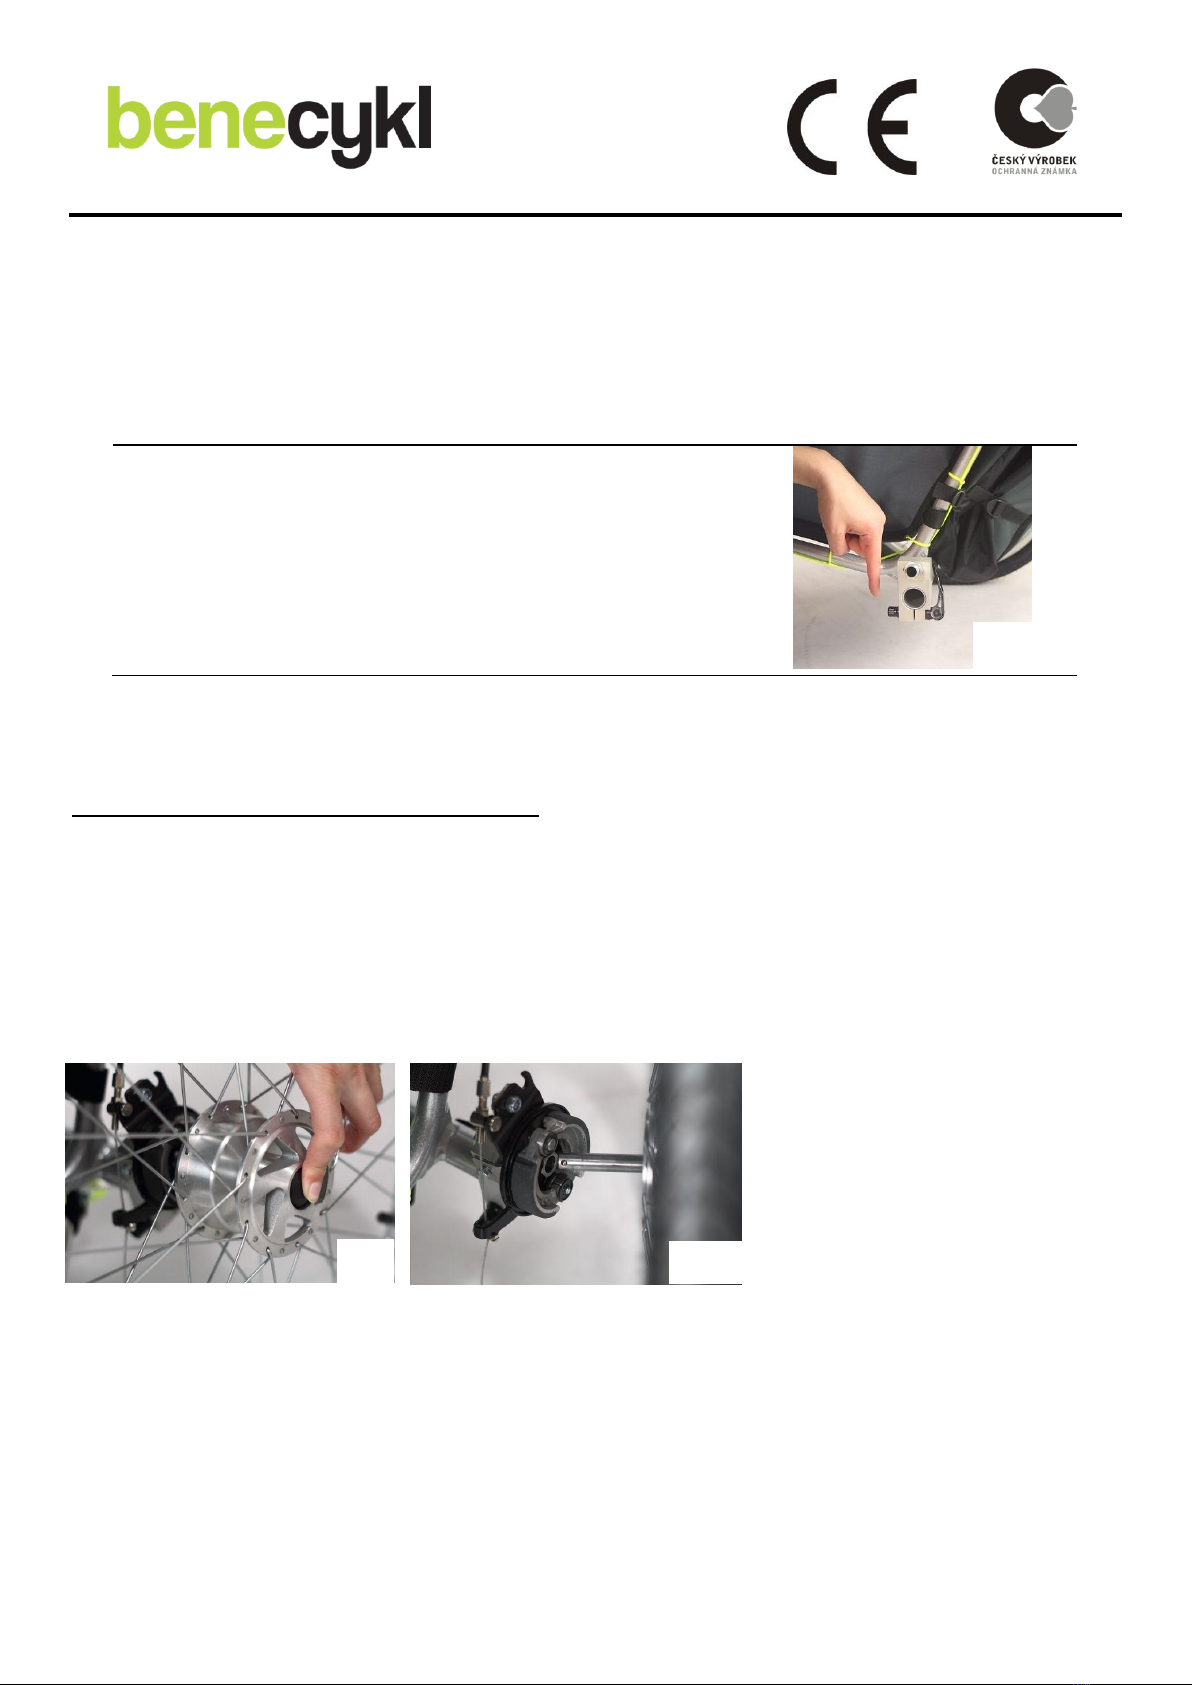
Removing and replacing the rear wheels
For better storage and handling both rear wheels can be easily removed from the stroller frame by quick
release hub. To remove them out, press and hold the center of the hub (Fig. 20) and push the wheel out
(Fig. 21). The same way put them back, always make sure that the wheels are fixed well.
CAUTION
Always remember to check the wheel alignment and adjust it
each time you change position of the stroller. Poor alignment
can cause unnecessary resistance and cause worn tires.
19
21
20

DESCRIPTION AND USE ANOTHER TRUCK ACCESSORIES
A seat, a hut and a „tropiko“net
The seat and the hut (Fig. 22) is made from a waterproof fabric " Kortexin". The material does not
require special maintenance. For cleaning there can be used common detergents. Hut would be used for
shading the stroller. Stiffness of tilting can be influenced by tightening screws located inside the plastic
clips. Tropiko is used as a protection against insects. It is fastened to the hut with a zip. To fix the net to
the stroller drag the bottom of the net over the footstep in front of the stroller.
CAUTION :
Material the seat is made of as well as of the hut and the net is not
fire resistant and possible increased thermal radiation (danger of
cigarette burns , or spark from the fire, etc.).
Attaching the hut to a wheelchair
1. First fix the construction of the hut into the tubular sleeve in the rear part of the frame of the
stroller (Figure 23).
2. Lock the inset construction of the hut in the tubular sleeve by attached safety-pin ( Fig. 24).
22
23
24

Glare shield
Glare shield can be easily fixed with velcro to the hut of the stroller BABY and JUNIOR. The glare shield
provides protection against the sun and at the same time it can also be used with tropiko net (Fig. 25
and 26).
Raincoat
Raincoat is designed to protect against rain and cold wind or coldness and is made of transparent folio.
Raincoat follows exactly the shape of the stroller and thus it covers and protects the whole stroller
against water. Slip the raincoat over the stroller with a shut hut. First pull the raincoat with the wider top
part over the hut and fasten round the handle with velcro. Then pull the shorter lower part over the foot
step. Finally drag the side parts over the edges of the stroller (Fig. 27).
Keep the regular maintenance of the raincoat with common detergents and water of temperature of
+45°C. For cleaning you may not use any solvent (e.g. acetone, benzene, toluene, etc.).
CAUTION :
Keep a delicate care as the raincoat is made with a seamless
welding technology and is therefore susceptible to tearing or
burning out. Applying any force may result in tearing of welds in
exposed places. This defect is not subject to warranty
guarantees.
Beware of using the raincoat in case of warm sunny weather, it
could very quickly lead to overheating of the child.
25
26
27
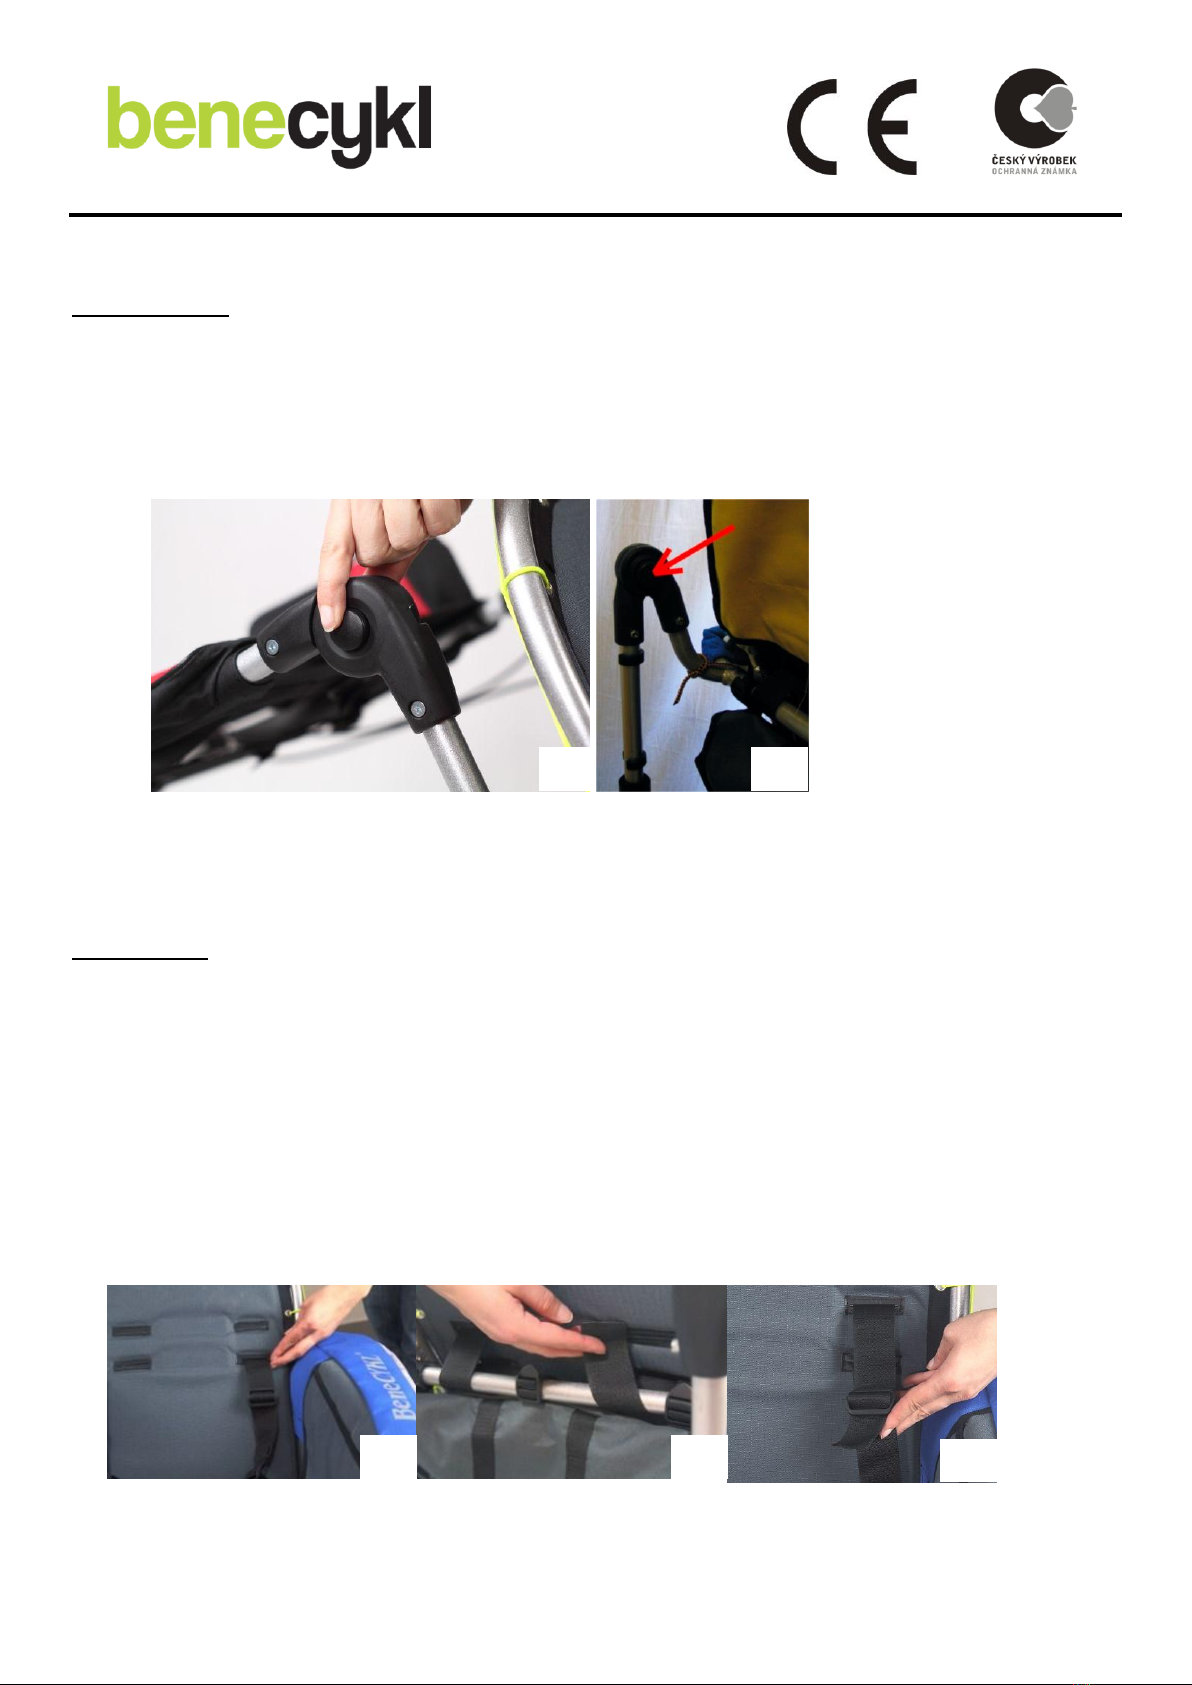
Rear handrail
Any change in position of the handrail do by simultaneous pressing of the two plastic joints (Fig. 28)
with simultaneous bending of the handrail into the desired position (Fig. 29). For greater comfort the
handrail is covered with a foam coating. For security reasons, we recommend to place a red bicycle "
blink " on the handrail.
Safety belts
The truck is equipped with five-point safety belts. If necessary, the seatbelts are easily removable from
the stroller. To remove the belt, remove the belt end from the buckle, thread through the belt mounting
on the back part of the seat and follow the direction of threading the belt until the full release. For
reuse follow the same technique. Thread the belt through the appropriate hole in the seat according to
the child's height (Fig. 30), wrap the strap around the back tube of the skelet paralelly to the ground
(Fig.31). Use the same hole to pull the belt back inside the stroller. Then thread the buckle downwardly
(Fig. 32).
There are holes for the safety belts also in the winter bag which is a possible acessory of the stroller.
28
29
30
31
32
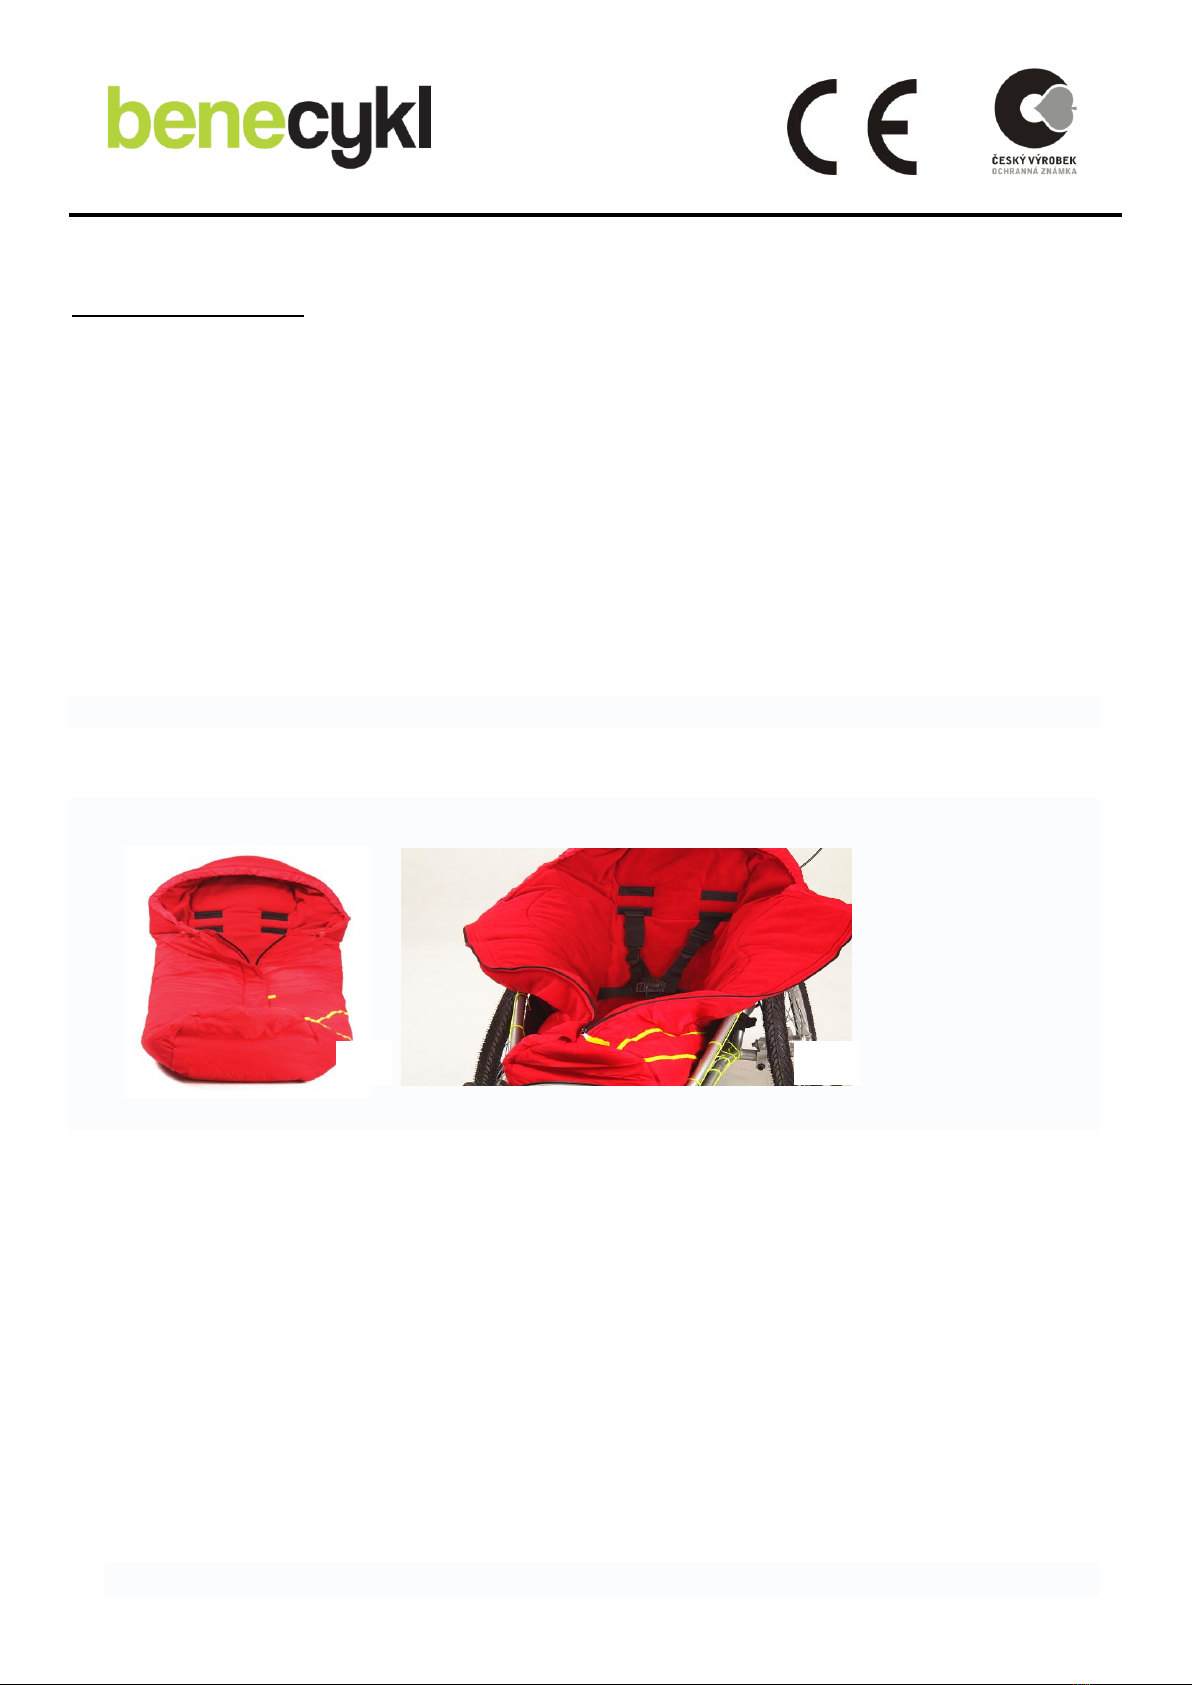
Winter bag m -wear
Instructions for use: After removing the bag from the transport container (Fig. 33) lay the bag down on
the stroller and select the appropriate holes according the child´s size for threading safety belts through.
Pull out the safety belts from the frame (before accidental pulling out we recommend you carefully
inspect fixing of the belts), thread the belts through the holes and fix the winter bag to the stroller.
Safety belts must be adjusted correctly and secured against pulling out (Fig. 34). If necessary, remove the
bag from the stroller the same way you fix it.
The bag is in the inner part of shoe area equipped with a protective layer made of a material
Microfighter easily cleaned by wiping with a damp cloth, etc. When cleaning the inside of the bag open it
to allow it to dry properly.
Material used: Outer layer - fleece BASIC + Microfighter
The inner layer - 100% polyester fleece
_____________________________________________________________________________
CAUTION :
Never use winter bag not fixed to the skelet by seat belts. You risk serious injury to your child.
_____________________________________________________________________________
Maintenance :
-Winter bag where the material Microfighter can be impregnated and let dry properly.
-Transport the bag in the container .
-In summer store the bag freely laid in ventilated areas .
-For use in wet weather let the bag dry properly .
Laundering :
-Wash the bag inside out with activated zip with temperature max. of 40 ° C.
-When washing, use liquid detergent.
-Don´t use fabric conditioner.
-Do not iron!
-Do not bleach.
-Tumble drying is not recommended unless it is absolutely necessary, use friendly programs.
33
34
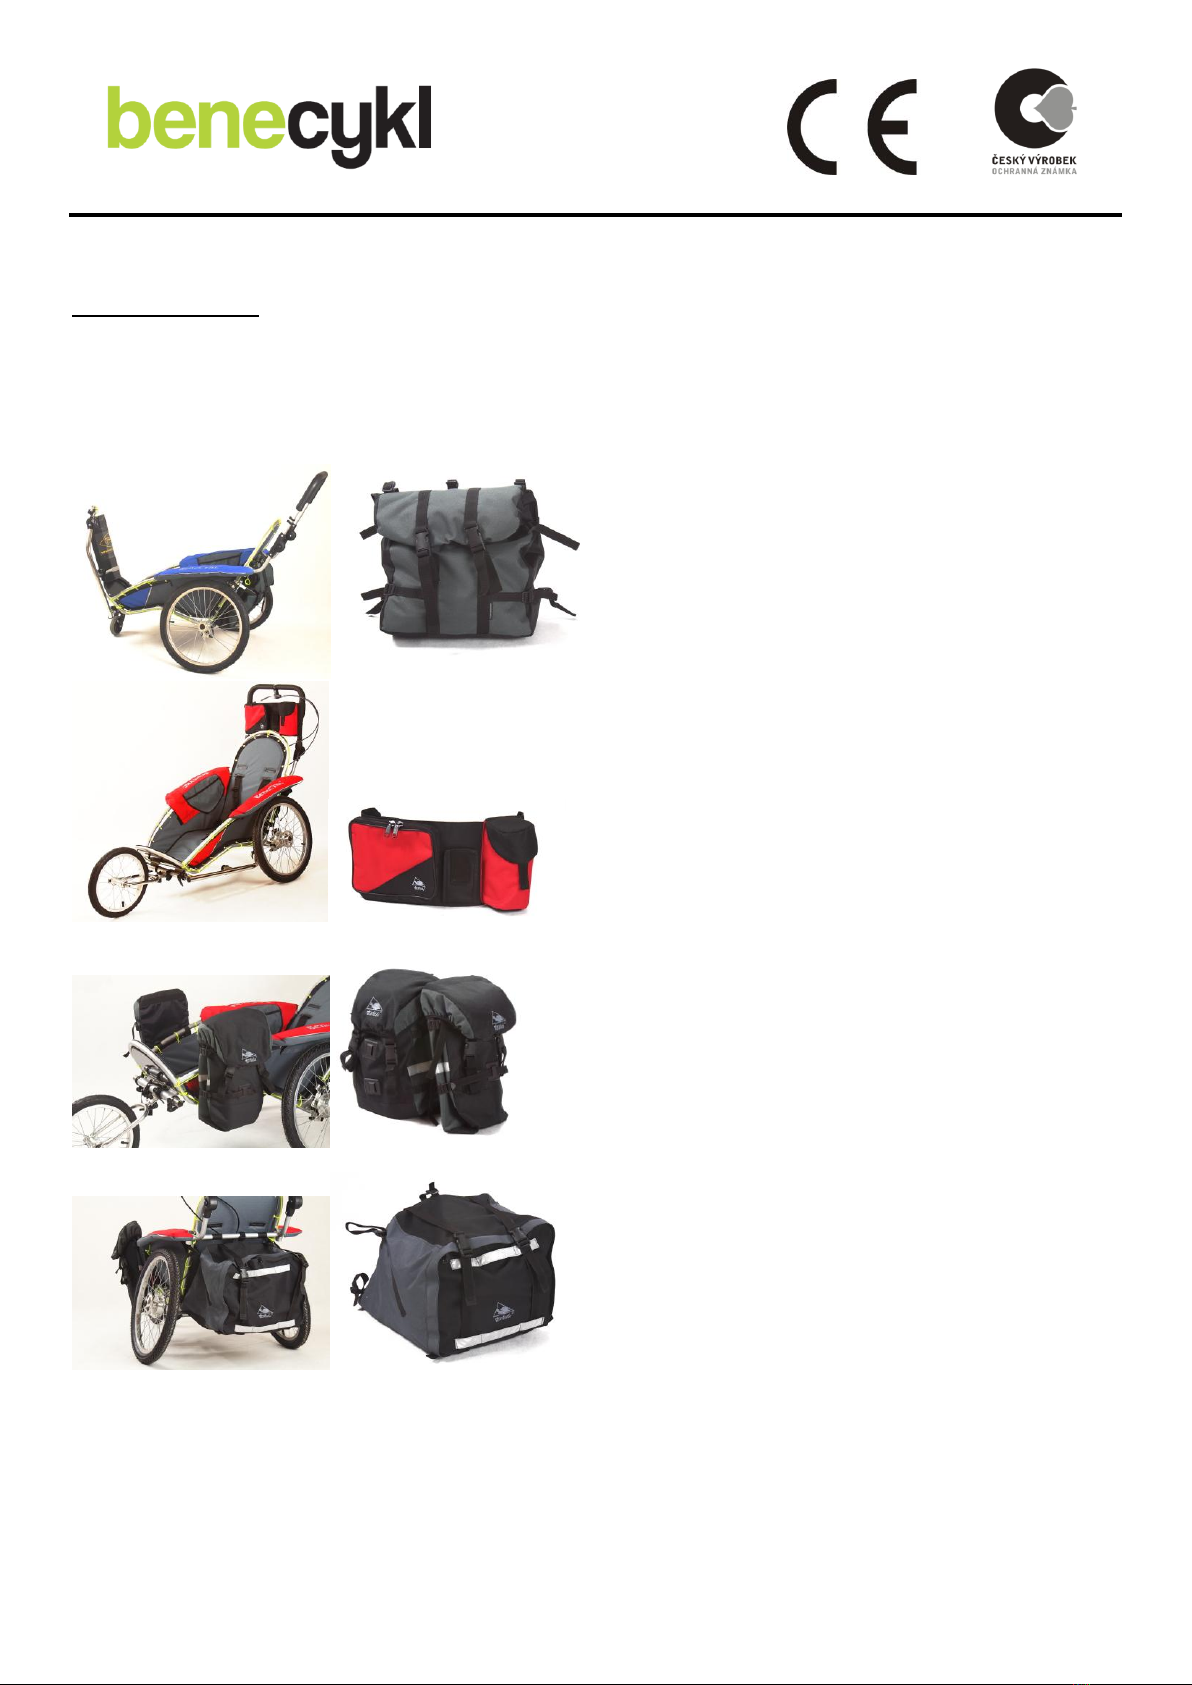
Backpacks, bags
Fix any bag with straps at the place designated for a specific bag. Maintenance is the same as of the seat
cover and the hut.
Figure 35 Backpack positioning on the
stroller, detail of the rear backpack
Figure 36 Positioning of pockets on the
handrail, pocket detail
Figure 37 Positioning of the front
backpacks on the stroller frame, detail
of the front backpacks
Figure 38 Positioning of large rear
backpack, detail of the backpack
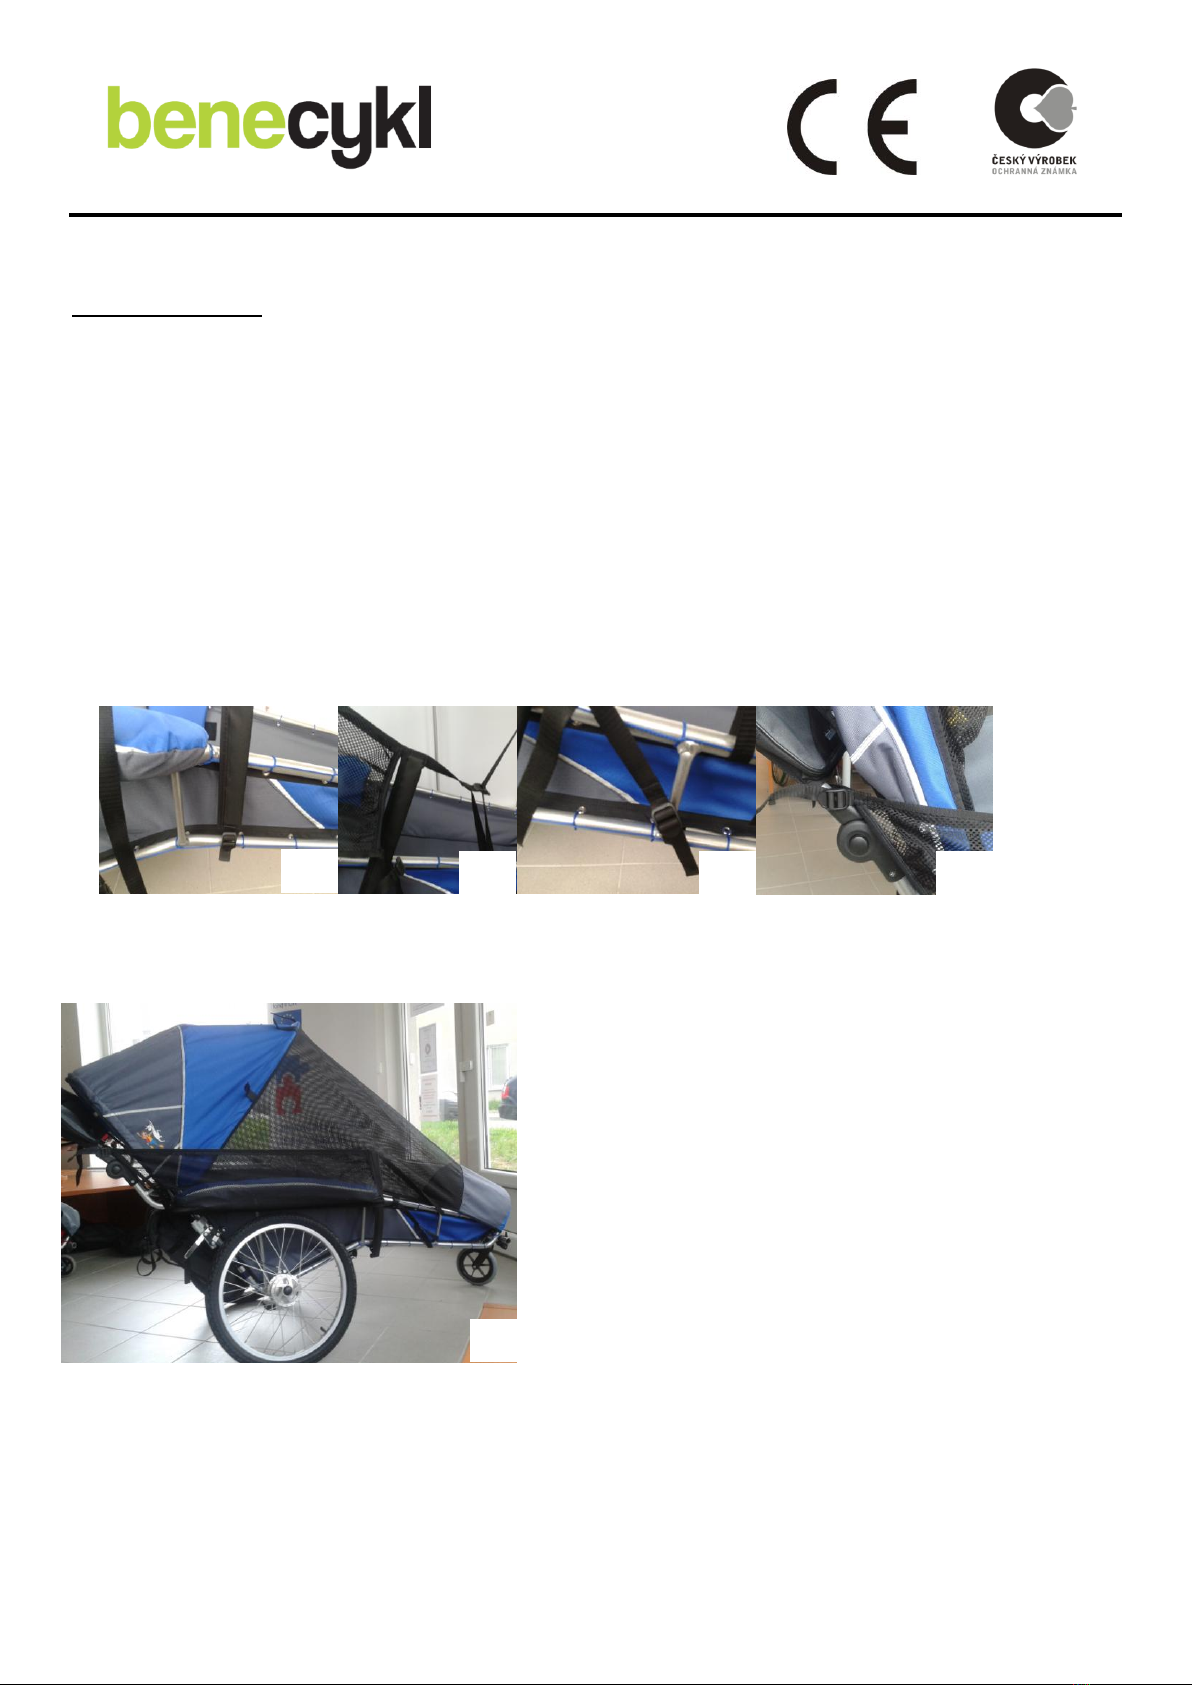
Hand protection
These nets serve as a protection against accidental child hands contact with the spokes. Fix the nets
directly to the construction of the stroller with clamps. Raised position of the net provides the plastic -
coated fixing covered by a coating.
Installing the net :
1. Fix the plastic fixing to the bottom of the stroller skelet (between the two vertical struts, Fig. 39).
2. Fix both straps that are at the plastic fixing (Fig. 40 and 41).
3. Fix the two remaining straps to the handrail. The upper one above the joint (Fig. 42) and the
second one to the bottom of the handrail.
Note: The net must be placed on the outside of the net tropiko (Fig. 43).
39
40
43
41
42
Wheel cover
The wheel cover (Fig. 44) is made of washable tent fabric and serves as a protection against spotting
carpets (floors in the house / apartment) if you come from outside.
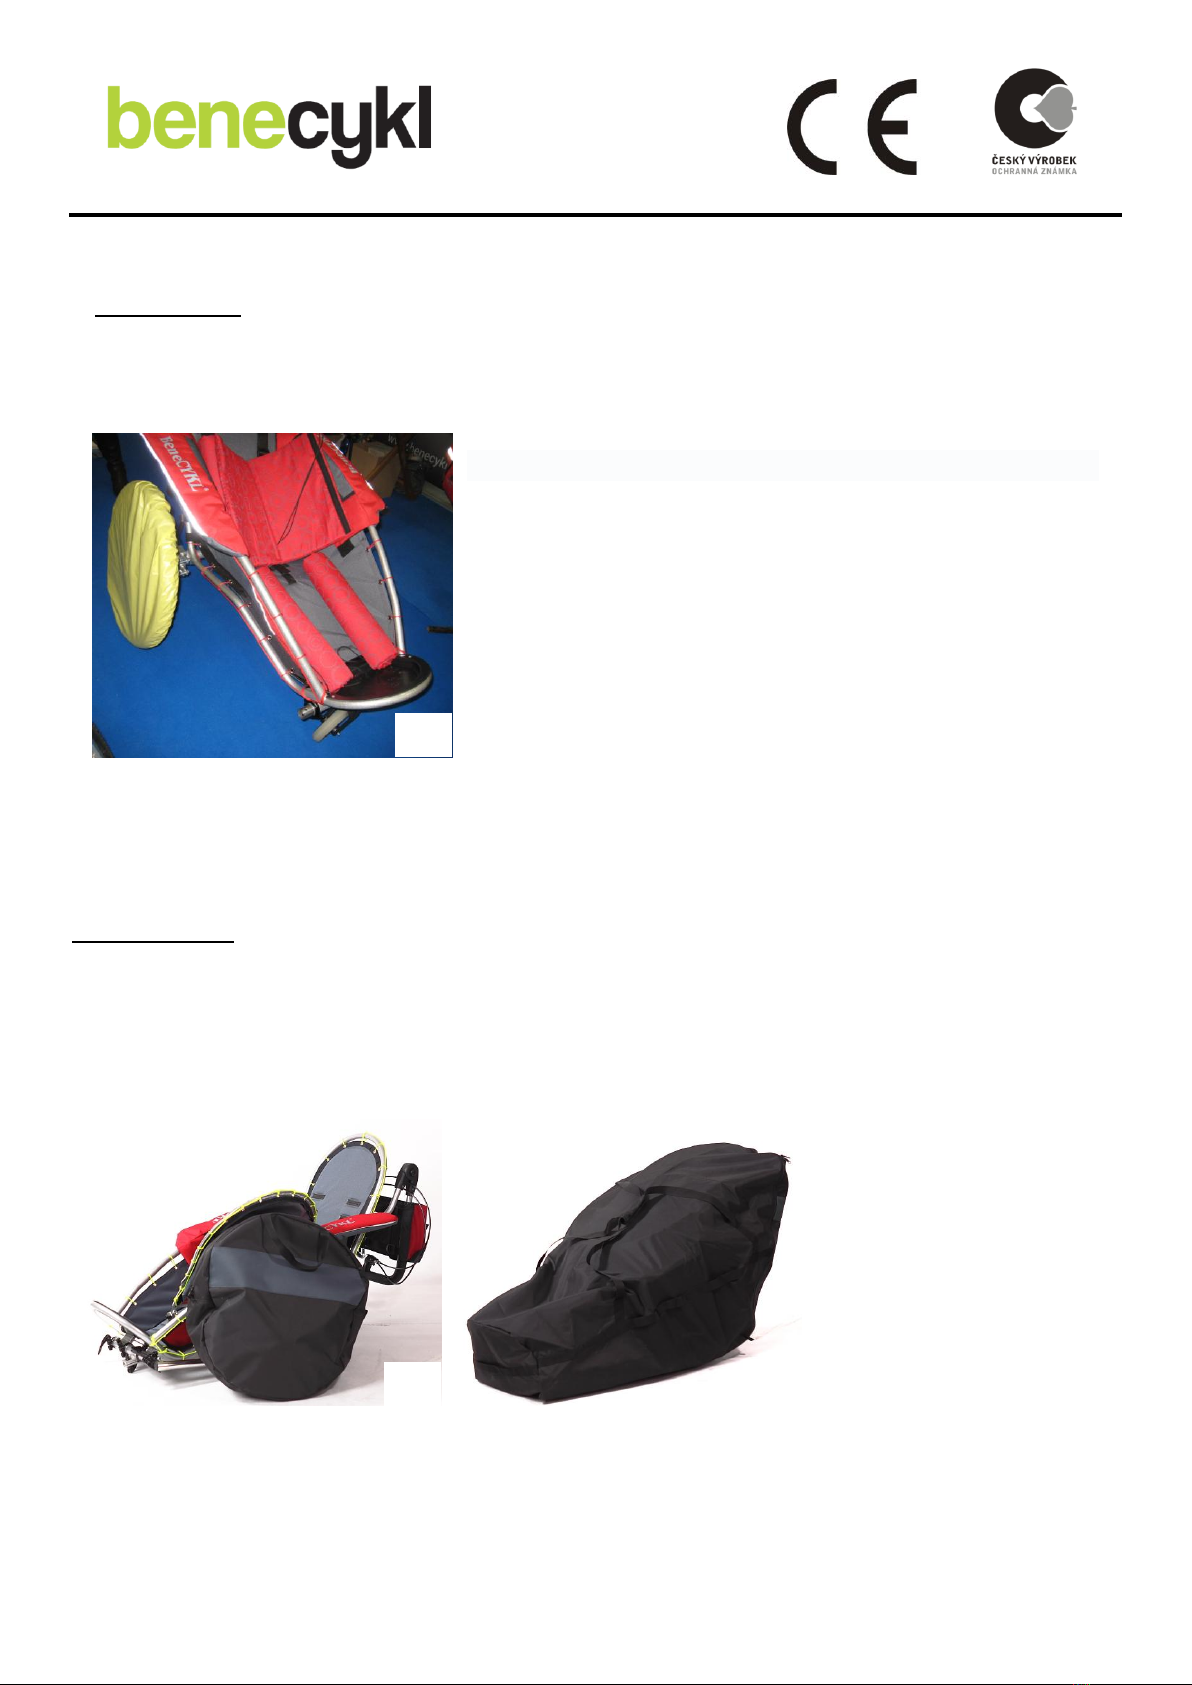
Transport bag
The stroller can be easily set down. Remove the front and rear wheels, put them into a special bag.
Fold the handrail of the stroller. Put off all the backpackcs (Fig. 45). Put the skelet of the stroller into the
transport bag (Fig. 46), which can be mounted on a car roof or stored in the trunk, so that the stroller is
protected from any dirt during transport.
44
45
46
Table of contents
Other Benecykl Stroller manuals


