Benecykl Baby User manual


User Manual-Update 2.8.2019
- 2 -of
19
Contents:
Contents:
........................................................................................................................................................2
PURPOSE OF USE
..........................................................................................................................................3
PASSENGER REQUIREMENTS FOR INDIVIDUAL MODELS
...................................................................3
REQUIREMENTS FOR THE TOWING CYCLE
...........................................................................................3
BAGGAGE REQUIREMENTS
......................................................................................................................3
APPLICABLE STANDARDS AND LAWS
...................................................................................................3
GUIDE FOR OPERATING INSTRUCTION
......................................................................................................4
RECOMMENDATIONS BEFORE TRAVEL:
................................................................................................4
USING A SPECIAL STROLLER
...................................................................................................................4
BEFORE USING A SROLLER WITH A BICYCLE, PLEASE CHECK:
.......................................................6
THE STICKERS
..............................................................................................................................................6
REFLECTORS
................................................................................................................................................6
DESCRIPTION OF THE MAIN PARTS
OF THE STROLLER....................................................................7
DIMENSIONS OF EACH VARIATION
OF THE STROLLER (in mm) ......................................................7
FRONT SWIVEL WHEEL (BUGGY)
............................................................................................................8
FRONT LARGE WHEEL
...............................................................................................................................8
TOWING SYSTEM WITH PROTECTIVE SHIELD
......................................................................................9
WINTER AND SKI SET
................................................................................................................................10
REPLACEMENT OF THE STROLLER ACCESSORY WHEN CHANGING ACTIVITY.
..........................10
FRONT SWIVEL WHEEL (BUGGY) –FRONT LARGE WHEEL (INLINE)
............................................10
Tow Bar- front INLINE bike or BUGGY wheel
................................................................................................11
SETTING THE CORRECT REAR WHEEL GEOMETRY
...........................................................................11
REMOVING AND ATTACHING THE REAR WHEELS
............................................................................12
DESCRIPTION OF ADDITIONAL ACCESSORIES OF THE STROLLER
..................................................12
SEATER, HOOD AND TROPIKO
...............................................................................................................12
SUN SHADE
................................................................................................................................................13
Raincover
......................................................................................................................................................13
BACK HANDRAIL
......................................................................................................................................14
SAFETY BELTS
..........................................................................................................................................14
WINTER AND SUMMER FOOTMUFF
..........................................................................................................15
HAND PROTECTORS
.................................................................................................................................17
FIXATION INSERT , CHEST FIXATOR
....................................................................................................17
TRANSPORT BAG
......................................................................................................................................18
FOR WHEELS, WHEEL SLEEVES
................................................................................................................18
CLEANING
THE STROLLER.....................................................................................................................18
INTERVAL MAINTENANCE
........................................................................................................................19
STORAGE OF THE STROLLER
.................................................................................................................19
WARRANTY..............................................................................................................................................19

User Manual-Update 2.8.2019
- 3 -of
19
PURPOSE OF USE
The BeneCYKL Special Stroller for handicapped people is designed for transporting one child on paved
roads, as a bicycle trailer or as a special sport stroller. The BeneCYKL Special stroller for handicapped
people can be used as buggy stroller, stroller or stroller for bike. The BeneCYKL special stroller opens new
leisure opportunities for families with children who have reduced or completely reduced ability to move
independently. Thanks to its stable and sturdy construction, it is also suitable for use in more demanding
terrain, which cannot be reached with a common stroller or with a wheelchair. You can use the BeneCYKL
strollers all year round for several sporting activities with handicapped children (hiking, jogging, biking,
roller skating, skiing). You can use it not only in sports activities, but also for easy transportation of the child
in the country or when walking around the city in buggy mode.
BeneCYKL Special strollers for handicapped people should be used on the paved roads in the bike trailer
mode. In the setting of the special sport stroller, you can handle heavier terrain with the BeneCYKL
strollers.
Special strollers have a mechanical construction and do not use other auxiliary electrical or chemical
equipment. All materials used are inert and surface-and chemically stable. They are chosen to meet the
criteria for use for children from the earliest age.
BeneCYKL Special baby carriages are manufactured with the utmost safety and comfort and with an
emphasis on simplicity of all settings. The rigid construction and inclined wheel hinge ensure
maximum stability of the stroller during cornering and uneven terrain.
Positioning of t
he stroller is done
by tilting the front wheel, when you can change
the
position of the child from sitting to lying. Sitting in
the
stroller
relaxes spasticity, precedes bruising and contracture. The fixed back part of the stroller
promotes healthy spine development of the child.
The stroller is very easy to operate and can be equipped with a large number of accessories.
PASSENGER REQUIREMENTS FOR INDIVIDUAL MODELS
Model
Baby
Junior
Max
MAX height
110cm
140cm
180cm
MAX weight
40kg
50kg
70kg
Do not exceed the load capacity of the stroller (child + load) of which Max. 5kg in the back rucksack.
The maximum height of the baby in Model Baby is 110cm with the child's seat fastened to a minimum of
50 mm between the head and the frame of the stroller.
REQUIREMENTS FOR THE TOWING CYCLE
The towing cycle must be approved by the manufacturer for pulling the stroller, be in good technical
condition and have functional brakes. The rear wheel of the towing cycle should be equipped with a
mudguard. The BeneCYKL stroller can be connected to towing cycles with a rear wheel diameters of
26 ", 27.5" and 29 ".
Maximum allowable speed is 25 km/h (15 mph). Recommended speed in corners and terrain is 7km/h. (4 mph)
BAGGAGE REQUIREMENTS
Distribute the load evenly in the entire space of the stroller (fastening to the structure), especially in
the rear and side parts of the stroller, using rucksacs and carry on bags to fit it.
Never overload the front of the stroller! The permissible load range of the towing bar is 3-8kg.
APPLICABLE STANDARDS AND LAWS
The BeneCYKL stroller meets the following standards: ČSN EN 15918 + A1:2013, ČSN EN 1888:2012, ČSN EN 1041
+ A1:2014, ČSN EN ISO 15223-1:2016, ČSN EN 12183:2012 and ČSN EN ISO 14971:2012. The laws of 54/2015
Coll. and 268/2014 Coll. are also complied with.

User Manual-Update 2.8.2019
- 4 -of
19
GUIDE FOR OPERATING INSTRUCTION
These instructions for use give all technical and safety aspects necessary for the assembly, operation and
maintenance of a BeneCYKL special stroller for handicapped people .
Read all the instructions carefully.
Use this manual to train all people who will use the stroller.
For the BeneCYKL special stroller to serve you well and for a long time, it is necessary to respect the
following recommendations.
RECOMMENDATIONS BEFORE TRAVEL
:
Due to the small height of the entire stroller, we recommend that you highlight the stroller with the
supplied f
lag.
Always
secure the child with the
safety belts (or the chest fixator) which are an integral part
of the
stroller.
The child must always wear a bicycle helmet when riding behind the cycle.
When engaging behind the cycle, always use a protective shield to protect your child from flying debris.
While riding, it is recommended to use the "Tropiko" cover (sun cover and debris protection), which
serves as a protection against insects, as well as any flying debris.
To protect against rain, snow or mud
,
we recommend using
the
rain cover.
The stroller frame is equipped with front (white), rear (red) and side (orange) reflective strips. The
stroller cover is also lined with a reflective belt around the perimeter. However, with reduced visibility
and when riding on public roads, it is strongly recommended to highlight the stroller with static or
flashing placed on the handle (not included in the standard sets).
Check the tow bar securing to the cycle frame by means of the safety clip, and also with the carabiner
with a black strap.
Make sure that the rear wheel tilt is correctly set (see adjusting the rear wheels).
Ensure that the rear wheels are properly secure in the hub with the help of the quick-release axle.
Check the inflation of the tyres.
Carefully pay attention to the balance of the entire load so that the BeneCYKL stroller is evenly loaded
in the rear and middle parts and the front part of the stroller is not overloaded. This will not only ensure
driving enjoyment with minimal effort and resistance, but also minimize the overloading of the clamping
mechanisms.
Do not exceed the maximum load capacity of the BeneCYKL stroller. For the layout of load use
standardized rucksacks, carry on bags -Front, back small, back large, bag for handle.
The manufacturer guarantees the functionality of the front positioning mechanism with the lock tow
bar and the front of the big wheel only if the load on
the
front of
the stroller
on the axes of the front
wheels
does not
exceed 8kg.
In the case of uneven load distribution, overloading of the front part of the stroller or incorrect adjustment
of the rear wheels, the manufacturer will take no responsibility for damage to clamping mechanisms and
wheel hinges or the resulting excessive tyre wear which may occur.
USING A SPECIAL STROLLER
The BeneCYKL Special stroller for handicapped people can be used all year round and it is characterized by
its multifunctionality, when by simple adjustment of the front wheel you get a buggy stroller, sport stroller,
or when using the tow bar, a stroller behind the cycle.

User Manual-Update 2.8.2019
- 5 -of
19
The BeneCYKL Special stroller for handicapped people is suitable for:
In the variation buggy stroller for transporting one child and small load in the city and inside premises,
using safety belts and other safety elements (Tropiko) and instructions specified in the "Operating
instruction",
In the "Sport stroller" mode for the transport of one child and small load during hiking (even Alpine),
"Jogging" or "in-line" skating, using safety belts and other safety elements (Tropiko) and instructions
specified in the " Operating instruction",
In the winter option for tourist activities using the appropriate "ski" or "winter" set.
In the stroller behind the cycle mode the stroller is used as a stroller that is pulled behind cycle or electric
cycle, using safety belts, bicycle helmets and other safety features (Tropiko, rain cover, shield) and
instructions specified in the " Operating Instructions"
The BeneCYKL special stroller for handicapped people is not suitable for:
Transport of animals or oversized and excessively heavy loads (according to load capacity),
Engaging other brands of strollers
Driving up and down stairs and steep crossing of obstacles higher than approx. 10 cm (stairs, curbs, stones
etc.),
Transporting more than one person in the stroller
Unreasonably fast riding when connected behind the cycle or electric cycle, especially in bends
and uneven terrain.
WARNING:
Before the first ride with the BeneCYKL stroller behind the cycle
,
we recommend that you run
a
test
drive without
a
child, but with a load corresponding to the child's weight. This step will tell you how
the stroller behaves and how you need to adjust your riding characteristics
to the towed stroller
.
Always adjust the speed of the ride with the stroller attached to the cycle to the comfort of your child,
surface and tilt of the terrain, so that the rider is always in control of the cycle and of the stroller.
The maximum allowable speed is 25km/h (15mph),
never exceed
this speed.
When braking
,
expect a longer braking
distance
due
to the
weight of
the
stroller.
When riding, always ensure that the stroller is a safe distance from any side obstructions (columns, curbs,
etc.).
When cornering, use a larger turning circle. Reduce speed near bends and rough terrain to 7km/h
(4mph).
The stroller must be
stationary when the child is getting in or out of the stroller.
Despite the high stability of the BeneCYKL stroller, given by the tilted slope of the rear wheels,
the stroller may be at risk of flipping over sideways, especially in the following situations:
Riding in too steep sloping terrain,
Steep cornering of the stroller at a higher speed,
Riding too fast on uneven surfaces causing one wheel to come off the ground, especially in curves,
When riding with an empty stroller.

User Manual-Update 2.8.2019
- 6 -of
19
3
4
5
6
WARNING:
Riding behind the cycle is always to be individually assessed, the way and speed of riding to adapt to
specific conditions and ensure the safety of not only their own, but also other road users. Always check
the technical condition of the cycle and the stroller before riding. In particular, it is a signaling marking
and a flag which the stroller must be equipped with.
BEFORE USING A SROLLER WITH A BICYCLE, PLEASE CHECK:
Securing the safety pin
Safety strap
Attachment of children with safety belts and securing of the baggage
Location of the signaling flag
Overall technical condition of the cycle and the stroller
Ensure the child wears a properly fitted cycle helmet
Whether the brakes are working properly
Tyre Pressures
THE STICKERS
Each stroller is clearly and permanently marked with the manufacturing label.
The manufacturing label (Fig. 1) has a unique number under which each stroller is registered
with the manufacturer. Label is glued to the bottom axle of the wheel trolley.
REFLECTORS
Each stroller is equipped with an orange flag (Fig.3), Orange reflective rear wheel straps (Fig.4), white
reflective rectangles located on the front of the trolley frame (Fig.5) and red reflective squares (Fig.6),
placed on the rear of the trolley frame.

User Manual-Update 2.8.2019
- 7 -of
19
P
Copy
of the stroller
accessories according
to the
selected activity
WARNING:
Safety elements on the stroller (reflective straps and signaling flags) are
essential to guarantee good visibility.
The towing of the BeneCYKL special stroller on public roads and in the
dark is only allowed when the back of the trolley is fitted with a flashing or
permanent red light to meet local regulations.
DESCRIPTION OF THE MAIN PARTS
OF THE STROLLER
DIMENSIONS OF EACH VARIATION
OF THE STROLLER (in mm)
1)
Foam-coated handle and
hand brake
2)
Place for attaching
accessories (handle bag)
3)
Hinge for adjusting the tilt
of the handle
4)
Five-point seatbelts,
place for attachment of the
fixation liner
5)
Mudguard
6)
Rear wheel with drum brake
7)
Tow Bar
8)
Front fixed wheel 14inch
9)
Front Protective arch with
footstep
10)
Seat
11)
Place for attachment of a
detachable hood with a
mosquito net

User Manual-Update 2.8.2019
- 8 -of 19
8
9
10
The front swivel wheel (Fig. 7) makes it easy to handle the stroller and turn
it almost in its own length. For use in normal urban environments (buggy
stroller). To adjust the position of the swivel wheel, loosen the two internal
quick-release clamps (Fig. 8) and rotate it around its axis. Adjust the wheel
perpendicular to the ground to avoid damage of the attachment and fix it
with the quick-release clamps.
Thanks to the selection of suitable accessories, the stroller can be easily adapted to your chosen activity
(riding in the city, riding in the terrain, cycling, winter stay in nature, etc.). Individual activities can also be
combined with a simple system of manipulation.
FRONT SWIVEL WHEEL (BUGGY)
WARNING
Improper overloading of the stroller in the front may lead to malfunction
of the
clamping mechanisms or
hinge of front wheel. The use of the swivel wheel is not very suitable for uneven terrain. Avoid
overloading the front wheel when the child is standing and affecting the stroller’s weight distribution.
FRONT LARGE WHEEL
The front large wheel is designed for movement activities in the most demanding terrain and sports activities
such as "in-line" skating, hiking or "jogging". The front large wheel is firmly fixed in one position, so the
stroller holds one track and does not deviate. With the help of two internal quick-release clamps (Fig. 8), the
stroller can be positioned as needed to the desired tilt. You can easily change the position of the child from
the seating position (Fig.9) to the full lying position (Fig.10). Make sure that the wheel holder does not touch
the body of the stroller when positioning. Ensure the tyre of the large wheel is pressurised to the listed
pressure.

User Manual-Update 2.8.2019
- 9 -of 19
11
12
13
14
th
TOWING SYSTEM WITH PROTECTIVE SHIELD
The towing system (Fig. 11) is used for cycling. The bike hinge consists of a tow bar with a rotary
reduction (Fig. 13), a protective shield (fig. 11) and an adapter (Fig. 12). The adapters are supplied with a
bicycle set in two pieces. On the bicycle, unscrew the quick grip or nut from the left side of the rear axle.
Under the rear wheel axis nut or under the rear wheel locking lever (opposite of front derailleur), insert the
Adapter (Fig.12). Re-tighten the quick release handle/Nut according to the cycle manufacturer's instructions.
To connect the cycle, grab the tow bar, insert it into the adaptor (Fig.12), secure the safety clip and wrap the
safety strap behind the fork of the rear wheel (Fig.13). No specific angle is required to connect the tow bar
with the cycle, which allows you to position the stroller as needed. The shield located on the tow bar protects
the child in the stroller from the stones and debris thrown up from the rear wheel. Place the protective shield
in the hole approximately in the middle of the tow bar, using the quick-release clamp. For proper function of
the shield, watch the location which occupies the shield against rear wheel and a stroller Fig. 14).
The tow bar can be easily folded under the trolley when not in use and again used quickly if necessary.
Enabling (see description below) of the two side quick-release clamps on the front axle of the stroller allows
the bar to move around this axis. After placing in the desired position, do not forget to reattach the clamps.
When securing the quick-release clamps of the tow bar, it is necessary to make a stronger tightening. Quick -
release clamps, you are not currently using, always pull firmly. In case of prolonged non-use, the bar can be
completely removed to reduce the weight of the stroller.
WARNING
When securing the quick release clamps of the tow bar, a
stronger tightening must be performed. Always tighten
the quick-release clamps that are not in use firmly (fig.
15, 16).
15
th
16
th
User Manual-Update 2.8.2019
- 10 -of
19
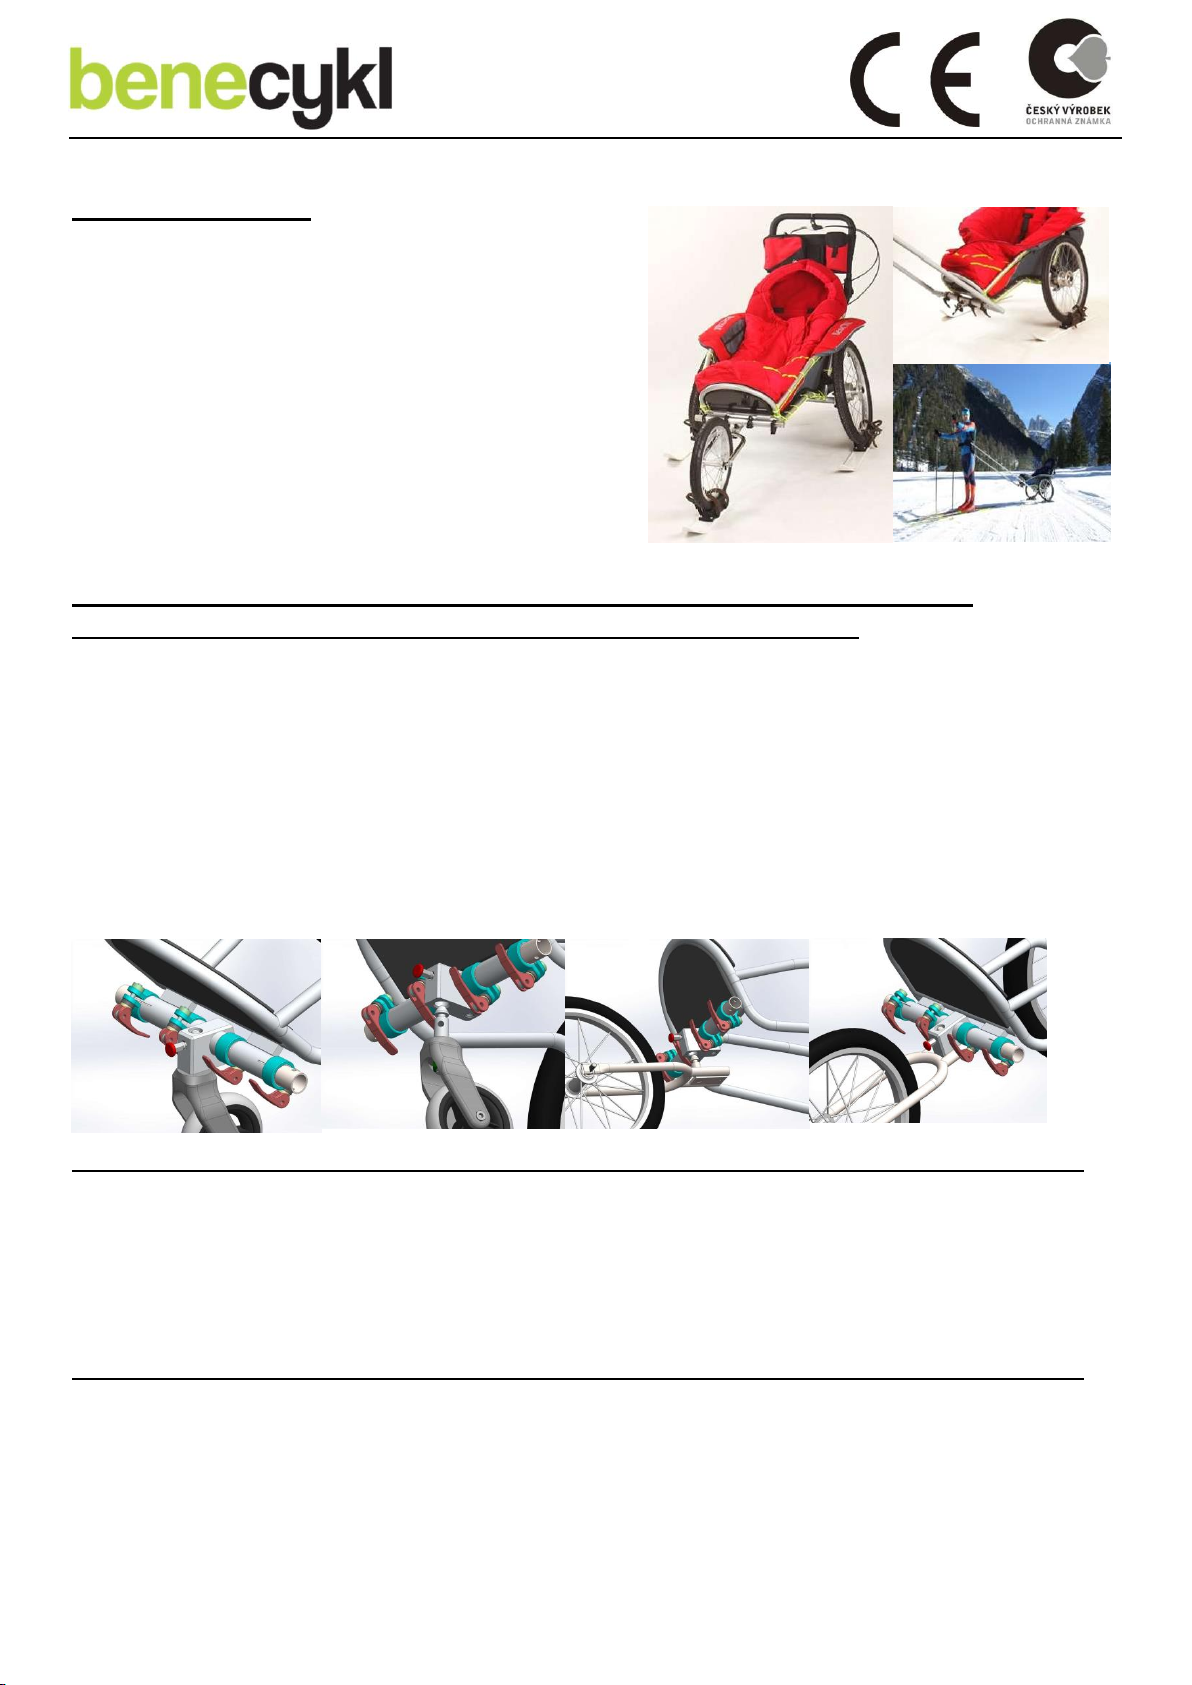
WINTER AND SKI SET
In winter, you can easily use the BeneCYKL Special
stroller for handicapped people as a sledge. The two larger
skis can click on the rear wheels and the smaller ski on the
front big wheel. Fasten the skis with straps (Fig. 17) and
push the stroller in front of you. If you want to use it for
cross-country skiing and pull the stroller like a sledge
behind, use the SKI SET. After removing the front wheel
and disassembling the tow bar behind the wheel, slide the
hip belt rod into the axis of the front tube and hold it firmly
(Fig. 18 19).
REPLACEMENT OF THE STROLLER ACCESSORY WHEN CHANGING ACTIVITY.
FRONT SWIVEL WHEEL (BUGGY) –FRONT LARGE WHEEL (INLINE)
The front wheels can be freely changed according to the terrain in which the BeneCYKL stroller will be
used. The exchange is very simple:
1. Loosen the lock pin on the wheel holder and pull out the buggy wheel (Fig.20 and 21).
2.
Fit
the Inline
wheel from the same side to the same hole (Fig.22 and 23).
When changing the front wheels, make sure that the locking pin snaps into the groove on the wheel axle and
at the same time the lock bolt on the underside of the fork must be tightened. .To adjust the position of the
stroller when the inline wheel is in place, loosen the inner clamps, see fig. 8. Always tighten the clamps
firmly.
WARNING:
When adjusting the stroller, never forget to adjust the rear wheel geometry so that the Dural cubes are
always perpendicular to the ground-see “Correct wheel alignment”. With poorly adjusted geometry of
the rear wheels, the stroller will skid, creating unnecessary resistance with increased vibrations and the
subsequent safety of releasing the self-tightening nuts and quick-release clamps. Last but not least, there
is uneven tyre wear!!!
18
17
th
19
th
20
th
21
st
22
nd
23
rd

User Manual-Update 2.8.2019
- 11 -of
19
Tow Bar-
front INLINE bike or BUGGY wheel
The tow bar is firmly fixed in the position under the stroller (see fig. 24).
To flip the tow bar and connect the stroller to the bike, perform the
following steps:
1. Release all the quick -release clamps on the front wheel axis and on the
tow bar, and set the tow bar and the shield approximately to the
position on Fig. 25.
2. Pull the tow bar and the shield under the buggy wheel approximately to
the position in Fig. 26 and lightly tighten the quick-release clamp at the
drawbar shield and the outer clamps on the front wheel axis
3. The buggy wheel is folded under the stroller as close as possible to the seat so that it does not touch
the ground during riding, see Fig.27.
4. Adjust the control bar according to the necessary tilt of the stroller and tighten all the quick-release
clamps, see Fig. 28
5. Set the protective shield to the operating position (Fig. 14).
6. Fasten the stroller to the bike (see the towing system behind the cycle).
7. Adjust the geometry of the rear wheels.
The "Cycloset" tow Bar can be carried under the stroller even when using the
INLINE wheel. However, the INLINE wheel cannot be brought down under the
stroller when using the Bike set.
When changing the use of a large "inline" wheel for the "Cycloset" tow bar, you must first permanently
remove the inline wheel from the wheel holder before using the tow bar.
SETTING THE CORRECT REAR WHEEL GEOMETRY
The rear wheels are 20 inches in size and their tilting ensures a better balance of the entire stroller and
therefore safety for your child.
The maintenance of the rear wheels for optimum driving characteristics consists of the centering of the
wheels, which we recommended to be entrusted to the specialist service and, finally, to the appropriate
inflation of the tyres depending on the riding terrain. For a paved surface, take advantage of higher tyre
pressure and lower pressure when driving on free terrain. However, never exceed the maximum pressure
indicated on the wheel casing.
Setting the correct geometry of the rear wheels by turning the dural cubes (Fig. 29) into a perpendicular

User Manual-Update 2.8.2019
- 12 -of
19
position relative to the ground. To move the cubes, you must first loosen the appropriate quick-release
clamp, which will be re-tightened after the setting is complete. Tilt settings can be performed at any time
after stopping as needed, without disconnecting the stroller from the cycle.
WARNING:
Don’t forget to adjust the rear wheel geometry, be sure to check or adjust during any changed position
of the stroller. Whenever you reposition the stroller
and each
time the front wheel is
replaced or when you
are attaching the bike. Bad geometry adjustment may cause unwanted resistivity and high wear of
tyres.
REMOVING AND ATTACHING THE REAR WHEELS
For better storage and handling, both
rear wheels can be easily removed from
the stroller frame. Through the quick-
release pins.
To remove, press and hold the centre
of the pin (Fig.30) and slide the wheel
(Fig.
31) in the same way. The wheels
are put
back in the same way.
After fitting, always pull the wheel and check that is firmly attached to the stroller frame.
DESCRIPTION OF ADDITIONAL ACCESSORIES OF THE STROLLER
S
EATER
,
HOOD AND TROPIKO
The seater and the hood (Fig. 32) are sewn from the "Ripstop" waterproof fabric.
The material does not require special maintenance, you can use common
cleaning products. The hood is used to shade the stroller. The stiffness of the
tilting can be influenced by tightening the bolts located inside the plastic
clamps. Tropiko is used as a protection against insects. Tropiko is fastened to
the hood with a zipper. Fasten to the stroller by firmly dragging the bottom
of the Tropiko over the footplate in the front of the stroller.
29
th
30
th
31
st
32

User Manual-Update 2.8.2019
- 13 -of
19
Attaching the hood to the stroller frame
1. Slide the hood into the pipe clamp at the back of the stroller frame (Fig. 33).
2. Secure the enclosed design of the hood in the tube clamp supplied with the cotter pin (Fig.34).
3. On the MAX Stroller , the hood consists of two rods which are inserted into the clamp and secured by a
cotter pin (Fig. 35) After putting the hood over the back of the stroller , the hood is fastened with a
velcro fastener to the cover (Fig. 36).
WARNING:
The material of the seater, the hood and the Tropiko is not resistant to fire and possibly increased heat
(there is a risk of cigarette burn, spark from fire, etc.).
S
UN SHADE
You can easily attach the sunshade by Velcro to the
BeneCYKL BABY and BeneCYKL JUNIOR stroller.
The shade provides sun protection while the Tropico
cover can also be used (Fig. 37 and 38).
Raincover
The Raincover is used to protect against rain and cold wind or cold and is made of transparent foil. The
raincover accurately copies the shape of the stroller and conceals and protects the stroller.
The raincover is attached to the tilted hood. Put the raincover on the wider top of the hood and fasten it
around the handle with the Velcro fastener. Then drag the narrower bottom part over the footboard. As the
last step, drag the side sections over the edges of the stroller (Fig. 39).
Maintenance of the raincover should be performed by conventional detergents and water up to a temperature
of + 45 °c. Solvents (e.g. acetone, petrol, toluene, etc.) must not be used for cleaning.
Max
Max
33
34
35
36
WARNING:
Ensure gentle handling, the raincover is made of seamless welding
technology and is therefore prone to rupture or burn. Violent manipulation
can result in rupture of welds in stressed areas. This defect
is not subject to
warranty guarantees. Beware of using the raincover in the event of warm
sunny weather, it could very quickly cause the child to overheat.
39
37
38

User Manual-Update 2.8.2019
- 14 -of
19
BACK HANDRAIL
To change the position of the handle, simultaneously press the button
of both plastic joints (Fig. 40) with the simultaneous bending of the
handrail to the desired position. For extra comfort when using the
stroller, the handle is fitted with a foam cover. For safety reasons, it is
recommended to place a cycling red "flashing" light (not included)
when driving around on a raised handle.
SAFETY BELTS
The stroller is equipped with five seat safety belts. If necessary, the safety belts can easily be removed
from the stroller. To remove the straps, take the end of the belt out of the buckle, thread the handle
in the seat of the stroller and continue to copy the direction of the belt to the complete release. Use the
same techniques for refitting. Thread the belt through the appropriate opening in the seat according to
the height of the child (Fig. 41), wrap the belt around the rear bar parallel to the ground (Fig. 42) and
return the belt inside the stroller with the same opening. Then take the buckle down in the downward
direction (fig. 43).
41
42
43
40

User Manual-Update 2.8.2019
- 15 -of
19
WINTER AND SUMMER FOOTMUFF
After removing the footmuff from the transport container (Fig.44, Fig. 47) attach the winter footmuff
on the stroller. Based on the body proportions
of the child
choose appropriate openings for safety
straps
. Drag the safety straps from frame of the stroller (carefully inspect the way the straps are
fastened), pass the straps through the openings and fasten the winter footmuff to the stroller. Set the
safety straps properly and secure against stripping off (Fig.45). The footmuff can be removed from
the stroller in the reverse way.
The interior part of the shoe compartment of both footmuffs are
equipped with a protective layer of Microfighter material, which can be easily maintained
by wiping
d
irt off with moistened cloth. In the case of cleaning the inner part of the footmuff let it dry properly.
The Summer footmuff (Fig.46, Fig. 47) can be unpinned along its whole length and
used as a
picnic
blanket.
Materials used in winter footmuff: outer layer –Fleece BASIC + Microfighter
Internal filling –100% POLYESTER
M
aterials used in Summer footmuff: outer layer –softshell +
Microfighter Inner layer –100% fleece
WARNING:
Never use the footmuff not fixed to the stroller frame with safety belts. You risk serious injury to your
child.
Maintenance and washing:
In places where the Microfighter material is used , you can impregnate the footmuff
Transport and store the footmuff in the transport container (Fig.44)
When using in humid weather,allow the footmuff to dry thoroughly
Wash footmuff inside out with zip at maximum 40 °c.
Use liquid detergents when washing
Wash WITHOUT Fabric softener
Do NOT IRON, do not tumble dry, do not bleach or chemically clean
44
45
46
47

User Manual-Update 2.8.2019
- 16 -of
19
Fig. 36 Location of the
stroller, detail of
kapsičk
The dog's
hanches
Fig. 38 Place the
backpack on the
rear
backpack
Frame
Large Rear
Detail of the large
Fig. 37 Place the
backpack on the
front backpack
A pairof front
the stroller,
detail
RUCKSACKS AND CARRY ON BAGS
The rucksacks are made of coated fabric that is waterproof. Attach using straps in the place
designated for the specific
bag.
The material does not require special maintenance, cleaning can be used with conventional cleaning agents.
Fig. 48 placing the bag on the stroller,
detail of the rear Daypack
Fig. 49 position of the bag on the handle
of the trolley, detailPockets
Fig. 50 position of the pair of front
packs on the trolley frame, detail of the
front Backpack
Fig.51 Location of Large Rear
Backpack on stroller frame.Detail
of a large backpack.
Warning:
The material
of
the seater, the hood and
the
Tropiko is not flame
-
resistant and possibly increased heat
(there is Danger
of
burning
by
cigarette, spark from fire
,
etc.).
Do not overload the bag for the stability of the trolley!!!
48
49
50
51

User Manual-Update 2.8.2019
- 17 -of
19
52
53
54
55
56
HAND PROTECTORS
The nets are designed to protect against accidental contact with the wheels. You attach these meshes
directly to the stroller frame using the buckle. Raised location of the net is ensured via plastic
reinforcement coated with a fabric. The net is placed from the outside part of the Tropiko cover (Fig. 56).
To install the mesh:
Attach the plastic reinforcement to the base of the frame of Stroller (between the two vertical braces,
Fig.52).
Attach the two straps
that
are on the plastic reinforcement (Fig.53 and Fig.54).
Attach the two remaining straps to the stroller handle. Top one above the joint (Fig. 55) and the
second one to the bottom of the handle.
FIXATION INSERT , CHEST FIXATOR
For better seating comfort, and especially for children who do not hold their head upright and need a seat
support, it is possible to equip the stroller seat with a fixation insert with an abduction wedge (Fig. 57). It is
also possible to retrofit the seat of the stroller with a pad made of soft material (foams, latex, or ROHO®
seat, etc.) The pad is not part of the product.
Chest fixation is used to clamp children who
do not sit or sit with difficulty (Fig. 58).
The entire front part of the fixation is padded
and gives the child a stable semi-seating
position.
The fixator consists of five separately holding
buckles. You can easily adjust the size of the
fixator according to the child's body
proportions.
57
58

User Manual-Update 2.8.2019
- 18 -of
19
T
RANSPORT BAG
The stroller is very easy to disassemble. The front and
rear wheels can be removed and put in a special bag.
Fold the handle
of the
stroller. Remove the added
rucksacks (Fig.59). Insert the frame
of the stroller
into the transport bag (Fig.60), which can be
fastened to the roof of the car or put in the boot, thus
protecting
the
stroller during transport.
FOR WHEELS, WHEEL SLEEVES
Plastic wheel covers (Fig. 61) can be used for
protection against unwanted touching of the spoked
wheels.
The rear wheel sleeve (Fig. 62) is sewn from a
washable material and serves as a protection against
the dirt on carpets (floors in the house/apartment) if
you arrive from an outdoor environment.
Warning:
In the case the Benecykl trolley is connected to the bicycle attach always a protective helmet to the child
complying with the requirements of EN 1078.
CLEANING
THE STROLLER
To clean the stroller, use only water and normal household cleaners such as detergents and fabric care
products, soft cloths or impregnating and silicone sprays. Do not use any sharp-edged or abrasive cleaners,
nor are the use of any cleaning agents containing acids or solvents permitted.
After each use: Clean the inside of the seat.
After severe weather conditions: Perform thorough cleaning of the inner and outer seats. Treat all sliding or
movable parts with silicone spray.
59
60
61 62

User Manual-Update 2.8.2019
- 19 -of
19
I
NTERVAL MAINTENANCE
Before every ride:
Check that the castor wheels are firmly fastened
Check the air pressure of the wheels; Should range between 2.75 and 4.5 bar
Check the total weight including children and baggage.
Check the safety belts for tight tightening.
Check the condition of the wheels; Replace tyres if needed.
Check that all screw connections and pins are tightly tightened.
Every 200km
Check the
fabric seat
cover
and seatbelts
for
cracks, wear and tear and if any parts are missing.
Inspect all frame tubes, all connecting parts and fixing components for wear or damage.
Every 500km
Treat all sliding or movable parts with a silicone spray. Perform
thorough cleaning of the inner and outer space of the stroller.
STORAGE OF THE STROLLER
Keep the stroller in a dry, ventilated place without direct sunlight at a temperature of 10 –35 °C
WARRANTY
The multi-purpose BeneCYKL Special Sport Stroller for handicapped persons is under warranty from the
date of purchase. The warranty period is two years. The warranty covers defects in materials or
workmanship, but does not include damage to the stroller due to improper use, inadequate maintenance,
failure to observe the instructions, use of force or normal wear and tear. If the stroller is in need of the
service or if you wish to claim a warranty claim, please contact the manufacturer.
Dear customer, Thank you for purchasing a special
handicapped Stroller BeneCYKL®and we wish you many
pleasant moments with the product of our brands.
USER MANUAL –BeneCYKL®Special Stroller for handicapped persons
Manufacturer:
BENECYKL
®
s.r.o., Chvalovka 1342/9, 635 00 BRNO bystrc, CZECH REPUBLIC
ičo: 29298725, Tax ID: CZ29298725
DATE OF LAST REVISION 2.8.2019
This manual suits for next models
2
Table of contents
Other Benecykl Stroller manuals


