BenQ XL2731 User manual

XL
XL Series
User Manual

2
Copyright
Copyright © 2019 by BenQ Corporation. All rights reserved. No part of this publication may
be reproduced, transmitted, transcribed, stored in a retrieval system or translated into any
language or computer language, in any form or by any means, electronic, mechanical, magnetic,
optical, chemical, manual or otherwise, without the prior written permission of BenQ
Corporation.
Disclaimer
BenQ Corporation makes no representations or warranties, either expressed or implied, with
respect to the contents hereof and specifically disclaims any warranties, merchantability or
fitness for any particular purpose. Further, BenQ Corporation reserves the right to revise this
publication and to make changes from time to time in the contents hereof without obligation of
BenQ Corporation to notify any person of such revision or changes.
The performance of flicker-free may be affected by external factors such as poor cable quality,
unstable power supply, signal interference, or poor grounding, and not limited to the above
mentioned external factors. (Applicable for flicker-free models only.)
BenQ ecoFACTS
BenQ has been dedicated to the design and development of greener product as part of its
aspiration to realize the ideal of the "Bringing Enjoyment 'N Quality to Life" corporate vision
with the ultimate goal to achieve a low-carbon society. Besides meeting international regulatory
requirement and standards pertaining to environmental management, BenQ has spared no
efforts in pushing our initiatives further to incorporate life cycle design in the aspects of
material selection, manufacturing, packaging, transportation, using and disposal of the products.
BenQ ecoFACTS label lists key eco-friendly design highlights of each product, hoping to ensure
that consumers make informed green choices at purchase. Check out BenQ's CSR Website at
http://csr.BenQ.com/ for more details on BenQ's environmental commitments and
achievements.

3
Power Safety
• The AC plug isolates this equipment from the AC supply.
• The power supply cord serves as a power disconnect device for pluggable equipment. The
socket outlet should be installed near the equipment and be easily accessible.
• This product should be operated from the type of power indicated on the marked label. If you
are not sure of the type of power available, consult your dealer or local power company.
• The Class I pluggable equipment Type A must be connected to protective earth.
• An approved power cord greater or equal to H03VV-F or H05VV-F, 2G or 3G, 0.75mm2must
be used.
For Germany only:
• (If the weight of the product is less than or equal to 3 kg) An approved power cord greater or
equal to H03VV-F, 3G, 0.75mm2must be used.
• (If the weight of the product is more than 3 kg) An approved power cord greater or equal to
H05VV-F or H05RR-F, 3G, 0.75mm2must be used.
• (If a remote control is provided) RISK OF EXPLOSION IF BATTERY IS REPLACED BY AN
INCORRECT TYPE. DISPOSE OF USED BATTERIES ACCORDING TO THE
INSTRUCTIONS.
For models with adapter:
• Use only the power adapter supplied with your LCD Monitor. Use of another type of power
adapter will result in malfunction and/or danger.
• Allow adequate ventilation around the adapter when using it to operate the device or charge
the battery. Do not cover the power adapter with paper or other objects that will reduce
cooling. Do not use the power adapter while it is inside a carrying case.
• Connect the power adapter to a proper power source.
• Do not attempt to service the power adapter. There are no service parts inside. Replace the
unit if it is damaged or exposed to excess moisture.
Care And Cleaning
• Do not place the monitor face down on the floor or a desk surface directly. Otherwise,
scratches on the panel surface may occur.
Please follow these safety instructions for best performance, and long life for your monitor.
0~3000 m10~90 %0~40 C 0~12000 m10~60 %-20~60 C

4
• The equipment is to be secured to the building structure before operation.
• (For models that support wall or ceiling mounting)
• Install your monitor and monitor mounting kit on a wall with flat surface.
• Ensure that the wall material and the standard wall mount bracket (purchased separately)
are stable enough to support the weight of the monitor.
• Turn off the monitor and the power before disconnecting the cables from the LCD
monitor.
• Always unplug the product from the power outlet before cleaning. Clean the LCD monitor
surface with a lint-free, non-abrasive cloth. Avoid using any liquid, aerosol or glass cleaners.
• Slots and openings on the back or top of the cabinet are for ventilation. They must not be
blocked or covered. Your monitor should never be placed near or over a radiator or heat
sources, or in a built-in installation unless proper ventilation is provided.
• Do not place heavy loads on the monitor to avoid possible personal injury or damage to the
monitor.
• Consider keeping the box and packaging in storage for use in the future when you may need
to transport the monitor.
• Refer to the product label for information on power rating, manufacture date, and
identification markings.
Servicing
• Do not attempt to service this product yourself, as opening or removing covers may expose
you to dangerous voltages or other risks. If any of the above mentioned misuse or other
accident such as dropping or mishandling occurs, contact qualified service personnel for
servicing.
• Contact your place of purchase or visit the local website from www.BenQ.com for more
support.
Caution
• The monitor should be 50 ~ 70 cm (20 ~ 28 inches) away from your eyes.
• Looking at the screen for an extended period of time causes eye fatigue and may deteriorate
your eyesight. Rest your eyes for 5 ~ 10 minutes for every 1 hour of product use.
• Reduce your eye strain by focusing on objects far way.
• Frequent blinking and eye exercise help keep your eyes from drying out.

Table of Contents
Copyright ......................................................................................................................................2
Disclaimer .....................................................................................................................................2
Power Safety ................................................................................................................................3
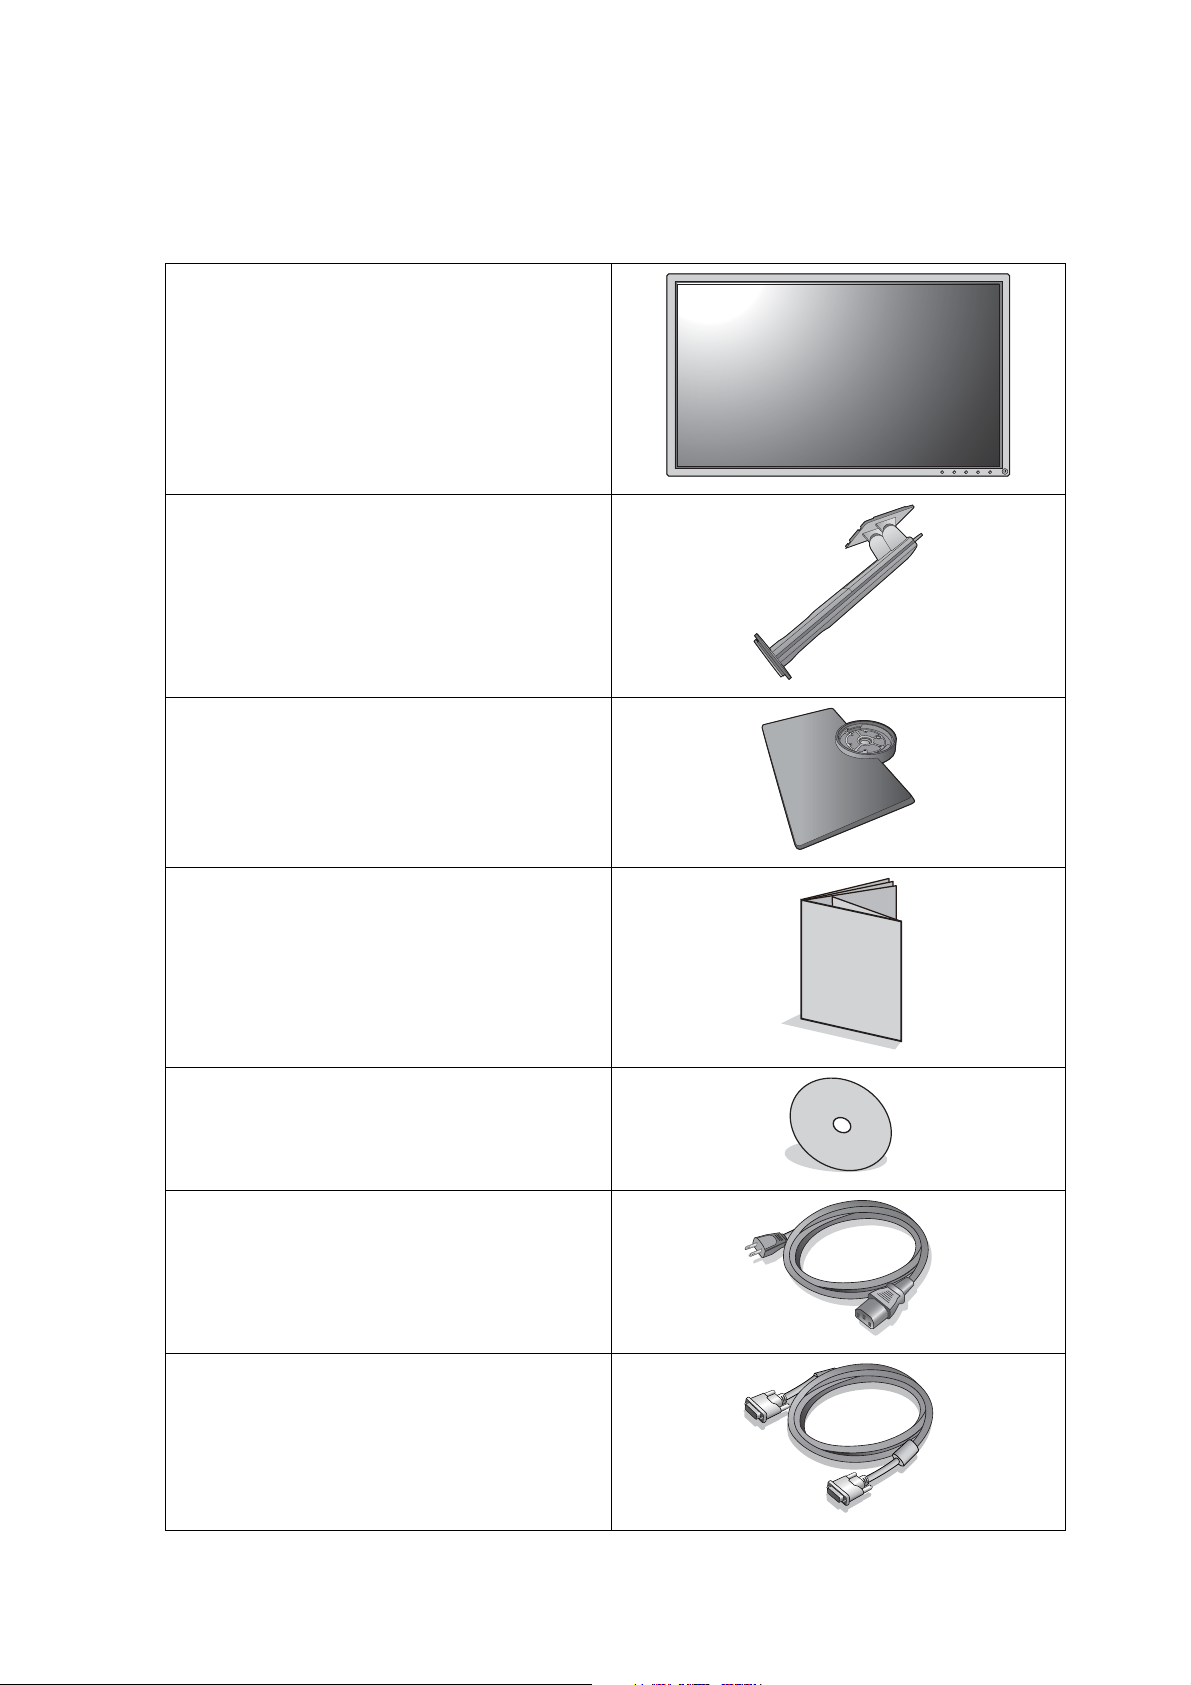
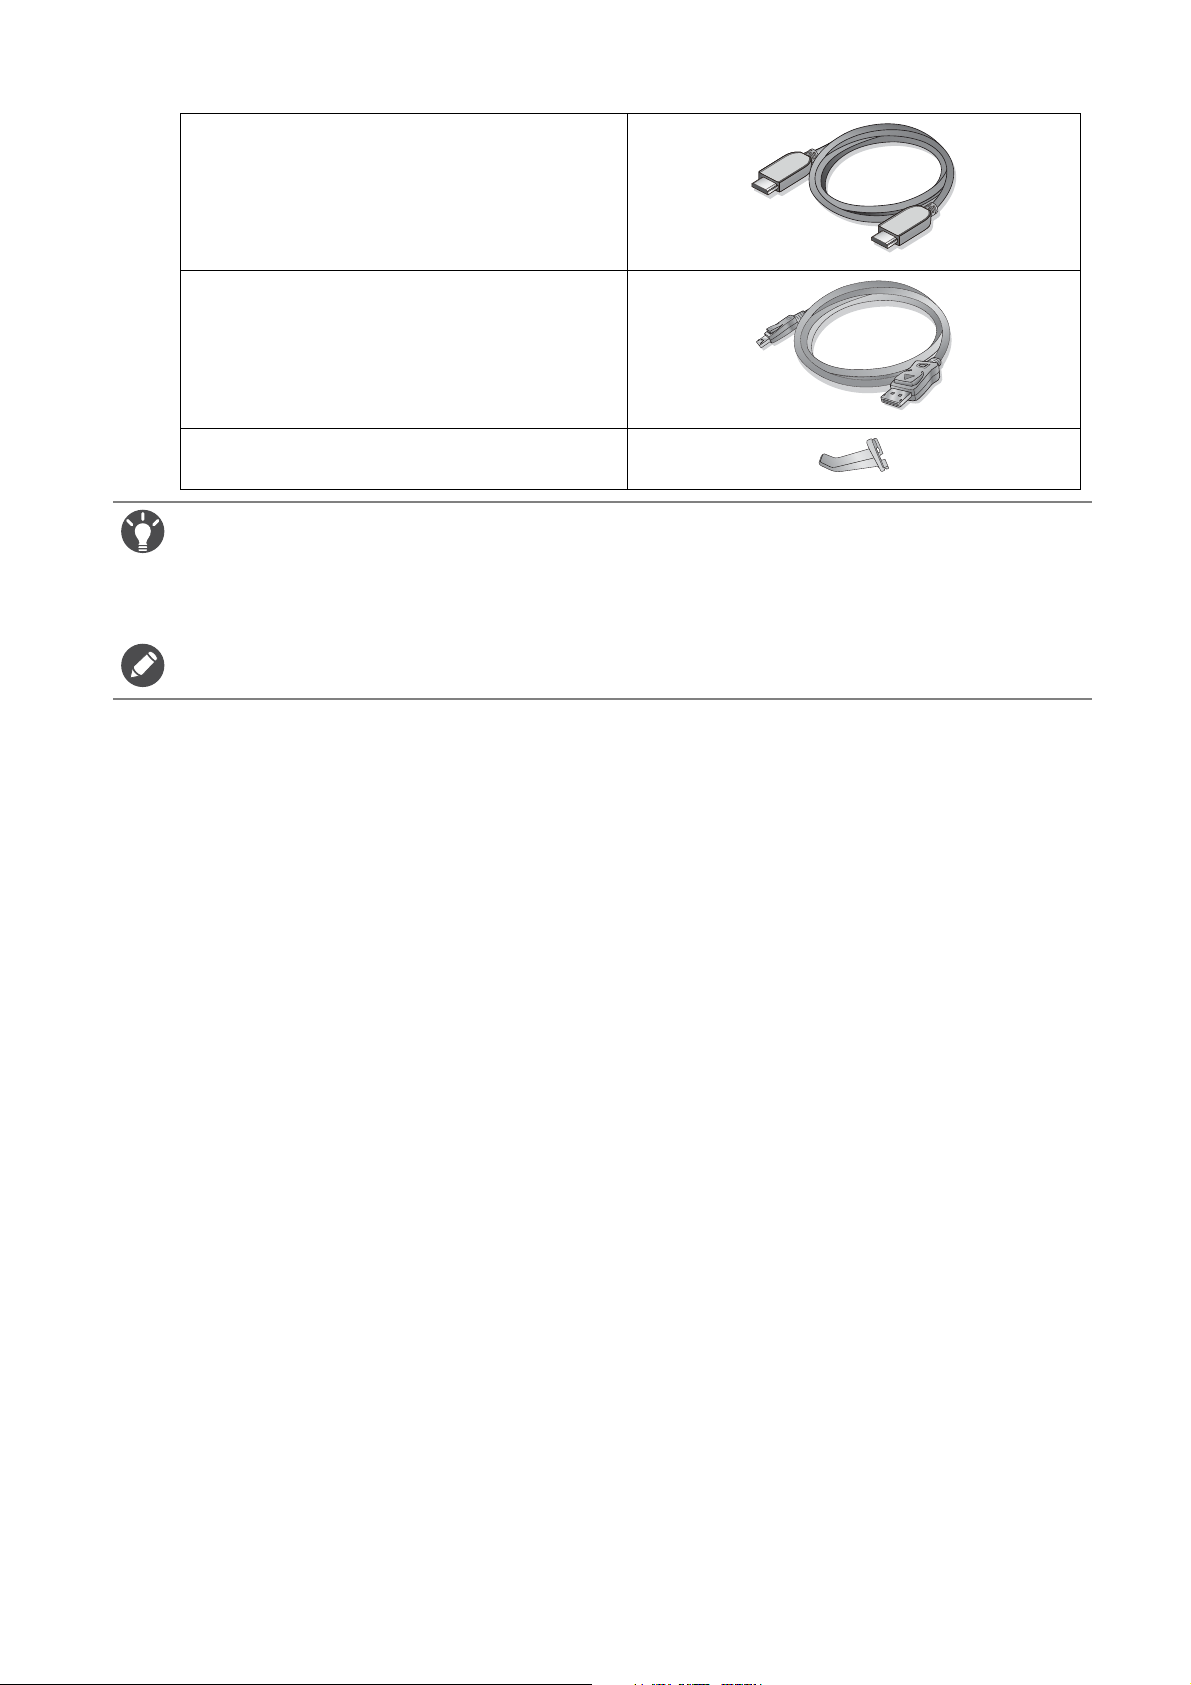
Getting started .............................................................................................................................6
Getting to know your monitor ................................................................................................8
Front view .................................................................................................................................................... 8
Back view...................................................................................................................................................... 8
Input and output ports.............................................................................................................................. 9
Connections ..............................................................................................................................................10
How to assemble your monitor hardware .........................................................................11
How to detach the stand and the base ...............................................................................................17
Adjusting the monitor height ................................................................................................................19
Viewing angle adjustment ....................................................................................................................... 19
Rotating the monitor ...............................................................................................................................20
Using the monitor wall mounting kit ...................................................................................................22
Getting the most from your BenQ monitor ......................................................................23
How to install the monitor on a new computer ..............................................................................24
How to upgrade the monitor on an existing computer .................................................................25
How to install on Windows 10 system ...............................................................................................26
How to install on Windows 8 (8.1) system .......................................................................................27
How to install on Windows 7 system .................................................................................................28
How to adjust your monitor ..................................................................................................29
The control panel..................................................................................................................................... 29
Basic menu operation.............................................................................................................................. 30
Initial setup for playing games at 144 Hz / 240 Hz ...........................................................................32
Customizing the hot keys....................................................................................................................... 33
Setting up your own game mode.......................................................................................................... 34
Adjusting display mode............................................................................................................................ 34
Using Smart Scaling .................................................................................................................................. 34
Using Instant Mode .................................................................................................................................. 34
Activating VESA standard DisplayPort Adaptive-Sync..................................................................... 35
Enabling color vision accessibility (Color Weakness)...................................................................... 35
Navigating the main menu .......................................................................................................36
Game Settings menu ................................................................................................................................37
Picture menu .............................................................................................................................................39
Display menu .............................................................................................................................................42
System menu .............................................................................................................................................45
Troubleshooting ........................................................................................................................49
Frequently asked questions (FAQ)....................................................................................................... 49
Need more help?...................................................................................................................................... 51
4/24/19

6 Getting started
Getting started
When unpacking please check you have the following items. If any are missing or damaged,
please contact the place of purchase for a replacement.
BenQ LCD Monitor
Monitor Stand
Monitor Base
Quick Start Guide
CD-ROM
Power Cord
(Picture may differ from product supplied
for your region.)
Video Cable: DVI-D Dual Link
(Optional accessory)

7Getting started
Video Cable: HDMI
(Optional accessory)
Video Cable: DP
Headphone hook
• Available accessories and the pictures shown here may differ from the actual contents and the product
supplied for your region. And the package contents may subject to change without prior notice. For cables
that are not supplied with your product, you can purchase them separately.
• Consider keeping the box and packaging in storage for use in the future when you may need to transport the
monitor. The fitted foam packing is ideal for protecting the monitor during transport.
Always keep the product and accessories out of reach of small children.

8 Getting to know your monitor
Getting to know your monitor
Front view
Back view
1. Control buttons
2. Power button
12
3. Handle
4. Headphone hook
5. Input and output ports (vary by
model, see Input and output
ports on page 9)
6. Kensington lock slot
7. Cable management hole
• Above diagram may vary depending on the model.
• Picture may differ from the product supplied for your region.
3
6
5
7
4

9Getting to know your monitor
Input and output ports
Available input and output ports may vary depending on your purchased model. Check the
Specification document on the provided CD for details.
1. AC Power Input jack
2. Headphone jack
3. DVI-D socket
4. HDMI-2 socket
5. HDMI-1 socket
6. DisplayPort socket
123465
HDMI 2.0 ports only work with compatible graphic cards and devices.
Compatible issue may occur when the HDMI 2.0 input port conducts with a HDMI 1.4 output port.

11How to assemble your monitor hardware
How to assemble your monitor hardware
• If the computer is turned on you must turn it off before continuing.
Do not plug-in or turn-on the power to the monitor until instructed to do so.
• The following illustrations are for your reference only. The location and available input and output jacks may
vary depending on the purchased model.
1. Attach the monitor base.
Please be careful to prevent damage to the monitor. Placing the screen surface on an object like a stapler or a
mouse will crack the glass or damage the LCD substrate voiding your warranty. Sliding or scraping the monitor
around on your desk will scratch or damage the monitor surround and controls.
Protect the monitor and screen by clearing a flat
open area on your desk and placing a soft item like
the monitor packaging bag on the desk for padding.
Gently lay the screen face down on a flat clean
padded surface.
Attach the monitor stand to the monitor base as
illustrated. Make sure to align the arrow on the end
of the stand to the one on the monitor base.
Turn the stand clockwise until you cannot go
further.

12 How to assemble your monitor hardware
Raise the thumbscrew lid ( ) and tighten the
thumbscrew as illustrated ( ). Then push the lid
back.
Orient and align the stand arm with the monitor
( ), push them together until they click and lock
into place ( ).
Carefully put down the stand and the base.
Gently attempt to pull the stand and the base back
apart to check that they have properly engaged.
Carefully lift the monitor, turn it over and place it
upright on its stand on a flat even surface.
To move the monitor, you must hold the handle and the
bottom of the stand base at the same time as illustrated.
2
1
1
2

14 How to assemble your monitor hardware
2. Connect the PC video cable.
The video cables included in your package and the socket illustrations in this document may vary depending on
the product supplied for your region.
1. Establish a video cable connection.
• Connect the plug of the DVI-D Dual Link cable to the monitor video socket.
• Connect the plug of the HDMI cable to the HDMI port on the monitor.
• Connect the plug of the DP cable to the monitor video socket.
2. Connect the other end of the cable to the computer video socket.
3. Tighten all finger screws (if available) to prevent the plugs from accidently falling out during use.
3. Connect the headphones.
You may connect headphones to the headphone jack found on the back side of the monitor.
The headphone jacks work only when the audio source is HDMI or DisplayPort.
The audio source may not work on headphone jack under certain resolution (2560 x 1440, 144Hz) due to the
graphic limitation on some of the graphic cards.
or or or

15How to assemble your monitor hardware
4. Connect the power cable to the monitor.
Plug one end of the power cord into the socket
labelled on the rear of the monitor. Do not
connect the other end to a power outlet just yet.
5. Organize the cables.
6. Install the headphone hook (optional step).
You can install the headphone hook to place your
headphone. It is useful when your headphone is not
in use.
Orient and align the headphone hook with the hole
on the monitor stand, and attach the hook to the
hole ( ). Turn the hook clockwise until you
cannot go further ( ). The headphone hook is
ready to use.
Leave your headphone on the headphone hook if
needed.
7. Connect-to and turn-on the power.
Plug the other end of the power cord into a power
outlet and turn it on.
Picture may differ from product supplied for your region.
1
2

16 How to assemble your monitor hardware
Turn on the monitor by pressing the power button
on the monitor.
Turn on the computer too, and follow the
instructions in Getting the most from your BenQ
monitor on page 23 to install the monitor
software.
To extend the service life of the product, we recommend
that you use your computer's power management function.

17How to assemble your monitor hardware
How to detach the stand and the base
1. Prepare the monitor and area.
Turn off the monitor and the power before
unplugging the power cable. Turn off the computer
before unplugging the monitor signal cable.
Protect the monitor and screen by clearing a flat
open area on your desk and placing a soft item like
a towel on the desk for padding, before laying the
screen face down on a flat clean padded surface.
Please be careful to prevent damage to the monitor. Placing
the screen surface on an object like a stapler or a mouse will
crack the glass or damage the LCD substrate voiding your
warranty. Sliding or scraping the monitor around on your
desk will scratch or damage the monitor surround and
controls.
2. Remove the monitor stand.
While pressing and holding the VESA mount
release button ( ), detach the stand from the
monitor ( and ).
3. Remove the monitor base.
Raise the thumbscrew lid ( ) and release the
thumbscrew as illustrated ( ).
1
3
2
2
1

18 How to assemble your monitor hardware
Turn the base clockwise until you cannot go
further.
And then detach the base from the stand.
You can remove the headphone hook as illustrated. Keep the
headphone hook somewhere safe for future use.
1
2

19How to assemble your monitor hardware
Adjusting the monitor height
Viewing angle adjustment
You may position the screen to the desired angle with the monitor tilt, swivel, and height
adjustment functions. Refer to the product specifications for details.
To adjust the monitor height, hold both the left and the
right sides of the monitor to lower the monitor or lift
it up to the desired height.
• Avoid placing hands on the upper or lower part of the
height-adjustable stand or at the bottom of the monitor, as
ascending or descending monitor might cause personal injuries.
Keep children out of reach of the monitor while performing this
operation.
• If the monitor has been rotated to portrait mode and height adjustment is desired, you
should be noted that the wide screen will keep the monitor from being lowered to its
minimum height.

20 How to assemble your monitor hardware
Rotating the monitor
1. Pivot the display.
Before rotating the monitor with a portrait viewing orientation, the display has to be rotated 90
degrees.
Right-click the desktop and select Screen resolution from the popup menu. Select Portrait in
Orientation, and apply the setting.
Depending on the operating system on your PC, different procedures should be followed to adjust the screen
orientation. Refer to the help document of your operating system for details.
2. Fully extend the monitor and tilt it.
Gently lift the display up and extend it to the maximum
extended position. Then tilt the monitor.
The monitor should be vertically extended to allow to rotate
from landscape to portrait mode.
3. Rotate the monitor 90 degrees clockwise as
illustrated.
To avoid the edge of the LCD display hitting the monitor base
surface while it is being rotated, do tilt and extend the monitor
to the highest position before you start to rotate the display. You
should also make sure there are no obstacles around the monitor
and there is enough room for cables.
90
This manual suits for next models
2
Table of contents
Other BenQ Speakers manuals