Bertoni city User manual

MANUAL INSTRUCTION
CITY
combi stroller

BEFORE USE CAREFULLY READ THESE INSTRUCTIONS AND
KEEP THEM FOR FURTHER REFERENCE. FAILURE TO OBSERVE
THESE INSTRUCTIONS MAY AFFECT THE SAFETY OF YOUR
CHILD!
EN
SAFETY REQUIREMENT
1.Thestrollermayturnoverifsomethingishangedonthehandleorputonthecanopy!
3.Donotallowchildrentosuspendhim/herselforplayinthestroller!
4.Donotallowchildrentostandinthestroller!
5.Usebrakesifyoudonotholdthestrollerwithhand!
6.Usethebrakeswhenplacingthechildinawheelchair!
7.Donotusethestrolleronunevensurfacesnearfireorotherdangerousplaces!
8.Donotusethestrolleronstairsandescalators!
9.Donotallowyourchildtostandontheseatandfootrest!
10.Donotuseaccessoriesnotapprovedbythemanufacturer!
11.Adjustmentofthebackrestshouldbeperformedonlybyanadult!
12.Donotleavethestrolleronhillsorinclinedsurfacesevenifyouhaveactivatedthebrakesystems!
13.Donotleavethechildunattended!
14.Please,usethebrakesystemsevenwhenyounotusingthestrollertoavoidemergency.
15.Alwaysusethesafetybeltsystems!
16.Oilwheelsandmetalpartsregularlytomakesurethestrollerworkswell.
17.Donotletyourchildplaywithstrollerpartsinordertoavoidinjury!
18.Alwaysdryandairthestrollerifithasgotwet.
19.Anyadditionalloadorincorrectoperationmaycausedamageorincident.
20.Thepersonassemblingthestrollermustbeacquaintedwiththefunctionalityofthestroller.
21.Beverycarefulonthestreets.Alwaysfoldthestrollerbeforegoingupstairsordownstairs.
22.Donotusefunctionsorwaysofexploitationnotmentionedinthisinstruction!
23.Theheightofcarriedchildshouldnotexceed96cm.
24.Donotuseinappropriateaccessorieswiththestroller.
25.Thestrollerisdesignedtobeartotalloadupto15kg.
26.Thestoragebasketbearloadupto2kg.
27.Thisstrollercanbeusedonlyfor1child.
28. Thisstrollerissuitableforchildrenupto3yearsold.
29.Thesummerbasketisnotsuitableforchildrenunder6months.
2.Strollershouldalwaysbeusedunderthesupervisionofanadult!

WARNING
WARNING!Itmaybedangeroustoleaveyourchildunattended!
WARNING!Ensurethatalllockingdevicesareengagedbeforeuse!
WARNING! Donotaddamattressthickerthan10mm!
WARNING!Starttousesafetybeltsassoonasyourchildiscapabletositwithoutassistance!
WARNING!Anyloadattachedtothehandleaffectsthe stabilityofthepram/pushchair!
WARNING!Check that the pram body or seat unit attachment devices are correctly engaged
beforeuse!
WARNING!Newborn child is not able to sit and hold his head up unassisted. Therefore, do not fix
the backrest in sitting position! Lower it to maximum lying down!
!Always use safety belts when the child is in the stroller! Always use the crotch belt in
combination with the waist belt! To prevent injury from a fall or a slip off always use the shoulder
straps!
WARNING!Regularly check for loose parts!
WARNING!When you adjust the cart, beware the child is not close to moving parts of the stroller.
WARNING!Do not hang on any bags and packages!
!This vehicle is designed for children from 0 months and weight up to 15 kg!
WARNING!This product is notsuitable for running or skating!
EN 1888:2003
WARNING
WARNING
MAINTENANCE AND CARE
1. To clean the metal parts use damp cloth and then dry them.
2. To clean the plastic parts use cloth, water and soft detergent.
3. To clean the woven fabric use upholstery cleaner.
4. Any additional load affects stroller's stability!
5. When storing never place other items on or in the stroller. This will damage it!
6. Oil caster bolts and wheels regularly.
7. Check for damaged parts regularly and replace immediatly!


UNFOLDING OF THE STROLLER
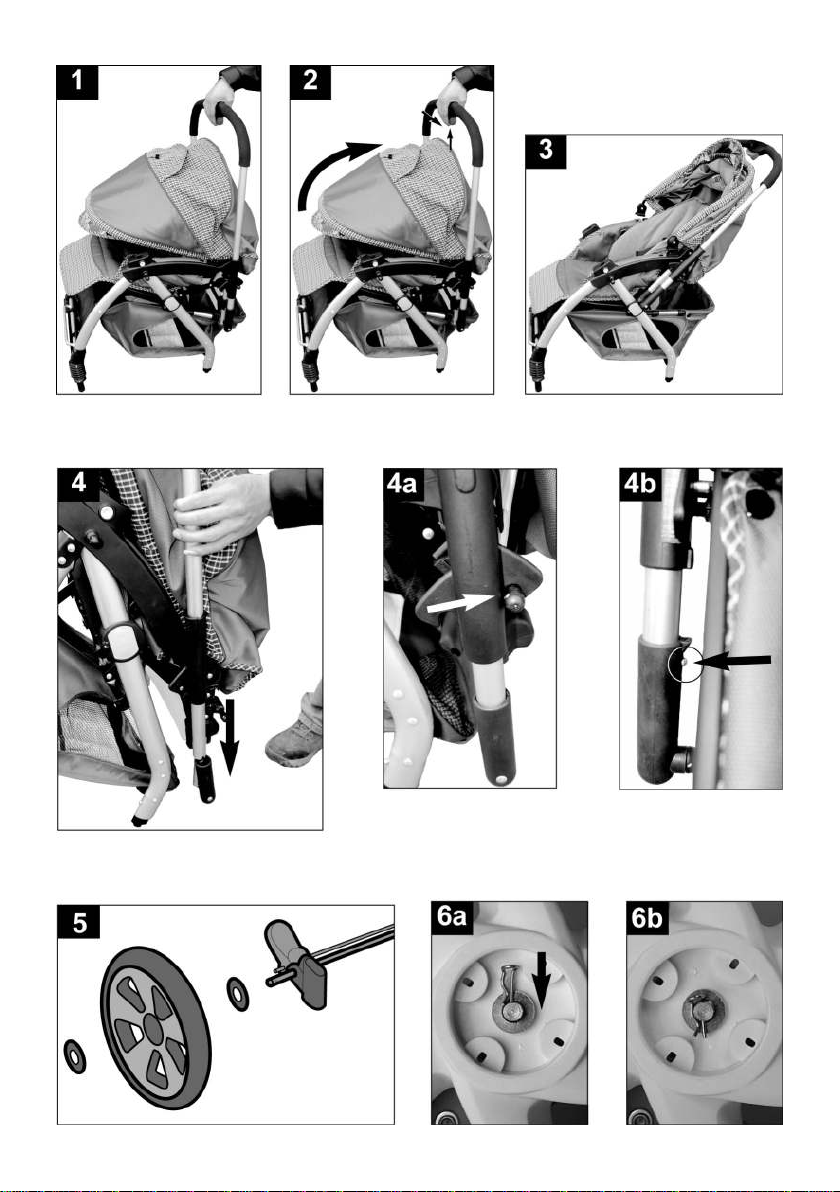
1. Folded stroller. (picture 1)
2. Slide and press the red button on the parental handle to the left and press to unlock the
mechanism. Pull the handle towards you. Stroller will “click” when is completely unfolded and locked.
(pictures 2 and 3)
ASSEMBLING OF THE STROLLER
INSTALLATION OF THE REAR WHEELS
1. Remove the cotter pin and one washer from the axle leaving the other washer on its place. Place
the wheel (with spokes out) in the axis. Place the second washer. (picture 5)
2. Insert the straight side of the cotter pin through the hole in the axle. (pictures 6, 6а and 6b)
3. To install the second wheel please, repeat steps 1 and 2.
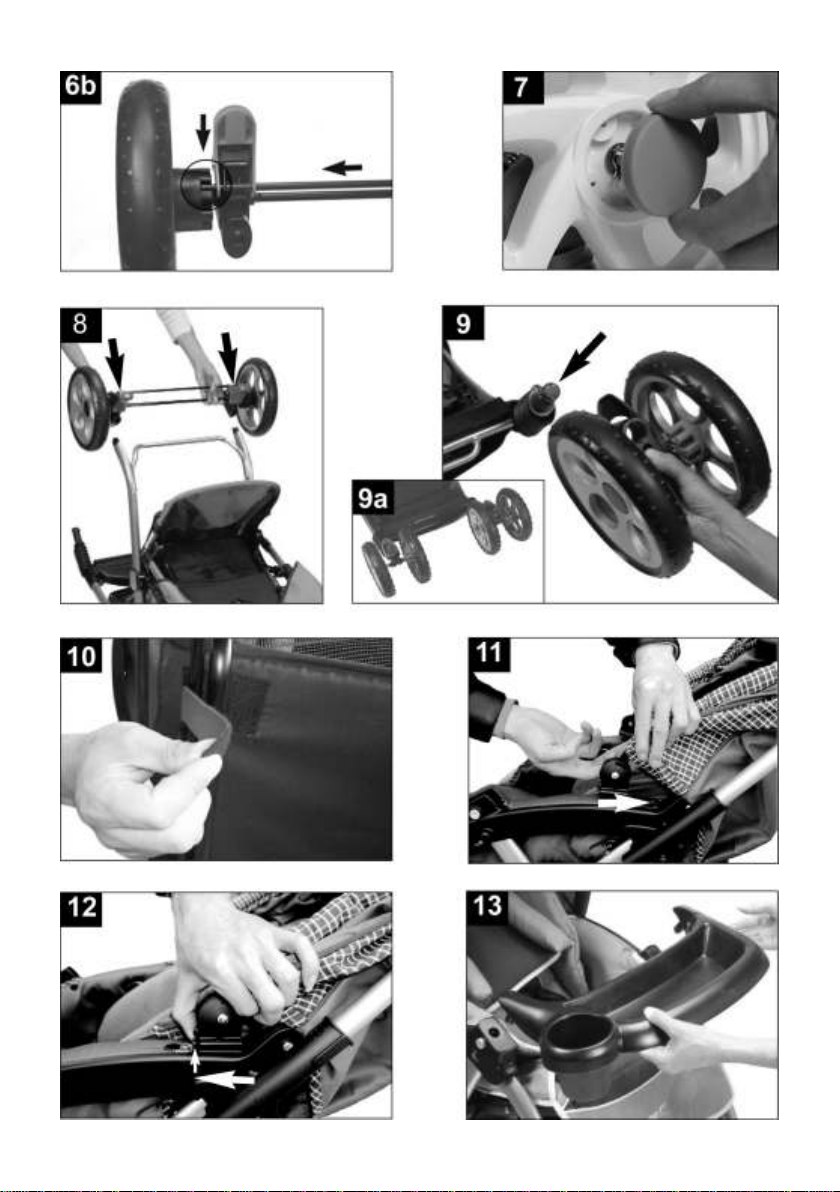
4. Place the caps on the both wheels. (picture 7)
5. Turn the stroller upside down. Hold the axle with the wheels and in the same time the brakes have
to be in the direction of the handle. Insert the holes into the pipes of the construction until “click”.
INSTALLATION OF THE FRONT WHEELS
1. Insert the front wheel into the pipe of the metal frame. Wheel will “click” if it is installed properly.
(picture 9)
2. Repeat the same operation to install and the other front wheel. (picture 9а)
INSTALLATION OF THE SHOPPING BASKET
1. Install the shopping basket by using the velcro straps located on its bottom side. (picture 10)
INSTALLATION OF THE CANOPY
1. Insert the pin of the canopy into the hole made for this purpose. (picture 11)
2. To remove the canopy lift the button and pull up. (picture 12)
INSTALLATION OF THE TRAY
1. Insert the tray pins into the holes in the frame of the stroller. Press until tray “clicks” into place.
(picture 13)
2. To remove the tray press the release buttons on the both sides and pull the tray out. (picture 14)
INSTALLATION OF THE FOOTREST
1. Place the footrest between the both metal pipes in the front part of the frame of the stroller. Install
the footrest on the horizontal frame and press until it “clicks”. (picture 15)
INSTALLATION OF THE PARENTAL HANDLE
1. Insert the metal pipes of parental handle into the holes made for this purpose until the spring
pushes out the metal pin. (picture 4)
2. Install the mechanisms for reversal of parental handle. (picture 4а)
3. When dismantling press the metal button to remove the handle. (picture 4b)

SERVICE USE
USING THE REAR BRAKES
1. Step on the red lever close to the rear wheel to activate the brake. (picture 16)
2. Lift the lever up to unlock the brake.
USING THE FRONT BRAKES
1. Step on the lever between the both front wheels to lock their movement only forward. (picture 17)
2. Lift the lever up to release the wheels to turn in all directions.
ADJUSTING THE POSITION OF THE BACKREST
1. The backrest has 3 position. To change the position of the backrest you have to use the mechanism
located on back side. Trying to adjust the backrest without unlocking the mechanism will be damage it
and this is not subject to warranty! (picture 18)
ADJUSTING THE POSITION OF THE FOOTREST
1. To adjust the position of the footrest you have to use the mechanisms located on its both sides.
(pictures 19 and 19а)
ADJUSTING THE POSITION OF THE CANOPY
1. То аdjust the position of the canopy you have to pull it forward or backward depending on your
needs. (picture 20)
USING THE SAFETY BELT
1. To unlock the safety belt press simultaneously the both mechanisms and pull it out. (picture 21)
2. To lock the safety belt bring together the both plastic mechanisms and place them in the locking
buckle. (picture 22)
CHANGING THE POSITION OF THE PARENTAL HANDLE
1. To change the position of the handle first lift the plastic mechanisms on its both sides. Then change
the position of the handle until the locking mechanisms “click”. Make sure they are locked well!
(pictures 23 and 24)
FUNCTION AS A NEWBORN BASKET
1. Place the backrest of the stroller in the lowest position.
2. Remove the tray.
3. Lift the soft pad for the foot up and fold the both side parts inward. (picture 25)
4. Pass each of the velcro straps through the slot in the fabric from inside of the stroller. (picture 26)
5. Tighten each of the velcro straps to fix the footrest in this position. (picture 27)
6. Press the releasing mechanisms on both sides of the footrest. Lift until it is locked. (picture 28)
Notice: Make sure the footrest is locked well.
7. Place the tray. (picture 29)

REMOVING THE TEXTILE PART OF THE STROLLER FOR CLEANING
1. Release all fixing elements of the textile part from the stroller. (picture 30)
Notice: Pull the textile part following the direction of the arrows to release the fixing elements. (picture
31)
2. Pull the textile part up to release the pins underneath the seat. (picture 32)
3. Release the velcro straps under the seat. Pass them through the holes in the seat. (pictures 33
and 34)
4. Lift the seat up and find the slots below. Pass the buckle through the slot. (picture 35)
5. Release the velcro straps and push the both metal elements through the backside of the stroller.
(picture 36)
6. Pull the textile part up off the plastic elements. (picture 37)
PLACING THE TEXTILE PART OF THE STROLLER
To place the textile part back repeat the same steps from “REMOVING THE TEXTILE PART OF THE
STROLLER” in reverse order.
WARNING!
- For proper installation of the restraint system make sure that the both metal elements are in one
plane with the backside of the stroller.
- Never use the stroller without the both metal elements and the strap.
FOLDING THE STROLLER
Notice: Before folding the stroller lock the rear brakes and take your child out of the stroller. Fold the
canopy and remove any additional load from the basket.
1. Slide and press the red button on the parental handle. Press forward and down until you lock the
stroller. The stroller will remain fixed in this position.

www.bertoni-eu.com
Дидис ООД - България
Шумен 9700, “Правда” 1
Тел.: 054/850 830
Факс: 054/850 839
e-mail: [email protected]
Didis Ltd. - Bulgaria
Shumen 9700, “Pravda” 1 Str.
Tel.: +359 54 850 830
Fax: +359 54 850 839
e-mail: [email protected]
Table of contents
Other Bertoni Stroller manuals

Popular Stroller manuals by other brands


Kolcraft
Kolcraft S69-R1 instruction sheet

BABY MONSTERS
BABY MONSTERS EASY TWIN 4 manual

Advance mobility
Advance mobility Baby Jogger Freedom Assembly instructions

Delta Childrens Products
Delta Childrens Products CX RIDER 11106 instruction manual

TFK
TFK Joggster 3 operating manual

Joyello
Joyello MUSINO JL-934 user manual


