Beryl Smart BS-50UK721UHD User manual

Please read these instructions before operating
your set and retain them for future reference.
LED COLOR TV
Model:
Operating Instruction
BS-50UK721UHD
BS-55UK721UHD
RWYJ00-H207

PRECAUTION

WARNING
Using cabinets orstands recommended bythe manufacturer ofthe television set.
Only using furniturethat can safelysupport the televisionset.
Ensuring the televisionset is notoverhanging the edgeof the supporting
furniture.
Not placing thetelevision set ontall furniture (forexample, cupboards or
bookcases)without anchoring both the furniture and the television setto a
suitable support.
Not placing thetelevisions set oncloth or othermaterials that maybe located
between the televisionset and supportingfurniture.
Educating children aboutthe dangers ofclimbing on furnitureto reach the
Televisionset or itscontrols.
Never place atelevision set inan unstable location.Atelevision set mayfall,
causing serious personalinjury or death.Many injuries,particularly tochildren,
can be avoidedby taking simpleprecautions such as:
If your existingtelevision set isbeing retained andrelocated,the same
considerations as aboveshould be applied.
IMPORTANT INFORMATION
Using cabinets orstands recommended bythe manufacturer ofthe television.
Only using furniturethat can safelysupport the television.
Ensuring the televisionis not overhangingthe edge ofthe supporting furniture.
Not placing thetelevision on tallfurniture (for example, cupboards or
Bookcases)without anchoring boththe furniture andthe television toa Suitable
Support.
Not standing thetelevisions on clothor other materialsplaced between the
television and supportingfurniture.
Educating children aboutthe dangers ofclimbing on furnitureto reach the
television or itscontrols.
If a televisionis not positionedin a sufficiently stable location,itcan be potentially
hazardous due tofalling.Many injuries,particularly tochildren, can beavoided
by taking simpleprecautions such as:

CAUTION
Danger of explosionif battery isincorrectly replaced.
Replace only withthe same orequivalent type.
Batteries shall notbe exposed toexcessive heat suchas sunshine, fireor the
like.
Used batteries shouldnot be throwninto the garbagecan, please leave them
at an appropriatedepot.
CAUTION
Where the MAINS plug or an appliance coupler is used as the disconnect
device, the disconnect device shall remain readily operable.
CAUTION
These servicing instructions are for use by qualified service personnel only.
To reduce the risk of electric shock, do not perform any servicing other than
that contained in the operating instructions unless you are qualified to do so.
Attention:
Motionless picture might cause permanent destruction to the display.
Be sure not to display motionless picture on the LED TV for more than
2 hours, because it would cause picture remnants to appear, which is
called "screen burns". To avoid suchpicture remnants, please decrease
the "contrast" and "brightness" of the display when displayingmotionless
picture.
While watching TV program in 4:3 size mode for a long time, there would .
be traces on the edge of the screen's left, right and center parts because
of different transmition of the light on the screen.Similar impact on the
screen will occurwhen playing DVDor connecting gamescontrol. Products
destroyed by these reasons can't be guaranteed for maintenance.
It might cause picture remnants to display electronic gamesand motionless .
picture of PC more than a period of time.To avoid sucheffect, please
decrease the "contrast" and "brightness" when displaying motionless
picture.

Place the TV on a firm and flat surface,leaving a space of at lease 10cm around
the set and30cm from thetop of theset to the wall or cabinet.Ensure the TV is
positioned close to the wall to avoid it falling when pushed.
10cm 30cm 10cm 10cm
When you turning the TV set,do not hold the top side of the TV set ,you should
hold the bottom side .
When you lifting the TV set,do not use one hand to handle it,you should lift the
TV set by two hands.

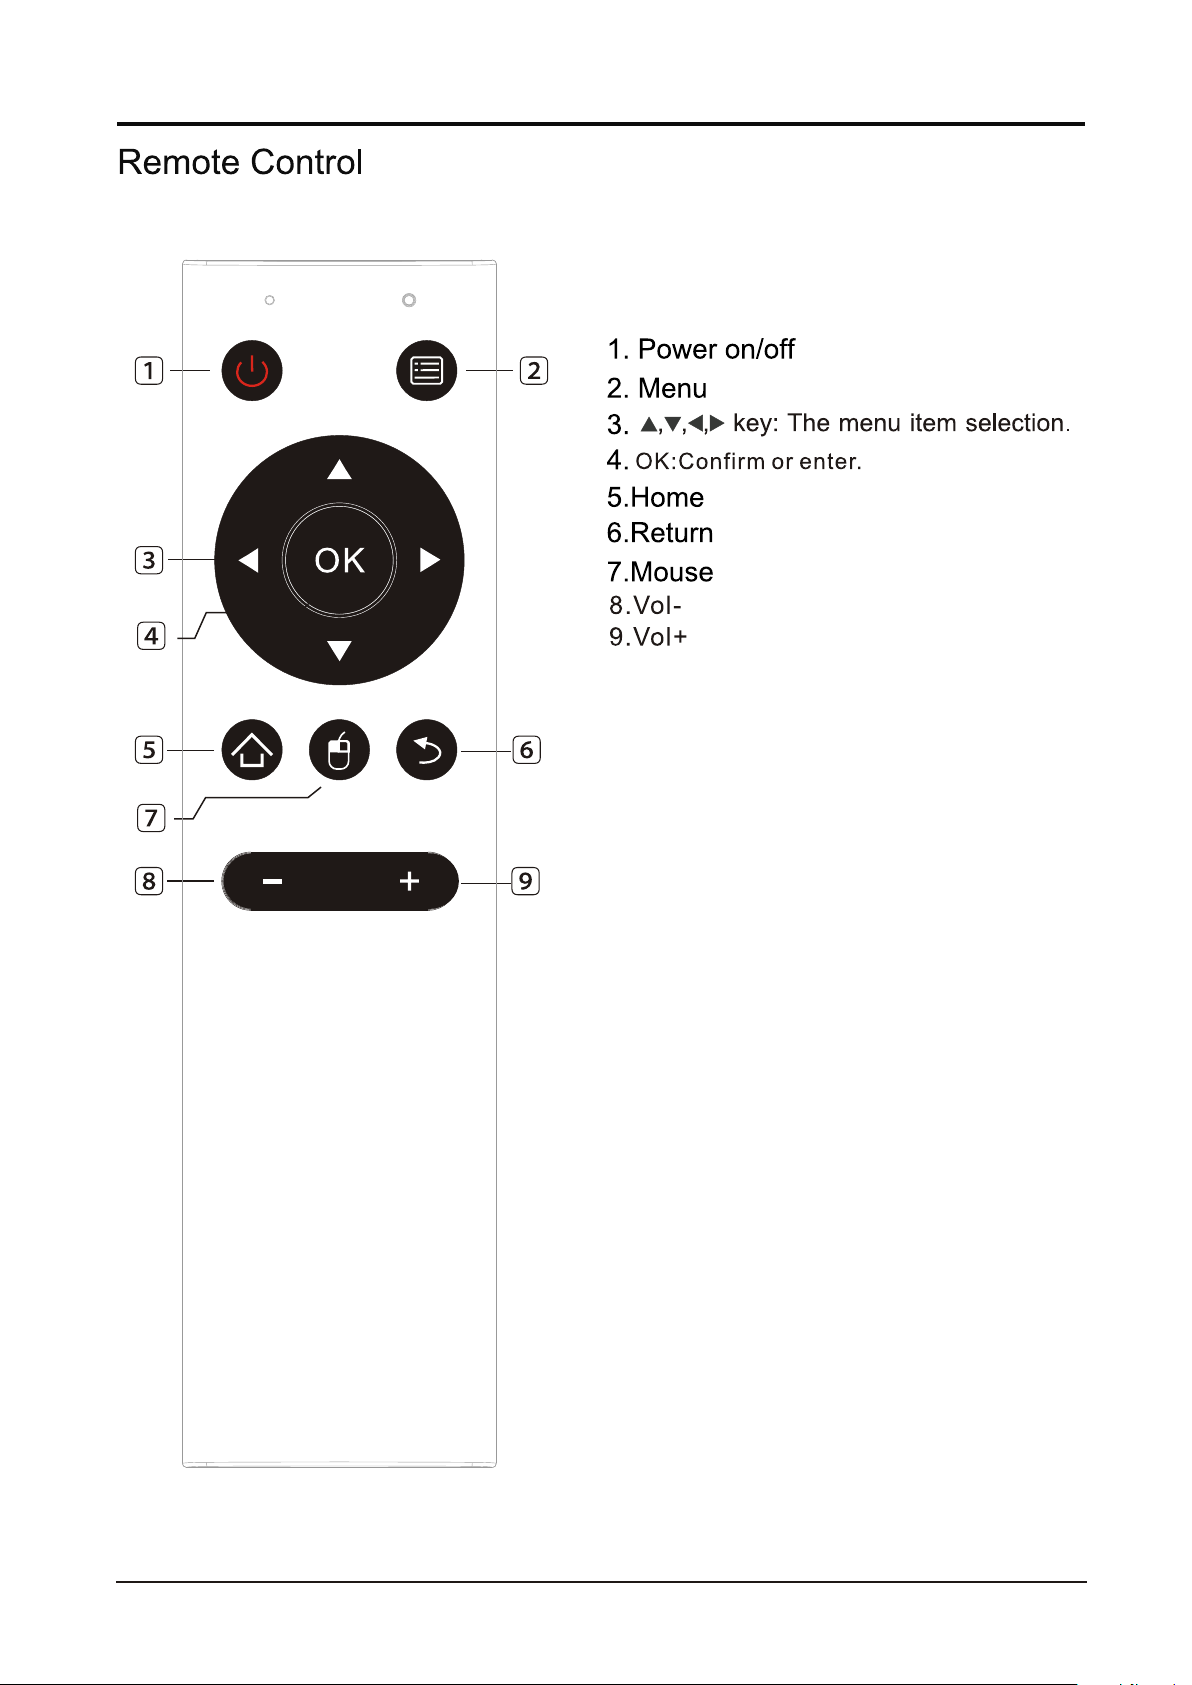
2.4 Home page
1.3 Keys
1
CONTENTS
LED COLOR TV
1. Connection and Preparation of TV..................................................
1.1 Accessories ...........................................................................
1.2 Installation of Stand................................................................
and Interfaces................................................................
1.4 Remote Control.......................................................................
1.5 Installation of Batteries...........................................................
2. Basic Operation...........................................................................
2.2 Setting of Standby Mode..........................................................
2.3 Input Source
3. Technical Specification................................................................
4. Supported Signal Modes..............................................................
5. Simple Troubleshooting ...............................................................
2
2
2
3
4
6
6
6
7
17
18
.........................................................................
............................................................................
2.1 Power ON/OFF(Optional)..........................................................6
7
2.5 TV Setting ............................................................................ 9
2.6 Media ...................................................................................15
19
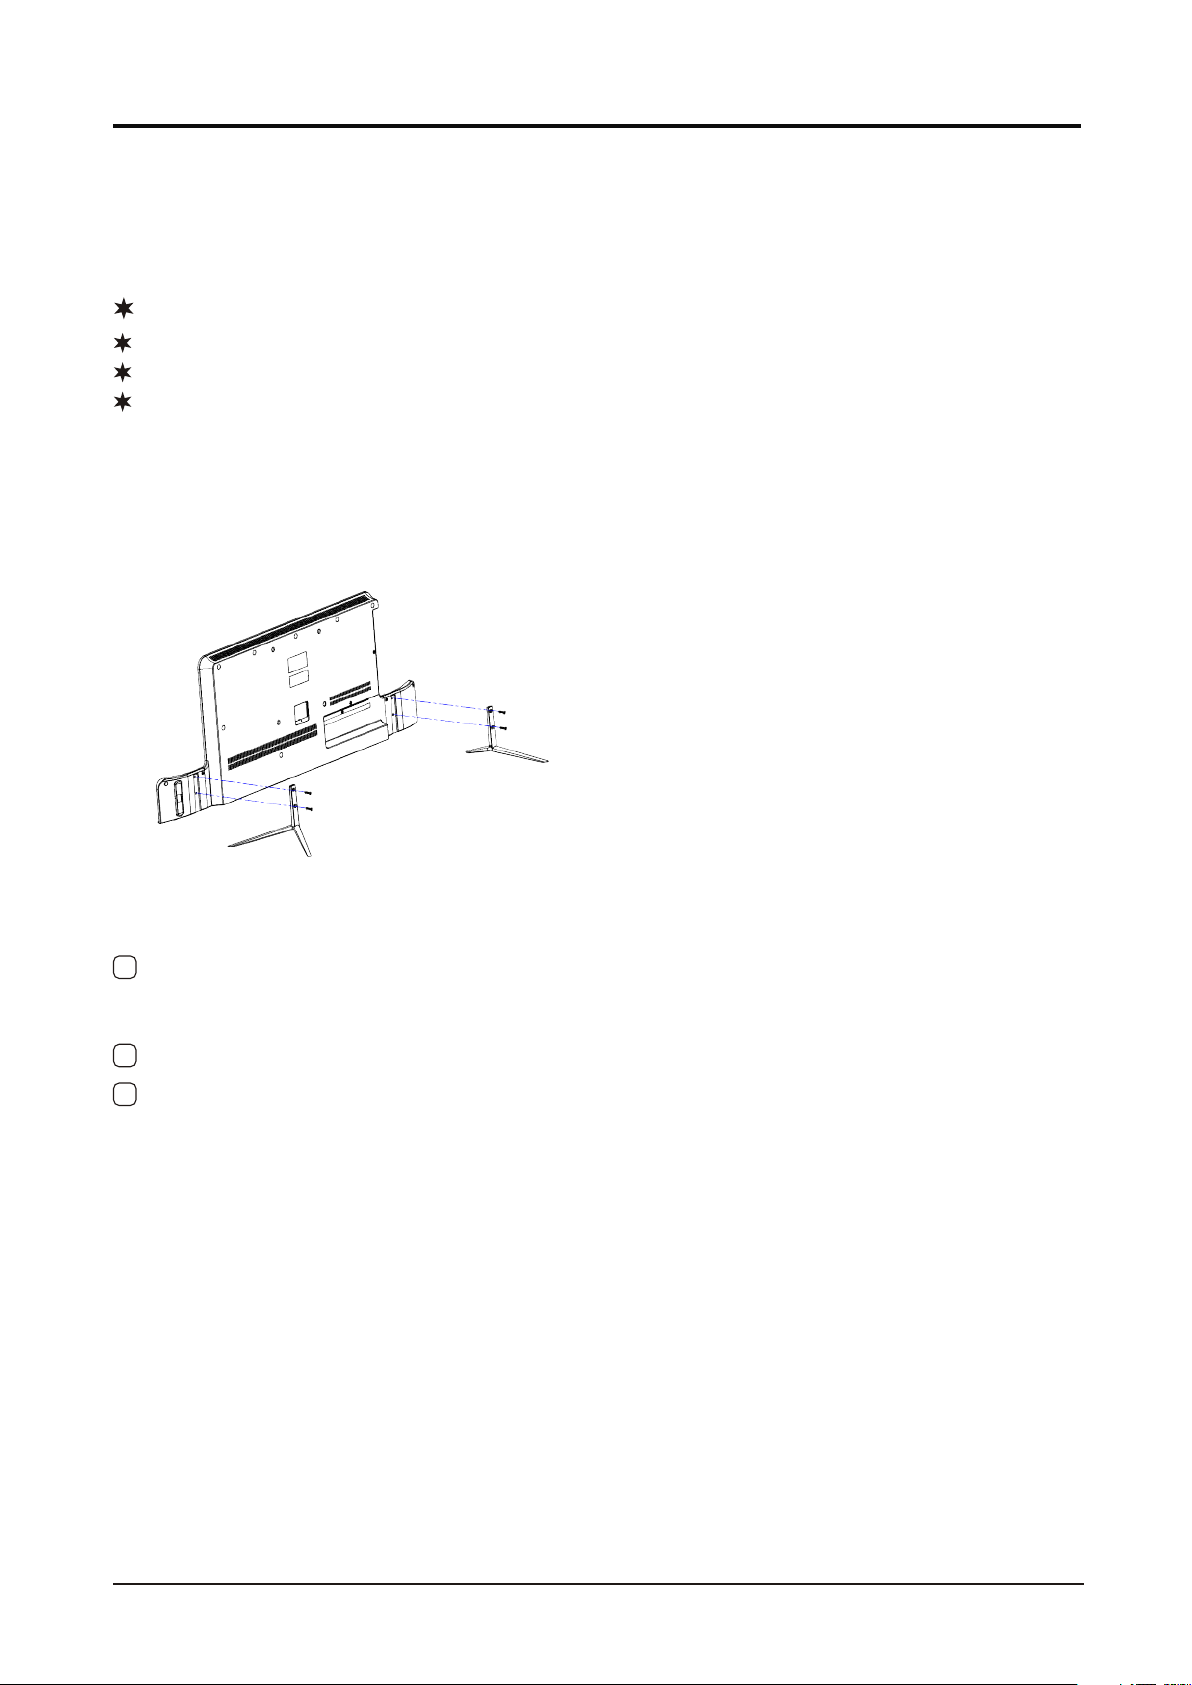
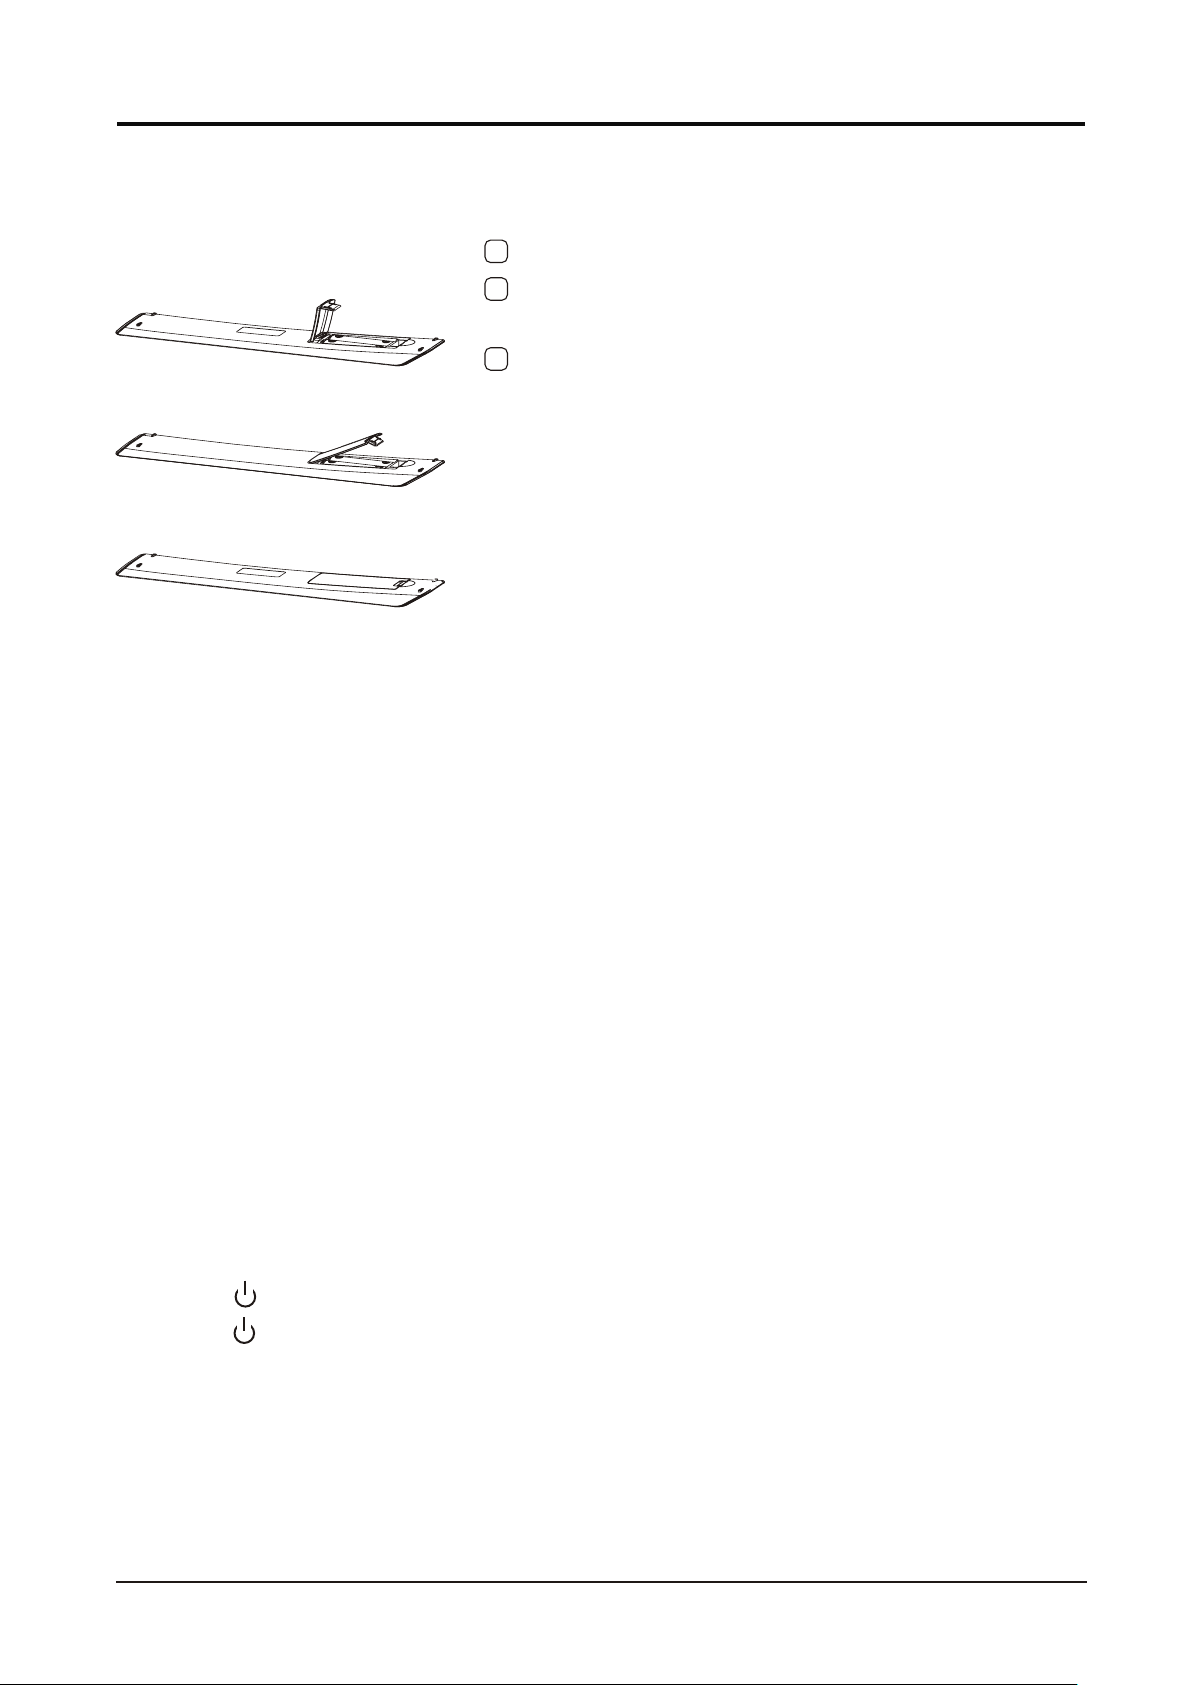
2 Insert thestand into thebottom socket ofthe TV.
1.Connection and Preparation of TV
1.1 Accessories
User Manual
Remote Control
Battery(UM-4/R03P/AAA)
Wall Mount Kit (Pre-assembled)(Optional)
1.2 Installation of Stand
1 Place theTV with the front panel facing downwards on the soft cloth or soft
pads on adesk.
3 Insert the screws into the sockets and tighten them.
2
LED COLOR TV
(For the physical structure, please refer to the real object)
3
The design and specification takes actual
products as the standard
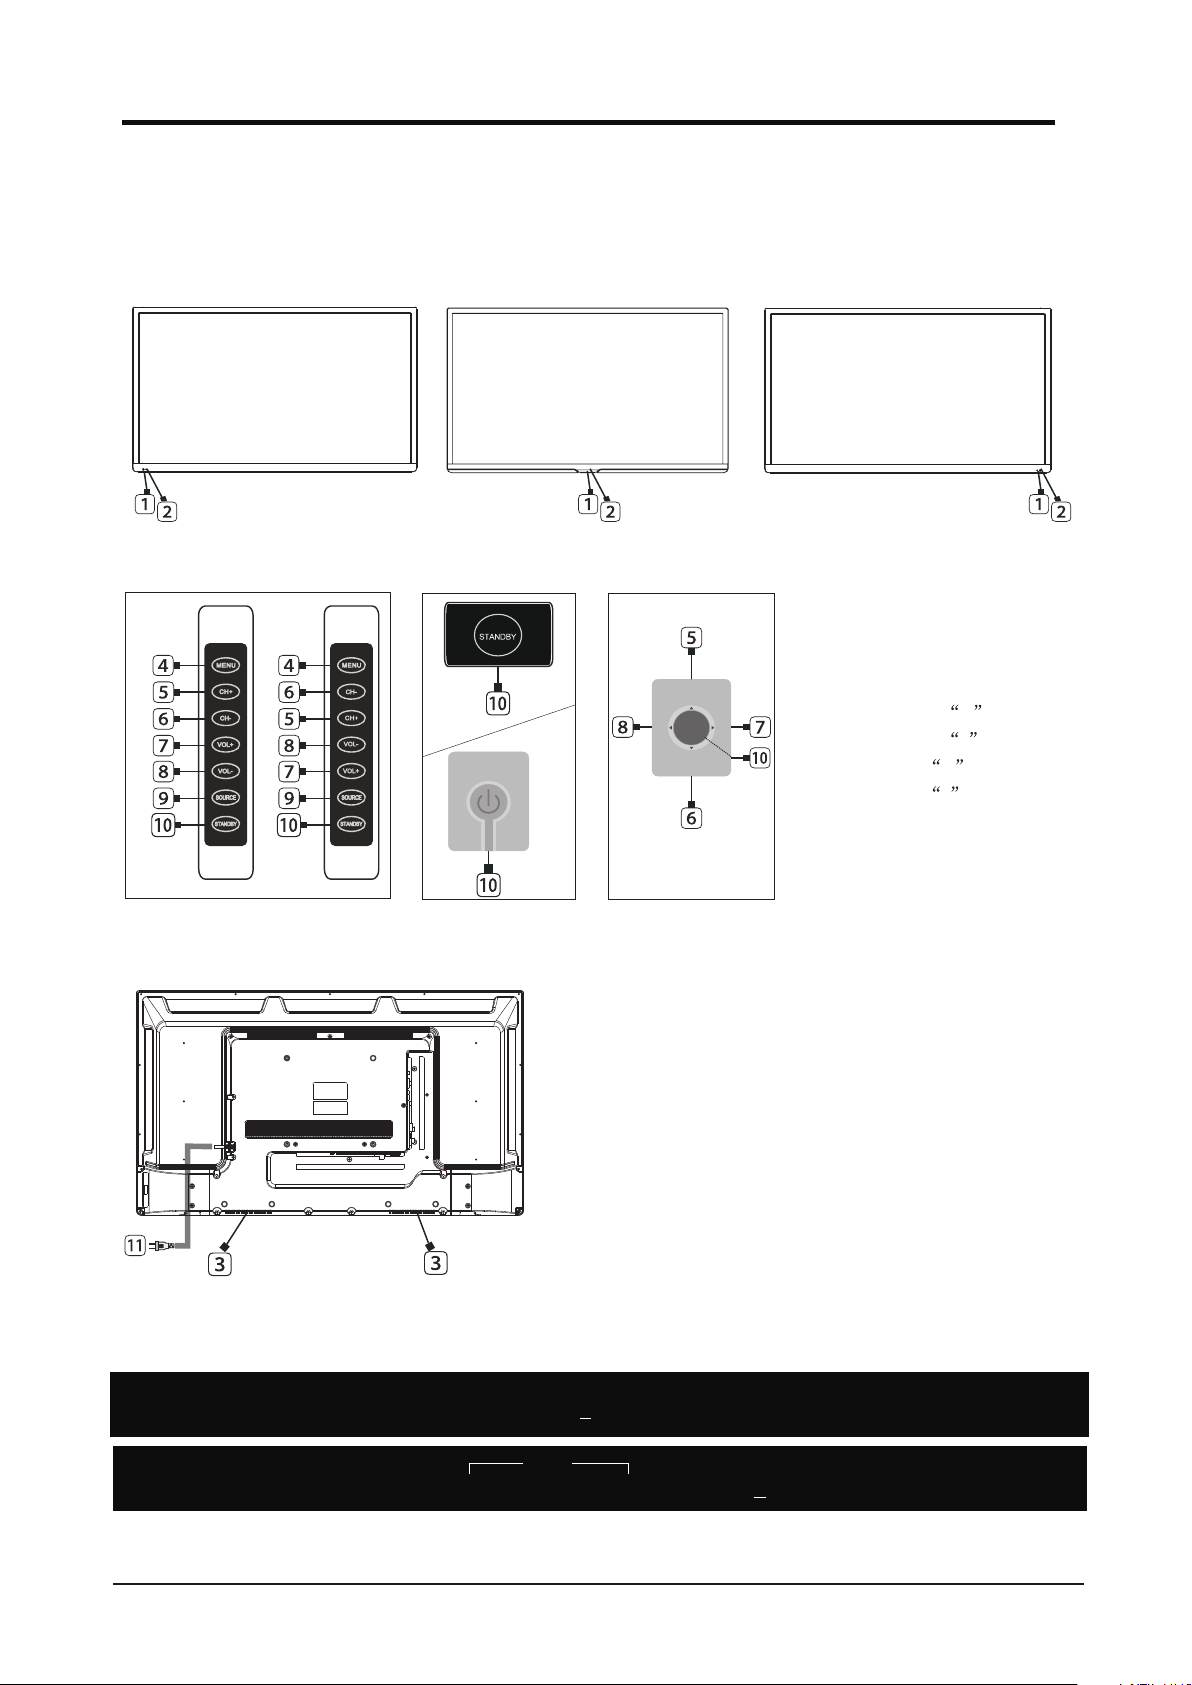
1.3 Keys and Interfaces
LED COLOR TV
PC(VGA) COAXIAL
RJ45 VIDEO LR
AV1 IN
or
or or
1. REMOTE SENSOR WINDOW
2. POWER INDICATOR
3. SPEAKER
4. MENU KEY
5. PROGRAM + KEY
6. PROGRAM - KEY
7. VOLUME + KEY
8. VOLUME - KEY
9. SOURCE KEY
10. STANDBYKEY
11. POWERPLUG INPUT
ok
or
(7keys) (1key) (5keys)
or
HDMI1 HDMI2 HDMI3
USB1
5V---500mA
USB2
EARPHONE
MINI
YPbPr
MINI AV2
PC AUDIO
YPbPrL/R
(ARC)
RF IN
(S2)
500mA
13V/18V---
RF IN
(T2)
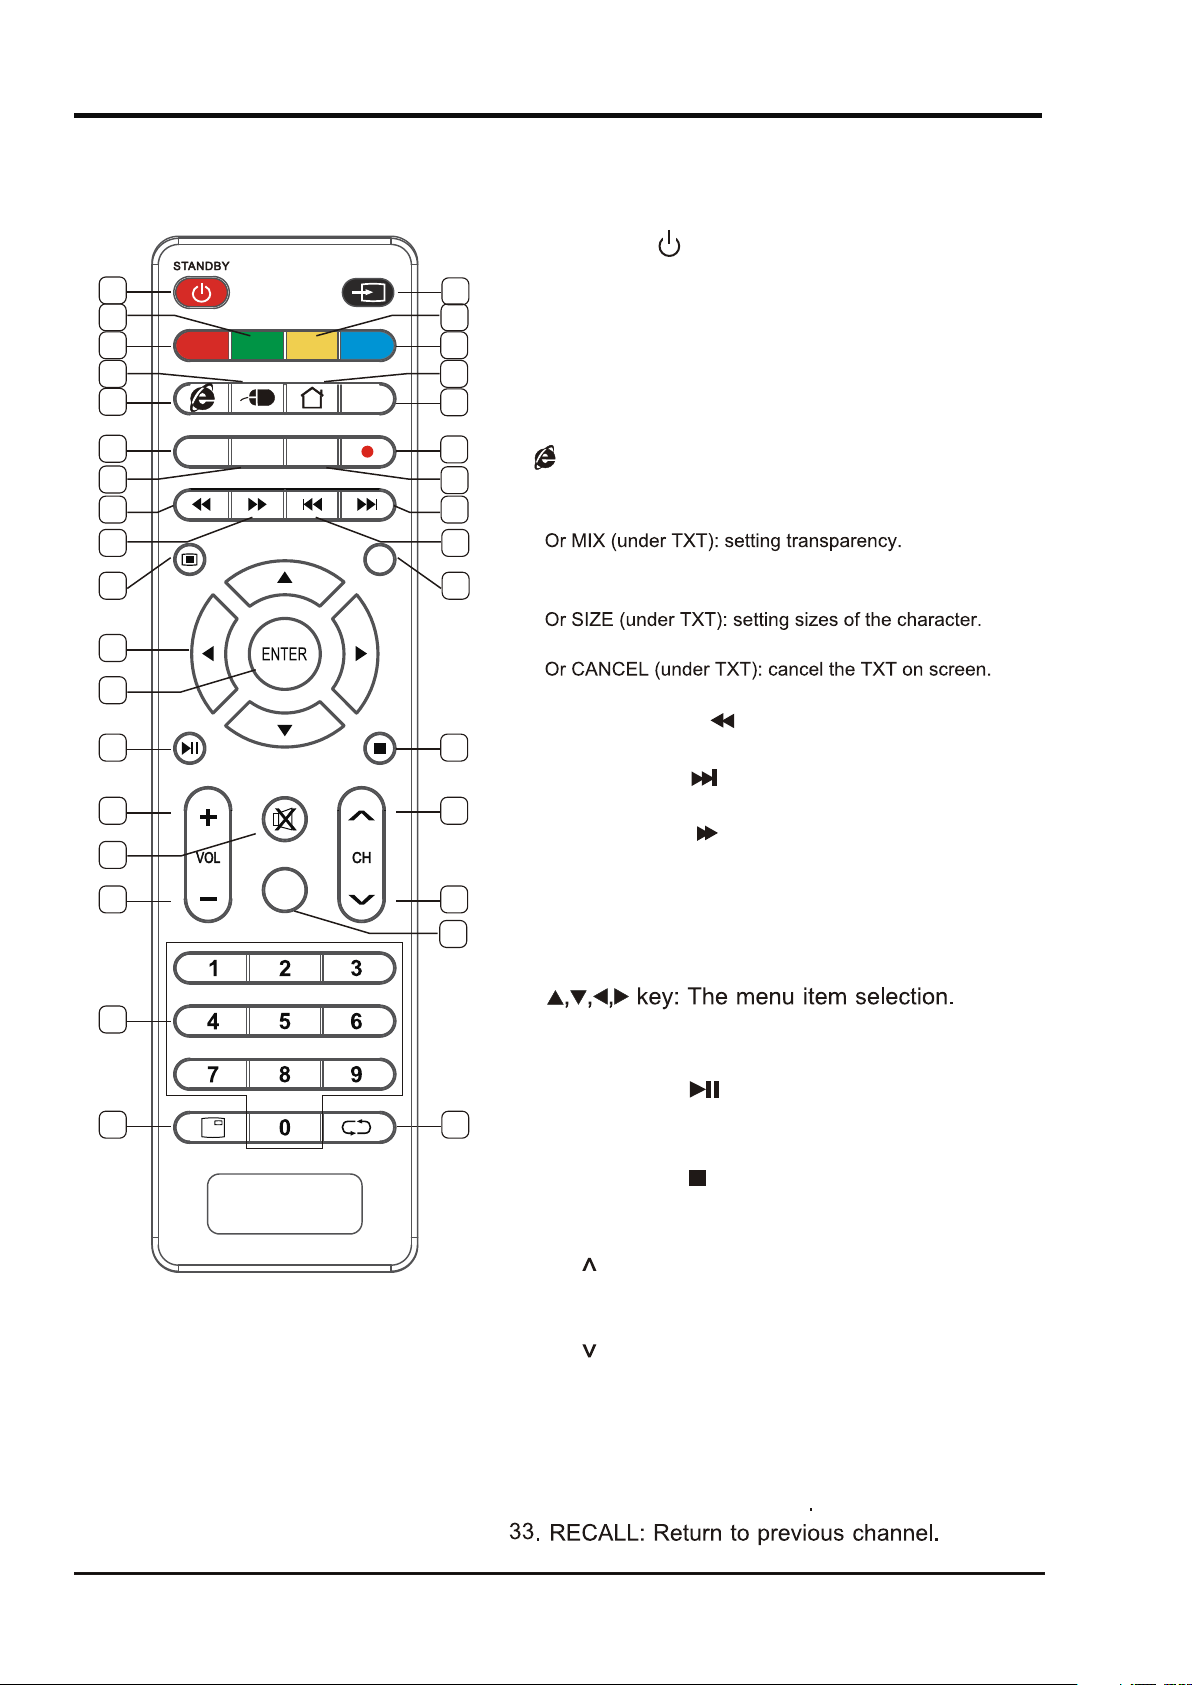
1.4 Remote Control
LED COLOR TV
4
(Here is only the sketch, please in kind prevail)
32. DISPLAY : Display the information of
current video and audio.
33
MENUMENU EXITEXIT
MUTEMUTE
TV/RADIOTV/RADIO
SOURCESOURCE
TXTTXT
FAV.LISTFAV.LIST SUBTITLESUBTITLE AUDIOAUDIO RECORDRECORD
MIXMIX SIZESIZE
CANCELCANCEL
INDEXINDEX HOLDHOLD REVEALREVEAL SUBPAGESUBPAGE
TIMESHIFTTIMESHIFT EPGEPG
DISPLAYDISPLAY RECALLRECALL
12
56
34
78
910
11 12
13 14
15 16
19
23 24
21
22
25
28
26
29
27
30
31
32
17 18
20
24. EPG:Enter or exit EPG(Electronic Program .Guide)
MEDIA mode: Stop the playback and
return to file list.
1. STANDBY( ) : Standby turn on and off.
2. SOURCE: Select the signal source.
30. TV/RADIO:Select the TV or Radio mode.
19. MENU : Enter or exit menu.
20. E
XIT : Exit menu or operation.
21.
22.
ENTER: Confirm or enter.
9. :Entering the website..
7.
10. TXT: Enter or exit teletext.
23.TIMESHIFT:DTV mode time shift.
MEDIA mode:
Press one time to pause,
press again to playback.
13. SUBTITLE:DTV mode select subtitle mode.
14. AUDIO: Select TV audio mode.
15.
MEDIA mode: Next
16.
MEDIAmode: Fast Forward
17. HOLD:Hold the currentpage.
MEDIA Mode: Previous.
18. REVEAL: Reveal the hidden information.
5. RED: Access the red item or page.
6. BLUE: Access the blue item or page.
3. GREEN: Access the green item or page.
4.
YELLOW:Access the yellow item or page.
11.
25. VOL+: Incre ase th e volu me.
27. MUTE: Mute sound.
28. VOL - : Decrease the volume.
: Select the channel forward.
26. CH
: Select the channel backward.29. CH
31. 0~9 : Continue to press the keys to select
a channel.
12. RECORD:DTV mode record data USB disk.
FAV.LIST:Favorite channel list.
INDEX:Display the indexpage.
MEDIA mode: Fast Backward
SUBPAGE:Enter the sub pagemode.
HOME:Enter to homepage.
8.
MOUSE:Turn on the remote controlmouse or turn it off.
5
LED COLOR TV
(Here isonly the sketch, please in kind prevail)
2.1 Power ON/OFF(Optional)
6
1.5 Installation of Batteries
1 Open the back lid of the remote control.
2 Install two 7#(AAA)1.5V batteries.
Ensure the correct polarity of the batteries.
3 Cover the back lid.
Please take out of the batteries from the remote
control for long time of no use.
If the remote control doesn't work properly,
please carry out the following checks.
- Check the TV is turned on.
- Check the polarity of the batteries are correct.
- Check the batteries are not drained.
- Check the power supply is normal or the power cord
is correctly connected.
- Check there are no special fluorescent light or neon
light around.
LED COLOR TV
(Here is only the sketch, please in kind prevail)
2. Basic Operation
- Connect the power cord to the AC input. Insert the power cord into the
appropriate socket.
- Press the Power switch to switch on the TV, then pressPower button to
turn on the unit.
- Press thePower switch again to switch off the TV.
Note: After switch off the TV, please don t immediately re-open the power
switch ,should be delayed one minute more to re-open the power switch.
2.2 Setting of Standby Mode
- Press ( ) button to turn on the unit.
- Press ( ) button again to return the display to standby mode. The
power indicator turns red.
- Be sure not to set your TV in standby mode for a long period of time.
’

LED COLOR TV
7
Input Source
to enter Input Source menu.
【 】/【 】
Press SOURCE button to
Press ▼ ▲button to select
Press ENTER to select source.
.
2.3
2.4
Press MENU button to enter main menu.
Home page
HOME
Press / button to select Home page in Setup Wizard or press ◄ / ► button to select Home in the ▼ ▲
menu of ATV input .
Note:Apps link and input source are subject to detail order,above photo just for your reference.

8
Settings
Press / to select Setting and press ENTER button to enter the System Setting .▼ ▲
LED COLOR TV
Press ◄ / ► button to select Network/Time/Common / System Info.
Press / / ◄ / ► button to select HOME /MOVIES /MUSIC/
TV /APPS.
▼ ▲
You can choose the program you want on the home page.
SHOW
/Accounts
LED COLOR TV
9
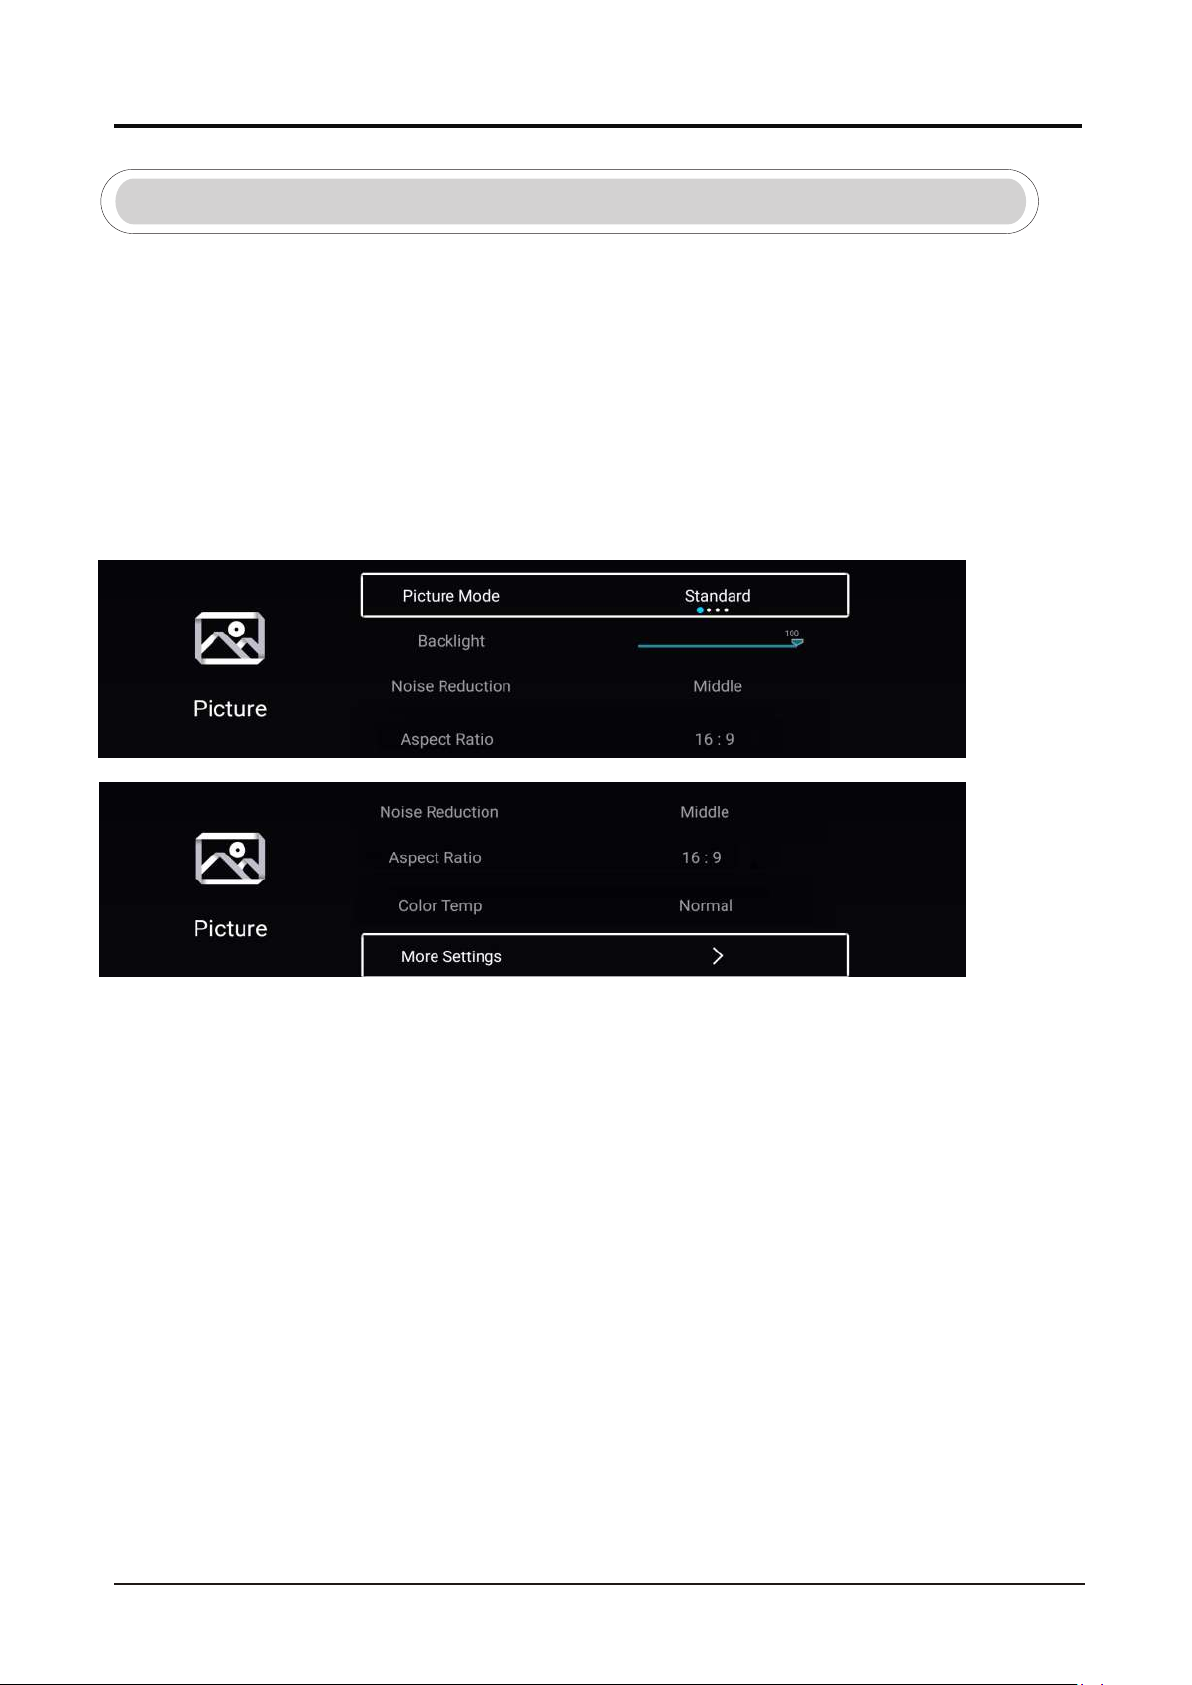
2.5 TV Setting
P MENU button to enter the TV Setting. ress
ress / button to highlight the desired menu icon , and press ENTER button to select.P ◄ ►
Picture
ressP MENU button to enter the main menu.
Press / button to select the Picture. ◄ ►
Press ENTER button to enter the sub-menu.
Press button to select Picture Mode. ▼ / ▲
Press MENU or EXIT button to quit.
Picture Mode
.Highlight the item and press ENTER button to enter the sub-menu, that shows the picture mode you can choose
Press button to select Standard/Dynamic/Soft/Vivid/User. ◄ / ►
Standard Produces a standard image.
Dynamic Enhance the contrast ,color and clarity of the screen, so that the picture in the
dynamic will balance the color.
Soft Reduce the screen contrast , color and clarity to make the screen looks soft.
User Select to customize picture settings.

LED COLOR TV
10
/【
Contrast/Brightness/Color/Sharpness
These terms Picture Mode
are available only when "User" is selected in .
Press ▼ / ▲ button to select Contrast/Brightness/Color/Sharpness.
Press ◄ / ► . button to adjust
Contrast Adjust the contrast of the image.
Brightness Adjust the brightness of the image.
Color Adjust the color intensity of the image.
Sharpness Adjust the edge sharpness of the image.
Backlight
Press button to select Backlight.
▼ / ▲
Press button to adjust. ◄ / ►
Noise Reduction
Set up options to eliminate the image noise intensity.
Press button to select Noise Reduction. ▼ / ▲
button toselect.Press ◄ / ►
Color Temp
Adjust the overall color of the image.
Press ▼ ▲ button to select Color Temp./
Press ◄ / ► button to select .
Cool The picture is in favor of green-blue and less red.The whole color is in favor of light.
The picture is more fresh and elegant.
Normal The picture does not in favor of any color.The color is moderate.
Warm The picture is in favor of red-green and less blue to make the color more vivid and soft.
More Settings
Press ▼ / ▲ button to select More Settings.
Press button to enter the sub-menu.
LCD
Press ▼ ▲ button to select DLC./
Press ◄ / ► button to select On/Off.
ENTER ►】
Aspect Ratio
Press ▼ ▲ button to select Aspect Ratio./
Press ◄ / ► button to select.
LED COLOR TV
11
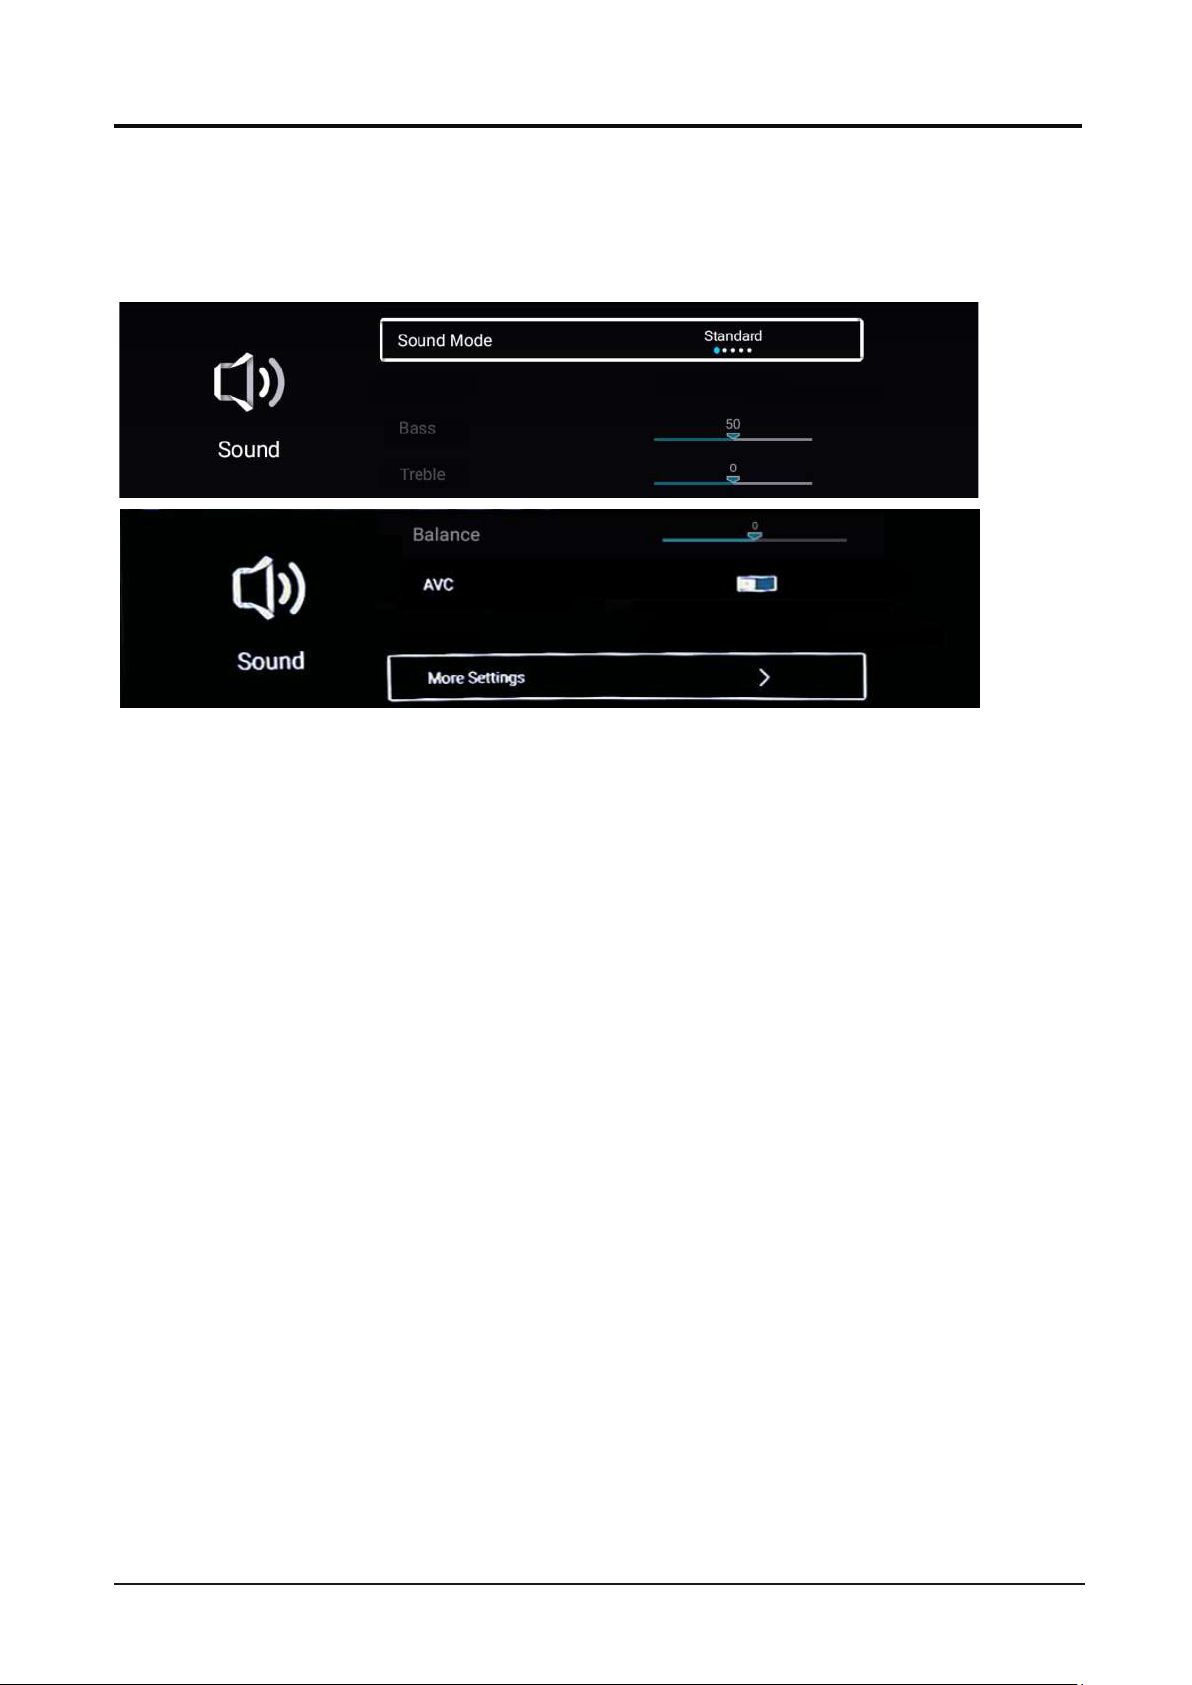
Sound
ressP MENU button to enter the main menu.
Press / button to select the Sound. ◄ ►
Press ENTER button to enter the sub-menu.
Mulit-Track Sound
Press / button to select Mulit-Track Sound. ▼ ▲
Sound Internal TV Speaker
Out
Multi-Track Sound Mono
t speaker sound
Sound Mode
Press ▼ ▲button to select Sound Mode, then press ◄ ► button to select.
【 】/【 】 【 】/【 】
Standard Produces a balanced sound in all environments.
Music Preserves the original sound.Good for musical programs.
News Enhanced voice.
User Select to customize picture settings.
Bass Adjust the bass.
Treble Adjust the treble.
Balance Adjust the left and righ output balance.
Balance
AVC
AVC
Press ▼ ▲ button to select , then press ◄ ► button to adjust.
Press ▼ ▲button to select , then press ◄ ► button to choose ON/OFF.
【 】/【 】 【 】/【 】
【 】/【 】 【 】/【 】
After opening the AVC,Once the volume is set, regardless of any difference TV Version printed
on each channel, it can make the speaker volume remained stable.
Movie Enhances treble and bass for a rich sound experience.
Sound Out
/Sound OutPress▼ ▲ button to select .
Press / button to select. ◄ ►

LED COLOR TV
12
Channel
Press ▼
▲button to select.Press ENTER ◄ ► to enter.【 】/【 】 【 】/【 】/
Press MENU button to display the main menu. Press ◄ ► button to select Channel
in the main menu.
【 】/【 】
Channel List
Channel List ,press MENU button edit the channel.
Press ▼ ▲ button to select
【 】/【 】
More Settings
Digital Audio Output
【 】/【 】 【 】/【 】
Press ▼ ▲ button to select , then press ◄ ► button to choose.
Digital Audio Output
Surround
Press / button to select Sorround. Press / button to select On/Off. ▼ ▲ ◄ ►
Audio
Only
Press / button to select Audio Only. Press ENTER button enter the sub-menu. ▼ ▲
Scan
Press ▼ ▲/ button to select Scan.Press ENTER button to enter the sub-menu.
/ button to select .Press ▼ ▲
SPDIF Delay
【 】/【 】
Press ▼ ▲button to selec SPDIF Delay , then press button to choose.
►】
◄【 】/【
d is pa
LED COLOR TV
13
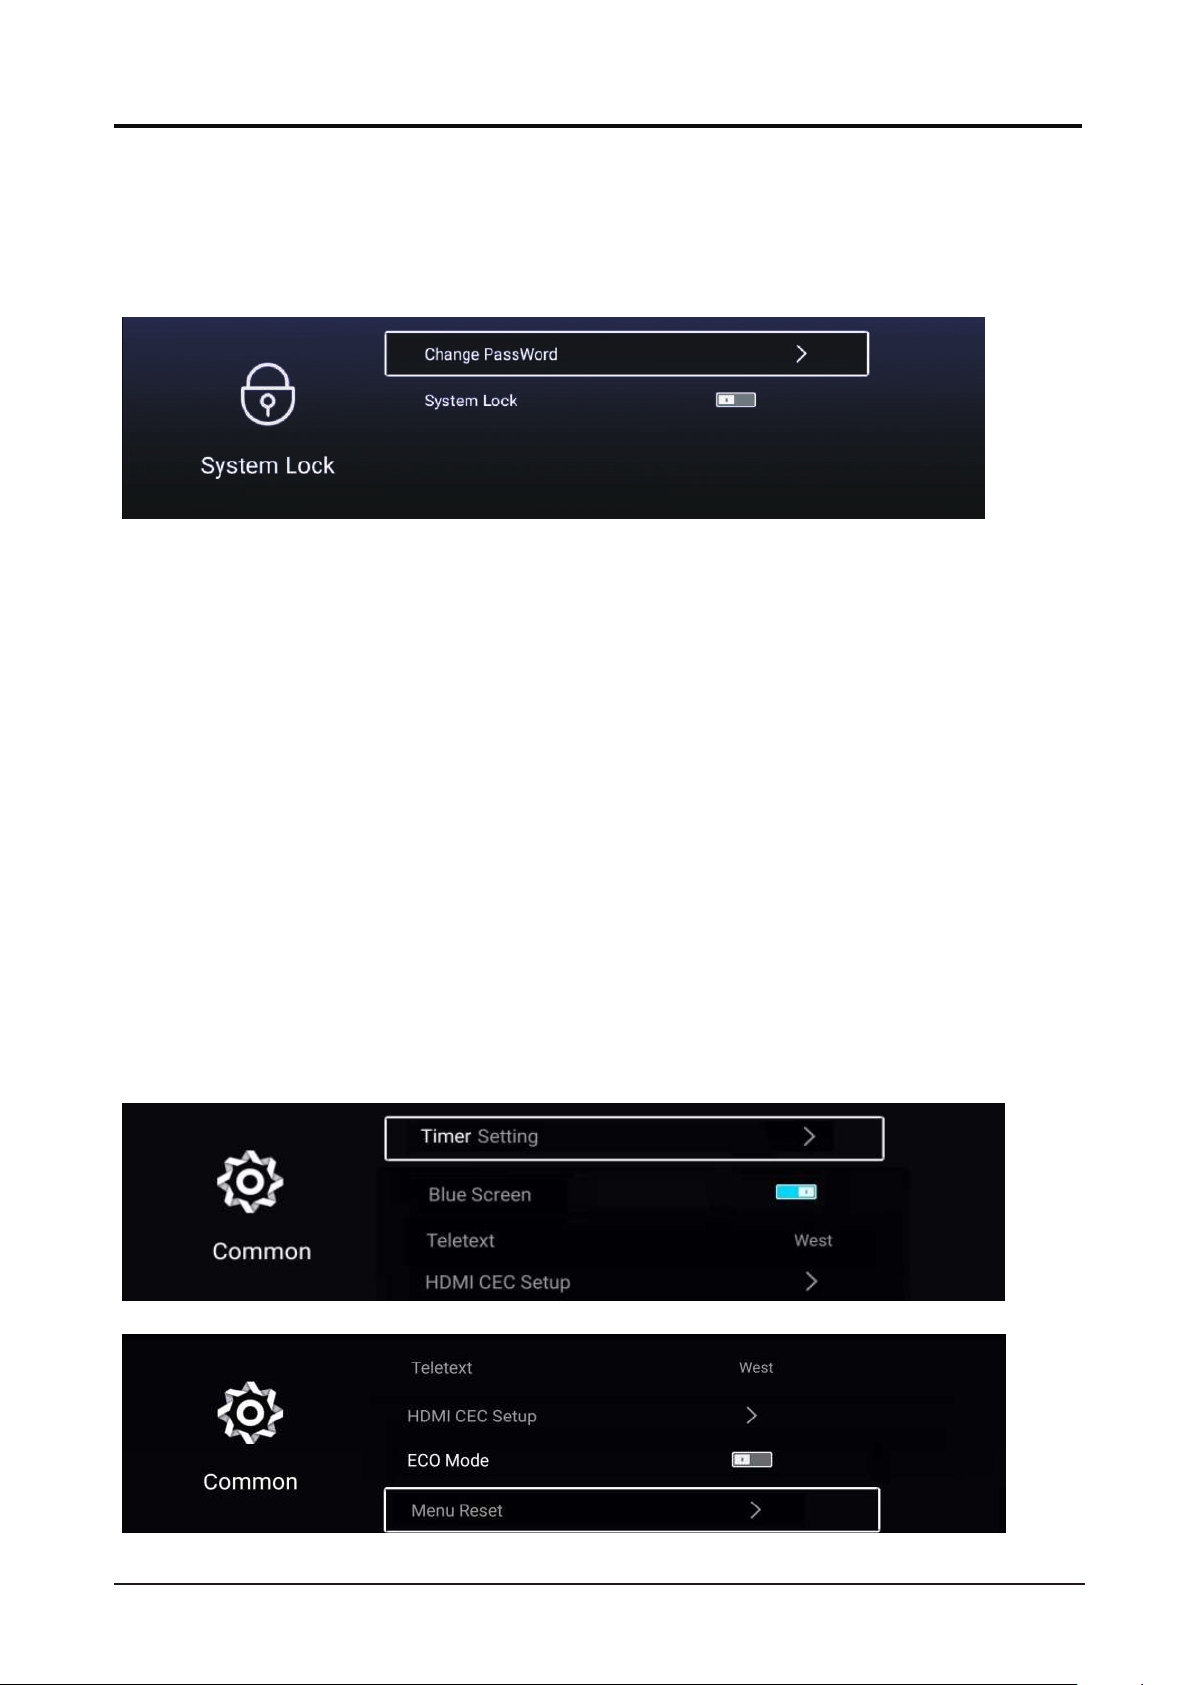
Lock
Press MENU button to display the main menu.
/
Press ◄ ► button to select Lock.
Press ▼ ▲button to select . Press ENTER ◄ ► to enter.
Change Password
Press ▼ ▲button to select Change Password.
System Lock
Press ▼ ▲button to select System Lock.
【 】/【 】
【 】/【 】 【 】/【 】
【 】/【 】
【 】/【 】
sswor 【】.
0000
Key Lock
▼ ▲ ◄ ► n Off.Press / button to select Key Lock.Press / button to select O /
ENTER
Common
P MENU button to enter the main menu.ress Press / button to select Common. ◄ ►
Press button to enter the sub-menu.

t.
t.
e
LED COLOR TV
14
Blue Screen
Set the background color to blue when there is no input signal.
▼ ▲Press / button to select Blue Screen.
Press / button to select On/Off.◄ ►
HDMI CEC Setup
Press ▼ ▲/ button to select HDMI CEC Setup.
Press
ENTER
button
to
enter the sub-menu.
Menu Reset
Recall the default setting.
Press ▼ ▲/ button to select Menu Reset.
Press ENTER button to enter the sub-menu.
Advanc
P MENU button to enter the main menu.ress
Press / button to select Advance. ◄ ►
Press ENTER button to enter the System Setting.
OSD Timer
▼ ▲Press / button to select OSD Timer.
Press / button to select.◄ ►
Autostandby Timer
▼ ▲Press / button to select Autostandby Timer.
Press / button to selec◄ ►
Sleep Timer
▼ ▲Press / button to select Sleep Timer.
Press / button to selec◄ ►
Teletext
▼ ▲Press / button to select Teletext.
Press / button to select .◄ ► Arabic/East/West Euro/Farsi/Russian
ECO mode
Press ▼ ▲/ button to select ECO mode.Press ◄ / ► to select On/Off.
ct.
Timer Setting
▼ ▲Press / button to select Timer Setting.
Press / button to select Sele▼ ▲

LED COLOR TV
15
Video
Media
2.6
Press ◄ / ►/ / button to select All/Video/Audio/Image.▼ ▲
Press / button to select Video or All, and press / /◄ / ► button to select your desired movie.▼ ▲ ▼ ▲
Press Menu button to display the setting options on the left side.
Press / button to select and press ENTER button to display all available videos. ▼ ▲ Play List
Play Mode
Press / button to select and press ENTER button to select.▼ ▲ Play Mode
Press / button to select and press ENTER button to select.▼ ▲
Audio Track
Press / button to select and press ▼ ▲ Audio Track
Subtitle Track
Press / button to select and press ▼ ▲ Subtitle Track
ENTER button to select.
ENTER button to select.
Play List
Press / / ◄ / ► button to select Media in Apps on the Home page,▼ ▲ and press ENTER button
to enter the Media Center.
Aspect Ratio
Aspect Ratio
Encoding Standard
Press ▼ / ▲ button to select Encoding Standard and press ENTER button to select ISO/WINDOWS.
This manual suits for next models
1
Table of contents
Other Beryl Smart TV manuals


