Besco Medical SPRING XL User manual

INSTRUCTION MANUAL
SPRING XL
Lightweight wheeled walker

Instruction manual Spring XL lightweight wheeled walker
Page 2
CONTENTS
1.Preliminary Note.................................................................................................4
2.General information......................................................................................5
2.1Intendeduse..........................................................................................................................5
2.2Indications.............................................................................................................................5
2.3Contraindications..................................................................................................................5
2.4Servicelife.............................................................................................................................6
2.5Responsibility........................................................................................................................6
3.Product and delivery overview ................................................................6
3.1Deliveryinspection................................................................................................................6
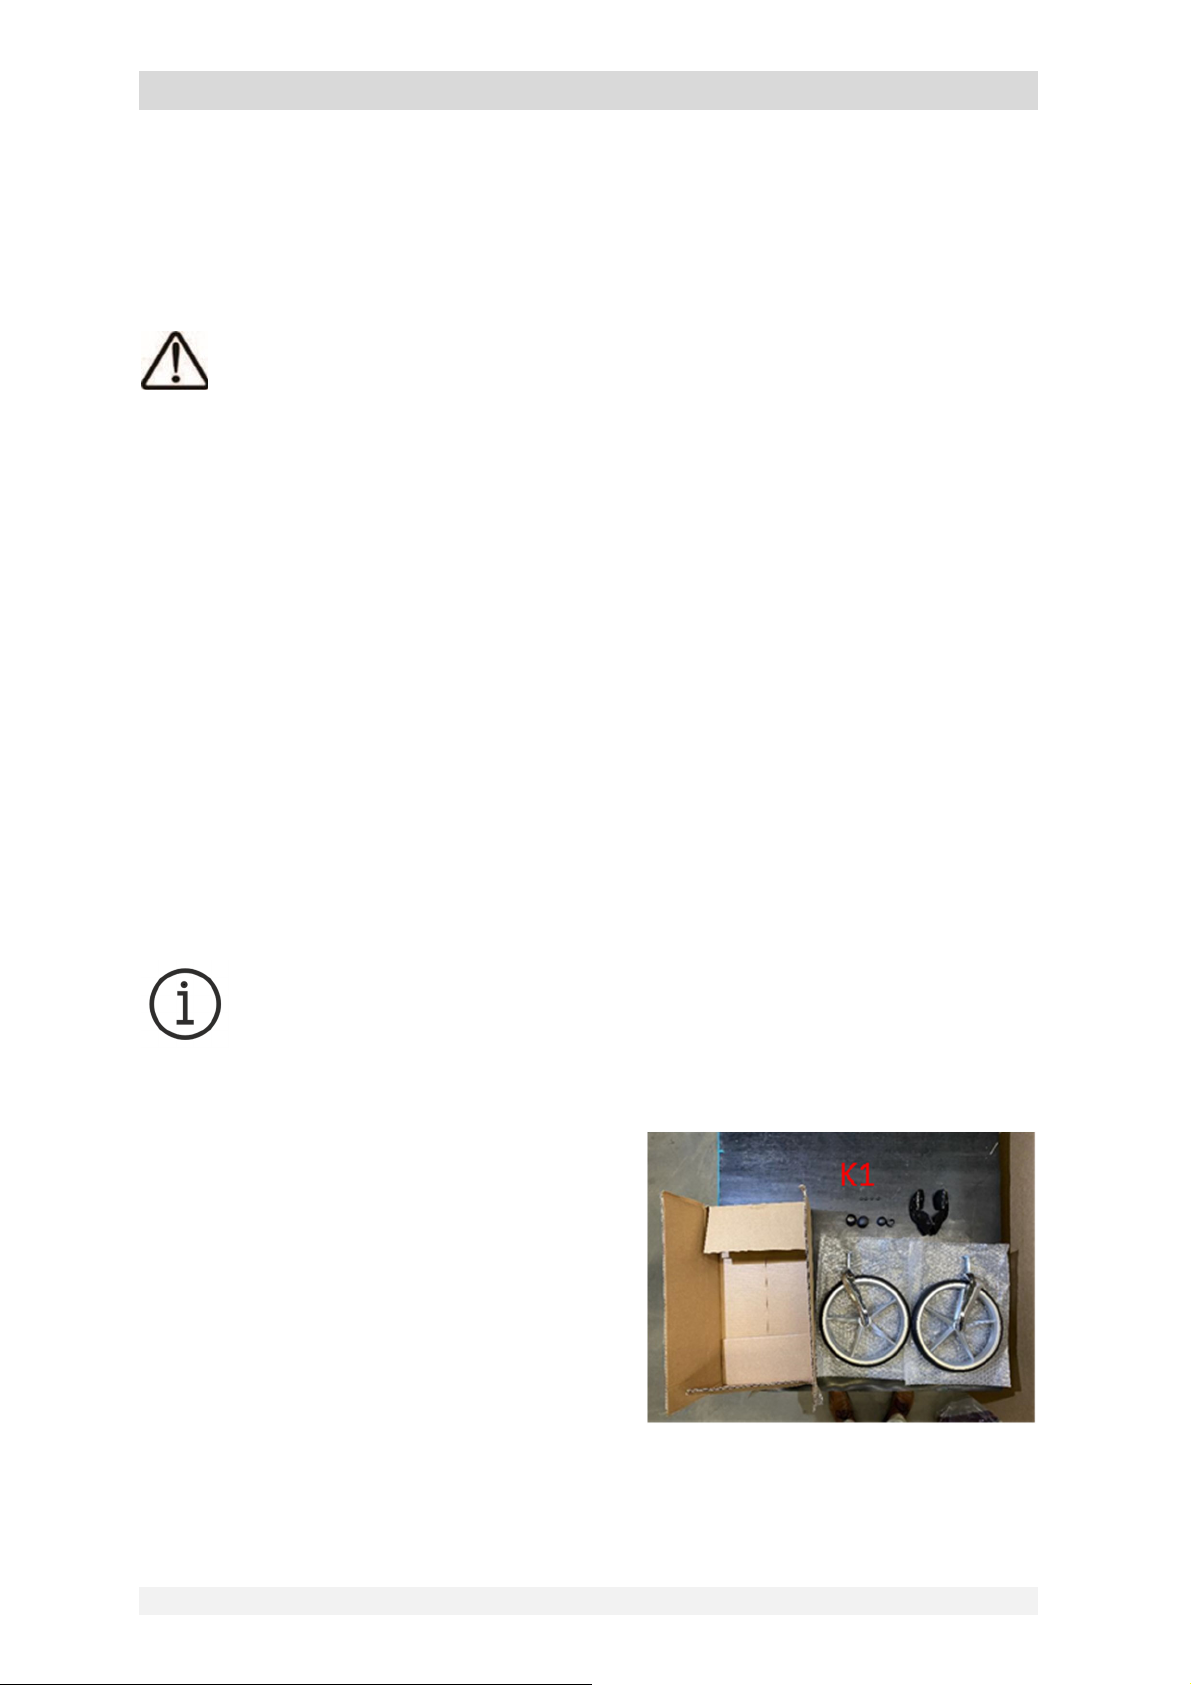
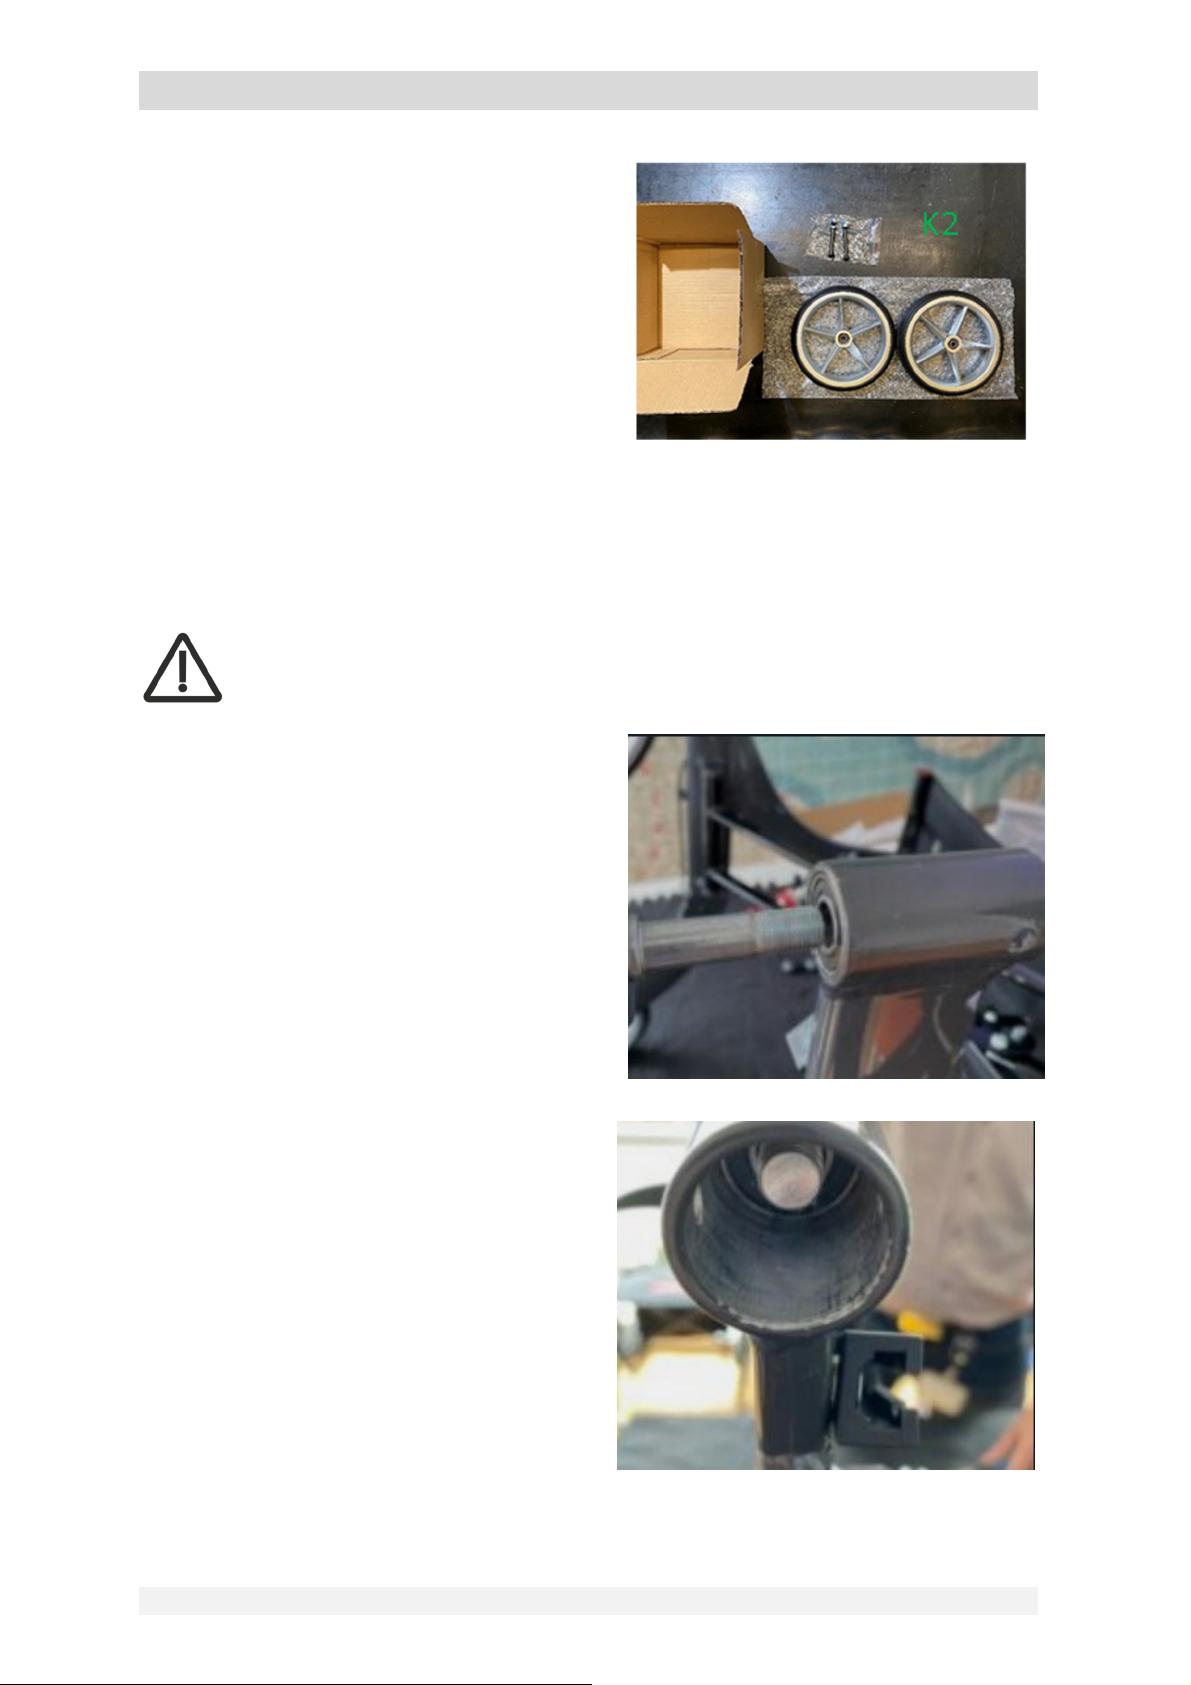
3.2Deliverycontents...................................................................................................................6
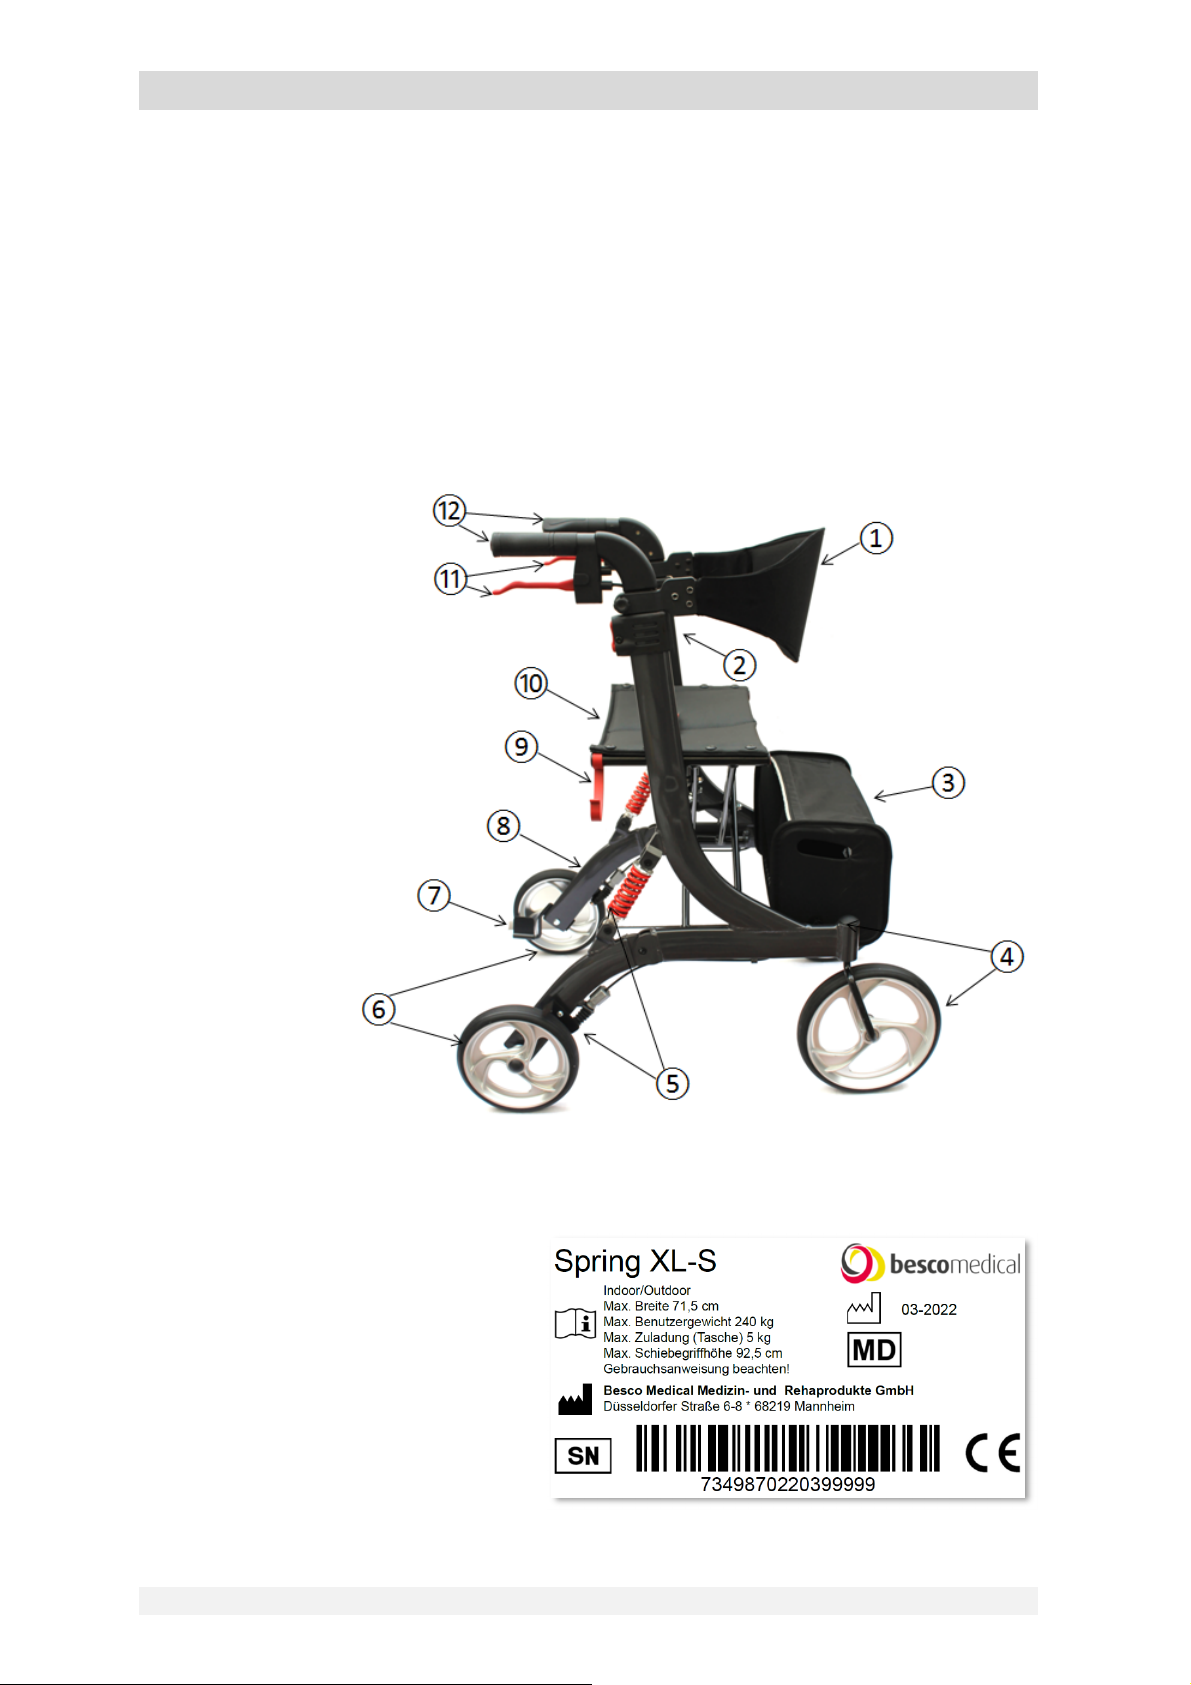
3.3SPRINGXLwheeledwalkeroverview....................................................................................8
4.Preparing the wheeled walker for use.................................................9
4.1Overviewofworksteps.........................................................................................................9
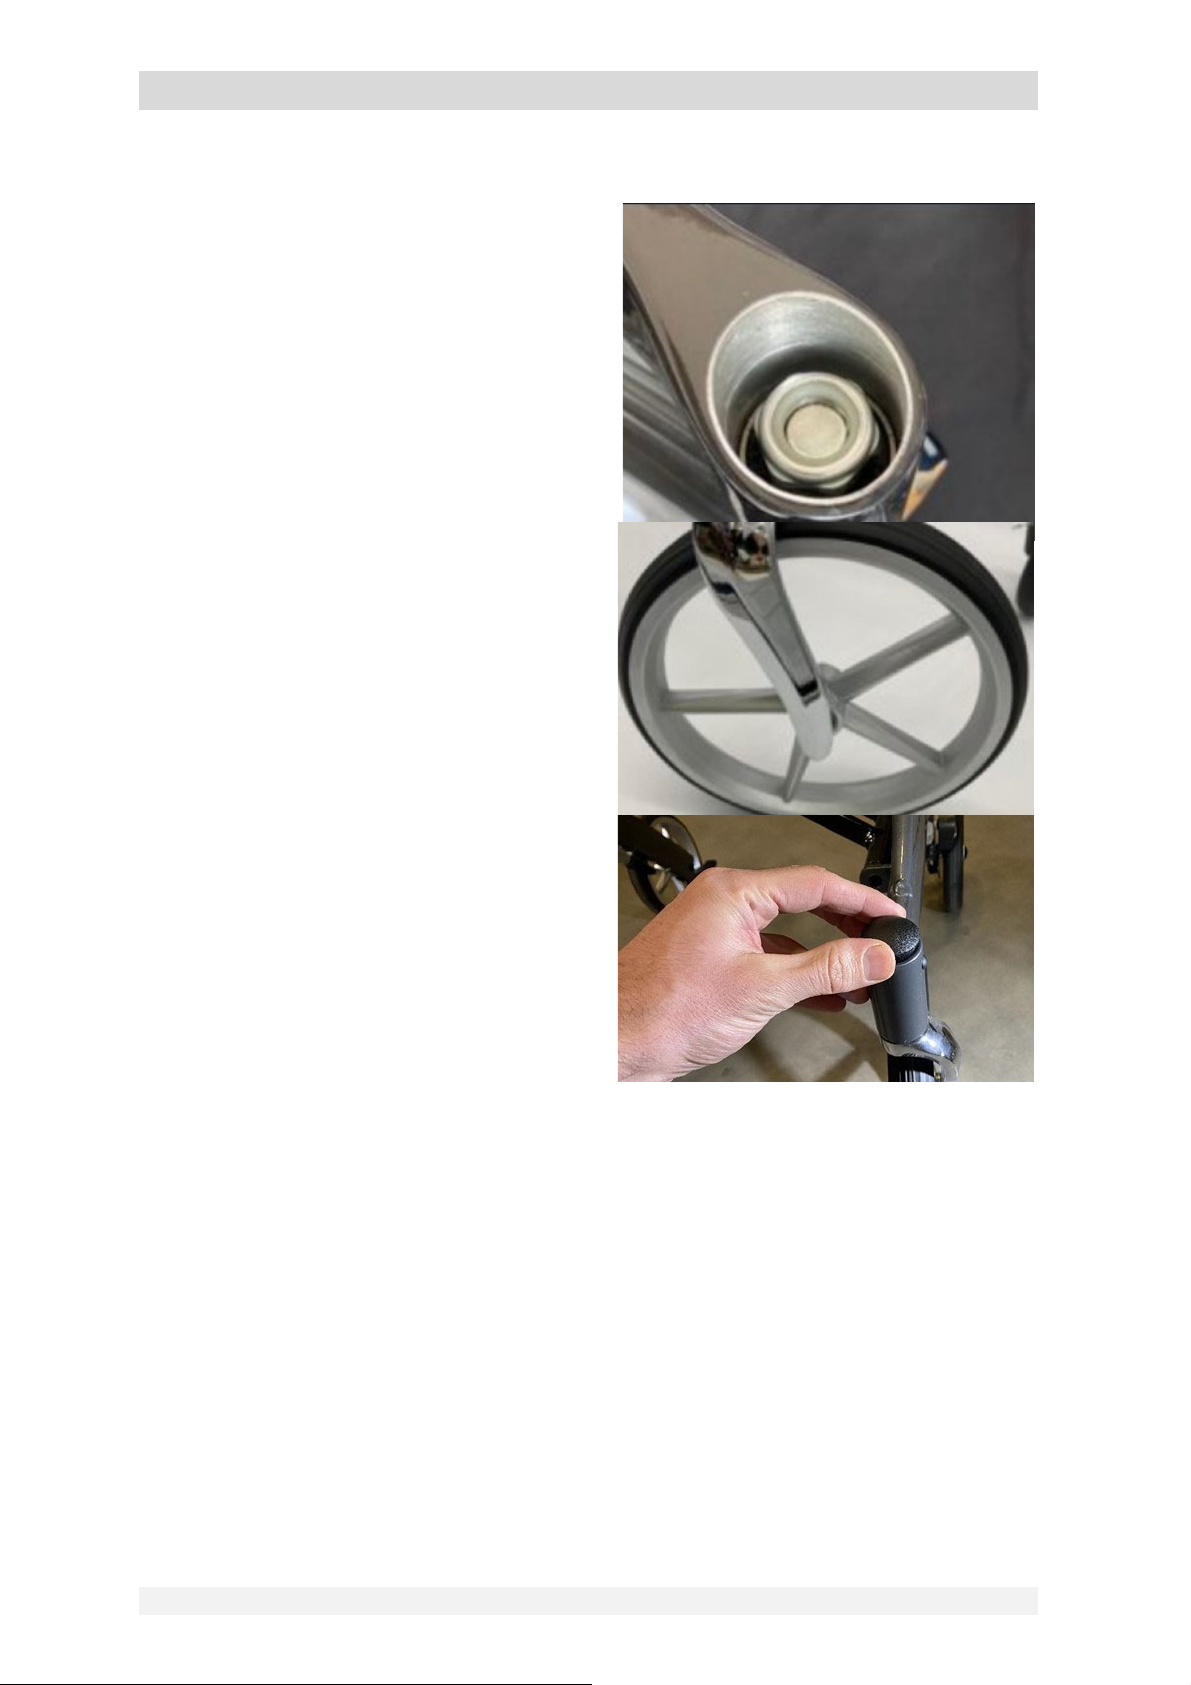
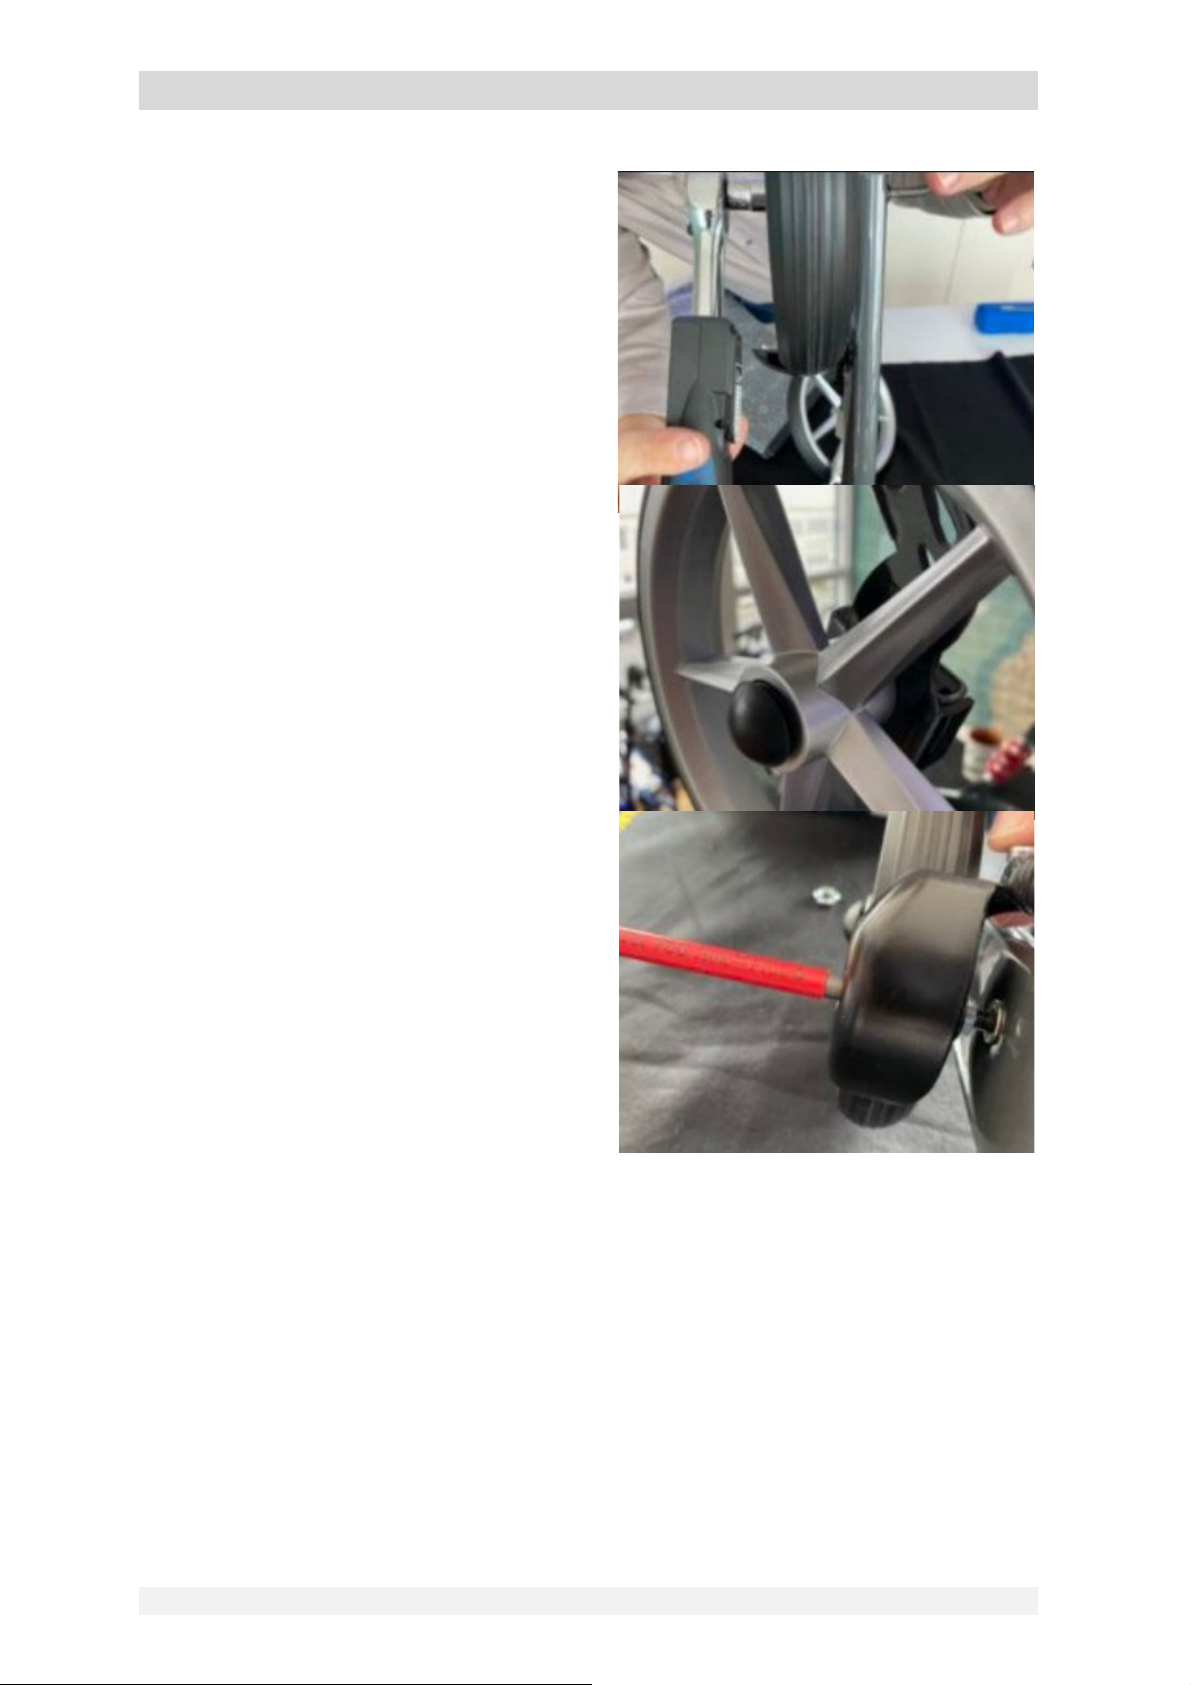
4.2Assemblingthefrontwheels...............................................................................................10
4.3Assemblingtherearwheels,tiltingaidsandbrakes...........................................................12
5.Adapting the wheeled walker to the user........................................14
5.1Adjustingthepushhandleheight.......................................................................................14
5.2Adjustingthebacksupportheight......................................................................................15
5.3Attachingthebag................................................................................................................15
5.4Adjustingthebrakes............................................................................................................16
6.Using the Spring XL wheeled walker...................................................18
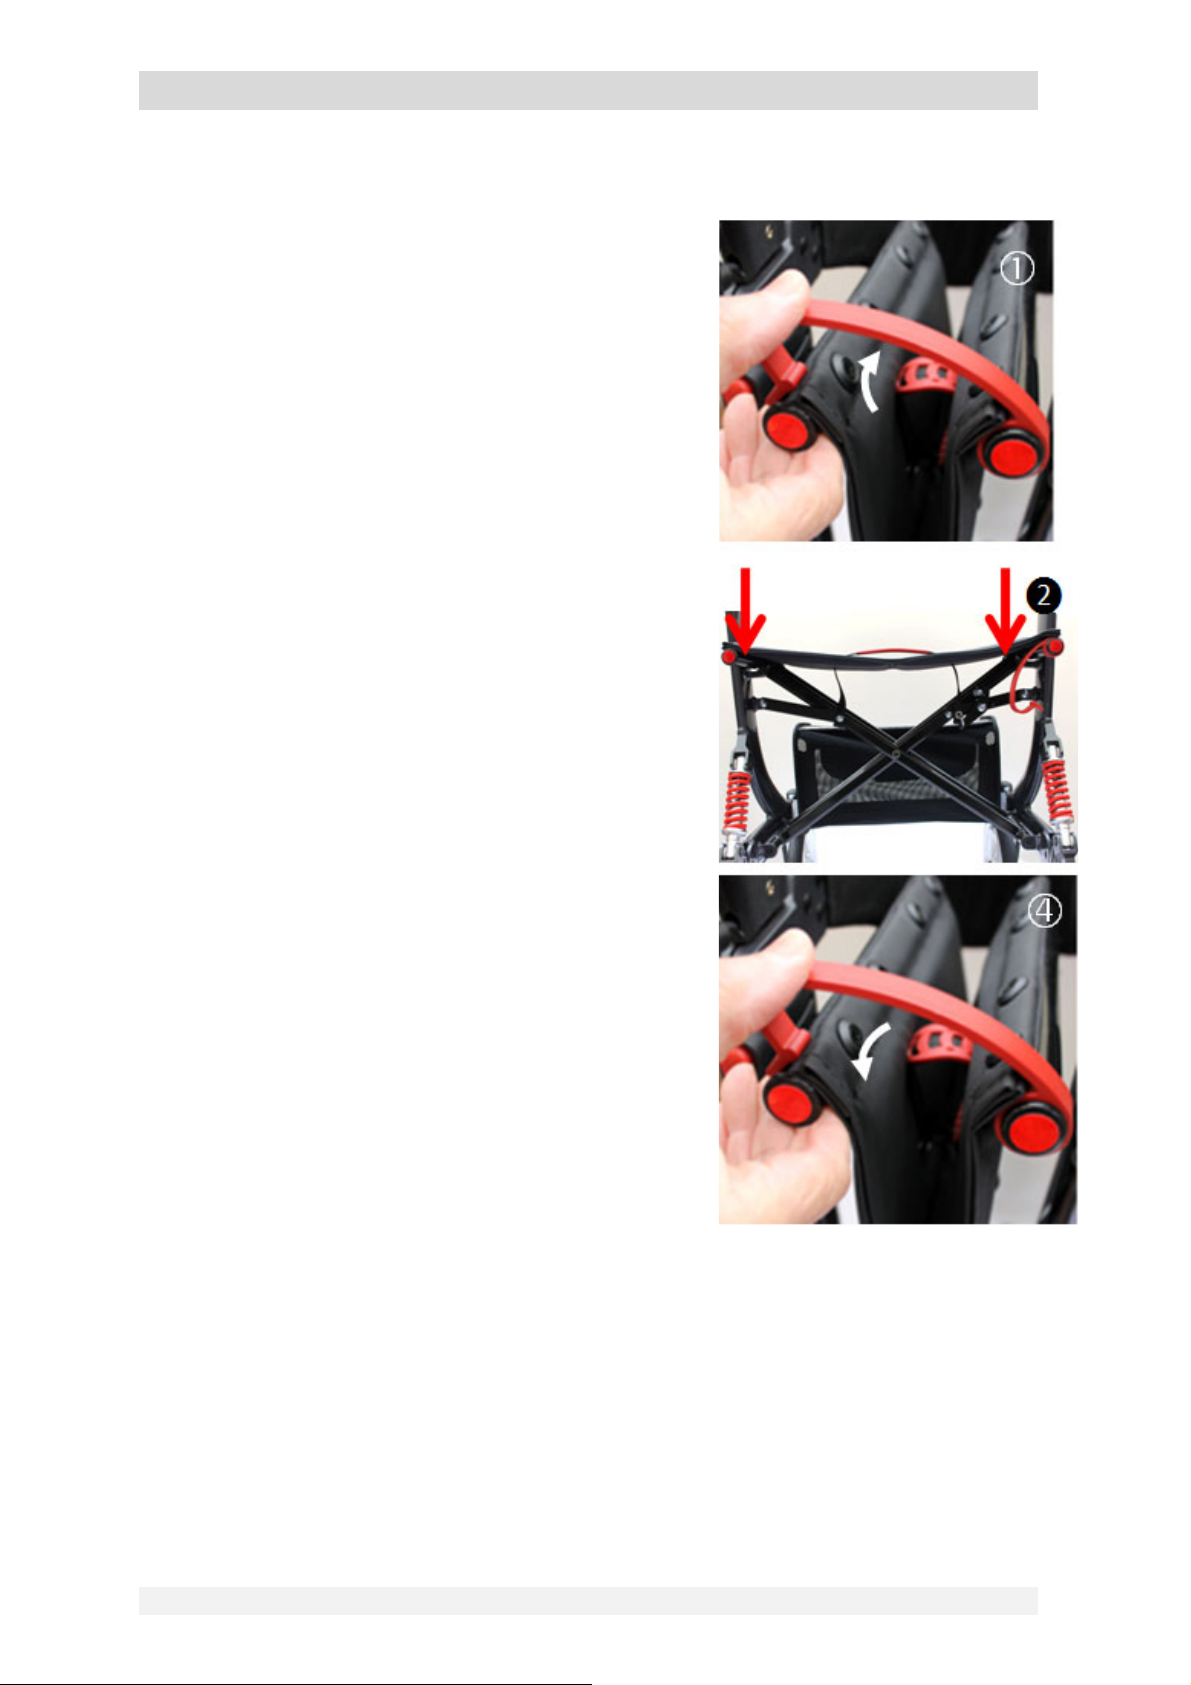
6.1Unfoldingandfolding..........................................................................................................18
6.2Walkingwiththewheeledwalker.......................................................................................19
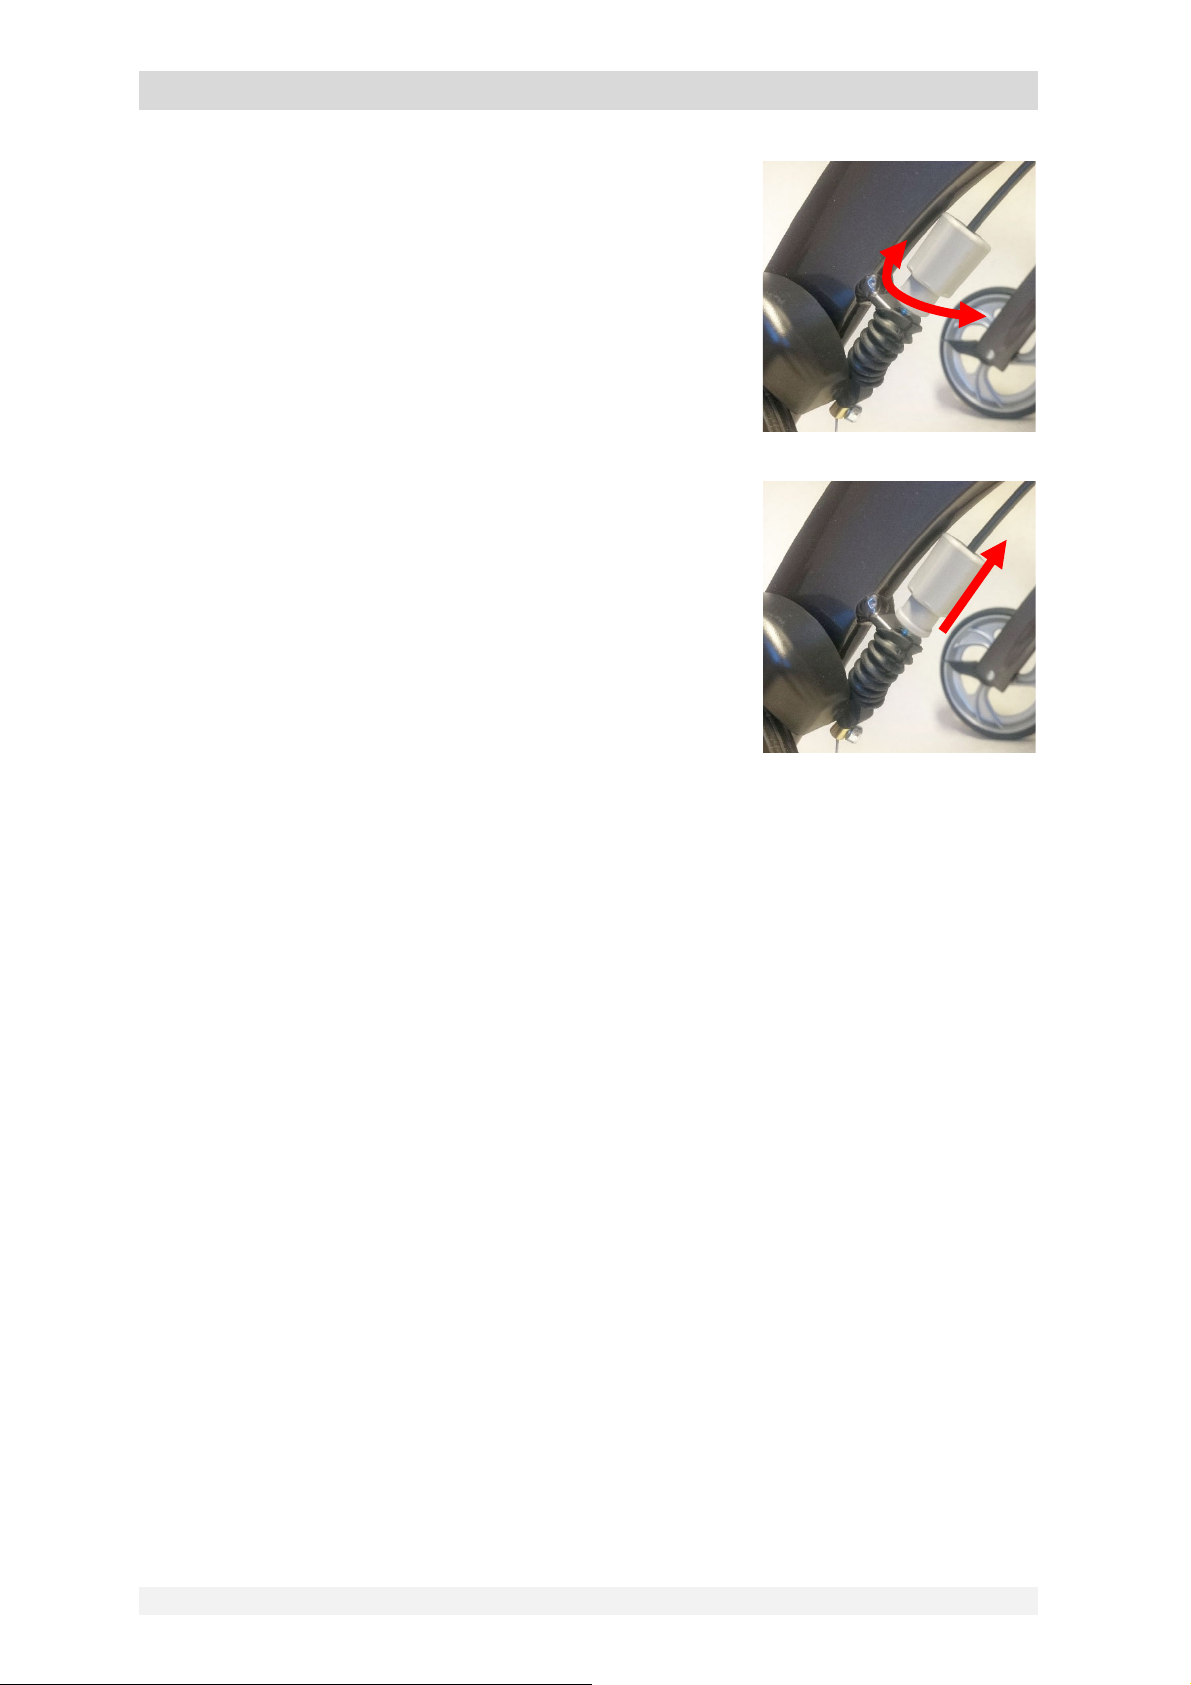
6.3Tiltingaid.............................................................................................................................20
6.4Theparkingbrake................................................................................................................20
6.5Theservicebrake.................................................................................................................20
6.6Usingthewheeledwalkerasaseat....................................................................................21
6.7Carryingthewheeledwalker...............................................................................................21
6.8Safetyinformation...............................................................................................................21
7.Cleaning and disinfection............................................................................22
7.1Cleaning...............................................................................................................................22
7.2Disinfection..........................................................................................................................22

Instruction manual Spring XL lightweight wheeled walker
Page 3
8.Reuse..................................................................................................................22
9.Technical data................................................................................................23
10.Disposal............................................................................................................ 24
11.Inspection, repair and maintenance.................................................. 24
12.Warranty............................................................................................................25
13.Declaration of conformity ....................................................................... 26

Instruction manual Spring XL lightweight wheeled walker
Page 4
1. PRELIMINARY NOTE
Thank you for choosing the SPRING XL lightweight wheeled walker.
You won’t be disappointed by the quality of our product.
Please read the instruction manual in full before using the wheeled
walker for the first time.
It contains important safety information and useful tips for the
proper use and care of the wheeled walker. If you have any
questions or need additional information, please contact the
dealer who supplied you with the SPRING XL wheeled walker who
will be happy to advise you.
Serial number Enables the assignment of the medical
device to a production batch
Manufacturer Indicates the manufacturer of the medical
device
Date of manufacture Time of manufacture
Observe instructions for use The instruction manual must be read in
full by the user before use.
CE marking Declaration of conformity, device complies
with the European Medical Device
Regulation MDR 2017/745
Safety information Important note on the avoidance of
hazards
Labelling Medical device
Important information Helpful tips for using the product

Instruction manual Spring XL lightweight wheeled walker
Page 5
2. GENERAL INFORMATION
This instruction manual is intended to help you familiarise yourself
with the operation and handling of the wheeled walker. It is vital to
follow the instructions in the manual when using the wheeled
walker. Keep the instruction manual handy and include it if you
pass on the wheeled walker to another owner. Please read the
instruction manual in full before using the wheeled walker for the
first time.
2.1 Intended use
The SPRING XL wheeled walker is designed for indoor and outdoor
use. It is intended to be used exclusively as a walking aid.
2.2 Indications
The wheeled walker is suitable for persons with reduced mobility
who still have sufficient walking ability, strength and are stable
enough on foot to be able to leave the home with the support of
the wheeled walker. The wheeled walker is suitable for indoor and
outdoor use.
2.3 Contraindications
Use of the wheeled walker is unsuitable in the following
circumstances:
Perception disorders
Severe balance disorders
Loss of arms
Inability to sit

Instruction manual Spring XL lightweight wheeled walker
Page 6
2.4 Service life
The expected service life of the wheeled walker is up to 5 years,
provided it is used as intended and the safety, care and
maintenance instructions are followed. The wheeled walker can
continue to be used beyond this period as long as it is in good
condition.
2.5 Responsibility
As the manufacturer, we can only accept responsibility for the
safety, reliability and fitness for purpose of the wheeled walker if
modifications, extensions, repairs and maintenance work are only
carried out by persons who have been authorised by us and the
wheeled walker is used in compliance with all instructions for use.
3. PRODUCT AND DELIVERY OVERVIEW
3.1 Delivery inspection
The SPRING XL wheeled walker is supplied in a cardboard box. After
unpacking the item, keep the cardboard box and the packaging
material if possible. It can be used to store the wheeled walker at
a later date if necessary.
Upon receipt, check that the contents of the delivery are complete
and intact. In the case of damage, do not use the product and
inform your dealer.
3.2 Delivery contents
The contents consist of the following main components:
Outer packaging
Wheeled walker
Back strap

Instruction manual Spring XL lightweight wheeled walker
Page 7
Net bag
Cane holder (2 parts)
Instruction manual
Service booklet
When not assembled, the delivery contents also include:
2 cardboard boxes with the wheels and necessary fittings

Instruction manual Spring XL lightweight wheeled walker
Page 8
3.3 SPRING XL wheeled walker overview
①BACK SUPPORT
②HANDLE HEIGHT ADJUSTMENT
③TRANSPORT BAG
④FRONT WHEELS (STEERABLE)
⑤BRAKE BOLTS
⑥Rear wheels
⑦Tilting aid (both sides)
⑧Cane holder
⑨Transport lock
⑩Seat
⑪Brake lever
⑫Push handles
Fig. may differ
On the inside of the left
frame there is a type plate
with serial number and
manufacture date, similar to
the example on the right:

Instruction manual Spring XL lightweight wheeled walker
Page 9
4. PREPARING THE WHEELED WALKER FOR USE
If your wheeled walker has been delivered pre-assembled, you can
skip this section.
Before using the wheeled walker for the first time, parts of it
must be assembled. Assembly must only be carried out by
qualified persons.
The assembly is explained in detail below.
4.1 Overview of work steps
Assemble the front wheels and put on the castor bushing
covers
Assemble the rear wheels and put on the black cover cap
Assemble the brakes
Test the brakes
Insert the net bag
If necessary, fit the back strap
Note: A torque spanner with 5 Nm and socket wrenches
(sockets) sizes 13 and 19 are required to assemble the
wheels.
Contents of box K1:
2 x front wheels with axle
2 x tilting aids
2 x plugs castor bushing (black)
2 x plugs axle rear wheels

Instruction manual Spring XL lightweight wheeled walker
Page 10
Contents of box K2:
2 rear wheels
2 axles with nuts and washers
for each
2 black cover caps
4.2 Assembling the front wheels
You will need the parts from box K1.
While unpacking, be aware of the risk of injury from
catching your fingers between the spokes and the fork.
Insert the axle at the wheel fork
into the castor bushing. Make sure
that the fork is on the outside of
the wheeled walker.
If the fork jams during insertion,
this can be remedied by gently
shaking it.
Align the axle.

Instruction manual Spring XL lightweight wheeled walker
Page 11
Screw on the nut. First tighten the
screw lock and then tighten the nut
with a torque of 5 Nm.
Carry out a functional test.
Before putting on the cover caps,
check the wheels for ease of
movement. The cover caps are
difficult to remove.
Next, press the cover cap onto the
castor bushing.

Instruction manual Spring XL lightweight wheeled walker
Page 12
4.3 Assembling the rear wheels, tilting aids and brakes
You will need:
2 axles with nuts and washers
from K2
Both wheels from K2
2 tilting aids from K1
2 black cover caps from K1
Insert the axle from the inside to the
outside, then put on the tilting aid,
then the washer and finally the rear
wheel.
The image shows the axle mount of
the rear wheel and the assembly of
the tilting aid.
Important: The washer must
be fitted between the tilting
aid and the wheel.
If the wheel jams while it is being
put on the axle, you can gently
shake it to put it on properly.

Instruction manual Spring XL lightweight wheeled walker
Page 13
Tighten the nut of the rear wheel
with a torque of 5 Nm.
Before putting on the cover caps,
check the wheels for the
positioning of the nuts and that
they move freely.
Put on the black cover caps.
Assemble the brakes and adjust
them.
The brake adjustment is described
in the relevant section of this
instruction manual.

Instruction manual Spring XL lightweight wheeled walker
Page 14
5. ADAPTING THE WHEELED WALKER TO THE USER
The wheeled walker must be adjusted to the height of the person
using it
5.1 Adjusting the push handle height
Adjust the height of the push handles to your height. You do not
need any tools to do this.
You will find a red toggle switch below each handle (pictured). Push
in a toggle switch at the lower end and keep it pressed down. Now
you can pull the handle up or push it down. Release the button
when you have reached the desired setting. Now pull or push again
until you hear and feel that the handle has clicked into place and
can no longer be adjusted.
Repeat the process on the
other side to set both
handles to the same height.
The correct height
setting has been
reached when you
can grasp the push handles standing between the rear wheels with
slightly bent arms.
Before use, make sure that both push handles are engaged!

Instruction manual Spring XL lightweight wheeled walker
Page 15
5.2 Adjusting the back support height
You can adjust the height of
the back support to your
height. You do not need any
tools to do this. On the outer
sides of the frame directly
below the handles, you will
find a black adjustment screw
on each side (pictured).
Loosen the screw slightly. Now push the back support holder to the
desired height. Tighten the screw again.
Repeat the process on the other side.
Warning: An incorrectly fastened back support strap can lead
to serious falls! Before each use, make sure that the locking
screws are correctly tightened and re-tighten them if
necessary. Do not use the back strap if there is obvious
damage.
To avoid injury, never lean on the back strap!
5.3 Attaching the bag
The wheeled walker is
delivered with the bag fitted.
The bag can be easily removed
or attached using the guide
rails (pictured).

Instruction manual Spring XL lightweight wheeled walker
Page 16
5.4 Adjusting the brakes
Before the first use, the brake must be adjusted. The brake setting
should be checked regularly and corrected if required.
The brakes should be adjusted by trained professionals. If
you have sufficient experience however, you can also adjust
the brakes yourself. However, please remember that incorrectly
adjusted brakes can have life-threatening consequences.
At regular intervals or if a lack of braking power is noticed,
the brakes must be readjusted to compensate for tyre wear.
You can use a 1€ coin as a guide, the
thickness of the coin roughly
corresponds to the ideal distance
between brake and tyre
1. Push the knob down to override the
anti-twisting device

Instruction manual Spring XL lightweight wheeled walker
Page 17
2. Re-tighten the Bowden cable by turning
it anticlockwise or loosen it by turning it
clockwise.
3. Pull the knob up again to prevent
unintentional adjustment.
Carry out the above steps in the same way on both sides.

Instruction manual Spring XL lightweight wheeled walker
Page 18
6. USING THE SPRING XL WHEELED WALKER
6.1 Unfolding and folding
The wheeled walker can be folded for
storage to save space.
Release the red retaining latch (Figure
1). Then push the wheeled walker seat
down on the outside to unfold it (Figure
2).
There is a lock on the bottom of the
wheeled walker to stop it from
accidentally folding.
If you hear a distinct snapping sound
when unfolding, the lock is properly
engaged.
To fold it up, pull the seat up by the
handle (Figure 3) and lock it with the
red retaining latch (Figure 4).

Instruction manual Spring XL lightweight wheeled walker
Page 19
6.2 Walking with the wheeled walker
Try out the wheeled walker on level, dry ground first. If possible,
have someone accompany you. After the first few goes, when you
feel more confident, practise using the wheeled walker on sloping
surfaces.
The push handles must be adjusted to your height for optimum
walking.
Adopt an upright posture to avoid hunching your back.
Stand in the wheeled walker so that your ankles are between the
rear wheels.
Walk in small steps without pushing the wheeled walker too far
forward, which will make it easier for you to keep your balance.
By pushing the wheeled walker, you determine the speed and
change of direction.
Always make sure you apply both brakes at the same time
otherwise the wheeled walker will twist around the braked
wheel with the unbraked wheel and you could fall.
Always try to avoid obstacles, e.g. for steps, look for a ramp, for
stairs, a lift can be taken. If this isn’t possible, the wheeled walker
will need to be carried over the obstacle. If possible, seek the help
of a second person for this.

Instruction manual Spring XL lightweight wheeled walker
Page 20
6.3 Tilting aid
The wheeled walker is equipped with
two tilting aids to help you negotiate
kerbs. Stepping on the tilting aid with
your foot and simultaneously pulling the
wheeled walker towards you by the
handles raises the front wheels. This
means that you can negotiate kerbs and
other smaller obstacles with minimal
effort. Please ensure you have steady
footing.
6.4 The parking brake
The wheeled walker is equipped with
brakes and has a parking brake to
prevent it from rolling away
unintentionally. The parking brake is
operated by pressing down both brake levers
until you hear or feel them engage. To release the
parking brake, pull the brake levers up again.
6.5 The service brake
The service brake is released with the two
brake levers on the push handles by pulling
them upwards.
Always make sure you apply both
brakes at the same time, otherwise the
wheeled walker will twist around the braked wheel with the
unbraked wheel and you could fall.
Table of contents
Other Besco Medical Mobility Aid manuals