V3 ENGLISH 21-1053
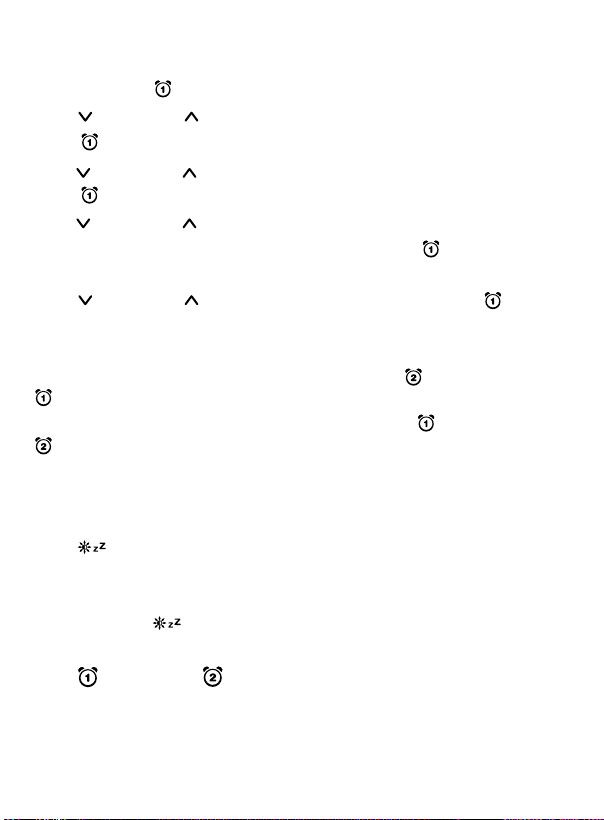
Saving radio station presets
Your clock radio can store ten station presets for FM and AM
stations.
1With the radio turned on, press and hold (radio/clock). A
preset number blinks.
2Press (down) or (up) repeatedly to select the preset number
you want, then press (radio/clock) to save. A radio station
blinks.
3Press (down) or (up) to adjust to the radio band you want,
then press (radio/clock) to save. The next preset number
blinks.
Tip: Press and hold to adjust the band more quickly.
4Repeat steps 1–4 to save another preset station.
OR
Press and hold (radio/clock) to save your changes and exit.
Note: To automatically search and save radio stations, turn on the radio,
then press and hold (radio/clock) for six seconds.
Recalling preset stations
With the radio on, press (radio/clock) repeatedly to select the
preset station you want.
Using the sleep timer ( )
1When listening to the radio, press and hold SNOOZE to set
the sleep timer.
2Press SNOOZE repeatedly to set the sleep timer for 90 min.,
60 min., 45 min., 30 min.,15 min., or OFF. The radio
automatically turns o after the specied time.
3To stop listening at any time, press and hold (power).
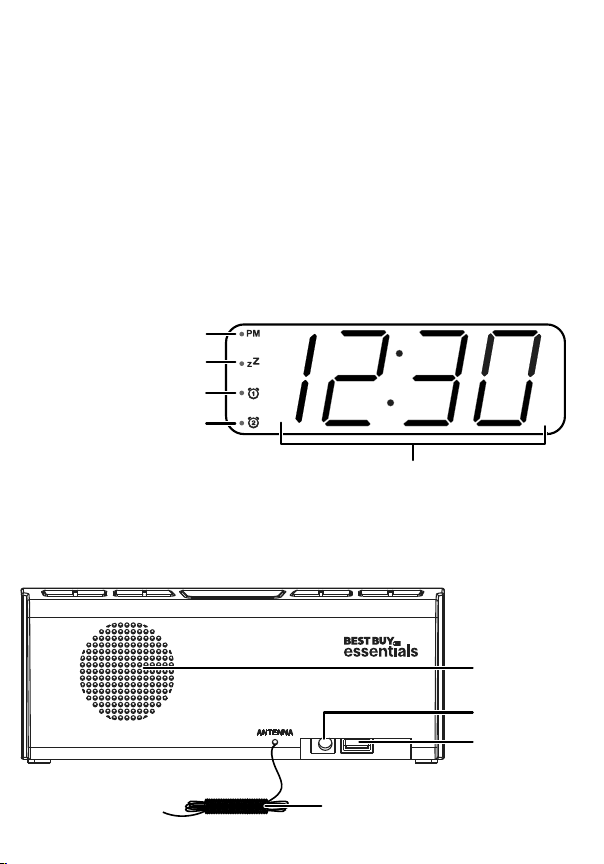
Charging USB devices
Connect a USB cable (not included) from the clock radio’s USB port to
your smartphone, tablet, or other USB device.
Note: The reception sensitivity on the radio may worsen when charging a
smartphone through the USB port.
Adjusting the LED brightness ( )
Press SNOOZE repeatedly to adjust the display’s brightness level.
Maintaining your clock radio
Use a soft, dry cloth to clean the exterior of your clock radio. For
stubborn stains, dampen the cloth with a weak solution of mild
detergent and water, then immediately dry.
Note: Do not use abrasive cloths, thinners, alcohol, or other chemical
solvents, because they may damage the nish or remove the panel lettering.
Specications
• Dimension (H × W × D): 3.2 × 7.9 × 2.2 in. (8.1× 20 × 5.7 cm)
• Weight: 0.7 lbs. (0.3 kg)
• Power requirements: AC 120 V, 60 Hz
• Power consumption: 6 W
• Tuner:
Band: FM and AM
Range: FM – 87.5~107.9 MHz | AM – 520~1710 KHz
Presets: 20 for AM and FM
• USB port: 5 V/1 A
• Backup battery: CR2025 battery
Troubleshooting
No power
• Make sure that the power adapter is connected securely and
correctly to the power outlet.
• Make sure that the power outlet is working.
No sound from the speakers
• Press +(raise volume) to increase the volume.
• Make sure that the power adapter is connected securely and
correctly to the power outlet.
• Make sure that your clock radio is turned on.
Static or noise when playing the radio
• Make sure that the station is tuned correctly and that the station
has a good signal.
• Try another station.
• For FM stations, extend or rotate the antenna wire to improve
the reception.
• For AM stations, adjust the position of your clock radio and
unplug the USB charging cable (if connected) for the best
reception.
The sound is distorted
• Make sure that the volume level is not set too high.
• Make sure that the station is tuned correctly and that the station
has a good signal.
The clock radio gets warm after extended play at high volume
levels
• This is normal. Turn down the volume to let the radio cool.
Safety information
1. Read these instructions.
2. Keep these instructions.
3. Heed all warnings.
4. Follow all instructions.
5. Do not use this apparatus near water.
6. Clean only with dry cloth.
7. Do not block any ventilation openings. Install in accordance with the manufacturer’s
instructions.
8. Do not install near any heat sources such as radiators, heat registers, stoves, or other
apparatus (including ampliers) that produce heat
9. Do not defeat the safety purpose of the polarized or grounding-type plug. A polarized plug
has two blades with one wider than the other. A grounding type plug has two blades and
a third grounding prong.The wide blade or the third prong are provided for your safety. If
the provided plug does not t into your outlet, consult an electrician for replacement of
the obsolete outlet
10. Protect the power cord from being walked on or pinched particularly at plugs,
convenience receptacles, and the point where they exit from the apparatus.
11. Only use attachments/accessories specied by the manufacturer.
12. Use only with the cart, stand, tripod, bracket, or table specied by the manufacturer, or
sold with the apparatus. When a cart is used, use caution when moving the cart/apparatus
combination to avoid injury from tip-over.
13. Unplug this apparatus during lightning storms or when unused for long periods of time.
14. Refer all servicing to qualied service personnel. Servicing is required when the apparatus
has been damaged in any way, such as power-supply cord or plug is damaged, liquid has
been spilled or objects have fallen into the apparatus, the apparatus has been exposed to
rain or moisture, does not operate normally, or has been dropped.
WARNING and the following or equivalent,
• To reduce the risk of re or electric shock, do not expose this apparatus to rain or moisture.
• The MAINS plug or an appliance coupler is used as the disconnect device, the disconnect
device shall remain readily operable
Legal
FCC and IC Information:
This device complies with Part 15 of the FCC Rules. Operation is subject to the following two
conditions: (1)This device may not cause harmful interference, and (2) this device must accept
any interference received, including interference that may cause undesired operation.This device
complies with Industry Canada licence-exempt RSS standard(s). Operation is subject to the
following two conditions: (1) this device may not cause interference, and (2) this device must
accept any interference, including interference that may cause undesired operation of the device.
This equipment has been tested and found to comply with the limits for a Class B digital device,
pursuant to Part 15 of the FCC Rules. These limits are designed to provide reasonable protection
against harmful interference in a residential installation. This equipment generates, uses, and
can radiate radio frequency energy and, if not installed and used in accordance with the
instructions, may cause harmful interference to radio communications. However, there is no
guarantee that interference will not occur in a particular installation. If this equipment does
cause harmful interference to radio or television reception, which can be determined by turning
the equipment o and on, the user is encouraged to try to correct the interference by one or
more of the following measures:
• Reorient or relocate the receiving antenna.
• Increase the separation between the equipment and receiver.
• Connect the equipment into an outlet on a circuit dierent from that to which the receiver is
connected.
• Consult the dealer or an experienced radio/TV technician for help.
Warning: Changes or modications not expressly approved by the party responsible for
compliance could void the user's authority to operate the equipment.
This equipment complies with Industry Canada radiation exposure limits set forth for an
uncontrolled environment.
ICES Statement
CAN ICES-3 (B)/NMB-3
One-year limited warranty
Visit www.bestbuy.com/bestbuyessentials for details.
Contact Best Buy essentials
For customer service, call 866-597-8427 (U.S. and Canada)
www.bestbuy.com/bestbuyessentials
Best Buy essentials is a trademark of Best Buy and its aliated companies.
Distributed by Best Buy Purchasing, LLC
7601 Penn Ave South, Richeld, MN 55423 U.S.A.
©2022 Best Buy. All rights reserved.