Best Choice Products SKY5062 User manual

SKY5062 + SKY6072 + SKY6195
Ver. 3
INSTRUCTION
MANUAL
Laser Force Blasters with Vests

As shoppers, we’re always trying
to find the perfect balance between
quality & value. At BCP, we believe
we’ve achieved that. Our diverse
catalog of everyday essentials is
tailored especially to our customers
& guaranteed to hit that sweet
spot of high quality & low price.
Always.
|3
• LIFE INDICATORS (3): Each life indicator represents 3 health (for a total of 9).
• LOW BATTERY: The 3 life indicators will flash slowly to indicate that the blaster has low battery.
• MAX STRIKE DISTANCE: 130 feet
PHILLIPS
SCREWDRIVER APPROXIMATELY
5 MIN.
ASSEMBLY
1 PERSON
ASSEMBLY
REQUIRED
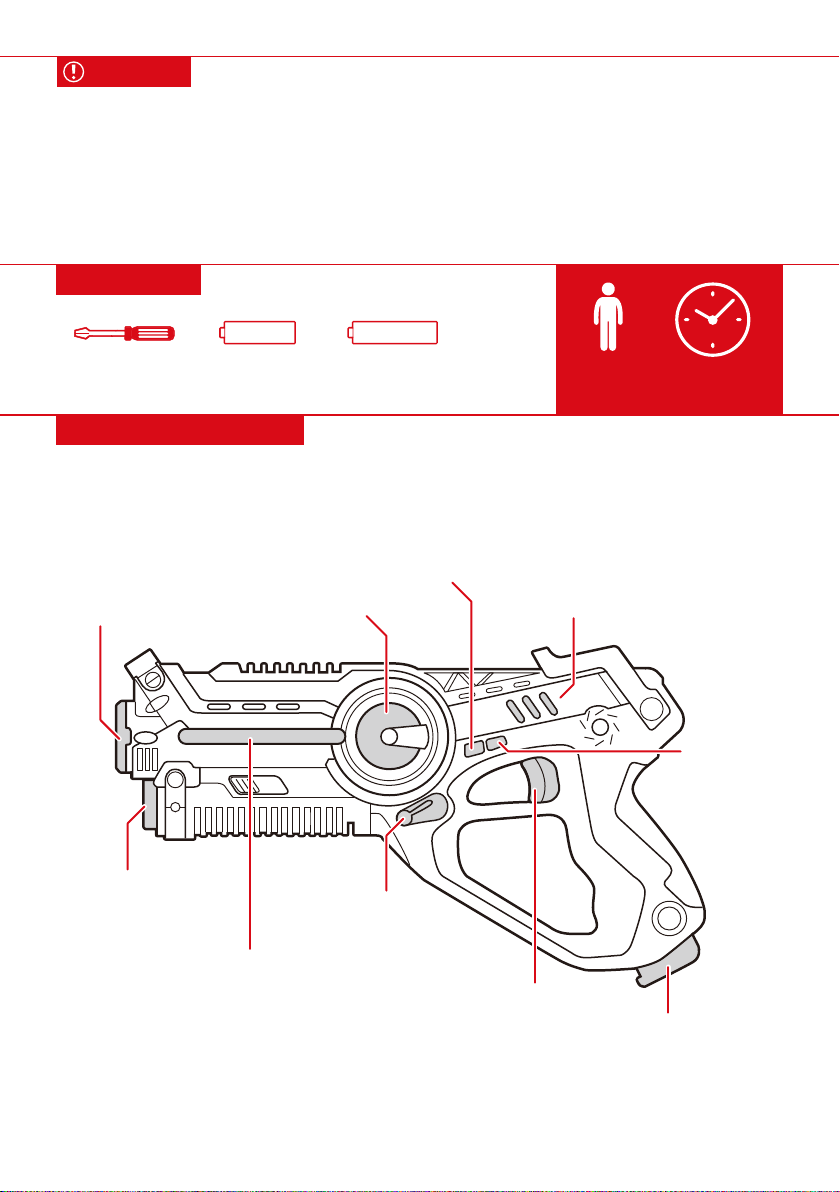
BLASTER DIAGRAM
4 AA BATTERIES
PER GUN
+AA -
3 AAA BATTERIES
PER VEST
+AAA -
Please retain these instructions for future reference.
NOTICE
•Avoid exposure to direct sunlight and excessive heat.
•Do not immerse product in water.
•Do not alter this product in any way as it may result in product failure.
•If any parts are missing, broken, damaged, or worn, stop using this product until repairs are made
and/or factory replacement parts are installed.
•Do not use this item in a way inconsistent with the manufacturer’s instructions as this could void the
product warranty.
SHOOTING INDICATOR
TEAM INDICATOR
TEAM
SELECTION
LIFE INDICATORS (3)
TRIGGER
RELOAD
POWER
SWITCH
INFRARED
RECEIVER
INFRARED
EMISSION
GUN SELECTION
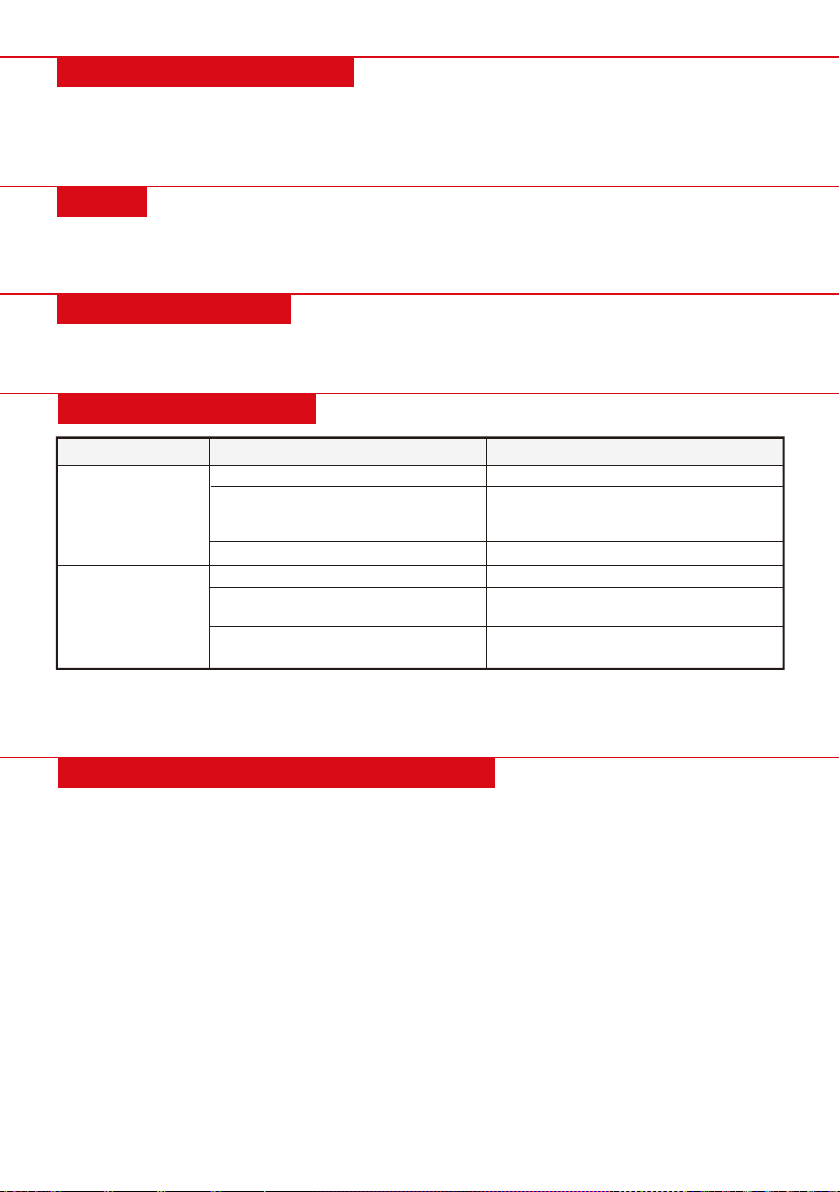
1. Use a screwdriver to remove the battery covers.
2. Insert 4 AA batteries into the blasters and 3 AAA batteries into the vests. Make sure the batteries are
inserted with the correct polarity.
3. Replace the battery covers.
4|
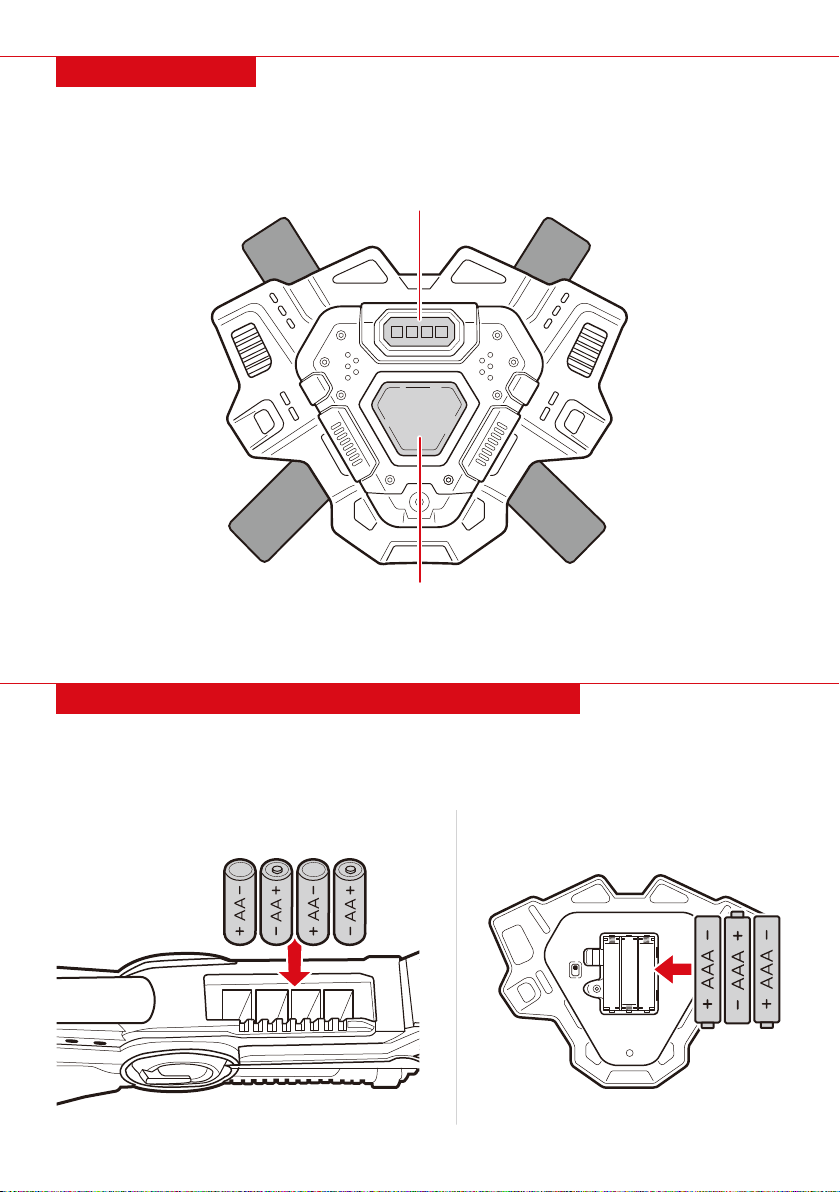
VEST DIAGRAM
• INFRARED RECEIVER: Vibrates and flashes colors when hit
• LIGHT INDICATOR: Displays team color
• LIFE INDICATORS (4): Each life indicator represents 3 health (for a total of 12)
NOTE: When vest and gun are paired, only the health points of the vest are active (12 health points).
BATTERY INSTALLATION - BLASTER & VEST
BLASTER VEST
LIGHT INDICATOR / INFRARED RECEIVER
LIFE INDICATORS (4)
-
+
-
+

|5
1. Place vest strap over your neck.
2. Fasten buckle in the back. Tighten straps to secure vest.
VEST INSTRUCTIONS
Press the gun selection button to toggle between 4 gun modes:
4
Aim and shoot at an opponent’s blaster or vest to register a hit. Once hit, the life indicator will
reduce accordingly and the gun/vest will vibrate and emit a sound. When your life indicator
reaches 0, the indicators will flash and you will not be able to shoot anymore.
NOTE: When paired, the blaster and vest are infrared receivers with shared health points (12 health
points). If only playing with guns, each gun has 9 health points.
5
Press the team selection button to toggle between teams. There are 4 colors to represent 4
possible teams – blue, red, green, or white. You cannot shoot your own team. A player cannot
change teams during a game.
2
Switch the vest on and it will cycle through dierent colors. Use the blaster to shoot the vest and
the vest will turn the color of your team. The vest is now assigned to your team. You cannot shoot
your own team’s vest.
3
Switch the blaster on. The blaster will default to pistol mode.
1
OPERATING INSTRUCTIONS
Shotgun Submachine Gun Rocket Launcher
Pistol
HEALTH REDUCED
BY EACH SHOT
GUN MODES
SHOTS
When you run out of ammo, press the reload button under the grip to reload.
FRONT BACK
WARNINGS REGARDING BATTERIES
•Do not mix alkaline, standard (carbon zinc) and rechargeable (nickel hydride) batteries.
•Do not mix old and new batteries.
•Non-rechargeable batteries should not be charged.
•Rechargeable batteries should be charged under adult supervision only.
•Exhausted batteries should be removed.
•The supply terminals should not be short-circuited.
•Do not put batteries next to or in a heat source (fire, electronic heating device, etc.).
•Do not hit batteries against hard objects.
•Do not submerge batteries in water.
•Batteries should be inserted with the correct polarity.
CARE
REASON
Low battery
Infrared signal could not reach the
blaster because the distance is too far
or angle is wrong
Obstacles blocking the infrared signal
Low battery
Overexposure to direct sunlight
Competing infrared transmission from
other devices, such as TV remotes
TROUBLESHOOTING
PROBLEM
Blasters do not work
Blasters operate
automatically
SOLUTION
Replace the batteries
Reduce the firing distance and firing angle
Remove the obstacles
Replace the batteries
Block sunlight or play in an area
without direct sunlight
Stop using or move away from
competing infrared devices
NOTE: If normal operation of the product is disturbed or interrupted, strong electro-magnetic interference
may be causing a problem. Reset the product by turning it completely o and then back on. If normal
operation does not resume, try replacing the batteries and moving the product to another location.
COMPATIBLE SETS
With the ability to mix and match Best Choice Products laser guns, you’ll have more than enough
blasters for your next event, birthday party, or family reunion!
RESET BLASTER & VEST
•A player cannot change teams or reset a gun/vest during a game.
•Press the team selection button to change your team before a game.
•To reset a gun/vest, switch the gun/vest o and on.
• If unused for a long period of time, remove the batteries.
• If necessary, clean this product with a damp cloth.
6|

Earn points while you shop. Join today!
bestchoiceproducts.com
Give your friends 15% o their first order! For each
successful referral you’ll receive 100 points.

All items can be returned for any reason within 60 days of the receipt and will receive a full refund as long
as the item is returned in its original product packaging and all accessories from its original shipment are
included. All returned items will receive a full refund back to the original payment method. All returned
items will not be charged a re-stocking fee.
All returned items require an RA (Return Authorization) number, which can only be provided by a Best
Choice Products Customer Service Representative when the return request is submitted. Items received
without an RA may not be accepted or may increase your return processing time. Once an item has been
received by Best Choice Products, refunds or replacements will be processed within 5 business days.
All returns must be shipped back to the Best Choice Products Return Center at the customer’s expense. If
the reason for return is a result of an error by Best Choice Products then Best Choice Products will provide
a pre-paid shipping label via email. Boxes for return shipping will not be provided by Best Choice Products,
and is the customer’s responsibility to either use the original shipping boxes or purchase new boxes.
Pictures may be required for some returns to ensure an item is not damaged prior to its return. Items
returned are not considered undamaged until they are received by Best Choice Products and verified as
such. All damages to items are the customer’s responsibility until the item has been received by and
acknowledge by Best Choice Products as undamaged.
PRODUCT WARRANTY INFORMATION
Manufacturer and seller expressly disclaim any and all liability for personal injury, property damage or
loss, whether direct, indirect, or incidental, resulting from the incorrect attachment, improper use,
inadequate maintenance, unapproved modification, or neglect of this product.
HELP CENTER
Product Assembly
Product InquiryChat Support Returns & Refunds
Orders FAQ
WARNING
Question about your product? We're here to help. Visit us at:
help.bestchoiceproducts.com
CHAT
US!
This manual suits for next models
2
Table of contents
Other Best Choice Products Toy manuals


