Flowtoys FLOWLIGHT-FS User manual

FLOWLIGHT-FS :: OPTIMIZATION GUIDE
The owlight-full spectrum was born of a passion for beauty and movement,
and engineered to meet the need for a high-performance, rechargeable and
durable light source for kinetic activities, personal lighting and entertainment.
The owlight serves as a versatile, interchangeable pixel of light in the
Flowtoys Modular System of poi, stas, juggling and martial ow props.
Clip a owlight to your person, backpack or bicycle. Use it as a ashlight or
for ambient lighting, while you are at a festival, camping, or at home. With a huge range of
modes and color schemes, the possibilities are limited only by your imagination.
OPTIMIZING YOUR GLOW – UNDERSTANDING YOUR BATTERIES
The owlight runs on a single AAA battery. It amplies and regulates the voltage – this
means you can use common rechargeable batteries and your owlights will run at full
brightness for the entire life of the battery, and not dim over the course of the night. Using
higher-voltage disposable alkaline batteries will not increase the brightness, or runtime.
How long does a battery last? This depends a lot on the mode you are in. With freshly
charged NiMH rechargeables, owlights normally last for 7-24 hours in most modes, 2-4
hours in page 3 “performance”modes, and 1-2 hours in “bolder” and “bold” (all white modes).
Runtimes with disposable alkaline batteries are typically lower, and cheapo disposable
batteries may last less than 30 minutes, as they cannot handle the amperage required.
How long will a rechargeable battery hold its charge? Typical NiMH rechargeables hold a
good charge for a few weeks. After that they may have less than 50% of their charge left, so
we recommend charging batteries within a week of any important uses, like festivals, parties
or performances.
New feature - charge-level indicator: Hold the button while the light is o to see the
charge-level indicator. Green is at least 80% charged, red is at least 80% dead, orange and
other in-between shades are approximate and indicate about 50%. This is intended for NiMH
batteries only - a “green” reading for alkaline disposable batteries may actually mean 50% or
less, due to the voltage dierence of the chemistry.
QUICK START GUIDE
• See inside for battery installation.
• Press the button once to turn on your owlight.
• Press again to change to the next mode.
• Continue pressing to cycle through all 10 modes on the rst page.
• At the end, the light will turn o.
• There are many other features, but this is all you need to know to get started!
TROUBLESHOOTING
A truly defective owtoys product can always be sent back for free repair or replacement, but most
apparently“faulty” owlight behavior just requires a good battery or a little care!
1. Use only rechargeables or good alkalines. The circuitry is optimized for rechargeables. The
voltage amplier draws a lot of power, so cheapo batteries don’t last long, and can create faulty
behavior.
2. Your battery is low. Dim orange light? Flashes and turns o? Won’t respond to the button? Try
a battery that you are sure is good, switch your batteries around with other lights to check.
3. There is something obstructing battery contact! Check that the clear battery pull-tab is
blocking the battery contact. Check that your batteries are clear of physical debris. Sometimes
the wrapper on the battery itself tears away and blocks the contact.
4. There is oxidation on your contacts. Do the battery or spring contacts have black marks
or debris on them? This may be oxidized metal dust from the battery and/or battery contacts
caused by friction/vibration. Clean the battery and battery springs with your ngers, a clean cloth
or eraser, and apply a tiny bit of petroleum jelly (vaseline) to the springs. This works wonders to
prevent future oxidation and promote electrical conductivity.
FLOWLIGHT ACCESSORIES
Flowlights were designed as a versatile pixel of light that can be used as a stand alone LED light-
stick, as well as linked together in the Flowtoys Modular System to create poi, stas, juggling clubs,
martial ow props and more. Visit www.owtoys.com for the whole range of accessories and
possibilities.
Recommended: Get crystal cases to protect and cushion your owlights, and
owmass to add more weight if you like heavier rigs. We also provide quality,
comfortable handles and leashes.
DURABILITY
Flowlights were designed for a high-impact lifestyle. However nothing is indestructible! Flowlights
are electronic instruments - we recommend using one of our protective housings or avoiding very
hard collisions and drops if they are unprotected.
Interesting note:We calculated the impact during a simple “buttery” poi-move to be over
100mph. The force during impact is equivalent to a 5 ton elephant standing on a cell phone!
Note: Chemical glowsticks release gaseous esters that break down polycarbonate and make it
brittle. This can occur even if an uncracked glowstick is placed near polycarbonate, and is not only a
result of broken or leaking glow-sticks. Avoid exposure!
The Home of Poi Hassle Free Warranty
At Home of Poi we have a free 12 month warranty/replacement process on all items purchased
from us in the unlikely event that a fault occurs. This does not include claims arising from abuse or
misuse. Unlike other warranties we do not ask you to send products back at your cost, we avoid this
hassle by simply asking for photos and/or video of the fault. Once your claim is approved we will
then send free parts/products or apply store credit to help remedy the situation. Most products can
be recycled or reused locally, reducing the carbon footprint by not having to send items back. We
feel this warranty substantially reduces waiting times and expense for you our valued customer.
This really is the HoP hassle free, cost free, environmentally friendly warranty process
2016.11
OPERATING INSTRUCTIONS
Your owlight-FS has a large variety of modes and features enabling
innite unique patterns, and eects. We’ve organized them into 4 pages
of modes to keep it easy to navigate with a few types of button presses.
BUTTON PRESSES
Click: 0.3 seconds or less. A quick click, like a computer-mouse click.
Multiple clicks, like a double-click on a computer mouse, will access
dierent pages - 2 clicks for page 2, 3 clicks for page 3, and so on. You
may discover this by accident by trying to cycle through the modes too
quickly, and nd a mode you’ve never seen!
Press: 0.3-0.75 seconds. The classic button-press, this is what feels
“normal”to most people.
Long-press: 0.75-1.5 seconds. An indicator ash lets you know you can
let go. This puts you into the “adjust” state to adjust the mode you are in.
Hold: 1.5 seconds or more. If the light is on, it will turn o, it will also
remember your mode and any adjustments you might have made to it.
When you press the button again, it returns to where you were. If it is o,
it will display its battery’s life estimate, then turn back o.
Save: 3.5 seconds. If you continue holding past“o”, the pattern will be
saved to the Favorites page and the light will turn back on.
NAVIGATING PAGES AND MODES :: The owlight-FS has 4 pages, each with 10 modes.
Page 1: classics
1 click or press of the button from“o”brings you to page 1 mode 1 (p1m1).“Rainbow” the rst of the
“classic modes like bold, re, water and other elemental modes. The last mode on this page (p1m10) is a
new instant-classic: pulse, which responds to your moves, like stalls, bumps and wraps.
Modes: Rainbow • Rainbow drops •Bold •Lantern •Fire •Water •Earth •Air •Spirit •Pulse
Page 2: party
Click the button quickly 2x - you’ll see the indicator ash 2x to let you know you’re now on page 2.
Subsequent presses take you through the 10 modes in that page, and each mode is adjustable. This
page celebrates all that is fun and festive - it’s where you’ll nd much-loved modes like candy, petals,
and microdots, and cult-favorites like watermelon, freedom, and solar-are.
Modes: Candy • Petals • Love • Watermelon • Freedom • Microdots • Unicorn • Blue blazer • Solar are • Strobe
Page 3: perform
3 quick clicks takes you to page 3. The indicator ashes 3 times and you’re now ready to perform. These
modes are superbright, and battery life is the last thing on your mind. This page contains all the modes,
with their full power unleashed. Just press the button to cyle through them, but be warned: the
brightest ones may drain your battery in under an hour!
Modes: Flamebow • Alicorn • Liquid sugar • Rainbow dash • Fireball • Froth • Jammin • Bolder • Sunset • Daybreak
Page 4: favorites
4 quick clicks takes you to page 4“favorites”. Here you’ll see your most recently saved pattern. You can
select from your last 10 saved patterns by pressing the button to cycle through them. You can save any
mode and adjustments you make to it by holding down the button until the light turns o and turns
back on. This will also save a copy of any mode/pattern in Favorites to slot 1 (p4m4). You can use this to
re-order your favorite modes without adjusting them!
3 superbright LEDs
advanced micro-controller
single button, easy use
voltage regulator
color indicator
100% optical shell,
durable polycarbonate
no tools battery door
rechargeable AAA cell*
custon battery spring
easy attachment points
State-of-the-art, latest
technologies, design,
versatile, attractive,
easy-to-use, intuitive,
sustainble alternative to
chemical glowsticks.
Designed from the
ground up with great
engineering, awesome
design, good taste and
love.
FEATURES
37g w/ battery
23 mm
130 mm
Take me home!
To get back to page 1 from any other page, press the button to cycle through the modes until
the light turns o. A single click or press will bring you back to the beginning: page 1 mode 1.
Note:If you press too quickly (less than 0.3 sec. each) it might register as a “click” and change
what page you are in. if this is happening just go slightly slower :)
Tip: 5 quick clicks or more will take you to page 1 mode 1 instantly.
ADJUSTING MODES
Every mode has 1 parameter that can be adjusted. In most cases it’s the color/hue, in others
it’s the speed/density of the pattern, or the brightness. To put a mode into its adjust state, do a
long-press (hold for more than 0.75 sec., let go when the indicator ashes). The mode will then
cycle slowly through its adjustment. When you see what you like, a button press will stop the
adjust cycle, selecting that adjustment.
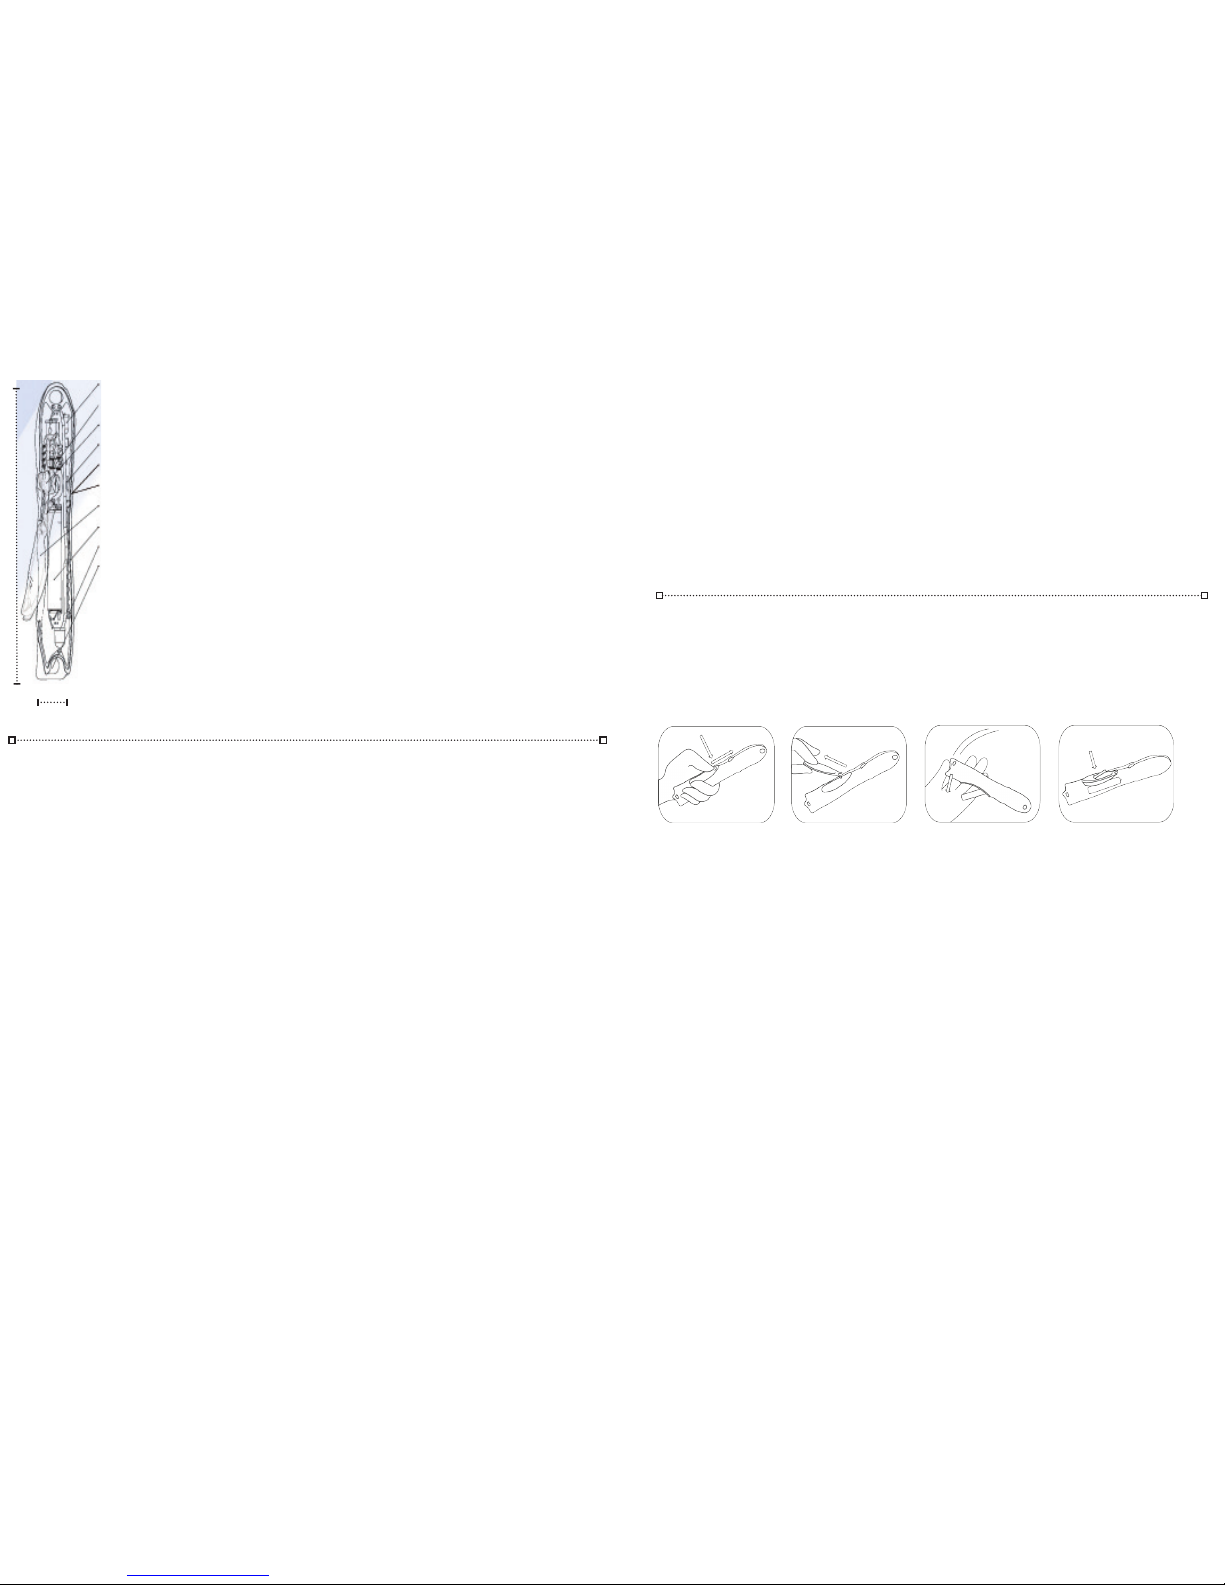
OPENING YOUR BATTERY DOOR
The battery door is integrated into the unique design of the body, spreads light around the
battery and can be removed without tools. However it can be tricky to open, like a puzzle-box
;) Basically there is a tiny“latch” inside near the button that needs to be released. There is a
slight lip at the tip of the door near the button and the lip needs to go down towards
battery, and forwards towards the head/button to release the latch.
You should be able to do this with your thumb. but if it’s dirty or stuck you may need to use a
hard object like a battery, or the tail of another owlight works really well, to push down and
forwards on the tip of the door. Do not push on the main body of the door itself – this will
prevent it from unlatching. Don’t worry, you WON’T break it!
Once you have released the battery door, you can pull the door rmly to separate the door
from the light and access the battery compartment. Visit owtoys.com for video instructions,
or email support@owtoys.com if you have any questions.
Inserting and removing the battery
The positive end of the battery (pointy end) points to the head of the owlight (pointy end).
Push the battery forwards and down. The springs are quite rm so push hard.
There is a transparent pull-tab in the battery compartment – make sure it’s not blocking the
contacts and that it goes under the battery for easy removal. A very rm tap on a table or other
semi-hard object will also pop the battery out of the compartment.
Push the front lip of the door
down and forwards towards the
button rmly. The back of the door
should pop out. It may help to use a
small object like a battery or the end
of another owlight.
Pull the door out to access the
battery compartment. The antenna
are very strong and durable. You can
pull hard to remove the door. This
is normal.
To remove the battery, pull on the
clear battery pull tab, or tap the tail
of the owlight rmly against a rm
surface. Battery may be snug,
Insert battery “+”end rst towards
the pointy head of the light. Ensure
clear tab is placed correctly. Push
battery “-”end down. Insert antennae
of battery door. Push door down and
back to secure it. Power up & enjoy!
Other Flowtoys Toy manuals

Popular Toy manuals by other brands

QuickWorldWide
QuickWorldWide Little Quickie 8 Assembly and maintenance manual

Mattel
Mattel HOT WHEELS HW CITY instructions

Hasbro
Hasbro TRANSFORMERS CYBERVERSE DEAD END quick start guide

bruder
bruder 02827 quick start guide

TTS
TTS LI10249 quick start guide

Hangar 9
Hangar 9 85cc Sukhoi SU-26MM Assembly manual


Fisher-Price
Fisher-Price G6675 quick guide

Laser Dollhouse Designs
Laser Dollhouse Designs Tiffany Victorian Assembly instructions

Estarmodels
Estarmodels Fi-156 Fieseler STORCH I instructions

Build RC
Build RC 3M Gliderman manual

ROBBE
ROBBE Eolo R 22 Assembly and operating instructions

Trix
Trix Class 45 operating instructions