BestCam BST800 User manual

English
Contents
English............................1-26
1 .Introduction
1.1. After sales service ................................................. 01
1.2. Trail camera working principle ............................ 02
1.3. Warning ...................................................................03
1.4. Camera overview ..................................................06
1.5. Brief operation of the camera ............................... 07
1.6. Specification ..........................................................08
2 . Preparing the Camera
2.1. Power supply ...........................................................09
2.2. Inserting the memory card .................................... 10
2.3. Using the wall mount/bracket ............................... 12
2.4. Installing the camera properly ..............................13

English
3. Basic Operation
3.1. Turn SETUP, On And Off to the Camera .......... ..15
3.2. How to play the recorded videos and photos. ...... 18
4. Setup Menu and Functions .................................................21
5. FAQ .......................................................................................26

Introduction
1
1 .Introduction
1.1.After sales service
Choose us! We provide you with the best products and services, and
always focus on professional brand.
We are committed to sincere and thoughtful service to ensure customer
satisfaction. If you have any questions or concerns about our products,
please feel free to email us at:
We will reply you within 24 hours and provide you with a 100%
perfect solution. If you want to learn more about the following
information, you can scan the QR code to visit our website
www.hapimpofficial.com
■ Beginner tutorial
■ Download the manuals for different models
■ Get new product information
■ FAQ (Frequently Asked Questions and Answers)
■ Make suggestions or complaints about the products
■ Product operation video

Introduction
2
1.2. Trail camera working principle
The trail camera is triggered by motion and variance in temperature.
The trail camera is able to do this by using a motion(PIR) sensor. The
motion sensor is aware that something is in front of them by changes
in motion and the temperature difference between the moving object
and the background environment.
The trail camera detects animals or people by sensing changes in
infrared light that occurs when the subject enters the camera's IR
detection zone: When the subject enters camera's IR detection zone, the
sensing module of the trail camera will start the camera to complete the
capture, thereby obtaining photos and videos. If the subject leaves the
detection zone, the trail camera is in a dormant standby state, for
example, the trail camera starts to capture again when it enters the
detection zone again.
Applications
■ Hunting: scouting an area for gaming
■ Wildlife observation at the backyard or garden: spying on the natural
world, indulging your interest in wildlife
■ Indoor/outdoor security surveillance
Introduction
3
1.3. Warning
■ While you are checking the camera under the SETUP mode, the
ambient light source is unstable because your hands are holding the
camera and moving, the PIR sensor will be triggered to work, and you
might hear clicking sounds accompanied by screen flickering, which is
normal.
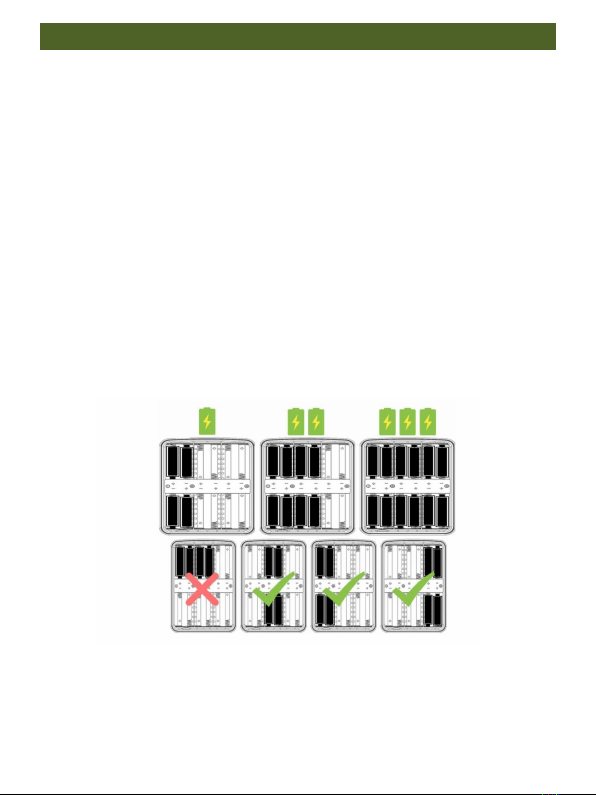
■This trail camera requires at least 4 pcs of AA batteries to get work.
Please pay attention to the arrangement of the batteries. Every 2
batteries must be arranged neatly up and down to supply power, please
see the following picture. Every 4 batteries set is a power supply
system, so you can also use 8 or 12 pcs of AA batteries to extend its
lasting time.
■ It is recommended to use high-performance alkaline batteries, which
can prolong the use time of the camera. It is not recommended to use a

Introduction
4
1.2V rechargeable battery, because the working voltage of each battery
that a hunting camera requires is 1.5V. If the battery voltage is
insufficient, it will not work properly and drain the battery fast after
working for only few hours (the camera will show that the battery is
low).
■ The camera can be also supplied by the 6-12V external power
adapter.
■ When using the hunting camera for the first time, please format the
memory card before using.
■ When placing the battery, please be sure the polarity of the batteries
is correct, if not, it will cause the camera to short circuit and burn out.
Please note that the camera is not protected by the short circuit!
■ When using the product for the first time, please remove the layer of
protective film on the lens and on the sensor of the product.
■ Ensure that the motion sensor is not dirty or damaged , if there is any
scratch or damage, it will affect the normal triggering of the camera.
■ Field installation: please make sure that the buckle of the camera and
the bottom DC plug are all closed and sealed, otherwise the camera
could be damaged in the rain.
■ The included mini USB cable is only used to transfer files from the
camera to the PC, please do not use it to charge the camera or the
rechargeable battery, it will seriously damage the camera.
■ Please keep the camera lens and infrared sensing windows clean. If

Introduction
5
dirty, clean with a soft glasses cloth.
■ Do not scratch the LCD display screen, camera lens, infrared sensing
windows and IR led glasses with any sharp objects.
■When it is at low battery level, please replace all the batteries on time
to avoid leakage of the electrolyte that could damage the camera.
■ In the SETUP mode, the camera will shut down automatically after 3
minutes without any operation. Please turn on the power again(slide to
OFF and then SETUP) if you want to continue to set up.
■Please read more notices from the next chapters. If you want to
know more information, please go to our website
www.hapimpofficial.com to view or directly scan the QR code to
get more information.
Introduction
6
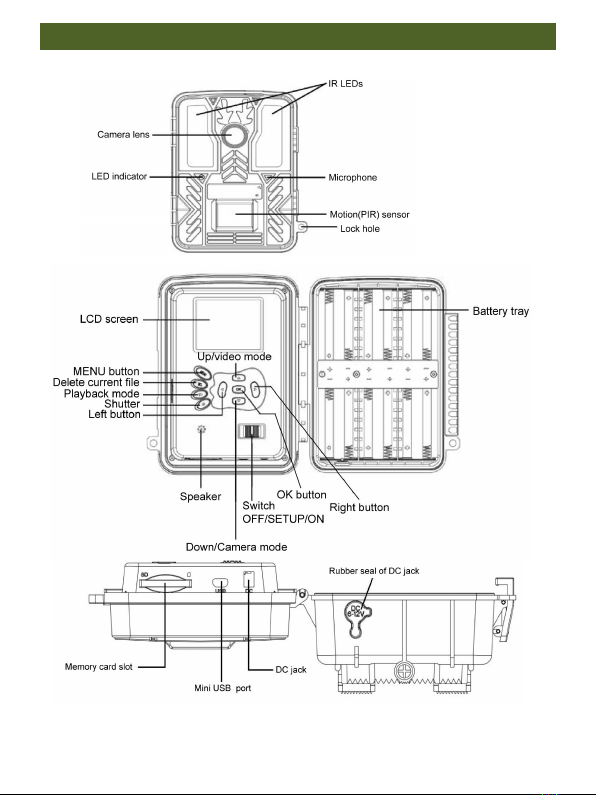
1.4. Camera overview
Introduction
7
1.5. Brief operation of the camera

Introduction
8
1.6.Specification
Preparing the Camera
9
External power supply port
supply
2. Preparing the Camera
2.1. Power supply
This camera supports 2 options of power supply: AA batteries or
external power supply.
■AA batteries:You can use 4 or 8 or 12 pcs 1.5V AA batteries, and
make sure the battery polarity is correct. Please refer to chapter 1.3,
the picture of showing the correct way to install the batteries.
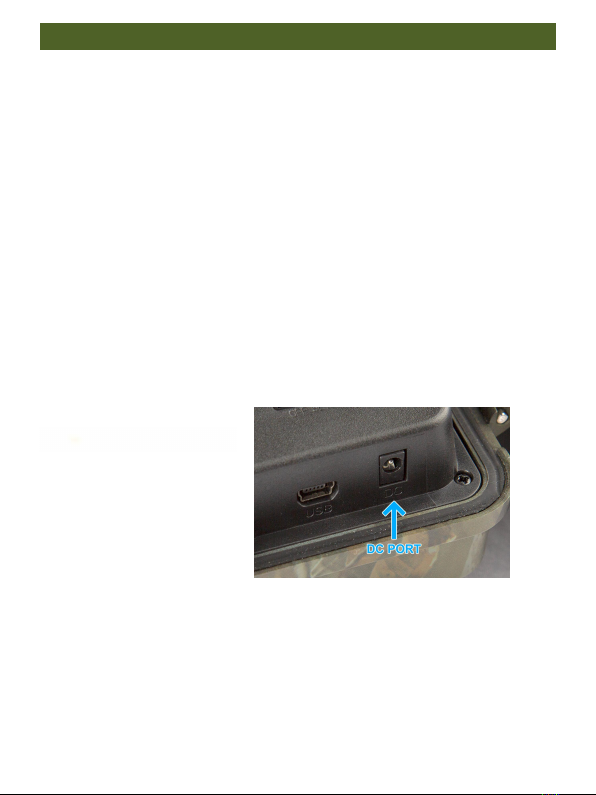
■A good option to get longer battery life is to add an external power
supply: At the bottom of camera, there is an external power supply(DC)
port, you can use a 6V-12V at least 1.5A, AC adapter with
3.5mm*1.35mm DC jack size or you can use a 6V-12V at least 1.5A
trail camera solar panel.
Notice:
■ It is not recommended to use 1.2V rechargeable batteries,
because it is not enough to support the normal operation of the
camera. We recommend high-performance alkaline batteries (not
included).
Preparing the Camera
10
■ Avoid mix-matching brands, types, or ages of the batteries, which
will greatly increase the odds of a battery leaking, leading to a
damaged camera.
■ Anytime you place or remove the batteries, make sure that the
camera is OFF.
■ Most batteries will lose their activity when working at low
temperatures, leading to a camera failure. Put the camera indoors
and it will return to work normally. Rechargeable batteries cannot
be recharged in the camera with an external power supply.
■ It is not recommended to use a universal external power adapter,
if the voltage is adjusted to inaccurate, you risk burning the
camera.
■ When using an external power source, please keep the four new
batteries in( to avoid external power suspension).
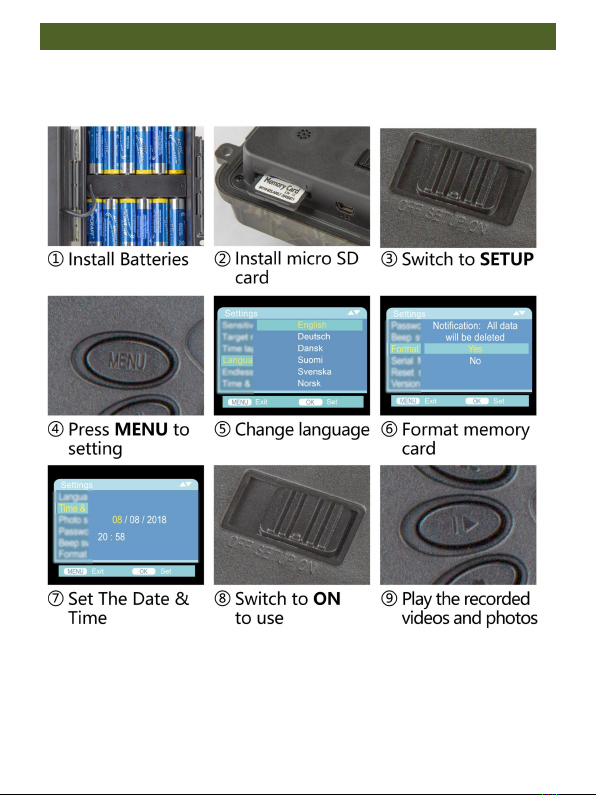
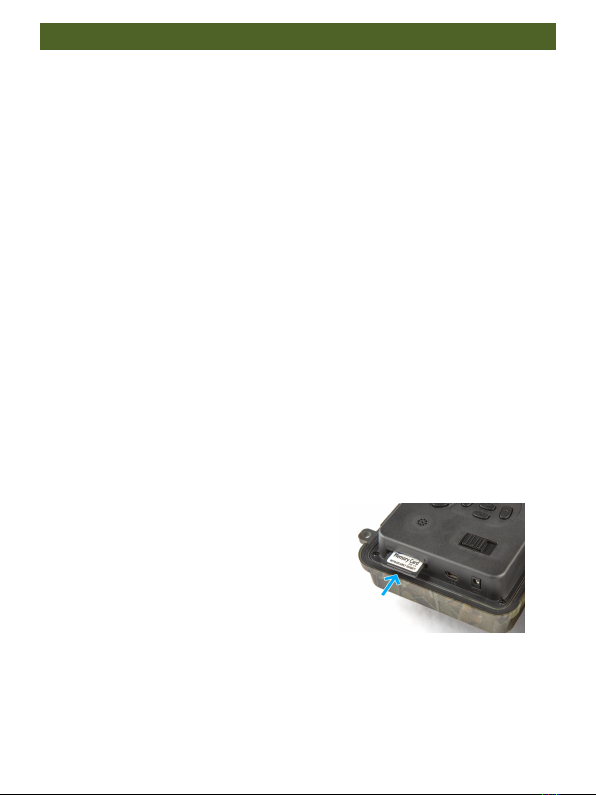
2.2. Inserting the memory card
A memory card is required so that the
camera can take and save the videos
and photos.
1.Switch OFF the camera;
2.Insert the memory card;
3.Push the memory card into
the card slot until it clicks into place;

Preparing the Camera
11
To remove the memory card, please push the card in again until it is
partly ejected.
Notice:
■ Please format the memory card if it is used for the first time or if
it has been used with other cameras before.
■ Don’t remove the card or turn off the power while formatting or
reading or saving the files from the memory card, this might lead
to data losses.
■ Suggest to use the SD card at least class 10 or higher.
■ Be sure the power switch is OFF before inserting or removing the
memory card or batteries.
■ If the memory card has been used for many times, its
performance might be reduced. If the memory card performance
decreases, please replace the old new memory card with the new
one.
■ If the capacity of the memory card is full, the camera will stop
recording automatically. Turn on the loop recording function if you
want to keep on saving data: in this case the newest data will
replace the oldest.
■ Do not insert the memory card forcibly. Please refer to the
marking on the camera. Press the edge of the card gently to pop up
the memory card.

Preparing the Camera
12
2.3. Using the wall mount/bracket
The camera can also be securely attached to walls or ceilings by using
the included wall mount. Installing the wall mount ensures that all
existing bolts are securely tightened.
1. 1/4’’Screw
2.Counter screw/Lock nut
3.Pivot bolt
4.Drilled holes
5. Mini wrench
6.Plastic expansion tube/Wall plugs
7.Long screw of metal bracket
Required tools
■ Drill
■ 6 mm masonry/concrete drill bit
■ Phillips head screwdriver

Preparing the Camera
13
2.4. Installing the camera properly
Under SETUP mode, you can work out the optimum exposure angle
and the range of the motion sensors.
During alignment, consider whether the use of the motion sensor may
be useful for attaining the desired observation results.
Align the camera as follows:
Fasten the camera to a tree or similar object at a height of 1-2 meters
and align the camera in the desired direction. Make sure the switch is at
the “SETUP” position, then move slowly from one side of the target
area to the other side. While doing this, look at the LED indicator.
If you see the LED indicator light up in red, that means you have been

Preparing the Camera
14
detected by the motion sensor and know the motion sensor is working
properly. In this way, you can work out the best alignment for the
camera.
To ensure that the camera does not make unwanted recordings of
irrelevant movements, it should not be set up in a sunny location or
close to branches that can move in the wind.
Please refer to the above installation diagram to determine the correct
installation angle, install the hunting camera as horizontally as possible,
and do not install it downwards, which will reduce the capture range of
the camera and the shooting angle.
Notice:
■The LED indicator is to test whether the motion sensor works
properly, so only when the switch is at the SETUP position, when
the motion is detected, it will light up. It does not light up when the
switch slides to ON, so you don’t need to worry the camera will
disturb the animals.
■ The correct installation distance should be at least one meter
away from the object, otherwise, it is easy to be vague.
■ Please make sure to install the hunting camera horizontally,
otherwise, it may reduce the detection range of the camera.
■ The installation height is determined by the size of the shooting
target or the distance, such as a small hedgehog, the shooting
distance should be as short as possible, and the installation height
should be as low as possible.

Basic Operation
15
■ There should be no obvious obstructions (such as branches and
leaves) in the front of the lens, and try to keep it as open as
possible.
■ Try to confirm that there is no strong backlight at the front of
the lens, otherwise, the quality of the photos and videos taken will
be seriously reduced, and noise and blurring will occur.
3. Basic Operation
3.1. "ON","SETUP" and "OFF" modes
3.1.1. When the camera is under the "SETUP" mode
After you have placed the batteries and memory card in, under the
SETUP mode, you can set parameters, check the camera, manually
shoot and view photos and videos, etc.

Basic Operation
16
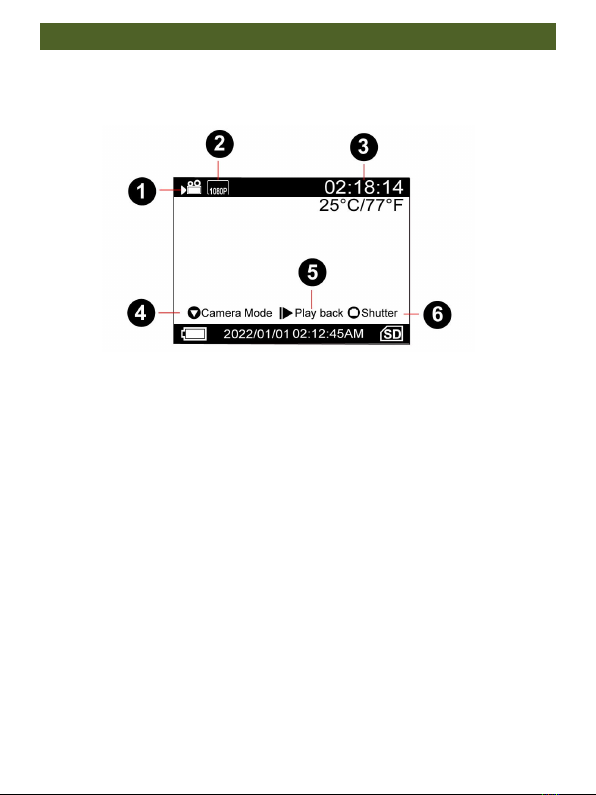
The icon meanings on the screen
1. Photo mode
2. Photo resolution
3. How many photos can be taken with the remaining capacity of
the memory card
4. Temperature
5. Press
button, go to video mode
6. Press button, go to playback mode
7. Press button to shoot
8. Remaining capacity of the batteries
9. Date and time
10. Memory card is inserted
Basic Operation
17
The icon meanings on the screen
1. Video mode
2. Video resolution
3. How long the videos can be taken with the remaining capacity
of the memory card
4. Press button go to the camera mode
5. Press button,go to playback mode
6. Press button to shoot
Notice:
■ Please follow the icon instructions and press the button to perform
the corresponding operation.
■ In the SETUP mode, the camera will shut down automatically after 3
minutes without any operation. Please turn on the power again(slide to
OFF and then SETUP) if you want to continue to set up.
Table of contents
Popular Camping Equipment manuals by other brands


Olymbros
Olymbros Z3 user manual

MDC
MDC ROBSON XTT owner's manual

Quest Leisure Products
Quest Leisure Products 120010 instruction manual

Crivit
Crivit 273821 Instructions for use

Quest Leisure Products
Quest Leisure Products Childrens Dinosaur 5203T instructions

Contigo
Contigo AUTOSEAL Care and use instructions