Bestway 58628E User manual

58628E
www.bestwaycorp.com

WARNING!
THIS IS NOT A TOY!
- Do not let children use or play with the cleaner. Assemble and disassemble this product by adult only.
- Do not allow swimming in the pool while the cleaner is in use.
- TURN OFF THE PUMP before connecting cleaner to the pool.
- If there are stones, roots, or metal corrosion in contact with the bottom side of the liner, clean them out before installing the cleaner. If necessary,
have a qualified professional do the cleaning.
- If the liner is brittle, damaged or wrinkled, have a qualified professional perform the necessary repairs or liner replacement before installing the
cleaner.
- Make sure the cleaner is not in the pool during any chemical sanitization.
- TURN OFF THE PUMP before servicing the cleaner or performing any maintenance.
NOTE: Drawings for illustration purpose only. May not reflect actual product. Not to scale.
SAVE THESE INSTRUCTIONS
Automatic Pool Cleaner for Above Ground Pools
Cleans the bottom of your pool automatically. Works with all major brands of soft-wall pools. This product includes 24.5 ft. (7.50 m) of hose to fit pool
sizes up to 22 ft. (6.71 m).
This is a unique automatic above ground pool cleaner that is compatible with sand filters as low as 800 gal./h (3,028 L/h) and up to
3,000 gal./h (11,356 L/h), and compatible with filter pumps as low as 1,000 gal./h (3,785 L/h) and up to 2,500 gal./h (9,463 L/h).
The Automatic Pool Cleaner has a built-in filter that prevents clogging of your hoses and filter system. Before connecting the Automatic Pool
Cleaner, inspect the unit to make sure the bottom plate is properly locked in position and that the mesh bag is clean.
IMPORTANT: Wait 4 hours to use the cleaner after chemical maintenance. The high level of chemicals will damage the diaphragm.
IMPORTANT: After every use, the diaphragm needs to be washed with clean water for 1 minute.
2
OWNER’S MANUAL
AQUASWEEPER
Connect F - K - B - A in order, then connect the long hose sections (A+A+A...)
For 22 ft. (6.71 m) round & rectangular pools, connect all 10 long hoses (A+B).
For pools smaller than 22 ft. (6.71 m), reduce the number of long hoses (A)
simultaneously until total length of hose assembly is equivalent to the length
from skimmer/dedicated suction line to the farthest point in the pool plus a
length equal to hoses A. (Fig. 1)
Fig. 1
WARNING
INSTRUCTIONS
HOSE SECTION ASSEMBLY
A. Long hose B. Long hose D. Pouring weight
F1. Connector F2. Connector F3. Connector K. Regulator valve
2
PARTS REFERENCE OVERVIEW

NOTE: Turn filtration OFF before connecting the Automatic Pool Cleaner to your pool.
F3
(1)
(2) (3)
F3F3
The 2connectors (F1/F2/F3)and Connection Hose A enables the Automatic Pool Cleaner to fit most brands of Above Ground Pools in the
market. Choose the right connector and see the following diagrams for proper connection to the water outlet of your pool.
F3connection mode
Detach the strainer plug and insert the F3into the strainer hole.
1.
3
A
F3
F1
1.4 in. (36 mm) Strainer Hole
Remove the grid cover and directly insert the cuff of hose A
into the strainer hole.
F3+F1connection mode
Screw F3onto F1, and then align and screw F1onto the strainer.
HOW TO CONNECT YOUR AUTOMATIC POOL CLEANER TO POOL
F2
K
K
Installing on a Skimmer Style Filter Pump
IMPORTANT: The connector K must be submerged into the water at all times. If the connector K is out
of the water, it will suction air and the vacuum cleaner will stop operating.

The water hose should be in a C shape, and the product should be placed into the water in the direction of the water hose, as follows.
2.3
NOTE: If your pool has two suction lines, then one suction line should be covered before using the cleaner. (Fig.3)
Pump
Fig. 3 (b)
Pump
Fig. 3 (a)
2.2
4
Completely immerse the hoses and the Automatic Pool Cleaner to let air escape, then connect the open end if the hose to the pool (Fig.2).
2.1
Fig. 2

5
3. Pressure Regulator Adjustment
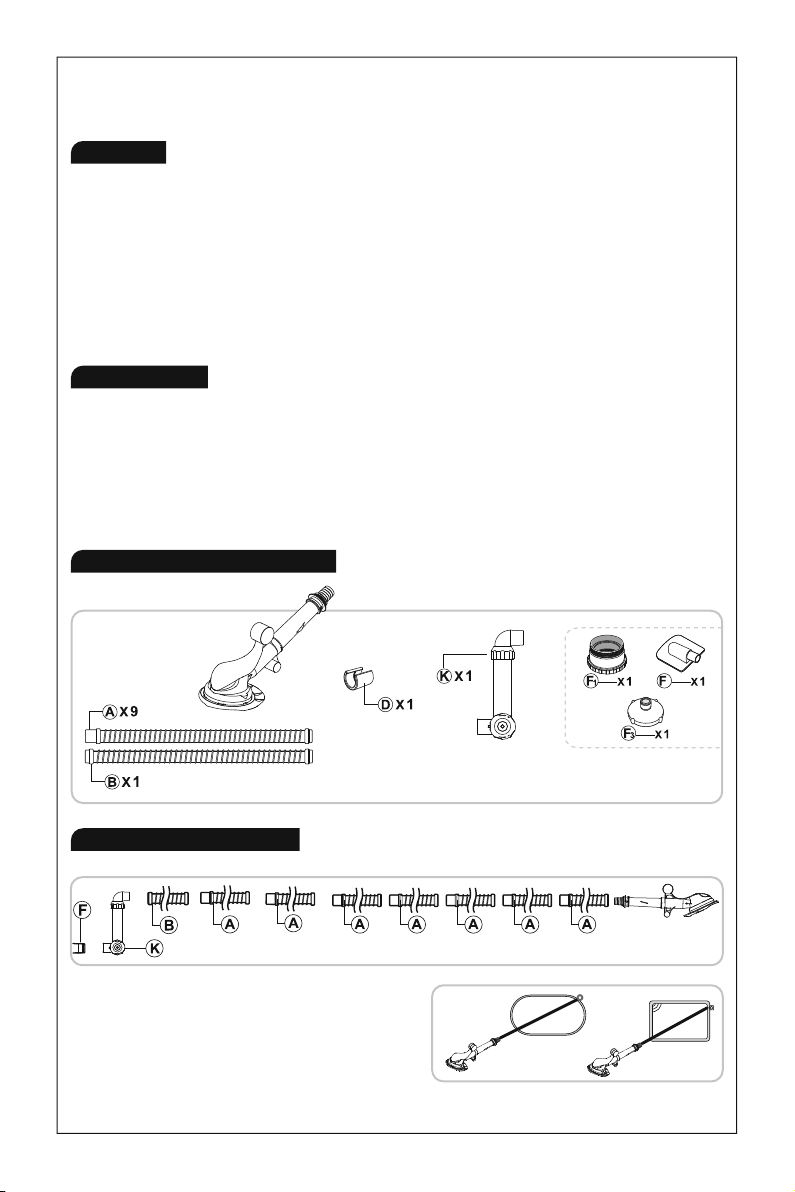
Unscrew the valve, lock nut, and adjust the Z-type valve up and down to ensure that the water
hose is on the horizontal surface (as shown on the right), and tighten the lock nut of the valve.
WARNING! TURN OFF THE PUMP BEFORE ADJUSTING THE PRESSURE REGULATOR.
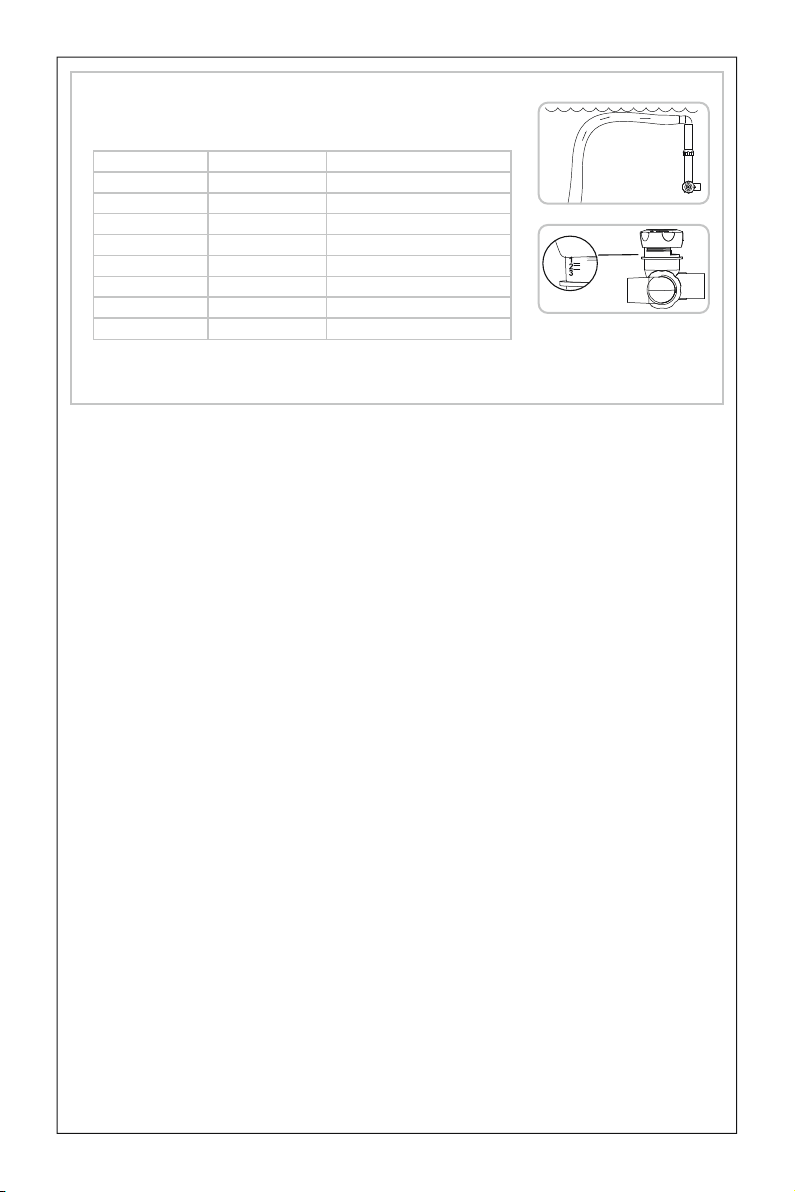
Req. Pump Flow Rate
800gal/h (3028L/h)
1,000gal/h (3,785L/h)
1,500gal/h (5,698L/h)
2,000gal/h (7,571L/h)
2,200gal/h (8,327L/h)
2,500gal/h (9,463L/h)
3,000gal/h (11,356L/h)
Pump Type
Sand Filter
Filter Pump
Filter Pump
Sand Filter
Filter Pump
Filter Pump & Sand Filter
Turn the knob to:
Screw regulator valve to end
Turn knob until bottom reaches Line 3
Turn knob until bottom reaches Line 2
Turn knob until bottom reaches Line 1
NOTE: Different brands of pumps of the same horsepower may vary in performance. You may
need to adjust the regulator to the next highest setting if the cleaner sticks to the pool floor and
does not move due to strong suction.
BEFORE STARTING THE FILTRATION SYSTEM, YOU MUST BE SURE THAT ALL AIR
INSIDE THE HOSE OF THE CLEANER IS PURGED OUT. IF AIR REMAINS INSIDE THE
HOSE, THE FILTRATION SYSTEM WILL SUCK THE AIR AND IT WILL CAUSE SERIOUS
DAMAGE TO THE FILTER PUMP OR SAND FILTER. TO AVOID DAMAGE TO YOUR
FILTRATION SYSTEM FOLLOW THE BELOW PROCEDURES:
FILTER PUMP:
1. Connect the hose of the pool cleaner to the outlet of the pool following the steps above.
The pool cleaner must be inside the water and the hose connected correctly to the pool.
2. Start the filter pump for 30 seconds.
3. Stop the filter pump and open the purge valve of the filter pump in order to remove the air
collected. When water flows out, close the purge valve.
4. Start the filter pump for other 30 seconds.
5.
Stop the filter and purge the air trap inside the filter pump following the operations in point 3.
6. Repeat the operation until the purge valve can be opened, and no air comes out.
SAND FILTER:
1. Connect the hose of the pool cleaner to the outlet of the pool following the steps above.
The pool cleaner must be inside the water and the hose connected correctly to the pool.
2. Start the sand filter for 30 seconds.
3. Stop the sand filter and unscrew the transparent cover of the debris screen until the air
flows out.
4. Start the sand filter for other 30 seconds.
5. Stop the sand filter and purge the air trap inside following the operations in point 3.
6. Repeat the operation until when you can stop the sand filter debris screen with the
transparent cap remaining full of water.
IMPORTANT: After setting up the pool cleaner, the product may not stop correctly. This
could be due to different situations, such as the ground not being flat, the hose getting
tangled, or many other things. In this case, you may have to manually move the item.
IMPORTANT: If the bottom of the pool is dirty, the net inside the pool cleaner, the filter
cartridge or the sand may have to be washed often. If the net, filter cartridge or the sand is
dirty, the pool cleaner will stop working. Remember to purge the air after cleaning the net
inside the pool cleaner.
HOSE WEIGHT APPLICATION

PROPER MAINTENANCE OF YOUR AUTOMATIC POOL CLEANER
CAUTION! REMOVE THE LADDER FROM THE POOL BEFORE STARTING.
Once your Automatic Pool Cleaner is connected to the pool, turn on your pump. The Automatic Pool Cleaner starts to clean the bottom of your
pool. It will operate automatically until the filter basket is full. The filter basket has a removable mess bag designed to filter the sand and small
particles from the bottom of the pool.
IMPORTANT! Make sure the mesh bag is in place during cleaner operation.
Empty this mesh bag regularly to ensure maximum suction. If your pool has many leaves or large debris on the bottom, they must be removed
using a leaf skimmer (not included). This will prevent the basket from becoming full too quickly and allow the smaller particles to be collected.
HOW TO CLEAN
(1) See ”a” from the picture A. Press in the center to open the bottom cover.
(2) See ”b” from the picture B. Take out the filter plant.
(3) See “c” from the picture C. Separate the filter net ”c” and the filter frame ”c1”, then clean the filter plant.
ATTENTION: The velcro can stick to the back net and filter net inside. Please separate them properly to avoid any damage on the filter net.
HOW TO REPLACE THE DIAPHRAGM
(1) Open the bottom cover and take out the filter net.
(2) See from the picture A. Pull out the diaphragm assembly part from the product.
(3) See from the picture B. Separate the diaphragm ”a” from the connection tube, and take out the diaphragm O ring.
(4) Put on the new diaphragm with the ring, and connect them back to the tube according to the picture C.
(5) Insert the diaphragm assembly part in the original position, see the “b” from the picture D. Twist the diaphragm until it is in the vertical position.
(6) Put on the filter and cover with the lid.
A B C D
A B C
1. When the weight (Part D) is moved to the left of the hose, it helps lower the vac cleaner.
2. When the weight (Part D) is moved to the right of the hose, it helps raise the vac cleaner.
HOSE WEIGHT APPLICATION
Ideally, the bottom surface of the cleaner should rest flat on the pool bottom. First, assemble the hose weight on the first long white hose (A) from
the cleaner. If the cleaner leans forward, move the hose weight along the long white hose towards the cleaner. If the cleaner leans backward, move
the hose weight to the next long white hose.
6

TROUBLE SHOOTING
WARNING: Turn off the pump before performing cleaning, maintenance and troubleshooting.
The cleaner stops operating for the following reason:
Problem Solution
Stop the filter pump or sand filter, purge the air and start again.
For assistance, please visit the support section on our website,
www.bestwaycorp.com.
Reduce the length of the hoses follow instruction manual.
Turn off the pump, reconnect the product at the diagonal position of the pool,
the water hose should be in a C shape, the product should be place into the
water in the direction of the water hose.
Stop the pump, take out the cleaner from the water and remove the debris.
Filter pump
- Stop the pump, block the connector A and B to avoid water flowing out from
the pool, and clean the filter cartridge or replace if necessary.
Sand filter pump
- Disconnect the cleaner from the pool, perform backwash and rinse to clean
the sand.
Check if the diaphragm has any holes or breakage. If so, follow the
instructions on how to replace the diaphragm
Check the bottom of the pool. If there are wrinkles, level the pool to reduce
them.
Check to see if the debris screen inside of the head is dirty. Clean the debris
screen.
Check to see if the filter cartridge or filter sand is dirty. Clean the filter
cartridge or back wash the filter sand.
Move the Pouring Weight backward.
- Air inside the pump
- The hose is too long
- The hoses are entangled
- The debris screen inside the cleaner head is full of debris
- The filter cartridge or sand is too dirty
- The diaphragm is broken
- The cleaner is stuck on wrinkles
7

©2021 Bestway Inflatables & Material Corp.
All rights reserved/Tous droits réservés/Todos los derechos reservados/Alle Rechte vorbehalten/Tutti i diritti riservati
Trademarks used in some countries under license from/
Marques utilisées dans certains pays sous la licence de/
Marcas comerciales utilizadas en algunos países bajo la licencia de/
Die Warenzeichen werden in einigen Ländern verwendet unter Lizenz der/
Marchi utilizzati in alcuni paesi concessi in licenza a
Bestway Inflatables & Material Corp., Shanghai, China
Manufactured, distributed and represented in the European Union by/
Fabriqués, distribués et représentés dans l’Union Européenne par/Fabricado, distribuido y representado en la Unión Europea por/
Hergestellt, vertrieben und in der Europäischen Union vertreten von/Prodotto, distribuito e rappresentato nell'Unione Europea da
Bestway (Europe) S.r.l., Via Resistenza, 5, 20098 San Giuliano Milanese (Milano), Italy
Distributed in North America by/Distribués en Amérique du Nord par/Distribuido en Norteamérica por
Bestway (USA) Inc., 3411 E. Harbour Drive, Phoenix, Arizona 85034, United States of America
Tel: +86 21 69135588 (For U.S. and Canada)
Distributed in Latin America by/Distribué en Amérique latine par/Distribuido en Latinoamérica por/Distribuído na América Latina por
Bestway Central & South America Ltda, Salar Ascotan 1282, Parque Enea, Pudahuel, Santiago, Chile
Distributed in Australia & New Zealand by Bestway Australia Pty Ltd, Unit 2/98-104 Carnarvon St Silverwater, NSW 2128, Australia
Tel: Australia: (+61) 29 0371 388; New Zealand: 0800 142 101
Distributed in United Kingdom by Bestway Corp UK Ltd. 8 Wentworth Road, Heathfield Industrial Estate, Newton Abbot, Devon, TQ12 6TL
Exported by/Exporté par/Exportado por/Exportiert von/Esportato da
Bestway (Hong Kong) International Ltd./Bestway Enterprise Company Limited
Suite 713, 7/Floor, East Wing, Tsim Sha Tsui Centre, 66 Mody Road, Kowloon, Hong Kong
www.bestwaycorp.com
303021258528
Table of contents