Betstco Value Leader AM Series Application guide

1
Value-Leader AM Boom Hedge Cutter 1 Revision 1-22-2018
OPERATION & PARTS MANUAL
Please read these instructions carefully before using! Always grease
all fittings and be sure to always check and fill with oil before
operating! Retain this manual for future reference.
Betstco
83371 Melton Rd., Creswell OR 97426
Phone: 541-895-3083
www.betstco.com
Specificationssubjecttochangewithoutnotice.
Rugged Labor Saving Equipment Since 1995
AM SERIES HEDGE CUTTER

2
Value-Leader AM Boom Hedge Cutter 2 Revision 1-22-2018
2
Value-Leader AM Boom Hedge Cutter 2 Revision 1-22-2018
Introduction
The Value Leader range of hedge cutter is designed to meet all the requirements of farmers,
contractors and municiple users in the cutting of hedges, ditches, embankments and roadsides.
The result is a range of hedge cutter, with excellent handling characteristics, robust and capable
of a long trouble free life.
They are disigned to be mounted into agricultural tractor three point systems. When mounted the
machine is stabalized by means of two stabablizer bars between the machine and the tractor.
NEVER use the machine for any other purpose than that for which is was designed (See this
manual)
In particular:
NEVER USE THE ARMS LIKE A CRANE

3
Value-Leader AM Boom Hedge Cutter 3 Revision 1-22-2018
Congratulations and thank you for buying a Value Leader Hedge Arm Mower. This machine is built
for a long and trouble free life, but this will depend on its correct use and maintenance.
It is essential to respect some simple rules
First of all, READ THIS MANUAL CAREFULLY
The most important points are as follows
1. Do not exceed the maximum PTO speed of 540 RPM
2. Adjust the rotation of the rotor to suit the type of work to be carried out
3. The roller must be used to limit the height of cut and NOT to support the machine
4. Grease the rotor and the roller bearings twice a day
5. Grease the rest of the machine once a day
6. Replace the filter after 50 hours and check the oil level
7. Check all nuts and bolts on the cutting head regularly
8. Check drive belt tension regularly
9. Make sure that all hydraulic unions are kept tight and do not leak
10. Never use the machine if the rotor is out of balance
11. Never cause the rotor to block
If this happens frequently, it indicates:
Too high of a forward speed
The rotor is turning the wrong way for the type of work
The PTO speed is incorrect
There is a problem in the hydraulic system
The use of non-original spare parts can invalidate the warranty

4
Value-Leader AM Boom Hedge Cutter 4 Revision 1-22-2018
BASIC SAFETY AND HEALTH REQUIRMENTS
WARING DANGER
NEVER try to assemble, connect or start the machine before understanding completely the
functions,
the controls and all the necessary safety precautions, as illustrated in the instruction manual.
Always follow VERY CAREFULLY all the instructions for both the hedge cutter and the tractor,
especially those concerned with safety.
NEVER LEAVE THE DRIVER’S SEAT OF THE TRACTOR AS LONG AS THE ENGINE OR THE
MACHINE IS WORKING.
NEVER USE THE HEDGE ARM MOWER ARMS LIKE A CRANE IN ANY WAY.
After mounting the hedge mower to the tractor, it may be necessary to stabilize the whole unit by
ballasting the back wheels of the tractor and/or by fitting the tractor with some counterbalance
weights.
The track of the tractor can be widened; this will increase the stability of the unit.
VERY IMPORTANT
Understand the meaning of all the DANGER and INSTRUCTION labels that are on the machine; all
precautions must be taken and all the instructions respected.
If you need some advice, or some help, or if you do not understand a part of this handbook, or of
the machine, contact Betst Products.
If you are not sure, NEVER SUPPOSE-DEMAND EXPLANATIONS.
The machine MUST NOT be rebuilt or modified in any part without the written authority of the
manufacture.
The manufacture declines all responsibilities for a machine that has been modified without its
written consent.
NEVER try to repair, adjust, or work on the machine in any way if it is not safely supported
ALWAYS MAKE SURE THAT THE MACHINE IS LIFTED AND LOWERED SAFELY

5
Value-Leader AM Boom Hedge Cutter 5 Revision 1-22-2018
WARNING DANGER
Before executing any repair or operation on the tractor, or on the hedge cutters, ALWAYS make
sure that the wheels of the tractor or another prime mover are positively blocked from any
movement.
BEFORE ANY ADJUSTMENT, REPAIR OR CONTROL TO THE HEDGE CUTTER, ALWAYS
STOP THE ENGINE OF THE TRACTOR.
Always be aware of all that is around you and use the machine with care.
Fully take notice of your working area, with particular regard to any buildings, power lines, steep
slopes, wire, or any other hazardous material that may affect the working of the machine.
Always keep all persons and animals well clear of the working area.
Drive and operate the machine taking in to consideration the weather conditions-sun, rain, ice,
snow, wind etc.

6
Value-Leader AM Boom Hedge Cutter 6 Revision 1-22-2018
1- Before connecting the machine to the tractor, make sure that it is standing on a solid and level sur-
face. (It is important to take the machine off the tractor in a suitable place, so that it can be easily re-
connected the next time it is needed.) Make sure the machine is correctly supported and that the
transport locks are in position to prevent the arm dropping when the machine is lifted.
2- Before, or during all maneuvers of the tractor or vehicle concerned with the process of connecting the
hedge mower, make sure that NO ONE is nearby. Make sure that all persons keep at a safe dis-
tance: ALWAYS take care during maneuvers in reverse and when aligning the hedge mower with the
tractor.
3- ALWAYS ensure that the tractor brakes are applied correctly, so that the tractor can be kept in the
chosen position during the mounting of the machine. This will stop any movement to the vehicle,
which could cause injury or damage.
4- Make sure that the stabilizer bars and the top link are connected on the machine correctly. You must
use only good quality pins on the three point linkage attachment. Lock the pins with lynch pins.
5- If it is necessary to adjust or to overhaul the machine when it is connected to the tractor, you MUST
put some suitable stand or supports under the machine to avoid any accidental lowering of the arms
and/or the machine. Make sure that any stands are on firm and level ground
THE MACHINES MUST BE ALWAYS SUPPORTED AND LOWERED WHEN BEING ADJUSTED OR
REPAIRED
6- NEVER work, adjust, overhaul or repair any machine while it is in motion. Before starting the adjust-
ments, overhauls, repairs, always stop the machine and TURN OFF THE ENGINE OF THE TRAC-
TOR.
BEFORE LEAVING THE DRIVER’S SEAT OF THE TRACTOR, TURN OFF THE ENGINE OF THE
TRACTOR.
7- In transit, always use the transport supports or the chains where provided. In case of larger ma-
chines, the hedge mower is transported with the arms to the rear: this may make the tractor unstable.
Make sure that there is enough front ballast to maintain stability.
8- ALWAYS use the machine with care. Do not use it for any other works except that for which it was
designed. Do not overload the machine because this could be the cause of damage to the machine
and/or to the tractor.
9- When you take the machine off the tractor, make sure that the support feet are in safe position. The
machine must be parked in a place where it is not dangerous or a possible obstruction for other peo-
ple. Make sure that the ground is firm and level.
10- Carry out regular and periodic maintenance during the working life of the machine to make sure that
the machine is ALWAYS in a safe condition.
11- THE HEALTH AND SAFETY INSTRUCTIONS MUST ALWAYS BE RESPECTED.
GENERAL DIRECTIONS

7
Value-Leader AM Boom Hedge Cutter 7 Revision 1-22-2018

8
Value-Leader AM Boom Hedge Cutter 8 Revision 1-22-2018
CONNECTING THE HEDGE CUTTER TO THE TRACTOR
1- Connect the bottom links of the tractor to the machine, making sure that the pins are securely
locked with lynch pins.
2- Attach the top link and secure with the lynch pins. Lift the machine, so that the PTO of the
tractor is at the same level and in line with that of the machine.
Adjust the check chains or sway blocks so that the machine is not
free to swing sideways.
Check that the safety lynch pins are in position
and that all lock nuts are tightened.
WARNING DANGER: NEVER stand between the tractor and the
machine during the hook up operations.
3- PTO shaft:
Make sure that the input shaft of the mower and the PTO shaft of the tractor are in line and at the same
height. Measure the distance D between the recesses on the tractor PTO shaft and that of the input shaft
on the machine gearbox. Adjust the length of the PTO shaft to give a clearance G of at least 50 mm (2”) at
each end of the shaft. Make sure that all PTO shaft guards are refitted and in good condition.
4- Fitting of stabilizer turnbuckles “T”
The machine has two STABALIZER TURNBUCKLES: for their assembly and disassembly it is ESSENTIO-
NA TO READ the following instructions:
Raise the main body of the machine up to work position
Fix the two turnbuckles with the pins provided between the top hole of the bottom linkage attach-
ment points on the machine (see picture) and the holes provided in the top link yoke of the machine.
Tighten the turnbuckles so that the machine is locked and will not move. Lower the linkage making
sure that there is no upwards pressure on the stabilizers.
SEMI-AUTOMATIC HOOK UP TO THE HEDGE CUTTER
Raise the quick hitch bar to the height of the bottom link connection points on the mower, remove the lock
pins from the mower and back in slowly until the hitch bar is fully located.
Lock the bar into place with the lock pins. Fit the PTO shaft and top like
Raise the machine to its correct working height and fit the stabilizers as described above.
Before this operation READ CAREFULLY
the instructions that are included in the
handbook given with the PTO shaft.
NEVER USE THE PTO SHAFT WITHOUT ALL OF ITS GUARDS FITTED AND IN GOOD CONDITION.
Always attach the chains on both ends of the PTO guard to an appropriate point so that the guard cannot turn.

9
Value-Leader AM Boom Hedge Cutter 9 Revision 1-22-2018

10
Value-Leader AM Boom Hedge Cutter 10 Revision 1-22-2018
TAKING THE HEDGE CUTTER OFF OF THE TRACTOR
1. Choose a level and firm surface with good access
2. VERY IMPORTANT. Using the hydraulic system, close the head angling ram, then the hedge and
the reach rams to bring the machine into the rest position. Fit the parking stands.
3. Stop the PTO shaft and TURN OFF THE ENGINE OF THE TRACTOR
4. REMOVE THE STABALIZERS. Lower the hedge mower to the ground (by lowering the linkage of
the tractor). If necessary adjust the linkage so that the machine is resting completely on the
ground. Make sure that the hedge mower is in a correct rest position and well placed on its feet.
5. Remove the chains holding the PTO guard and then remove the PTO shaft.
6. Disconnect the top link and then the bottom links
7. Remove the hedge mower controls from the tractor and store them in their parking place on the
machine
8. Drive forward very slowly checking that all connections to the tractor are free. Removing the cab
protection is necessary.
WORKING OF THE HEDGE CUTTER
The driver must fully understand the controls and the capacity of the tractor. It is always
recommended that the driver practice the controls and the working of the hedge mower in a safe
location BEFORE beginning work.
The forward speed that can be achieved will be different depending on the type and the quantity
of the material that has to be cut. Choose a speed suitable for the job to be done. Make sure that
the PTO speed of the tractor is 540 RPM for general use. This speed will give the best cut.
VERY IMPORTANT: THE PTO MUST NEVER EXCEED 540 RPM
WARNING DANGER
ALWAYS keep the cutting head as close to the tractor as possible to maintain the greatest
stability.
NEVER direct the cutting head and the flails towards the operator when the machine is in motion.
MAXIMUM CUTTING THICKNESS:
Hard wood 3cm. (1.18”)
Soft wood6 cm. (2.36”)
ALWAYS adjust your forward speed according to the type of the material to be cut

11
Value-Leader AM Boom Hedge Cutter 11 Revision 1-22-2018
Reverse the rotor rotation (lever I and L) only when the rotor is completely stopped:
Carrying out this operationn when the rotor is in motion can damage the hydraulic motor
12
Value-Leader AM Boom Hedge Cutter 12 Revision 1-22-2018
VERY IMPORTANT
NEVER start the cutting head with the flails facing the operator or any other people.
ALWAYS work the machine with the cutting head addressed towards the material to be cut
Never pass under the hedge cutters particularly if it is on the road
USE OF THE MACHINE ON THE ROAD
Before using the hedge cutters on the roadside, the operator must consult the authorities that
control the upkeep of the roads, as the rules can be different from one area to another.
The rules concerning the upkeep of the roads must always be respected.
ATTENTION
In general the tractor or any other prime mover must work in the direction of the traffic; this must
be confirmed by consulting the local laws concerning the upkeep of the roads.
ALWAYS use the traffic signs, or any other systems recommended by the maintenance services
and make sure that they are in a correct position in relation to the work being carried out.
Respect the movement of the traffic and try to ensure that it flows freely. Give enough time for
pedestrians and cyclists to get clear of the working area.
Obey the laws on the lighting to be used on the tractor during work on the highway.
VERY IMPORTANT
Never transport passengers on the tractor or on the machine.
Make sure that “onlookers” are clear of the working zone of the machine.
Never allow anyone in front of the cutting head, or in the ejection radius of the cut material.
You must always maintain a safety zone around the machine:
13
Value-Leader AM Boom Hedge Cutter 13 Revision 1-22-2018
WORKING WITH THE HEDGE CUTTER
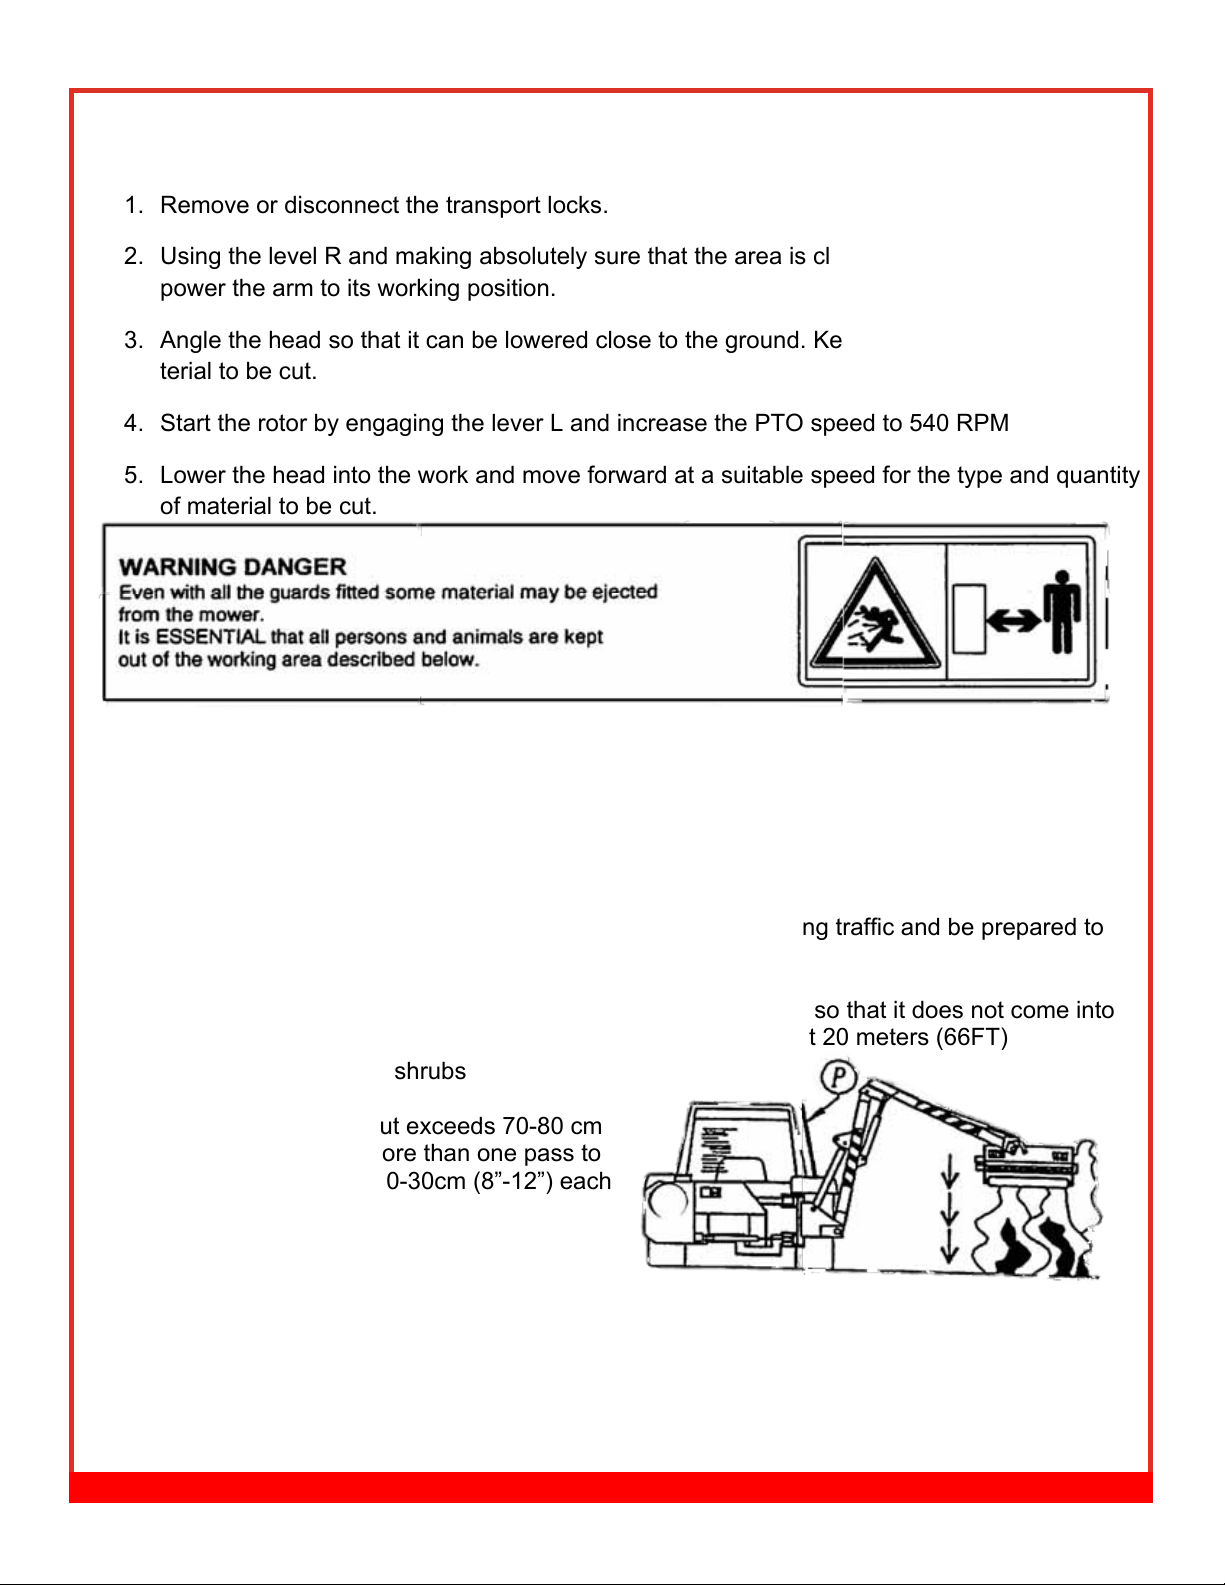
1. Remove or disconnect the transport locks.
2. Using the level R and making absolutely sure that the area is clear of people and obstacles,
power the arm to its working position.
3. Angle the head so that it can be lowered close to the ground. Keep the rotor clear of the ma-
terial to be cut.
4. Start the rotor by engaging the lever L and increase the PTO speed to 540 RPM
5. Lower the head into the work and move forward at a suitable speed for the type and quantity
of material to be cut.
Keeping the flail head horizontal to ground level allows the machine to be used with the greatest
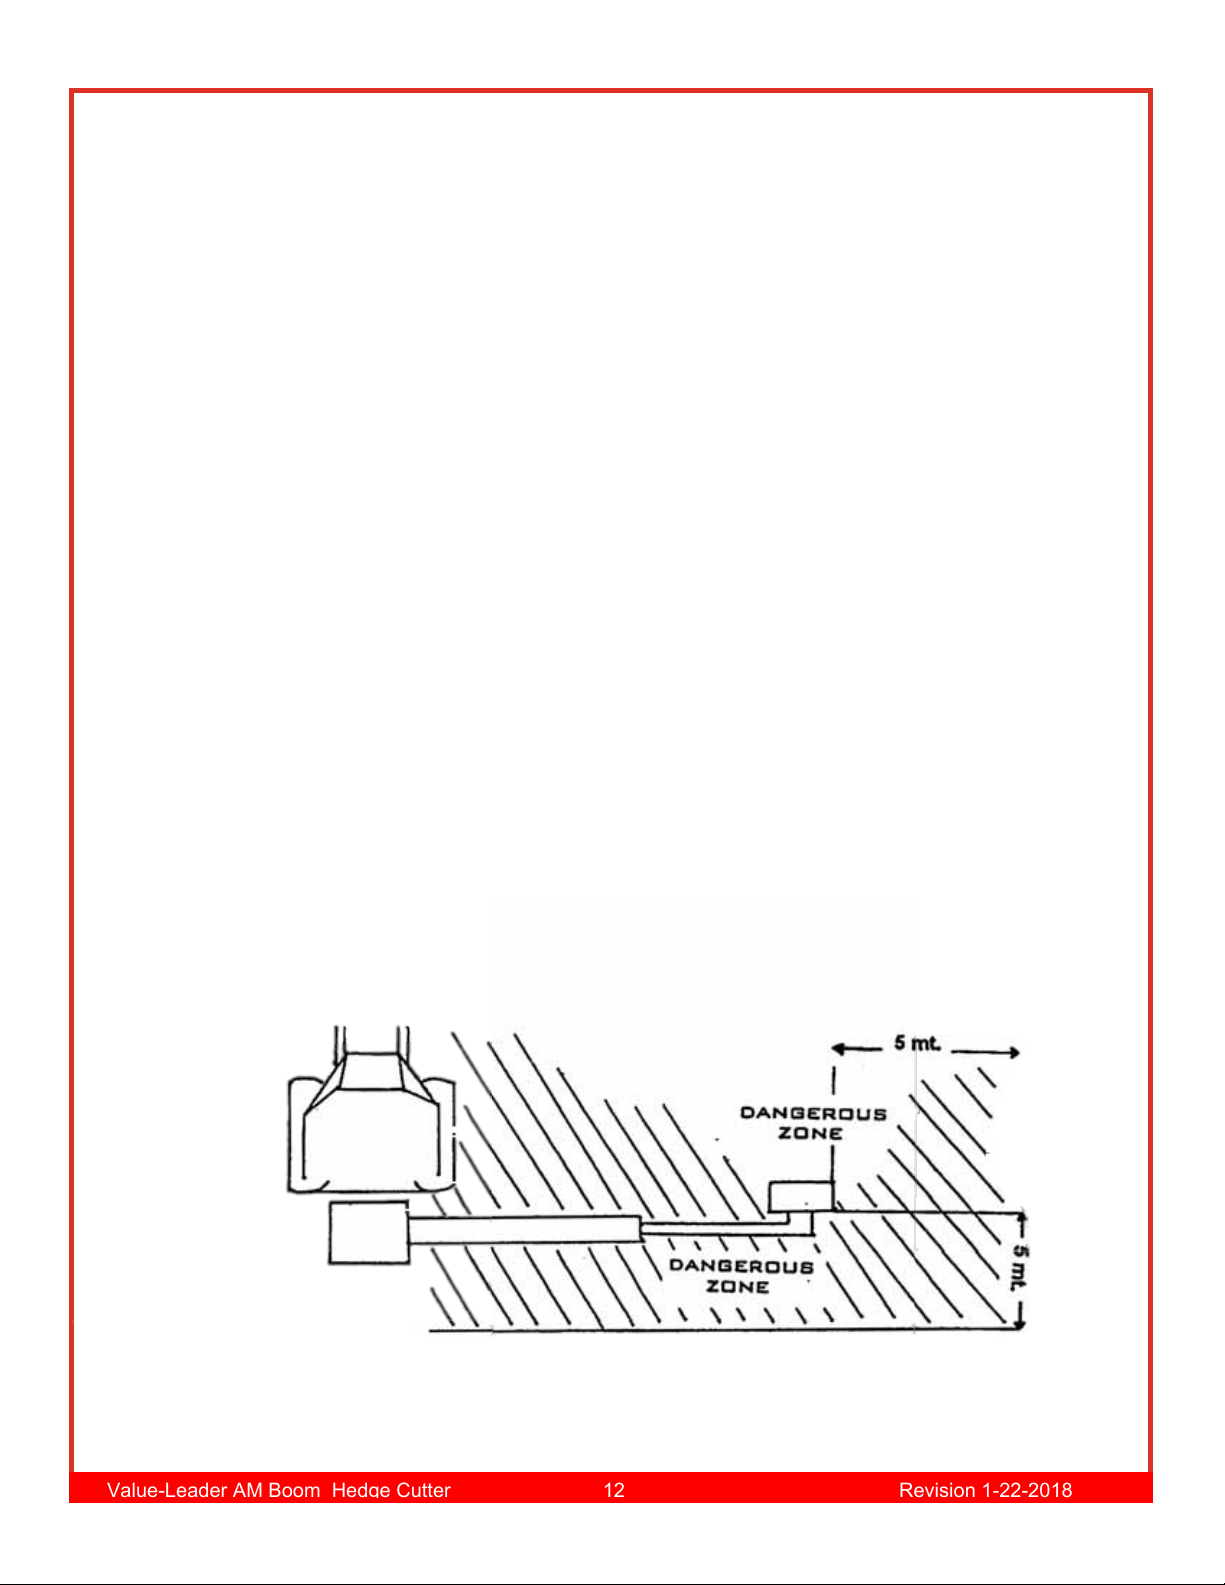
safety. ALWAYS KEEP A CLEAR SAFE WORK ZONE OF AT LEAST 10 METERS (33 FT)
Check often that no one has entered this working zone and caused a dangerous situation
When working on the roadside which is open to traffic, always place warning signs at the correct
distance from your work to alert passing traffic. Be aware of passing traffic and be prepared to
stop immediately
When working in areas where there are stones, raise the machine so that it does not come into
contact with the stones and increase the safe work zone to at least 20 meters (66FT)
Cutting hedges, reeds and shrubs
When the material to be cut exceeds 70-80 cm
(28”-32”) in height, take more than one pass to
complete the job, cutting 20-30cm (8”-12”) each
pass.
WARNING
The use of the flail head off the ground or at an angle other than horizontal to the ground can
cause danger to the driver. In this case the cab guards P must be fitted to the side window of the
tractor.
The manufacture declines all responsibility for any accident caused by NON-OBSERVANCE of
this instruction
The guard must be made of a strong steel mesh with a mesh size of no more than 2 cm (0.75”)

14
Value-Leader AM Boom Hedge Cutter 14 Revision 1-22-2018
STORING OF THE MACHINE
When storing the machine, it is very important to find a level and firm parking surface.
VERY IMPORTANT
To make sure that the machine is safely parked, ALWAYS place the machine on its support
feet. Make sure that the support feet of the machine are locked in a correct position.
NEVER allow children to play above or around the machine in its parking position
NEVER wear large or torn clothes because they could get entangled in the mechanism of in the
controls.
ALWAYS be sure that the guards are in the correct position to protect the operator from the
flying material.
Be sure that the visibility through the cab screens is ALWAYS good.
Be sure that the controls, joysticks, levers etc are in a correct position, so that the operator can
use them without difficulty and at the same time they do not prevent the other driving functions.
The controls MUST NOT hamper the entrance and the exit of the cab.
The exhausted oil and the other noxious products must be always thrown in special waste
containers, legally certified and suitable for containing the product in question.
ALWAYS DISPOSE OF THE EXHAUSTED PRODUCTS IN SPECIAL AUTHROIZED
DISPOSAL AREAS.
During transport of the hedge mower from one place to another, in particular when working,
some passive movements of the arms can take place because of rough surfaces; so, it is
VERY IMPORTANT to put the arms and the cutting head in the correct transport position
BEFORE beginning transport. (See the respective paragraph).
LEVER AND JOYSTICK SAFETY
The control levers that set the hydraulic cylinders of the arms of all types of machines return to
the neutral position when the lever is free. This system is important in order to avoid any
involuntary movements or displacements of the arms.

15
Value-Leader AM Boom Hedge Cutter 15 Revision 1-22-2018
MAINTENANCE OF THE MACHINE
a) After the first 20 working hours and then periodically, check the tightening of:
All the bolts, also on the gearbox and pumps:
Hoses connections
b) If vibrations occurs, stop working immediately, disengage the PTO and check the conditions of the
blades. Make sure that they swing free and, if necessary, replace those broken or worn out. Before
proceeding with operations, the machine must be closed in transport position.
c) Always keep the rotor clean. If necessary, remove foreign material that might be kinked inside
the cutting head and/or around the rotor.

16
Value-Leader AM Boom Hedge Cutter 16 Revision 1-22-2018
WARNING: DANGER TO THE HANDS
Before attempting any manual operations wait
for the rotor to stop completely. Switch off the
PTO and stop the engine of the tractor.
WARNING: DANGER TO THE FEET
Never approach the mower when it is working
and keep feet, hands and clothing well clear at
all times.
DANGER SIGNALS

17
Value-Leader AM Boom Hedge Cutter 17 Revision 1-22-2018
HYDRAULIC CONTROLS – CUTTING POSTION
The cutting head must be lowered slowly until it is in work position. NEVER drop the cutting head.
When you have to cut at ground level (grass etc), the cutting head must be lowered slowly until
the roller is just exerting a small amount of pressure on the ground.
IMPORTANT: Keep the rotor and roller clear of rocks, stones, stumps etc.
If you meet a large obstacle or you see wire twist around the rotor, you MUST STOP
IMMEDIATELY. Remove the obstacle or the wire before starting again.
The operator can circumnavigate normal obstacles by slowing down and moving the position of
the head. Some degree of float can be achieved by the use of an optional float system. This will
allow the head to follow the contours of the ground within the limits of the system.
CUTTING HEAD
The rotor of the cutting head is balanced before it is assembled into the head: this makes for
vibration free operation. If the rotor should vibrate or lose one or more blades, STOP THE
MACHINE IMMEDIATELY, because if you continue there could be some serious consequences,
like damage to the bearings and weakening of the structure.
When you stop the machine, clean the rotor and check that no flails or bolts are missing; if they
are, replace them immediately with only genuine spare parts.
Vibration can also be the consequence of a shock against a solid object; in this case the rotor
must be rebalanced, repaired or even replaced.
TRANSIT
1. Reduce the reach of the machine by operation of the reach arm.
2. Turn the flail head until it is nearly perpendicular to the angling arm.
3. Using the breakaway ram, swing the dipper arm to the rear.
4. Operate the reach ram until the ram is completely closed
5. The hedge mower is ready for transport on the road.

18
Value-Leader AM Boom Hedge Cutter 18 Revision 1-22-2018
ADJUSTMENT OF THE WORKING POSTION
The work position (distance 4-5 cm {1 1/2’-2’} from the ground) is obtained by adjusting the back
roller: if, after lowering the roller completely a higher cut is still needed, the top link can be
lengthened. This must be done with care, making sure that the top link does not become
completely unthreaded. The machine must not be leaning back too much as the breakaway will
operate too easily. The machine works best when it is set in the vertical position. When mowing
high beware of material being ejected from the mower an INCREAASE THE SAFE WORKING
ZONE TO AT LEAST 20 meters (66 FT).
IN THE CASE OF DAMAGE TO THE HEDGE MOWER, CAUSED BY NOT OBSERVING THE
ABOVE MENTIONED INSTRUCTION OF SAFETY, THE MANUFACTURER DECLINES ANY
WARRANTY.
IN THE CASE OF DAMAGE TO A THIRD PARTY CAUSE BY NOT OBSERVING THE ABOVE
MENTIONED INSTRUCTIONS ALL THE RESPONSIBILITIES ARE BOURNE BY THE DRIVER
OF THE VEHICLE.
DO NOT ALLOW UNSKILLED STAFF TO DRIVE THE TRACTOR EVEN DURING
TRANSPORT!

19
Value-Leader AM Boom Hedge Cutter 19 Revision 1-22-2018
LUBRICATION POINTS
A label that indicates the grease points and shows the picture of a grease gun is placed on
every pivot pin of the arms and the rams. These points must be lubricated every day. The
roller and the rotor bearings must be lubricated twice a day.
PTO SHAFT
You must check the PTO shaft every week, in particular, the mechanical slide and the plastic
guard. Any damage to the guard must be repaired and you MUST use the anti-rotation chains.
The universal joints must be lubricated in accordance with the instructions provided by the
shaft manufacture. Every fifteen days, the internal shaft must be lubricated over all its length in
order to ensure that it slides correctly.
HYDRAULIC OIL
NOTE: the oil tank is fitted with two filters: one filter is on the oil tank and the other one is
inside-to filter the oil on entry and exit.
It is advised that different types of hydraulic oil should NEVER BE MIXED; but, if you have to
use a type of oil different from the oil that you previously put in the oil tank, it must be
compatible. (Check with your oil supplier).
If the return filter is very dirty, clean it. This should be considered as a temporary measure, in
most cases, it is better to change the filter.
VERY IMPORTANT
THE OIL FILTER MUST BE CHANGED AFTER THE FIRST 50 WORKING HOURS AND
EVERY 250 WORKING HOURS THEREAFTER.
The oil level should be checked every day by looking at the gauge near the return filter.
Contamination of the oil will necessitate a complete oil change: contamination may show as
darkness of color and/or a smell of burning.
Clean the area around the oil filling cap (in particular before you open it). Replace the filter in
good time and use clean receptacles to reduce the danger of contamination of the oil.
Clear the fins of the oil-cooler periodically with a jet of air.

20
Value-Leader AM Boom Hedge Cutter 20 Revision 1-22-2018
GEARBOX
Check the oil level regularly by means of the glass indicator on the gearbox. Change the oil
every season.
PIPES AND HOSES
You must check all pipes and hoses regularly to make sure that the metal braiding is not
damaged.
If there is damage, the damaged pipes/hoses should be replaced because their pressure
capacity will be reduced and this will increase the risk of a burst.
When you replace a hose it is important TO USE A LOT OF CARE because every new pope
has to be assembled in the same position as the one substituted. The direction of the pipe run
must also be the same.
Check the hydraulic connections every day to make sure that there are no leaks.
CABLES AND CONTROL HANDLE
No maintenance of the cables and the controls is needed and they must not be greased.
If the controls are hard, check that there are no twists in the cable and that there are no broken
or loose internal components.
CUTTING HEAD
Check the flails every day and make sure that they are always in GOOD CONDITION.
Check the nuts and bolts every day; they must always be tight.
A missing or broken flail must be replaced IMMEDIATELY because the loss of the balance
causes damage to the bearings and to the structure.
In regards to the replacement of the flails, it is important to remember that you must REPLACE
THEM IN PAIRS in order to maintain the balance.
INDIRECT TRANSMISSION ROTOR: Check the tension of the drive belts on the cutting head
every day; a load of 5 kg (11 lb) must five a deflection of 9 mm (0.35”) when applied to the
belts in the center between the pulleys.
The access to the belts is gained by lifting the protection panel on the side of the belt casing.
You can adjust the tension of the belts by lessening the screws that fix the motor and then by
adjusting the special internal adjuster screw. Re-tighten the motor screws and the screws
securing the panel.
BEFORE STORAGE
Clean the hedge mower and check for any damage or necessary repairs.
Obtain the spare parts and compete the repairs in good time of the next season.
Grease the machine well, IN PARTICULAR the rods of the hydraulic cylinders.
Do not expose the machine to inclement weather; if it is possible keep the machine covered.
INDERECT TRANSMISSION ROTOR: The tension of the drive belts of the cutting head must be
loosened to protect the belts.
This manual suits for next models
1
Table of contents


