Better Homes and Gardens BHT-10003 User manual
Lot Number :
Date of purchase :
,
True Innovations seating products are warranted against defects in material and
workmanship while owned by the “Original Purchaser”. The term “Original Purchaser”
is defined as that party or entity which purchases True Innovations furniture from an
authorized True Innovations retailer as shown by the original sales receipt. This
warranty does not apply to “as is” or previously owned seating products.
True Innovations warrants its products to be free from defects in materials and
workmanship (normal wear and tear, fading and stretching excepted), for one year
from the date of purchase, except as provided below under the limited warranty.
The exceptions or exclusions to this warranty are as follows:
1. Any warranty claim that is submitted after the limited warranty period, or without
proper proof of purchase will not include the cost of parts, labor, or delivery.
2. This warranty shall not apply to the True Innovations products which have been
subjected to misuse, neglect, alteration, modification, or attachments, either caused
by the original purchaser, shipping, storage, accident, fire, flood, or acts of God.
In the event of a defect in material or workmanship covered by this warranty, True
Innovations will repair or replace, at their discretion, without charge the warranted
furniture within a reasonable amount of time. We reserve the right to require damaged
parts to be returned to us upon request. Natural markings such as scars, brands, grain
variations, wrinkles, color variations, etc. will be considered normal characteristics
and not construed as defects. We cannot warrant leather against scratching or scuffing
as all leather is subject to blemishes with use.
For claims or questions concerning this warranty, please contact True Innovations
Customer Service department on the web at www.trueinnovations.com. Be prepared
to provide your name, address, daytime phone number, the model and purchase order
number of the product, date of purchase, and the store where it was purchased. True
Innovations requires that the original sales receipt be submitted with all requests to
confirm that you are the original purchaser according to our written warranty.
This warranty gives you specific rights, and you may also have other rights, which vary
from state to state.
Should you prefer to speak with a service representative, you may call toll free:
1-800-379-9773, or fax 714-544-5118.
Limited Warranty
Customer Service Support: 1-800-379-9773
THIS INSTRUCTION BOOKLET CONTAINS IMPORTANT SAFETY INFORMATION.
PLEASE READ AND KEEP FOR FUTURE REFERENCE.
Model: BHT-10003
Deluxe Power Lift Recliner
with Heat and Massage
Assembly Instructions

E
L
E
C
TR
I
C
PO
W
E
R
S
U
P
P
L
Y
A
LI
M
E
NT
A
T
I
ON
E
LE
C
T
R
I
Q
U
E
N
O
T
E:PLS
D
O
N
OT
T
H
R
O
WAWAY
Customer Service Support: 1-800-379-9773
2
Customer Service Support: 1-800-379-9773
3
Parts List
Call us first!!
DO NOT RETURN TO STORE
For immediate help with assembly or product
information call our toll- free number:
1-800-379-9773
Mon-Fri 6:00 am to 5:00 pm Pacific Time
Thank you for selecting one of True
Innovations seating solutions.
It’s True...Fast, Friendly Customer Service
At True Innovations, we are c ommitted to ex cellence. Our primary objective
is to provide fast, friendly customer service to all of our customers.
Seat Cushion (1) Back Cushion (1)
A
Power Cord (1)
C
B
Remote Control (1)
D
Included Parts
NOTE:
Power Cord (C) and Remote Control (D) are located in
the back of the seat cushion.
WARNING:Do not throw box away.
E
L
E
C
TR
I
C
PO
W
E
R
S
U
P
P
L
Y
A
LI
M
E
NT
A
T
I
ON
E
LE
C
T
R
I
Q
U
E
N
O
T
E:PLS
D
O
N
OT
T
H
R
O
WAWAY
C
ELECTRIC POWER SUPPLY
ALIMENTATION ELECTRIQUE
NOTE: PLS DO NOT THROW AWAY
DE F1 F2
Reinforcement foot (2)
E
¹⁄4”x1³⁄4”L screws (4)
F1
butterfly nut (4)
F2

Assembly Instruction
Customer Service Support: 1-800-379-9773
5
4
Customer Service Support: 1-800-379-9773
Step 1
A
EF1
F1
F2
F2
Attach Base metal frame of seat cushion (A) to the Reinforcement
foot (E) using ¹⁄4”x1³⁄4” L screws (F1),Fully tighten all screws with
butterfly nut (F2).
B
A
Attach the Back Cushion (B) to the Seat Cushion (A) by sliding the
receivers into the mechanism posts located on the Seat Cushion
(A). From the front of the recliner, press down on both sides of the
Back Cushion (B) to firmly secure. The Back Cushion (B) and Seat
Cushion (A) will automatically lock into place. Then pull the back
flap down tightly and attach the back flap to the bottom of the Seat
Cushion (A).
Step 2
BRACKET
SLEEVE
Step 4
D
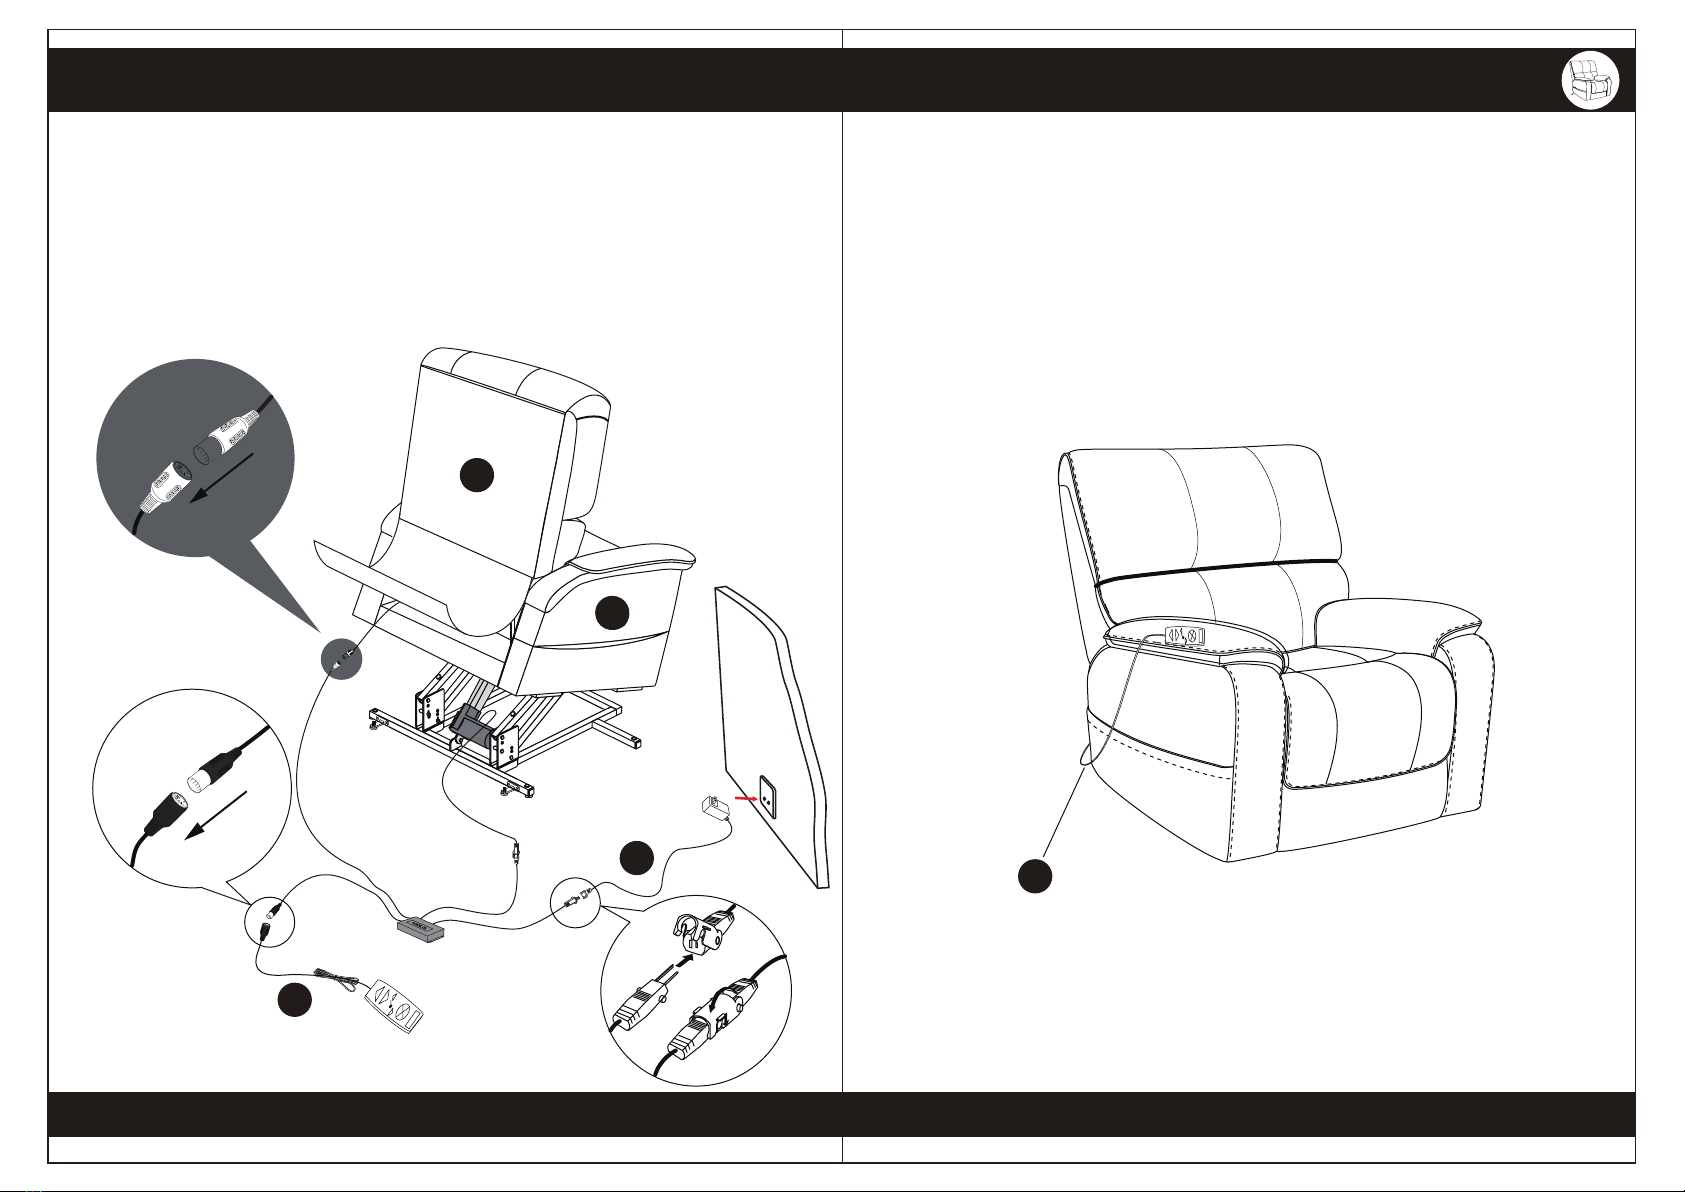
When you're not using the remote control (4), you can put it in
right side pocket.
pocket
Customer Service Support: 1-800-379-9773
7
6
Customer Service Support: 1-800-379-9773
Step 3
I
DEN
O
Wire Head of
back cushion
Open the safety catch on the Power Cord (C) and connect to
the power cord of the chair. Then secure the safety catch on.
Make sure the cables are firmly connected then plug the power
cord to the socket-outlet.Black connector with black connector
for remote control (D),white connector with white connector for
heat massage.
Female Plug
Male Plug
Female Plug
Female Plug
Male Plug
Male Plug
A
B
C
D
Assembly Instruction

ENILCERLLUFNOITISOPVTTIS
WARNING
Do not get off from the recliner while in a reclined position to prevent fall.
Always put the reclinerback to upright position and foot rest closed before getting off.
WARNING
As the chairslopes forward slowly, get off it.
Customer Service Support: 1-800-379-9773
9
8
Customer Service Support: 1-800-379-9773
FUNCTION 1
: RECLINE
FUNCTION 2
: LIFT
Autuomatic fully
reclined position
Manual reclining
functions
Automatically
lift to max position
Manual Lift
Function
Operating Instruction
The two buttons are one-click
to fully open, will not stop
unless you press the button
The two button is manually
control, can stop at any
position you want
Customer Service Support: 1-800-379-9773
11
10
Customer Service Support: 1-800-379-9773
First of all, check if local voltage is consistent with the transformer power supply,
If available,then plug in, to set up an electric circuit.
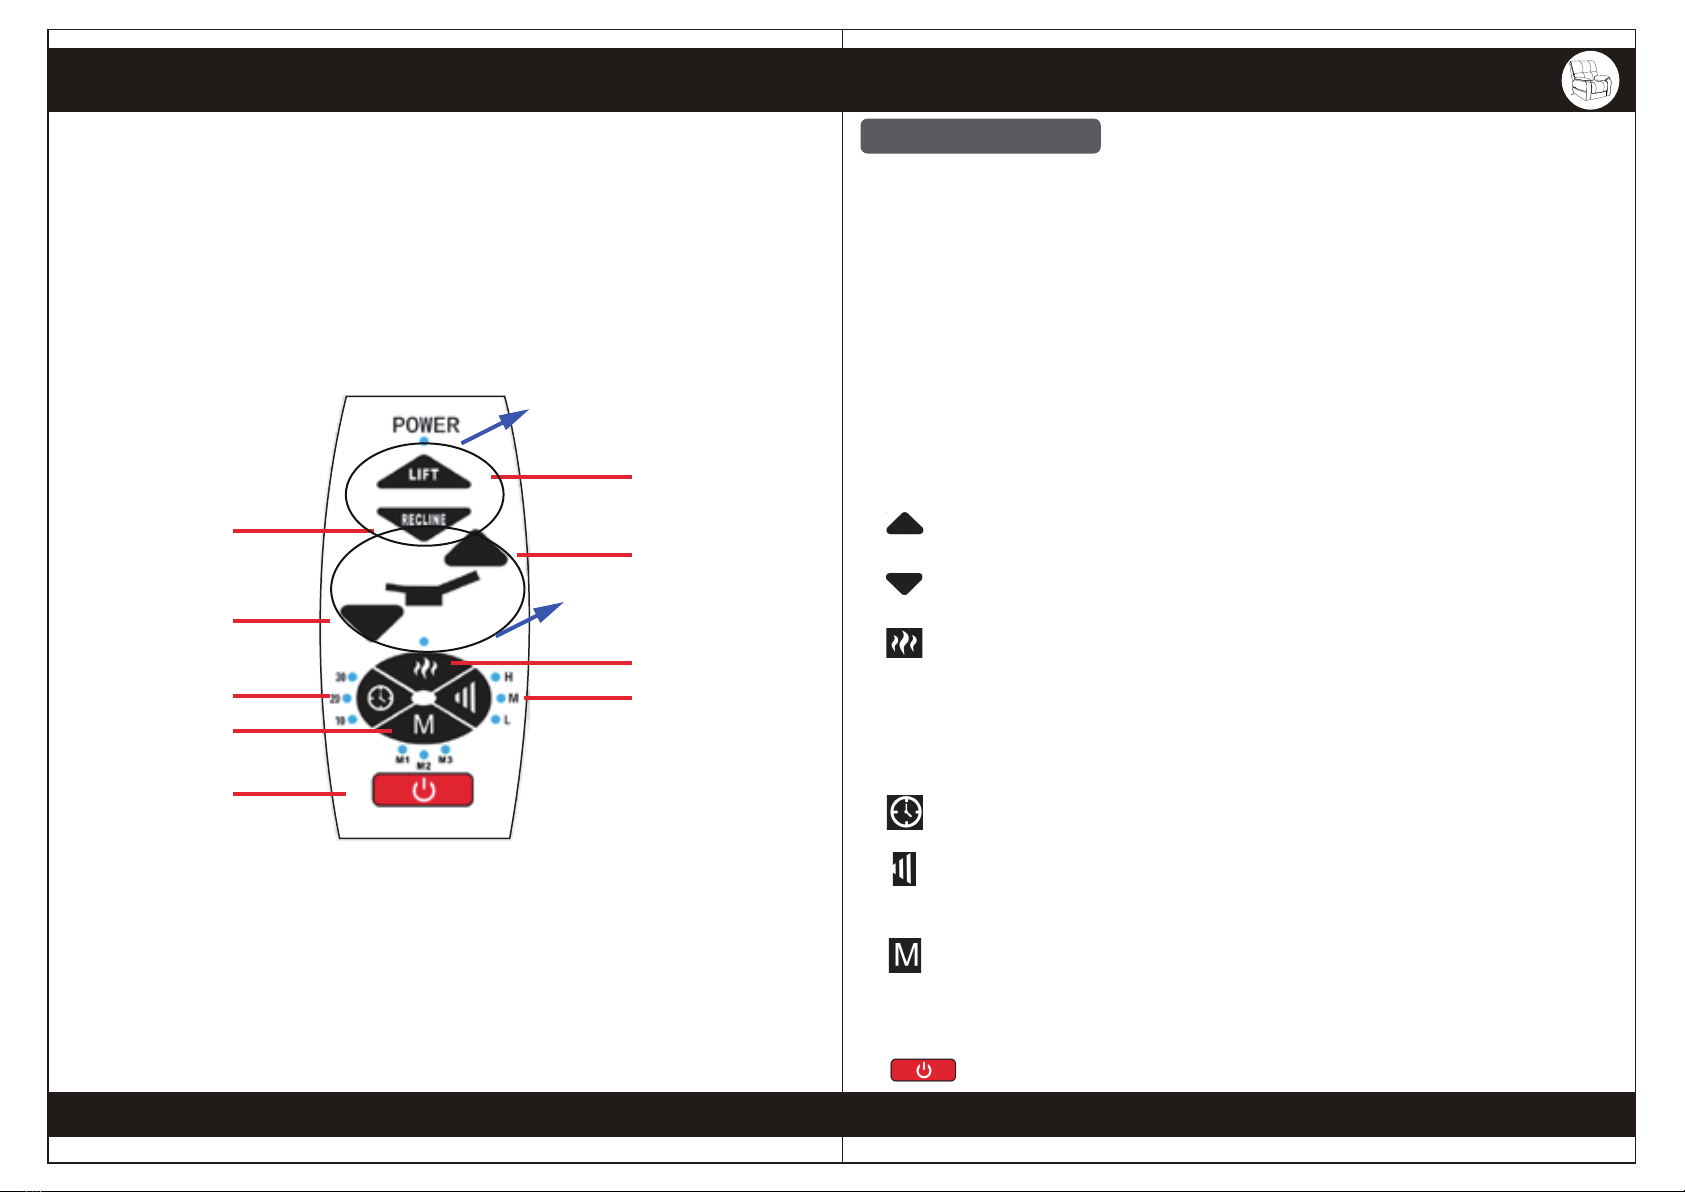
The top of the hand controller comes with a USB port to facilitate
charging of electronic products such as mobile phones.
1. Product require DC29V Power,Boot indicator light up after electrify;
2. LIFT: Automatic lift function button. Just one click, the chair will lift up to top
position;
3. RECLINE:Automatic recline function button. Just one click, the chair will recline
to max unfold position;
4. LIFT/RECLINE the 2 buttons can be changed at any time. For safety, when you
click new button, the last function will stop, and execute new function.
5. Up arrow button: should keep pressing to work, the chair will get down,
then unfold to max recliner position.
6. Down arrow button: should keep pressing to work, the back & footrest will
recover, then lift up to top position.
7. “Heat” key: Individual control switch,if users want the product to have
the spontaneous heat, they can press heating switch key for heating.
The maximum heating value is 65℃and it takes about 5 minutes to reach the
maximum heating value. There is a built-in protective chip in the product,
and the continuous heating will not make the heat value exceed the maximum peak
value.
8. Time” key: timing regulation key. Press “10-20-30” to regulate the time and
the corresponding mode indication lamp will be on.
9. Intensity” key: it has three-gear strength regulation key H-M-L. Press the
key, the strength indication lamp will flicker and the strength will change
as per the sequence: M-L-H cycling.
10. “Mode” key: it has three-mode switchover key. When the vibrating motor is
in a start state, the key can realize vibrating mode switchover,suchas
M1→M2→M3→M1……and the corresponding indication lamp will be on in certain
mode.
11. Power On / Off,vibration massage power.
Operation instructions
Hand Control Instruction
Automatic Lift
Up Arrow
Heat
Heat Intensity
Automatic
Reclining
Down Arrow
Timer
Massage
Modes
On/Off
Massage Power
Operating Instruction

Customer Service Support: 1-800-379-9773
13
12
Customer Service Support: 1-800-379-9773
WARNING
- Do not leave children unattended on orbeside the recliner.
- Discard the appliance if the covering shows any sign of deterioration,
such as checking, blistering, orcracking.
- Keep dry. Do not operate in a wet ormoist environment.
- Do not stand on the seat cushion.
- Please do not place this product nearsources of excessive heat.
- Please avoid use of sharp objects on ornearthis product.
- For persistent stains and overall cleaning, contact a professional upholstery
cleaning company.
- Do not sit on the edge of the seat, armrests oron the backrest as this could
make the reclinertip over.
- All warranties are limited to the original purchaserfornormal use which is
defined as a standard work week of forty hours by a person not exceeding
weight capacity of 225 lbs (102kgs).
Maximum weight load
capacity is 225 lbs (102 kgs)
NOTES:
- Please read the instruction sheets completely before
assembly.
- Remove all parts from carton and ensure all parts are
included prior to assembly.
- Assemble the chair on the carton or carpet to prevent
scratching the chair.
- Be careful not to cross-thread screws.
- Do not use power tools.
- Close supervision is necessary when this appliance is
used by, on, or near children, invalids, or disabled persons.
- Use this futon only for its intended use as described in the
operating instructions.
- Do not use outdoors. INDOOR USE ONLY.
Operating Instruction
Table of contents


