MIC 2MIC 1 MIC 3
MIC. I NPUT
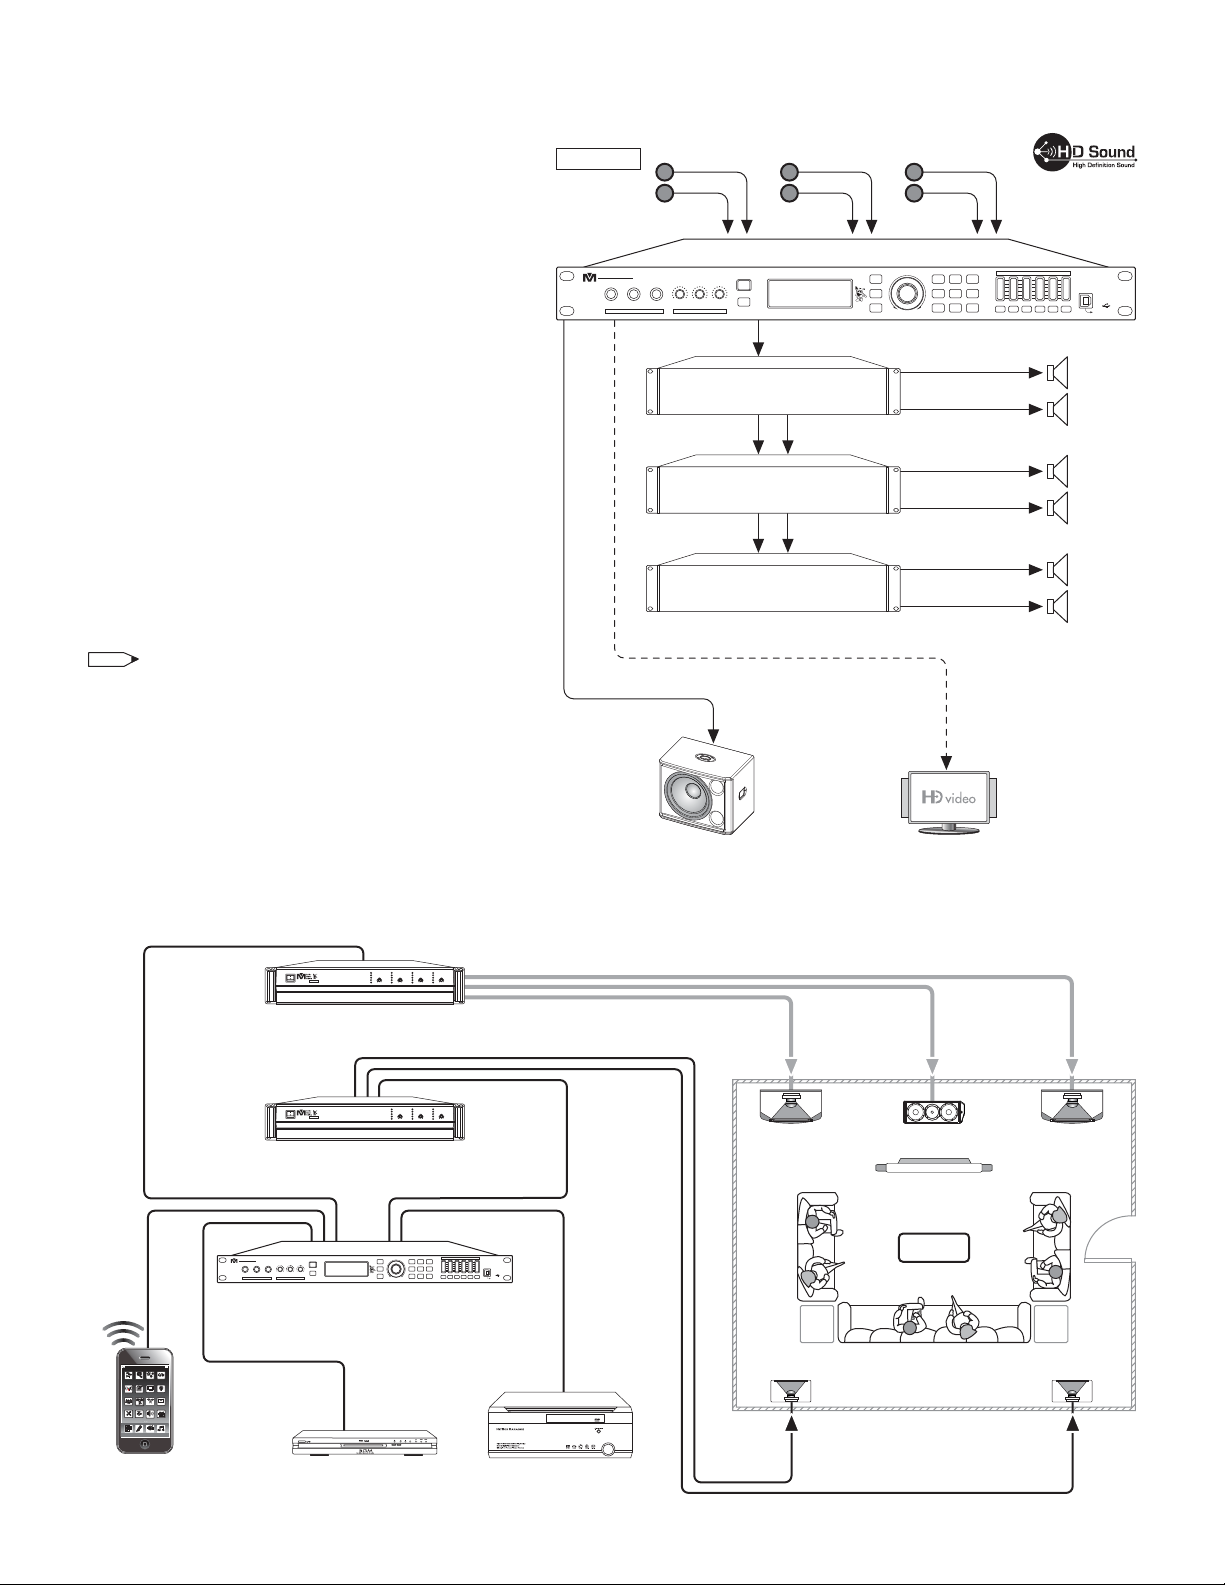
Better Music Builder
®
Passionate aboutMusic
MIC 3
MIC. V OLUME
IR
FEEDBACK
AUDIO V IDEO EFFE CTS PROCE SSOR DX-8000
High Definition LiveSound
MIC
EFFEC T
MUSIC
EQ
GAIN
BACK
DELAY
LIMIT ER
SYST EM
POLA RITY
X-OV ER
PROGR AM
ENTE R / ESC LEFT RIGH T
GROU P-A
LEFT R IGHT
GROU P-B
CENT ER
MONITOR
SUB
BASS
OUTP UT LEVE L
CLIP
LIMIT
0dB
-12dB
-24dB
EDIT
CLIP
LIMIT
0dB
-12dB
-24dB
EDIT
MIC 2/5MIC 1/4
MIC2MIC1 MIC3
MIC.IN PUT
BetterMusic Builder
®
Passionate ab out Musi c
MIC1/4 MIC2/5 MIC3
MIC.VO LUME
REMOTE
FEEDBACK
AUDIOV IDEO EFFE CTS PROCE SSOR DX-8000
HighDe finitio n Live Soun d
MIC
EFFECT
MUSIC
EQ
GAIN
BACK
DELAY
LIMITER
SYSTEM
POLARITY
X-OVER
PROGRAM
ENTER/ESC L R SL SR C SUB
EDIT(LONG)/MUTE (SHORT)/OUTPUT L EVEL
CLIP
LIMIT
0dB
-12dB
-24dB
EDIT
CLIP
LIMIT
0dB
-12dB
-24dB
EDIT
5
OVERLOADING
Do not overload wall outlets, extension cords or convenience
receptacles beyond their capacity, since this can result in fire
or electric shock.
An appliance and cart combination
should be moved with care. Quick
stops, excessive force and uneven
surfaces may cause the appliance and
cart combination to overturn.
Do not place the electronic equipment onto the unstable
table or stand. It is because it would fall easily from the
unstable table or stand, so it may cause accident including
personal injuries and
damage the equipment.
Please follow our instructions
to install the equipment, or
you may hire a professional
technician to handle the
installation for safety
purpose.
Do not store the electronic equipment near water or area
with moisture such as bathroom, kitchen sink, laundry area
and swimming pool, etc.
Do not place the electronic equipment near heat sources
such as stoves, radiators and heaters, etc. Placing the
electronic equipment too near to these heat sources would
result in damaging the equipment and causing fire.
120V AC-POWER
Do not place the set on an unstable cart, stand, tripod,
bracket, or table. The set may fall, causing serious injury to a
child or an adult and serious damage to the set. Use only a
cart stand tripod, bracket, or table recommended by the
manufacturer.
For the set with a three-wire grounding type ac plug:
This plug will only fit into a grounding-type power outlet.
This is a safety feature. If you are unable to insert the plug
into the outlet, contact your electrician to have a suitable
outlet installed. Do not defeat the safety purpose of the
grounding plug.
Do not transport the electronic equipment by yourself if its
weight exceeds 70 pounds. It is recommended that two
people work together to transport the equipment or by using
hand truck and the like.
Do not place the electronic
equipment directly under sunlight
or close to the window. It may
cause overheat on the electronic
equipment by the sunlight.
Do not block the openings and vents in the cabinet which
is designed for the ventilation of the electronic equipment.
The blocking may cause overheat in the electronic equipment
because of insufficient circulation of air, so it would damage
the electronic equipment.
X
HEATER
MIC 2MIC 1 MI C 3
MIC. IN PUT
Better Music Builder
®
Passi onate a bout Mus ic
MIC 3
MIC. VO LUME
IR
FEEDB ACK
AUDIO VIDEO EFFECTSPROCESSOR DX-8000
High De finitio n Live Soun d
MIC
EFFEC T
MUSIC
EQ
GAIN
BACK
DELAY
LIMIT ER
SYSTE M
POLA RITY
X-OVE R
PROGR AM
ENTER / E SC LEF T RIGHT
GROUP -A
LEFT RI GHT
GROUP -B
CENTE R
MONITOR
SUB
BASS
OUTP UT LEVE L
CLIP
LIMIT
0dB
-12dB
-24dB
EDIT
CLIP
LIMIT
0dB
-12dB
-24dB
EDIT
MIC 2/5MIC 1/4
MIC2MIC1 MIC 3
MIC. INPUT
BetterMusic Builder
®
Passionat e about Mu sic
MIC3
MIC. VOLUME
IR
FEEDBACK
AUDIO VIDEO EF FECTS PRO CESSOR DX-8000
High Definit ion Live So und
MIC
EFFECT
MUSIC
EQ
GAIN
BACK
DELAY
LIMITER
SYSTEM
POLARITY
X-OVER
PROGRAM
ENTER / ESC LEF T RIGHT
GROUP-A
LEFT RIGHT
GROUP-B
CENTER
MONITOR
SUB
BASS
OUTPUT LEV EL
CLIP
LIMIT
0dB
-12dB
-24dB
EDIT
CLIP
LIMIT
0dB
-12dB
-24dB
EDIT
MIC2/5MIC1/4
POWER ANTENNA-A CNANNEL-ADISPLAY CNANNEL-BDISPLAY
CHANNEL-A
VOLUME ANTENNA-B
CHANNEL-B
VOLUME
DUALCHANNELVHF WIRELESS SYSTEM
RF
AF
FREQ.
5 10 15 20 25 30 35 40
-30 -25 -20 -15 -10 -5 0 PEAK
000.000M
H
Z
MUTE
RF
AF
FREQ.
5 10 15 20 25 30 35 40
-30 -25 -20 -15 -10 -5 0 PEAK
000.000M
H
Z
MUTE
MIC 2MIC 1 MI C 3
MIC. IN PUT
Better Music Builder
®
Passi onate a bout Mus ic
MIC 3
MIC. VO LUME
IR
FEEDB ACK
AUDIO VIDEO EFFECTSPROCESSOR DX-8000
High De finitio n Live Soun d
MIC
EFFEC T
MUSIC
EQ
GAIN
BACK
DELAY
LIMIT ER
SYSTE M
POLA RITY
X-OVE R
PROGR AM
ENTER / E SC LEF T RIGHT
GROUP -A
LEFT RI GHT
GROUP -B
CENTE R
MONITOR
SUB
BASS
OUTP UT LEVE L
CLIP
LIMIT
0dB
-12dB
-24dB
EDIT
CLIP
LIMIT
0dB
-12dB
-24dB
EDIT
MIC 2/5MIC 1/4
MIC 2MIC 1 MIC 3
MIC. I NPUT
Better Music Builder
®
Passionate aboutMusic
MIC 3
MIC. V OLUME
IR
FEEDBACK
AUDIO V IDEO EFFE CTS PROCE SSOR DX-8000
High Definition LiveSound
MIC
EFFEC T
MUSIC
EQ
GAIN
BACK
DELAY
LIMIT ER
SYST EM
POLA RITY
X-OV ER
PROGR AM
ENTE R / ESC LEFT RIGH T
GROU P-A
LEFT R IGHT
GROU P-B
CENT ER
MONITOR
SUB
BASS
OUTP UT LEVE L
CLIP
LIMIT
0dB
-12dB
-24dB
EDIT
CLIP
LIMIT
0dB
-12dB
-24dB
EDIT
MIC 2/5MIC 1/4
MIC2MIC1 MIC3
MIC.IN PUT
BetterMusic Builder
®
Passionate ab out Musi c
MIC1/4 MIC2/5 MIC3
MIC.VO LUME
REMOTE
FEEDBACK
AUDIOV IDEO EFFE CTS PROCE SSOR DX-8000
HighDe finitio n Live Soun d
MIC
EFFECT
MUSIC
EQ
GAIN
BACK
DELAY
LIMITER
SYSTEM
POLARITY
X-OVER
PROGRAM
ENTER/ESC L R SL SR C SUB
EDIT(LONG)/MUTE (SHORT)/OUTPUT L EVEL
CLIP
LIMIT
0dB
-12dB
-24dB
EDIT
CLIP
LIMIT
0dB
-12dB
-24dB
EDIT
5
OVERLOADING
Do not overload wall outlets, extension cords or convenience
receptacles beyond their capacity, since this can result in fire
or electric shock.
An appliance and cart combination
should be moved with care. Quick
stops, excessive force and uneven
surfaces may cause the appliance and
cart combination to overturn.
Do not place the electronic equipment onto the unstable
table or stand. It is because it would fall easily from the
unstable table or stand, so it may cause accident including
personal injuries and
damage the equipment.
Please follow our instructions
to install the equipment, or
you may hire a professional
technician to handle the
installation for safety
purpose.
Do not store the electronic equipment near water or area
with moisture such as bathroom, kitchen sink, laundry area
and swimming pool, etc.
Do not place the electronic equipment near heat sources
such as stoves, radiators and heaters, etc. Placing the
electronic equipment too near to these heat sources would
result in damaging the equipment and causing fire.
120V AC-POWER
Do not place the set on an unstable cart, stand, tripod,
bracket, or table. The set may fall, causing serious injury to a
child or an adult and serious damage to the set. Use only a
cart stand tripod, bracket, or table recommended by the
manufacturer.
For the set with a three-wire grounding type ac plug:
This plug will only fit into a grounding-type power outlet.
This is a safety feature. If you are unable to insert the plug
into the outlet, contact your electrician to have a suitable
outlet installed. Do not defeat the safety purpose of the
grounding plug.
Do not transport the electronic equipment by yourself if its
weight exceeds 70 pounds. It is recommended that two
people work together to transport the equipment or by using
hand truck and the like.
Do not place the electronic
equipment directly under sunlight
or close to the window. It may
cause overheat on the electronic
equipment by the sunlight.
Do not block the openings and vents in the cabinet which
is designed for the ventilation of the electronic equipment.
The blocking may cause overheat in the electronic equipment
because of insufficient circulation of air, so it would damage
the electronic equipment.
X
HEATER
MIC 2MIC 1 MI C 3
MIC. IN PUT
Better Music Builder
®
Passi onate a bout Mus ic
MIC 3
MIC. VO LUME
IR
FEEDB ACK
AUDIO VIDEO EFFECTSPROCESSOR DX-8000
High De finitio n Live Soun d
MIC
EFFEC T
MUSIC
EQ
GAIN
BACK
DELAY
LIMIT ER
SYSTE M
POLA RITY
X-OVE R
PROGR AM
ENTER / E SC LEF T RIGHT
GROUP -A
LEFT RI GHT
GROUP -B
CENTE R
MONITOR
SUB
BASS
OUTP UT LEVE L
CLIP
LIMIT
0dB
-12dB
-24dB
EDIT
CLIP
LIMIT
0dB
-12dB
-24dB
EDIT
MIC 2/5MIC 1/4
MIC2MIC1 MIC 3
MIC. INPUT
BetterMusic Builder
®
Passionat e about Mu sic
MIC3
MIC. VOLUME
IR
FEEDBACK
AUDIO VIDEO EF FECTS PRO CESSOR DX-8000
High Definit ion Live So und
MIC
EFFECT
MUSIC
EQ
GAIN
BACK
DELAY
LIMITER
SYSTEM
POLARITY
X-OVER
PROGRAM
ENTER / ESC LEF T RIGHT
GROUP-A
LEFT RIGHT
GROUP-B
CENTER
MONITOR
SUB
BASS
OUTPUT LEV EL
CLIP
LIMIT
0dB
-12dB
-24dB
EDIT
CLIP
LIMIT
0dB
-12dB
-24dB
EDIT
MIC2/5MIC1/4
POWER ANTENNA-A CNANNEL-ADISPLAY CNANNEL-BDISPLAY
CHANNEL-A
VOLUME ANTENNA-B
CHANNEL-B
VOLUME
DUALCHANNELVHF WIRELESS SYSTEM
RF
AF
FREQ.
5 10 15 20 25 30 35 40
-30 -25 -20 -15 -10 -5 0 PEAK
000.000M
H
Z
MUTE
RF
AF
FREQ.
5 10 15 20 25 30 35 40
-30 -25 -20 -15 -10 -5 0 PEAK
000.000M
H
Z
MUTE
MIC 2MIC 1 MI C 3
MIC. IN PUT
Better Music Builder
®
Passi onate a bout Mus ic
MIC 3
MIC. VO LUME
IR
FEEDB ACK
AUDIO VIDEO EFFECTSPROCESSOR DX-8000
High De finitio n Live Soun d
MIC
EFFEC T
MUSIC
EQ
GAIN
BACK
DELAY
LIMIT ER
SYSTE M
POLA RITY
X-OVE R
PROGR AM
ENTER / E SC LEF T RIGHT
GROUP -A
LEFT RI GHT
GROUP -B
CENTE R
MONITOR
SUB
BASS
OUTP UT LEVE L
CLIP
LIMIT
0dB
-12dB
-24dB
EDIT
CLIP
LIMIT
0dB
-12dB
-24dB
EDIT
MIC 2/5MIC 1/4