Beurer medical GL 48 User manual

GL 48
EN
Instructions for use
Blood glucose monitor
Step by step
Lancet needles / Lanzetten / lancettes / lancetas / lancette
GL 48
LD 04
Codefree


Beurer GL48 3
Contents
1. Getting to know your device ..................................................................................................4
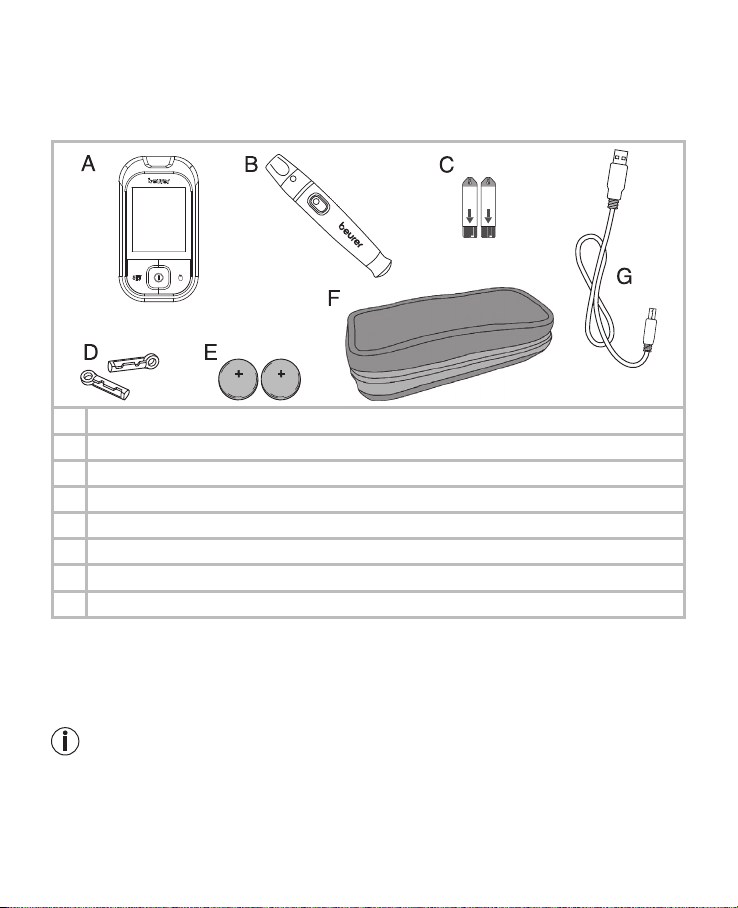
1.1 Scope of delivery and accessories ............................................................................................5
1.2 Replacements ..........................................................................................................................6
1.3 Functions of the device .............................................................................................................6
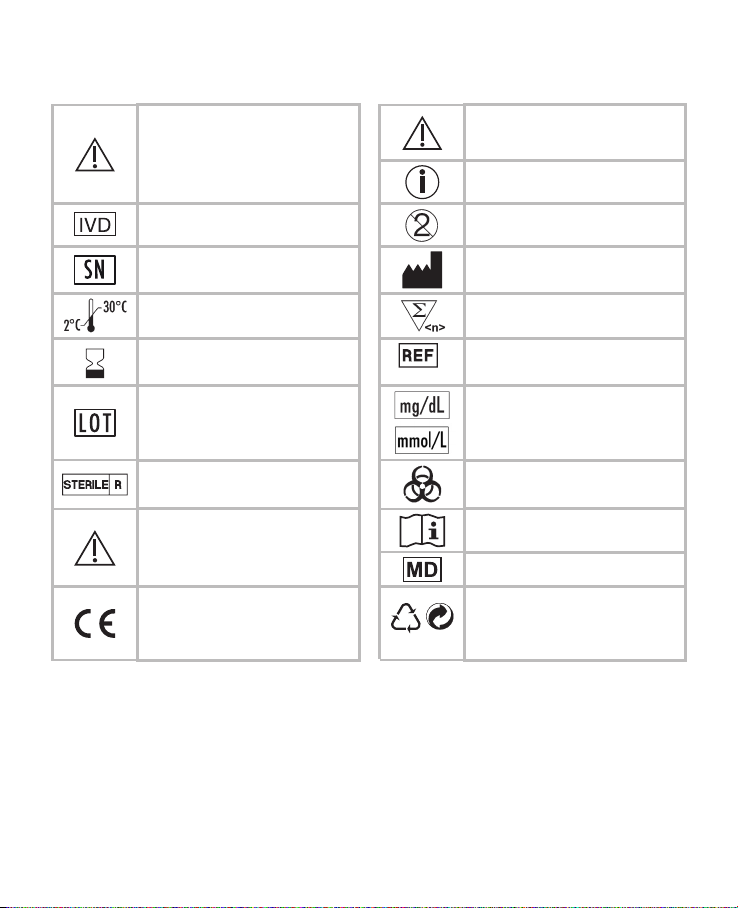
1.4 Signs and symbols ...................................................................................................................7
2. Warnings and safety notes.....................................................................................................8
3. Description of device and accessories..............................................................................11
3.1 Blood glucose monitor ............................................................................................................11
3.2 Display symbols......................................................................................................................12
3.3 Test strips...............................................................................................................................13
4. Initial use and basic settings ...............................................................................................14
4.1 Removing the battery insulation strips, replacing the batteries ..................................................14
4.2 Making and changing basic settings ........................................................................................14
5. Taking the blood glucose measurement ...........................................................................15
5.1 Preparing to take a blood sample ............................................................................................16
5.2 Taking a blood sample ............................................................................................................16
5.3 Reading the result and labelling measurements........................................................................18
5.4 Evaluating measured blood glucose values ..............................................................................19
5.5 Functional check using control solution ................................................................................... 20
6. Measurement memory ..........................................................................................................23
6.1 Displaying individual values .....................................................................................................23
6.2 Displaying average blood glucose values .................................................................................24
6.3 Displaying average blood glucose values for labelled values.....................................................25
6.4 Transferring measurements to a PC .........................................................................................27
7. Storing, maintaining and disinfecting the device ............................................................ 28
7.1 Cleaning .................................................................................................................................28
7.2 Disinfection ............................................................................................................................29
8. What if there are problems?................................................................................................. 29
9. Technical specifications .......................................................................................................31
10. Comparison of measured values with laboratory values ...............................................32
11. Usage limits for specialist personnel from the healthcare sector ............................... 34
12. Instructions for use for the lancing device LD 04 ............................................................37
12.1 Proper use ............................................................................................................................37
12.2 Warnings and safety notes ....................................................................................................37
12.3 Device description ................................................................................................................38
12.4 Initial use .............................................................................................................................. 38
12.5 Usage ..................................................................................................................................38
12.6 Post-processing and disposal ...............................................................................................40
12.7 Cleaning and maintenance ....................................................................................................40
12.8 Disposal ............................................................................................................................... 40
13. Warranty/service .................................................................................................................... 41

4 Beurer GL48
1. GettinG to know your device
Dear customer,
Thank you for choosing a product from our range. Our name stands for high-quality, thoroughly tested
products for applications in the areas of heat, weight, blood pressure, blood glucose, body tempe-
rature, pulse, gentle therapy, massage and air.
Please read these instructions for use carefully and keep them for later use. Be sure to make them
accessible to other users and observe the information they contain.
With kind regards,
Your Beurer team.
Getting to know your device
The GL48 blood glucose measuring system is intended for fast and simple blood glucose measurement
of fresh capillary blood samples, either for self-testing or in a clinical environment by trained personnel.
It enables you to measure your blood glucose quickly and easily, store the measured values and dis-
play the average of all measured values, thereby providing optimum assistance for monitoring your
diabetes. The test is performed exclusively externally (IVD).
The large display shows measured values clearly. The user-friendly design with handy test strips and
the simple controls with just a small number of buttons guarantee simple, yet reliable measurements.
The device can be connected directly to a PC using the USB cable provided. You can evaluate the
measured values on your PC using blood glucose diary software and use the results to monitor your
blood glucose values.
Blood glucose diary software is available to download for free at www.beurer.com.

Beurer GL48 5
1.1 Scope of delivery and accessories
Check that the set packaging has not been tampered with and make sure that all components are
present. Before use, ensure that there is no visible damage to the device or accessories and that all
packaging material has been removed. If you have any doubts, do not use the device and contact
your retailer or the specified Customer Service address.
5
A1 blood glucose monitor
B1 lancing device LD 04
C10 test strips
D10 lancets (5x lancet needles (blue, 28G) and 5x soft touch lancets (purple, 33G))
E2 button cell batteries, 3 V CR2032 (already inserted)
F1 practical case
G1 USB cable
These instructions for use, additional information
•
If the packaging has sustained considerable damage or the contents are incomplete, please return
the system to your retailer.
•
The blood glucose monitor, test strips and additionally available control solutions have been specially
designed to complement each other. For this reason, use only test strips and control solutions that
have been approved for this measuring device.
Note
•
Use original manufacturer accessories only.

6 Beurer GL48
1.2 Replacements
You can also obtain test strips, control solution and lancets without a prescription.
Item REF
100 test strips REF 463.72
50 test strips REF 463.70
Control solution LEVEL 7 and 8 REF 463.64
100 soft touch lancets 33G REF 457.24
100 lancet needles 28G REF 457.01
100 safety lancets REF 457.41
200 safety lancets REF 457.42
1.3 Functions of the device
This device is intended for measuring the blood glucose content in human blood. It is also suitable
for self-testing at home.
The measuring device enables you to quickly and simply:
•
Measure your blood glucose level
•
Display, label and save measured values
•
Display the average measured blood glucose value from the last 7, 14, 30 and 90 days
•
Display the average of the labelled measured blood glucose values from the last 7, 14, 30 and 90 days
•
Set the time and date
•
Transfer the stored measured values to a PC for evaluation
The measuring device also includes the following monitoring functions:
•
Warning in the event of unsuitable temperatures
•
Battery replacement display for low batteries
•
Warning that test strip is insuciently filled
Warning
•
Do not use the device to diagnose diabetes; it is intended for regular monitoring only.
•
Consult your GP with regard to insulin doses.

Beurer GL48 7
1.4 Signs and symbols
The following symbols are used on the device, in these instructions for use, on the packaging and on
the type plate for the device:
Warning
Warning instruction indicating a
risk of injury or damage to your
health/your patient’s health
Important
Safety note indicating possible
damage to the device/accessory
Note
Note on important information
In vitro diagnostic device Not for re-use/
for single use only
Serial number Manufacturer
Temperature limit
+2 °C to +30 °C Contents sucient for <n> tests
Use by /
Art.-Nr.
Item number
Batch designation
Unit of measurement for blood
glucose value
Sterilised by radiation (lancets) Biohazard, risk of infection
Important: check the instructions
for use for important safety-relat-
ed information such as warnings
and precautions
Consult instructions for use
Medical device (MDR Symbol)
CE labelling
This product satisfies the re-
quirements of the applicable Eu-
ropean and national directives.
21
PAP
Dispose of packaging in an en-
vironmentally friendly manner

8 Beurer GL48
2. warninGs and safety notes
Risk of infection
All components of the measuring device and its accessories may come into contact
with human blood and are therefore a possible source of infection.
Warning
•
Blood glucose values are displayed
in mg/dL or mmol/L.
You risk damaging your health if you meas-
ure your blood glucose value using a unit of
measurement with which you are not familiar,
misinterpret the values and subsequent-
ly take incorrect measures. Ensure that this
measuring device displays a unit of meas-
urement with which you are familiar. The unit
of measurement accompanies each blood
glucose value.
Please contact Customer Services if the device displays the incorrect unit of measurement.
•
When using the measuring device for various persons, observe the generally applicable regulations
regarding disinfection, safety and contamination.
•
Medical carers and others who use this system on several patients must be aware that all products
or objects that come into contact with human blood must be handled, even after cleaning, as though
they could transfer pathogens.
•
The lancing device is suitable for self-testing. Do not share the lancing device or lancet needles with
others or amongst various patients (risk of infection!).
•
Use a new sterile lancet needle for each blood sample (for single use only).
General notes
Warning
Do not use the device in the vicinity of strong electromagnetic fields and keep it away from radio
systems or mobile telephones.
Measuring the blood glucose content
Warning
•
The measurements taken by you are for your information only – they are no substitute for a medical
examination! Consult your GP regularly regarding your measured values. Do not alter the procedu-
res prescribed by your GP.
•
Despite the simple usage of the Beurer GL48 system for self-monitoring of blood glucose levels,
you may possibly need to obtain instructions for using the system from your healthcare professi-
onal (for example, your GP, chemist or diabetes consultant). Only proper use will guarantee exact
measurements.
09.03. 12:38
mg/dL
95
09.03. 12:38
35
mmol/L
Example

Beurer GL48 9
•
This device may be used by people with reduced mental capabilities provided that they are super-
vised or have been instructed on how to use the device safely and are fully aware of the consequent
risks of use.
•
This device is not suitable for use by people (including children) with restricted physical, sensory
or mental abilities, or lack of experience and/or lack of knowledge, unless they are supervised by
someone who is responsible for their safety, or have received instructions from this person on how
to use the device. Do not allow children to play with the device.
•
A lack of water, high fluid loss, for example perspiration, frequent passing of water, severe hypo-
tension (low blood pressure), shock or hyperosmolar hyperglycaemic non-ketotic coma may lead
to incorrect measured results.
•
A haematocrit value between 20% and 60% has no significant influence on the measurement re-
sults.
•
An excessively high or low haematocrit value (proportion of red blood cells) may lead to incorrect
measurements. In the event of a very high haematocrit value (above 60%), the displayed blood
glucose value may be too low; in the event of a very low haematocrit value (below 20%), it may be
too high. Consult your GP if you do not know your haematocrit value.
•
Do not use the test strips to measure blood glucose values on newborns.
•
Do not use NaF or potassium oxalate anticoagulants to prepare for venous blood samples.
•
Do not test any severely ill patients using this device.
•
Use fresh whole blood only. Do not use serum or plasma.
•
Use capillary blood without squeezing the penetration area. Squeezing the area causes the blood
to be diluted with tissue fluid and this may lead to an incorrect measurement.
•
Do not use the test strips above an altitude of 7010 m.
•
Very high levels of humidity may influence the test results. Relative humidity of more than 90% may
lead to inaccurate results.
Note
•
The Beurer GL48 measuring system is intended for measuring capillary and venous whole blood.
Storage and maintenance
Warning
•
Store the measuring device and its accessories out of the reach of small children and pets. Small
parts, such as lancet needles, parts of the lancing device, batteries or test strips may be life-thre-
atening when swallowed. If swallowed, seek medical attention immediately.
•
The test strip box contains desiccant, which may irritate the skin or eyes when inhaled or swallo-
wed. Keep the box out of the reach of children.
The measuring device is made from precision and electronic components. The accuracy of the mea
-
sured values and service life of the device depend on its careful handling:
•
Protect the device and its accessories from impacts, humidity, dirt, marked temperature fluctuations
and direct sunlight. Do not store the device, test strips and control solution in your vehicle, in the
bathroom or in a cooling appliance!
•
Do not drop the device

10 Beurer GL48
Batteries/Saving measured values
Notes on handling batteries
•
If your skin or eyes come into contact with battery fluid, rinse the aected area with water and seek
medical assistance.
•
Choking hazard! Small children may swallow and choke on batteries. Store batteries out of the
reach of small children.
•
Observe the plus (+) and minus (-) polarity signs.
•
If a battery has leaked, put on protective gloves and clean the battery compartment with a dry cloth.
•
Protect batteries from excessive heat.
•
Risk of explosion! Do not throw batteries into a fire.
•
Do not charge or short-circuit batteries.
•
If the device is not to be used for a relatively long period, take the batteries out of the battery com-
partment.
•
Use identical or equivalent battery types only.
•
Always replace all batteries at the same time.
•
Do not use rechargeable batteries.
•
Do not disassemble, open or crush the batteries.
Note
•
The stored blood glucose values are retained when the batteries are replaced. If applicable, the date
and time must be reset after replacing the batteries.
•
Use lithium-ion batteries only.
Repairs
Note
•
Do not open the device. Failure to comply with this instruction will void the warranty.
•
Do not repair the device yourself. Proper operation can no longer be guaranteed in this case.
•
Please contact Customer Services for repairs.
Disposal
Warning
•
It is essential to comply with the generally applicable safety precautions for handling blood when
disposing of materials of the measuring device. Dispose of all blood samples and materials with
which you or your patients come into contact correctly in order to prevent injury and infection of
other persons.
•
After use, dispose of test strips and lancets in a puncture-proof container.

Beurer GL48 11
Note
Empty, completely flat batteries must be disposed of through specially designated collection boxes,
recycling points or electronics retailers. You are legally required to dispose of the batteries.
The codes below are printed on batteries containing harmful substances:
Pb = Battery contains lead
Cd = Battery contains cadmium
Hg = Battery contains mercury.
For environmental reasons, do not dispose of the device in the household waste at the end
of its service life. Dispose of the device at a suitable local collection or recycling point in your
country. Dispose of the device in accordance with EC Directive – WEEE (Waste Electrical and
Electronic Equipment). If you have any questions, please contact the local authorities responsible
for waste disposal.
3. description of device and accessories
3.1 Blood glucose monitor
Front
1
Receptacle for test strips, illuminated
2 Test strip ejection slider
3 Display
4 Target scale
5 Highlighting button
6 ON/OFF button
7 PC connection
8 SET button
9 +/- button
Rear
1 Battery compartment (bot-
tom side)
1
2
3
5
6
7
8
9
4
CR2032
CR2032
1

12 Beurer GL48
3.2 Display symbols
1 Date, Err
2 Battery status
3 Test strip symbol
4 Measured value display, HI, LO display,
average blood glucose value
5 Control solution measurement
6 Temperature symbol
7 Target scale
8 Blood glucose unit mmol/L
9 Blood glucose unit mg/dL
10 Symbols for labelling measurements
11 Drop symbol
12 Time
13 Memory symbol
Note
The measuring device is supplied with the following basic settings:
•
Acoustic signal o
Warning
Ensure that you are using the device with the correct blood glucose unit (either mg/dL or mmol/L)
setting for you.
If in doubt, consult your GP.
1
2
3
4
5
6
10
10
10
11
88.88. 88:88
mmol/L
mg/dL
CONTROL
1B1B1B
7
8
9
12
13

Beurer GL48 13
3.3 Test strips
Front Rear
3
2
1
1 Gap for blood input
2 Grip area
3 Contacts
You can identify the rear by
the contact tracks.
Insert the test strip into the
device so that the contacts
are pointing inside the slot.
Make sure that the front of the
test strip is facing you.
Note
Read carefully the following information on handling and storing your test strips. The test strips will
only provide accurate measurements if all information is followed.
Warning
Use each test strip only once and for one patient only!
Handling test strips
Note
•
Securely close the test strip box immediately after taking out a test strip.
•
Do not use the test strips if they have expired . The use of expired test strips may lead to incorrect
measurements. The expiry date is located next to the hourglass symbol on the box.
•
Use the test strip for measurement immediately after removing it from the box.
•
You can touch any part of the test strip with clean, dry hands.
•
Do not bend, cut or otherwise modify the test strips.
•
Do not use test strips that have come into contact with fluids.

14 Beurer GL48
Storing test strips
Note
•
Keep the test strips in a cool, dry place above +2°C and below +30°C. Do not expose the test strips
to direct sunlight or heat. Do not store in your vehicle, in the bathroom or in a cooling appliance.
•
Permitted relative air humidity below 90 %.
•
The test strips must be stored in the original box – never use other containers.
4. initial use and basic settinGs
4.1 Removing the battery insulation strips, replacing the batteries
Note
•
Two batteries are included in delivery of the
blood glucose monitor. These have already
been inserted into the battery compartment.
•
Remove the insulation strip before initial
use.
1
Remove the battery compartment lid on the underside of the device.
2
When replacing the batteries, remove all batteries. If necessary, reset the date and time
(see “Making and changing basic settings”, page 14).
3
Insert two new CR 2032 3 V batteries. Make sure that the batteries are inserted the correct
way round in accordance with the markings. See the graphic in the battery compartment.
4
Close the battery compartment lid again carefully.
Note
•
The batteries are almost empty if appears. Replace both batteries as soon as possible.
•
If “ ” appears on the display, the battery power level is so low that no more measurements are
possible.
4.2 Making and changing basic settings
1
Remove the batteries and reinsert them. Alternatively, press the SET
button [8].
The year display flashes.
CR2032
CR2032

Beurer GL48 15
2
Setting the date and time
Note
Y
ou must set the date and time. Otherwise, you will not be able to save your measured values
correctly with a date and time and access them again later.
The time is displayed in the 24-hour format.
Set the year (calendar to 2099) by pressing the “+” or “–” button. Confirm using the SET but-
ton [8].
The day display flashes.
Proceed as described above for the month, day, hour and minute.
3
Setting the target scale
You can set a normal range for your blood glucose measuring results with the target scale.
After a measurement, a bar in the display will point at the colour-coded target scale beneath
the display.
The bar is in the red area = measurement value is below the set target range
The bar is in the green area = measurement value is within the set target range
The bar is in the yellow area = measurement value is above the set target range
Set the lower limit of your target range (Lo tAr) by pressing the
+/- button. Confirm using the SET button.
Set the upper limit of your target range (Hi tAr) by pressing the
+/- button. Confirm using the SET button.
“” and “ ” are displayed.
4
Switching the acoustic signal on/o
To switch the acoustic signal on/o, press the “+” or “–” button. “ ” and “ ” for switched
on or “ ” and “ ” for switched o.
Confirm using the SET button [8].
5
The measuring device is now ready for use.
5. takinG the blood Glucose measurement
Warning
•
If the protective disc on a lancet needle has already been removed, do not use the lancet needle.
•
If you drop the lancing device with an inserted lancet needle, carefully pick it up and dispose of the
lancet.

16 Beurer GL48
Important
•
Use the lancing device only with lancet needles from the same manufacturer. Using other lancet
needles may prevent the lancing device from working properly. The instructions for use for the lan-
cing device can be found in section 12.
•
If you are using a third-party lancing device, please read the respective Instructions for Use.
5.1 Preparing to take a blood sample
1
Using the lancing device, you can take a blood sample from the fingertip. To make the pro-
cedure as painless as possible, do not take samples directly from the centre of the fingertip,
but slightly to either side.
Warning
•
In the event of suspected hypoglycaemia: take blood from the fingertip only.
Reason: changes to blood glucose levels can be detected quickly in blood samples taken
from the fingertip.
2
Prepare the following items: measuring device, test strip box, lancing device, sterile lancet
needles.
3
Wash your hands with soap and warm water before taking a blood sample. This not only en-
sures optimal hygiene but also encourages good blood circulation at the puncture area on the
finger. Dry your hands carefully.
Warning
If you have used alcohol for cleaning, ensure that the area has fully dried prior to measuring.
5.2 Taking a blood sample
Warning
•
Change the puncture area for each measurement, e.g. a dierent finger or the other hand. Repea-
tedly using the same area may cause inflammation, numbness or scarring.
•
Without the cap, there is a danger of injury from the exposed lancet.
•
Do not squeeze your finger to obtain a larger drop of blood. If squeezed, the blood is diluted with tis-
sue fluid and this may lead to an incorrect result.
•
Please note that insucient blood circulation at the puncture area, e.g. caused by cold temperatures
or illness, may lead to incorrect results.
Important
Do not apply any blood samples or control solutions to the test strip before inserting it in the measu-
ring device.
1
Take a test strip from the box and immediately close it again.
2Hold the monitor so that the display is facing you.

Beurer GL48 17
3
Firmly insert a test strip into the device with the contacts first. Please
make sure that the front is facing you. You can touch any part of the
test strip with clean, dry hands.
Use the test strip within three minutes of removal.
4
The device automatically switches on and shows the start display.
The device is ready for measuring
once the droplet in the test strip symbol
88.88. 88:88
mmol/L
mg/dL
CONTROL
1B1B1B
starts
flashing
.
5You may now use the lancing device to take a blood sample. Make
sure that the blood remains as a droplet and is not spread. Immedi-
ately use the blood droplet to take a measurement.
Please read section 12 of these instructions for use in order to find
out how to use the lancing device correctly to take a blood sample.
5
Please also note the following:
•
If the blood glucose test results do not match how you feel, carry out another test using blood
from your fingertip.
•
DO NOT change your treatment purely on the basis of a measurement that was carried out
using blood taken from an alternative area. Carry out another test with blood from your fin-
gertip in order to confirm the test result.
•
If you often fail to notice that you have a low blood glucose level, carry out a test using blood
from your fingertip.
6
If there is an insucient amount of blood, repeat steps 1 to 7 with a greater penetration depth.
7Hold the blood input gap (at the tip of the test strip) to
the drop of blood until the gap is completely filled and
the monitor in the display starts counting backwards. Do
not press the penetration area to the test strip. The blood
must not be spread. The blood is sucked into the gap.
Note
Error message “002” appears on the display if the gap was not correctly and suciently filled
with blood. Repeat the measurement using a new test strip and a greater penetration depth.
Note
•
Do not apply blood to the sides of the test strips.
•
Do not add blood later if the device does not start the measurement. Remove the test strip and end
this test. Use a new test strip.
OK

18 Beurer GL48
•
The device switches itself o if the test strip has already been inserted into the device but no blood
is added to the test strip within two minutes. Briefly remove the test strip and reinsert it so that the
device automatically switches itself back on.
•
Contact Customer Services if you are unable to fill the test strip with blood correctly.
•
If you are measuring in a dark environment, press the ON/OFF button to switch the device on. The test
strip light switches on and makes it easier to insert the test strip.
5.3 Reading the result and labelling measurements
Reading the result
As soon as the gap is suciently filled with blood, the device performs the blood glucose measure-
ment. The measuring device counts down for approx. five seconds.
The measurement is then shown on the display.
Reading the target scale
Using the target scale, you can determine if your blood glucose measurement lies in the set normal
range. After a measurement, a bar in the display will point at the colour-coded target scale beneath
the display.
The bar is in the red area = measurement value is below the set target range
The bar is in the green area = measurement value is within the set target range
The bar is in the yellow area = measurement value is above the set target range
Read the measured value. For explanations and actions for the measured values, see chapter “5.5 Eva-
luating measured blood glucose values”. If an error message is displayed, read chapter “8. What if
there are problems?”
Highlighting measured values
You have the following options to highlight measured values.
Before meals.
After meals.
General highlight (e.g. after exercising).
Highlighting measured values enables you, your GP or diabetes consultant to better monitor your
blood glucose values. For example, you can display the average values of all measurements taken
before meals.
The measured value can be highlighted as soon as it is displayed. You cannot highlight it later.
For this purpose, briefly press the highlight button [3].
a) Pressing once highlights the value with .
b) Pressing again highlights the value with .
c) Pressing yet again highlights the value with .
d) Pressing a final time removes the highlight.
The selected highlight is stored in the memory of the device when it is switched o.

Beurer GL48 19
5.4 Evaluating measured blood glucose values
Your blood glucose monitor can process measured values between 20 and 630 mg/dL (1.1 and
35.0 mmol/L). The “ ” warning is displayed for measured values below 20 mg/dL (1.1 mmol/L). For
measured values above 250mg/dL (13.9 mmol/L), a ketone warning is also displayed. The “ ” war-
ning is displayed for measured values above 630 mg/dL (35.0 mmol/L).
Warning
•
If you suspect that the blood glucose results are incorrect, first repeat the test and, if applicable,
perform a functional test using control solution. Seek medical advice if dubious results persist.
•
Immediately seek medical attention if your symptoms are not in line with your measured blood glu-
cose values and you have observed all instructions for the Beurer GL48 blood glucose measuring
system.
•
Do not ignore symptoms of too high/low blood glucose levels. Consult your doctor.
Blood glucose values
The following tables list blood glucose values based on the STANDARDS OF MEDICAL CARE IN DI-
ABETES2016 from the ADA (American Diabetes Association).
Time of the blood glucose
measurement
Normal blood glu-
cose values
Increased risk of dia-
betes (prediabetes)*
Diabetes
On an empty stomach (fas-
ting plasma glucose)
Below 100mg/dL
Below 5.6 mmol/L
100 – 125 mg/dL
5.6 – 6.9 mmol/L
≥ 126 mg/dL
≥ 7.0 mmol/L
Two hours after an oral
glucose tolerance test (con-
sumption of 75g)
Below 140 mg/dL
Below 7.8 mmol/L
140 – 199 mg/dL
7.8 – 11.0 mmol/L
≥ 200 mg/dL
≥ 11.1 mmol/L
*The risk increases continually, beginning with values below the lower limit of the range and increasing disproportionately towards
the upper limit of the range.
Overview of glycaemic recommendations for non-pregnant adults with diabetes
A1C < 7.0%*
< 53 mmol/mol*
Preprandial capillary plasma glucose 80 – 130 mg/dL*
4.4 – 7.2 mmol/L*
Peak value of postprandial capillary plasma glu-
cose**
< 180 mg/dL*
< 10.0 mmol/L*
*For individual patients, more or less strict glycaemic targets may be appropriate. The target values should be adjusted depending
on the length of time the person has had diabetes, age/life expectancy, accompanying diseases, known cardiovascular diseases or
advanced microvascular complications, hypoglycaemia unawareness, as well as individual patient considerations.
**The postprandial glucose value can serve as a target value if the A1C values are not met despite the preprandial glucose targets
having been reached. Postprandial blood glucose measurements should be taken one to two hours after the start of a meal, as this
is when diabetics' values are generally at the highest.

20 Beurer GL48
Evaluating critical measured values
Display Blood glucose Action
Lo
Lo
Very low blood glucose
level
below 20 mg/dL
(below 1.1 mmol/L)
Seek medical attention immediately.
65
mg/dL
36
mmol/L
Low blood glucose level
below 70 mg/dL
(below 3.9 mmol/L)
Have a suitable snack.
Follow your GP's instructions.
150
mg/dL
83
mmol/L
High blood glucose level
on an empty stomach, abo-
ve 100 mg/dL (5.6 mmol/L)
2 hours after a meal
above 140 mg/dL
(7.8 mmol/L)
If this high value persists 2 hours
after your last meal, this may in-
dicate hyperglycaemia (high blood
glucose). Seek medical attention
to coordinate any measures, if ap-
plicable.
300
mg/dL
16
7
mmol/L
High blood glucose level,
possibly ketones
above 250 mg/dL
(13.9 mmol/L)
Perform a ketone test. For this pur-
pose, seek medical attention.
Hi
Hi
Very high blood glucose
level
above 630 mg/dL
(35.0 mmol/L)
Take another measurement using a
new test strip. If the display is the
same as before: seek medical as-
sistance immediately.
5.5 Functional check using control solution
The control solution is used to test the entire blood glucose measuring system. This helps to deter-
mine whether the measuring device and the test strips are working optimally together and whether
the test is being performed correctly.
Perform the control solution test if you suspect that the measuring device and/or the test strips could
be faulty or if you have repeatedly measured unusual blood glucose values. Also test the measuring
device if it has been dropped or is damaged. The control solution is available separately. For the control
solution test, please observe the additional notes in the instructions for use for the control solution.
Other manuals for GL 48
1
Table of contents
Other Beurer medical Blood Glucose Meter manuals
Popular Blood Glucose Meter manuals by other brands

MediVena
MediVena ONE-CARE PRO Operations & Procedures Manual

Beurer
Beurer GL43 Instructions for use

TaiDoc Technology Corporation
TaiDoc Technology Corporation PLUS One owner's manual

Palmdoc
Palmdoc PalmDoc II owner's manual

Nipro
Nipro 4Sure Smart Duo owner's manual

FOR-A
FOR-A Diamond PRIMA owner's manual