Beurer medical GL 50 evo User manual

3-IN-1 BLOOD GLUCOSE MONITOR
Step by step
GL 50 evo
EN


Beurer GL50 evo 3
1 Getting to know your device .........................................................................................4
1.1 Included in the delivery and accessories...............................................................................5
1.2 Replacements ........................................................................................................................6
1.3 Functions of the device..........................................................................................................6
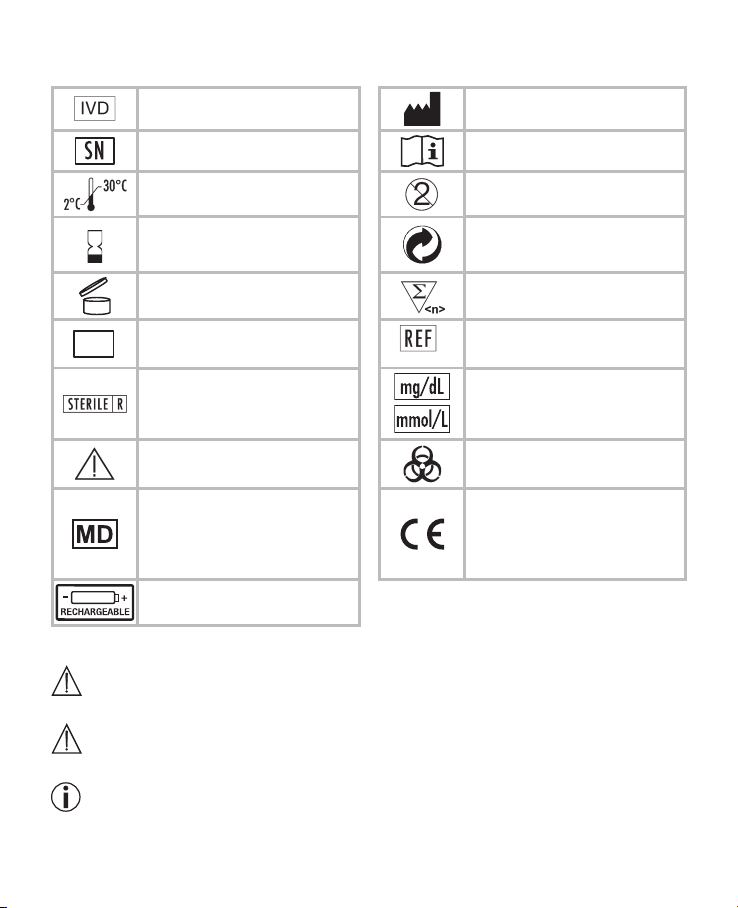
1.4 Signs and symbols ................................................................................................................7
2 Warnings and safety notes ............................................................................................8
3 Description of device and accessories .................................................................11
3.1 Blood glucose monitor.........................................................................................................11
3.3 USB cover............................................................................................................................12
3.4 Display symbols...................................................................................................................12
3.5 Test strips ............................................................................................................................13
4 Initial use and basic settings ......................................................................................14
4.1 Charging the battery ............................................................................................................14
4.2 Making and changing basic settings ...................................................................................15
5 Taking measurements....................................................................................................20
5.1 Preparing to take a blood sample........................................................................................20
5.2 Preparing the lancing device for taking a sample................................................................21
5.3 Taking a blood sample and measuring the glucose level ....................................................22
5.4 Reading the result and marking measurements ..................................................................24
5.5 Post-processing and disposal .............................................................................................25
5.6 Evaluating measured blood glucose values ........................................................................26
5.7 Functional check using control solution ..............................................................................28
6 MeasureMent MeMory .................................................................................................... 30
6.1 Displaying individual values .................................................................................................31
6.2 Displaying average blood glucose values for marked values ..............................................31
6.3 Evaluating measured values on a PC ..................................................................................32
7 Storing, maintaining and disinfecting the device .............................................32
7.1 Maintenance ........................................................................................................................33
7.2 Disinfection ..........................................................................................................................33
8 What if there are problems?........................................................................................34
9 Technical specifications................................................................................................36
10 Comparison of measured values with laboratory values .............................37
11 Usage limits for specialist personnel from the healthcare sector ..........39
12 Warranty/service...............................................................................................................41
Contents

4 Beurer GL50 evo
1 GettinG to know your device
Dear customer,
Thank you for choosing a product from our range. Our name stands for high-quality, thoroughly
tested products for applications in the areas of heat, weight, blood pressure, blood glucose, body
temperature, pulse, gentle therapy, massage and air.
Please read these instructions for use carefully and keep them for later use. Be sure to make them
accessible to other users and observe the information they contain.
With kind regards,
Your Beurer team.
Getting to know your device
The GL50 evo blood glucose monitor is intended for fast and simple blood glucose measurement of
fresh capillary blood samples, either for self-testing or in a clinical environment by trained personnel.
It enables you to measure your blood glucose quickly and easily, store the measured values and
display the average of all measured values, thereby providing optimum assistance for monitoring your
diabetes. The test is performed exclusively externally (IVD).
The backlit display shows measured values clearly. The user-friendly design with handy test strips
and the easy operation via a single scroll wheel guarantee simple, yet reliable measurements.
The device can be connected directly to a PC using the integrated USB connection. You can evaluate
the measured values on your PC using special software (in English and German language) and use
the results to monitor your blood glucose values.
Alternatively, you can transfer the measured values to your smartphone/tablet using the optional
Bluetooth®cap.

Beurer GL50 evo 5
1.1 Included in the delivery and accessories
Check that the set packaging has not been tampered with and make sure that all contents are present.
Before use, ensure that there is no visible damage to the device or accessories and that all packaging
material has been removed. If you have any doubts, do not use the device and contact your retailer
or the specified Customer Service address.
AB
EDC
A“3-in-1” monitor: lancing device, plug-in USB and monitor
BUSB cover
C10 test strips
D10 sterile lancet needles (5 x 28G blue, 5 x 33G purple)
E 1 practical case
These instructions for use, additional information
• The blood glucose monitor (A), test strips (C) and additionally available control solutions have been
specially designed to complement each other. For this reason, use only test strips (C) and control
solutions that have been approved for this blood glucose monitor (A).
Note
• Use original manufacturer accessories only.

6 Beurer GL50 evo
1.2 Replacements
You can also obtain test strips, control solution and lancets without a prescription.
Item REF
50 test strips REF 464.15
50 test strips, individually film packed REF 464.17
100 test strips REF 464.13
Control solution LEVEL 3 and 4 REF 464.16
100 soft touch lancets 33G REF 457.24
100 lancet needles 28G REF 457.01
100 safety lancets REF 457.41
200 safety lancets REF 457.42
1.3 Functions of the device
This device is intended for measuring the blood glucose content in human blood. It is also suitable
for self-testing at home.
The monitor enables you to quickly and simply:
• Measure your blood glucose level
• Display, mark and save measured values
• Output the measured values acoustically
• Display the average of the measured blood glucose values from the last 7, 14, 30 and 90 days
• Display the average of the marked measured blood glucose values from the last 7, 14, 30 and 90 days
• Set the timer and alarm
• Set the time and date
• Evaluate the saved measured values on a PC using special software
• Transfer the saved measured values to a smartphone/tablet using the optional Bluetooth®cap
• Transfer the saved measured values to a smartphone/tablet using the optional NFC cap
The monitor also includes the following monitoring functions:
• Warning that test strip is insuciently filled
• Warning in the event of unsuitable temperatures
• Ketone warning
• State of charge display when rechargeable battery is low.
Warning
•Do not use the device to diagnose diabetes; it is intended for regular monitoring only
•Consult your GP with regard to insulin doses.

Beurer GL50 evo 7
1.4 Signs and symbols
The symbols on the packaging and type plate of the monitor and accessories represent the following:
In vitro diagnostic device Manufacturer
Serial number Observe the instructions for use
Temperature limit
+2°C to +30°C Not for re-use/for single use
only
Use by Green dot (Der Grüne Punkt):
German dual waste collection
system
18 M
Maximum shelf life after initial
opening in months Contents sucient for <n> tests
LOT
Batch designation /
Art.-Nr. Order number
Sterilised by radiation (lancets) Unit of measurement for blood
glucose value
Warning, see accompanying
documents Biohazard, risk of infection
Medical device (MDR Symbol)
CE labelling
This product satisfies the
requirements of the applicable
European and national
directives.
Rechargeable battery
In the instructions for use, the symbols represent the following:
Warning
Warning instruction indicating a risk of injury or damage to your health/your patient's health.
Important
Safety note indicating possible damage to the device/accessory.
Note
Note on important information.

8 Beurer GL50 evo
2 warninGs and safety notes
Risk of infection
All components of the blood glucose monitor and its accessories may come into contact
with human blood and are therefore a possible source of infections.
Warning
• Blood glucose values are displayed in mg/dL or mmol/L. You risk damaging your health if
you measure your blood glucose value using a unit of measurement with which you are not
familiar, misinterpret the values and therefore take incorrect measures. Therefore, please
ensure that this monitor displays a unit of measurement with which you are familiar. The unit
of measurement accompanies each blood glucose value. Please contact Customer Services
if the device displays the incorrect unit of measurement.
• When using the blood glucose monitor for various persons, observe the generally applicable
regulations regarding disinfection, safety and contamination.
• Medical carers and others who use this system on several patients must be aware that all products
or objects that come into contact with human blood must be handled, even after cleaning, as though
they could transfer pathogens.
• The lancing device is suitable for self-testing. Do not share the lancing device or lancet needles with
others or amongst various patients (risk of infection!).
• Use a new, sterile lancet needle for each blood sample (for single use only).
General notes
Warning
Do not use the device in the vicinity of strong electromagnetic fields and keep it away from radio
systems or mobile telephones.
Measuring the blood glucose content
Warning
• The measurements taken by you are for your information only – they are no substitute for a medical
examination! Consult your GP regularly regarding your measured values. Never independently alter
the procedures prescribed by your GP.
• The Beurer GL50 evo monitor provides a simple way of monitoring your own blood glucose values,
however, you may need to obtain information on how to use the system from your healthcare
professional (for example, your GP, chemist or diabetes consultant). Only proper use will guarantee
exact measurements.
• This device may be used by people with reduced mental capabilities provided that they are supervised
or have been instructed on how to use the device safely and are fully aware of the consequent risks
of use.
• A lack of water, high fluid loss, for example perspiration, frequent passing of water, severe hypotension
(low blood pressure), shock or hyperosmolar hyperglycaemic non-ketotic coma may lead to incorrect
measurements.

Beurer GL50 evo 9
• A haematocrit value (proportion of red blood cells) between 20% and 60% has no significant influence
on the measurement results.
• A very high or low haematocrit value (proportion of red blood cells) may lead to incorrect
measurements. In the event of a very high haematocrit value (above 60%), the displayed blood
glucose value may be too low; in the event of a very low haematocrit value (below 20%), it may be
too high. Consult your GP if you do not know your haematocrit value.
• Do not use the test strips to measure blood glucose values on newborns.
• Do not use NaF or potassium oxalate anticoagulants to prepare for venous blood samples.
• Do not test any severely ill patients using this device.
• Use fresh whole blood only. Do not use serum or plasma.
• Use capillary blood without squeezing the penetration area. Squeezing the area causes the blood to
be diluted with tissue fluid and this may lead to an incorrect measurement.
• Do not use the test strips above an altitude of 7010 metres.
• Very high levels of humidity may influence the test results. Relative humidity of more than 90% may
lead to inaccurate results.
Note
The Beurer GL50 evo measuring system is intended for measuring capillary and venous whole blood.
Storage and maintenance
Warning
• Store the blood glucose monitor and its accessories out of reach of small children and pets. Small
parts, such as lancet needles, cover caps or test strips may be life-threatening when swallowed. If
swallowed, seek medical attention immediately.
• The test strip box contains desiccant, which may irritate the skin or eyes when inhaled or swallowed.
Keep the box out of the reach of children.
The monitor is made from precision and electronic components. The accuracy of the measured values
and service life of the device depend on its careful handling:
• Protect the device and its accessories from impacts, humidity, dirt, marked temperature fluctuations
and direct sunlight. Do not store the device, test strips and control solution in your vehicle, in the
bathroom or in a cooling appliance.
• Do not drop the device.
Repairs
Note
• Do not open the device. Failure to comply with this instruction will void the warranty.
• Do not repair the device yourself. Proper operation can no longer be guaranteed in this case.
• Please contact Customer Services for repairs.

10 Beurer GL50 evo
Disposal
Warning
• It is essential to comply with the generally applicable safety precautions for handling blood when
disposing of materials from the blood glucose monitor. Dispose of all blood samples and materials
with which you or your patients come into contact correctly in order to prevent injury and infection
of other persons.
• After use, dispose of test strips and lancets in a puncture-proof container.
Note
Rechargeable batteries must not be disposed of with household waste. As a consumer, you are
required by law to recycle used rechargeable batteries. You can recycle your old rechargeable batteries
at public collection points in your community or wherever rechargeable batteries of the relevant type
are sold.
For environmental reasons, do not dispose of the device in the household waste at the end
of its service life. Please dispose of the device in accordance with EC Directive – WEEE
(Waste Electrical and Electronic Equipment). If you have any questions, please contact the
local authorities responsible for waste disposal.
Notes on handling batteries
• If your skin or eyes come into contact with fluid from the battery cell, flush out the aected areas
with water and seek medical assistance.
• Choking hazard! Small children may swallow and choke on batteries. Store batteries out of the reach
of small children.
• If a battery has leaked, put on protective gloves and clean the battery compartment with a dry cloth.
• Risk of explosion! Never throw batteries into a fire.
• Do not disassemble, split or crush the batteries.
• Only use chargers specified in the instructions for use.
• Batteries must be charged correctly prior to use. The instructions from the manufacturer and the
specifications in these instructions for use regarding correct charging must be observed at all times.
Rechargeable battery disposal
• The empty, completely flat rechargeable batteries must be disposed of using specially designated
collection boxes, recycling points or electronics retailers. You are legally required to dispose of the
batteries.

Beurer GL50 evo 11
3 description of device and accessories
3.1 Blood glucose monitor
An overview of the monitor
1 2 3
1 Lancing device
2 Plug-in USB
3 Monitor
Front Side
1 Display
2 Slot for test strips
1
2
1 Scroll wheel
2 ON/OFF switch
3 Tensioning slider
1
2
3
3.2 Lancing device and lancet needles
1 Cap
2 Protective lancet disc
3 Sterile lancet needle
4 Lancet holder
5 Dial for setting dierent
penetration depths
6 Tensioning slider
7 Trigger
23457
6
1

12 Beurer GL50 evo
3.3 USB cover
If you would like to use the blood glucose monitor without
the integrated lancing device, you can use the supplied
USB cover in place of the lancing device.
3.4 Display symbols
1
4
2
3
6
7
5
memory
1 State of charge
2 Memory space number
3 Blood sugar unit mg/dL or mmol/L
4 Time
5 Symbol for marking measurements
6 Date
7 Measured value display
Note
The monitor is supplied with the following basic settings:
• Beep on
• Bluetooth®o
• NFC o
• Ketone warning on
• Language: German
Warning
Ensure that you are using the device with the correct blood glucose unit (either mg/dL or mmol/L)
setting for you. If in doubt, consult your GP.

Beurer GL50 evo 13
3.5 Test strips
Front Rear
1
2
3
1 Gap for blood input
2 Grip area
3 Contacts
You can identify the rear by the contact tracks.
Insert the test strip into the device
so that the contacts are pointing
inside the slot.
Make sure that the front of the test
strip is facing you.
Note
Read carefully the following information on handling and storing your test strips. The test strips will
only provide accurate measurements if all information is followed.
Warning
Use each test strip only once and for one patient only!
Handling test strips
Note
• Securely close the test strip box immediately after taking out a test strip.
• Do not use the test strips if they have expired. The use of expired test strips may lead to incorrect
measurements. The expiry date is located next to the hourglass symbol on the box or on the
respective film packaging of the individual test strips.
• The test strips expire 18 months after the box is opened (note down the expiry date (date of opening
plus 18 months
18 M
) on the label. In the event of overlap, the shelf life is limited to the expiry date (see

14 Beurer GL50 evo
date next to the hourglass symbol ). This does not apply for individual test strips, which are to be
used immediately after opening the film packaging.
• Discontinue use of the test strips if one of the two expiry dates ( /
18 M
) has passed.
• You can touch any part of the test strip with clean, dry hands.
• Use the test strip for measurement immediately after removing it from the box/film packaging.
• Do not bend, cut or otherwise modify the test strips.
• Do not use test strips that have come into contact with fluids.
Storing test strips
Note
• Keep the test strips in a cool, dry place above +2°C and below +30°C. Do not expose the test strips
to direct sunlight or heat. Do not store in your vehicle, in the bathroom or in a cooling appliance.
• Permitted relative air humidity below 90%.
• The test strips must be stored in the original box/unopened film packaging – never use other
containers.
4 initial use and basic settinGs
In order to activate the device, move the ON/OFF switch into the “ON” position.
on
o
The ON/OFF switch is used as a keylock for the scroll wheel.
Information regarding initial use
• Before putting the blood glucose monitor into operation for the first time, you must fully charge the
rechargeable battery. To charge the rechargeable battery, proceed as directed in the following chapter.
• Before the initial use, no battery symbol will be displayed during charging.
4.1 Charging the battery
1
Remove the lancing device from the blood glucose monitor.
2
Connect the blood glucose monitor to a computer via the USB port.
Leave the blood glucose monitor to charge for at least 2 hours.
3
Once you have fully charged the rechargeable battery of the blood glucose monitor, disconnect
the blood glucose monitor from the computer.
4
Place the lancing device back on the blood glucose monitor.
After charging the battery, wait 30 minutes before carrying out a blood glucose measurement.

Beurer GL50 evo 15
4.2 Making and changing basic settings
1
Setting the date and time
Note
You must set the date and time. Otherwise, you will not be able to save your measured values
correctly with a date and time and access them again later.
The time can be displayed in 12-hour format or 24-hour format.
1. Switch on the blood glucose monitor by briefly pressing and holding the scroll wheel.
2. Rotate the scroll wheel until the arrow is pointing towards
“Settings”, then press the scroll wheel.
• All values
• Average
• Settings
Back
3. Rotate the scroll wheel until the arrow is pointing towards “Date/
time”, then press the scroll wheel.
• Timer
• Alarm
• Date/time
• Bluetooth on/o
4. Set the year by rotating the scroll wheel, then press the scroll
wheel.
Year 2018
Month 10
Day 21
24h/12h mode 24h
5. Use the same procedure to set the month, day, 24 h or 12 h mode, hour and minute.
6. To save the settings, rotate the scroll wheel until the arrow is
pointing towards “Save” and confirm by pressing the scroll
wheel.
24h/12h mode 24h
Hour 12
Minute 00
Save

16 Beurer GL50 evo
2
Setting the timer
You can set a timer on the blood glucose monitor. A beep sounds when the timer elapses.
To set a timer, proceed as follows:
1. Switch on the blood glucose monitor by briefly pressing and
holding the scroll wheel.
2. Rotate the scroll wheel until the arrow is pointing towards
“Settings”, then press the scroll wheel to confirm.
• All values
• Average
• Settings
Back
3. Rotate the scroll wheel until the arrow is pointing towards
“Timer”, then press the scroll wheel.
• Timer
• Alarm
• Date/time
• Bluetooth on/o
4. Rotate the scroll wheel until the hour is marked, then press the
scroll wheel. Now set your desired timer hour by rotating the
scroll wheel and press the scroll wheel to confirm.
5. Use the same procedure to set the timer minute.
6. In order to start the timer, rotate the scroll wheel to “Start” and
press the scroll wheel.
Timer
Start Stop
3
Setting the alarm
You can set an alarm on the blood glucose monitor. A beep sounds at the set alarm time.
You can set 4 dierent alarm times. To set an alarm, proceed as follows:
1. Switch on the blood glucose monitor by briefly pressing and
holding the scroll wheel.
2. Rotate the scroll wheel until the arrow is pointing towards
“Settings”, then press the scroll wheel to confirm.
• All values
• Average
• Settings
Back
3. Rotate the scroll wheel until the arrow is pointing towards
“Alarm”, then press the scroll wheel.
• Timer
• Alarm
• Date/time
• Bluetooth on/o
4. Select one of the 4 alarm times with the scroll wheel and press
the scroll wheel.
5. Now set your desired alarm hour by rotating the scroll wheel
and press the scroll wheel to confirm. Use the same procedure
to set the alarm minute.
• Alarm
• 12:00
• 22:00
• O

Beurer GL50 evo 17
3
6. In order to start the alarm, rotate the scroll wheel to “On” and
press the scroll wheel.
7. In order to turn o the alarm, rotate the scroll wheel to “O”
and press the scroll wheel.
alarm
on
4
Switching Bluetooth®or NFC on/o
You can switch on Bluetooth®/NFC on the blood glucose monitor.
1. Switch on the blood glucose monitor by briefly pressing and
holding the scroll wheel.
2. Rotate the scroll wheel until the arrow is pointing towards
“Settings”, then press the scroll wheel.
• All values
• Average
• Settings
Back
3. Rotate the scroll wheel until the arrow is pointing towards
“Bluetooth on/o” or “NFC on/o” and press the scroll wheel.
• Alarm
• Date/time
• Bluetooth on/o
• NFC on/o
4. Rotate the scroll wheel until the arrow is pointing towards
“Bluetooth on”, then press the scroll wheel. Bluetooth®is now
switched on. Proceed in the same manner to switch on NFC.
• Bluetooth on ✔
• Bluetooth o
Back

18 Beurer GL50 evo
5
Switching the beep on/o
On the blood glucose monitor, you can switch on the beep, switch o the beep or set a result
beep.
1. Switch on the blood glucose monitor by briefly pressing and holding the scroll wheel.
2. Rotate the scroll wheel until the arrow is pointing towards
“Settings”, then press the scroll wheel.
• All values
• Average
• Settings
Back
3. Rotate the scroll wheel until the arrow is pointing towards
“Beep on/o”, then press the scroll wheel.
• Bluetooth on/o
• NFC on/o
• Beep on/o
• Ketone on/o
4. Use the scroll wheel to select your desired setting (beep on,
beep o or result beep) and confirm by pressing the scroll
wheel.
• Beep on ✔
• Beep o
• Result beep
Back
Note
The result beep transmits the measurement as an acoustic beep signal.
Example: measured value 103
Start signal
Beep beep
Number 1
Short beep
Number 2
Long beep (for 0)
Number 3
3 x short beep
The beep signal is repeated 2 times and can be interrupted by rotating the scroll wheel.
6
Switching the ketone warning on/o
On the blood glucose monitor, you can switch a ketone warning on and o.
1. Switch on the blood glucose monitor by briefly pressing and
holding the scroll wheel.
2. Rotate the scroll wheel until the arrow is pointing towards
“Settings”, then press the scroll wheel.
• All values
• Average
• Settings
Back
3. Rotate the scroll wheel until the arrow is pointing towards
“Ketone on/o”, then press the scroll wheel.
• NFC on/o
• Beep on/o
• Ketone on/o
• Turn display

Beurer GL50 evo 19
6
4. Use the scroll wheel to select your desired setting (warning on
or warning o) and confirm by pressing the scroll wheel.
• Ketone
• Warning on ✔
• Warning o
Back
7
Turning the display
You can turn the display on the blood glucose monitor.
1. Switch on the blood glucose monitor by briefly pressing and
holding the scroll wheel.
2. Rotate the scroll wheel until the arrow is pointing towards
“Settings”, then press the scroll wheel.
• All values
• Average
• Settings
Back
3. Rotate the scroll wheel until the arrow is pointing towards “Turn
display”, then press the scroll wheel.
• Beep on/o
• Ketone on/o
• Turn display
• Language
8
Selecting the menu language
The following menu languages are available: English, German, French, Spanish, Italian and
Turkish.
1. Switch on the blood glucose monitor by briefly pressing and
holding the scroll wheel.
2. Rotate the scroll wheel until the arrow is pointing towards
“Settings”, then press the scroll wheel.
• All values
• Average
• Settings
Back
3. Rotate the scroll wheel until the arrow is pointing towards
“Language”, then press the scroll wheel.
• Ketone on/o
• Turn display
• Language
Back
4. Use the scroll wheel to select your desired menu language and
confirm by pressing the scroll wheel.
• Language
• DDeutsch ✔
• GEnglish
• FFrançais

20 Beurer GL50 evo
5 takinG MeasureMents
Warning
• If the protective disc on a lancet needle has already been removed, do not use the lancet needle.
• If you drop the lancing device with an inserted lancet needle, carefully pick it up and dispose of the
lancet.
Important
• Use the lancing device only with lancet needles from the same manufacturer. Using other lancet
needles may prevent the lancing device from working properly.
• If you are using a third-party lancing device, please read the accompanying instructions for use.
5.1 Preparing to take a blood sample
1
Choose a part of the body from which to take a blood sample
Using the lancing device, you can take a blood sample from the fingertip. To make the procedure
as painless as possible, do not take samples directly from the centre of the fingertip, but
slightly to either side.
Warning
• In the event of suspected hypoglycaemia: take blood from the fingertip only. Reason:
changes to blood glucose levels can be detected quickly in blood samples taken from the
fingertip.
2
Prepare all parts
Prepare the following items: GL50 evo measuring device (A), test strip box or test strips in
film packaging (C) and sterile lancet needles (D).
Make sure that the ON/OFF switch is in the “ON” position.
3
Wash your hands
Wash your hands with soap and warm water before taking a blood sample. This not only
ensures optimal hygiene but also encourages good blood circulation at the puncture area on
the finger. Dry your hands carefully.
Warning
If you have used alcohol for cleaning, ensure that the area has fully dried prior to measuring.
Table of contents
Other Beurer medical Blood Glucose Meter manuals