BG Electrical Smart! User manual

Installation and User Guide
Before commencing work always isolate the power at the consumer unit / fuse box.
1. Unscrew the socket from the wall/mounting box.
2. Note the cable connections: There will generally be three different wiring configurations, this
illustration shows a single wire of each colour connected to each terminal (there could be two or
three wires of each colour connected to each terminal) + an additional connection between the
mounting box earth terminal and the socket earth terminal.
3. Unscrew each terminal to release the wires.
1. Carefully position the accessory into the mounting box,
ensuring that no wires are trapped between the plate and
the wall and secure with screws (do not over tighten) then
set screw covers in place (optional).
2. Once the installation has been completed correctly,
replace the fuse for the circuit, switch the power back on at
the consumer unit and test.
1. Install mounting box (metal or pattress) for either flush or surface mounting, ensuring
appropriate size of product. (Mounting box to be purchased separately)
2. Select the most suitable entry point of the mounting box (knock-out) and route the supply
cable through.
3. Cables should be prepared so a sufficient conductor length reaches the terminals. Strip
the ends of the individual conductors leaving an adequate length bare to enter terminals.
1. Line up the new socket to mounting box and
take note of where each terminal is located.
2. Connect each wire to the matching terminal.
(Refer to key in step 2).
An earth connection should always be made
between the mounting box earth terminal and
the socket earth terminal.
Make sure no copper wire is exposed & that
only the bare end enters the terminal.
3. Tighten terminal screws securely.
(Do not over tighten).
Wiring Instructions
1. Power Off
2a. Replacing an Existing Socket (Removal)
2b. New Installation
3. Wire Up Your Socket 4. Complete The Installation
Installation and User Guide
You can now plug in the device you would like to control.
Connecting Additional Smart Devices Power Control
Setup Advice & How-To Guides
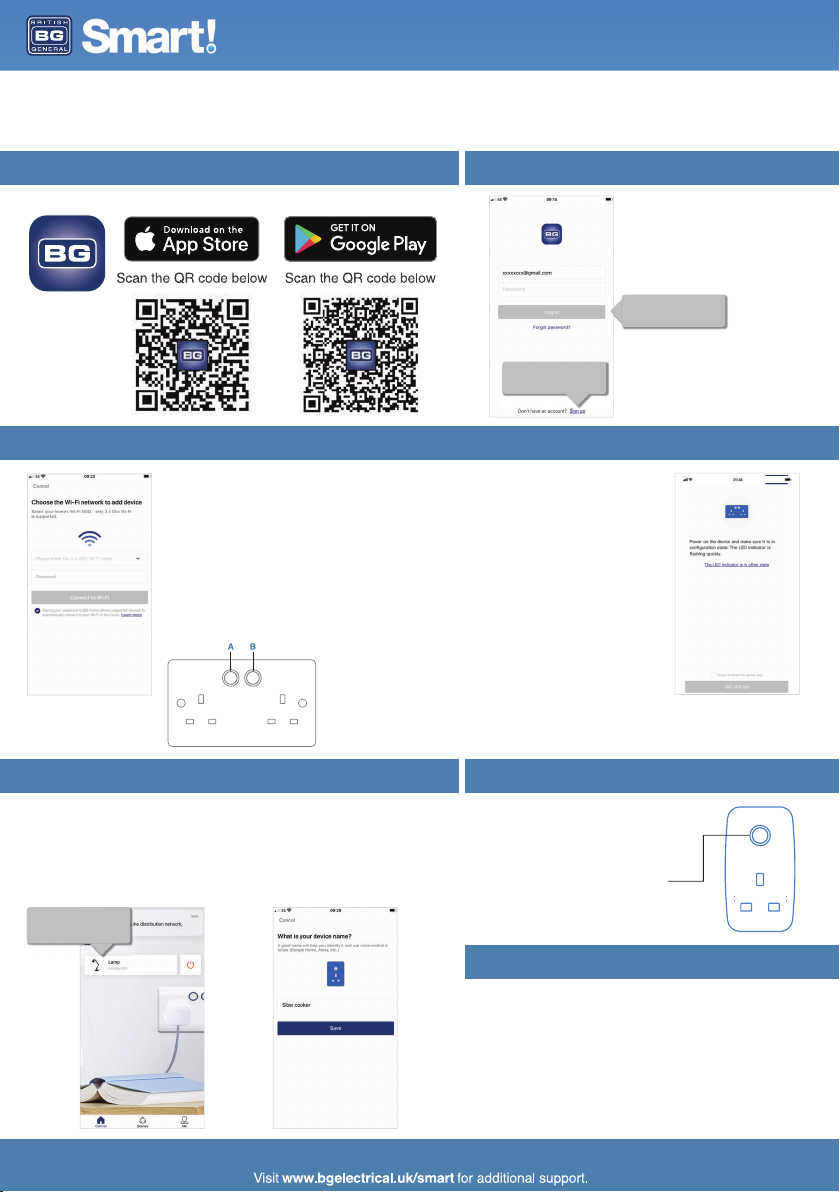
Download the BG Home App for your Android or iOS device.
If you already have a BG Home
account, sign in.
If you are new to BG Home, sign
up and follow the on screen
instructions.
Ensure that your Smart Socket is connected to the power supply as per the ‘Wiring
Instructions’.
After the initial power up both switch LED indicators will illuminate RED and start to blink and
the socket will be ready for setup.
Press and hold button A for 5 seconds. The socket will then enter Wi-Fi configuration mode
and the indicator illuminated RED flashing quickly.
Follow the on-screen instructions to set-up your device.Please make sure your phone is
connected to 2.4GHz WiFi (not 5GHz)so your device can be discovered and set-up
successfully.
Once set up your mobile device will indicate a successful connection and the red indicator on
the socket will turn off.
To connect additional BG Smart devices, please follow the steps below:
1. Connect and power up the device.
2. Press and hold the power button until the RED LED flashes quickly.
3. Go to the BG Home app and ‘Add Device’.
4. Once found and connected name the device accordingly.
Repeat for all additional BG Smart devices.
Power control at each socket can be
manual or ‘smart’ The power button
will illuminate BLUE for ON.
Indicator Brightness Control
The intensity of the power indicators can be adjusted. Press
and hold button B for 5 seconds. The indicator will illuminate
BLUE and it will enter the brightness adjustment mode. When
the brightness has reached the desired level release the
button.
If these setup procedures fail,follow the “AP Config” setup and
follow the step by step instructions in the App.
Smart Socket Setup Instructions
5. Install the BG Home App
7. Power Up Your Socket
6. Account Creation
If you already have a BG Smart
device connected, the App can
auto-discover a new device for
faster set-up.
POWER BUTTON

Device Menu Screen
Getting The Most Out Of Your BG Sockets
Setting Timers
Set a Delay
Set up timers so your device will turn on and off at specific times. Get your morning coffee
ready for when you get up in the morning, save energy by turning sockets off whilst you’re at
work, turn the lamp on or off at a certain time of day, or set the slow cooker to come on at
lunch time so your food is ready to eat when you get home!
Smart sockets do more than enable you to turn sockets on and off with an App – you can
set timers, configure scenes, set a parental lock, control these with your voice and sync up
with other smart devices in your home using IFTTT.
Set a delay time for your sockets to turn on or off after a set length
of time. Ideal for sockets where you plug in devices like hair
straighteners or heaters for added safety, and for charging your
mobile phone so this turns off once it has reached a full charge.
Select Timer
Select the device you
want to set a timer for.
Choose how
often you want
the timer to
operate.
Choose the time you want
the timer to function.
Choose to turn on or turn
off.
Create more than one timer to suit
your requirements.
The toggle buttons mean you can
turn these on or off whilst
retaining your timer settings when
not in use.
Delays can be set for devices to turn on or turn off.
In the device menu, choose the amount of time you
want to pass before the delay operates.
You can select one of the pre-set options, or create
your own custom timescale.
Installation and User Guide
User Guide

Installation and User Guide
Creating Scenes
Manage Homes
You can add many different scenes to suit your lifestyle to further automate your sockets.
You may want a number of sockets to turn on or off together without having to operate them all
independently.
You could set a night-time scene so all lamps turn off and your bedside socket turns on ready to charge
your phone, create a ‘goodbye’ scene for when the house is empty or a ‘welcome home’ scene so
everything is just how you want it when you get home.
Go to the ‘Scenes’ menu on the bottom of the Home screen, select + from the top left corner of the scenes
screen and create your custom scene.
User Guide
Create a custom scene to add
different actions for a number of
devices to happen at the same time.
Select ‘+’
2
Select ‘Scenes’
1
You could also set a scene to help with
your children's evening routine - turn on
the lamp in their room at bedtime, and
set lights out and devices off at the
desired time to make sure they are not
up late watching TV or playing on
consoles in their bedroom.
Add a picture, name and effective period
for the scene to operate.
Add more than one device to create
multiple actions that happen at the
same time, so you can turn some
devices on and other off.
If you have more than one property with smart sockets installed, be it home or office, you can create a
separate ‘home’ for each of these and manage these through the ‘Me’ menu. Other homes that you have
ben invited to will also appear in this menu.
You can switch between properties in the BG Home App control screen by clicking on the home name at
the top of the screen, and switching to the home you want to manage.
Switch homes at the top of
the home screen.
Alternatively select 'me'
Select 'Manage homes'
Re-name your home, manage
rooms and manage members.

Installation and User Guide
Random Function
Turn lamps on and off at random times to imitate home occupancy
when you’re away for added security.
User Guide
Invite Others to Join Your Home
Toggle on and off as required so your
setting is saved ready for when it’s
needed, even if it’s not constantly in use.
2
set a time to start and end the
random activation, and how often
you would like this to be repeated.
1
You may want other members of your household to be able to operate sockets with their own phone or
tablet. No problem! You can invite a new member from the BG App Home screen by pressing the + icon
at the top of the screen.
Set a Parental Lock
The parental lock allows you to de-activate the active buttons so these cannot be turned on or off at the
wall, and prevent members that you have invited within the app from turning sockets on or off, or
changing any of your set timers or scenes. This is ideal for sockets which you want to behave in a routine
way, and to prevent children turning devices on and off when you don’t want them to.
To turn on the parental lock, select ‘function set’ from the … menu, and toggle the parental lock on or off
as required.
Invite other members from
your household.
The App will generate a unique QR
code that will be valid for 15 minutes.
An invited member can then join your
home by scanning the QR code which
will be unique to your home.
Toggle 'parental lock' on.
This can be toggled off when you
need to change settings or re-enable
active buttons on the faceplate.
when parental lock is on, devices cannot be
operated and settings cannot be changed within
the app, and active buttons on the faceplate will
also be locked so they cannot be turned on or off.
Select 'Function Set' from
the device control screen.
Other manuals for Smart!
1
Table of contents
Other BG Electrical Accessories manuals


