BGD LYNX 2 User manual

1
LYNX 2 manual EN v1.1 March 2023Version 1.1 March 2023

2
LYNX 2 manual EN v1.1 March 2023
Contents
Contents
Welcome to Bruce Goldsmith Design ................. 4
Quick Summary .................................................................. 5
Introduction ......................................................................... 6
Limitations ....................................................................... 6
Test ight and Warranty........................................... 6
Weight Range ................................................................ 7
Modications .................................................................. 7
Brake line lengths......................................................... 7
Harness ............................................................................. 8
Preparation .......................................................................... 9
Connecting the speed bar ....................................... 9
On launch ......................................................................... 10
Pre-ight inspection.................................................... 10
Flight Characteristics ...................................................... 12
Take-off ............................................................................ 12
Straight Flight ............................................................... 13
Turning ............................................................................. 13
Active piloting .............................................................. 13
Thermalling ..................................................................... 14
Speed System ............................................................... 14
C-steering......................................................................... 16
Rapid descent procedures....................................... 17
Landing ............................................................................ 18
Recovery Techniques ...................................................... 20
Stalls .................................................................................. 20

3
LYNX 2 manual EN v1.1 March 2023
Spins .................................................................................. 21
Symmetric Front Collapse ...................................... 21
Asymmetric Front Collapse ................................... 22
Releasing a trapped tip (cravat) ......................... 22
Loss of brakes................................................................ 23
Storage, repairs and servicing .................................... 24
Storage and care ......................................................... 24
Repairs............................................................................... 24
Mounting Replacement Lines................................. 26
Environmental protection and recycling .......... 29
Technical Data ................................................................... 30
Materials............................................................................ 30
Specications ................................................................. 31
Glider overview diagram........................................... 32
Risers .................................................................................. 33
Riser lengths and brake & accelerator travel 34
Line Plan............................................................................ 35
Line Lengths ................................................................... 36
Service Booklet .................................................................. 38
Test ight record ......................................................... 38
Service Records ........................................................... 39
Owner Record ............................................................... 40
Closing Words..................................................................... 42
Contents

4
LYNX 2 manual EN v1.1 March 2023
LYNX 2 OWNER’S MANUAL
Solo paraglider | EN / LTF C
Welcome to Bruce Goldsmith Design
BGD is a world leader in the design and production of paragliders. For many years Bruce Goldsmith and his
team have been developing products with world-beating performance for pilots who want the best. We apply
our knowledge to design top quality products that combine the highest performance with the safe handling our
customers value and respect. BGD pilots appreciate our quality and reliability. BGD´s world-class status is based on
the skills and expertise we have developed in combining aerodynamic design with cloth and materials technology. All
BGD products are developed and made with the same skill and attention to good design that are synonymous with
the ultimate performance and precision required by paragliders.
Congratulations on your purchase of the BGD LYNX 2
The LYNX 2 is a lightweight cross-country paraglider. It is a 2.5-liner design which means there are three line levels in
the centre of the wing and only two at the tips. It does not have full chord-wise plastic rods, which means it can be
packed down small and is easy to carry for hike-and-y or vol-bivouac. It is a cross-country wing for pilots who y
regularly and is not suitable for beginners.
As with all aircraft, regular maintenance and checks are mandatory. The LYNX 2 is made from high quality lightweight
materials and should be looked after accordingly – do not drag it over the ground. Proper care will ensure it keeps its
original safety and performance and lasts for many years.
This manual contains information on how to look after your paraglider, as well as techniques to get the best out of it
in the air. If you ever need replacement parts or further information, please do not hesitate to contact your nearest
BGD dealer or contact BGD directly.
Welcome

5
LYNX 2 manual EN v1.1 March 2023
Quick Summary
The LYNX 2 is a 2.5-liner design. The following things should be noted in particular:
1. Launch should be done using the main A riser ony (risers marked with red), without the separate AR3 (big
ears) line.
2. The risers and lines are attached with soft links which are protected by Lycra covers. It is important to lift the
covers and inspect the soft links regularly, to check they are correctly closed and are not becoming worn.
3. Rapid descent techniques: You should not B-Line stall the LYNX 2; Big Ears can be done using the AR3 line.
Note that Big Ears are harder to pull in than on a traditional three-liner. Big ears on the LYNX 2 should always
be done with some speed bar applied, to avoid the risk of deep stall.
4. The LYNX 2 was certied using collapse lines for the accelerated EN tests, because it is hard to pull the
accelerated collapses using only the A risers. If you do SIV on the LYNX 2 we recommend to only do trim
speed manoeuvres to avoid the need for using collapse lines.
Quick Summary

6
LYNX 2 manual EN v1.1 March 2023
Introduction
Limitations
The LYNX 2 is a solo paraglider. It is not intended for tandem use or for aerobatic manoeuvres.
It is suitable for winching. Both pilot and winch operator should have the necessary training and qualications for
winching, and the winch system should be certied for paraglider use.
This paraglider should not:
1. Be own outside the certied weight range
2. Have its trim speed adjusted by changing the length of risers or lines
3. Be own in rain or snow
4. Be towed with a tow-line tension in excess of 200kg
Test ight and Warranty
All information about the BGD warranty can be found on the Warranty page of our website. To benet from the
warranty, you must complete the warranty registration form on the website (www.ybgd.com)
It is your dealer´s responsibility to test y the paraglider before you receive it in order to verify the trim settings. The
waranty may be void if the test ight has not been completed by the dealer.
Introduction

7
LYNX 2 manual EN v1.1 March 2023
Weight Range
Each wing size is certied for a certain weight range. The weight refers to the ‘overall take-off weight’. This means the
weight of the pilot, the glider, the harness and all other equipment carried with you in ight. We generally recommend
your paraglider is own in the middle of the weight range.
If you mainly y in weak conditions you might wish to y towards the lower end of the weight range to benet from
a better sink rate. In the lower half of the weight range the turning agility will be lower and the glider will be more
damped. In strong turbulence the wing will have a greater tendency to deform or collapse with a lower wing loading.
If you prefer dynamic ight characteristics, want better speed or y in strong conditions you might choose to y
higher in the weight range. If you y in the upper half of the weight range agility and speed will be higher and you will
have greater stability in turbulence, but there will be reduced self-damping in turns and after collapses.
Modications
Any modications to your glider, e.g. changing the line lengths or the speed system, can cause a loss of airworthiness
and certication. We recommend that you contact your dealer or BGD directly before performing any kind of
modications.
Brake line lengths
The length of the brake lines is set at the factory so that the trailing edge is not deformed at all when brakes are not
applied. There should be around 7cm slack in the brake lines, before they take effect on the canopy. It should not be
necessary to shorten the brake lines. However, it is possible that shrinkage can occur. If necessary, the brake lines can
be lengthened by adjusting the knots.
Introduction

8
LYNX 2 manual EN v1.1 March 2023
Harness
The paraglider was tested with a ‘GH’ (without diagonal bracing) type harness. The GH category includes weight-shift
harnesses as well as ABS style (semi-stable) harnesses.
The harness complies with the EN standard harness dimensions, which are:
• Seat board width: 42cm.
The horizontal distance between the attachment points of the paraglider risers (measured from the centre-line of the
karabiners) must be:
• 38cm for pilots under 50kg
• 42cm for pilots from 50-80kg
• 46cm for pilots above 80kg
Introduction

9
LYNX 2 manual EN v1.1 March 2023
Preparation
Connecting the speed bar
The LYNX 2 comes with accelerator risers and can be own with or without a speed bar attached. The speed bar should
be connected and adjusted following the instructions in your harness manual to ensure correct routing of the lines.
The weight-optimised speed system has universal attachments instead of Brummel hooks. These comprise a loop
with a knot, sewn into the end of the accelerator line. The line can be attached to the speed bar using a classic
larks head knot. If your speed bar has Brummel hooks you can attach to the accelerator line using this knot without
removing the Brummel hooks.
Larks Head Knot
When attaching the speed bar lines, make sure the lines run freely and are not caught around anything including
reserve handle, risers or lines.
To adjust the speed bar to the correct length, sit in your harness and ask an assistant to hold the risers up in their
in-ight position. The speed bar length can be adjusted by moving the knots, so that the bar sits just beneath your
harness seat. You should be able to hook your heels into the bar, and to attain full bar extension (the two pulleys
touching) when you push your legs out. Once you have set the bar up in this way on the ground, a test ight in calm
Preparation

10
LYNX 2 manual EN v1.1 March 2023
air can be useful to ne-tune the length, ensuring it is even on both sides.
On launch
1. Select a suitable take-off area determined by wind and terrain, clear of any obstacles that may catch in the
lines or damage the canopy.
2. Take your paraglider to the top of the take-off area, and allow the canopy to unroll itself down the hill if
on a slope. This should leave the paraglider with the bottom surface facing upwards, the openings at the
downwind/uphill end of the take-off area, and the harness at the trailing edge at the upwind side.
3. Unroll the canopy to each side so that the leading edge openings form a semicircular shape, with the trailing
edge drawn together to form an arc. The harness should be drawn away from the canopy until the suspension
lines are just tight.
Pre-ight inspection
Your paraglider is designed to be simple to inspect and maintain but a thorough pre-ight procedure is mandatory on
all aircraft. The following pre-ight inspection procedure should be carried out before each ight.
1. Whilst opening the paraglider check the outside of the canopy for any tears where it could have been caught
on a sharp object or even have been damaged whilst in its bag. Visually inspect the risers for any signs of
damage.
2. Check the lines for signs of damage, twists or knots. Divide the suspension lines into groups, each group
coming from one riser. By starting from the harness and running towards the canopy remove any tangles or
twists in the lines. Partially inating the canopy in the wind will help to sort out the lines.
Preparation

11
LYNX 2 manual EN v1.1 March 2023
3. Ensure the brakes are clear and free to move. Check the knot which attaches the brake handles to the brake
lines. Avoid having too many knots, as there is a risk the knots could become stuck in the brake pulleys. Both
brakes should be the same length and this can be checked by having an assistant hold the upper end of the
brake lines together whilst you hold the brake handles. The brake lines should be just slack with the wing
inated when the brakes are not applied.
4. Always check the buckles and attachments on the harness. Ensure the two main attachment maillons/
karabiners from the harness to the main risers, and the individual shackles which attach the risers to the lines,
are tightly done up.
5. Before getting in to the harness you should be wearing a good helmet. Check the parachute container is
correctly closed and the handle is secure. Put on the harness ensuring all the buckles are fastened and that it
is well adjusted for comfort.
Your paraglider is now ready for ight
Preparation

12
LYNX 2 manual EN v1.1 March 2023
Flight Characteristics
This manual is not intended as an instruction book on how to y your paraglider. You should be a qualied pilot, but
the following comments describe how to get the best from your wing.
Take-off
The wing should be inated using the main A risers only, not the Baby-A (Big Ears) riser. The main A-riser is marked
with red material. The glider will rise smoothly overhead to the ying position and can be launched easily using either
the forward launch technique (best for light winds) or reverse launch (best for stronger winds).
Forward Launch
Stand facing into wind with your back to the canopy and all the A-lines taut behind you, then take one or two steps
back (do not walk all the way back to the canopy). Take a main A-riser in each hand and begin your launch run
putting pressure gently and smoothly on the A-risers. As soon as the canopy starts to rise off the ground, let go of
the A-risers but maintain pressure on the risers through the harness. Maintaining gentle pressure on the A-risers helps
in very calm conditions. Have your hands ready to slow up the canopy with the brakes if it starts to accelerate past
you.
Reverse Launch
In winds over 10km/h it is recommended to do a reverse launch and inate the canopy whilst facing it, using the main
A-risers. Releasing pressure on the A-risers when it is at about 45° will help to stop it overshooting. The stronger the
wind and the greater the pressure on the A-risers, the more quickly the canopy will rise. In stronger winds taking a
step towards the glider as it rises can take some of the energy out of the glider and it will be less likely to overshoot.
Flight Characteristics

13
LYNX 2 manual EN v1.1 March 2023
Straight Flight
Your paraglider will y smoothly in a straight line without any input. At the maximum in-ight weight, without the
accelerator it will y at approximately the trim speed shown in the Specications table.
Turning
Your wing does not require a strong-handed approach to manoeuvring. For a fast turn smoothly apply the brake on
the side to which the turn is intended. The speed with which the brake is applied is very important. If a brake is applied
fairly quickly the canopy will do a faster banking turn, but care must be taken not to bank too severely. To attain a more
efcient turn at minimum sink, apply some brake to the outside wing to slow the turn and prevent excessive banking.
The glider ies very well like this, but care must be taken not to over-apply the brakes, as this could result in a spin.
The wing will turn far more efciently if you weight-shift into the turn in the harness. Remember that violent brake
application is dangerous and should be avoided.
Active piloting
The objective of active piloting is to get the glider to y smoothly through the air with a stable position above your
head, and controlled angle of incidence. Active piloting means ying in empathy with your paraglider, guiding it
through the air and being aware of feedback from the wing. If the air is smooth the feedback can be minimal but in
turbulence feedback is continuous and needs to be constantly checked.
In order to get the best performance from your wing, it is best to control it though small brake inputs and weightshift
rather than constantly being present on the brakes. A small brake movement early is more efcient than a big input
later. The more you let the glider y at trim speed, the better performance you will get out of it.
Your paraglider is resistant to collapse without any pilot action, but ying actively will increase the safety margin.
Active piloting can make your ying experience safer and more enjoyable, and it becomes instinctive in good pilots.
Flight Characteristics

14
LYNX 2 manual EN v1.1 March 2023
Thermalling
To attain the best climb rate your wing should be thermalled using a mild turn as described above, keeping banking
to a minimum. In strong thermals a tighter banking turn can be used to stay closer to the thermal´s core. Remember
that weightshifting in the harness will make the turn more efcient and reduce the amount of brake required.
Care must be taken not to apply so much brake as to stall. This is easy to avoid as the brake pressure increases
greatly as you approach the stall point. Only y near the stall point if you have enough height to recover (at least
100m).
Speed System
Launching and general ying is normally done without using the accelerator. A pilot ying at the maximum in-ight weight
should be able to reach the top speed noted in the specications table when the speed-bar is fully applied.
Full speed is achieved when the two pulleys on each A-riser touch. Do not go beyond this point or use excessive
force to attempt to make the glider go faster, as this may result in the glider collapsing.
When you come off the bar it is important to do so smoothly and progressively, to manage the pitch. It is possible for
any paraglider to front-collapse if the bar is released too quickly.
We recommend you only y in conditions where you can progress into wind with no speed-bar applied, so that you have
the extra airspeed in reserve should you need it.
IMPORTANT:
1. Practise using the speed system in normal ying and get fully used to using half speed-bar before you use the
full speed-bar.
Flight Characteristics
15
LYNX 2 manual EN v1.1 March 2023
2. The speed increase is achieved by reducing the angle of attack, which means the canopy has slightly more
collapse tendency.Take care when ying fast in rough or turbulent conditions as deations are more likely to
occur at speed.
3. Remember that your glide deteriorates at higher speeds.
Best glide is achieved when the risers are level and the brakes are off, or with a little accelerator applied (up
to 25% speed).
The Dyneema line that connects the speed system in the risers is designed to have a small amount of slack in it.
This is done intentionally in order to obtain the correct riser lengths when accelerated. The amount of slack in this line
varies between the different glider sizes, and determines the B riser length when fully accelerated.
This line can be adjusted for length or replaced where it is looped on the maillon of the B-riser.
Check the component parts of the speed system regularly for signs of wear and tear, and ensure that the system
always works smoothly.
Flight Characteristics
A AR3 B C
XS 330 380 380 450
S 320 370 380 500
M 320 370 380 500
ML 320 370 380 500
L 320 370 380 500
Riser lengths for a fully accelerated glider
16
LYNX 2 manual EN v1.1 March 2023
Flight Characteristics
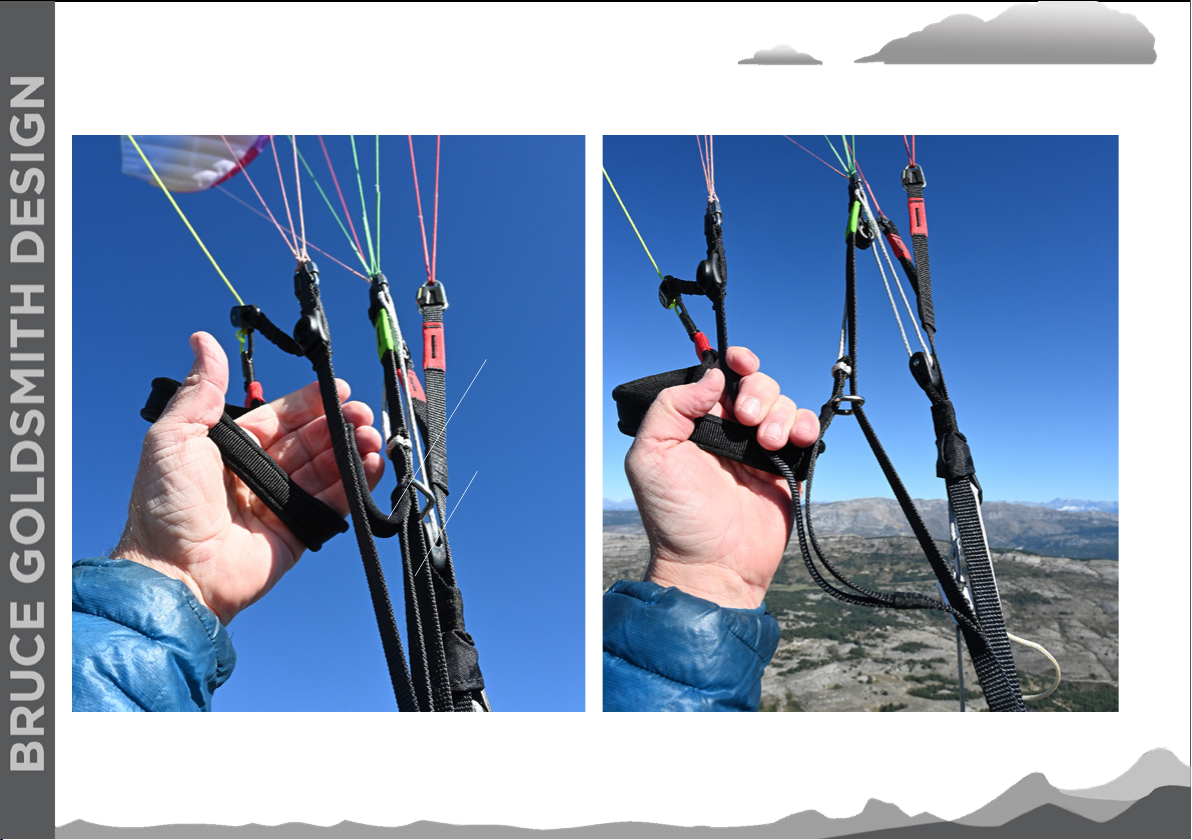
FIG. 1: Keeping the brake in your hand, grasp the C-steering handle with your ngers
C-steering
speed riser
C-steering
handle

17
LYNX 2 manual EN v1.1 March 2023
C-steering
The LYNX 2 has an effective and light C-steering system that allows you to actively pilot the wing without using the
brakes which is particularly useful when ying accelerated.
The risers are equipped with a ‘speed riser’. This is an extra riser that is attached to the back of the speed system.
This speed riser is also attached to the front of the C steering handle. The idea is to balance the load on the C steering
handle giving you more control over the glider when using the C-steering.
To y with the C-steering system, keep hold of the brakes, and grasp the C-steering handle with your ngers as
shown in FIG. 1. The C-steering system allows you to make small pitch adjustments when gliding, especially on speed.
It can also be used to control direction, but you must take care not to accidentally stall the glider as the range is
much less than on the brakes.
Rapid descent procedures
Big Ears
Big Ears (folding the wingtips in to increase sink rate) allows you to descend quickly without substantially reducing
the forward speed of your glider. It is possible with the LYNX 2, using the AR3 line, and should be done with some
speed bar applied (around quarter-bar) in order to avoid the risk of deep stall.
To engage Big Ears, lean forward in the harness and grasp the AR3 lines, keeping hold of both brake handles if
possible. As you apply up to a quarter speed bar, simultaneously pull the AR3 line out and down at least 30cm so
as to collapse the tips of the glider. It is very important that the other A-lines are not affected when you do this
as pulling these could cause the leading edge to collapse. Steering with Big Ears in is possible by weight-shifting.
When you let go of the outer A-lines or the Baby A risers, the Big Ears will come out on their own. A pump on the
brakes can speed this up if necessary.
Flight Characteristics

18
LYNX 2 manual EN v1.1 March 2023
Before using Big Ears in earnest you should practise with plenty of ground clearance in case a leading-edge
collapse occurs. Always keep hold of both brakes in order to retain control. Putting your hands through the brake
handles so they remain on your wrists is a good method of doing this.
B-Line Stall
This method should not be used for the LYNX 2.
Spiral Dive
A normal turn can be converted into a spiral dive by continuing to apply one brake. The bank angle and speed of the
turn will increase as the spiral is entered. Be careful to enter the spiral gradually and with control, as too quick a brake
application can cause a spin or a high G spiral.
Spiral dives are one of the most dangerous manoeuvres in paragliding and the high G-force and quick loss of altitude
can easily catch pilots out. A mistake in judging these factors can lead to a very serious accident, so spirals must be
treated with great respect. Pilots are advised to practise spiral dives under close supervision or during an SIV course.
To pull out of a steep spiral dive, release the applied brake gradually and/or apply opposite brake gradually. A sharp
release of the brake can cause the glider to surge and dive as the wing converts speed to lift. Always be ready to
damp out any dive with the brakes. Also be ready to encounter turbulence when you exit from a spiral because you
may y though your own wake, which can cause a collapse.
CAUTION: Spiral dives can cause loss of orientation or black-out and they take some time to exit from. This
manoeuvre must be exited in time, and with sufcient height.
Landing
Landing is very straightforward. When landing in light winds, are in the normal way from an altitude of around 2m. It
may sometimes help to take wraps on the brakes to make the are more effective.
Flight Characteristics

19
LYNX 2 manual EN v1.1 March 2023
Strong-wind landings require a different technique. If you use the brakes to are in a strong wind the wing tends to
convert this energy to height, which can be a problem. The best method is to take hold of the rear risers at the maillons
just before landing, and collapse the canopy using these when you have landed. The glider will collapse very quickly
using this method.
After landing, the B-risers can also be used to collapse the canopy, although it is more difcult to control the
collapsed canopy on the ground with the B-risers.
Flight Characteristics

20
LYNX 2 manual EN v1.1 March 2023
Recovery Techniques
Recovery Techniques
Stalls
Stalls are dangerous and should not be practised in the course of normal ying. This manual is not intended to give
instruction in this or any other area.
Stalls are caused by ying too slowly. Airspeed is lost as brake pressure increases and as the canopy approaches the stall
point it will start to descend vertically and nally begin to collapse. Should this occur it is important that the pilot releases the
brakes at the correct moment. The brakes should never be released when the wing has fallen behind the pilot; the brakes
should be released fairly slowly, to prevent the forward dive of the canopy from being too strong. A pre-release of the
brakes and reconstruction of the full span is recommended to avoid the tips getting cravatted during the recovery. Pilots are
advised not to attempt this manoeuvre unless under SIV instruction.
Deep Stall (or Parachutal Stall)
Your paraglider has been designed so that it will not easily remain in a deep stall. However, if it is incorrectly rigged
or its ying characteristics have been adversely affected by some other cause, it is possible that it could enter this
situation. In the interests of safety all pilots should be aware of this problem, and know how to recover from it.
The most common way to enter deep stall is from ying too slowly, from a B-line stall or even from big ears.
When in deep stall the pilot will notice the following:
1. Very low airspeed.
2. Almost-vertical descent (like a round canopy), typically around 5m/s.
3. The paraglider appears quite well inated but does not have full internal pressure. It looks and feels a bit limp.
Table of contents
Other BGD Aircraft manuals


Popular Aircraft manuals by other brands

Advance acoustic
Advance acoustic Epsilon 6 user manual

Diamond Aircraft
Diamond Aircraft DA 40 Series Maintenance manual

Ozone
Ozone OCTANE Pilot's manual

Textron
Textron Cessna Citation Sovereign Operation manual

Advance acoustic
Advance acoustic Protect II RIS user manual

Eclipse Aviation
Eclipse Aviation Eclipse 500 Flight manual

moyes
moyes LITESPEED owner's manual

HQ-Powerkites
HQ-Powerkites 120520 owner's manual

Cub Crafters
Cub Crafters CARBON CUB SS Maintenance manual

czech sport aircraft
czech sport aircraft SportCruiser N107BK Pilot operating handbook

Hoffmann
Hoffmann HO-V 62 Operation and maintenance manual

Diamond
Diamond JAR-VLA Flight manual


