BGD WOW User manual

1
Version 1.0 November 2020Version 1.0 November 2020

2
Version 1.0 November 2020
CONTENTS
Contents
Welcome
Introduction / Overview of Parts
Installation
Deploying
Repacking
Maintenance and Repairs
Guarantee
Specications
Closing
Repacking record
3
I5
7
8
9
14
16
17
18
19

3
Version 1.0 November 2020
WOW Owner’s Manual
Reserve parachute for paragliding
Welcome
Welcome to Bruce Goldsmith Design
BGD is a specialist manufacturer of high quality paragliding equipment. We y, research and develop in the south
of France, where Gourdon produces active-air test conditions year round. Bruce Goldsmith has been designing
paragliders and equipment since 1991, and has produced some of the world’s most loved and successful wings,
including two World Championship winning designs. We apply our competitive knowledge to design top quality
products that combine the highest performance with the safe handling our customers value and respect. BGD
pilots appreciate our quality and reliability. BGD´s World Class status is based on the skills and expertise we have
developed in combining aerodynamic design with cloth and materials technology. All BGD products are developed
and made with the same skill and attention to good design that are synonymous with the ultimate performance and
precision required by paragliders.
Congratulations on your purchase of a BGD WOW
The Wow is a modern square reserve parachute with a fast opening time, low sink rate and high pendulum stability.
The corner cut-outs make it very stable in descent immediately after deployment, and the symmetrical design
prevents system-related forward movement, resulting n a stable descent with easy landing.
The materials and technologies used in its construction ensure its reliability and robustness so it will have a long
service life. It is made from lightweight materials and packs down small. The panels are CNC precicion cut, and the
polyamide lines attach to the canopy with traditional loops, so they are quick and easy to replace if necessary. The
lines have some stretch, so they absorb some of the impact of a deployment.
The reserve is packed in a lightweight inner container linked to a deployment handle. The inner container is designed

4
Version 1.0 November 2020
Welcome
to open in any direction. The handle is reinforced for an easy grip, even when wearing gloves.
Before each ight, check all straps securing the outer container to the harness (where applicable). Ensure that the
container is closed properly, and visually inspect the pins for damage and make sure that they are secure.

5
Version 1.0 November 2020
Introduction
Operating limits / precautions
The WOW has been specially developed for use as a reserve parachute for paragliding. It is not intended to be used
for other ying sports including BASE-jumping and skydiving. It is suitable for integrated reserve containers.
• According to EN 12491, the reserve should only be used up to maximum speeds of 32m/s or 115km/h.
• The reserve should be aired out and repacked every 6 months.
• After a deployment, the reserve should be inspected by a qualied person.
• The reserve parachute must be replaced after 10 years, even if it has never been used.
• A compatibility test should be carried out to ensure harness and rescue are compatible.
• This parachute system has been tested and found compliant using the original manufacturer’s inner container.
Use of any other inner container may produce different results, including failures
Pre-ight check
Before each ight, check all straps securing the outer container to the harness (where applicable). Ensure that the
container is closed properly, and visually inspect the pins for damage and make sure that they are secure.
Introduction

6
Version 1.0 November 2020
Overview of parts
Introduction
Canopy
Lines
Corner openings
Bridle
Centre or apex lines
Packing loops (on top surface)
1
2
3
4
5
6
3
6
1
2
3
4
5

7
Version 1.0 November 2020
Installation
Compatibility Check
The WOW rescue system is suitable for integrated reserve containers in a wide range of harnesses. The rst-time
installation of the reserve chute into a harness should be carried out only by an expert, to ensure the harness is
compatible with the reserve.
To connect the reserve chute to the V-bridle, use an oval screw shackle with at least 2200 daN ultimate strength. The
lines should be secured on both sides of the screw shackle with rubber bands by means of a Larks Head knot; xing
tape or a neoprene cover can be used to protect against fraying and abrasion.
Directly connecting the bridle to the harness attachment webbing is not recommended, as if knotted incorrectly it
could signicantly weaken the system.
It is important to ensure that the connection is centred, that is, the two connecting lines leading to the shoulder straps
are of the same length. If the harness does not have an integrated attachment for the reserve chute on the shoulder
straps, then the reserve chute connecting lines can also be attached to the main karabiners.
Practice throw
After the initial installation, and if the back protection has been moved or changed, it is essential to do a simulated
reserve deployment under a static swing to ensure the parachute release system operates correctly and the
parachute comes out easily.
Installation

8
Version 1.0 November 2020
Deploying
To deploy the WOW in an emergency:
1. Visually locate the deployment handle.
2. Grasp the deployment handle and pull it to release the parachute in its inner container, from the external
outer container or harness.
3. Using the deployment handle, throw the inner container forcefully into open air (AWAY from the paraglider
canopy). If in a strong rotation, throw downwards towards your feet. The canopy will separate from the inner
container and inate quickly and easily thanks to the central line.
4. Stop your paraglider from ying to ensure a stable parachute descent. This can be achieved by pulling the
B-risers.
As with all paraglider reserve systems, the deployment throw must be forceful enough to separate the inner container
from the canopy. The special coating of the WOW makes this easier, and reduces failed deployments.
However, if the initial throw was not powerful enough for the system to deploy immediately, grasp the parachute
bridle attached to the harness, and pull it back for another, more forceful, throw.
Poorly maintained reserve chutes may open more slowly. If the container does not separate from the chute after
throwing, pull rmly and sharply on the lines to assist separation.
This guide conforms to requirements specied by Regulation EN 12491.
Deploying

9
Version 1.0 November 2020
Repacking
Repacking
Your parachute should be repacked every 6 months, preferably by a qualied professional. When removing the
parachute from the harness take the opportunity to complete a practice deployment. Check that you can reach your
handle easily and that the parachute exits the harness smoothly and easily.
Proper packing of the canopy is essential for the reliability and safety of the system. Therefore it is strongly
recommended to have the system re-packed by an authorised and trained specialist.
These instructions are aimed at pilots who are competent in folding a modern square reserve. They do not serve as a
substitute for proper training in folding a parachute.
The manufacturer can ensure the safety and reliability of the system only when it has been packed by a trained
professional who followed a proper packing procedure.
Before repacking
Airing
Before repacking, the reserve chute must be aired out, ideally for 12 hours in a cool, dry room.
Inspection
A thorough inspection is necessary. Visually inspect the reserve chute, checking for damage to the canopy, the lines,
the suspension points, the main riser and the screw shackle.
LINES: carefully inspect all the lines on both sides to ensure that they are undamaged, from the riser all the way to the
canopy. Make sure that the parachute is completely disentangled and that both the lower line and the upper of the
reef knot run freely from the risers to the canopy.

10
Version 1.0 November 2020
CLOTH: Ensure that it is not damaged or contaminated.
OUTER AND INNER CONTAINERS: Ensure that the handle is properly and securely attached to the inner container
and the riser is securely (tightly) attached to the harness.
If you nd any damage or contamination that may lead to system failure, the system must be checked by the
manufacturer. If you are not certain about the reliability of the system, send it to a professional for inspection.
Packing Area
Ensure the packing area is large enough, clean, level and dry. You will need the following to help you repack:
• A 30cm length of line
• Silicon-based rubber rings to organise the lines
• A line separator
• Weights or clips to hold the sections together as you fold
Repacking

11
Version 1.0 November 2020
Use the length of line to thread the packing loops together. Don’t forget the four corner
loops mounted slightly further back on the panels.
Secure the packing loops to something rigid, and pull on the bridle and the attached
loops until the apex line is tensioned.
Ensure that the lines are free of twists and tangles – start at the bridle and work
towards the parachute keeping the apex lines central and the suspension lines on either
side separated. Make sure none of the lines are twisted around the apex lines or each
other.
Lay out the canopy with one of the four corner points at the bottom, one on the left,
one on the right and one on top. Start with the rst corner at the bottom and smooth
the material by running your hand along it on the table.
Pull the base from each line attachment point to the next along the seam to the side
you are sorting and smooth out the crossed panel. A line separator and a weight will
help to secure the already sorted lines.
1
2
3
4
Repacking
12
Version 1.0 November 2020
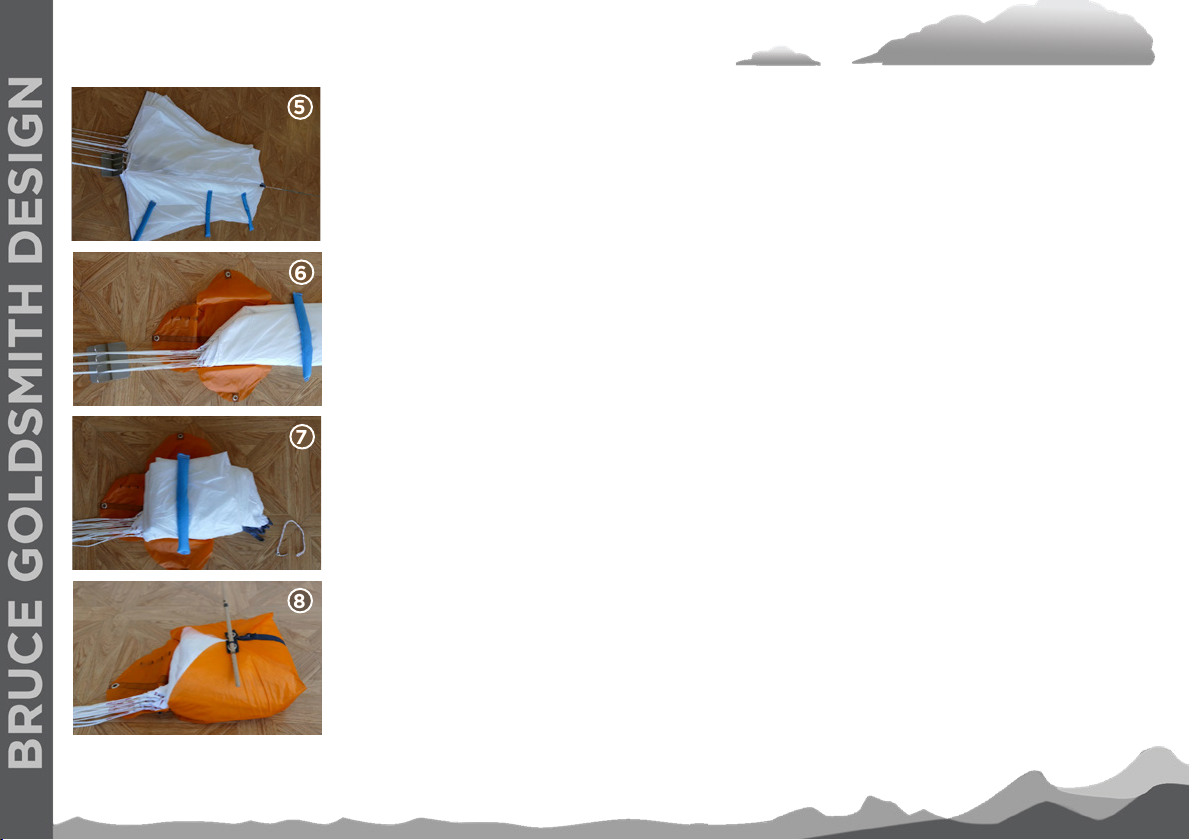
Lay out the next panels in a rectangular fashion. Identify the corner that points to one
of the sides. This is also to be laid out in a crossed fashion, as shown.
Continue with rectangular panels until the next corner is reached, which is now
the uppermost one and last on this side. Leave a channel through so that the table
underneath is visible. Use weights to secure the rst side, then repeat for the second.
Return to the channel and run hands along the connecting points of the middle lines
until they are free of material. Extra material can simply be pushed up inside the
channel, to prevent the material from burning during a deployment.
Panel sorting is now complete.
Inspect the middle line towards the bridle to check that it is free.
Fold the reserve chute with a “double-S fold“ as shown and place in the reserve
container with the line pocket in the direction of the base/bridle, using the full length
and width.
Close the rst three rescue aps and secure them with a small line loop. This method
will avoid burns from a deployment since the bundle of lines will be released rst and
will not come in contact with the material.
5
6
7
8
Repacking

13
Version 1.0 November 2020
Starting at the main riser, loop the line bundles in the shape of a gure-eight. Use
silicone-based rubber rings to x the line bundles. The gure-eights should be made to
the same width as the deployment bag. Leave approximately 30cm free for the nal
line loop.
Place the line bundles in the designated line pocket inside the reserve container. Secure
the fourth and nal rescue ap with the remaining line length.
Make sure that none of the items that you used to help with the packing, have accidentally been packed with the
parachute.
9
Repacking

14
Version 1.0 November 2020
Maintenance and Repairs
Maintenance
The canopy must be stored in a clean and dry place. Avoid extensive exposure to direct sunlight. If it gets wet,
immediately dry the canopy and the lines to prevent damage caused by mould. Contamination by oils or other chemicals
could signicantly reduce the load stability of the life saving system. A contaminated canopy must be inspected by a
professional. The outer container can be cleaned (without the canopy inside!) using water and a mild detergent followed
by a thorough rinse and drying. Use only clean water without soap to clean the canopy and lines.
The parachute must be checked and repacked before the rst installation by an authorised packer. We recommend it
is checked and repacked every 6 months, to ensure it remains clean and dry and does not become compressed. The
repacking should be recorded in the Maintenance and Packing log book.
When repacking, we recommend the parachute is aired, ideally between 1 and 3 days (to discharge static electricity).
Take care to keep out any insects or moisture.
If you have own in damp conditions or landed in a wet or snowy place, it is recommanded to check within 24 hours
whether the rescue was affected by humidity. If it has been, you should unfold it, dry it and repack it.
The parachute should be replaced after ten years from the date of purchase. The purchase date must be written on
the certication label by the dealer when the parachute is sold.
Repairs
All repairs must be carried out by the manufacturer. Any unqualied repair might lead to the system failure.
Maintenance and repairs

15
Version 1.0 November 2020
Recycling
We all have a responsibility to look after the environment and protect the places in which we y. Even the best
products have a limited service life, and once your reserve chute reaches this point it should be disposed of in an
appropriate recycling facility.
Maintenance and repairs

16
Version 1.0 November 2020
Guarantee
Our reserves are guaranteed against any production fault for two years from the date of purchase.
The guarantee does not cover damage caused by misuse, by neglecting the regular maintenance, by poor storage
conditions, or overloading.
Guarantee
17
Version 1.0 November 2020
Specications
90 110
Area (m2)22.5 27.5
Weight (kg) 1.2 1.4
Length of centre lines (mm) 4448 4915
Max. payload* (kg) 90 110
Min. payload* (kg) 60 73
Sink rate at max. payload* (m/s) 4.9 5.25
Volume (l) 4.1 5.2
Certication EN / LTF
*Payload = Weight of fully equipped pilot without paraglider
Specications
Materials
Canopy:
Lines:
Riser:
Nylon 6.6, 33dTEX
Edelrid A-6798-150
Dyneema/polyester 13 mm

18
Version 1.0 November 2020
Closing
If you are ever unsure about the information contained in the manual, contact your BGD dealer.
This document is not a contract.
BGD reserves the right to alter or modify its products without notice.
Closing
BGD GmbH, Am Gewerbepark 11, 9413 St. Gertraud, Austria. Tel: +43 (0) 4352 20477
sales@ybgd.com www.ybgd.com

19
Version 1.0 November 2020
Repacking Record
Date of Packing: By: Signature:
Repacking Record
Table of contents
Other BGD Aircraft manuals


Popular Aircraft manuals by other brands


Daher-Socata
Daher-Socata TBM 900 Pilot's information manual

czech sport aircraft
czech sport aircraft SportCruiser Pilot operating handbook

PAPILLON
PAPILLON BODYGUARD 7 manual

Direct Fly
Direct Fly ALTO 912 TG Aircraft Maintenance Manual

AIR TRACTOR
AIR TRACTOR AT-502A Maintenance section

Nova
Nova MENTOR 3 manual