Sol Sports Cyclus 2 User manual

Manual
LTF / EN B
Version 1 2 / 2023

2 3
Summary
WELCOME TO THE SOL TEAM .................................................................... 4
Symbols.......................................................................................... 4
IMPORTANT NOTES..................................................................................... 5
............................................................................. 6
.......................................................................... 6
................................................................................... 6
.................................................................... 6
Accessories .................................................................................... 6
Technology..................................................................................... 8
Overview paraglider..................................................................... 10
Overview risers ............................................................................ 11
Line plan ...................................................................................... 12
.......................................................... 14
............................................................................. 14
..................................................................... 14
........................................................................ 14
............................................................................... 14
........................................................................... 15
Laying out the glider .................................................................... 15
Harness ........................................................................................ 15
............................................. 16
Accelerator................................................................................... 16
Riser lengths ................................................................................ 17
........................................................................................................ 18
....................................................................... 18
.......................................................................... 19
........................................................................... 20
Thermals and Soaring .................................................................. 20
Turns ............................................................................................ 21
......................................................................... 21
................................................................................. 21
Landing ........................................................................................ 22
.................................................................... 22
Big ears ........................................................................................ 23
............................................................................... 23
B-Stall........................................................................................... 24
................................................................. 24
..................................................................................... 24
Lateral closing .............................................................................. 25
Parachutal .................................................................................... 26
........................................................................................ 26
............................................................................. 27
Line Over...................................................................................... 28
.......................................................................... 28
PACKING YOUR PARAGLIDER.................................................................... 29
.................................................................................. 29
...................................................................... 31
Storing.......................................................................................... 33
Back Pack ..................................................................................... 33
........................................................................................... 35
INSPECTION............................................................................................... 36
REPAIRS...................................................................................................... 36
............................................................................... 36
LINE CRACK .................................................................................. 36
QUICK LINK SEALING.................................................................... 36
WARRANTY ................................................................................................ 37
............................................................. 38
OPERATION LIMITS ................................................................................... 39
............................................................................................ 39
TECHNICAL DATA....................................................................................... 40
Weight, measure and data........................................................... 40
Parts and materials ...................................................................... 42
Lines............................................................................................. 42
Line lengths.................................................................................. 44
Line lengths individually .............................................................. 48

4 5
You have just acquired a high-quality product, manufactured under one of the most
demanding industry standards worldwide. We are certain that this equipment will allow
you to learn, increase and amplify your knowledge and technique during your ights.
We hope your paraglider Cyclus 2 will provide you with many nice ights and that you’re
experiencing moments that will last forever in your memory. This way our philosophy
will proof right: security, performance, easy handling and innovation.
Please, read this manual carefully. All necessary information you’ll need for your new
equipment is right here.
In case of questions or doubts regarding your paraglider or in case you simply are
interested in our new products - we are at your dispose.
Thank you very much for choosing SOL PARAGLIDERS.
Warnings and important notes - pay attention and read carefully
Notes regarding environment protection
Additional information
WELCOME TO THE SOL TEAM IMPORTANT NOTES
- As owner of a Sol Paraglider you are responsible for all possible risks existing by using
this equipment. The inappropriate and/or abusive use of your equipment increases this
risks.
- It’s not possible to transfer this responsibility of risks, using this equipment, to the
producer, distributor or seller.
- A regular training, whenever possible, especially on the ground, is indispensable and
necessary. A poor handling and control of the glider, especially on the ground, is one of
the most frequent causes of accidents.
- Always be prepared to improve your skills. Attending special workshops will improve
your skills and maintain your knowledge about materials and techniques, which always
are developing, up to date.
- Only use a certied paraglider, harness with protector and reserve and use them within
the described and certied limits. Remember, if you y a paraglider outside the certied
norms your insurance will not pay the damage. It is in your responsibility as a pilot to
know what your insurance covers.
- Sol Paragliders is ying and testing every single paraglider produced, to assure our
clients full quality and function of every glider. We recommend that every new or reviewed
paraglider will be tested on the ground and ew from the training hill by his pilot.
- Never take off without helmet, hand-gloves and boots.
- Check all your equipment before each ight. Never take off with an inappropriate or
damaged equipment.
- As pilot you only are allowed to use a paraglider in accordance to your skills and in
accordance to the instruction level required in each country.
- Before each ight check your physical and mental state. Are you t to y?
- Before take off choose the right Paraglider and environment, check the weather
conditions, if you have any doubt - don’t y.
- Never y during rain, snow, strong wind, turbulent conditions or if thunderstorm clouds
are in the sky.
- If you are always ying with conscious - you’ll be able to y for many years your glider.
Symbols

6 7
A project aimed at a wide range of pilots who want a lighter and more compact paraglider
for their travels and adventures around the world. With its modern constructions, we
created a small-volume product with great versatility of use.
With 1.1 kg less compared to the ATMUS 3, the CYCLUS 2 gains great prominence for
take-off being very light, stability, speed, glide and climb in thermals, creating a
comfortable package to y in all conditions.
The Cyclus 2 has a LTF / EN B certication. The certication details are available on:
www.solparagliders.com.br.
Suitable for a wide range of pilots from the talented beginner purchasing their second
glider to experienced pilots wanting to y more relaxed in more active weather conditions.
It is also intended for pilots looking for great thermal ights and good distance ights
without giving up the passive safety of a classic B.
Cyclus 2 - THE PROJECT
Special characteristics
Certication
Recommendation
- Ease of thermals;
- High Project Aspect Ratio;
- Performance;
- X - Battens;
- Glide;
- 50 meters less line;
- Easy Takeoff;
- Ecological;
- New design;
- Mini ribs;
- Hybrid system of risers and lines;
- Riser for ears;
- 3D Shaping;
- Confort;
- Light.

8 9
Technology

10 11
1. Trailing edge
2. Top
3. Leading edge
4. Bottom
5. Stabilo
6. Lines
7. Risers
1. Riser A
2. Riser A'
3. Riser B
4. Riser C
5. Brake lines
6. Toggle connection
7. Toggle
8. Speed system
9. Accelerator
10. Accelerator connection
11. Connection to harness
1
23
4
5
6
7
1234
5
6
7
8
9
9
10
11
Overview paraglider Overview risers
12 13
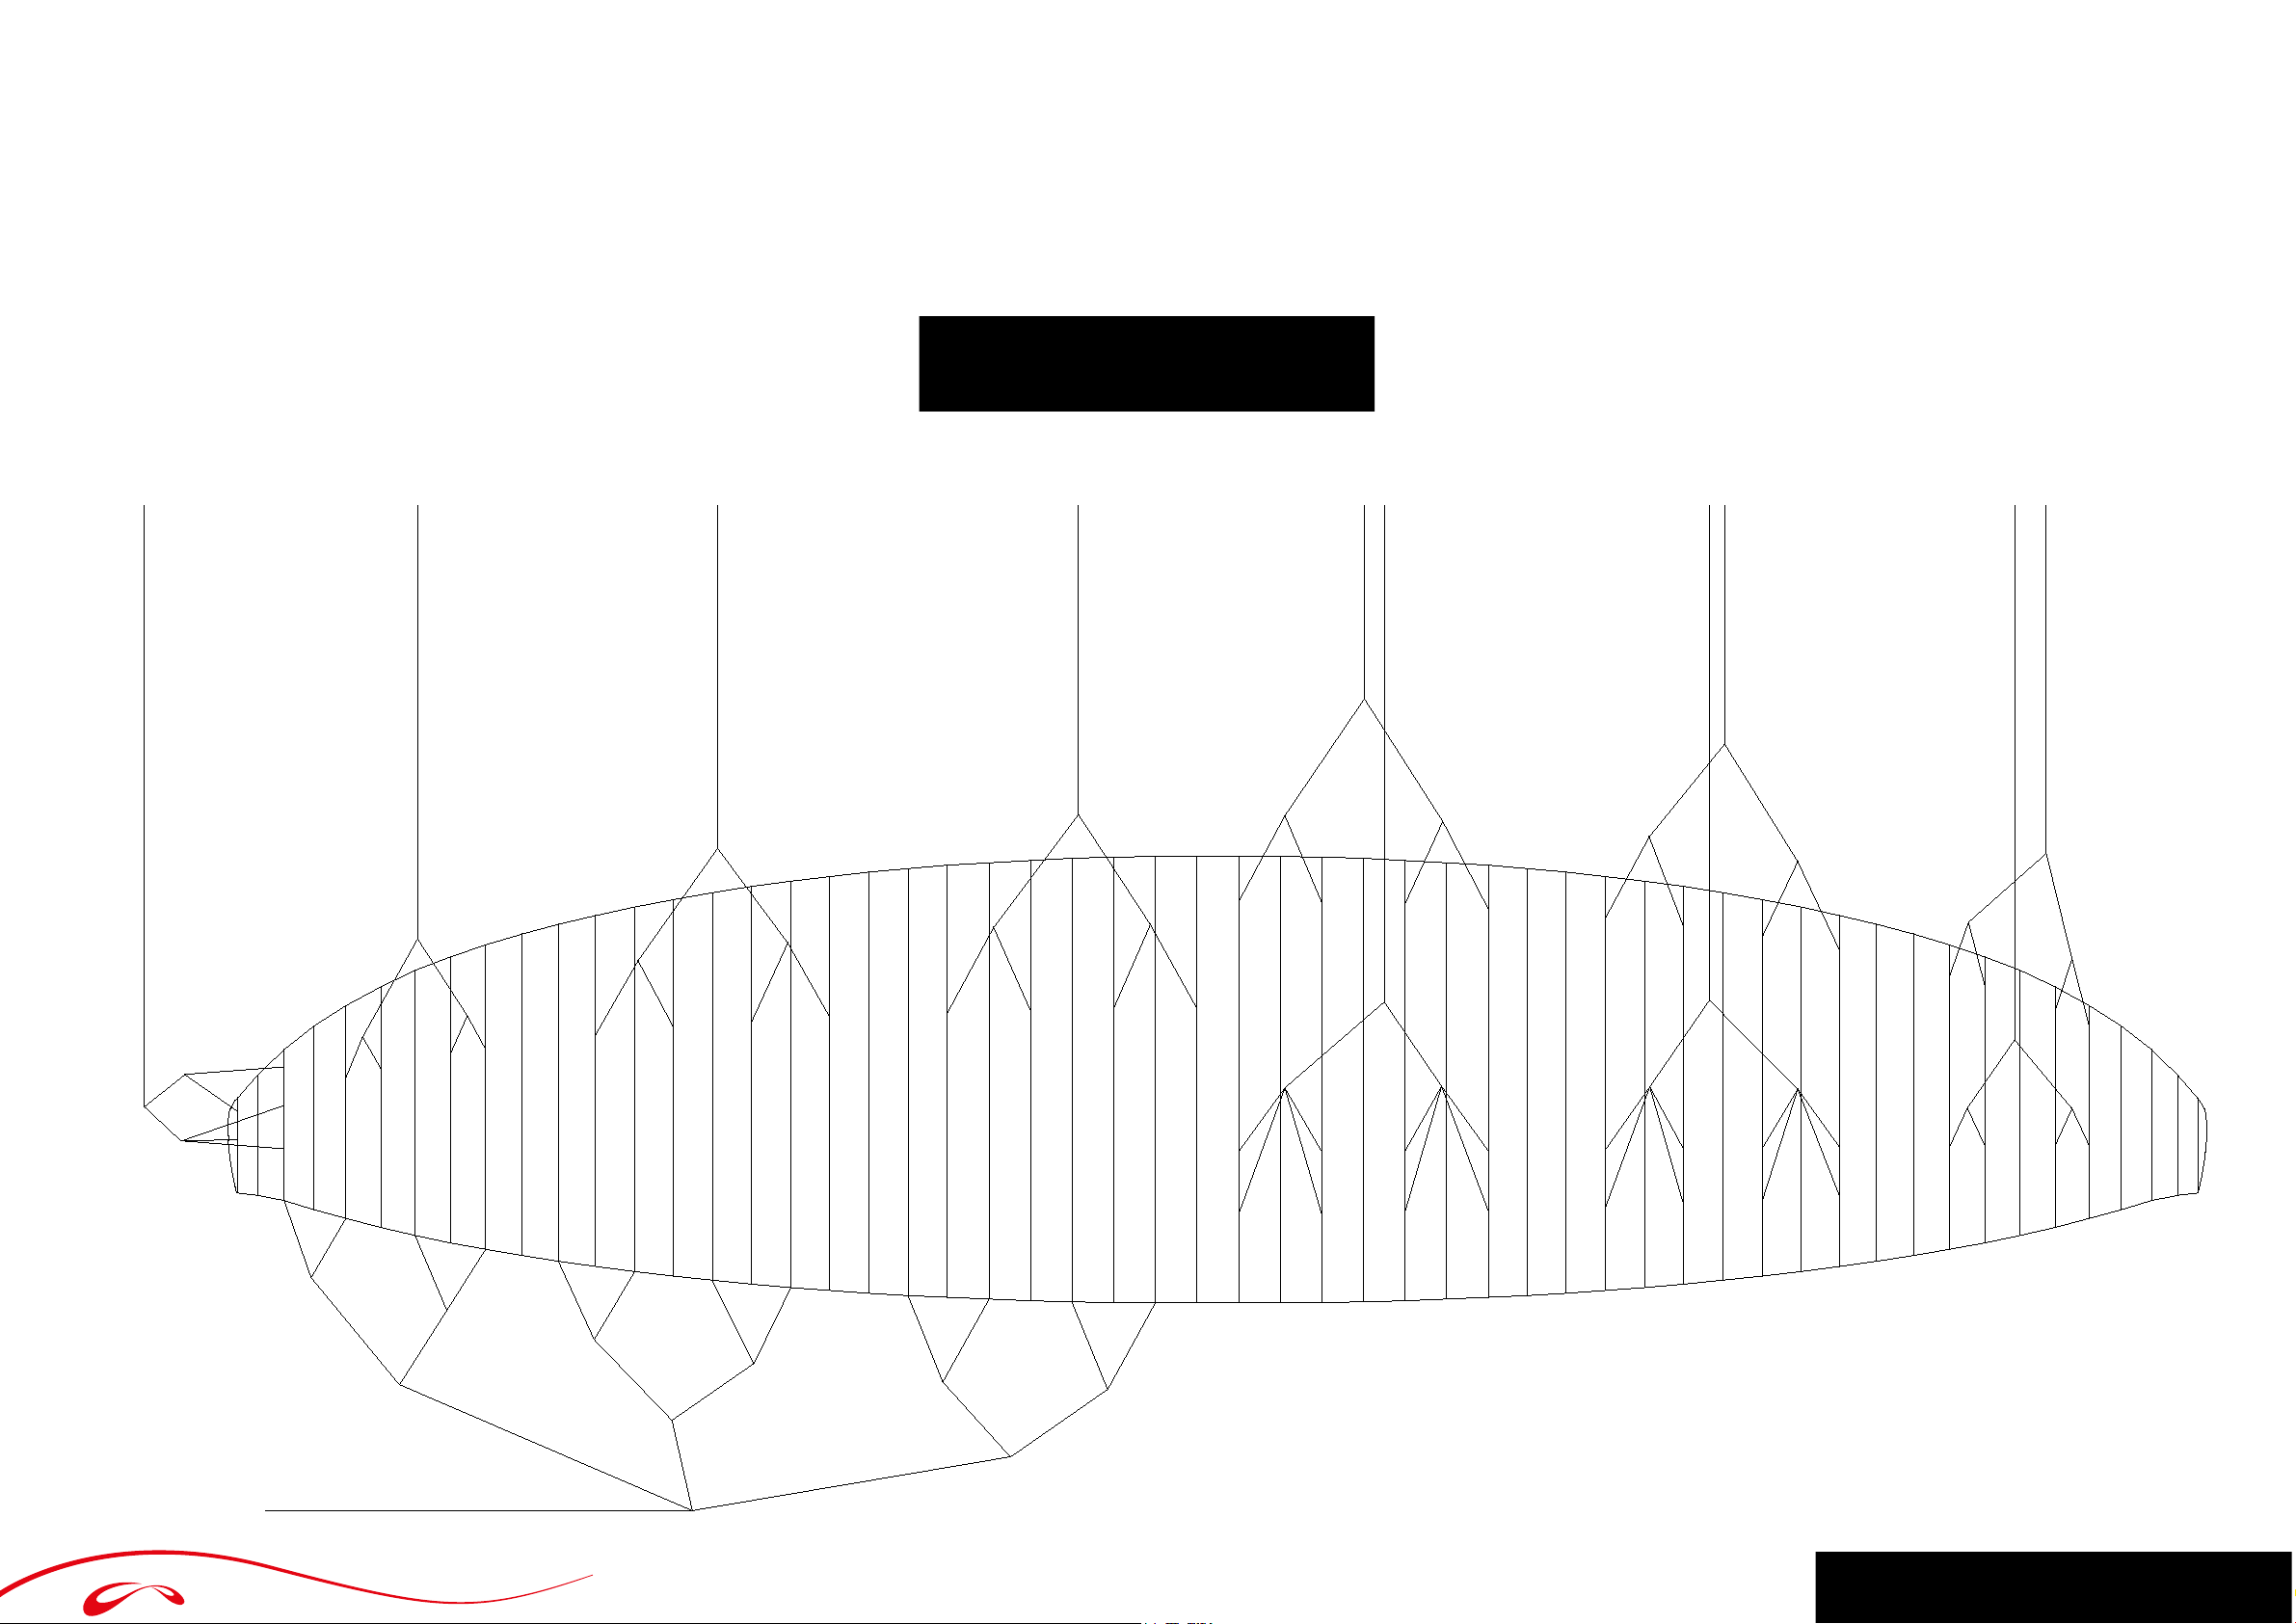
The suspension point design was developed for an ideal weight distribution and long
life. During all consideration and calculation, security always is our rst goal.. The used
material mix for the lines of the Cyclus 2 forms an ideal combination: long life with little
deformation and aerodynamic drag.
A 1
2A
3A
4A
5A
6A
7A
8A
9A
10A
11A
12A
13A
14A
B 1
2B
3B 4B
5B 6B
7B 8B 9B 10B 11B 12
B13B 14B
C 2 3C4C
5C
6
C7C
8
C9C
10
C
11C
12
C
13C
14C
D 7
8D
9D
10D
11D
12D13
D
14
D
F 1
2F
3F
4F
5F
6
F7F 8F 9F 10F 11F 12
F
FM3
FM3
FM3
FM3
FM3
FM3
FM1
FM2
FM1
FR
SM
SM
BM 1
2BM
3BM
4BM
5BM 6BM
BR3
AM 1
2AM
3AM
4AM
5AM
6AM
CM 1
2CM
3CM
4CM
5CM
6CM
RISER B
BR2BR1SR
RISER A
AR3 CR2 AR1CR3 AR2 CR1
BRAKEHANDLE
RISER B RISER B RISER B RISER C RISER C RISER A'RISER ARISER C
Never and under no circumstances the line length can be altered!
Line plan

14 15
THE PARAGLIDER - INFORMATION
If your take off weight is between two weight ranges we suggest the following procedure:
- For a more accurate and dynamic handling or if you usually y in the mountains and/or
turbulent conditions, you should choose to y in the upper weight range.
- For a better sink rate and if you usually y above at land and in light weather conditions,
you should choose to y in the lower weight range.
The Cyclus 2 can be used for towed ight. The used equipment must be certied, the
team handling the equipment must be licensed and you must have done a workshop
learning this take off. Always use the special tow connection. The take off only should be
done if the canopy is lled completely and steady above the pilots head.
The Cyclus 2 was not designed and is not certied for engine ight. SOL Paragliders
doesn’t recommend this type of ight.
The Cyclus 2 was not designed and is not certied for tandem ight. SOL Paragliders
doesn’t recommend this type of ight.
Each paraglider seize is dedicated to a certain weight range, from a minimum take off
weight to a maximum. The take off weight is the sum of the weight of:
It’s not recommended to y outside the weight range
1. the pilot
2. the paraglider
3. the harness with reserve
4. all ight accessories
Take off weight
Tow release take off
Flight with engine
Tandem ight
It is extremely important that there are no entanglements and/or bunched lines
present.
PREPARING FOR FLIGHT
- Choose an easy training elevation with less inclination for the rst ight, without
obstacles and a day with easy weather conditions.
- Open your canopy and lay him down in shape of a horseshoe.
- Check fabric and lines, if there is any damage or fatigue caused by wear.
- Check if all quick links are closed.
- Identify, separate and organize all risers A, A’, B, C and the brake lines.
The Cyclus 2 was tested within the standard of LTF with a harness of type GH. We can
recommend for the Cyclus 2 all harness of type ABS, tested with a carabiner connection
height between 42 and 48 cm, measured form the seat and depending on the seize.
Attention: the suspension height will inuence the “normal” brake position. Always use
a harness with back protection.
The distance between the carabiners should be correct. Together with your glider comes
an “Easy Check” measure tape which might help you to check the distance exactly.
Estando fora da medida indicada, o parapente pode ter reações fora de sua
conguração normal.
Laying out the glider
Harness

16 17
Without twisting the risers connect them with the carabiners of the harness. Check if
they are connected and positioned in the right way without any twist. The (A) riser must
be in front in ight direction.
Most of modern harness have pulleys for assembling the Foot Speed System. The line
must be rmly attached to the stirrup. The other end of the line is fed through the harness’
pulleys and comes out vertically, and must be rmly attached to the clip of the quick look.
In order to adjust the Speed System, we suggest that you connect the harness and the
risers, suspended from the ground. Ask a friend to pull the risers (A) upwards. At this
time, adjust the length right to the bar in such way to be easily reachable with your feet
in ight and by stretching the legs, make sure to allow for a clear path to maximize the
accelerator usage.
PARAGLIDER SOL
SIZE XXS XS S M L XL XXL TANDEM
MEASURE 38 CM 38 CM 40 CM 42 CM 44 CM 46 CM 48 CM 44 CM
Risers not accelerated
A = 52 cm
A' = 52 cm
B = 52 cm
C = 52 cm
Measure without
quick links
Measure without
quick links.
Risers accelerated
A = 40 cm
A’ = 42 cm
B = 44 cm
C = 52 cm
Riser lengths actually measured shall not differ more than ± 5 mm from the
lengths laid down in the user’s manual.
Riser lengths
Connecting paraglider and harness
Check if the carabiners are really looked and closed!
Accelerator

18 19
- Helmet closed?
- Carabiners looked and closed?
- Harness all looks closed?
- Carabiner distance OK.?
- Risers A in hands?
- Brake lines free, toggles in hand?
- Pilot stays in the midst of the canopy?
- Take off area free?
- Paraglider and pilot lined up against the wind?
- Air space in take off direction free?
FLIGHT
Take Off Check List
Forward Take off
When ready to takeoff, the pilot must have risers A and the toggles in hand. The arms
must be extended to the side, as if they are extensions of risers A. A decisive run allows
a quick and stable ination. After the initial ination momentum, the pilot must keep the
tension forward on risers A, not pulling them downwards, until the canopy is above his
head. At this point, the brakes must be carefully activated and the pilot must be prepared
for possible directional changes. A move to underneath the center of the paraglider is
the best method for corrections, provided there is room for it. The pilot glances at last
upwards to ensure the canopy is properly located above, completely unobstructed and
inated. Only at this point, the pilot decides whether or not to takeoff.

20 21
Reverse Take off
Thermals and Soaring
The preparation is the same as to forward take off. But this time you have to turn towards
the canopy. During the turn lift the hand which is turning away from the glider with the
risers above your head. Now you can inate the glider with the red A risers. Push the
risers up and let them go when the canopy is over your head. If necessary use the brakes
gently. Turn out and begin the start run. Attention: check to turn out to the right side.
Example you turned with your left side to the glider you have to turn out with your left
side to the glider. Otherwise you will have made a 360 degree turn and all your risers are
twisted.
In case of strong wind it could be necessary to make some steps towards the canopy
during ination. This take off method can be used even with little wind.
In turbulent conditions, the paraglider must be own with the brakes softly applied,
resulting in greater canopy stability. The pendulum effect back and forth must be
avoided! The canopy must remain on top of the pilot. For this purpose, the speed must be
increased by releasing the brakes upon entering a thermal (depending on its intensity) or
braking on exit. This is part of the basic technique on “active ying”.
During soaring, a minimum height of 50m over ground is highly recommended, for safety
reasons. Knowing and respecting ight regulations is extremely important, especially
when airspace within close proximities of mountains is shared among several pilots,
where last minute anti-collision maneuvers are not executable.
Turns
Accelerated ight
The Cyclus 2 is very sensitive, responding instantly to turn commands. Leveled turns
can be achieved with the shifting of weight on the risers with minimum altitude loss.
A combination of weight shifting and breaking technique is the most efcient way of
executing turns in any situation. The given brake utilized determines the radius of turns.
By activating the brakes on the outside edge of the turns, as well as applying maximum
weight shifting on the risers, the efciency and resistance to collapse in turbulences (at
the edge of thermals) is increased.
In case it becomes necessary to perform turns in a constrained space we recommend to
release the outside brake in the given turn and pull a little more the brake on the inside
of the turn.
The paraglider glides best when no brakes are applied.
It is recommended to use the accelerator when ying against the wind or in zones with
descending air. Due to a decreased angle of attack, the canopy may collapse easier than
when set at the normal position. The pilot must remember that the higher the speed, the
more dynamic the collapse response or symmetric closing will be.
- Exercise the use of the accelerator during calm conditions.
- Be cautious ying accelerated in difcult and turbulent conditions.
- Remember: The higher the speed the higher the descent rate.
- Check always on all accelerator parts for good function and signs of wear.
By pulling either brake too strongly or suddenly, there is a danger of creating a
negative spiral!
Active ying
For best performance during your ight, it is important to be always sensitive to what
your canopy is trying to communicate. The key elements of active ying are: controlling
the canopy advancement and the canopy pressure. If you apply gently the brakes (about
+- 15cm) you are getting a good feedback about the canopy pressure, which can alter
easily in turbulent air. You can feel it very well on the brakes. The general idea: keep the
pressure constant.
Avoid ying excessively with the brakes on, cause you might brake to the point of stopping
the canopy from ying. Always consider your aerodynamic speed. Your movements can
be symmetric or asymmetric and both or one brake can be applied. This corrections
control your ight and reduce the risk of collapses. We suggest that you practice on the
ground. Canopy advancement and pressure loss can be simulated well on the ground.

22 23
Landing
Always choose a secure and clean landing side with lots of space, great distance to
natural obstacles and is not under the inuence of turbulent air.
- The nal approach stage must be done in straight line upwind.
- With less than 30m above ground avoid steer turns, they may result in dangerous
pendulous movements and the pilot could crash to the ground with high velocity.
- Before landing get up in your harness with the weight against the chest strap, especially
in turbulent conditions.
- Fly with hands up, without brakes, until more or less 1m over ground. In turbulent
conditions y active until the end. Than apply slowly and progressively the brakes to
reduce velocity until you can almost without speed land on the ground.
- Always adapt your landing on space, circumstances and wind.
- If the wind is strong and you feel it might be possible been dragged or uplifted after
landing, pull symmetrically the B risers. This movement kills the glider fast and controlled
and avoids a re-ination or that the glider turns into a great sail. After killing the glider
pull him back to you using the B risers.
The following maneuvers should be used only in emergency situations and need a
special training fore safety use. If possible attend a workshop to learn and practice this
maneuvers.
This maneuvers are used by cloud entrance and in case of approaching thunderstorms.
Remember: a good weather analysis before ight helps to avoid this maneuvers
during ight.
FAST DESCENT MANEUVERS
Big ears
Positive spiral
Push the line AR 1 on the riser A’ down and to the outside. Keep the line until the glider
ear is closed. Do it rst on one side and than on the other.
The paraglider handling stays exact the same: using the brakes or shifting your weight.
If you want to return to normal ight, let go of the lines AR 1. Normally the canopy opens
on its own, but you can help pushing the brakes lightly.
A positive spiral has a high sink rate. But the high acceleration, G-Force, impedes to y this
maneuver for a long time. The G-Force may cause that the pilot looses his consciousness
and spirals until he crashes the ground. The same high energy is acting on the equipment
and will shorten his endurance.
A positive spiral never should be exercised in turbulent conditions or strong lateral wind.
Under strong wind conditions the pilot has to remember that the lateral drift could be
enormous.
When the pilot activates just one brake, slowly and progressively, the paraglider inclines
sideways in a sharp angle and enters in a steep and quick turn, which may become a
positive spiral. During a spiral the rotation radius can be controlled by the force applied
to the inside brake.
In order to come out of the spiral, the pilot must release the brake slowly and shift his
weight lightly to the outside of the turn. A sudden exit may result in an exaggerated
forward movement of the canopy, and cause a collapse. For this reason, on the last turn,
the inside brake of a given turn must be softly applied again.
In case the canopy collapses during this process, the spiral must be counter-acted, as
the active canopy area will be reduced.
- Never combine big ears with spirals. The canopy active area reduction p l u s
the ‘G’ force may result in line and/or canopy damage.
- Leaving a fast spiral must be executed slowly and progressively.
- The maneuver requires high altitudes (at least 600 meter over ground) and is
dangerous, due high descent ratio the pilot can lose the altitude reference.

24 25
This maneuver provokes a parachute ight and as a result the paraglider is almost
unable to be directed.
To initiate the maneuver get the B risers closely to the quick links and push them
symmetrically and slowly downwards until the canopy prole is deformed. The glider
stops to y forward and descents vertically.
To end the maneuver let go symmetrically and at the same time of the B risers. The glider
stops to sing and starts to y forward again
B-Stall
In the event risers ‘B’ are pulled too quickly or too deeply, a horseshoe may
occur towards the front. In order to regain normal ight, the pilot has to let go
of the B risers and must apply the brakes lightly. In case the parachute ight
continous, use the method described below in “parachutal”.
EXTREME FLIGHT SITUATIONS
Front-stall
Normally the paraglider opens on his own after a front-stall. In turbulent conditions it
may happen that the canopy make a fast movement forward, in order to avoid another
front-stall it is necessary to apply the brakes precisely.
Caution: If the brake lines are applied too much the glider could get into a full-stall.
Active ying almost ever avoids lateral closing. If lateral closing happens, the canopy
folds predictable and progressively from the tip to the center. This corresponds a collapse
of 50% or more and results in a slight tendency for a turn. The glider can be held on
course using the brake on the open side.
Normally the paraglider opens on his own. If the collapse happens during accelerated
ight the canopy has a more dynamic reaction, but even than the turn can be controlled
without problems.
To facilitate the closed side to ll the pilot has to pull down slowly (ca. 2 seconds) the
brake on the closed side and let go again (pump). Shifting the weight to the open side
helps to re-inate the sail and increases security, cause the brake has to be used less
and this avoids a full-stall.
Without action, the paraglider will begin a positive spiral. The pilot must lightly apply the
brake on the external side to stop a spiral and at the same time shift his weight on the
same side until the canopy is stabilized. Exactly at this stage of pendulum effect under
the canopy, it is important that the pilot controls carefully the amount of force applied on
the brakes, and often it is needed to decrease the force. Once a straight ight is achieved,
the closed side can be re-inated by the pumping action.
Lateral closing

26 27
Parachutal
Full-stall
If the glider is wet or the regular inspections weren’t made, the risk of a
parachutal ight exists.
This paraglider does not have parachutal ight tendencies and recovers on its own from
an intentional parachutal ight induced by braking commands. In case of a parachutal
ight after an extreme situation loose the brakes and use the accelerator. Before using
the brakes again make sure that the glider ies normally.
The Cyclus 2 has a long way on the brakes before he enters a full-stall. A full-stall
happens if the brakes are pulled symmetrically and excessively downwards. Normally
the glider starts to y backwards and deforms to a horseshoe, the opening on the front.
Before terminating the canopy must be stabilized. Afterwards both brake lines have to
be loosened symmetrically and slowly, to avoid that the canopy kicks forward.
Negative spiral
The Cyclus 2 has a long way on the brakes and difculties to enter in a negative spiral.
But if one of the brakes is extremely pulled downwards it can happen.
The side with the brake pulled down enters in a stall, while the other side maintains open.
In this case the brake must be loosened at once, before the glider turns 180º, in order
to get the glider back to normal ight. Depending on the situation in which the brake is
loosened, the canopy can react quite dynamic and kick forward provoking a collapse.

28 29
Line Over
Emergency ying
If the tip of the wing is trapped in lines it could cause a positive spiral, which is difcult
to control. To get out of this situation, rst stabilize your wing and get him into normal
ight. In other words control direction. Than pump on the side of the Line Over. During
this procedure lean on the opposite side, otherwise there is a risk to turn or increase the
spiral.
You also may try to pull the stabilo lines SR, the outer lines on the blue riser B, to free the
canopy. Watch out for the brake to avoid a stall on the clean side.
If the Line Over is big and all the counter action does not help and the glider is not to
manage, release the reserve, whilst you are having height enough.
In case of a brake line crack or the brake line is trapped or anything else happened
and doesn’t allow to use the brakes, use the C risers and weight shifting to steer the
glider. Land on the nearest possible side. This situation could happen in case of poor
maintenance of the equipment or an extreme ight situation.
Attention: the steering commands on C risers are much shorter than on the
brake lines.
Folding Bag
There are different ways who can help to extend the life of your paraglider. One way is to
fold the glider right. It’s most important to watch out for the reinforcements to maintain
the take off characteristics and the performance. We are recommending the “Origami
Method” and the use of a Origami-Pack Sack (see below). Together with your glider you
get a traditional pack sack who also protects your glider. How to use it we describe after
the “Origami Method”.
Step 1: Open the folding bag and pull the
partially in. The outside will look like a
cabbage. This way you’re avoiding that
the glider drags over the ground during
folding.
Step 2: Begin with the center of the trailing
edge. Put one prole over the other. Each
side separate.
PACKING YOUR PARAGLIDER

30 31
Step 3: Now do it in the same way
with the leading edge proles. Put the
reinforcements of top and bottom in the
right way, don’t close the cell openings
and push out the fabric.
Step 5: At last fold the sack as shown in
the photo. This method is very gentle to
the more stiffer parts of the glider.
Step 4: Fold the wing like an accordion
from both sides and close the folding bag.
Watch out for the lines and fabric closing
the zipper.
Traditional-Method
Step 1: Bundle up your glider in form of a
cabbage. This way you’re avoiding that
the glider drags over the ground during
folding.
Step 2: Begin with the center of the trailing
edge. Put one prole over the other. Each
side separate.
Step 3: Now do it in the same way
with the leading edge proles. Put the
reinforcements of top and bottom in the
right way, don’t close the cell openings
and push out the fabric.

32 33
Step 4: Fold the wing like an accordion from both sides and put one side over the other.
Now all reinforcements are laying side-wise one above the other.
Step 5: Fold the sack as shown in the
photo. This method is very gentle to the
more stiffer parts of the glider.
Step 6: At last put the glider into the protection bag.
Step 1: Open your back pack and put your
glider in.
Storing
Back Pack
Most part of the glider fabric is Nylon. As all other synthetic materials it suffers and
deteriorates under the inuence of ultraviolet radiation (UV). It looses his stiffness and
gets more porous. Whenever it is possible avoid to submit your glider to the sun light, it
has a high UV rate, especially in heights. It is recommended to store your paraglider very
well whilst it not in use. It should be stored dry in a dry place, protected from UV rays,
distant from chemical products. Avoid to store the glider in hot places like the trunk of a
car.
We recommend that you store your equipment in the back pack. That way it is easy to
transport and protect. Your back pack was designed to be useful and comfort. Do it this
way:
Step 2: Your harness put above the glider
and close the zipper.

34 35
Step 4: Close all parts and pockets of the
back pack.
Step 3: Store your helmet and accessories
between the glider and the harness or in
the upper part of the back pack.
TIPS FOR CARE
- Over-stressing of individual lines, more than normal load in ight, should be avoided.
An excessive deformation is irreversible and can’t be undone. For the same reason avoid
stepping on the lines, bending or folding them, especially the main lines.
- Always open the glider on clean ground, otherwise dirt could penetrate the fabric,
shorten the lines or damage the canopy. Lines should not be entangled to objects during
the phase of ination, otherwise they could be deformed or damaged. Never step on the
canopy, especially not on hard ground.
- Take offs and landings under strong wind conditions could force the glider to crash
uncontrolled with high velocity on the ground, the crash could damage fabric and
sewings.
- In case of a Line Over the brake lines could wear of or a main line could be cut by a
brake line or crack by friction.
- Handling the paraglider on a earthy ground under strong wind conditions accelerates
the aging process of your equipment.
- After a water or tree landing the paraglider must be sent for inspection to an authorized
dealer’s workshop.
- It must be avoided that sand, stones or snow enter in the cells, otherwise the weight on
the trailing edge could brake the glider and cause a full-stall. Besides, the sharped edges
could damage the sail’s fabric.
- After the landing be careful, avoid crashing the leading edge on the ground. Otherwise
the material and sewings of the cell openings could be damaged.
- In case the paraglider gets in contact with salty water, he must be washed with sweet
water and dry in the shadow. Never use tools to accelerate the drying process. Salty
water could reduce the line resistance and increase the porosity of the fabric, even
washed out with sweet water.
- After any kind of accident: the equipment must be sent for inspection to an authorized
dealer’s workshop or to the manufacturer.
- Keep up to the required inspection data, to assure that your equipment is always save
for use and within the certication requirements.

36 37
INSPECTION
REPAIRS
Your paraglider has strictly to follow the required inspection intervals. The rst inspection
check is mandatory completing 24 months or 100 ights, whichever comes rst.
After the rst inspection any wing must be checked yearly or at each 100 ights,
whichever comes rst. In any of these inspections may occur that a shorter period for
the next inspection will be dened (f. ex. 6 months or 50 ights).
Without performing the mandatory inspections, the paraglider loses its certication and
the warranty becomes null and void.
After any kind of accident or a long period without use: sent the paraglider for inspection
to an authorized dealer’s workshop or to the manufacturer. It’s for your own good.
Minor repairs (see below) you could do by yourself, but all other repairs must only be
made by an authorized dealer’s workshop or the manufacturer.
Repairs must only be made by an authorized dealer’s workshop or to the manufacturer.
In case of minor repairs you are receiving with your glider a basic repair kit. It contains
adhesive labels in case of minor tears and quick link sealing.
Small tears up to 10 cm away from the line suspension points may be xed by yourself.
Beyond that the maintenance must be made by an authorized dealer’s workshop or the
manufacturer.
• Clean the spot where the adhesive label will be applied with a humid cloth.
• The adhesive label has to be at least 2,5 cm larger than the tear.
• Round the edges, otherwise the adhesive label could loosen after the aplication.
• Apply on both sides of the tear.
In case of a line crack we recommend to contact your dealer, an authorized dealer’s
workshop or the manufacturer. After the repair test the glider on the ground and check
if everything is alright.
Along with your kit you’re get sealing for the quick links. Don’t leave your risers without
them, because they avoid the movement of the screw nut, making it impossible to open.
FABRIC TEARS
LINE CRACK
QUICK LINK SEALING
WARRANTY
Access your warranty term:
http://www.solparagliders.com.br/garantia
Register your product to validate your warranty:
http://www.solparagliders.com.br/registro.php
Warranty Terms
Product Registration

38 39
Please be aware of our environment: don’t toss your garbage into nature, respect the
animals. Remember: nature is our gliders engine.
If your paraglider gets out of use remember it cannot be recycled. Please give it to your
dealer or your ying-school, they should know how to handle it.
ENVIRONMENT AND RECYCLING
Safety is the major theme of our sport. In order to y safely, pilots must train, study,
practice and be alert to the dangers around us. In order to achieve excellent safety levels,
we must y regularly as much as possible, don’t go beyond our limitations and avoid
exposing ourselves to unnecessary dangers. Learning to y is a slow process and takes
years, so don’t pressure yourself. If conditions are not favorable, keep your equipment
stored away.
Don’t overestimate your skills and be honest with yourself. Every year we see many
accidents which in most cases could be prevented with a minor adjustment.
We are a part of the community in which we live: friends, family and even people we
don’t necessarily know worry about us. Our obligation towards this community is to
keep ourselves healthy and that at each landing we will be one landing happier than
before. We y so that we can feel more alive.
We wish you good and safe ights with your new paraglider.
SOL Paragliders Team !!
FINAL WORDS
In conformity of LTF standard:
Temperatures between -30 degree till +70 degree of Celsius during the storage shouldn’t
inuence the use and security.
Temperatures between -30 degree till +50 degree of Celsius and a variation of humidity
between 25% and 100% during the use shouldn’t inuence the use and security.
Remember: Your product is a high quality product and was made out of carefully chosen
materials. Store your equipment carefully and keep up the maintenance. The operating
temperature limit is below -30° C.
OPERATION LIMITS
Table of contents
Other Sol Sports Aircraft manuals

Popular Aircraft manuals by other brands


Zodiac Aerospace
Zodiac Aerospace ATOM Legend S T1,5 Use and maitain manual

Cessna
Cessna 182S Skylane Pilot operating handbook

DUC Hélices
DUC Hélices SWIRL-2 instruction manual

Topmodel CZ
Topmodel CZ Marabu V manual

XciteRC
XciteRC PARACOPTER RTF manual

FlyingFoam
FlyingFoam Nurf General assembly instructions