BIELMEIER BCSK-4P User manual
WARNING! Please carefully read this user manual before operating the staple gun.
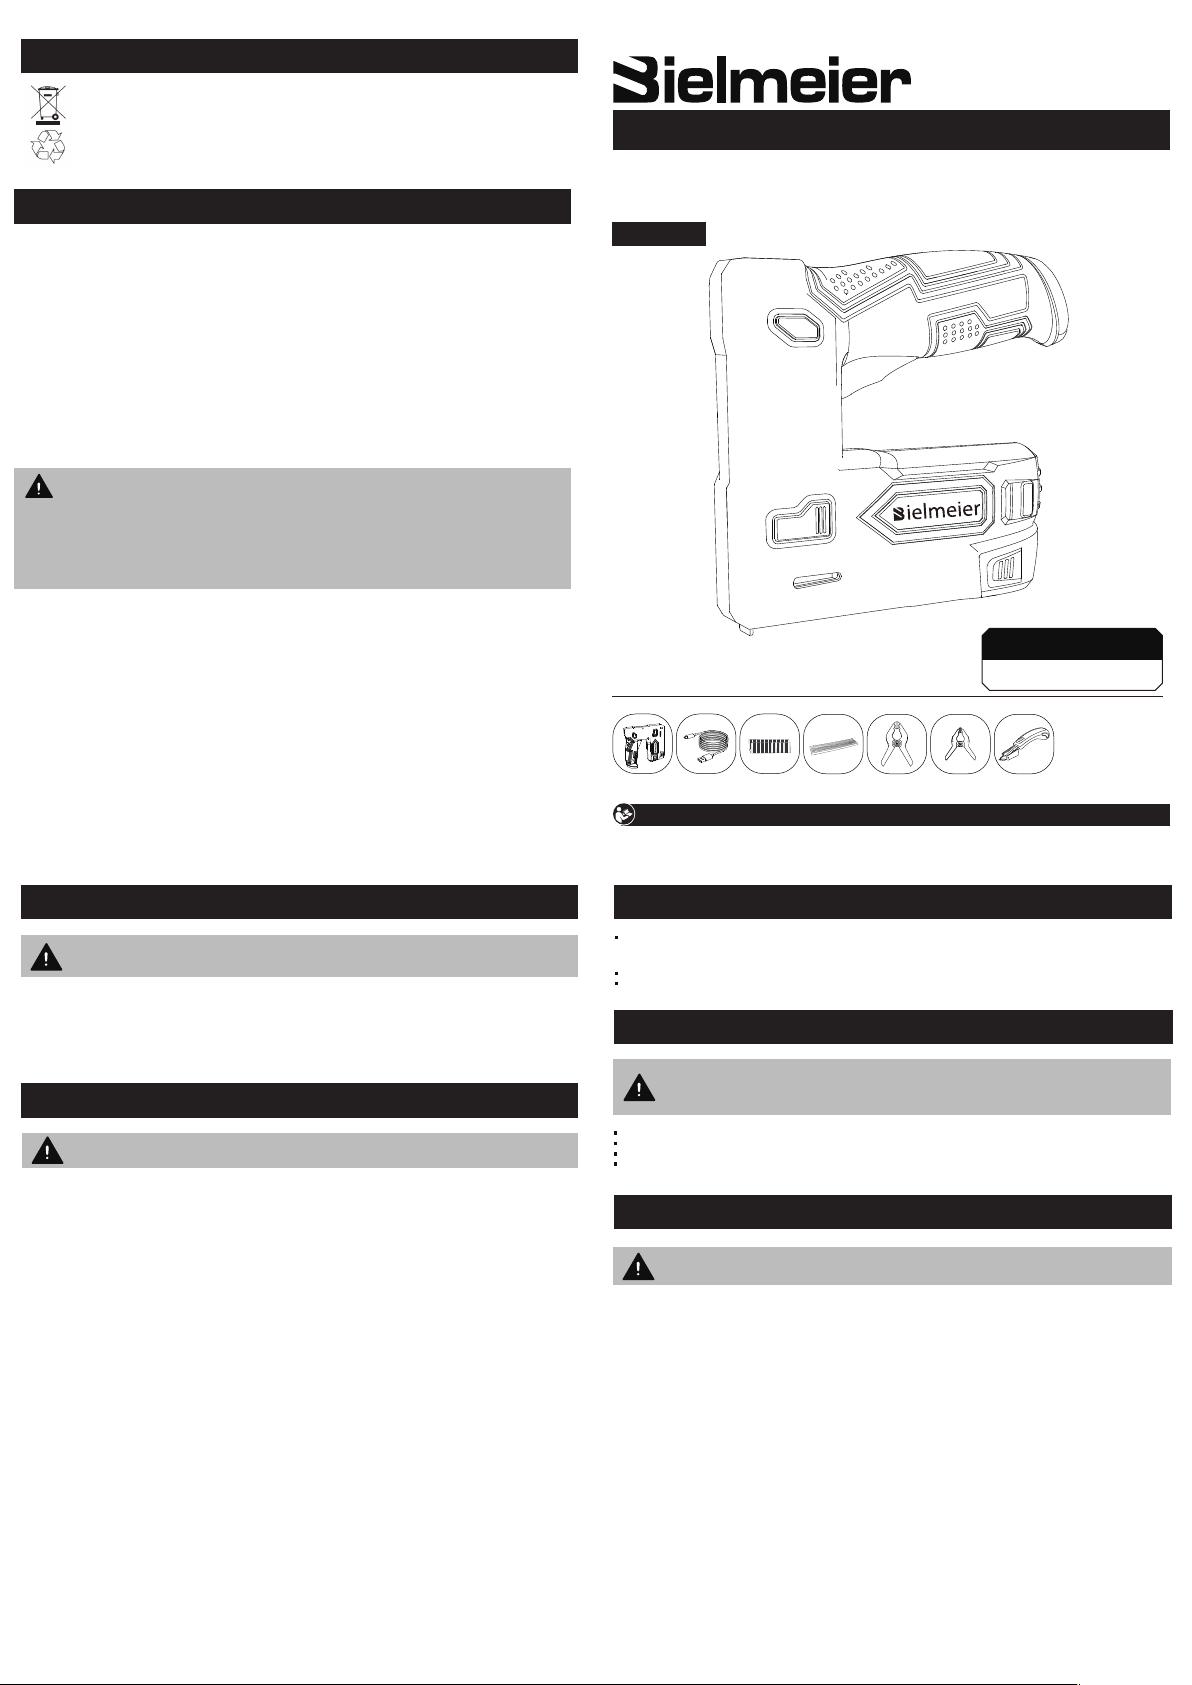
USER MANUAL
4V Max Lithium ion
Cordless Staple Nail Gun
WHAT'S IN THE BOX
BCSK-4P
MADE IN CHINA
Cordless Staple Gun Brad Nails x 800
Tpy-c Charge Cable
CUSTOMER SERVICE
Staples x 1800
GENERAL POWER TOOL SAFETY WARNINGS(CONT.)
STAPLE GUN SAFETY WARNINGS
WARNING! This appliance is not intended for use by persons including children with
reduced physical, sensory or mental capabilities, or lack of experience and knowledge,
unless they have been given supervision or instruction concerning use of the appliance
by a person responsible for their safety.
Always assume that the tool contains fasteners. Careless handling of the stapler or nailer can result in unexpected firing of fasteners and personal injury.
Do not point the tool towards yourself or anyone nearby. Unexpected triggering will discharge the fastener causing an injury.
Do not actuate the tool unless the tool is placed firmly against the workpiece. If the tool is not in contact with the workpiece, the fastener may be deflected away from your target.
Do not use this stapler or nailer for fastening electrical cable. It is not designed for electric cable installation and may damage the insulation of electric cables thereby
causing electric.Shock or fire hazards.
BATTERY AND CHARGER SAFETY WARNINGS
.
■ This charger is not intended for any uses other than charging rechargeable batteries. Any other use may result in risk of fire, electric shock or electrocution.
■ Since battery tools do not have to be plugged into an electric outlet, they are always in an operational condition. Be aware of possible hazards when not using the battery tool or
when charging accessories. Following this rule will reduce the risk of electric shock, fire and serious personal injury.
■ Do not place battery tools or batteries near fire or heat. This will reduce the risk of explosion and possibly injury.
■ Do not crush, drop or damage the battery. Do not use a battery or charger that has been dropped or has received a sharpblow. A damaged battery is subject to explosion.
Properly dispose of a dropped or damaged battery immediately.
■ To avoid damage to the electric plug and cord when disconnecting the charger, be sure to pull by the plug and not the cord. Make sure the cord is placed where it will not be
stepped on, tripped over, or otherwise subjected to damage or stress.
■ To reduce risk of electric shock, unplug the charger from the outlet before attempting any cleaning. Removing the battery will not reduce the risk.
■ A battery can explode if set near a source of ignition, such as a pilot light. To reduce the risk of serious personal injury, never use any cordless product near an open flame. If a
battery explodes, it can propel debris and hazardous chemicals. If exposed to debris or chemicals, use water immediately to flush away particles/residue.
■ Do not charge battery tools in a damp or wet location. Do not use, store or charge battery or products in locations where the temperature is less than 50℉or more than 100 ℉.
■ Under extreme usage or temperature conditions, battery leakage may occur. If liquid comes in contact with your skin, wash mmediately with soap and water. If liquid gets into your
eyes, flush them with clean water for at least 10 minutes, then seek immediate medical attention. Following this rule will reduce the risk of serious personal injury.
■ Never attempt to open the battery and charger for any reason. If the plastic housing of the battery pack or charger breaks or cracks, immediately discontinue use and do not
recharge.
■ The battery is not fully charged out of the carton, first read the safety instructions and then follow the charging notes and procedures.
■ Save these instructions. Refer to them frequently and use them to educate others who may use this tool. If you loan this tool tosomeone, be sure they are familiar with these
instructions too.
Use the power tool, accessories, and tool bits, etc. By follpwing these instructions, taking into account the working conditions and the work to be performed. Use of the power
tool for operations different from those intended could create a hazardous situation.
Service
Have your power tool serviced by a qualified repair person using only identical replacement parts. This will ensure that the power tool is properly and safely maintained.
If the supply cord is damage, it must be replaced by the manufacturer, its service agent or similarly qualified persons to prevent any potential hazard.
WARNING! This manual contains important safety and opeerating instructions for you battery
and charger.
Before using the charger, read all instructions and cautionary markings on the charger, battery pack and the
product using the battery pack.
CARING FOR ENVIRONMENT
Power tools that are no longer usable should not be disposed of with household waste but in an environmentally
friendly way. Please recycle where facilities exist. Check with your local council authority for recycling advice.
Recycling packaging reduces the need for landfill and raw materials. Reuse of recycled material decreases pollution
in the environment. Please recycle packaging where facilities exist. Check with your local council authority for
recycling advice.
GENERAL POWER TOOL SAFETY WARNINGS
WARNING! Read all safety warnings and all instructions. Failure to follow the warnings
and instructions may result in electric shock, fire and/or serious injury.
ELECTRICAL SAFETY WARNINGS
WARNING! When using mains powered tools, basic safety precautions should always
be followed to reduce the risk of fire, electric shock, personal injury and material
damage.
Note: Bielmeier cordless tools are interchangeable for use in the United States and Canada.
Note: The power outlet used for the power tools/charger must be protected by a 30mA ground fault circuit interrupter or earth leakage circuit breaker. If the supply cord is damaged, it must be
replaced by an electrician or a power tool repairer in order to avoid a hazard.
Note: Double insulation does not take the place of normal safety precautions when operating this tool. The insulation system is added to prevent against potential injury should an electrical
failure occur within the tool.
Save all warnings and instructions for future reference. The term “power tool” in the warnings refers to your mains operated (corded) power tool or battery operated (cordless) power tool.
Electrical safety
Before operating the unit, carefully read the entire manual and be certain you know how to switch the unit off in case of an emergency.
Be sure to save these instructions and any other documents supplied with this unit for future reference.
Work area safety
■ Keep work area clean and well lit. Cluttered or dark areas invite accidents.
■ Do not operate power tools in explosive atmosphere, such as in the presence of flammable liquids, gases or dust. Power tools create sparks which may ignite the dust or fumes.
■ Keep children and bystanders at a safe distance while operating a power tool. Getting distracted while using the tool may lead to injury for the operator or bystanders if not exercising
proper safety.
■ Power tool plugs must match the outlet. Never modify the plug in any way. Do not use any adapter plugs with earthed(grounded)power tools. Unmodified plugs and matching
outlets will reduce the risk of electric shock.
■ Avoid bodily contact with earthed or grounded surfaces, such as pipes, radiators, ranges and refrigerators. There is an increased risk of electric shock if your bady is earthes or
grounded.
■ Do not expose power tools to rain or wet conditions. Water entering a powe tool will increase the risk of electric shock.
■Do not abuse the cord. Never use the cord for carrying, pulling or unplugging the power tool. Keep cord away from heat, oil, sharp edges or moving parts. Damaged or entangled
cords increase the risk of electric shock.
■ When operating a power tool outdoors, use an extension cord suitable for outdoor use. Use of a cord suitable for out door use reduces the risk of ekectrric shock.
■ If operating a power tool in a damp location is unavoidable, use a ground fault circuit interrupter(GFCI) protected supply with a rated leakage current of 30mA or less. Use of a
GFCL reduces the risk of electric shock.
Personal safety
■ Alwalys be sure to pay close attention to what you are doing when operating a power tool. Do not use a power tool when you are tired or under the influence of drugs, alcohol or medication.
A moment of inattention while operating power tools may result in serious personal injury.
■ Use personal protective equipment. Always wear eye protection. Under the appropriate condition, protective equipment such as a dusk mask, non-skid safety shoes, hard hat, or hearing
protection can reduce personal injuries.
■ Prevent unintentional starting . Make sure the switch is in the off-position before picking up or carrying the tool or connecting the unit to a power source/battery pack. Carrying power
tools with your finger on the switch or energizing power tools that have the switch may lead to accidents.
■ Rremove any adjusting key or wrench before turning the power tool on. A wrench or a key left attached to a rotating part of the power tool may result in personal injury.
■ Do not over reach. Keep proper footing and balance at all time. This enables better control of the power tool in unexpected situations.
■ Dress properly. Do not wear loose clothing or jewelry. Keep your hair, clothing and gloves away from moving parts. Loose clothes, jewelry or long hair, can get caught in moving
parts resulting in serious injury.
■ If devices are provided for the connection of dust estraction and collection facilities, ensure these are connected and properly used.
Power tool use and care
■ Do not force the power tool. Use the correct power tool for your application. The correct power tool will do a better and safer job when used for its designed purpose.
■ Do not use the power tool if the on/off switch is malfunctioning. Any power tool that cannot be controlled with the swtich is dangerous and must be repaired.
■ Disconnect the plug from the power source and/or the battery pack from the power tool before making any adjustments, changing accessories, or storing power tools.
This help reduce the risk of starting the power tool accidentally.
■ Store idle power tool out of the reach of children. Do not allowe persons unfamiliar with the power tool to operate it without first reading these instructions. Power tools
are dangerous in the hands of untrained users.
■ Properly maintain power tools. Check for misalignment or binding of moving parts, breakage of parts and any other conditon that may affect the power tools operation.
If damaged, have the power tool repaired before use. Many accidents are caused by poorly maintained power tool.
■ Keep cutting tools sharp and clean. Properly maintained cutting tools with sharp cutting edges are less likely to bind and are easier to control.
staple remover x1
Clamp(4”) x 2 Clamp(3”) x 2
WARRANTY
Yongkang Huore Industry Trading Co., Ltd.
Email: [email protected]
Add: Yuanzhou, Jiangnan Street, Yongkan City,
Zhejiang, P. R. China 321300
YOUR PRODUCT IS GUARANTEED FOR A MAXIMUM PERIOD OF 12 MONTHS FROM THE
ORIGINAL DATE OF PURCHASE AND IS INTENDED FOR DIY (DO IT YOURSELF) USE ONLY.
Warranty excludes consumable parts, (For example, bearings and O-rings, etc.)
30-DAY MONEY BACK GUARANTY
Within the first 30 days of purchase, you are allowed to return your product for a full refund.
30 DAYS TO 90 DAYS (3 MONTHS)
A defective unit will be replaced with a new one in accordance with the terms of this warranty, due to
manufacturing fault.
90 DAYS TO 12 MONTHS
Up to 12 months after purchase, we will provide speedy and effective online service.
WARNING!
The following actions will result in the warranty becoming void.
● If the tool has been operated on a supply voltage other than that specified on the tool.
● If the tool shows signs of damage or defects caused by or resulting from abuse, accidents or
alterations.
● Failure to perform maintenance as set out within the user manual.
● If the product is disassembled or tampered with in any way.
● Professional, industrial or high frequency use.
ANY QUESTIONS, PLEASE CONTACT OUR CUSTOMER SERVICE CENTER:
TO ENSURE THE QUICKEST RESPONSE POSSIBLE, PLEASE HAVE THE MODEL NUMBER AND
DATE OF PURCHASE AVAILABLE SO OUR CUSTOMER SERVICE REPRESENTATIVE CAN
ANSWER ANY QUESTIONS YOU MAY HAVE RELATING TO THE WARRANTY POLICY OR
PROCEDURE.
KNOW YOUR PRODUCT
SPECIFICATIONS
Working Voltage: 4VDC Max
Max Magazine Capacity: 50 Staples or Nails
Impact Rate: 50/min
Staple Size: 1/4”-9/16” Type 50
Nail Size: 9/16”-5/8” Brad
Battery: 4VDC Max, 1,500mAh, Li-ion
Charging Time: Approx. 2 hours (based on 5VDC/1A)
Product Weight: 1.60 lbs.
UNPACK AND SETUP
CAUTON!
The charger for this product should be protected by a leakage current device
(rated at 30mA or less).
CHARGING
The charge indicator will illuminate red if the battery is low, indicating that the battery needs charging.
1. Plug the charging output end into the charging port on the staple gun.
2. Connect the Typ-c cable to a DC power device such as power back, computer, or connect to an AC supply through an adaptor.
Note: The charge indicator will remain red whilst charging.
3. Once fully charged, the indicator light will illuminate green.
WARNING!
always be sure the power switch is in the OFF position when assembling these parts.
ASSEMBLY
LOADING STAPLES
This staple nailer only accepts T50 staples, other types of staples including paper staples, will jam the unit.
1. Hold the tool upside down.
2. Squeeze the magazine latches on either side of the tool and
3. Insert a row of staples into the opening behind that nose piece.
Note: Rows of more than 50 staples do not fit in the staple gun.
4. Push the loaded magazine back into the unit until it clips into place.
4
6
57
2 3
1
OPERATION
OPERATION(CONT.)
WARNING!
Always wear eye protection with side shields marked to comply with ANSI
Z87.1. Failure to do su could result in objects being thrown into your eyes and other
possible serious injuries.
WARNING!
Do not allow familiarity withthis product to make you careless. Remember that
a careless fraction of a second is sufficient to inflict serious injury.
WARNING!
Do not use this tool for fastening electrical cable or wire. Itis not designed for
electrical cables, causing electric shock or a fire hazard.
LOADING NAILS
This staple gun nailer only accepts 9/16”- 5/8” brad nails. Other types of nails will jam the unit.
1. Hold the tool upside down.
2. Squeeze the magazine latches on either side of the tool and pull the magazine out of the tool.
3. Insert a row of nails into the opening behind the nose piece. Be sure to align them to the side marked with a nail marker so that the nail head is against the internal groove.
Note: Rows of more than 65 nails do not fit in the staple nail gun.
4. Push the loading magazine back into the unit until it clips into place.
WARNING!
Always keep your fingers away from the discharging area of the tool when
driving a staple or nail. Failure to keep fingers out of the way can result in serious
personal injury.
APPLICATIONS
You may use this product for the purposes listed below:
Driving staples or nails into wood;
Using the included accessory, driving staples or nails to secure fencing wire or wire screen.
DRIVING A STAPLE OR NAIL
The Safety Striker System is a two step process where a staple or nail will only fire when the safety striker pin is pushed against the material to be fastened.
■ Hold the handle firmly with the nose of the tool flat against the workpiece at a 90° angle.
■ Press the safety striker pin down against the workpiece to be fastened. The safety striker pin must be depressed before pulling the switch trigger.
■ The tool will drive another staple each time the trigger is depressed as long as the safety striker pin is depressed.
NOTE: Make sure that the power ON/OFF switch on the back of the staple gun is ON before operating.
0 1
a
b
TROUBLESHOOTING
WARNING! Always make sure the power ON/OFF switch is in the OFF position before
investigating the fault.
MAINTENANCE
WARNING! To avoid serious personal injury, always be sure that the
power switch of the tool is OFF position when servicing.
WARNING! When servicing, use only identical replacement parts. Use of any other
parts can create a hazard or cause product damage.
WARNING! Never use water or any liquids to clean or rinse off your product . Corrosive
liquids, water, and chemicals can enter the product’s electronic components and/or
battery compartment and damage electronic components and/or the battery pack,
which can result in a short circuit, increase risk of fire, and serious personal injury.
Remove any buildup of dirt and debris by wiping the product clean with a dry cloth
occasionally.
When not in use, staple nail gun should be stored in a dry, frost free location, keep out of children’s reach.
If the housing of the staple nail gun requires cleaning, do not use solvents. Use of a cloth only is recommended. Never immerse any part of the staple nail gun into liquid.
Bielmeier tools will not be responsible for any damage or injuries caused by repair of the staple nail gun by an unauthorized person or mishandling.
Jammed Staple Nail Gun
Squeeze the magazine latches on either side of the tool and pull the magazine out of the tool.
Using a pair of pliers, remove any jammed staples or nails.
Note: Be careful not to bend the end of the magazine. If this occurs the unit will be inoperable.
With the magazine still open, tap the safety striker pin against a surface to dislodge any loose staples.
The Battery Has A Short Run Time
Ensure that the battery is properly charged, it will take 4-5 charging cycles before the battery reaches optimum charge and run time.
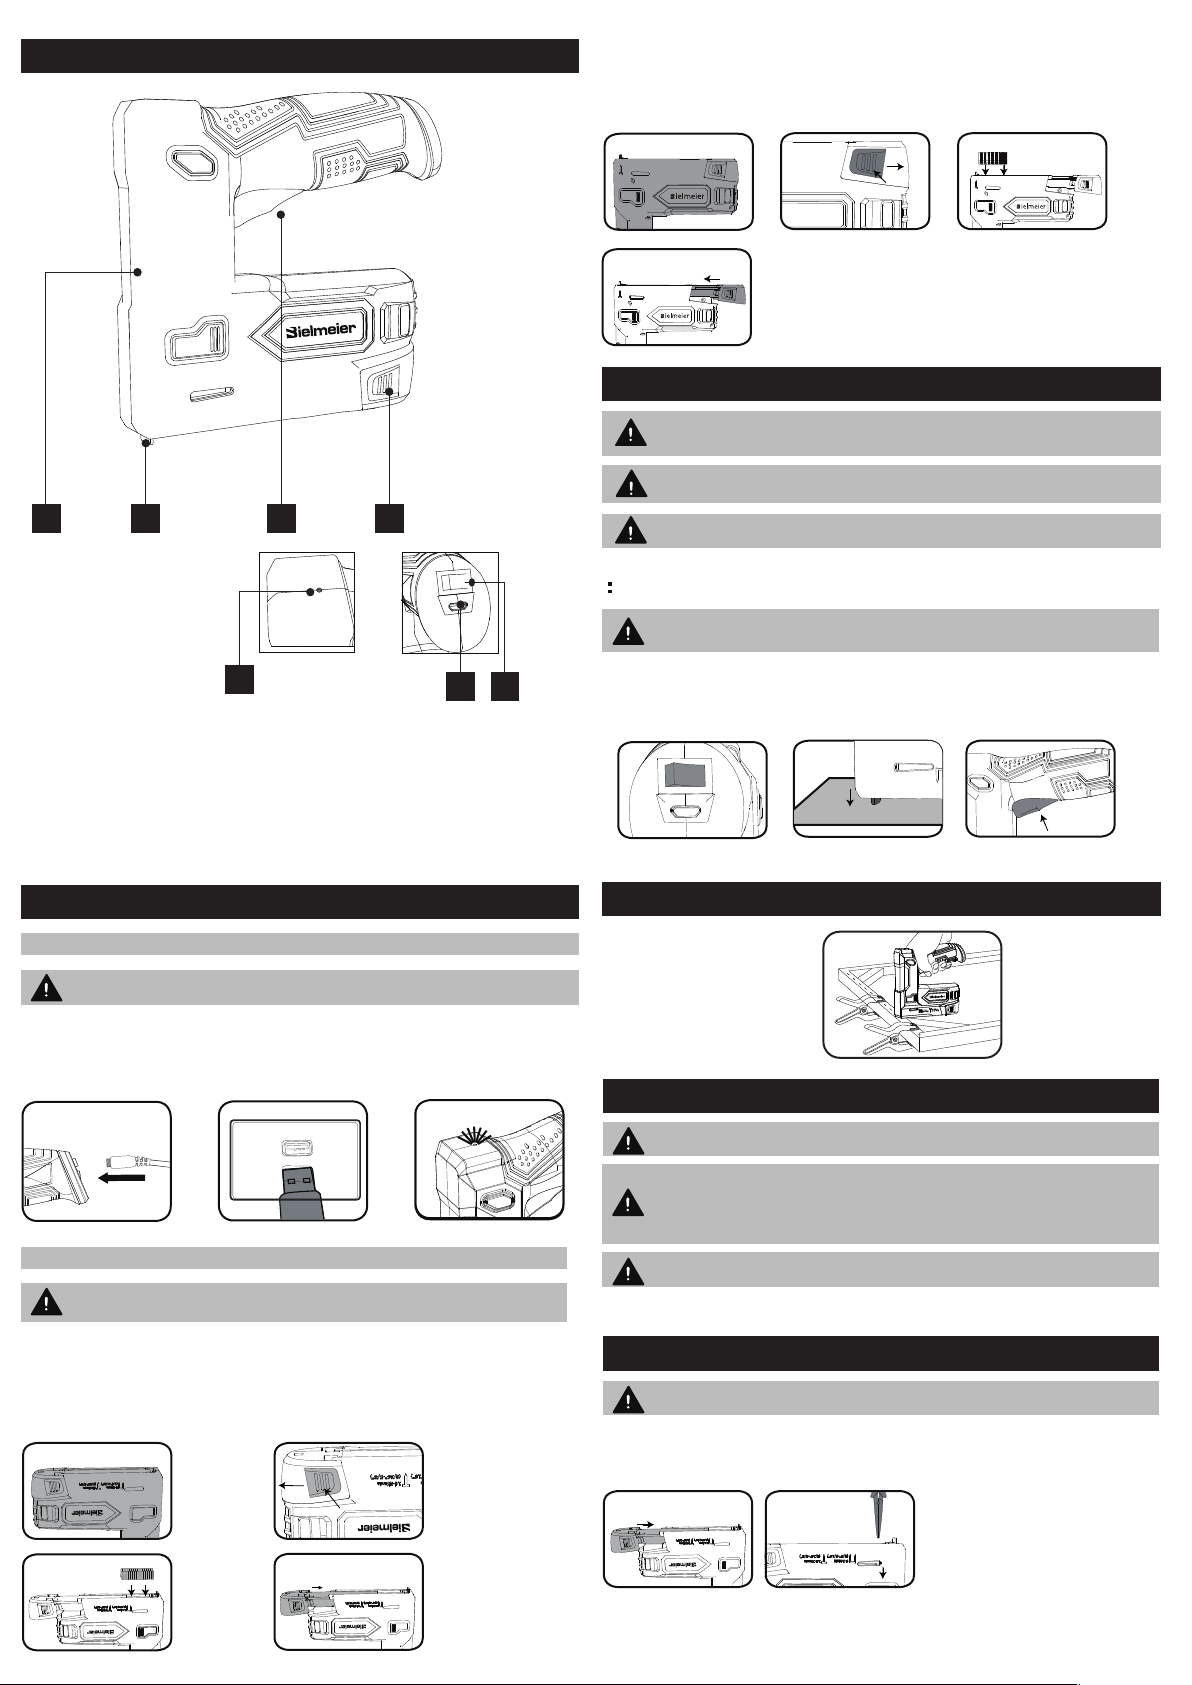
1. Main Housing
2. Safety Striker
3. Switch Trigger
4. Magazine Latch
5. LED Indicator
6. Micro Typ-C Charging Port
7. ON/OFF Power Switch
a
b
How To Use Clamp
Place the materials that need to be bound on top of the wood,
use clamps to assist in spreading them out evenly, and then
secure them in place with a nail gun.


