Bierer VD1000 User manual
1
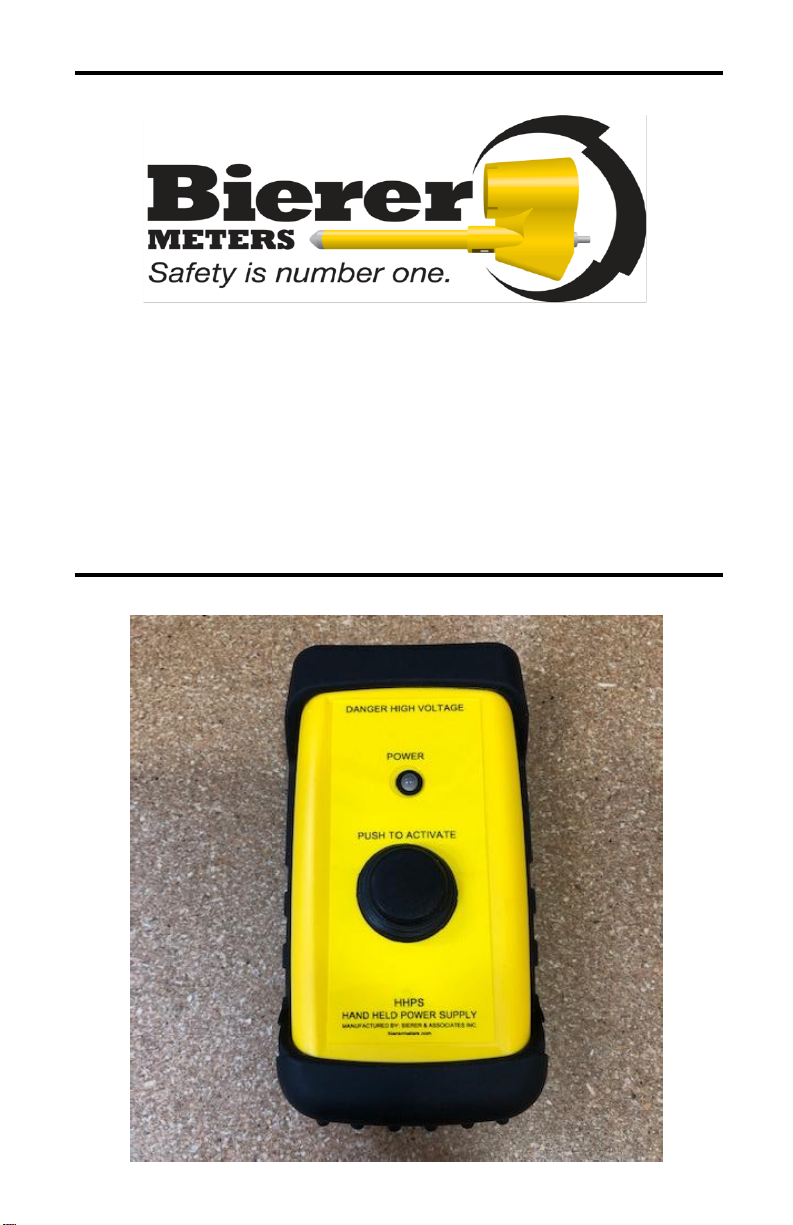
Hand Held
Power Supply
Instruction Manual

2
CAUTION
The equipment covered in these operating instructions should be
used by qualified employees, trained in and familiar with the
safety-related work practices, safety rules and other safety
requirements associated with the use of this type of equipment.
These instructions are not intended as a substitute for adequate
training, nor do they cover all details or situations which could be
encountered in relation to the operation of this type of equipment.
WARNING
Use appropriate length live line tool for the voltages being worked
and maintain minimum approach distances as outlined in OSHA
1910.269, Table R-6. Do not let live line tool fittings become
grounded in any way. This will damage meter and may cause
personal injury.
NOTICE
Before operating this equipment, read, understand and follow all
instructions contained in this manual. Keep instructions with
equipment.

3
Design and Function
The Hand Held power supply is designed to provide a single phase
known voltage source for the test and verification of a voltage
detector. It is recommended to use this tool before and after each
use of the meter to verify function of the meter to prevent false
indications in the event of a tool malfunction. It is specifically
designed for use on non-wired voltage detectors.
The supply provides an approximately 800 volt output, varying
slightly in relation to the actual voltage of the 9V battery that
supplies the unit. The readings the meter will give will also slightly
vary depending on the unit being tested and the position of all the
components. Due to the frequency output being higher than the 60
Hz our voltage detectors are calibrated to. This does not affect the
test results as it will still verify the meter is functioning and reading
a voltage. If any meter does not read a voltage, it would be
considered faulty and do not use it till proper function is verified.
BATTERY REPLACEMENT
1. Remove the power supply from the rubber grip cover by pushing
up at the bottom and then pull the unit out.
2. Slide the cover off the battery compartment.
3. Remove the battery and replace it with a new 9V battery, being
sure to observe the orientation of the battery and matching it to
the legend at the bottom of the battery holder.
4. Slide the battery cover back onto the unit.
5. Place the unit back into the rubber cover by placing the top into
first and then pushing the bottom into the case.
CAUTION:
Use caution when handling the tool. The metal disk at the top of the unit
is an energized source when the power button is depressed, even when
the battery light is red.

4
TESTING ON KNOWN VOLTAGE
Testing with the Hand Held power supply on non-wired voltage
detectors only.
1. Turn the meter in question on and follow the instruction for
preparing the unit for use. The power supply can test the appropriate
meters in any position listed on the chart on page 5.
2. With the power supply in hand, depress and hold the power button.
If the light on the unit turns green, the battery voltage is good and
you can proceed to the next step. If the light is red, follow the
procedure on page 3 then repeat this step.
3. While holding the power button down and holding the meter being
tested in hand, make contact with the metal disk on the end of the
power supply with the tip of the meter. The expected results are
shown on page 5.
NOTE: Depending on how the meter is held, the results could vary. The
results on page 5 are under normal conditions, holding the body of the
housing and not touching the probe or the quick change tool adapter. if
you are not sure of the results, please contact technical support for
assistance.
4. Once test is complete, release the push button and return the power
supply to its normal storage location. The meter is now ready for use.

5
Hand Held Power Supply Expected Results.
Meter
Position
Expected reading
VDA040C
C
FULL SCALE
URD
2.0 - 3.4
OH
2.5 - 5.0
X4
1.0 - 2.0
VDA040P
P
FULL SCALE
URD
2.0 - 3.4
OH
2.5 - 5.0
X4
1.0 - 2.0
VD1000
URD
2.5 - 5.5
OH
3.0 - 6.0
OHT
6.0 - 16.0
VD1000T
T
60.0 - 90.0
URD
2.0 -5.0
OH
2.5 - 5.5
OHT
6.0 - 16.0
VD1000P
P
999.0
URD
2.0 -5.0
OH
2.5 - 5.5
OHT
6.0 - 16.0
VDA0300
ALL
4.0 - 6.0
VDAH300
ALL BUT H
4.0 - 6.0
VDA0450
ALL
4.0 - 6.0
VDAH450
ALL BUT H
4.0 - 6.0
NOTE: Depending on how the meter is held, the results could vary. The
results on page 5 are under normal conditions, holding the body of the
housing and not touching the probe or the quick change tool adapter. if
you are not sure of the results, please contact technical support for
assistance.

6
Limitation of Warranty and Liability
Bierer & Associates Inc. warrants this product to be free from defects in
workmanship and material, under normal use and service conditions for
a period of one year from date of shipment.
Due to continuous product improvement and development, Bierer &
Associates Inc. reserves the right to modify product designs and
specifications without notice.
It is impossible to eliminate all risks associated with the use of high
voltage electrical devices including this device. Risks of serious injury or
death are inherent in working around energized electrical systems. Such
risks include but are not limited to variations of electrical systems and
equipment, manner of use or applications, weather and environmental
conditions, operator mentality, and other unknown factors that are
beyond the control of Bierer & Associates Inc.
Bierer & Associates Inc. does not express or imply to be an insurer of
these risks, and by purchasing or using this product you AGREE TO
ACCEPT THESE RISKS. IN NO EVENT SHALL Bierer & Associates Inc. BE
LIABLE FOR ANY INCIDENTAL, CONSEQUENTIAL OR SPECIAL DAMAGES
RESULTING FROM THE USE OR HANDLING OF THIS PRODUCT.
Technical & Service
Bierer & Associates Inc.
Manufacturing & Repair
10730 Farrow Rd.
Blythewood, SC 29016
Tel: (803) 786-4839
Fax: (803) 786-5457
bierermeters.com

7
NOTES_______________________________________________
______________________________________________________
______________________________________________________
______________________________________________________
______________________________________________________
______________________________________________________
______________________________________________________
______________________________________________________
______________________________________________________
______________________________________________________
______________________________________________________
______________________________________________________
______________________________________________________
______________________________________________________
______________________________________________________
______________________________________________________
______________________________________________________
______________________________________________________
______________________________________________________
______________________________________________________
______________________________________________________
______________________________________________________
______________________________________________________
______________________________________________________
______________________________________________________
______________________________________________________
______________________________________________________
______________________________________________________
______________________________________________________
______________________________________________________
______________________________________________________
______________________________________________________
______________________________________________________
______________________________________________________
______________________________________________________
______________________________________________________
______________________________________________________
______________________________________________________
______________________________________________________
______________________________________________________
8
Other manuals for VD1000
1
This manual suits for next models
8
Table of contents
Popular Power Supply manuals by other brands

Windbit
Windbit RS420 Series installation manual

Whelen Engineering Company
Whelen Engineering Company ISP94A installation guide

Broadata
Broadata PS-8DC-5V user manual

Philips
Philips Color Kinetics Power/Data Supply SPDS-60CA... product manual

Excelsys
Excelsys CoolX1800 Designers Manual

Delta Elektronika
Delta Elektronika ES 150 Series product manual


