BIGLEASH VIBRATION TRAINER V-10 User manual

VIBRATIONTRAINER
®
BigLeash
the
Owner’s Guide
V-10 Vibration Trainer
Owner’s Guide

VIBRATION TRAINER by DogWatch
Thank You for Purchasing
At DogWatch®, “It’s all about your dog.®” You can be assured that you have
purchased one of the most technolog cally advanced pet tra n ng products
ava lable. Our extens ve research and test ng has resulted n products that
are safe and effect ve for tra n ng your pet.
Your B gLeash V-10 V brat on Tra ner offers B g Features:
■Exclus ve “InTouch” two-way commun cat on lets you know you are
connected to your dog . . . even f he s out of s ght.
■10 levels of v brat on prov des profess onal dog tra ners and pet owners
w th a gentle training opt on to help your pet learn.
■An aud ble s gnal to supplements the v brat on tra n ng
■The F refly®n ghtl ght feature to helps you keep track of your dog n the
dark.
To make sure that you get the most from your B gLeash V brat on Tra ner,
please follow the nstruct ons outl ned n th s manual.
If you have any quest ons, please v s t our webs te or call Customer Serv ce:
1-800-793-3 36 x622, M-F, 9am to 5pm EST.
®

1
Table of Contents
Charging the Transmitter and Receiver Collar ....................................2
Turning the Transmitter and Receiver ON and OFF ..............................3
Receiver Features ..................................................................................
Transmitter Features ..............................................................................5
BigLeash Vibration Training....................................................................9
Training Basics ......................................................................................10
Troubleshooting ....................................................................................12
Warranty & Service................................................................................1
Programming the Receiver Collar........................................................16
DogWatch®offers a full range of pet conta nment and
tra n ng solut ons, nclud ng Outdoor H dden Fences,
Indoor Boundar es and Remote Tra ners. Our H dden
Fence s rated a “Best Buy” by Consumers D gest.

2
FULLY CHARGE THE TRANSMITTER AND THE RECEIVER BEFORE USING THE FIRST TIME.
■The batteries take approximately 3-4 hours to charge.
•We recommend charging your transmitter and receiver when not in
use. A protection circuit prevents overcharging.
Battery Status Indi ators
■Transmitter screen: Battery icon
•Charged battery: No battery icon.
•Low battery: Battery icon comes on and flashes.
•Charging: Battery icon stays on in a steady state.
•Charging complete: No battery icon.
When plugged-in: - The LCD screen backlight stays illuminated.
- The transmitter and receiver will not turn on.
■Receiver collar: Battery status light
•Charged battery: Light flashes green (unplugged, turned on.)
•Low battery: Light flashes red (unplugged, turned on.)
•Charging: Light turns steady red (plugged-in.)
•Charging complete: Light turns steady green (plugged in.)
Battery Icon
Icon = low battery
No icon = charged
Using a battery c arger ot er t an t e one provided may damage your battery
and may invalidate your Warranty.
Charging the Transmitter and Re eiver Collar
3
ON/OFF
Alignment Markers
{
{
Hold the
Alignment
Markers
Together
▲ ▲▲
▲ ▲▲
■When the transmitter and receiver collar turn on, you hear a low-to-hi
“beep” tone and the LCD screen turns on.
■Follow the same procedure to turn off the receiver and the transmitter.
You will hear a hi-to-low “beep” tone and the screen will turn off. Turning
your system off when not in use will help preserve the battery life.
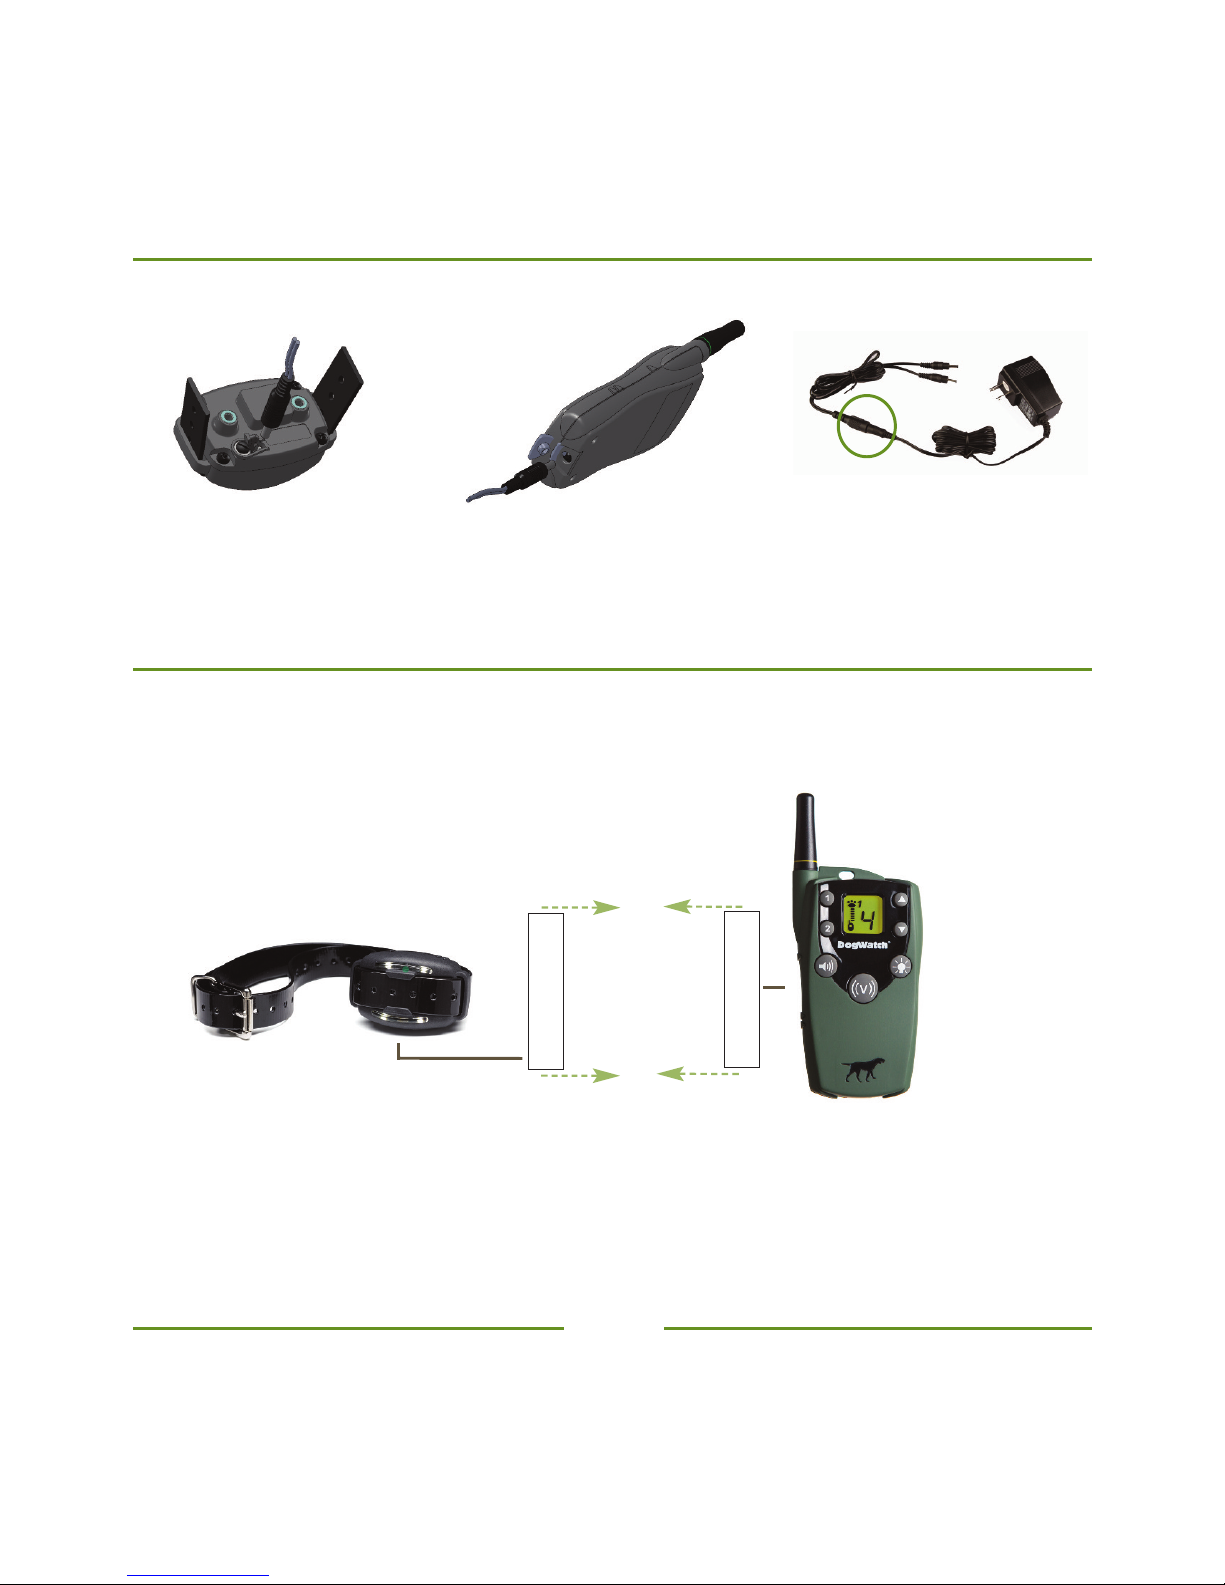
Both the transmitter and receiver must be turned on to operate.
To turn the transmitter and receiver on or off,hold the transmitter and receiver
ne t to one another so the alignment markers (indicated below) on the transmitter
match the alignment markers on the receiver.
The transmitter
and receiver will
not t rn on while
charging.
Turning the Transmitter and Re eiver ON and OFF
Lift the protective tab on
the back of the receiver
to insert the charger.
Connect the ‘Y’ cord to the
power adapter to charge the
transmitter and receiver at
the same time.
Lift the protective tab on the
bottom of the transmitter to
insert the charger.
Connecting the transmitter and receiver to the charger
Firefly Nightlight
■To activate the Firefly light strips, press the
nightlight button on the transmitter.
■The Firefly nightlight may be used on both Collar
1 and Collar 2 at the same time, but each collar
must be activated separately.
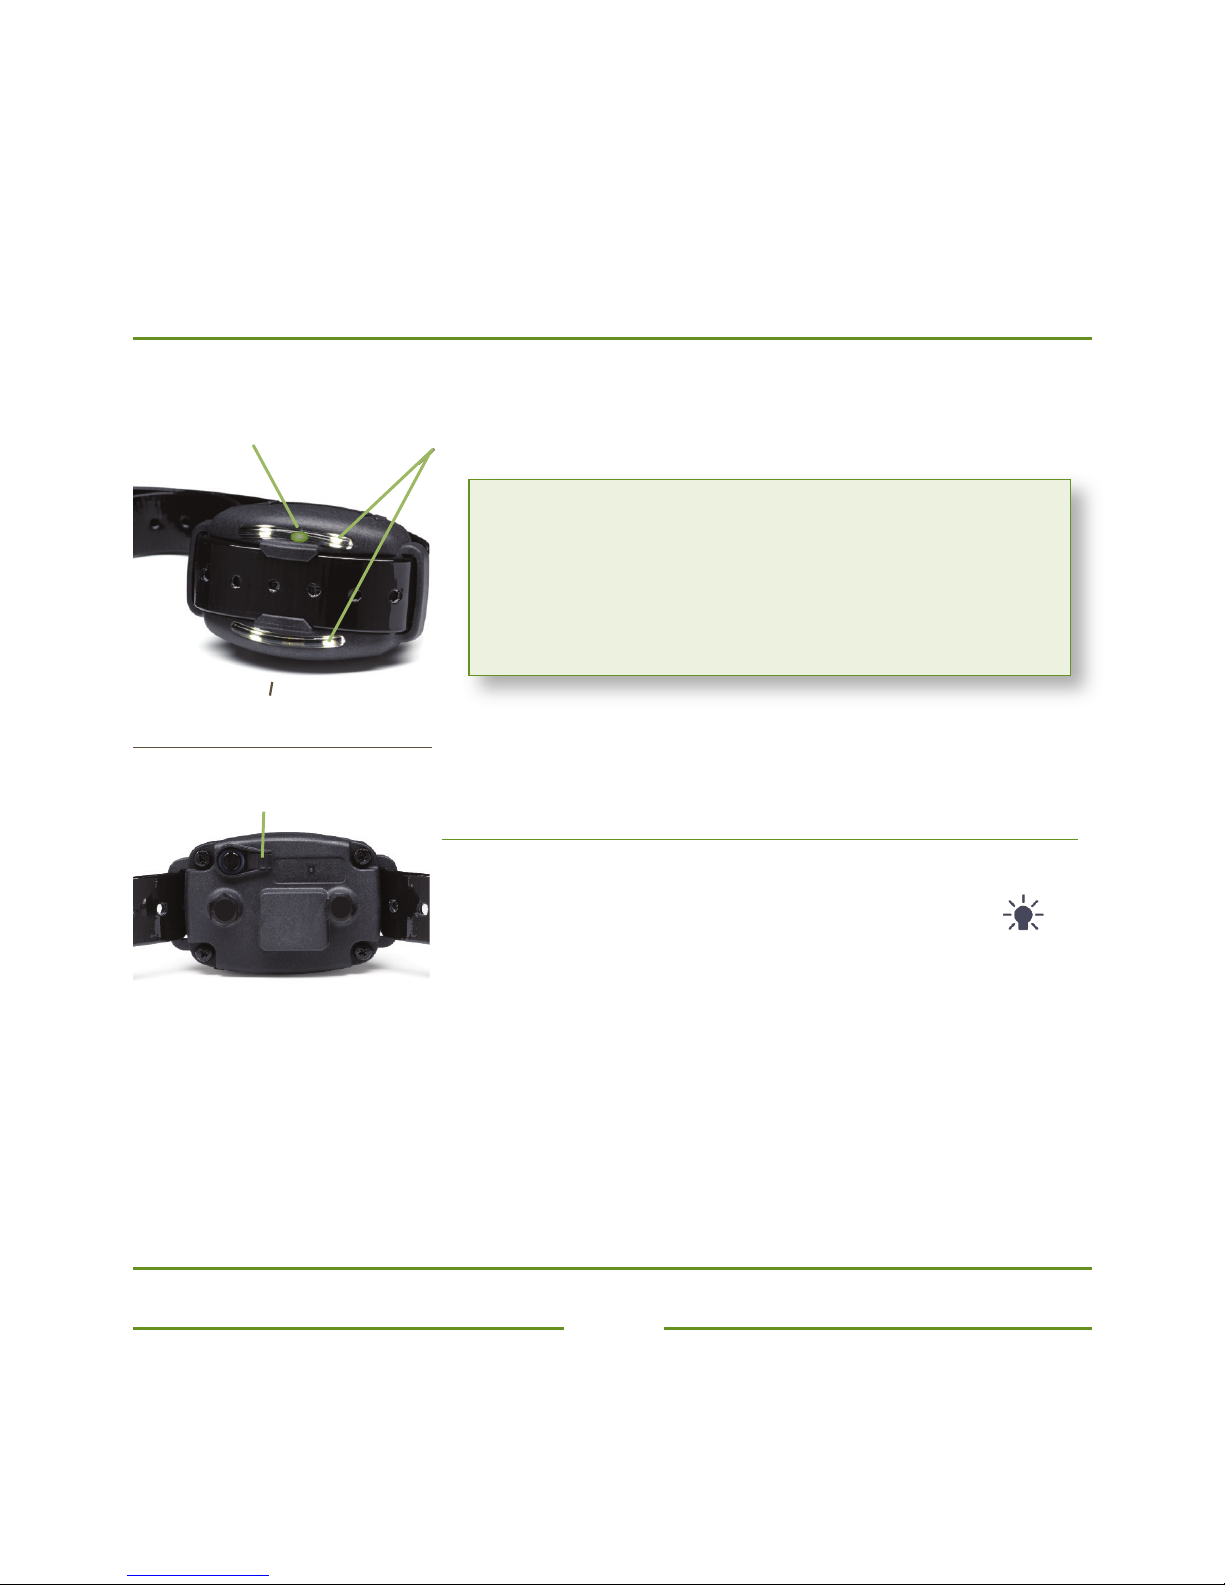
Re eiver Features
The BigLeash receiver provides a battery status light and the Firefly®nightlight to help
you keep track of your dog at night.
Lift t e protective tab to
insert t e c arger. Replace
t e protective tab securely
after c arging.
Battery Status Lig t* Firefly Nig tlig t Strips
ON/OFF Alignment Markers
Battery C arging Port
(under t e protective tab)
Turn “on” the receiver collar by holding the
Receiver and the Transmitter next to each other
at the Alignment Markers (see page 3).
Battery Status Light
Blinks GREEN Turned on, charged
Blinks RED Turned on, low battery
Steady RED Plugged-in, charging
Steady GREEN Plugged-in, fully charged
The BigLeash receiver is waterproof for all-weather, year-round use.
}
•Press the nightlight button briefly, the light strip blinks briefly.
•Press the nightlight button for 5 seconds, the light stays on and continues to
blink. To turn “off”, press the nightlight button again for 5 seconds until the
light stops blinking.
FRONT
BACK
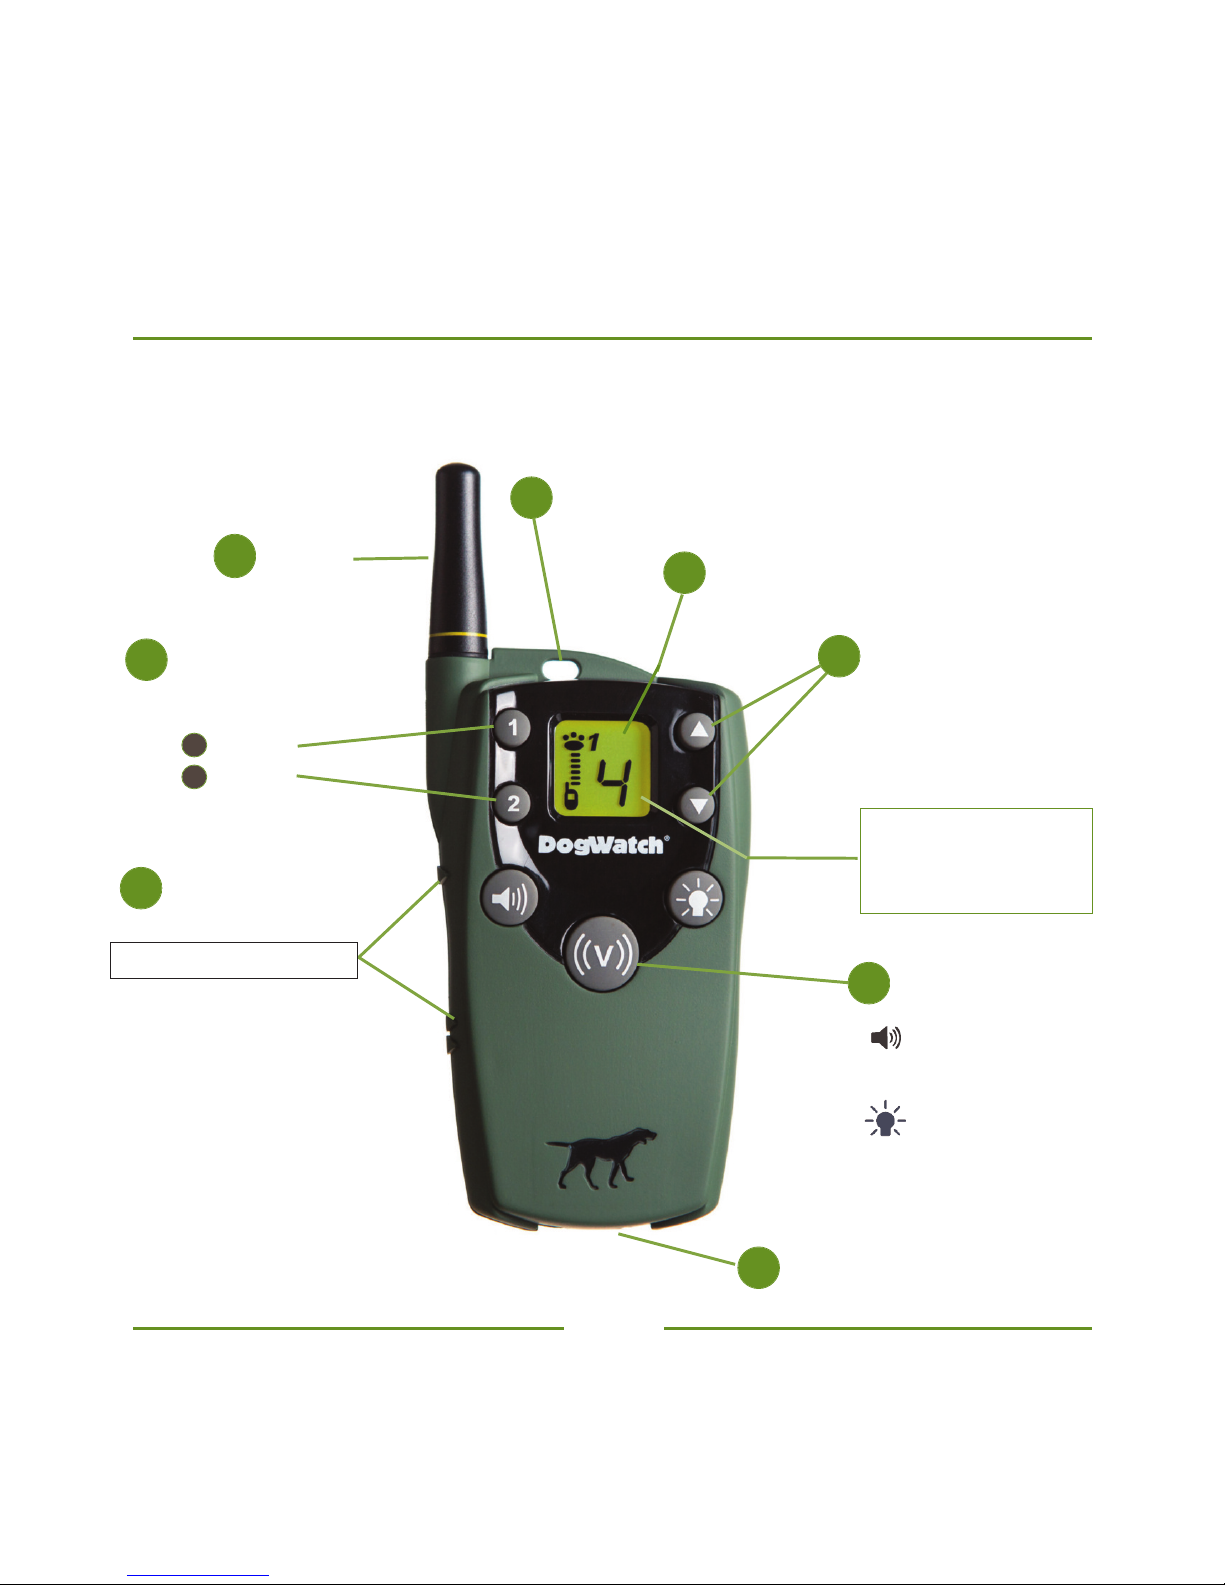
Transmitter Features
5
1
2
2
Collar 1/Collar 2
7
On/Off Alignment Markers
Lanyard Loop
Antenna
3Vibration Level
Adjustment
1 Lowest
10 Highest
LCD Display
▲ ▲▲
5
BigLeash®uses exclusive digital FM technology with In-Touch™two-way
communication between the transmitter and the receiver collar.
■Switches signal from
Collar 1 to Collar 2
Collar 1
Collar 2
Charging Port
8
1
Location where the
battery icon appears
when the battery is
low.
6Signal Buttons
= Audible
((V)) = Vibration
= Firefly nightlight

1. Lanyard Loop
A lanyard is supplied with each transmitter.
2. Antenna/Range Information
Your BigLeash Vibration Trainer provides a 1/2 mile range in optimal conditions.
Range will vary depending on environmental conditions such as terrain, weather,
vegetation, buildings and other obstructions.
For best results, hold the transmitter with the antenna pointed up. Pointing the
antenna at the dog will not increase the range or the signal strength.
3. Vibration Levels
•Level 1 = Lowest vibration signal.
•Level 10 = Highest vibration signal.
Use the low levels if your dog is calm and responds readily to the vibration signal.
Use higher levels if your dog is excited or does not respond to the lower levels.
Find the Appropriate Vibration Level
To begin training, start at Level 1. Send a vibration signal to your dog
and pay close attention to see if there is a reaction such as a quick head
shake, looking down, flick of an ear or something else to indicate he felt
the vibration. Continue increasing the level until there is a reaction. We
recommend using the lowest effective level and adjusting as needed.
6
Use the ▲and ▼buttons to adjust the vibration level.
7
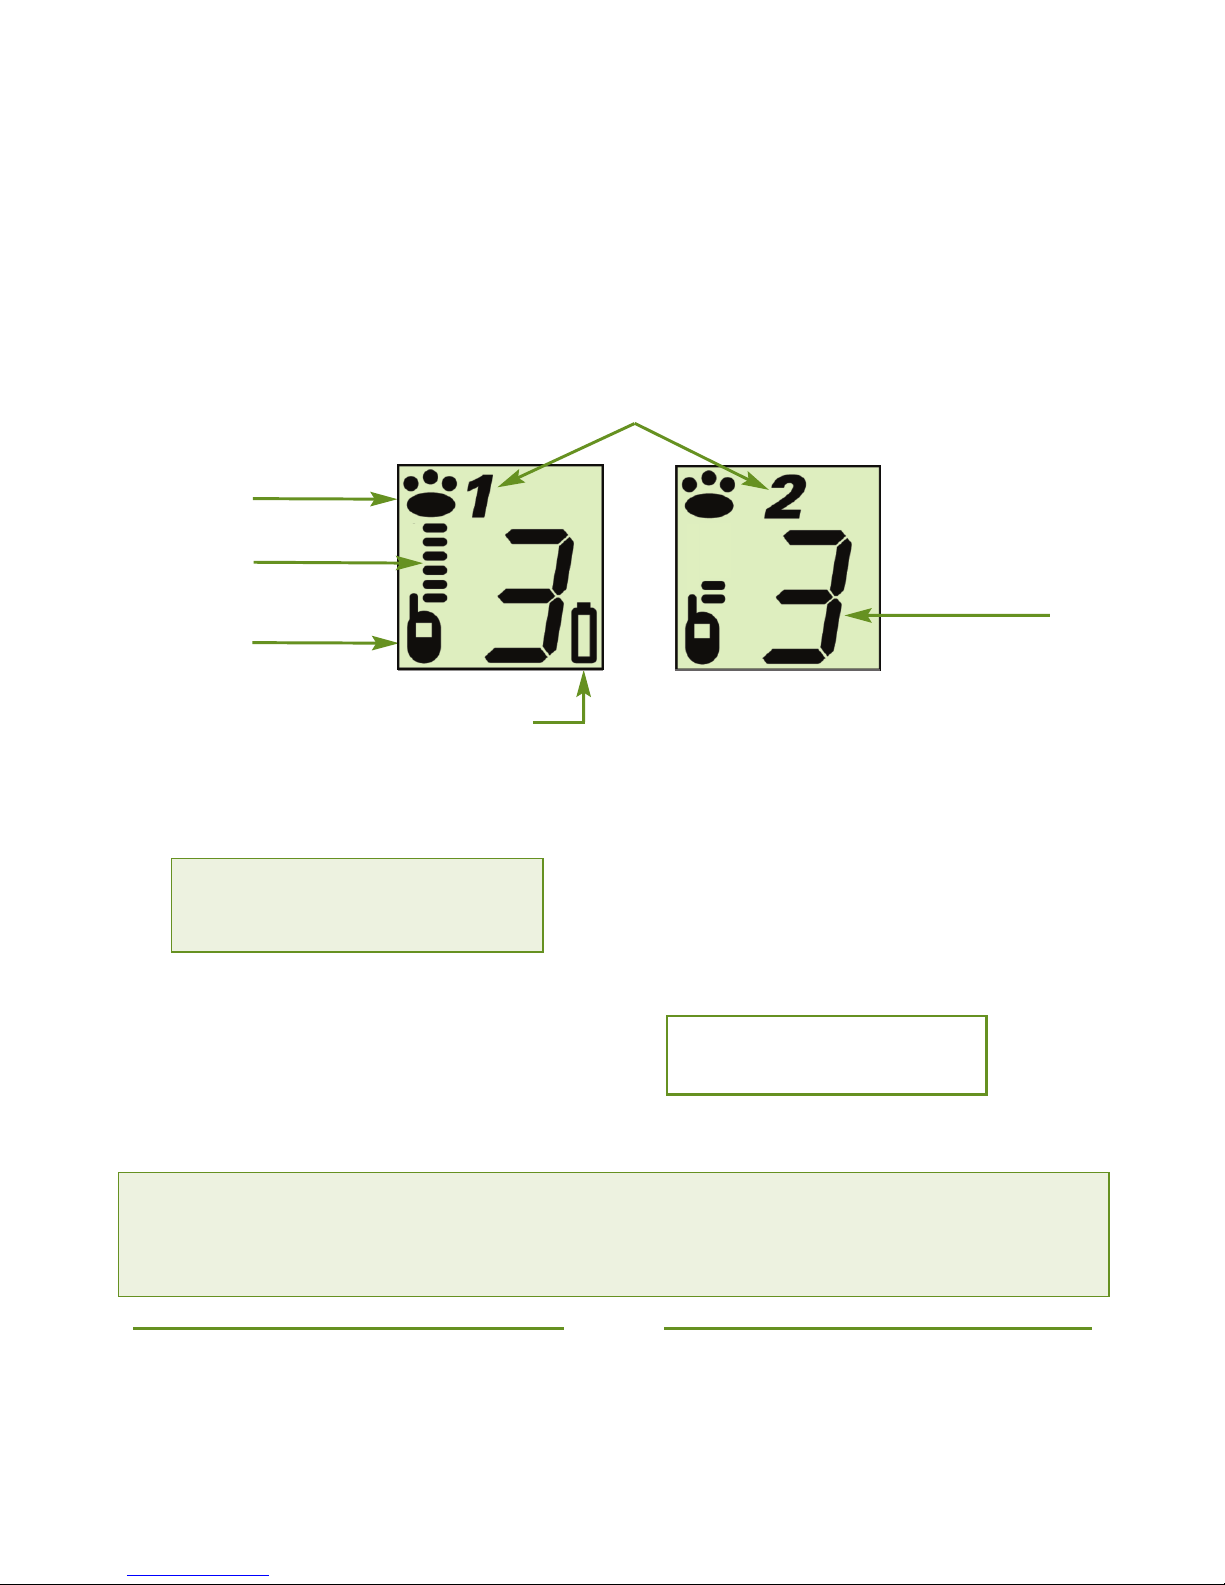
■Collar 1/Collar 2I on
Indicates which collar is receiving the signal when working with 2 dogs.
Collar 1
Receiver
Icon (Paw)
Example 1 Example 2
Transmitter Low Battery Icon
Signal
Strengt
Transmitter
Icon
Vibration Level
Collar 2
4. LCD Display
■Signal Strength
Indicated by the lines between the
transmitter and the paw icons.
■Battery I on
No icon = Charged
Icon = Low Battery
■Re eiver I on (Paw)
Indicates that the receiver collar is
‘on’ and functioning properly.
Paw blinks if signal is lost
(dog out of range or collar
battery is depleted.)
■Transmitter I on
Indicates that the transmitter is ‘on’
and functioning properly.
Transmitter icon blinks to indicate
activation when any button is pushed.
■Vibration Level
1 Lowest
10 Highest
Example 1: Strong signal, vibration level 3, collar 1, and low transmitter battery.
Example 2: Weak signal, vibration level 3, collar 2, and good battery.
A weak signal usually indicates t e dog is moving out of range of t e transmitter.

8
5. Collar 1/ Collar 2Feature
Your transmitter comes set for use with one dog but can easily be programmed
for two dogs.
■If you are working with two dogs, you will need two receiver collars. See
page 16 for information about adding the second collar.
■The Collar 1 and Collar 2 buttons allow you to change commands between
the two collars. The transmitter saves the settings for each collar. The
settings change automatically when you switch from Collar 1 to Collar 2.
■The LCD screen indicates if the transmitter is set to Collar 1 or Collar 2.
6. Training Buttons
Vibration Button ((V))
Pressing the vibration button sends a vibration signal to the dog’s receiver
collar. The signal continues as long as you press the button.
Audible Button
Pressing the audible button sends an audible signal to the dog’s receiver
collar. The signal continues as long as you press the button. The audible
signal can be used as alternative or supplement to the vibration signal.
Firefly Nightlight Button
Pressing the nightlight button turns the nightlight on and off.
- Press briefly for intermittent use
- Press for 5 seconds to keep the flashing light on. Press again for 5 seconds
to turn it off.

9
BigLeash Vibration Training
Vibration training allows you to use the vibration signal from the remote trainer
as a stand-in for the traditional leash to accomplish your training objectives. The
goal is to achieve off-leash control aided and reinforced by the remote trainer.
Training is accomplished by using the vibration signal to simulate the different
pulling pressures usually associated with the leash during normal walking or
training exercises. Initially, your dog will learn to respond to your voice command
(or hand signal) in conjunction with a simultaneous leash tug and vibration signal.
As your dog learns the commands and associates them with the vibration signal,
you will be able to achieve the same results without the leash.
Helpful Tips
•Each step builds on the previous step, so make sure you and your dog have
mastered the previous step before you move on.
•Whenever your dog responds correctly make sure to reward him with praise
•Depending on your dog’s performance you may need to increase or decrease
the level of vibration
•Always perform your training sessions in a place that is free of hazards that
could put you or your dog in danger.
Consistency
As with all types of training, consistency is the key to learning.
Timing
Send the vibration signal at the exact time you give the command and tug the
leash. When training without the leash, give the command and the vibration
signal at the same time. This helps your dog learn to associate the vibration
with the command.

10
Training Basi s
The ‘Look’ Command
The ‘Look’ Command is the foundation of BigLeash training. Your goal is to train
your dog to respond to the vibration signal by directing his attention to you, even
when he is not close enough to hear your verbal command. When you have his
attention, you can then successfully deliver other commands.
Step 1 - On Leash
•Attach a long leash to your dog’s collar and allow him to wander freely around
you to become accustomed to being on the long leash.
•To begin training, gently pull in the leash to create a slight tension in the leash
and at the same time say “look,” encouraging your dog to move towards you
and make eye contact.
•As soon as your dog makes eye contact with you, release the pressure from
the leash and praise your dog with a happy voice.
•Repeat this action in different locations with different distractions until your
dog responds quickly to the command.
•Have your dog wear the BigLeash collar during this Step so that he becomes
accustomed to the collar before you start using it.
Step 2 - On Leash with Introduction to Vibration
•Turn on your BigLeash transmitter and receiver.
•With the long leash still connected to your dog’s collar, place the BigLeash
vibration collar on your dog. Put the collar around your dog’s neck right
behind the ears where it will provide the snuggest fit.
•Set your transmitter to the lowest level that gets a response from your dog.
(See Page 6.)

11
•Pull gently on the leash to get your dog’s attention. As soon as you begin to
pull, give the “Look” command while pressing the ((V)) button.
•As soon as your dog makes eye contact release the ((V)) button and the
pressure from the leash.
•Repeat this action in different locations with different distractions until your
dog responds quickly and reliably to the vibration and your command.
•Reward with praise every time your dog responds correctly.
Step 3 - Off Leash with the BigLeash Remote Trainer
•Turn on your BigLeash and put the receiver collar on your dog’s neck.
•Set your transmitter to the lowest level that gets a response from your dog.
•Without the leash, let your dog wander in a safe area and give the “Look”
command at the same time you press and hold down the ((V)) button.
•As soon as your dog makes eye contact with you, release the ((V)) button,
and follow with praise.
•Use the vibration signal in conjunction with your command to reinforce the
training as needed or to get your dog’s attention when he is too far away to
hear your command.
Learning Other Commands
As your dog’s performance level improves with the “Look” command, you and
your dog are now ready to move on to other commands such as “Sit”, “Heel”,
“Come” and “Down”. With each new command, you and your dog must go
through the three training steps. Your goal is to achieve a consistent and quick
response to your verbal command, reinforced, when needed, by use of the
vibration signal in conjunction with the verbal command.

Troubleshooting
The Remote Trainer Does Not Seem To Be Working
•Check to make sure the batteries in both the transmitter and the
receiver are charged.
•Check to see that both the transmitter and receiver are turned “on”.
Note: The transmitter and receiver will not turn on when charging.
•If fully charged but not turning on, press the ((V)) button on the transmitter
and check the LCD screen. If the transmitter icon displays, follow the
reprogramming instructions on page 16. If the icon does not display, or if
reprogramming does not work, please call Customer Service.
Dog Does Not Seem To Respond
•Check to see that the collar is snug enough for your dog to feel the vibration.
•Check the vibration. If it is on a low setting, try increasing the vibration level.
•If your transmitter is programmed for use with 2 dogs, check to see that your
transmitter is set to the correct collar.
The Transmitter Range Is Reduced
•The range may be affected by variations in terrain, weather, buildings and
other obstructions.
•For best operation hold the transmitter with the antenna pointed toward the
sky, not towards the dog.
•Keep your fingers away from the antenna. Touching the antenna will greatly
reduce the range.
12

The Battery Does Not Seem To Charge
•Be sure the charging plugs are fully and securely inserted.
•Make sure you are using the battery charger provided with the trainer.
•If the battery does not hold a charge as long as it used to, it may be time to
replace the battery.
For battery questions or replacement, please contact Customer Service:
( 00) 793-3436 x622 M-F, 9am-5pm EST
No Communication Link
•The link can usually be restored by turning the system off and then turning it
on again or by plugging-in the transmitter and receiver to charge.
•Sometimes the transmitter and receiver must be reprogrammed to recognize
each other. See page 16.
Cold Weather Performance
•All batteries experience a drop in voltage during and may run down more
quickly in cold weather.
•For best results in the cold months, charge and store your remote trainer at
room temperature.
For other Troubleshooting questions, please visit the website -or-
contact Customer Service. (800) 793-3 36 x622, M-F 9am-5pm EST.
13

1
Warranty & Servi e
■Register your warranty information online at either:
www.dogwatch.com -or- www.bigleash.com.
■Completed warranty information must be submitted online within 30 days
of purchase or all repairs will be subject to applicable labor fees.
■If warranty information is not on file, a proof of purchase is required.
WARRANTY
DogWatch Inc. (the Company), subject to the terms and conditions set forth
hereunder, hereby warrants that it will repair or replace at it’s own discretion,
without charge for parts or labor, the product or any part thereof (other than
batteries) which is found to be defective by reason of improper workmanship
and/or materials for the warranty period of one (1) year from the original date
of purchase. Warranty claims may be subject to dealer service charges and/or
manufacturers shipping and handling charges. Except for the express warranty
stated above, the Company disclaims all express and implied warranties or mer-
chantability or fitness for a particular purpose.
As a condition of this warranty, Customer must:
(a) complete warranty registration online within 30 days after purchase,
(b) notify the Company of a claimed defect within the warranty period after the
purchase, and (c) mail product back, insurance and postage prepaid, to:
DogWatch Inc. at 10 Michigan Drive, Natick, MA 01760.
The Company’s sole responsibility under this warranty will be to repair or replace,
at its option, the product or part which DogWatch Inc. determines to be defective.
In no event will the Company be liable for any special, indirect, or consequential
damages arising out of the purchase or use of the product. In no event shall the
Company’s liability exceed the purchase price of the product.

15
Warranty Procedures and Guidelines
■DogWatch Inc. provides a one (1) year limited warranty from the date of
purchase on both parts and labor for the transmitter, receiver and battery
charger.
■Warranty does not cover repairs or replacement due to misuse by the owner
or dog, improper maintenance or lost units.
■The transmitters are “water resistant,” not “water-proof,” and are not covered
under warranty for water-related damage or malfunction.
■The warranty is void if the unit has been altered or an unauthorized person has
attempted repair work.
■Warranty is non-transferrable.
Procedure for Repair Work
■All warranty work must be completed at DogWatch Inc. Return shipping to
DogWatch Inc. is the owners’ responsibility.
■IMPORTANT! Both the transmitter and the receiver must be returned
when a repair is requested.
■If the repair is covered under warranty, the cost for shipping the product
back to the customer (ground service) is covered by DogWatch Inc.
Expedited shipping service is at the owner’s expense. If the repair is not
covered under warranty, all shipping costs are the owner’s responsibility.
■Credit card information is required prior to service work beginning.
■When returning a unit for repair, include a description of the problem with
your name, address, daytime phone number and email address. Service
request forms are available at www.dogwatch.com or www.bigleash.com.

Programming the Re eiver Collar
Adding a Second Collar
Your transmitter is pre-set for use with one dog but can easily be programmed
for use with two dogs. Collar 2 has a red collar strap and has a small “Dog 2”
sticker on the back so that you can differentiate Collar 1 from Collar 2.
1. Before adding Collar 2 to the transmitter, charge it for at least 3 hours.
2. Make sure the transmitter and both the receivers (Collar 1 and Collar 2)
are turned ‘off’.
3. With the transmitter and the receivers turned “off”, hold down the ((V))
button for 10 seconds until the screen on the transmitter turns ‘on’.
4. Set the TRAINING LEVEL to ‘2’.
5. Press and hold down the Collar 2 button while turning the new
receiver ‘on’ by aligning the receiver next to the transmitter at the
alignment markers.
6. Continue to hold the receiver next to the transmitter at the alignment
markers while holding down the Collar 2 button.
7. You will hear a series of beeps. When the series of beeps stops, move the
receiver away from the transmitter.
. The second receiver is now programmed to the Collar 2 setting.
9. Turn the transmitter and receiver “on” in the usual way to use.
Re-Programming Collar 1 to the Transmitter
Follow the same steps as Adding a Second Collar, except:
•Set the training level to ‘1’ (step 4).
•Hold down the ((V)) button instead of Collar 2 button (step 5).
16

This device complies with part 15 of the FCC Rules. Operation is subject to the following two conditions:
(1) This device may not cause harmful interference, and (2) this device must accept any interference
received, including interference that may cause undesired operation.
Changes or modifications not expressly approved by DogWatch, Inc., could void the user’s
authority to operate the equipment.
This equipment has been tested and ound to comply with the limits or a Class B digital device, pursuant
to Part 15 o the FCC Rules. These limits are designed to provide reasonable protection against harm ul
inter erence in a residential installation. This equipment generates, uses and can radiate radio requency
energy and, i not installed and used in accordance with the instructions, may cause harm ul inter erence
to radio communications. However, there is no guarantee that inter erence will not occur in a particular
installation. I this equipment does cause harm ul inter erence to radio or television reception, which can
be determined by turning the equipment o and on, the user is encouraged to try to correct the inter erence
by one o the ollowing measures:
- - Reorient or relocate the receiving antenna. - - Increase the separation between the equipment and receiver.
- - Connect the equipment into an outlet on a circuit di erent rom that to which the receiver is connected.
- - Consult the dealer or an experienced radio/TV technician or help.
This device complies with Industry Canada regulations.
Under Industry Canada regulations, this radio transmitter may only operate using an antenna o a type and
maximum (or lesser) gain approved or the transmitter by Industry Canada. To reduce potential radio
inter erence to other users, the antenna type and its gain should be so chosen that the equivalent isotropically
radiated power (e.i.r.p.) is not more than that necessary or success ul communication.
This device complies with Industry Canada licence-exempt RSS standard(s). Operation is subject to the
ollowing two conditions: (1) this device may not cause inter erence, and (2) this device must accept any
inter erence, including inter erence that may cause undesired operation o the device.
Con ormément à la réglementation d'Industrie Canada, le présent émetteur radio peut onctionner avec une
antenne d'un type et d'un gain maximal (ou in érieur) approuvé pour l'émetteur par Industrie Canada.
Dans le but de réduire les risques de brouillage radioélectrique à l'intention des autres utilisateurs, il aut
choisir le type d'antenne et son gain de sorte que la puissance isotrope rayonnée équivalente (p.i.r.e.)
ne dépasse pas l'intensité nécessaire à l'établissement d'une communication satis aisante.
Le présent appareil est con orme aux CNR d'Industrie Canada applicables aux appareils radio exempts
de licence. L'exploitation est autorisée aux deux conditions suivantes : (1) l'appareil ne doit pas produire
de brouillage, et (2) l'utilisateur de l'appareil doit accepter tout brouillage radioélectrique subi, même si le
brouillage est susceptible d'en compromettre le onctionnement.
For RF exposure - This portable equipment complies with FCC and Industry Canada RF radiation
exposure limits set forth for an uncontrolled environment. To maintain compliance, it must not be
co-located or operated in conjunction with any other antenna or transmitter.

DogWatch, DogWatch logos and BigLeash are Registered Trademarks
of DogWatch, Inc. DogWatch products are lead-free and compliant with
the Reduction of Hazardous Substances (RoHS) initiative.
The Consumers Digest logo and Best Buy Seal are registered trademarks of
Consumers Digest and used under license.
©2015 DogWatch Inc. All rights reserved. 295076 Rev. B 02-15
Bring out the best in your dog.®
by
www.dogwatchtrainingproducts.com
TRAINING PRODUCTS
Table of contents
Popular Pet Care Product manuals by other brands

Hagen
Hagen EXO TERRA PT2234 operating instructions

Petsafe
Petsafe Stubborn Dog In Ground Fence RF-275-11 operating guide

Avson
Avson D00-144 Assembly & instruction manual

KAS
KAS Pump Box user manual

Hunter Electronics
Hunter Electronics GPS-DTR 25000 quick start guide

DOG
DOG d-control professional 1000 user guide


