BikeMaster 152148 User manual

BikeMaster
Digital Torque
Ratchet
USER
MANUAL

Thank you for choosing the BikeMaster digital torque ratchet. Please read instruction
carefully before using. You will find the BikeMaster digital torque ratchet easy to use. Turn it
on and apply the digital torque ratchet.
CONTENTS
1. Product Specifications
2. Components and Features
3. How to use Digital Torque Ratchet.
3-1: Battery Installation and Replacement
3-2: Power On:
3-3: How to select "UNIT". ( kg-cm, kg-m, lb-in, lb-ft, N-m)
3-4: How to set "Target Torque Value."
3-5: How to set "Peak" and "Track".
3-6: Turn Off
3-7: Memory
4. Care and Cleaning
5. Important safeguards
3
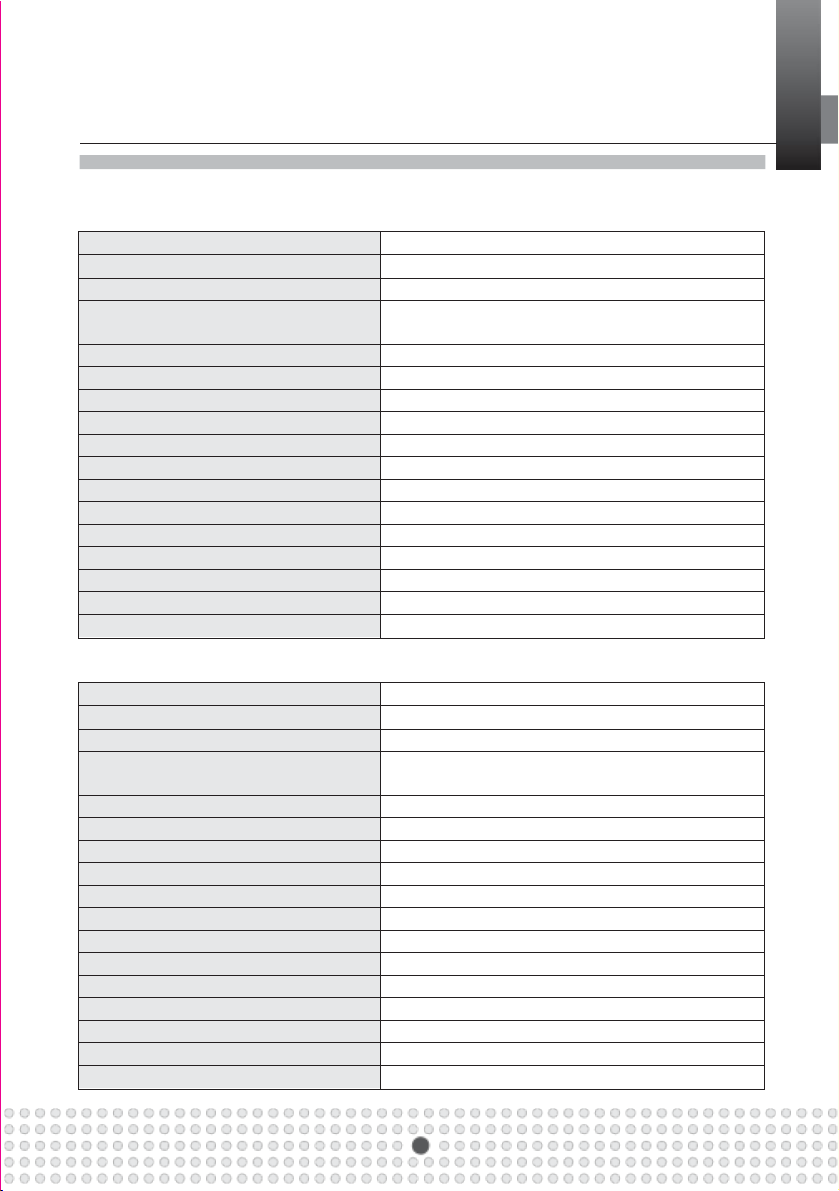
Product Specifications
Model No.: 152148 ¼ inch Drive
Accuracy
±3%
Memory
50
Display resolution
0.1
Display Range
6-30 N-m (4.4 ~ 22.1Ib-ft) (RJ-28041-1)
16-80 N-m (11.8 ~ 59.0lb-ft) (RJ-28041)
Drive
1/4 inches
Operation Mode
Peak/Track
Unit Selection
kg-cm, kg-m, lb.-in, lb.-ft., N-m
Length
280mm
Weight
1.6 kg
Gear Teeth
36
Key
5
Battery
CR2032 x 1pc
Battery Life
55hrs (continuous operation)
Operating Ambient Temperature
-10ºC - 60ºC (13.9ºF - 139.9ºF)
Storage Temperature
-20ºC - 70ºC (-4ºF - 157.9ºF)
Operating relative humidity
15 to 90% noncondensing
Auto shut off
80 seconds
Model No.: 1 5 2 1 4 7 3 / 8 i n c h D r i v e
Accuracy
±2%
Memory
50
Display resolution
0.1
Display Range
20-100 N-m (14.8 ~ 73.8Ib-ft) (RJ-31083-1)
27-135 N-m (19.9 ~ 99.6lb-ft) (RJ-31083)
Drive
1/4 inches
Operation Mode
Peak/Track
Unit Selection
kg-cm, kg-m, lb.-in, lb.-ft., N-m
Length
310mm
Weight
1.6 kg
Gear Teeth
36
Key
5
Battery
AA x 2
Battery Life
110hrs (continuous operation)
Operating Ambient Temperature
-10ºC - 60ºC (13.9ºF - 139.9ºF)
Storage Temperature
-20ºC - 70ºC (-4ºF - 157.9ºF)
Operating relative humidity
15 to 90% noncondensing
Auto shut off
80 seconds

4
Components and Features
Quick Release
Alarm
M
LCD
+ (Increase)
Drive LED
Mode
(Clear)
Battery Cap
- (Decrease)
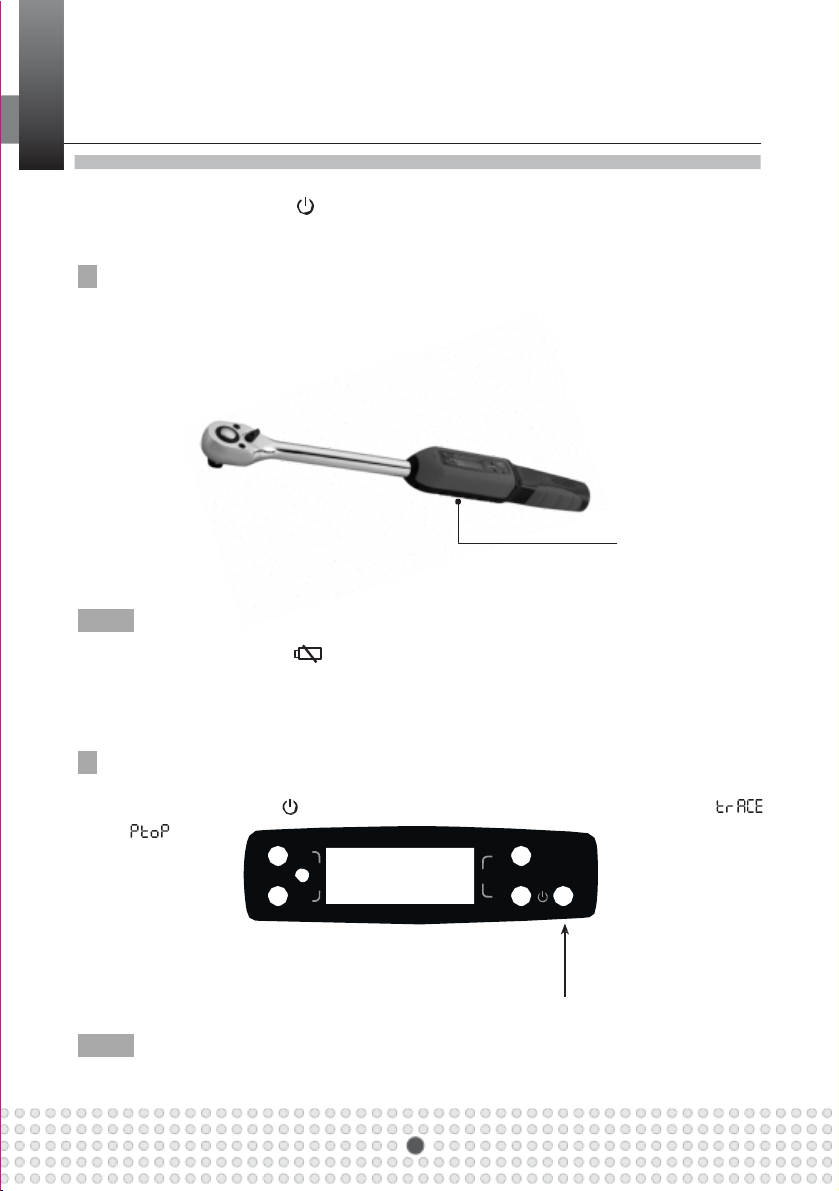
UNIT
How to use Digital Torque
Ratchet
Do not press "M" and " " button together please.
The system will enter into Calibration Mode.
A Battery Install and Replacement.
1. 1 x CR2032 Battery
2. Keep the end thread clean and dry for a good contact.
3. Open the battery cap.
4. Remove the old battery.
5. Install 1 CR2032 Battery in the housing. ("+" sign facing upwards).
6. Screw on the battery cap. Battery Cap
Note
1. When battery is low a " " icon will light.
2. Remove the battery if stored for a long period of time.
3. Battery life depends on battery quality and the amount of lights and alarms that are used.
4. Typical life is up to 55 hours
B Power On.
1. Press and release the " " button to turn the ratchet on. The LCD panel shows " "
or " ".
M
Mod
kg-cm kg-m in-lb ft-lb N-m
-
SET
MAX.
+
Digital
Ratchet
2. After 2 seconds the L.C.D panel show "00.0".
3. Swing the ratchet.
4. The L.C.D displays the torque value measured.
Note
If you do not use the ratchet for 80 seconds the digital ratchet will automatically shut off.
05
UNIT
UNIT
How to use Digital Torque
Ratchet
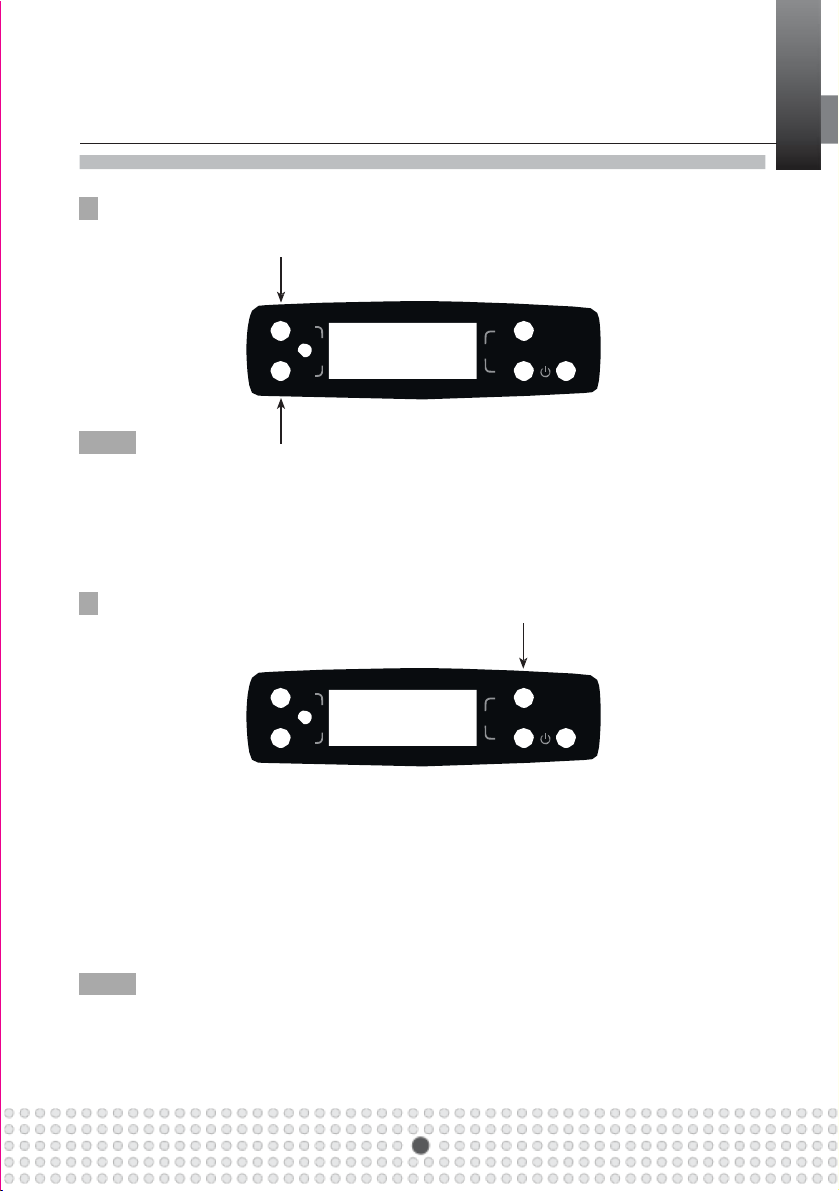
C How to select "Unit".
Press "M" and "Mod" button together and release to select different torque units.
M
Mod
kg-cm kg-m in-lb ft-lb N-m
-
SET
MAX.
+
Digital
Ratchet
Note
1. When you change units the target setting will also be changed to the new unit value.
2. This digital ratchet contains 5 unit selections.
(kg-cm, kg-m, in-lb., ft-lb, N-m).
D How to select "Target Torque Value".
M
Mod
kg-cm kg-m in-lb ft-lb N-m
-
SET
MAX.
+
Digital
Ratchet
1. Increase (+): 1. Press and hold the (+) button to increase the current target value,
2. The target will show for 10 seconds.
3. After 10 seconds the LCD display 0.00.
2. Decrease (-): 1. Press and hold the (-) button to lower the current target value,
2. The target will show for 10 seconds.
3. After 10 seconds the LCD display 0.00.
Note
1. When you are approaching 20% before the target you will see a flash of red light and
hear an intermittent alarm warring you that you are approaching the torque value.
2. When you are target value you will see red light and hear alarm. Stop pulling.
06
UNIT
UNIT
How to use Digital Torque
Ratchet
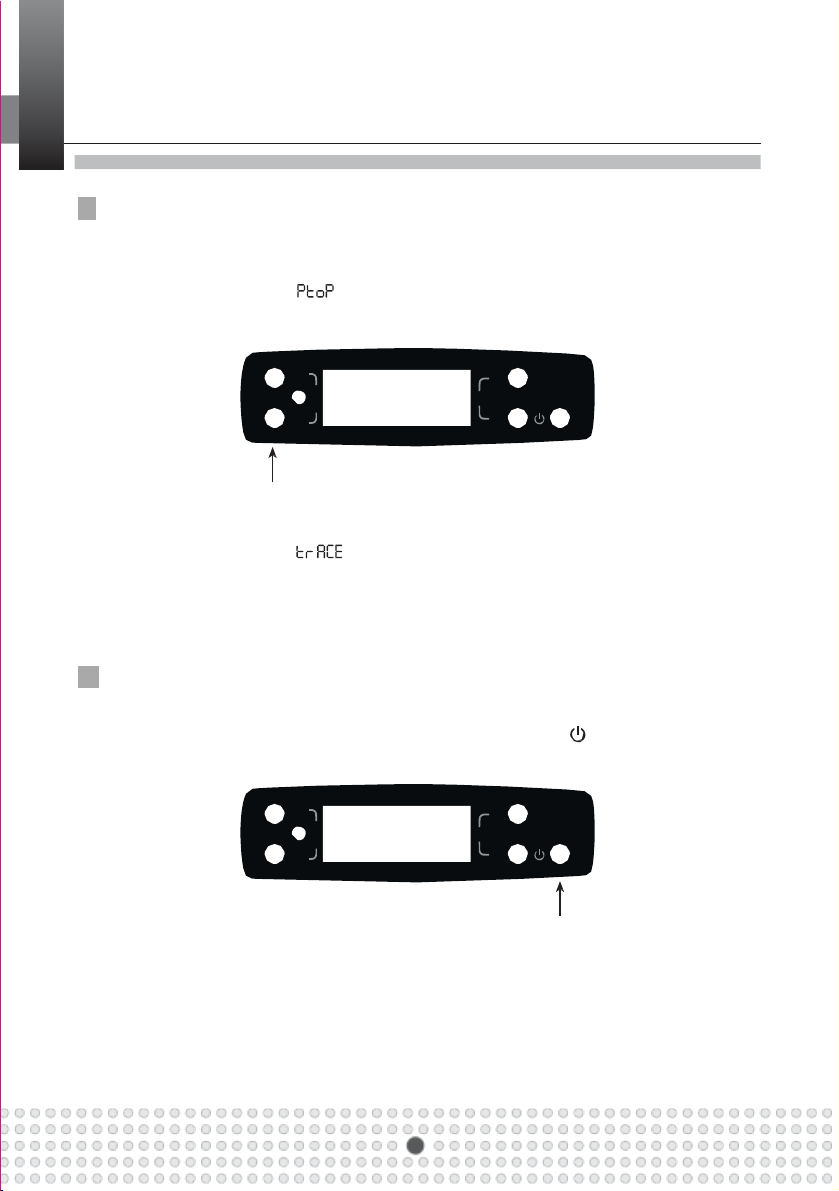
E How to set "Peak" or "Track".
Peak :
1. Press and release "Mod" - button when the ratchet is on.
2. The L.C.D panel shows " ".
3. The L.C.D panel shows 00.0 after 2 seconds.
M
Mod
kg-cm kg-m in-lb ft-lb N-m
-
SET
MAX.
+
Digital
Ratchet
Track :
1. Press and release "Mod" - button when the digital ratchet is on.
2. The L.C.D panel shows " ".
3. The L.C.D panel shows 0.00 after 2 seconds.
G Turn Off.
1. If you do not use the ratchet for 80 seconds the digital ratchet will automatically shut off.
2. To manually turn off the digital ratchet press and release the " " button.
M
Mod
kg-cm kg-m in-lb ft-lb N-m
-
SET
MAX.
+
Digital
Ratchet
07

UNIT
How to use Digital Torque
Ratchet
H Memory
1. To display this store reading must be under the "Ptop" mode. The digital ratchet must
be turned on.
2. Press "M" button at least 1 second and release.
3. The display shows the memory number is "P01" than "Torque Value"
4. Press "M" button at least 1 second one more time.
5. The display will show the memory number is "P02" than "Torque Value"
6. "P01" is the latest reading "P50" would be the oldest.
M
Mod
kg-cm kg-m in-lb ft-lb N-m
-
SET
MAX.
+
Digital
Ratchet
Note
1. This Digital Torque Ratchet stores the last 50 torque value readings.
08

Important Safeguards
Do not press "M" and " " button together please.
The system will enter into Calibration Mode.
Store in a clean, dry place.
Use a clean, soft, dry cloth to clean the ratchet and L.C.D panel.
Basic safety precautions should be observed when using the ratchet and always wear
safety glasses.
Never submerge the ratchet in water or any other liquid.
Never clean the ratchet with organic solvents.
Use the ratchet only for the intended use described in this manual.
Do not exceed the permitted torque value for the ratchet.
Do not use the ratchet if it is not working properly, or if it has suffered any damage.
Do not disassemble the digital torque ratchet.
Do not expose the ratchet to extreme temperature, humidity direct sunlight or shock violently.
Do not shake or shock.
To ensure accurate measurement periodic recalibration is necessary.
Discover other tools on our website.
BikeMaster puts everything within reach.
This manual suits for next models
1
Table of contents
Popular Tools manuals by other brands


Ground Zero
Ground Zero GZDM Doorkit Application Instructions

VARO
VARO POWERplus XQ POWXQ9100 manual

PCB Piezotronics
PCB Piezotronics ICP 086C42 Installation and operating manual

HammerSmith
HammerSmith MultiTool M32722 Instructions for use

Milwaukee
Milwaukee M18 GG Operator's manual

Bosch
Bosch PTK 14 E operating instructions


