manuals.online logo
Brands
  1. Home
  2. •
  3. Brands
  4. •
  5. Woodhaven
  6. •
  7. Tools
  8. •
  9. Woodhaven 3000 User manual

Woodhaven 3000 User manual

3000, 3002 & 3004
Planing Sled
Owners Manual
Please Read Carefully!
Part# Description Qty.
5521 1/4" Knob 2
Part# Description Qty.
5760B Oval Nut 12
Part# Description Qty.
5590 Knob 2
Part# Description Qty.
BUSH050 3/8” Spacer 10
Parts List:
Please identify and verify that you have all of
the hardware shown. Please refer to photos in the
instructions for the parts listed below:
Part Description Quantity
3000B Brackets, 4 pc. set (2 pairs). . . . . . . . . . . . . 1
3000P NoDrill Plate . . . . . . . . . . . . . . . . . . . . . . . . . 1
4973 NoDrill Plate Hdw. . . . . . . . . . . . . . . . . . . . . 1
4406 6" Ultra Track . . . . . . . . . . . . . . . . . . . . . . . . 2
Model 3000 also includes the parts below:
4436 36" Ultra Track . . . . . . . . . . . . . . . . . . . . . . . 2
4016 16" Double Track . . . . . . . . . . . . . . . . . . . . . 2
Model 3002 also includes the parts below:
4448 48" Ultra Track . . . . . . . . . . . . . . . . . . . . . . . 2
4024 24" Double Track . . . . . . . . . . . . . . . . . . . . . 2
Model 3004 also includes the parts below:
4460 60" Ultra Track . . . . . . . . . . . . . . . . . . . . . . . 2
4032 32" Double Track . . . . . . . . . . . . . . . . . . . . . 2
Part# Description Qty.
WS002 Washer 22
Part# Description Qty.
5860 Ratchet Handle 4
Part# Description Qty.
NUT006 Acorn Nut 4
Part# Description Qty.
HB020 3/4" Bolt 6
Part# Description Qty.
CAB015 Angle Bracket 8
Part# Description Qty.
STP004 1/2" Screw 16
Part# Description Qty.
PAD1 Glide Pad 8
Part# Description Qty.
HB030 1” Bolt 14
Part# Description Qty.
MF006 5/8" screw 4
BEFORE BEGINNING
The Planing Sled must be setup and used on a flat surface.
Identify and verify that you have all the parts listed. You'll need a
7/16" wrench for assembly. Read the instructions carefully at least
once before beginning.
1
Insert the 5/8" screws (MF006) from the
underside of the router plate through the
countersunk holes. Start an oval nut
(5760B), flat side first, on the end of
each screw. Slide a 6" Ultra Track
(4406) on to two of the oval nuts,
position it even with the plate at
it's ends and edge, then tighten the
screws. Repeat for the second Ultra
Track on the opposite side of the
router plate.
ASSEMBLY - ROUTER SLED
Follow the directions in the 4973 Plate Hardware
and attach your router to the Router Plate (3000P). The
router does not need to be perfectly centered on the
plate. Position your router on the plate so the router
handles (if you haven't removed them) are parallel to
one of the router plate edges and position the router
to take the best advantage of the plates mounting slots
and router control locations. Mark the position of
the router on the router plate (timing mark) so you
can return it to the same location, then temporarily
remove the router.
An optional drill style plate (PN 3000PD) is
available for semi-permanent mounting of your router,
but it requires drilling mounting holes in the plate.
Remove the paper backing and
install the glide pads (PAD1 - 2 on
each track, 4 extras provided) where
shown on the outsides of each Ultra
Track, next to where the plate attaches
to the track.
On four of the 3/4" bolts
(HB020), install a 3/8" spacer
(BUSH050), washer (WS002) and
acorn nut (NUT006). Slide two of the
bolt heads in to the top T-slot of the
Ultra Track, one on either side of the
knob. Position the spacers flush with
each end of the Ultra Track and lightly
tighten the acorn nuts for now. Repeat this
step on the opposite Ultra Track, then set the
Router Sled aside for now.
5760B x2
MF006 x2
HB020 x2
Timing Marks
BUSH050 x2
WS002 x2
NUT006 x2
HB030 x1
BUSH050 x2
5590 x1
Glide Pads x2
4406
On a 1" bolt (HB030), place two 3/8"
spacers (BUSH050) and start a knob (5590)
on the end of the bolt. Slide the bolt head in
the top side T-slot of the Ultra Track. Center
the bolt in the track and lightly tighten the
knob for now. Repeat this step on the
opposite Ultra Track.
2
ASSEMBLY - BRACKETS & RAILS
Install a washer (WS002) on eight of the 1" bolts
(HB030). From the ribbed side of the Sled Bracket, insert
the bolts through the holes in the Sled Brackets
(3000B - 4 brackets - 2 pairs) and start an oval
nut (5760B), flat side first, on the end of each
bolt. Sliding the oval nuts into the T-slot of the
Double Track, mount a pair of Sled Brackets to both
Double Tracks (4016, 4024 or 4032, depending on model
purchased).
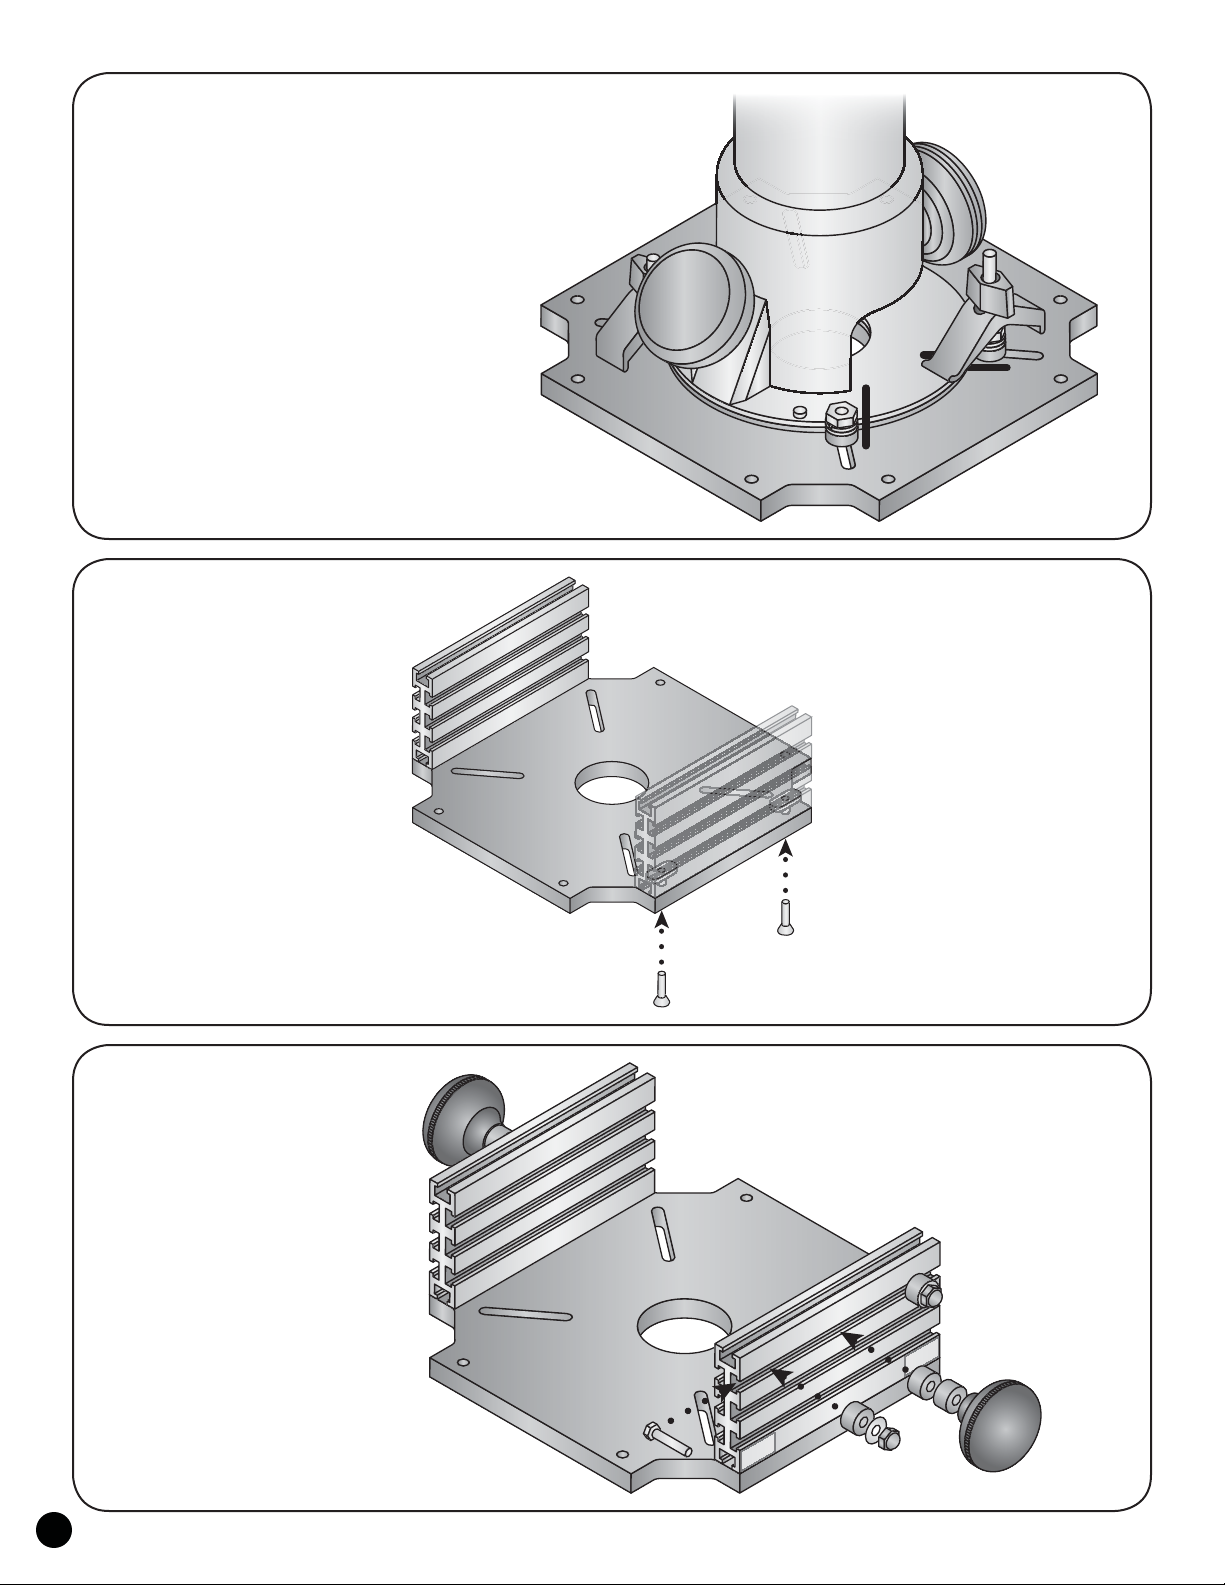
Position the pair of brackets so they are 3-5/8"
apart (measured from the inside ends - this gap will
be adjusted later), flush with the edge of the Double
Track and centered on it, then tighten the bolts. Insert
a 1" bolt (HB030) through the hole in the rib on each
Sled Bracket and install two washers (WS002) and ratchet
handle (5860) on the end of each bolt.
Set the Ultra Tracks on a flat surface, making sure
they are on the same plane. Install the Sled Brackets/
Double Track on the Ultra Tracks (4436, 4448 or 4460
depending on model purchased) by sliding the bolt
head/rib of the bracket into the T-slot of each Ultra
Track.
For now, position the Sled Brackets so they are
2" from the ends of the Ultra Tracks and tighten the
ratchet handles.
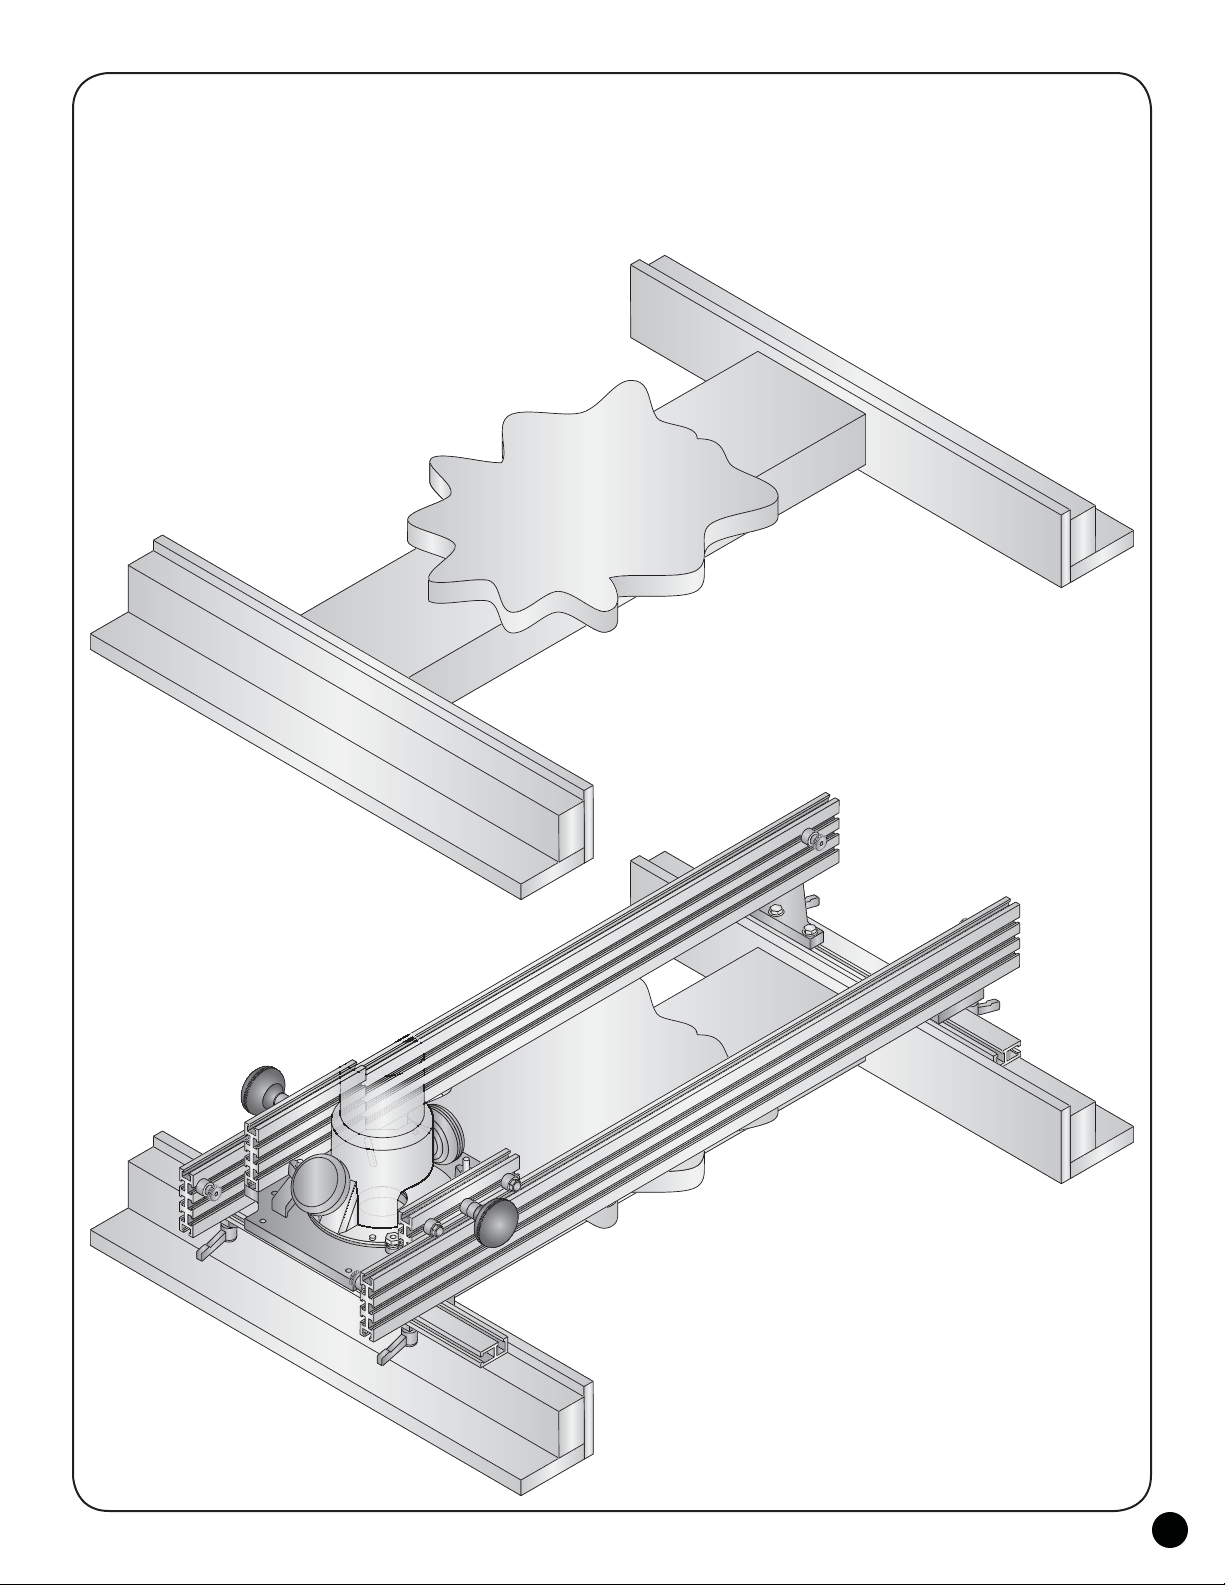
Take the Router Sled (router should not be
installed yet) and place it as shown on the top of the
two Ultra Track rails. Loosen the knobs and four acorn
nuts, dropping the Router Sled slightly downward
between the Ultra Tracks, then tighten the acorn nuts.
This adjustment should allow the four spacers/glides of
the Router Sled to sit evenly on the Ultra Track rails.
Flip the Router Sled over between the Ultra Tracks and tighten
the two knobs on the Router Sled so those spacers are not touching the
Ultra Track rail. Double check that the Router Sled does not rock on
the Ultra Track rails.
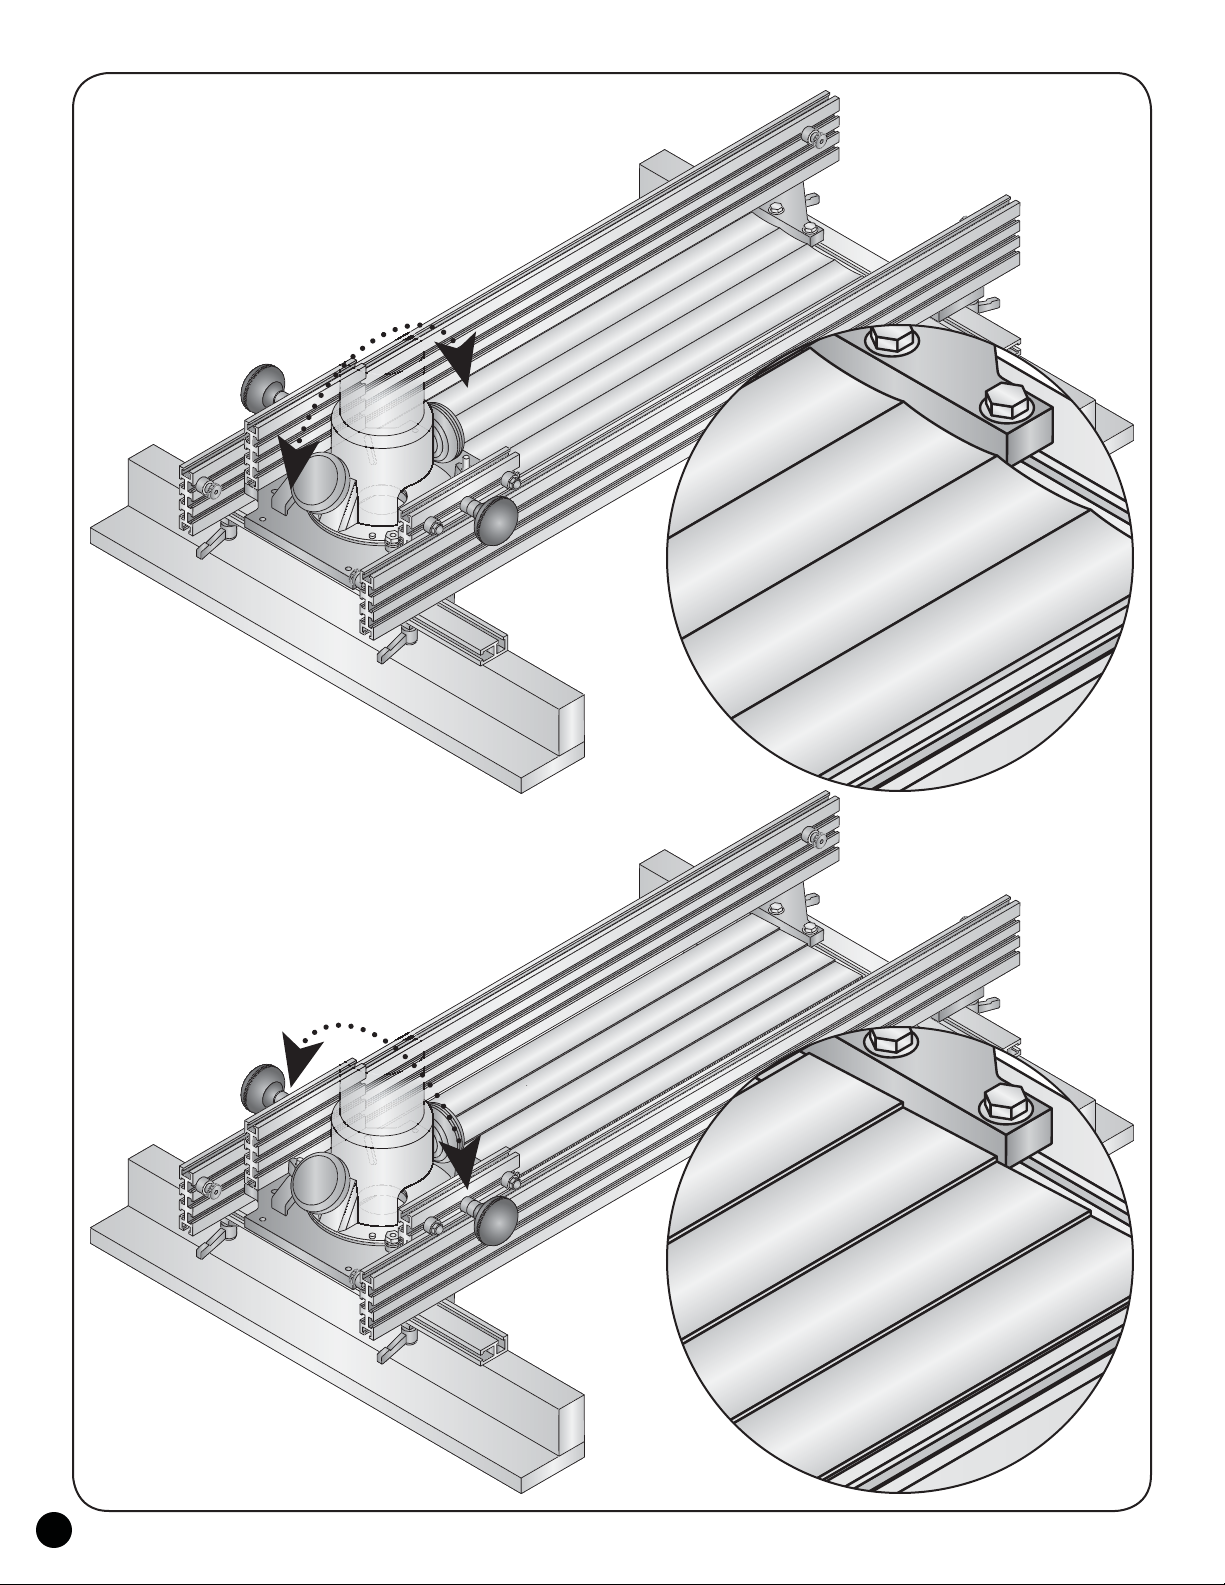
Loosen one of the Ultra Track rails by loosing the Sled
Brackets where they attach to the Double Tracks. Adjust the
Ultra Track rail against the Router Sled so it moves freely,
but with very little side-to-side slop between the Ultra
Track rails, then retighten the Sled Brackets.
Install a spacer (BUSH050), washer (WS002)
and knob (5521) on a 3/4" bolt (HB020) and insert
the head of each bolt in the upper side T-slot of one of the
Ultra Tracks. These act as stops to control the front-to-back
movement of the Router Sled on the Ultra Track rails.
HB030 x1 per bracket
WS002 x2 per bracket
5860 x1 per bracket
3-5/8"
Sled Brackets 2"
in from the ends
of the Ultra
Tracks
HB030 x2 per bracket
WS002 x2 per bracket
5760B x2 per bracket
H
H
HB
03
03
0
0
x2
x2
30
x
30
x
x
0
x
H
H
H
H
H
H
HB
HB
0
0
HB0
B
B
B
B
BU
SH050
x2
2
2
2
2
H0
H0
H050
H050
SH
SH0
WS002 x2
S0
S0
WS
WS
55
55
21
21
x
x
2
2
3
OPTION "A" - PART THINNER THAN 3" WITH
PARALLEL EDGES
This option is designed for best portability. Maximum
depth of cut is approximately 1/4" without readjusting the
part height in relation to the rails. Make two "L" shaped
wood rails out of 1-1/2" x 2-1/4" and 3/4" x 3-1/2" material.
These "L" rails will be screwed to the underside of the part
to be planed. The rails must be straight and longer than
the part length by at least 12" (for the 3000 Planing Sled)
or 16-20" (for the 3002 & 3004 Planing Sleds).
The part must have parallel edges. Set the part face
down, shimming if necessary so it won't rock from corner-
to-corner or side-to-side. Place 1" to 1-1/8" thick spacers you
provide between the "L" rails and the flat workbench to
insure both rails are on the same plane.
Line up the inside of the rails so they're in line with the
edges of the part and parallel to one another. Using four to
eight angle brackets (CAB015) and 1/2" screws (STP004),
attach the rails to the underside of the part.
The brackets bend to conform to
any iregularities between the
part and the rails so the
rails remain flat on
the workbench.
3/4" x 3-1/2"
1-1/2" x 2-1/4"
CAB015 & STP004 x4
"L" Wood Rail
1" to 1-1/8" Spacers x4
Part
The part should be mounted so that the planing
surface is 1" to 1-1/8" above the 2-14" tall rail.
In use, the bottom of the Double Track rails of the
Planing Sled will ride on the top of the 1-1/2" wide wood
rails and their inside edges will ride against the parallel
edges of the part.
4
OPTION "B" - ANY SHAPE PART THINNER THAN 3"
This option is designed to be semi-permanent setup and
functions as a planing workbench in your shop. This setup is
a good choice for odd shaped parts that do not have parallel
sides. Maximum depth of cut without repositioning the part
is approximately 1/4". It may require more part mounting
hardware than what we provide.
These rails will be permanently mounted to a flat
workbench and the part will attached independently to the
workbench for planing. By shimming under the part support,
the part can be raised or lowered independently of the wood
rails to optimize the part height.
Make two "L" shaped wood rails out of 1-1/2" x 2-1/4",
3/4" x 3-1/2" and 1/2" x 3-1/2" material. The rails must be
straight and longer than the part length by at least 12" (for the
3000 Planing Sled) or 16-20" (for the 3002 & 3004 Planing
Sleds).
3/4" x 3-1/2"
1-1/2" x 2-1/4"
1/2" x 3-1/2"
"L" Wood Rail
Part
Part Support
The part should be mounted so that the planing
surface is 1" to 1-1/8" above the 2-14" tall rail.
In use, the bottom of the Double Track rails of the
Planing Sled will ride on the top of the 1-1/2" wide wood
rails and their inside edges will ride against the parallel
edges of the 1/2" x 3-1/2" part of the wood rail.
OPTION "C" - PARTS 3" OR THICKER
This method (not shown) works well for resurfacing
butcher blocks, thick workbenches and more. Maximum depth
of cut without repositioning the rails is approximately 1/4".
Make two rectangular rails out of 1-1/2" x 3" material. The
part edges must be parallel, or the rails must be shimmed as
necessary so they're parallel, for this method to work. Fasten
the rails to the sides of the part using bar clamps or screws,
making sure both rails are on the same plane.
The rails should be positioned approximately 1" to 1-1/8"
below the surface of the part. Or you may want to measure up
from the bottom of the part, especially if it's surface is uneven,
to insure the part will be an even thickness. The rails must
be straight and longer than the part length by at least
12" (for the 3000 Planing Sled) or 16-20" (for the
3002 & 3004 Planing Sleds).
1-1/2" x 3"
Part
In use, the bottom of the Double Track rails of the
Planing Sled will ride on the top of the 1-1/2" wide wood
rails and their inside edges will ride against the parallel
edges of the part.
5
1
2
PLANING
Here we describe how to plane a part using Option A
described earlier. Make adjustments as necessary if using
Option B, or Option C. Loosen the two rear ratchet handles
and adjust the rear Double Track so the part is sandwiched
between (with a small gap) the front and rear Double Tracks.
Before using, make sure the Planing Sled moves freely
from side-to-side on the wood rails and the Router Sled
moves freely (but without excessive slop) between the Ultra
Tracks from front-to-back.
Never allow the center of the Router Sled to go past the
center of the wood rails or the Planing Sled could tip off the
wood rails.
When planing narrow parts, verify that the weight of
the overhanging Ultra Track rails will not tip the Planing
Sled off the wood rails. If necessary, you may need to make
an additional wood rail to support the outer ends of the Ultra
Track rails.
Install the necessary bit (must have at least a 2-1/2"
overall length) in your router and attach the router to the
Router Sled. Set the depth of cut to 1/8" or less. Set the stops
on the Ultra Track rail to control the front-to-back movement
of the Router Sled.
Wide parts may require you to complete one side of
the part before doing the opposite side. Never try to reach
beyond a comfortable and safe distance. Always work
against the rotation of the bit - never climb cut! Always take
appropriate safety precautions.
Make a pass (Step 1) moving the router front-to-back or
back-to-front (as needed so as not to climb cut) snd turn the
router off. Slide the Planing Sled to the left or right (Step 2)
approximately 1/8" less than the cutting diameter of the bit
you're using and repeat Step 1.
If you don't frequently adjust the Brackets/Double
Track for varying part widths, you can substitute the 5860
Ratchet Handles with 1/4-20 nuts, not provided.
6
CUT ISSUE FIX - DISHED CUT
If you experience a dished cutting pattern, rotate the
router/base slightly front-to-back by loosening and slightly
raising or lowering the front or back spacers/glides.
CUT ISSUE FIX - STEPPED CUT
If you experience a stepped cutting pattern, rotate the
router/base slightly left-to-right by loosening and slightly
raising or lowering the left or right side spacers/glides.
©Copyright WOODHAVEN INC. 4/6/16
(800) 344-6657 or WWW.WOODHAVEN.COM
7

This manual suits for next models

2

Other Woodhaven Tools manuals

Woodhaven 204 User manual

Woodhaven

Woodhaven 204 User manual

Woodhaven 3210 User manual

Woodhaven

Woodhaven 3210 User manual

Woodhaven EZ Lift 1429 User manual

Woodhaven

Woodhaven EZ Lift 1429 User manual

Woodhaven 7902 User manual

Woodhaven

Woodhaven 7902 User manual

Woodhaven 6002 User manual

Woodhaven

Woodhaven 6002 User manual

Woodhaven Angle-Ease 1470 User manual

Woodhaven

Woodhaven Angle-Ease 1470 User manual

Woodhaven 8625 User manual

Woodhaven

Woodhaven 8625 User manual

Woodhaven HD Panel Master 5432 User manual

Woodhaven

Woodhaven HD Panel Master 5432 User manual

Woodhaven 8715 User manual

Woodhaven

Woodhaven 8715 User manual

Woodhaven 5435 User manual

Woodhaven

Woodhaven 5435 User manual

Woodhaven 5432 User manual

Woodhaven

Woodhaven 5432 User manual

Woodhaven Angle Ease 1425 User manual

Woodhaven

Woodhaven Angle Ease 1425 User manual

Woodhaven 8610 User manual

Woodhaven

Woodhaven 8610 User manual

Woodhaven 8615 User manual

Woodhaven

Woodhaven 8615 User manual

Woodhaven 8395 User manual

Woodhaven

Woodhaven 8395 User manual

Woodhaven 8628 User manual

Woodhaven

Woodhaven 8628 User manual

Woodhaven Angle-Ease 1470 User manual

Woodhaven

Woodhaven Angle-Ease 1470 User manual

Woodhaven 6012 User manual

Woodhaven

Woodhaven 6012 User manual

Woodhaven 3000 User manual

Woodhaven

Woodhaven 3000 User manual

Woodhaven 7500 User manual

Woodhaven

Woodhaven 7500 User manual

Popular Tools manuals by other brands

Hilti DX 6 Original operating instructions

Hilti

Hilti DX 6 Original operating instructions

Sealey RE97XS05 quick start guide

Sealey

Sealey RE97XS05 quick start guide

Metabo KHE 32 operating instructions

Metabo

Metabo KHE 32 operating instructions

MSW MSW-SPS-14 user manual

MSW

MSW MSW-SPS-14 user manual

Tyco Electronics 1338744-1 instruction sheet

Tyco Electronics

Tyco Electronics 1338744-1 instruction sheet

Caen N1419 user manual

Caen

Caen N1419 user manual

Atlas Copco LPD Series Safety and operating instructions

Atlas Copco

Atlas Copco LPD Series Safety and operating instructions

Alexander Schleicher ASK 21 Flight manual

Alexander Schleicher

Alexander Schleicher ASK 21 Flight manual

Gimatic GS Series operating instructions

Gimatic

Gimatic GS Series operating instructions

Weber Rescue Systems BC 250 operating instructions

Weber Rescue Systems

Weber Rescue Systems BC 250 operating instructions

Macnaught HG20R-01 instruction manual

Macnaught

Macnaught HG20R-01 instruction manual

Dynello Rewinder II instructions

Dynello

Dynello Rewinder II instructions

Pittsburgh PRO 00239 Owner's manual & safety instructions

Pittsburgh

Pittsburgh PRO 00239 Owner's manual & safety instructions

Ebinger HOBBY WT 100 User instructions

Ebinger

Ebinger HOBBY WT 100 User instructions

Parkside PDMH 4500 B5 Translation of the original instructions

Parkside

Parkside PDMH 4500 B5 Translation of the original instructions

Timber Tuff Tools CS-CBRSC owner's manual

Timber Tuff Tools

Timber Tuff Tools CS-CBRSC owner's manual

kincrome K8007 instructions

kincrome

kincrome K8007 instructions

Senco FramePro325 FRHXP operating instructions

Senco

Senco FramePro325 FRHXP operating instructions

manuals.online logo
manuals.online logoBrands
  • About & Mission
  • Contact us
  • Privacy Policy
  • Terms and Conditions

Copyright 2025 Manuals.Online. All Rights Reserved.