bikemate EC-RLC-01 User manual

bikma®:
HD fiction Comercr
with Tail Light
Model Number EC—RLC-Ol
INSTRUCTION MANUAL
Version 07, 2018
AFTER SALES SUPPORT
‘5‘ 69 1800269 981
.
Tollfree MODEL:EC-RL(-01 PRODUCTCODEzéml 03/2019

Contents
01. Warranty Details
02. Welcome
03. General Information and Safety Instructions
07. Product Overview
09. Getting Started
‘10perating "studsns
21. CL :5
2L fec‘nmical 33B
21 Care and Maintenance
23. Disposal
24. Repair and Refurbished Goods or Parts Notice
.AFTER SALES SUPPORT
,‘3‘ ®1800 269 981
MODEL:E(-RL(~01 Pnooucr (ODE: 62282 03/2019 Tollf'ee

lllé. L
Welcome
All products broughtto you by Bikemate® are manufactured to the
bikemate .
.highest standards of performance and safety, and as part of our
HD ion Cwith Tail Light philosophy of customer service and satisfaction, are backed by our
comprehensive 1Year Warranty.
0
warranty Detalls We hope you will enjoy using your HD Action Camera with Tail Light
5C'A ’A ,2-
or many year- .- "*1,
Congratulations on choosing to buy aBikemate® product.
mmmn—fim '"4 "', ‘j''TOKEEPUP-TD-DATEWITHIMPOKTMPWI“
The product is guaranteed to be free from defects in workmanship
and parts for aperiod of 12 months from the date of purchase.
Defects that occur within this warranty period, under normal use and
care, will be repaired, replaced or refunded at our discretion. .
The benefits conferred by this warranty are in addition to all rights
and remedies in respect of the product that the consumer has under
the Competition and Consumer Act 2010 and similar state and
territory ans.
Cur goods come .«rtn guarantees that cannot be excluded under the
fact-'2 La.“ Consumer.31» "so are entitled to areplacement or
'e-‘m‘ ‘3' a“etcr ‘31 -‘E 5'»: ‘or :o~‘:—:*sa: o“ ‘o' a“, other
ease-cast. ‘oreseeaae «ass or Jana-9e
:1. we also act: *3 t: have :‘e 930:: 'eo-a 'e-c or replaced if the
Cue-cs ‘21“ t: x:r' axe-mane 31.317, an: :‘e failure 0085 not
"70¢". .. 2. ~33 ICI' ‘ainivirg
5.5.1
in
nu
mSALE 5mm ‘1
in"!!! ma mum mooucr (one: 62282 03/2019
2AFTER SALES SUPPORT
MODELIEC-RLC-m PRODUCTCODE:6228Z 03/2019 Tollfree

General information and Safety
‘hSTV'oCT‘Oi‘S
General. Information and Safety
Instructions (Cont)
I; Please 'eac carefllm, tf‘roug!" the following informationand keep these
®instructionsin case you neec to 'efer to them later. If you pass the
proc‘uct on to scmeone erse. grease aiso include these instructions.
General Safety Instructions
-Read all instructions before use and save for future reference.
-Check that the device is in good condition and free of damage before
each use.
-DO NOT use the device if it is damaged.
-DO NOT carry out any modificationsto the appliance.
-If the appliance is used in amanner not specified by the manufacturer,
the protection by the equipment may be impaired. _.
-DO NOT look directlyat the LED lights when in operation as this can
cause permanent damage to your eyes. \
ACAUTION: DO NOT ingest battery. Chemical Burn Hazard.
Electrical safety
~New battery must be fully charged before they are used for the first time.
-Before each use, make sure the dust cover is firmly closed.
.Keep the USB charging cable in aclean and dry place.
.The USB charging cable is designed for indoor use only.
-DO NOT use the device while charging or touch the device with wet
hands.
-DO NOT immerse the device in water or any other liquid.
-DO NOT drop or cause an impact to the USB charging cable or the
battery and never crush or puncture the battery.
-Only use the USB charging cable supplied. DO NOT attempt to charge
the battery with USB charging cable that are not approved by the
manufacturer.
Electrical safety
-Disconnectthe USB charging cable when not in use.
-Always store devicewith battery fully charged.
.Never dispose batteries or device in afire.
-Never place device on or in heating devices, such as microwaveovens,
stoves or radiators.Batteries may explode when overheated.
-If battery acid has leaked, avoid any contact. If contact is made, rinse
affected areas immediatelywith plenty of clean water and contact a
doctor urgently.
.The rechargeable battery is permanently built into the device and cannot be
replaced.
-DO NOT open the housing ofthe unit
-Whenthe housing is opened. there is arisk of mortal danger from
electric shock
-The USB charging cable is not rated for outdoor use. Never allow the
USB charging cable to become wet or subjected to moisture of any kind.
-Uncoil all of the cable supplied with the USB charging cable before use.
Coiled cable can overheat and cause damage.
-DO NOT use the USB charging cable on any other products or for
anything but its intended use.
.DO NOT use the USB charging cable if the supply cord is damaged.
m5115 m3
Tdiee MODELzEC-RLC-Oi PRODUG CODEZGZZSZ 03/2019
4AFTER SALES SUPPORT
MODEL:E(-RL(-01 PRODUCT(ODE262282 03/2019 TOWN
J

Generallnformation and Safety
Instructions (Cont) General. Information and Safety
Instructions (Cont)
I_
Battery warning:
-This product contains lithium operated batteries.
-DO NOT incinerate
-DO NOT disassemble-
-DO NOT short circuit.
-DO NOT expose to high temperature.
Hazard for children
-Keep out of reach of children.
-This is not atoy. Children should be supervised to ensure that they DO
NOT play with the unit.
Usage conditionsand restrictions
-This product is designed for domestic use. It is not suitablefor commercial
or industrial purposes. .
'Purpose: DO NOT use this product for anything other than its Intended
purpose, and only use it as described in this manual. Any other use [5 not
recommended by the appliance distributor, may cause injuries and vord
your warranty.
-Non—compliance:We accept no liability for any eventual damages caused
by improperuse or inappropriatehandling, or by any other non-compliance
with the instructions in this manual.
.
-This product is not intended for use by persons (including children) With
reduced physical, sensory or mental capabilities,or lack of experience
and knowledge, unless they have been given supervisionor instruction
concerning use of the appliance by aperson responsible for their safety.
-Caution: Do not look directlyat the light and do not leave the light on
when not in use.
Regulatory Information and Copyright Infringements
fCaution: To maintain compliance with the RF exposure guidelines,
place unit at least 20 cm from nearby persons.
Warning: Changes or modificationsto this unit not expresslyapproved by
the party responsible for compliance could void the users authority to
operate the equipment. Risk of explosion if battery is replaced by an
incorrecttype. Dispose of used batteries according to these instructions.
lWarning: The images recorded with this camera are intended for personal
use. Do not record images that infringeupon copyright laws without the
prior permissionof the copyright holders Please be advised that in certain
cases the copying of images from performances,exhibitionsor commercial
properties by means of acamera or other device may contravene copyright
or other legal rights even if the image was shot for personal use.
Disclaimer:The Bike Action Camera with Tail Light is designed specially to
be used as arear tail light with video and audio recording capabilitiesfor
bicycles. While every effort has been made to ensure it fits with most
bicycles on the market, it may not fit all bicycles depending on the set up.
The manufacturer, its subsidiariesand affiliates and distributors are not
liable for any consequential damages arising from any malfunctionof the
device, including memory cards.
AFTER SALES SUPPORT 5
loflfree MODEL:EC-RLC-Ol PRODUCl CODE:62282 03/2019
6AFTER SALES SUPPORT
MODEL:E(-RLHH PRODUCTCODE:62282 03/2019 Tallies

Product Overview Product Overview
01. Camera A. 8GB Micro SD Card x1 A
02. Indication Light 1B. USB Charging Cable x1E}
03. Camera ON /" OFF Button 1C. Mounting strap x1
04. Light ON /OFF Button r’ d) D. Aero Spacers x23% 5H
05. Speaker K
_IE. 1mm Silicone spacers x2
06. Microphone I3F. 2mm Silicone spacers x2Ba
07. Mounting Wedge 9G. 3mm Silicone spacers x2
08. Micro SD card slot mr4H. Short Straps x2\
09. Micro USB 2.0 Port @I. Long Straps x2
10. Dust cover 2{€- \
o’o
5
68
\9w
9
7am
10 |
AFTER SALES SUPPORT 78AFTER SALES SUPPORT
Tolllme MODflzEC-RLC-m PRODUCTCODMZZXZ 03/2019 MODELzEC-RLC—Ol PRODU(TCODE:62282 03/1019 Tollfree

Getting Started Getting Started (Cont)
Chargingthe Bike Camera
CAUTION:
Ensure that only the supplied Micro USB cable is used.
This device is powered by a 2600mAh lithium battery. Proper care when
charging can optimise the life of the battery. Before first use, please make
sure the device is fully charged. This operation must be performed indoors,
in adry and well ventilated place.
It is recommended to fully charge the device when recharging.
1. Please ensure the device is turned off when charging.
2. Plug in the charging cable to the USB port with input power supply.APC
or laptop USB port is preferable:the charge time will vary depending on
the method of charging: i.e. mains power USB (not supplied) or computer
USB. Always checkthe output ofthe USB mains adaptor before charging
this device.
3. Chargethe devicefor 2.5 —4.5 hours for maximum battery charge. Please
see the indication light for the charge status.
RED light ON
RED light OFF
4. Ensure the dust cover is firmly closed before use.
Low Battery Indication
When the device beeps four times, it indicatesthe battery capacity has
reached less than 25%. Please recharge the device.
[NOTE: This device comes with aHome Safe Mode. J
When your battery is running low (25% or less) the battery capacity is
smartly managed to save power and get you home safely; the camera
recording function will be automaticallydisabled in favourfor the rear light
function. The bike light will continue to function for approximately1.5 hours.
Charging mode:
Fully charged:
Install and Remove the Micro SD Card
1. Before first use, install the Micro SD card into the bike camera.
2. Lift up the dust cover, insert the Micro SD card to the Micro SD card slot.
3. Push the card into the slot until it clicks and locks into position then close
the cover.
4. Ensure that the dust cover is firmly closed.
5. To remove, press the card down into the slot until it clicks and releases.
Repair the Micro SD Card
In the event the Micro SD card doesn’t work or becomes corrupted, format
the card With the use ofa Micro SD adaptor (not provided) directly with a
computer. Always format the card in FAT32.
.
For more detailed instructions in now to complete formatting the Micro SD
card, please download ‘50 formatter' from the following link:
https://www.sdcard.org.downloadsxforrnatterj
Setting Date /Time
You can set the date and time for the video with a”UVC” file in the root
directoryof the rovided 8GB Micro SD card. Files will be transferred
automaticallywen the card is inserted.
1.0penthe Micro SD card directory.
2. Open the file "UVC”.
3. Install usin the following tips
a. Use the SB cable rowded to connect the camera USB port to computer.
b."Open the system ate time Sync, you will find the Host Time
2018-05-01 10:00:00” and the device time ”2018—05-01 10:00:00”.
c. Click ”Sync”.
d. Save the file.
4. Turn the camera OFF and then ON again or insert the Micro SD card and
turn the camera ON.
Note: Compatiblewith: Window 05: win 7, 32 bit and above, Apple OS: 10.1
and above
\
AFTER SALES SUPPORT 9
To" free MODEL:EC-RLC-ol PRODUG CODE:62232 03/2019
10 AFTER SALES SUPPORT
‘8‘ ®1800269981
MODELzEC-RLC-Ol PRODUCTCODE162282 03/2019 Tolllree
usupport@eurocentra.(om.au

Operating instructions Operating Instructions (Cont)
I;Recording Function
1. Fress and hold the on/off button (b for 1.5 seconds to turn ON the
recording function.
1When the device is turned on and starts recording,you will hear along
beep alert and the indication light will flash green.
3. To turn OFF the recording function, press and hold the on/off button d)
for 1.5 seconds. You will hear two beeps and the flashing green indication
light will turn OFF.
NOTE:This device comes with an Error Detection Alert.
If the Micro SD card does not insert properly into the SD card slot or is
removed while the camera is on, there will be arapid ”beep” alert which
reminds riders to stop riding, pull over to asafe position and re-insertthe
Micro SD card.
Light Function
Solid >Slow flashing >Rapid flashing
1. Press and hold the on /off button ii:- for 1.5 seconds to turn ON the light
for asolid light mode.
2. Press the button asecond time to switch to aslow flashing mode and a
third time to arapid flashing mode.
3. To turn the light OFF, press and hold the on /off button-:éz-for1.5 seconds.
Looping Function
The bike camera is designed with aset and forget function.The footage is
continuously recording onto the Micro SD card until there is no remaining
NOTE:The approximate looping record time is 1.5 —2.0 hours with the
provided 863 Micro SD card. The recorded videos are divided into 10
minute intervals. If you want to stop the looping function,you will have to
insert aMicro SD card with greater capacity: up to 32 GB. Alternatively, you
can remove the Micro SD card when the capacity is reached and replace
with anew Micro SD card.
IMPORTANT:In the case of an accident or major incident, it is important
to turn the camera OFF and/or remove the Micro SD card to ensurethat
the footage in not recorded over. To avoid the footage being recorded
over, you can use a3268 SD card (not provided) which has agreater
memory capacity.
The bike camera is produced with nanotecnuoiogy. lt enhances strength of
the device. is resistant to weathering anc protects it from the elements.
This technology modrfies the entire sur‘ace a'ea of the circuitry at a
molecua' ewe: warmer?) eating your bike camera in ahydrophobic
ate. '- ssac-cit: g'eatty errance 3:5 iongevity.
NOTE:The device is not waterproof. You should still take good care to
ensure the Micro SD card slot and ports are correctlyand firmly sealed so
that water ingress does not occur.
Approximate Operation Time
space. then it records over the oldest footage until there is no space left Function Operating Light with Operating Light with
and then it repeats. This looping function cannot be turned off. This is to Camera 0N Camera OFF
ensure that you do not forget to record your ride. Light turned off 5hours N/A
Flashing 3hours 20 hours
Slow flashing 3hours 20 hours
Steady 2.5 hours 6hours
mmssumtr n12 AFTER SALES SUPPORT
Tali-"es MODELEC-RLC-Ol PRODUCTCODE162282 0mm; MODflzK-RK-Ol PRODU(T(0DE:62282 03/2019 Toll free

Coerat'ng Instructions (Conti Operating Instructions (Cont)
[fil
Assembling the Bike Camera Aeroseat Seat Post Fitting
Standard Seat pole Fitting For fitting the bike camera to an aero seatpost,follow the same steps as above.
ywvead the mounting wedge through the mounting strap holes. Before placing the camera, position the aero spacers in the desired location
2. SeIect the appropriate alignment spacer (if required) that aligns the on your POST-
Bike Camera perpendicular to the ground. Place the spacer between Standard Seat po|e Aero Seat po|e
the mounting wedge and the seat post.
3. Position the camera in the desired location on your seat post.
4. While holding the bike camera against the post, wrap the straps
around to fasten.
5. Ensure the strap is pulled tight, checking that the bike camera is fitted
vertically and stable.
NOTE: ‘tne car-er: s"«o: I'E’Y‘Ei pierce the silicone spacer either on its
an" :r ir snowmen with the mounting wedge. Additional small and
Large straps nave been provided as spares.
Installing the camera on the front of your bike:
Installingthe camera vertically on the bike stem may cause the camera
lens to face towards the skyline and thereby not record at the desired
angle. For forward facing footage, we recommend installing the
camera horizontally on the handle bar, following the above fitting
steps and so that the camera is parallel to the ground. The footagewill
be recorded on a90° angle, but this footagecan be rotated later during
video editing (see ’rotating the video’ steps on page 19).
AFTER SALES SUPPORT 13'4AFTER SALES SUPPORT
'3‘ "~25 xiootL-tc-Ritm Paooucrtoomzaz 03/2019 “MW-RIC“ PRODUUCOUEIGZZH 03/2019 “"1”?

Operating Instructions (Cont) Operating instructions (Cont)
I_
install the Data Sync Software 3- Click "Install".
.ug”3,. 2"«‘§_\\'Hlyl.l'.r
‘.Clle Start” Readytolnstall
-~
'tb“stall' SDtS dionizeron our
u. UVC XU System Date SynchronizationSetup X$3593?”de °99mm "‘9 My" NV“ rV
Click Install to continuewith the installation, or did<Backif you wantto review or
..changeany settings.
Press button 'Start to initialize the USB UVC XU system date synchronization... _.”,ififl
Additional tasks:
,,,,, ,, ... ,,..Addfiondshortwts:
Create adesktopshortwt
——)
l
l
2. Click ”Create adesktop shortcut" box, then click ”Next”. 2
I‘<C“! ‘
fiSetup ~System Date Synchronizer —7v7 7hLJ
Select Additional Tasks 4_ Click 'Finisl'l'.
Which additional tasls shouldbe performed? ’Setup -System Date Syvrhrcrtza —
Select the additional tasks you would like Setup to pen‘orm while installing System Date Completmg’ the System Date
Synchronizer, then click Next. Synchronize:Setup Wizard
Additional shortcuts:
_. Seumhasfirlstiedm-vgmaaeWa‘qau‘vo-x
leate adesktop shortcut comma The acumen mbe launchedby Wme
Installed shortcuts.
dick Finish to exit Setup.
Next >Cancel
'
AFTER SALES SU PPOKT l5‘5AFTER SALES SUPPORT
Tollftee MODELitfi-RLC-Ol PRODUGCODE262282 03/2019 WJDElfC-RLC-Ol PRODUGCODE162282 03/1019 Tollfree

Operating Instructions (Cont)
5. Open the SYNC time system
6. Click ”SYNC” then you will see the ’DEVlCE TIME’ which means the
product has synchronizedto the correct time.
l'System Date Time Sync X
7
Host Time Device Time
éoiéili1750652315726“ "
Sync
AHERSALESSUPPORT
‘5' @18m269981
Tolfree
17
MODEL2EC-RLC-01 PRODUGEODHZZSZ 03fl019
Operating Instructions (Cont)
Video File Transfer
There are two ways for transferring recorded videos.
1. Remove the Micro SD card from the bike camera. Insert the Micro SD
card in an adaptor (not provided)and plug the adaptor into a
computer’s card reader.
2. Alternatively: leave the Micro SD card in the bike camera. Use the USB
cable provided to connect the camera directly to acomputer.
Turn on the camera and make sure the computer can find the device.
Once devices are connected, you can transfer Fles 'c the 3‘ke Came'a
dropsfilestrc~t”e‘4‘ 3': \’2'“.- .‘ "*"* ’e'.
View ”g ': '3e;:':-;~: =octage
ice _- i_.3- vew ya: use: iv:- :' n'.“‘."3‘u'. transferring files.
_are l“ '.-l a“ fire: "e'et:'e 93.. need to have acorrect
:oce: n3rd? to 0-5} t“: ‘i-ee
he recommend using “LC V
‘.ideolan.org). See below.
'3u can find the VLC media
IT:
0
:‘c‘ch‘:: ‘I l:
I
we 32,? :3 -.".e.' the footage
I) .esappliec 8GB SD card.
‘8AFTER SALES SUPPORT
VODELIE(-RLC-01 PRODUCl(ODE:62282 03/2019
Tollfree
A
V‘C)EL:E(-RLC-01 PRODUCT(ODEGZZBZ 03/2019
AAV-\ .- 7'on
eccstrng Instructions (Cont) Operating Instructions (Cont)
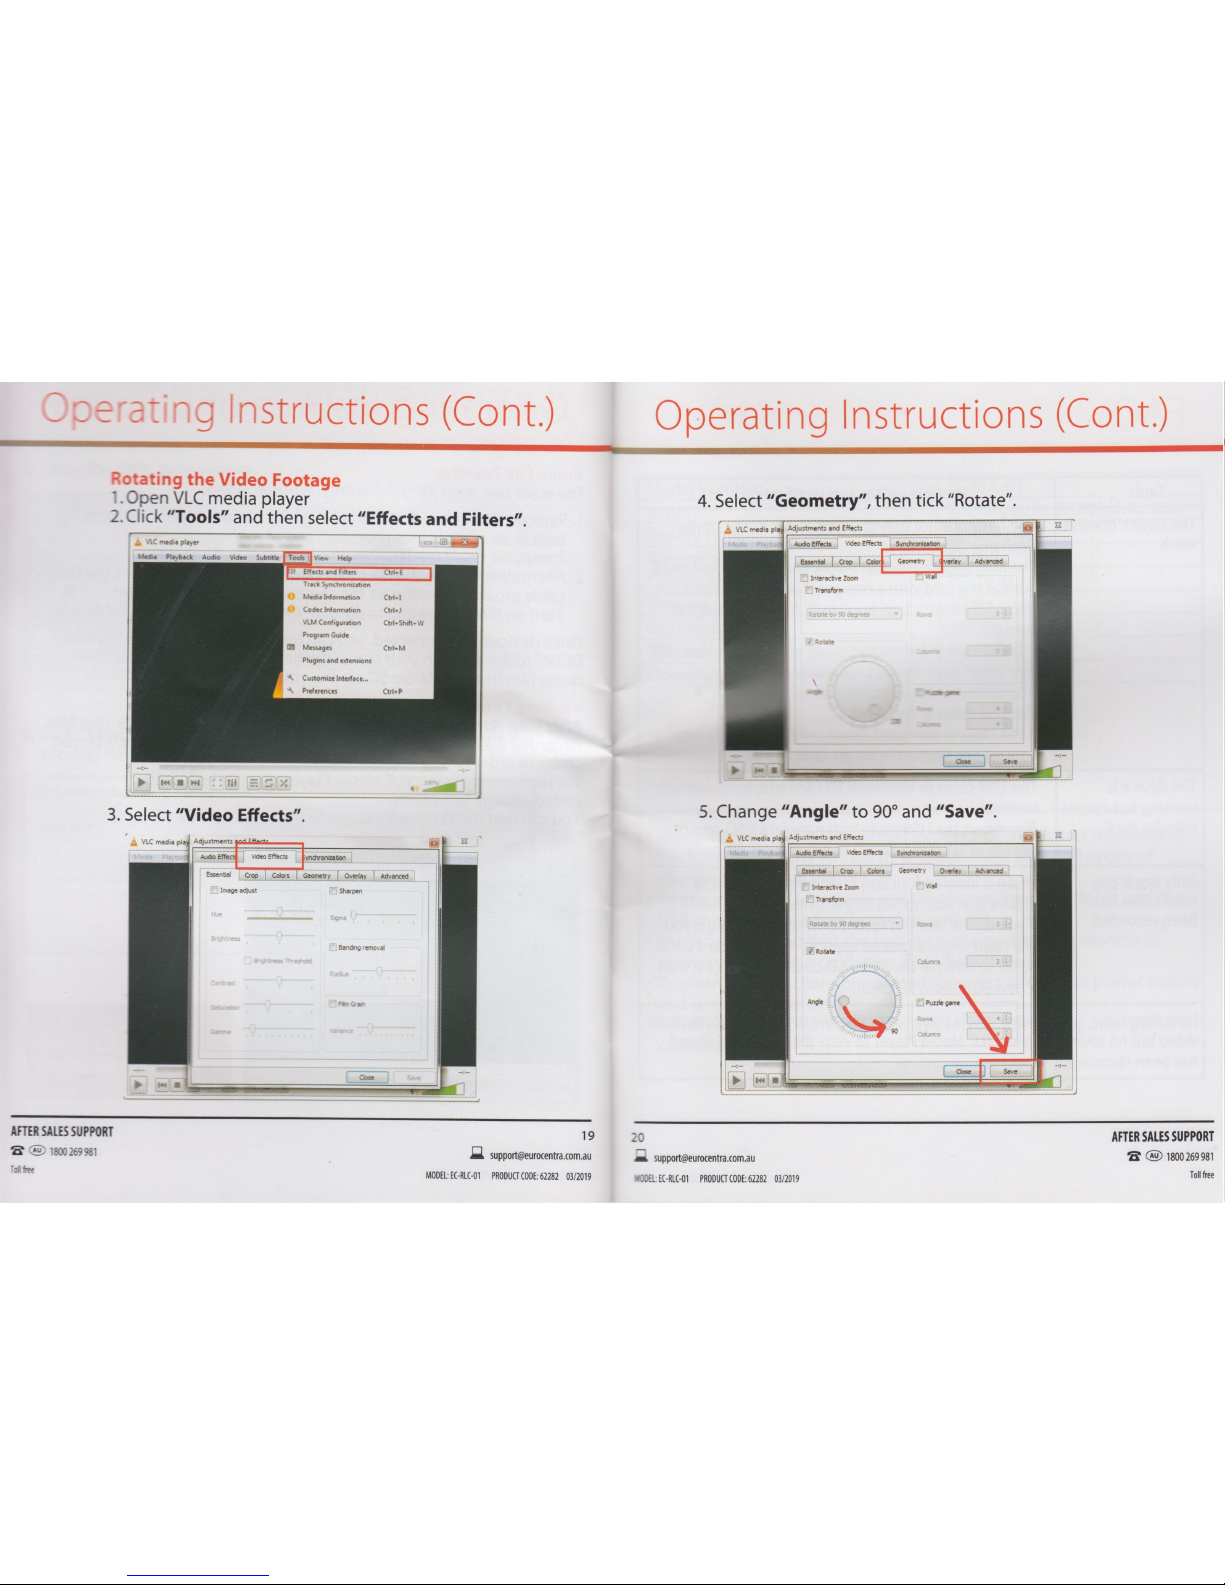
SRotating the Video Footage
1~'II
.Open VLC medra player 4. Select "Geometry”,then tlck ”Rotate .
2. Click ”Tools” and then select ”Effects and Filters”. .Mummdzm
.‘.1: m“ mm, W'WSW VrdenEFfecB Syndwonvzaflon .,
Mean Phybotk Audio v.4” Subtitle m5m”. l55.9 H”. smelly veday :Advanced
Interachv! Zoom “'5'
Yuck synchvcnfilhon Transform
Medulnlormnton (1-H
COOK lnlom'uban Chl~J
'ILM Configumuen CM‘Shvaw
ProgramGuide
Messages (“hm
Mugm and cadmium;
CustomueInter‘hte..
Prduemcs 3:r-
:0°— 1'
pmIm m E‘. 2Zn4J
3. Select ”Video Effects”.
5w: mam pl; Adjustmentsm__l ‘rd “'1
'
Muéffie videoEffens 3yndvmzanon mm Vw‘swam
,
V
Emmi _' gm cm 5:va om" Mum
Essean Crap ICalms ;Geometry lOverlay V
Advanced
'‘
Munch-e Zoom ""5"
Image adyusz Sharpen
Trans farm
Bending remodl
:r Angle I1Pulee game
AFTER SALES SUPPORT 19 20 AFTER SALES SUPPORT
’0”! MODELzEC—RLC-Ol PRODU(T(0DE:62282 03/2019 Tm"

FAQS Technical Data
Fault Possible causes and rectification Model Number: EC-RLC-Ol
,_
'.-.. . Battery: Rechargeable2600mAh lithium
The devrce doesn tThe battery rs not fully charged or it IS In low power. Battery Time: Up to 6Hours
work. -Recharge the battery. f- IPX4
The Micro SD card doesn't work or has been corrupted. Waterproo '
.P
-Format the card with acomputerwith the use ofa Camera resolution: HD 3920 X1080
Micro SD adaptor (not provided). Always format the Viewing angle: 100
card in FAT32. ISO range: 100-800
-For acompleteformatting guide please download ”SD .SD card: WHO 865
formatter" from the following link:
,Operation and storage mare: C~40 'C J
https://www.sdcard.org/downloads/formatter_4
The USB cable is damaged.
.If the cable is damaged, cease use immediately and
contactour supportteam on 1800 269 981. Care and Maintenance
The device is The USB cable or the Micro SD card adaptor is not fully
working but cannot inserted
transfer data. .Reconnect the USB cable to the camera USD port or ,The battery has alifespan of 500 cydes of charging and discharging.
the Micro SD card adaptorto acomputerproperly. -The battery capacity will fall by less than 10% after 500 cycles of
charging and discharging.
-To ensure proper functioning of the charge, keep the lights and the
USB charging cable free from dust and dirt.
-It is recommendedthat the battery is charged every 6months to
prevent over discharge during long-term storage.
-To clean the USB charging cable, disconnect it from the power supply
and use adry cloth only.
.Never use harsh chemicals, cleaning solvents or strong detergents for
cleaning.
Only latest one
hour video has
been recorded.
There is looping function on the device. This is to
ensure that you do not forgetto record your ride.
-If you do not want to record over stored footage, you
will need to get agreatercapacity Micro SD card up to
32 GB or remove the Micro SD card and replace it with
anew 86B Micro SD card.
Ican view the
video but no sound
Some media players may play the sound. We recommend
using VLC Media Player to view the video and sound
has been recorded. footage.
AFTER SALES SUPPORT 21 22 AFI'ERSALESSUPPORT
T
“We MODEL:E(»RL(-01 PRODUCTCODE:62282 03/2019 WEC‘RLM‘ rnooucrcomzzsz 03/10” ”a
Disposal
Packaging materials are considered raw materials and can thereforebe reused.
Dispose of them according to type in an environmentally friendly manner.
Appliances
Do not put old devices into your household waste, but take them to
collection points for electrical waste. Your local council can provide
_you with addresses and openinghours of your local waste disposal
centres.
Batteries
Every user is legally obliged to hand in all disposable and rechargeable
batteries for environmentally friendly disposal, regardless of whether
or not they contain toxic substances, at amunicipal/district or trade
collection point. Please only hand in disposable and rechargeable
batteries once they are flat!
AFTER 5MB SUPPORT 23
a5“.) 1310269981 .
El. support@euro<entra.com.au
Eli‘s-3 MODELzEC-RLC-Oi monument:61282 03/2019

Illa
ALDI
W
HD fiction Camera with Tail Light
Repair and Refurbished Goods
or Parts Notice
Unfortunately, from time to time,faulty products are manufactured which
need to be returned to the Supplier for repair.
Please be awarethat if your product is capable of retaining user-generated data
such as files stored on acomputer hard drive, telephone numbers stored on amobile
telephone, songs stored on aportable media player, games saved on agames console
or files stored on aUSB memory stick) during the processof repair, some or all of yOur
stored data may be lost. We recommend you save this data elsewhere prior to
sending the product for repair.
You should also be aware that rather than repairing goods, we may replacethem with
refurbishedgoods ofthe same type or use refurbishedparts in the repair process.
Please be assured though,refurbished partsor replacements are only used
where they meet ALDI’sstringentquality specifications.
‘5: a"; :‘me you feel your repair is being handled unsatisfactorily, you mayescalate
(.0; :on” oar: Pease telephone us on Customer service hotline 1800 269 981 or
5'33. 2. 9?, Lie
5xSc :uccs Pt: Lto
K"gsox, St'eet. Brenoae. Qld 4500. Australia
He: Does ‘800 269 981
Opera: ng hours 8:30 am —6:00 pm Monday to Friday
AFTER SALES SUPPORT
;mréemmzrau V
‘5‘ ®1800 269981
«:12; "—22.1: >‘r:r:ur::c»:.e;25; 932019 Tm“

Ila
ALDI
Warranty Certificate
REGISTER YOUR PURCHASEAT www.aIdi.com.au/en/about-aldi/product—regislration/
TO KEEP UP-TO-DATE WITH IMPORTANTPRODUCT INFORMATION
Congratulations!You have madean excellent choice of this quality product. Our commitmentto quality also includes our service. Should you,
contrary to expectations, experience defects due to manufacturing faults, ALDI will provide you with awarranty against defects as follows:
Warranty
The productis guaranteedto be free from defects in workmanship and parts for aperiod of 12 monthsfrom the date of purchase. Defects that
occur within this warranty period, under normal use and care, will be repaired, replaced or refunded at our discretion.
The benefitsconferred by this warranty are in addition to all rights and remedies in respectof the productthat the consumerhas underthe
Competition and Consumer Act 201 0and similar state and territory laws.
Our goodscomewith guaranteesthat cannot be excluded underthe Australian Consumer Law. You are entitled to areplacementor refund
for a major failure and for compensationfor any other reasonably foreseeable loss or damage.You are also entitled to have the goods repaired
or replaced if the goodsfail to be of acceptablequality and the failure does not amount to amajor failure.
Proof of Purchase «
This warrantyis valid for the original purchaseand is not transferable.Please keep your purchasedocket, tax invoice or receipt as the best
proofof purchase,and as proofof date on which the purchasewas made.
Extent of Warranty
This warrantyis limited to defects in workmanshipor parts. All defectiveproducts or parts will be repaired or replaced.
This warrantydoes not cover batteries or any other consumable items.
Normalear and Tear 7
This warrantydoes not cover normal wearand tear to the productsor parts.
Exclusions
This warrantydoes not cover:
-Any defectscaused by an accident,misuse, abuse, improperinstallation or operation,lack of reasonablecare,
unauthorisedmodification, loss of parts, tampering or attempted repair by a person not authorised by the distributor.
-Any productthat has not been installed, operated or maintainedin accordancewith the manufacturer’s
operating instructionsprovidedwith the product.
-Any productthat has been used for purposesother than domesticuse.
-Any damage caused by improperpowerinput or impropercable connection.
To MakeaClaim
This warrantyagainst defects is provided by ALDI Stores, Locked Bag 56, St Marys Delivery Centre, NSW 2760,
Phone (02) 9675 9000. If adefect in the goods appears within 12 months,you are entitled to claim awarranty,
please contact or send all warrantyclaims to:
Euro Centra (Australia) Pty Ltd
c/o Install and Fix SolutionsPty Ltd, Unit 1, 9Kingsbury Street, Brendale, Qld 4500, Australia
Help Desk 1800 269 981 (Operatinghours 8:30am -6:00 pm Monday to Friday)
When making areturn, please ensure the product is properlypackaged so as to ensure that no damage occurs to the
product during transit.
Please providethe original or acopy ofthe proofof purchase.Also please make sure you have includedan explanation
of the problem.
Please note that the costs of making awarrantyclaim, including any return postage, will be covered
by the supplier identifiedabove.
Please note upon receiving your warrantyclaim, the supplierwill send, via the post or email, arepair
and refurbishedgoods or parts notice. Please provideyour email addressand advise the supplier,
if you wish to obtain arepairand refurbishedgoods or parts notice via email.
AFTERSALES SUPPORT
Toll free MODEL: EC-RLC-Ol PRODUCT CODE: 62282 03/2019

Ila
ALDI
Warranty Certificate
/W
PRODUCTNAME HD Action Camerawith Tail Light
\
BRAND NAME BIKEMATE®
PRODUCTNUMBER 62282 MODELNUMBER EC-RLC-01 03/2019
1xBike Camera with Light /1 xBGB Micro SD Card /1 XUSB ChargingCable
CONTENTSOF PACK/ BOX 2 xAero Spacers/ ixInstructionManual /1xWarrantyCard /
K\
NAME
ADDRESS
EMAIL
DATE OF PURCHASE
SERIAL NUMBER
K/
F. . \
We recommend that you attach aphotocopy ofyour receipt, showrngthe date of purchase,to this Warranty
certificateand keep for your reference. Please do not send to the address below.
In the event ofaproduct fault, please call the CustomerService hotline. Please ensure that you have the product
details (as shown on this card) at hand so that we are able to respond quickly and efficiently as possible.
You can also registeryour product at httpsj/wwwaldi.com.au/en/about-aldi/product-registration/
to keep up—to—date with important product information.
Lj
K.fl
Euro Centra (Australia) Pty Ltd ‘
c/o Install and Fix SolutionsPty Ltd
Unit 1, 9Kingsbury Street,Brendale, Qld 4500, Australia
Help Desk 1800 269 981
(Operatinghours 8:30 am -6:00 pm Monday to Friday)
AFTERSALES SUPPORT
Toll free MODELSEC-RLC-Ul PRODUCT CODE: 62282 03/20l9
Other manuals for EC-RLC-01
1
Table of contents
Other bikemate Action Camera manuals


